Skirts are one of the most satisfying crochet projects — they’re wearable, flattering, and you can show off almost any stitch. Below you’ll find a warm introduction (materials, measuring, sizing math and fit tips) followed by seven complete skirt patterns with materials, skill level, gauge, construction overviews, step-by-step guides (including math examples), finishing tips, and styling/variation ideas. Each pattern is written so you (and your readers) can actually make the skirt, adjust the fit, and finish it like a pro.
Intro Quick — yarn, tools, measuring, gauge, and fit basics
Yarn & fiber choices
- Cotton / cotton-blend (DK — worsted): great for spring/summer skirts — breathable and holds shape.
- Wool / wool blends (sport — worsted): warm and drapey for fall/winter skirts.
- Acrylic / acrylic blends: easy care and affordable; good for bold colorwork.
- Bulky yarn is fine for structured short skirts but can feel heavy in longer garments.
Choose yarn based on season, drape preference, and care (machine-washable vs hand-wash).
Hooks & notions
- Hooks sized per yarn (3.5–6.5 mm range typical). Use a slightly smaller hook for firmer fabric in waistbands.
- Notions: tapestry needle, stitch markers, elastic (¼–1″ depending on casing), measuring tape, safety pins (for elastic insertion), small amount of interfacing or lightweight fabric for waistbands where desired, and optional zipper or buttons for closures.
Measuring & fit
Important measurements:
- Waist circumference (natural waist) — measure snugly where you want the waistband to sit.
- Hip circumference — around fullest part.
- Desired skirt length — measure from your waistband point down to hem (e.g., 18″ mini, 22–24″ midi, etc).
Decide ease (how much extra room you want):
- Fitted skirts: negative ease −1″ to 0″ (i.e., wool that stretches).
- Comfortable skirt: +1–3″ ease.
- A-line / flared: more ease at hips/hem.
Gauge & stitch math (practice this)
Always make a swatch in the stitch and yarn you plan to use. Measure stitches per inch (spi) and rows per inch (rpi). The shaping math below uses examples computed digit-by-digit so you can copy the method.
Example: if your gauge = 4 hdc = 1″ and your waist target = 28″:
- Needed stitches across waist = 4 × 28 = ?
- 4 × 20 = 80
- 4 × 8 = 32
- 80 + 32 = 112 stitches.
Adjust that to match the stitch pattern repeat required (if the pattern repeat is multiple of 6, choose the nearest multiple).
Construction approaches
- Worked in the round top-down: easiest for avoiding seams — start at waistband and increase for hips/flare.
- Worked bottom-up: start at hem and decrease toward waist (less common).
- Panels & seams: make panels and seam them for fitted pencil skirts.
- Waistband options: elastic casing, fitted crocheted ribbing, drawstring, or sewn interfaced band with zipper.
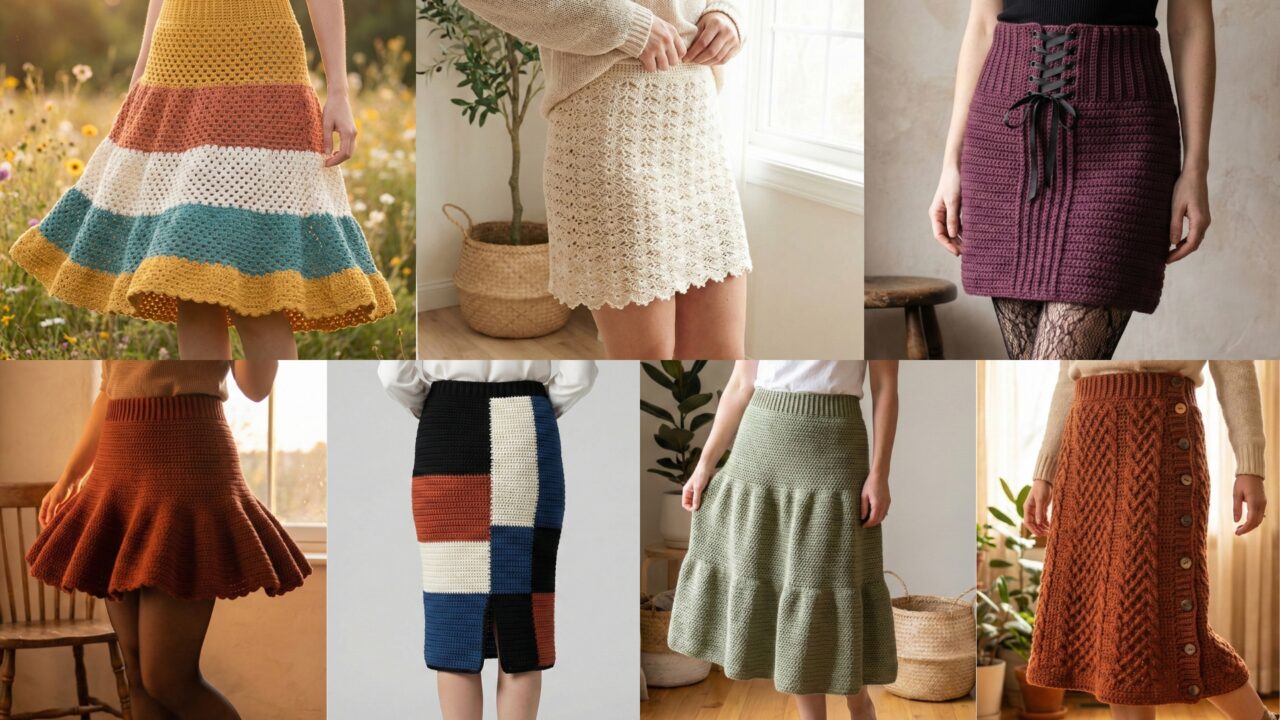
1. Crochet Granny Striped Tiered Skirt Pattern
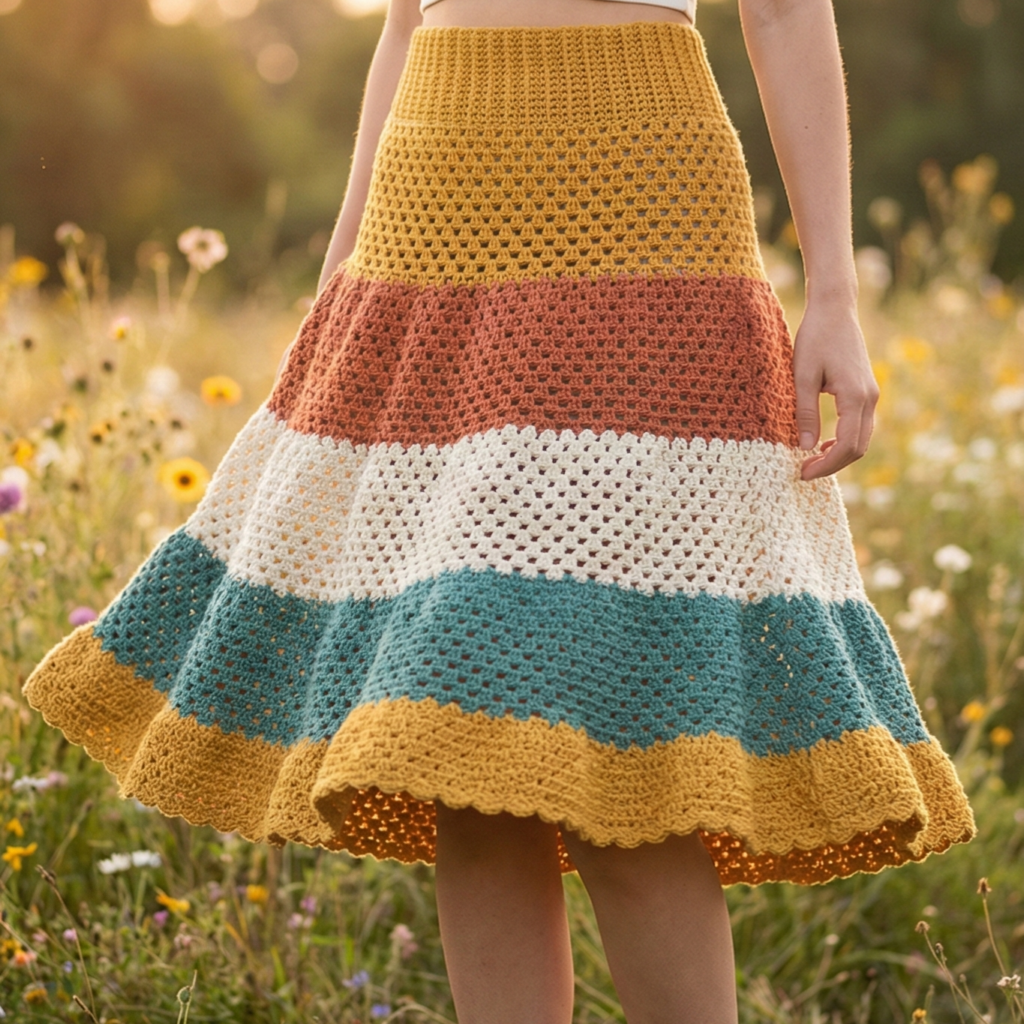
A breezy, festival-ready skirt made from granny-stripe tiers. Classic granny clusters make a playful tiered silhouette.
Skill level: confident beginner
Finished example (waist 28″, length 20″): A-line tiered skirt with 3 tiers.
Materials
- DK cotton in 3–4 colors — ~900–1,200 yd depending on fullness and length.
- Hook: 4.0–4.5 mm.
- Elastic or crocheted ribbing for waistband (optional), tapestry needle.
Gauge (example): 16 dc clusters (granny stitches) across ≈ 4″ (gauge varies; swatch first).
Construction overview
Make a fitted inner yoke (short band) worked in rounds, then join granny-stripe tiers to the yoke (either by picking up stitches or sewing panels). Each tier is wider than the previous to create ruffles.
Step-by-step
A — Compute foundation for yoke
- Swatch in hdc in the round if you want a stable yoke. Example gauge: 4 hdc = 1″. For a 28″ waist you need 4 × 28 = 112 hdc. (We did that math earlier: 112 stitches.)
- If your stitch repeat for the yoke is a multiple of 4, 112 is fine. Chain 112 (or foundation hdc 112) and join carefully.
B — Work fitted yoke
3. R1–R6: hdc in each stitch for about 1.5–2″ (6 rounds approx). Try on; you want slight negative ease if inserting elastic, or exact fit if the band is ribbed and snug.
C — Make first tier (hip shaping and flare)
4. Attach Color A at the base of yoke. Option 1: pick up stitches and work granny cluster rounds in the round: (3 dc, ch2) in next space, skip 2 to create granny clusters. Example increase round: work granny cluster in every ch2 space, then on next rounds increase by adding an extra granny every 6 clusters to create gentle flare.
5. Work first tier height 6–8″.
D — Second and third tiers
6. For Tier 2, switch color. Make the tier wider: aim for 1.5–2× the circumference of the tier above for a soft ruffle. Practical approach: after you join, do an increase round adding one extra granny cluster every 3 clusters to double width over a few rounds. Work height 6″.
7. Tier 3 (hem): increase again to create the fullest tier — either 2× the band above or as desired. Finish with one round of sc for stability.
E — Waist finishing
8. If using elastic: fold top band to create a casing before adding tiers, leave an opening, insert elastic, overlap ½″, sew elastic, close opening. If using crocheted ribbing: remove initial hdc band and instead work BLO hdc ribbing for 6–8 rounds and leave as fitted band (no elastic needed).
F — Math example for tier width
- If hip circumference is 36″ and you want Tier 1 to be 1.5× hip: 36 × 1.5 = ?
- 36 × 1 = 36
- 36 × 0.5 = 18
- 36 + 18 = 54 inches circumference for tier 1. Convert to stitch count with your granny cluster gauge.
Finishing & styling
- Block lightly, weave ends. Pair with crop tops or tees. For an edgier look, shorten tiers for a mini skirt.
2. Crochet Caron Graphic Pencil Skirt Pattern
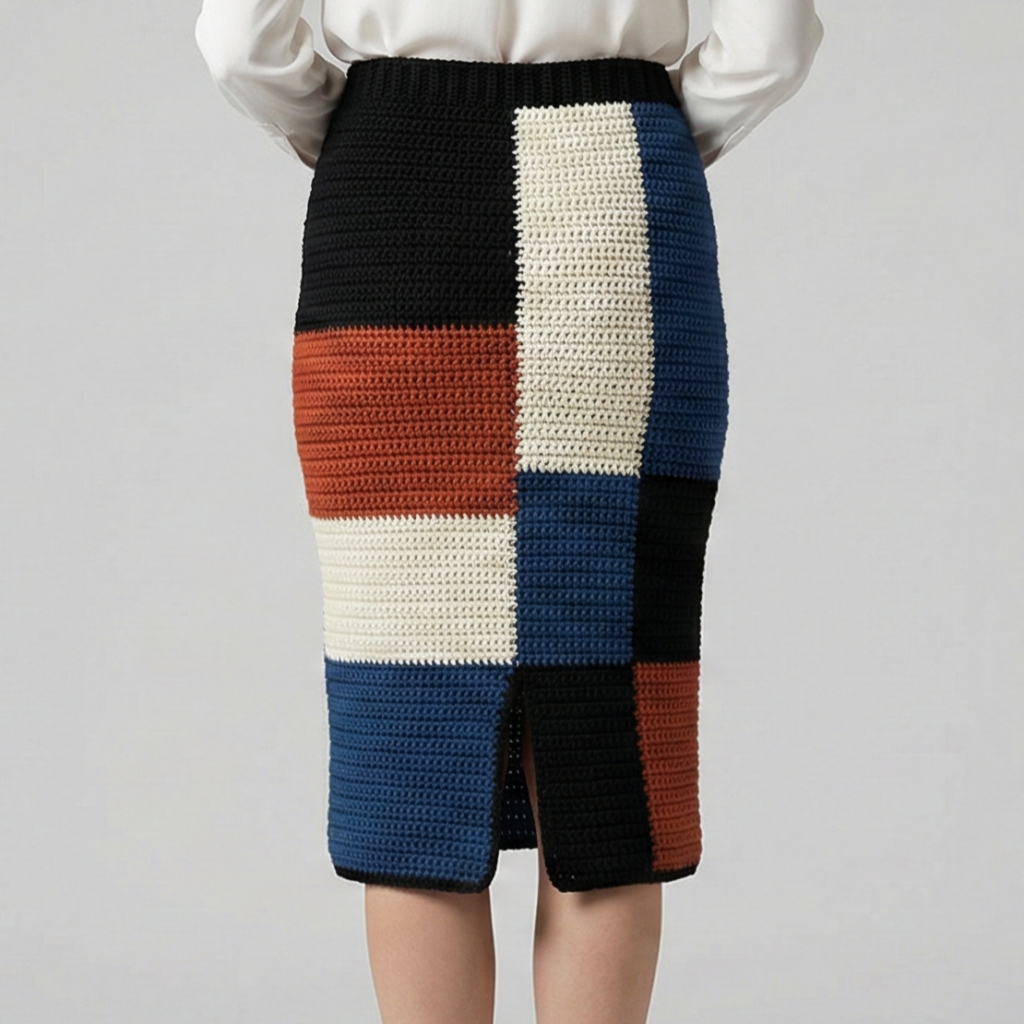
A modern pencil skirt featuring bold stripes or geometric color blocks à la graphic knitwear (works well in acrylic or blend yarn).
Skill level: intermediate (shaping & colorwork)
Finished example: hip-hugging pencil skirt (waist 30″, length 22″).
Materials
- Worsted weight yarn (solid + contrasting colors) — ~800–1,100 yd.
- Hook: 5.0–5.5 mm.
- Tapestry needle, optional zipper (for very fitted skirts), interfacing/fabric for waist panel.
Gauge (example): 14 sc = 4″.
Construction overview
Work bottom-up or top-down in the round with decreases/short rows for hip shaping; include color changes for the graphic pattern. For a very tailored fit, add a fabric interfaced waistband and zipper.
Step-by-step
A — Decide shaping method
- For a sleek pencil: top-down is convenient — start with waist band, shape hips with increases, then work even rounds through hip to thighs and decrease slightly toward hem if desired. Or knit bottom-up and add zipper at the center back.
B — Yoke/band
2. Compute waist stitches using gauge. Example gauge = 14 sc = 4″ → stitches per inch = 14 ÷ 4 = 3.5. For waist 30″: 3.5 × 30 = ?
- 3.5 × 10 = 35
- 35 × 3 = 105
- So 3.5 × 30 = 105 stitches. Round to nearest multiple if required by stitch pattern.
- Work 10–12 rounds of sc or hdc to create a stable waistband. Add a strip for a casing or attach interfaced fabric and zipper.
C — Hip shaping
4. To reach hip circumference, increase evenly over 1–3 rounds. Example: hip target 38″ with waist 30″ → increase circumference by 8″. Using stitches-per-inch 3.5, added stitches = 3.5 × 8 = 28 stitches total. Spread increases evenly (e.g., add 14 increases on opposite sides).
D — Work body with graphic stripes
5. Once hip shaping complete, work even in chosen stitch (sc or hdc) changing colors per your graphic chart. Carry yarn or use intarsia technique when blocks are large; for thin stripes, carry non-active yarn along inside.
E — Hem shaping
6. For a classic pencil, continue even to desired length (e.g., 22″). Optionally decrease 5–10% near hem for tapered look. Add small vent at back by working a small split and finishing edges, or leave as slit for walking ease.
F — Finish
7. Add a small fabric lining and a center-back zipper for polished fit; alternatively a wide elastic waistband inside the top works for comfortable wear.
Styling
- Pair with a blouse or oversized sweater tucked in. For a graphic modern look choose two high-contrast colors (black/white, rust/navy).
3. Crochet Lacy Shell Stitch Pencil Mini Skirt Pattern
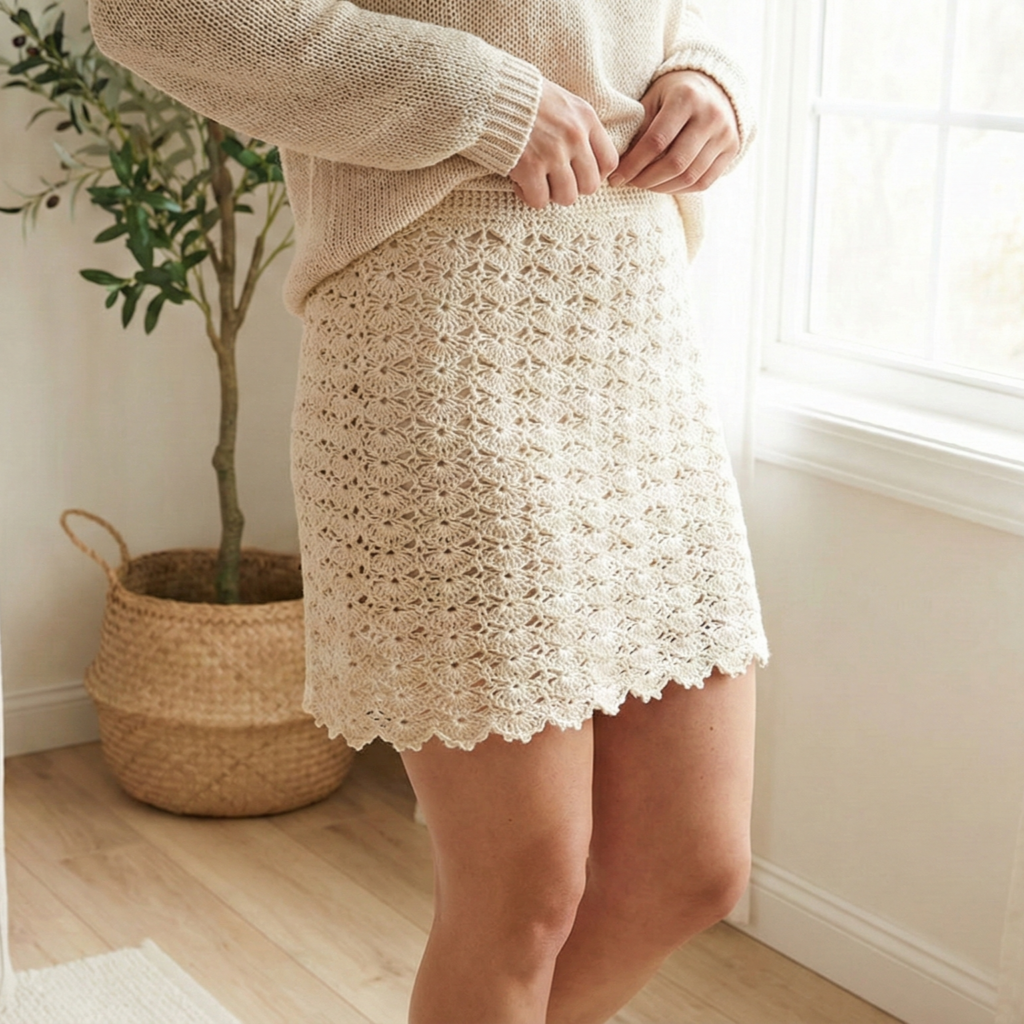
A flirty mini pencil using shell stitch for texture — delicate but form-fitting.
Skill level: intermediate (shaping + lace stitch)
Finished example: mini length 16″ from waist (waist 26″).
Materials
- Sport / DK cotton or blend — ~600–900 yd.
- Hook: 4.0 mm.
- Lining fabric (optional), elastic or crocheted rib band.
Gauge (example): 18 shell repeats = 4″.
Construction overview
Work a fitted band then a narrow column in shell stitch; shell pattern hides minor fit issues and looks delicate.
Step-by-step
A — Compute waist foundation
- Gauge: if 18 shell repeats = 4″, then stitches per inch (in repeats) = 18 ÷ 4 = 4.5 shell-units per inch. For waist 26″: 4.5 × 26 = ?
- 4.5 × 20 = 90
- 4.5 × 6 = 27
- 90 + 27 = 117 shell-units. Convert shell-unit back to actual stitch counts per your shell repeat (for example each shell uses 6 sts) — adjust accordingly.
B — Waistband
2. Make a firm band of hdc or BLO hdc for ribbing: 6–8 rounds to create a snug waist. Optionally insert elastic.
C — Shell stitch body
3. Shell pattern example (multiple of 6 + 1): skip 2, 5 dc in next, skip 2, sc in next across rows — this creates shell fans. Work in rounds or rows joined in the round with small transition stitches.
D — Shaping for hips
4. Add increases (small, 4–8 stitches total) across one or two rounds at the hip area to allow movement. If you prefer very fitted mini, skip increases and rely on stretch.
E — Hem finish
5. Finish with a neat sc round and optional picot trim. For a stronger hem, add a short linen-stitched backing or a narrow interfaced tape.
F — Lining & wear
- Because shell stitch is lacy, line mini skirts to avoid transparency (sew a simple woven lining to the inner band).
Styling
- Pair with boots and a cropped sweater for fall; sandals and a tank top for summer minis.
4. Crochet Moss Stitches Tiered Skirt Pattern
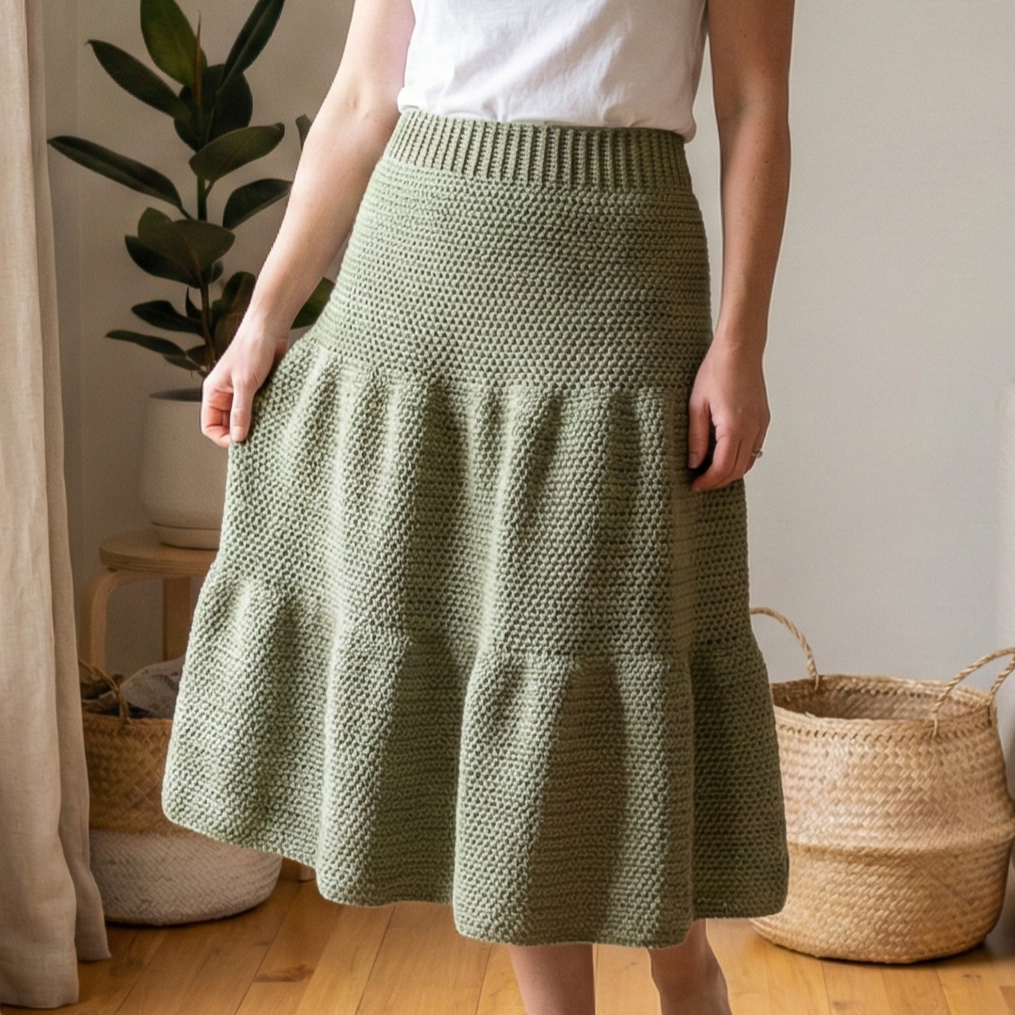
A textured tiered skirt using moss (linen) stitch for subtle movement and a refined look.
Skill level: confident beginner
Materials
- DK / worsted cotton or wool blend — ~900–1,300 yd.
- Hook: 4.0–5.0 mm.
- Elastic or ribbed band for waist.
Gauge (example): moss stitch 16 sts × 8 rows = 4″.
Construction overview
Worked top-down: fitted rib band, then alternate moss-stitch tiers (each tier wider than the previous) for gentle volume.
Step-by-step
A — Waistband
- Compute waist stitches via gauge. Example gauge: 16 sts = 4″ → 4 sts per inch. For waist 30″: 4 × 30 = 120 stitches. Foundation hdc or sc to create an even starting ring.
- Work BLO hdc ribbing for 8–10 rounds or make a casing for elastic.
B — First tier (hip)
3. Moss stitch row pattern (multiple of 2 + 1): sc, ch1, skip1 in alternating rows. Work 6–8″ for hip coverage.
C — Additional tiers
4. Join on new tier by increasing at regular intervals to double or 1.5× previous circumference. For a soft tier, add on average 8–12 stitches per 6″ around initially, then crochet even rounds to build tier height 6–8″.
D — Hem & finish
5. Finish with 3–4 rounds of sc for a stable hem. Add a 1″ lining if desired. Block lightly.
E — Fit note
- Moss stitch is dense; allow more ease or use larger hook if you need more drape. For a flowing tiered effect, hold yarn double or pick a yarn with more drape.
Styling
- This skirt works well as a daily wear piece — pair with tucked-in tees or button-down shirts.
5. Crochet Simple Ruffle Skater Mini Skirt Pattern

A playful skater mini with a fitted waist and a ruffled, flared body perfect for layered outfits and summer days.
Skill level: confident beginner
Materials
- DK cotton or cotton-blend — ~600–850 yd.
- Hook: 4.0 mm.
- Elastic for casing or ribbed waistband.
Gauge (example): 16 sc = 4″.
Construction overview
Fitted waistband, short hip band, then increase rounds to create ruffle/full flared skirt.
Step-by-step
A — Waist foundation
- Compute waist stitches. With gauge 16 sc = 4″ → 4 sc/in. For waist 26″: 4 × 26 = 104 stitches. Chain or foundation sc to join.
B — Ribbed waist
2. Work BLO sc for 8 rows to create a ribbed, foldable band. Fold and seam to create a casing for elastic OR leave unsewn for a clean stretchy band.
C — Hip band
3. Work 4–6 rounds of sc even for a short hip band.
D — Ruffle flare
4. Increase dramatically: Round 1 of flare: sc in next 2, inc repeat — this adds 1/3 circumference. Continue one or two more increase rounds (e.g., sc in 3, inc) until you reach desired ruffle fullness. Then work even rounds in sc or shell stitch for ruffle texture. Aim for hem circumference of 1.5–2× waist for skater fullness.
E — Hem finishing
5. Finish with a shell or picot round to highlight the ruffle edge and add bounce. Weave ends and block lightly.
Styling
- Skater minis are playful with sneakers and crop tops or chunky knits and tights for colder weather.
6. Crochet Cute Waist Corset Mini Skirt Pattern
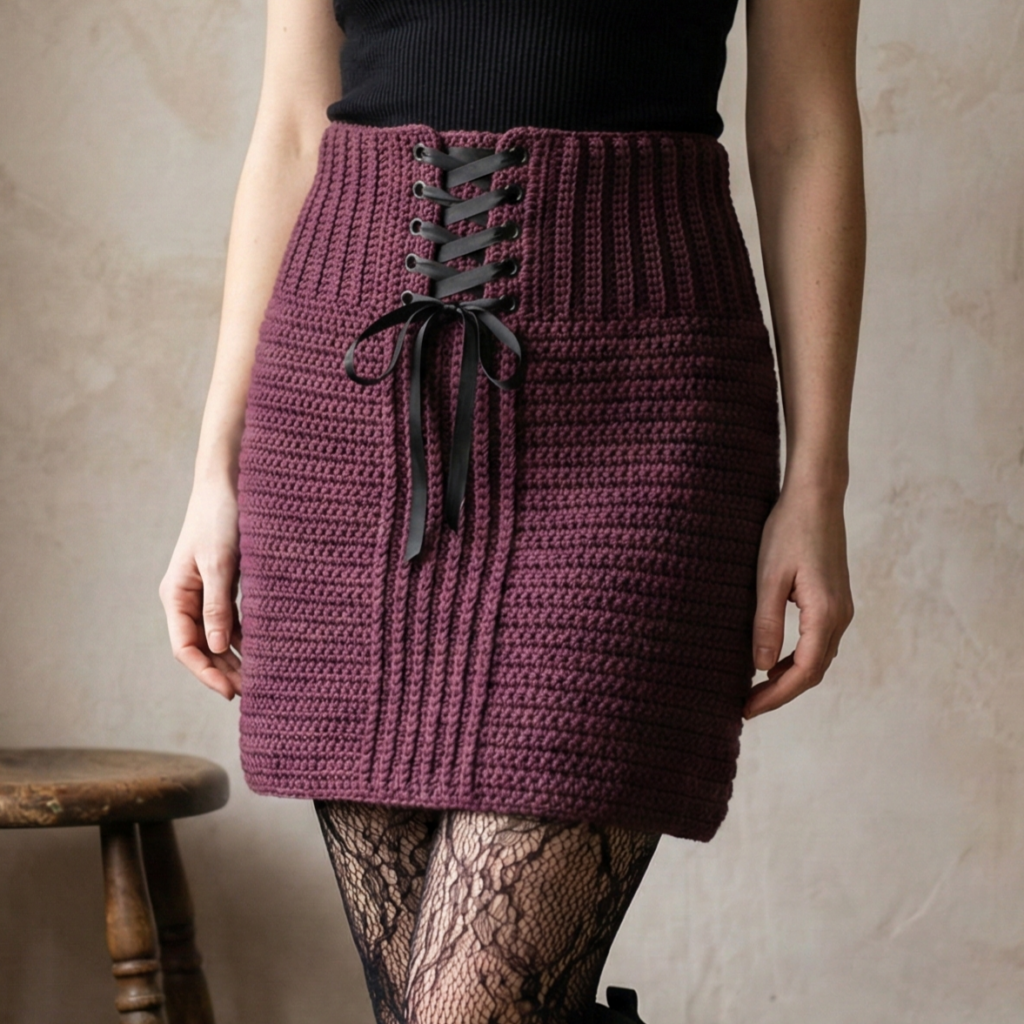
A structured mini with corset-inspired lacing or stitched panel details — great for statement looks.
Skill level: intermediate → advanced (shaping & hardware)
Materials
- DK / worsted yarn with some stability — ~700–1,000 yd.
- Hook: 4.0–5.0 mm.
- Eyelets (metal grommets) or crocheted cord loops, ribbon or cord for lacing, interfacing for waist if needed.
Gauge (example): 14 sc = 4″.
Construction overview
Work a firm waistband with vertical rib shaping; create decorative corset panels down the front or side; add eyelets and lace.
Step-by-step
A — Waist & yoke
- Compute waist stitches via gauge and work a firm band (hdc in BLO or multiple sc rounds). Fold to create a sampled casing or attach interfacing/fabric for stability.
B — Panel shaping
2. Crochet body in rows joined in the round, adding vertical rib columns (fpdc/bpdc) at panel lines for corset look. You can add thicker braided cords or sewn strips to mimic coutil boning visually.
C — Add eyelets
3. Mark eyelet placement down the front center or side (spacing 1″–1.5″). Create eyelets by making small buttonholes: ch4, skip 4 sts then continue; reinforce with sc around hole or set metal grommets after shaping.
D — Lacing
4. Use ribbon or cord threaded through eyelets; tie as desired. For structural support you can add a short zipper at the back and keep lacing decorative.
E — Hem & finish
5. Finish with tidy edge rounds. Optional lining helps maintain structure.
Styling
- Go gothic-romantic with lace tights and boots, or pair with an oversize blazer.
7. Crochet High Waisted Fall Rust Skirt Pattern
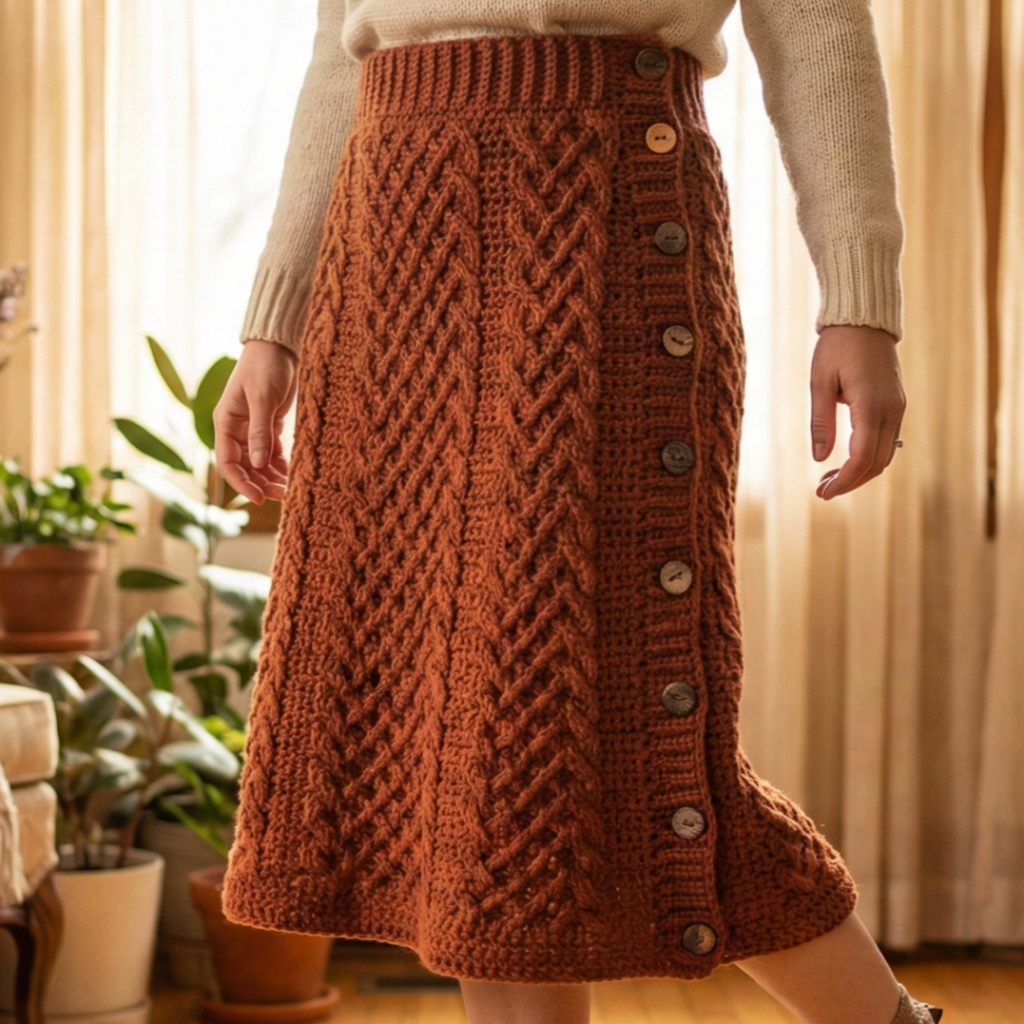
A cozy high-waisted skirt in warm rust tones, perfect for autumn — longer length and cozy stitch textures.
Skill level: intermediate
Materials
- Worsted wool or wool-blend yarn in rust/orange/tan — ~1,000–1,400 yd.
- Hook: 5.0–5.5 mm.
- Elastic or ribbed high waistband, lining optional.
Gauge (example): 14 hdc = 4″.
Construction overview
Top-down high waist with textured stitch panels (cable mimic or rib) and a slightly flared hem for movement.
Step-by-step
A — High waist band
- Measure around natural waist where you want the skirt to sit (e.g., 28″). Using gauge: 14 hdc = 4″ → stitches per inch = 14 ÷ 4 = 3.5. For 28″: 3.5 × 28 = ?
- 3.5 × 20 = 70
- 3.5 × 8 = 28
- 70 + 28 = 98 stitches. Use a foundation round of hdc 98 stitches and work 12–16 rounds for a tall high-waist band.
B — Hip shaping
2. Increase slightly across 1–3 rounds to fit hip circumference. Example hip target 38″ vs waist 28″: increase 10″ converted to stitches = 3.5 × 10 = 35 stitches spread across rounds.
C — Textured body
3. Switch to a knit-lattice or simple cable-mimic stitch (fpdc/bpdc columns) for body rounds; these read cozy and seasonal. Work even until desired skirt length minus hem (e.g., total length 28″ minus 2″ hem).
D — Hem flare
4. Add gradual increase rounds to reach slight flare for walking ease (e.g., add 6–8 stitches every 6–8 rounds for 4–6 rounds). Finish with a firm hem: 3–4 rounds sc or an applied border.
E — Finish & lining
5. Add a soft knit lining and a back zipper for ease or keep elastic and pull-on style. Block lightly and steam to even textured stitches.
Styling
- Pair with turtleneck and boots, or layer over tights with an oversized coat for chilly days.
Final finishing tips (applies to all skirts)
- Try on as you go. Crochet is forgiving — fit while you work. Use stitch markers to mark center front/back and hip points so shaping is symmetrical.
- Weave ends neatly on the wrong side. Use a tapestry needle and bury tails along stitch lines.
- Lining prevents see-through and protects delicate stitches from skin oils. Lightweight cotton or satin is good.
- Care card: tell future wearers fiber content and washing instructions (e.g., “Hand wash cold, lay flat to dry” or “Machine wash gentle, reshape damp”).
- Zippers & closures: When a zipper is required, sew a fabric interfaced panel into the skirt opening and hand-sew the zipper for clean results.
conclusion
You now have seven full skirt blueprints — from the playful Granny Striped Tiered Skirt and modern Caron Graphic Pencil Skirt to the delicate Lacy Shell Stitch Pencil Mini, textured Moss Stitch Tiered Skirt, flirty Simple Ruffle Skater Mini, structured Waist Corset Mini, and the cozy High-Waisted Fall Rust Skirt. Each pattern includes exact approaches for sizing and step-by-step construction so you can make a perfect fit.