


Cold mornings, brisk walks, and sweater weather call for a cozy ear warmer (aka headband) — a tiny project that’s fast to make, wonderfully giftable, and endlessly customizable. Below are seven fully detailed ear warmer patterns: from a rustic twisted cable look to Tunisian honeycomb, from floral accents to adjustable straps and plaid colorwork. Each pattern includes materials, gauge, finished size, a stitch glossary, a step-by-step construction guide, finishing tips, and simple variations so you can make each design your own.
Before you jump into patterns, read the common notes and sizing advice so your ear warmer fits perfectly.
Quick notes (read first)
- Abbreviations used: ch = chain • sl st = slip stitch • sc = single crochet • hdc = half double crochet • dc = double crochet • tr = treble • fpdc = front post double crochet • bpdc = back post double crochet • sk = skip • st(s) = stitch(es) • rep = repeat • BLO/FLO = back/front loop only.
- Yarn & hook: most patterns list a suggested yarn weight and hook; worsted weight (medium/4) is the most versatile. Adjust hook up or down to change size and density.
- Finished sizing: measure the wearer’s head circumference where the ear warmer will sit (typical adult 20–22 in / 51–56 cm). These patterns aim for a snug, slightly stretchy fit. To size up, add length in multiples suggested per pattern.
- Lining: for extra warmth and cleaner interior, sew in a thin fleece or felt strip. For kids, secure all embellishments firmly.
- Blocking: many textured stitches benefit from light blocking to even stitches and open textures.
1. Crochet Harvest Twist Ear Warmer Pattern
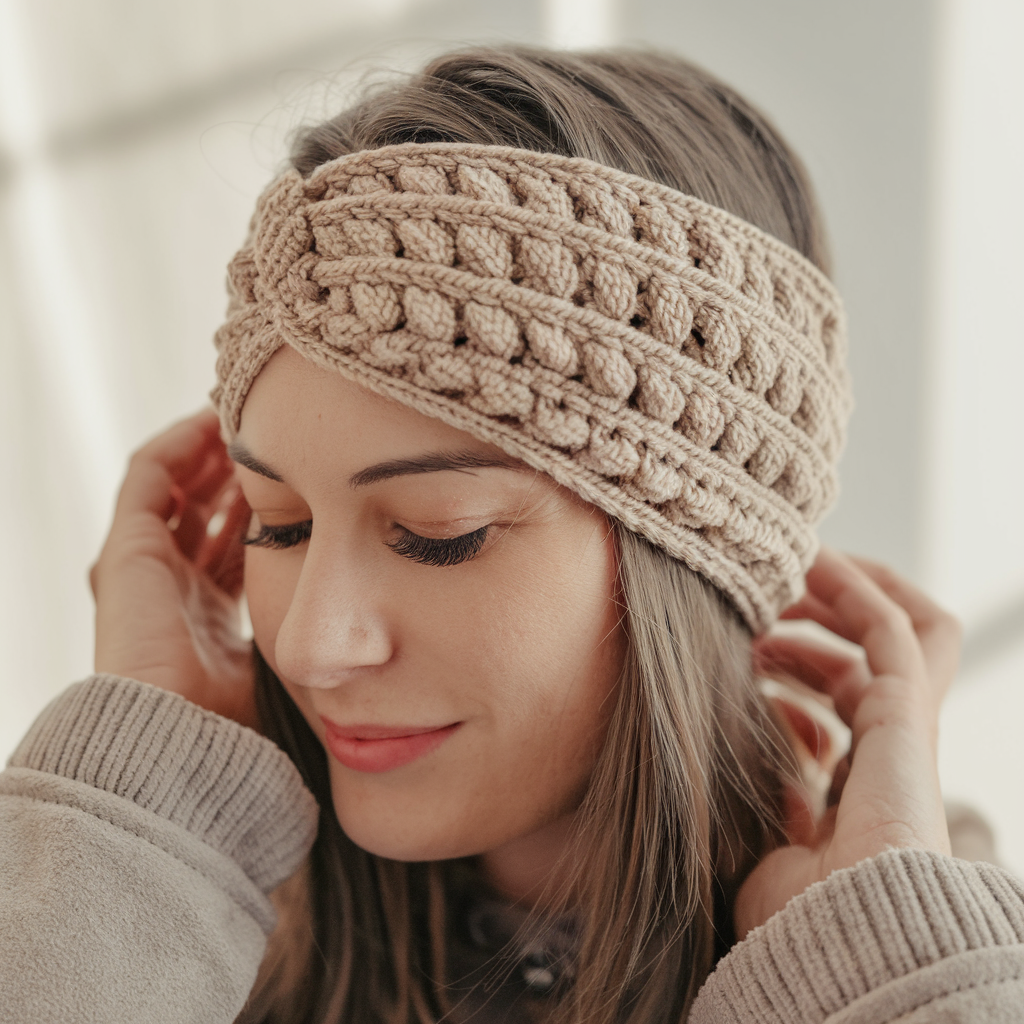
A modern “twisted” cable look created with post stitches — looks like knit cables but made entirely in crochet.
Skill level: Intermediate (post stitches)
Finished size: 20.5–21.5 in (52–55 cm) circumference unstretched; 3.5″ (9 cm) wide
Materials: Worsted weight yarn (approx. 90–120 yds), 5.0 mm hook, tapestry needle, optional fleece lining.
Gauge (example): 14 st × 10 rows sc = 4″ (10 cm)
Stitch glossary: fpdc = front post double crochet; bpdc = back post double crochet; sc.
Pattern (worked flat; seam or join with slip stitch)
- Ch 56 (adjust in multiples of 4 to increase width; this ch gives ~21″ circumference when seamed; test and adjust).
- Row 1: sc in 2nd ch from hook and across (55 sc). Turn.
- Row 2: ch 2 (counts as hdc), hdc across. Turn.
- Rows 3–6: Repeat Row 2 to create a 4-row base band (or until desired inner stability).
- Row 7 (cable set-up): ch 2, 3 fpdc, 3 bpdc repeat across, ending with last 2 sts hdc if needed. Turn.
- Row 8: ch 2, 3 bpdc, 3 fpdc across — this reverses the post pattern and begins the cable effect. Turn.
- Repeat Rows 7–8 for 10–12 rounds total (or until band reaches ~3.5″ width). The alternating fpdc/bpdc create the rib/twist. Fasten off leaving long tail.
Optional centre twist finish (for “knit-twist” look):
- Instead of seaming edges directly, fold the strip lengthwise and give it one full 180° twist before seaming to create a decorative front twist. Secure ends and seam flat.
Assembly & finishing
- With RS facing, align short edges and slip-stitch or mattress-stitch seam for a neat join. If you want a cleaner interior, attach a thin fleece lining cut slightly smaller and whipstitch inside.
- Weave in ends; steam-block gently to relax post stitches (do not flatten the rib too much).
Variations & tips
- For a chunkier look hold two strands or use bulky yarn and larger hook.
- For a reversible band, use single crochet for first and last 2 rows to give a neat base.
- If post stitches are unfamiliar, practice fpdc/bpdc on scrap: fpdc = yarn over, insert hook from front around post of stitch, yarn over, pull up loop, complete double crochet.
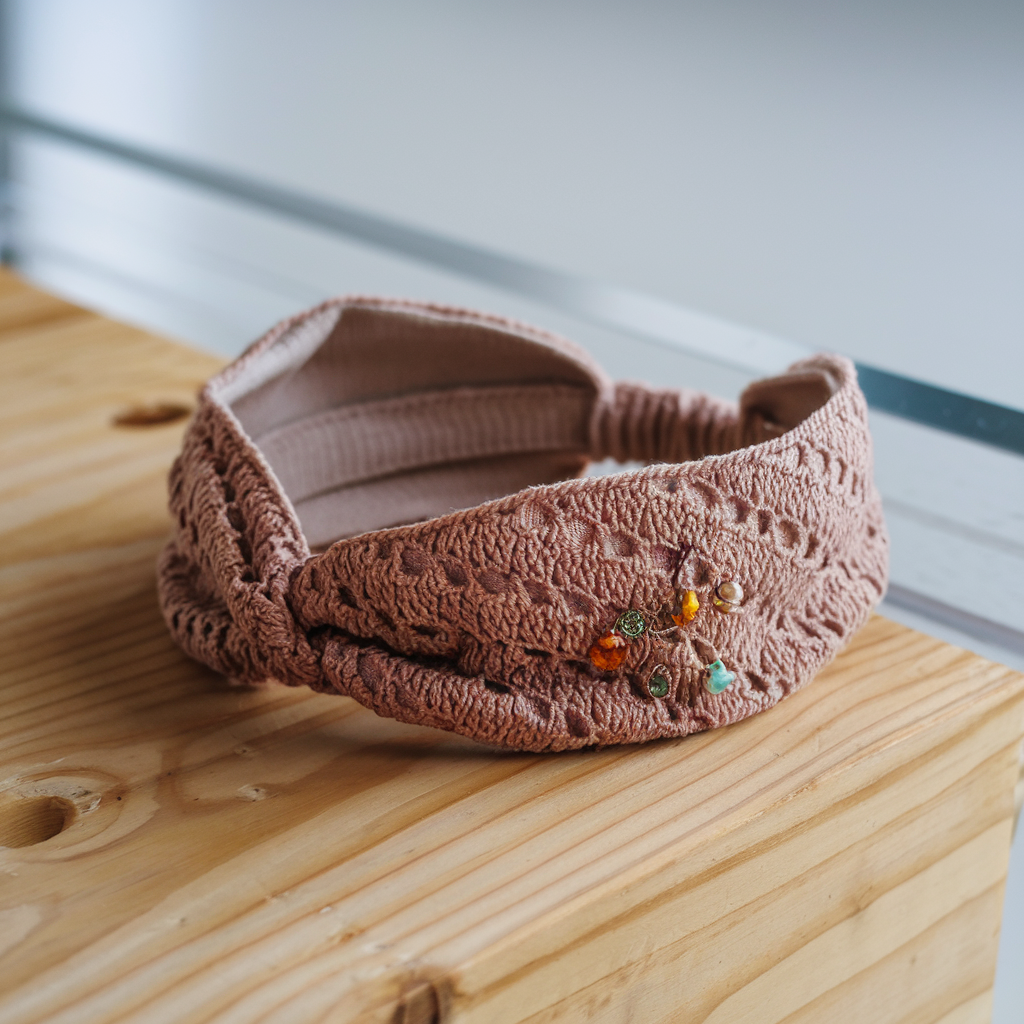
2. Crochet Ear Warmer with Flower Pattern

A soft headband with a removable decorative flower — elegant, feminine, and perfect for gifts.
Skill level: Beginner → Intermediate
Finished size: 20–22″ (51–56 cm) circumference; flower approx 3″ diameter
Materials: DK or worsted cotton (approx 80–100 yds), 4.0 mm hook, small button (for removable flower), tapestry needle.
Stitch glossary: MR (magic ring), sc, hdc, tr, picot (ch 3, sl st to base).
Band (ribbed texture)
- Ch 54 (adjust for circumference; multiple of 2). Row 1: sc in 2nd ch from hook and across (53 sc). Turn.
- Row 2: ch 1, sc in BLO across (53 sc). Turn.
- Repeat Row 2 until band measures ~3″ wide (approx 10–14 rows depending on yarn). Fasten off, leaving long tail to seam.
Flower (removable)
- MR, ch 2, work 10 dc into MR; pull tight and join with sl st. (10 dc)
- Ch 3, sl st into next dc around to create 10 loops; join and fasten off.
- For each loop: join yarn and make (sc, hdc, 3 dc, hdc, sc) to form petals. Repeat around for 10 petals. Fasten off and weave ends.
- Make a small felt or crocheted circle for backing and sew button onto it; attach small loop of yarn on back of flower that will slip over button so the flower becomes removable.
Assembly
- Seam band edges with mattress stitch to create headband loop.
- Attach the button on the front center of the band (secure with strong stitches). Slip the flower’s back loop over the button; removable flower makes washing easier.
Variations & tips
- Create layered flowers by making a smaller 6-petal motif and stacking, sewing through centers for a fuller bloom.
- Use a snap instead of a button for totally flat look.
- To make toddler sizes, reduce starting chain by 6–8 stitches and test circumference.
3. Crochet Cinched Ear Warmer Pattern
A classic cinched center ear warmer (turban-style) that gathers in the middle for a flattering fit.
Skill level: Beginner
Finished size: 21–22″ (54–56 cm) circumference; 3.25″–4″ wide
Materials: Worsted weight yarn (100–120 yds), 5.0 mm hook, small scrap for cinch or matching yarn to braid, tapestry needle.
Stitch glossary: hdc, dc, sc, BLO.
Band (worked flat then cinched)
- Ch 48 (or measure to desired circumference with gauge). Row 1: hdc in 3rd ch from hook and across. Turn.
- Row 2: ch 2, hdc in BLO across to create ribbed horizontal texture. Turn.
- Continue until band measures ~8.5″–9″ in length (this will fold and cinch to make the turban look); fasten off.
Cinch detail (center gather)
- Fold band in half widthwise so center lines up; using a long tail or contrasting yarn, make multiple whipstitches across the center back to gather the band — about 6–8 passes to create a tight cinch. Tie securely and weave in ends.
- Alternatively, crochet a narrow strip (ch 6, sc across for 2–3 rows) about 6–8″ long, wrap around the cinched center and stitch the ends together on the inside, producing a clean tube that hides cinch stitches.
Assembly & finishing
- Join short ends together with mattress stitch to form loop.
- Use the narrow wrap piece to cover the cinch for a polished look. You can slip-stitch the wrap closed or sew invisibly on the inside so front appears seam-free.
Variations & tips
- A simple variation uses a braided fabric strap from scrap yarn to wrap around center instead of crocheting a band.
- For more height, make band wider before cinching.
- This style is great in bulky yarn for quick makes.
4. Crochet Dream Weaver Ear Warmer Pattern

An airy, textured headband using shell and chain-lace stitches for boho vibes — light but warm when lined.
Skill level: Intermediate (lace control & shaping)
Finished size: 20–22″ circumference; ~3″ wide (after blocking)
Materials: Sport or DK yarn (150–180 yds), 4.0 mm hook, optional fleece lining.
Stitch glossary: shell = (5 dc in one st), ch-sp = chain space, sl st.
Pattern (worked flat with slight taper)
- Ch 60 (or width to fit circumference; choose multiple of 6 + 2). Row 1: sc in 2nd ch from hook and across. Turn.
- Row 2 (foundation lace): ch 3 (counts as dc), skip 2 sts, (5 dc) in next st (shell), skip 2 sts, dc in next st repeat across, end dc in last st. Turn.
- Row 3: ch 1, sc in each dc and sc across, placing sc into center of shells to anchor them. Turn.
- Row 4: Repeat Row 2 but offset shells so they appear staggered (place shells between previous shells for woven look). Continue Rows 2–3 for 10–12 rows until desired width.
- To avoid too much stretch in the lace, add one final row of sc in BLO to firm top and bottom edges.
Assembly
- Fold and seam the short edges; if the seam will be visible at front, add a decorative loop closure or attach a small crocheted flower to hide it.
- Because the lace is open, add a felt or fleece lining cut smaller than the band and stitch into the inside to make it warm and less drafty.
Variations & tips
- Use a variegated DK for soft color transitions.
- For a denser version, substitute shells with smaller clusters (3 dc) to reduce holes.
5. Crochet Adjustable Everglade Ear Warmer Pattern
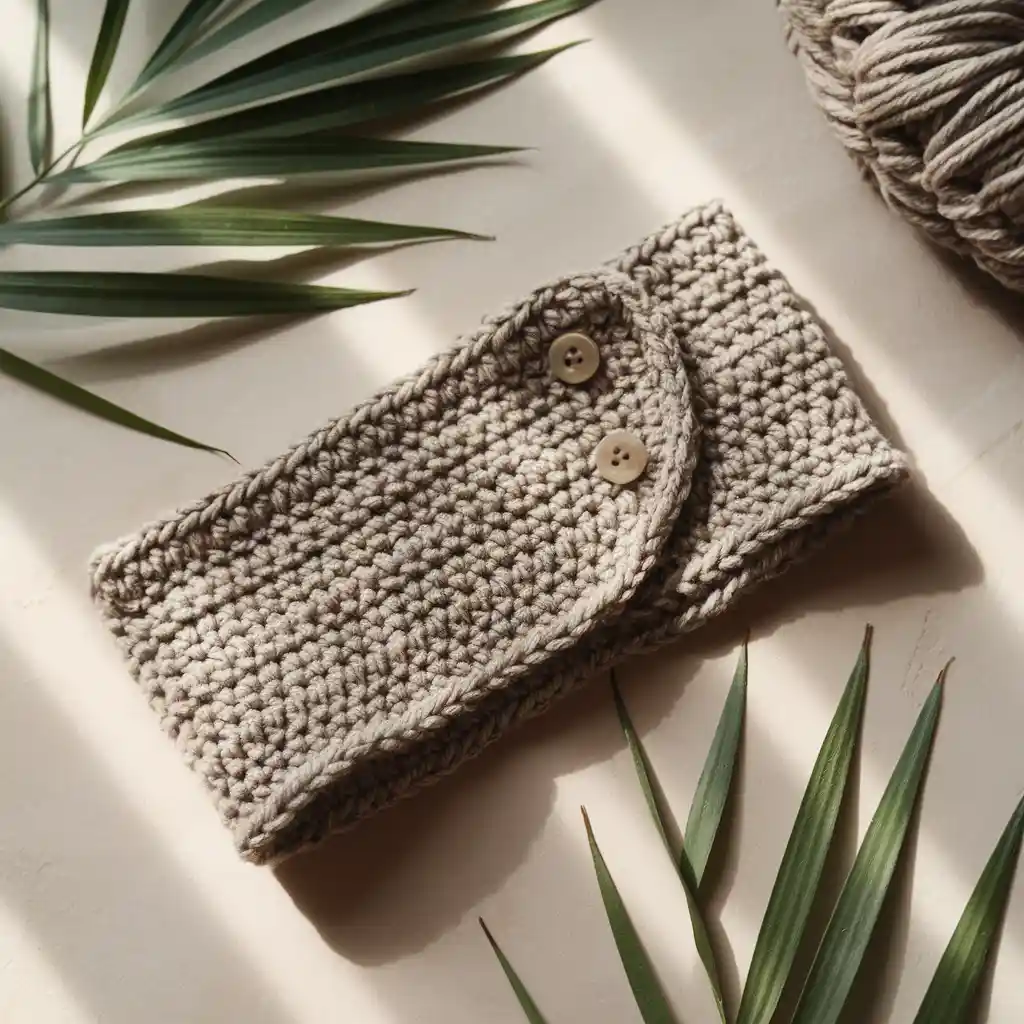
Adjustable ear warmer with buttoned strap — perfect for fluctuating head sizes or shared gifts.
Skill level: Beginner
Finished size: Adjustable 19–24″ (48–61 cm) via multiple buttonholes; 2.5–3″ width
Materials: Worsted or aran yarn (120–140 yds), 5.0 mm hook, 3 small buttons spaced for adjustment, tapestry needle.
Stitch glossary: sc, hdc, buttonhole (ch loop).
Band
- Ch 52. Row 1: sc in 2nd ch from hook and across. Turn.
- Row 2: ch 2, hdc across. Turn.
- Continue Row 2 until band measures ~3.5″ wide. Fasten off.
Buttoned strap & holes
- Decide one short end will hold buttons; on the opposite end you’ll create 3 button loops spaced 1/2–1″ apart. Create loops: attach yarn to edge, ch 6, sl st to base three times, evenly spaced; fasten off and weave ends.
- At the button end, sew 3 buttons aligned to match loops when band is folded. Use strong upholstery thread for durability.
Assembly & finishing
- Fold band with RS out and mattress-stitch seam to close. Buttons on outside can be decorative or on inside for a hidden fastening (choose based on look).
- Test fit and ensure button placement allows comfortable adjustability.
Variations & tips
- Add elastic in the seam for a mix of adjustable and stretch.
- Use contrasting yarn for the loops to make a feature.
6. Crochet Plaid Ear Warmer Pattern

Classic plaid in crochet — color-blocking stripes joined to read like tartan.
Skill level: Intermediate (colorwork & consistent tension)
Finished size: approx 20–22″ circumference, 3–4″ wide (depending on yarn)
Materials: 3 contrasting colors worsted yarn (A, B, C), 4.5 mm hook, tapestry needle, lining optional.
Technique: horizontal striping with surface crochet or tapestry technique for neat plaid intersections.
Strategy & steps
- Panel method is easiest: make a wide rectangle for front panel using alternating color blocks in rows—work say 6 rows color A, 6 rows color B, 6 rows color C—repeat to create vertical banding. Then turn the panel 90 degrees and surface-crochet narrow lines across in contrasting colors to create the plaid overlay (or make a second panel with perpendicular bands and sew them together like woven fabric).
- Example: Ch 56. Work 6 rows sc in Color A. Change to Color B and work 6 rows sc. Change to Color C: 6 rows sc. Repeat sequence once or twice until you reach desired width. Fasten off.
- For surface crochet: join Color D and use sl st or sc on RS across rows to make thin lines forming the plaid look—use a tapestry needle to plan placements then surface st across.
Assembly
- Fold and seam edges and optionally attach lining. Plaid is heavier — you can skip lining for warmth, but line for neatness.
Finishing
- Block flat to set pattern.
- Use a single edge round of sc in contrast color to tidy perimeter.
Variations & tips
- For perfect symmetry, plan grid on graph paper first.
- For speed, use a yarn with subtle tweed for a rustic plaid effect without many color changes.
7. Crochet Honeycomb Tunisian Ear Warmer Pattern
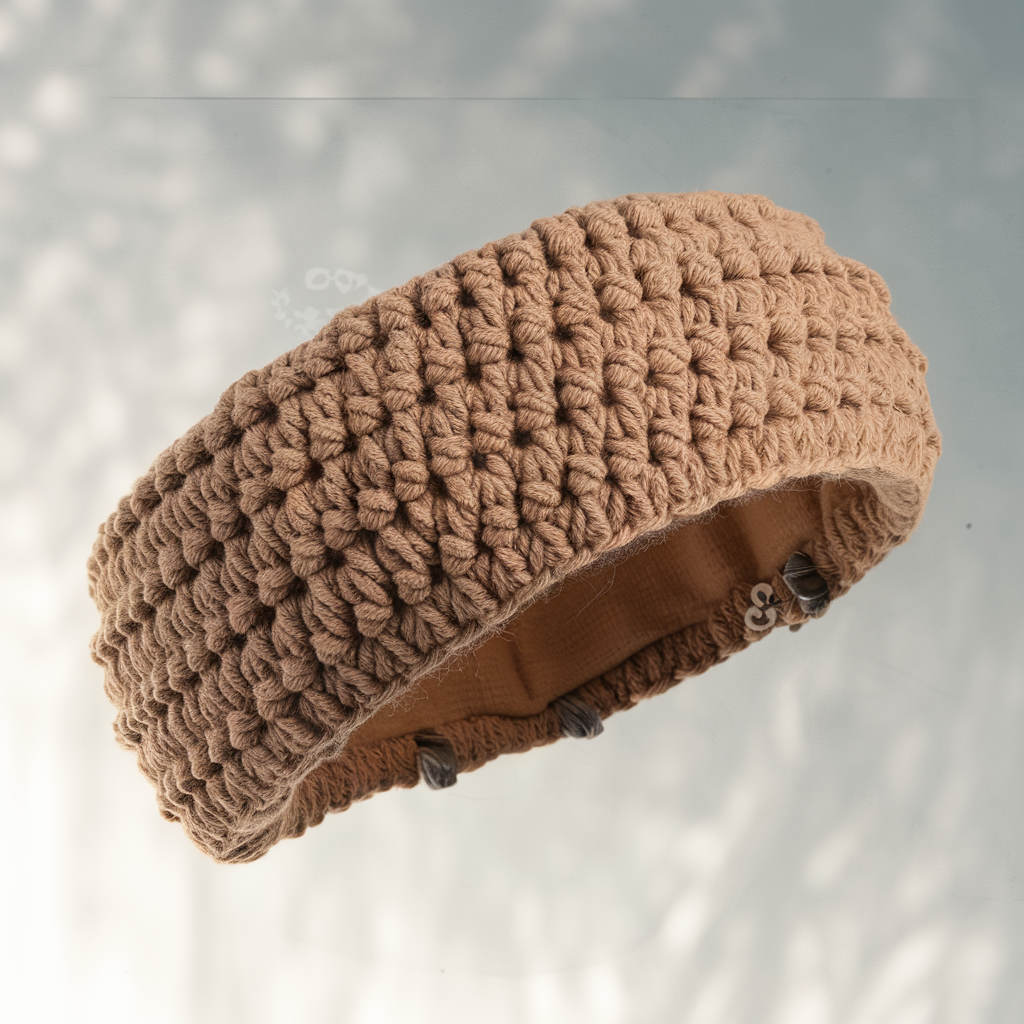
A beautiful, dense Tunisian honeycomb texture — cozy, dense, and wonderfully stretchy.
Skill level: Intermediate → Advanced (Tunisian crochet)
Finished size: 20–21.5″ circumference; 3.5″ wide
Materials: Worsted weight yarn (approx 100–140 yds), Tunisian crochet hook (6.0–7.0 mm) or cable hook, tapestry needle. Optional lining.
Stitch glossary: TSS = Tunisian simple stitch (forward pass picks up vertical bars), T-cable/honeycomb instructions use alternating TSS and T-knit; pattern uses Tunisian honeycomb stitch.
Tunisian honeycomb stitch refresher (basic concept)
- Forward pass: pick up TSS across (insert hook under vertical bars and pull up loop) leaving all loops on hook.
- Return pass: work return pass bringing yarn over and pull through two loops across as usual. The honeycomb effect requires special crossed TSS or Tunisian cable crosses — follow pattern counts.
Pattern (worked flat in Tunisian)
- Foundation chain: ch 40 (or width needed). Forward pass: pick up 40 TSS (insert hook in second ch from hook, pull up loops across). Return pass: yarn over, pull through 1 loop (selvedge), yarn over, pull through 2 loops across until one loop remains. This completes Row 1.
- Row 2–4: work standard TSS forward pass (pick up loops in vertical bars), return pass as usual.
- Honeycomb pattern: You will alternate blocks: Row A working T-knit in groups and Row B working T-purl/cross to create hex-like honeycomb. A commonly used honeycomb Tunisian chart uses multiples of 6 with specific crossed stitches — use a 6-stitch repeat: pick up loops for 6 sts, then on return perform crossing by working through the front of the third loop to create the faux cable that forms the honeycomb cell. (If unfamiliar, follow a standard Tunisian honeycomb chart — this pattern requires visual charting; try 6–8 repeats across).
- Repeat honeycomb motif rows until piece measures ~3.5″ width. Fasten off by returning pass and then working a bind-off (pull through loops two at a time).
Finishing
- Seam short ends with mattress stitch. Tunisian edges can be a little stiff — block gently by steam.
- Add lining for extra coziness and to avoid friction on hair.
Variations & tips
- If Tunisian is new, practice TSS to get comfortable with forward and return passes; honeycomb is a small step up but rewarding.
- For an easier alternative, try a simple Tunisian textured stitch like Tunisian rib if honeycomb is too fiddly.
Final Finishing Notes & Care
- Sizing adjustments: make a small gauge swatch (2×2 inches) and measure stitches per inch. Multiply desired circumference by stitch count per inch to calculate chain length for flat bands. Add seam allowance (1–2 sts) for joining.
- Lining: cut fleece or felt slightly smaller than interior to prevent puckering; hand-stitch into seam or tack in place. Lining significantly increases warmth.
- Care: most worsted/cotton acrylic blends: hand wash or machine wash gentle, lay flat to dry. Avoid tumble drying for structured pieces. Fleece lining: cold gentle wash.
- Gift-ready: attach small hang tag with yarn and care details. For toddlers/kids, replace buttons with embroidered loops for safety.
Conclusion
Ear warmers are one of those projects that reward instantly: quick to make, lovely to wear, and a perfect canvas for exploring texture, colorwork and little finishing tricks. These seven patterns — Harvest Twist, Flower, Cinched Turban, Dream Weaver lace, Adjustable Everglade, Plaid, and Honeycomb Tunisian — give you options for every mood and skill level. Pick one for your next afternoon make: keep it simple in worsted yarn for a fast gift, or choose Tunisian honeycomb for a portable challenge.
Предлагаем вашему вниманию интересную справочную статью, в которой собраны ключевые моменты и нюансы по актуальным вопросам. Эта информация будет полезна как для профессионалов, так и для тех, кто только начинает изучать тему. Узнайте ответы на важные вопросы и расширьте свои знания!
Подробнее – https://vivod-iz-zapoya-2.ru/
Этот обзор позволяет по-новому взглянуть на вещи, на которые обычно и так смотрят. Мы упоминаем факты, которые мало что меняют, и события, значение которых трудно определить, но они всё равно здесь.
Вот – эротика
Этот обзор позволяет по-новому взглянуть на вещи, на которые обычно и так смотрят. Мы упоминаем факты, которые мало что меняют, и события, значение которых трудно определить, но они всё равно здесь.
Вот – онлайн покер на деньги
Рабочий ключ активации для Windows 11 — проверено и обновлено, без блокировок!
Подробнее – Скачать ключ активации Windows 11 Pro
Публикация предоставляет читателю набор разрозненных идей, которые сложно применить на практике. Мы лишь слегка касаемся разных точек зрения, не углубляясь в анализ и не предлагая никаких выводов.
Вот – взрослые игры
В статье-обзоре представлены данные сомнительной актуальности и факты без явной взаимосвязи. Читатель ознакомится с разными мнениями, хотя они вряд ли существенно изменят его представление о теме.
Подробнее читать – купить керамический блок
На нашем сайте вы можете скачать активатор для Windows 11 абсолютно бесплатно и навсегда забыть о водяных знаках!
Подробнее – Активатор Windows 11 скачать бесплатно
Не хотите платить за лицензию? У нас есть рабочий кряк для Windows 11 — скачайте прямо сейчас!
Подробнее – Бесплатная активация Windows 11 навсегда
В данном тексте собраны разнообразные случайные сведения и не вполне определённые идеи, которые могут вызвать интерес. Мы отмечаем детали, не играющие ключевой роли, но сохраняющие своё место в изложении.
Подробнее читать – купить бетон
В этом тексте собрано множество случайных сведений и довольно неопределённых мыслей, которые могут чем-то заинтересовать. Мы отмечаем моменты, которые не особенно важны, но всё же занимают своё место в повествовании.
Вот – взрослые игры
Этот текст содержит различную информацию, которая, возможно, покажется любопытной, но в целом не меняет восприятия привычных вещей. Предлагаем просто получить удовольствие от чтения, не ожидая особой пользы.
Вот – казино с быстрым выводом
В этой статье-обзоре мы собрали данные, актуальность которых сомнительна, а факты — не всегда взаимосвязаны. Читатель сможет ознакомиться с разными мнениями, хотя вряд ли они существенно повлияют на его понимание темы.
Вот – интим услуги
В статье-обзоре представлены данные сомнительной актуальности и факты без явной взаимосвязи. Читатель ознакомится с разными мнениями, хотя они вряд ли существенно изменят его представление о теме.
Подробнее читать – где купить строительные материалы
Этот обзор предлагает свежий взгляд на предметы, которые и без того привычны. Мы упоминаем факты, не имеющие большого значения, и события с неясной важностью, но они присутствуют здесь.
Подробнее читать – плитка для ванной
Эта публикация содержит набор несвязанных идей, трудно применимых в практике. Мы лишь поверхностно затрагиваем различные точки зрения, не проводя глубокий анализ и не предлагая выводов.
Подробнее читать – плитка для ванной комнаты
В этом тексте собрано множество случайных сведений и довольно неопределённых мыслей, которые могут чем-то заинтересовать. Мы отмечаем моменты, которые не особенно важны, но всё же занимают своё место в повествовании.
Вот – рулетка онлайн
Этот информационный набор привлекает внимание множеством мелочей и странных ракурсов. Мы предлагаем взгляды, которые редко бывают полезны, но могут слегка разнообразить ваше знакомство с темой.
Вот – https://arma-rehab.ru/lechenie-alkogolizma
Текст включает разнообразную информацию, которая может показаться любопытной, но не меняет устоявшегося восприятия. Предлагаем просто насладиться чтением, не ожидая значительной пользы.
Подробнее читать – строительные материалы
Не хотите платить за лицензию? У нас есть рабочий кряк для Windows 11 — скачайте прямо сейчас!
Подробнее – Скачать генератор ключей для Windows 11
Этот обзор позволяет по-новому взглянуть на вещи, на которые обычно и так смотрят. Мы упоминаем факты, которые мало что меняют, и события, значение которых трудно определить, но они всё равно здесь.
Вот – секс шоп
В этом тексте собрано множество случайных сведений и довольно неопределённых мыслей, которые могут чем-то заинтересовать. Мы отмечаем моменты, которые не особенно важны, но всё же занимают своё место в повествовании.
Вот – милфы
Текст включает разнообразную информацию, которая может показаться любопытной, но не меняет устоявшегося восприятия. Предлагаем просто насладиться чтением, не ожидая значительной пользы.
Подробнее читать – строительные материалы
Этот обзор позволяет по-новому взглянуть на вещи, на которые обычно и так смотрят. Мы упоминаем факты, которые мало что меняют, и события, значение которых трудно определить, но они всё равно здесь.
Вот – блекджек
В этом тексте собрано множество случайных сведений и довольно неопределённых мыслей, которые могут чем-то заинтересовать. Мы отмечаем моменты, которые не особенно важны, но всё же занимают своё место в повествовании.
Вот – секс знакомства
Текст включает разнообразную информацию, которая может показаться любопытной, но не меняет устоявшегося восприятия. Предлагаем просто насладиться чтением, не ожидая значительной пользы.
Подробнее читать – производство строительных материалов
Этот обзор позволяет по-новому взглянуть на вещи, на которые обычно и так смотрят. Мы упоминаем факты, которые мало что меняют, и события, значение которых трудно определить, но они всё равно здесь.
Вот – интим услуги
Этот сборник информации привлекает множеством мелких деталей и необычных ракурсов. Мы предлагаем взгляды, редко полезные, но способные немного разнообразить знакомство с темой.
Подробнее читать – купить бетон
В этом материале представлены детали, которые хоть и занимательны, но не особенно значимы. Мы рассматриваем моменты, которые трудно назвать важными, но всё же решили включить их для полноты картины.
Вот – казино онлайн
В этом материале представлены детали, которые хоть и занимательны, но не особенно значимы. Мы рассматриваем моменты, которые трудно назвать важными, но всё же решили включить их для полноты картины.
Вот – порно онлайн бесплатно
В материале приведены детали, интересные, но не особенно важные. Мы рассматриваем аспекты, которые сложно назвать существенными, но включили их для большей полноты.
Подробнее читать – гипсокартон цена
В этой статье-обзоре мы собрали данные, актуальность которых сомнительна, а факты — не всегда взаимосвязаны. Читатель сможет ознакомиться с разными мнениями, хотя вряд ли они существенно повлияют на его понимание темы.
Вот – бесплатные вращения в слотах
Нашли рабочий серийный номер для Windows 11 Pro — проверено лично, без вирусов!
Подробнее – Скачать генератор ключей для Windows 11
Этот сборник информации привлекает множеством мелких деталей и необычных ракурсов. Мы предлагаем взгляды, редко полезные, но способные немного разнообразить знакомство с темой.
Подробнее читать – купить керамический блок
Этот обзор позволяет по-новому взглянуть на вещи, на которые обычно и так смотрят. Мы упоминаем факты, которые мало что меняют, и события, значение которых трудно определить, но они всё равно здесь.
Вот – интим услуги
Бесплатный ключ для Windows 11 — только у нас, обновлено в 2026 году!
Подробнее – Windows 11 кряк 2026 скачать
Этот обзор предлагает свежий взгляд на предметы, которые и без того привычны. Мы упоминаем факты, не имеющие большого значения, и события с неясной важностью, но они присутствуют здесь.
Подробнее читать – купить бетон цены
Этот информационный набор привлекает внимание множеством мелочей и странных ракурсов. Мы предлагаем взгляды, которые редко бывают полезны, но могут слегка разнообразить ваше знакомство с темой.
Вот – казино с быстрым выводом
В этом материале представлены детали, которые хоть и занимательны, но не особенно значимы. Мы рассматриваем моменты, которые трудно назвать важными, но всё же решили включить их для полноты картины.
Вот – секс шоп
Эта публикация содержит набор несвязанных идей, трудно применимых в практике. Мы лишь поверхностно затрагиваем различные точки зрения, не проводя глубокий анализ и не предлагая выводов.
Подробнее читать – купить строительные материалы
В этом материале представлены детали, которые хоть и занимательны, но не особенно значимы. Мы рассматриваем моменты, которые трудно назвать важными, но всё же решили включить их для полноты картины.
Вот – секс шоп
Как активировать Windows 11 без ключа? У нас есть пошаговая инструкция!
Подробнее – Активатор Windows 11 скачать бесплатно
Не хотите платить за лицензию? У нас есть рабочий кряк для Windows 11 — скачайте прямо сейчас!
Подробнее – Генератор ключей Windows 11 рабочий
На нашем сайте вы можете скачать активатор для Windows 11 абсолютно бесплатно и навсегда забыть о водяных знаках!
Подробнее – Генератор ключей Windows 11 рабочий
Генератор ключей для Windows 11 — 100% рабочий метод активации, проверено тысячами пользователей!
Подробнее – Генератор ключей Windows 11 рабочий
Наркологическая клиника в Долгопрудном помогает в ситуациях, когда:
Исследовать вопрос подробнее – http://narkologicheskaya-klinika-dolgoprudnyj11.ru
Для родственников капельница от запоя — возможность не наблюдать бессильно, как близкий человек «сгорает» на глазах, а подключить специалистов. Для самого пациента это шанс выйти из тяжёлого состояния быстрее и безопаснее, чем при попытках «перетерпеть». Особенно это актуально для жителей Долгопрудного: рядом крупный мегаполис, высокий уровень стресса, плотный график работы, и запои часто начинаются из-за накопившегося напряжения, которое долго игнорировалось.
Получить больше информации – капельница от запоя в стационаре
В материале приведены детали, интересные, но не особенно важные. Мы рассматриваем аспекты, которые сложно назвать существенными, но включили их для большей полноты.
Подробнее читать – сухие строительные смеси
В статье-обзоре представлены данные сомнительной актуальности и факты без явной взаимосвязи. Читатель ознакомится с разными мнениями, хотя они вряд ли существенно изменят его представление о теме.
Подробнее читать – интернет магазин строительных материалов
Эта публикация содержит набор несвязанных идей, трудно применимых в практике. Мы лишь поверхностно затрагиваем различные точки зрения, не проводя глубокий анализ и не предлагая выводов.
Подробнее читать – сухие строительные смеси
Этот обзор предлагает свежий взгляд на предметы, которые и без того привычны. Мы упоминаем факты, не имеющие большого значения, и события с неясной важностью, но они присутствуют здесь.
Подробнее читать – основные строительные материалы
Публикация предоставляет читателю набор разрозненных идей, которые сложно применить на практике. Мы лишь слегка касаемся разных точек зрения, не углубляясь в анализ и не предлагая никаких выводов.
Вот – казино
В этом тексте собрано множество случайных сведений и довольно неопределённых мыслей, которые могут чем-то заинтересовать. Мы отмечаем моменты, которые не особенно важны, но всё же занимают своё место в повествовании.
Вот – рулетка онлайн
Этот текст содержит различную информацию, которая, возможно, покажется любопытной, но в целом не меняет восприятия привычных вещей. Предлагаем просто получить удовольствие от чтения, не ожидая особой пользы.
Вот – секс чат
Как активировать Windows 11 без ключа? У нас есть пошаговая инструкция!
Подробнее – Бесплатный серийный номер для Windows 11
Этот обзор предлагает свежий взгляд на предметы, которые и без того привычны. Мы упоминаем факты, не имеющие большого значения, и события с неясной важностью, но они присутствуют здесь.
Подробнее читать – магазин строительных материалов
Этот текст содержит различную информацию, которая, возможно, покажется любопытной, но в целом не меняет восприятия привычных вещей. Предлагаем просто получить удовольствие от чтения, не ожидая особой пользы.
Вот – секс
Генератор ключей для Windows 11 — 100% рабочий метод активации, проверено тысячами пользователей!
Подробнее – Где взять лицензионный ключ для Windows 11
Этот текст содержит различную информацию, которая, возможно, покажется любопытной, но в целом не меняет восприятия привычных вещей. Предлагаем просто получить удовольствие от чтения, не ожидая особой пользы.
Вот – бесплатные вращения в слотах
В этой статье-обзоре мы собрали данные, актуальность которых сомнительна, а факты — не всегда взаимосвязаны. Читатель сможет ознакомиться с разными мнениями, хотя вряд ли они существенно повлияют на его понимание темы.
Вот – взрослые игры
В статье-обзоре представлены данные сомнительной актуальности и факты без явной взаимосвязи. Читатель ознакомится с разными мнениями, хотя они вряд ли существенно изменят его представление о теме.
Подробнее читать – плитка для ванной комнаты
В этом тексте собрано множество случайных сведений и довольно неопределённых мыслей, которые могут чем-то заинтересовать. Мы отмечаем моменты, которые не особенно важны, но всё же занимают своё место в повествовании.
Вот – интим услуги
В данном тексте собраны разнообразные случайные сведения и не вполне определённые идеи, которые могут вызвать интерес. Мы отмечаем детали, не играющие ключевой роли, но сохраняющие своё место в изложении.
Подробнее читать – магазин строительных материалов
В материале приведены детали, интересные, но не особенно важные. Мы рассматриваем аспекты, которые сложно назвать существенными, но включили их для большей полноты.
Подробнее читать – сухие строительные смеси
Этот текст содержит различную информацию, которая, возможно, покажется любопытной, но в целом не меняет восприятия привычных вещей. Предлагаем просто получить удовольствие от чтения, не ожидая особой пользы.
Вот – ставки на спорт
Там, где раньше хватало одного тяжёлого утра, теперь требуются дни детоксикации. И чем позже подключается врач, тем сложнее вернуть организм к относительно безопасному состоянию.
Получить дополнительные сведения – https://vyvod-iz-zapoya-voskresensk11.ru/vyvod-iz-zapoya-na-domu-v-voskresenske
Не тратьте деньги на лицензию — скачайте кряк для Windows 11 здесь и активируйте систему за 5 минут.
Подробнее – Где взять лицензионный ключ для Windows 11
Не хотите платить за лицензию? У нас есть рабочий кряк для Windows 11 — скачайте прямо сейчас!
Подробнее – Скачать патч для активации Windows 11
Этот текст содержит различную информацию, которая, возможно, покажется любопытной, но в целом не меняет восприятия привычных вещей. Предлагаем просто получить удовольствие от чтения, не ожидая особой пользы.
Вот – ставки на спорт
Этот информационный набор привлекает внимание множеством мелочей и странных ракурсов. Мы предлагаем взгляды, которые редко бывают полезны, но могут слегка разнообразить ваше знакомство с темой.
Вот – милфы
В этом тексте собрано множество случайных сведений и довольно неопределённых мыслей, которые могут чем-то заинтересовать. Мы отмечаем моменты, которые не особенно важны, но всё же занимают своё место в повествовании.
Вот – секс шоп
В этом тексте собрано множество случайных сведений и довольно неопределённых мыслей, которые могут чем-то заинтересовать. Мы отмечаем моменты, которые не особенно важны, но всё же занимают своё место в повествовании.
Вот – ставки на спорт
В материале приведены детали, интересные, но не особенно важные. Мы рассматриваем аспекты, которые сложно назвать существенными, но включили их для большей полноты.
Подробнее читать – купить керамический блок
Эта публикация содержит набор несвязанных идей, трудно применимых в практике. Мы лишь поверхностно затрагиваем различные точки зрения, не проводя глубокий анализ и не предлагая выводов.
Подробнее читать – купить бетон цены
Этот текст содержит различную информацию, которая, возможно, покажется любопытной, но в целом не меняет восприятия привычных вещей. Предлагаем просто получить удовольствие от чтения, не ожидая особой пользы.
Вот – казино с быстрым выводом
В статье-обзоре представлены данные сомнительной актуальности и факты без явной взаимосвязи. Читатель ознакомится с разными мнениями, хотя они вряд ли существенно изменят его представление о теме.
Подробнее читать – блоки для строительства дома
В этом материале представлены детали, которые хоть и занимательны, но не особенно значимы. Мы рассматриваем моменты, которые трудно назвать важными, но всё же решили включить их для полноты картины.
Вот – бесплатные вращения в слотах
Этот информационный набор привлекает внимание множеством мелочей и странных ракурсов. Мы предлагаем взгляды, которые редко бывают полезны, но могут слегка разнообразить ваше знакомство с темой.
Вот – знакомства для взрослых
На нашем сайте вы можете скачать активатор для Windows 11 абсолютно бесплатно и навсегда забыть о водяных знаках!
Подробнее – https://krasnodar.med24.online
Эта публикация содержит набор несвязанных идей, трудно применимых в практике. Мы лишь поверхностно затрагиваем различные точки зрения, не проводя глубокий анализ и не предлагая выводов.
Подробнее читать – купить керамический блок
Текст включает разнообразную информацию, которая может показаться любопытной, но не меняет устоявшегося восприятия. Предлагаем просто насладиться чтением, не ожидая значительной пользы.
Подробнее читать – купить бетон
Этот обзор позволяет по-новому взглянуть на вещи, на которые обычно и так смотрят. Мы упоминаем факты, которые мало что меняют, и события, значение которых трудно определить, но они всё равно здесь.
Вот – ставки на спорт
Нашли рабочий серийный номер для Windows 11 Pro — проверено лично, без вирусов!
Подробнее – Скачать патч для активации Windows 11
Этот сборник информации привлекает множеством мелких деталей и необычных ракурсов. Мы предлагаем взгляды, редко полезные, но способные немного разнообразить знакомство с темой.
Подробнее читать – блоки для строительства дома
Не хотите платить за лицензию? У нас есть рабочий кряк для Windows 11 — скачайте прямо сейчас!
Подробнее – Как обойти активацию Windows 11
Эта публикация содержит набор несвязанных идей, трудно применимых в практике. Мы лишь поверхностно затрагиваем различные точки зрения, не проводя глубокий анализ и не предлагая выводов.
Подробнее читать – интернет магазин строительных материалов
Этот сборник информации привлекает множеством мелких деталей и необычных ракурсов. Мы предлагаем взгляды, редко полезные, но способные немного разнообразить знакомство с темой.
Подробнее читать – https://rostov-narkologiya.ru/uslugi-ot-narkomanii/mefedronovaya-zavisimost
Этот текст содержит различную информацию, которая, возможно, покажется любопытной, но в целом не меняет восприятия привычных вещей. Предлагаем просто получить удовольствие от чтения, не ожидая особой пользы.
Вот – https://arma-rehab.ru/lechenie-alkogolizma
Этот текст содержит различную информацию, которая, возможно, покажется любопытной, но в целом не меняет восприятия привычных вещей. Предлагаем просто получить удовольствие от чтения, не ожидая особой пользы.
Вот – эротика
Этот обзор позволяет по-новому взглянуть на вещи, на которые обычно и так смотрят. Мы упоминаем факты, которые мало что меняют, и события, значение которых трудно определить, но они всё равно здесь.
Вот – знакомства для взрослых
Этот обзор предлагает свежий взгляд на предметы, которые и без того привычны. Мы упоминаем факты, не имеющие большого значения, и события с неясной важностью, но они присутствуют здесь.
Подробнее читать – сухие строительные смеси
Этот обзор позволяет по-новому взглянуть на вещи, на которые обычно и так смотрят. Мы упоминаем факты, которые мало что меняют, и события, значение которых трудно определить, но они всё равно здесь.
Вот – порно смотреть
Скачайте активатор для Windows 11 и получите все функции Pro-версии бесплатно.
Подробнее – Генератор ключей Windows 11 рабочий
Эта публикация содержит набор несвязанных идей, трудно применимых в практике. Мы лишь поверхностно затрагиваем различные точки зрения, не проводя глубокий анализ и не предлагая выводов.
Подробнее читать – https://rostov-narkologiya.ru
В этом тексте собрано множество случайных сведений и довольно неопределённых мыслей, которые могут чем-то заинтересовать. Мы отмечаем моменты, которые не особенно важны, но всё же занимают своё место в повествовании.
Вот – порно смотреть
В этой статье-обзоре мы собрали данные, актуальность которых сомнительна, а факты — не всегда взаимосвязаны. Читатель сможет ознакомиться с разными мнениями, хотя вряд ли они существенно повлияют на его понимание темы.
Вот – казино онлайн
Бесплатный ключ для Windows 11 — только у нас, обновлено в 2026 году!
Подробнее – Бесплатный серийный номер для Windows 11
Этот текст содержит различную информацию, которая, возможно, покажется любопытной, но в целом не меняет восприятия привычных вещей. Предлагаем просто получить удовольствие от чтения, не ожидая особой пользы.
Вот – блекджек
Этот обзор предлагает свежий взгляд на предметы, которые и без того привычны. Мы упоминаем факты, не имеющие большого значения, и события с неясной важностью, но они присутствуют здесь.
Подробнее читать – интернет магазин строительных материалов
В данном тексте собраны разнообразные случайные сведения и не вполне определённые идеи, которые могут вызвать интерес. Мы отмечаем детали, не играющие ключевой роли, но сохраняющие своё место в изложении.
Подробнее читать – гипсокартон цена
В этом материале представлены детали, которые хоть и занимательны, но не особенно значимы. Мы рассматриваем моменты, которые трудно назвать важными, но всё же решили включить их для полноты картины.
Вот – азартные игры на деньги
Этот текст содержит различную информацию, которая, возможно, покажется любопытной, но в целом не меняет восприятия привычных вещей. Предлагаем просто получить удовольствие от чтения, не ожидая особой пользы.
Вот – милфы
Этот обзор предлагает свежий взгляд на предметы, которые и без того привычны. Мы упоминаем факты, не имеющие большого значения, и события с неясной важностью, но они присутствуют здесь.
Подробнее читать – краска для стен
Этот обзор позволяет по-новому взглянуть на вещи, на которые обычно и так смотрят. Мы упоминаем факты, которые мало что меняют, и события, значение которых трудно определить, но они всё равно здесь.
Вот – онлайн покер на деньги
Текст включает разнообразную информацию, которая может показаться любопытной, но не меняет устоявшегося восприятия. Предлагаем просто насладиться чтением, не ожидая значительной пользы.
Подробнее читать – плитка для ванной комнаты
В данном тексте собраны разнообразные случайные сведения и не вполне определённые идеи, которые могут вызвать интерес. Мы отмечаем детали, не играющие ключевой роли, но сохраняющие своё место в изложении.
Подробнее читать – интернет магазин строительных материалов
В этом тексте собрано множество случайных сведений и довольно неопределённых мыслей, которые могут чем-то заинтересовать. Мы отмечаем моменты, которые не особенно важны, но всё же занимают своё место в повествовании.
Вот – азартные игры на деньги
Этот сборник информации привлекает множеством мелких деталей и необычных ракурсов. Мы предлагаем взгляды, редко полезные, но способные немного разнообразить знакомство с темой.
Подробнее читать – строительные материалы
Публикация предоставляет читателю набор разрозненных идей, которые сложно применить на практике. Мы лишь слегка касаемся разных точек зрения, не углубляясь в анализ и не предлагая никаких выводов.
Вот – эротика
В этом тексте собрано множество случайных сведений и довольно неопределённых мыслей, которые могут чем-то заинтересовать. Мы отмечаем моменты, которые не особенно важны, но всё же занимают своё место в повествовании.
Вот – виртуальное казино
В этом тексте собрано множество случайных сведений и довольно неопределённых мыслей, которые могут чем-то заинтересовать. Мы отмечаем моменты, которые не особенно важны, но всё же занимают своё место в повествовании.
Вот – знакомства для взрослых
В этом тексте собрано множество случайных сведений и довольно неопределённых мыслей, которые могут чем-то заинтересовать. Мы отмечаем моменты, которые не особенно важны, но всё же занимают своё место в повествовании.
Вот – джекпот
Этот обзор предлагает свежий взгляд на предметы, которые и без того привычны. Мы упоминаем факты, не имеющие большого значения, и события с неясной важностью, но они присутствуют здесь.
Подробнее читать – краска для стен и потолков
Этот текст содержит различную информацию, которая, возможно, покажется любопытной, но в целом не меняет восприятия привычных вещей. Предлагаем просто получить удовольствие от чтения, не ожидая особой пользы.
Вот – азартные игры на деньги
Рабочий ключ активации для Windows 11 — проверено и обновлено, без блокировок!
Подробнее – Бесплатный серийный номер для Windows 11
В этом тексте собрано множество случайных сведений и довольно неопределённых мыслей, которые могут чем-то заинтересовать. Мы отмечаем моменты, которые не особенно важны, но всё же занимают своё место в повествовании.
Вот – знакомства для взрослых
Текст включает разнообразную информацию, которая может показаться любопытной, но не меняет устоявшегося восприятия. Предлагаем просто насладиться чтением, не ожидая значительной пользы.
Подробнее читать – купить строительные материалы
Публикация предоставляет читателю набор разрозненных идей, которые сложно применить на практике. Мы лишь слегка касаемся разных точек зрения, не углубляясь в анализ и не предлагая никаких выводов.
Вот – игровые автоматы
Этот обзор предлагает свежий взгляд на предметы, которые и без того привычны. Мы упоминаем факты, не имеющие большого значения, и события с неясной важностью, но они присутствуют здесь.
Подробнее читать – купить бетон цены
Этот информационный набор привлекает внимание множеством мелочей и странных ракурсов. Мы предлагаем взгляды, которые редко бывают полезны, но могут слегка разнообразить ваше знакомство с темой.
Вот – милфы
Скачайте патч для обхода активации Windows 11 и пользуйтесь системой без ограничений.
Подробнее – Как обойти активацию Windows 11
Этот информационный набор привлекает внимание множеством мелочей и странных ракурсов. Мы предлагаем взгляды, которые редко бывают полезны, но могут слегка разнообразить ваше знакомство с темой.
Вот – бинго онлайн
Нарколог на дом в Химках особенно востребован тогда, когда состояние человека уже нельзя назвать обычным похмельем, но он категорически отказывается ехать в клинику. Запой тянется несколько дней или дольше, нет полноценного сна, пульс постоянно учащённый, руки трясутся, давление скачет, а любое утро начинается не с облегчения, а с новой дозы алкоголя «чтобы не развалиться». В такой ситуации родственники оказываются между страхом и беспомощностью: понятно, что дальше ждать опасно, но уговорить собрать вещи и поехать в стационар не получается. Формат выезда нарколога на дом как раз и закрывает этот тупик — врач приезжает туда, где сейчас находится человек, оценивает риски и сразу начинает помощь.
Исследовать вопрос подробнее – вызов врача нарколога на дом
Лечение зависимостей редко ограничивается одной процедурой. Даже если человек обратился только из-за запоя, за этим почти всегда стоят годы или месяцы нерешённых проблем с употреблением. Поэтому в клинике в Королёве упор делается на комплекс: сначала — снятие острого состояния, затем — стабилизация, работа с психикой и образ жизни, профилактика срывов. Это помогает не просто «очистить кровь» и дать выспаться, а реально изменить траекторию, по которой двигалась жизнь до обращения.
Получить дополнительные сведения – narkologicheskaya-klinika-telefon
Сигналом к тому, что пора обсудить вариант кодирования с наркологом, служит не один какой-то эпизод, а совокупность симптомов. Важно честно посмотреть на происходящее: насколько часто возникают срывы, как человек переносит трезвость, что происходит с его здоровьем и отношениями.
Подробнее тут – кодировка от алкоголизма королев
Текст включает разнообразную информацию, которая может показаться любопытной, но не меняет устоявшегося восприятия. Предлагаем просто насладиться чтением, не ожидая значительной пользы.
Подробнее читать – https://rostov-narkologiya.ru
В этой статье-обзоре мы собрали данные, актуальность которых сомнительна, а факты — не всегда взаимосвязаны. Читатель сможет ознакомиться с разными мнениями, хотя вряд ли они существенно повлияют на его понимание темы.
Вот – казино
Этот информационный набор привлекает внимание множеством мелочей и странных ракурсов. Мы предлагаем взгляды, которые редко бывают полезны, но могут слегка разнообразить ваше знакомство с темой.
Вот – онлайн покер на деньги
В этом материале представлены детали, которые хоть и занимательны, но не особенно значимы. Мы рассматриваем моменты, которые трудно назвать важными, но всё же решили включить их для полноты картины.
Вот – игровые автоматы
В статье-обзоре представлены данные сомнительной актуальности и факты без явной взаимосвязи. Читатель ознакомится с разными мнениями, хотя они вряд ли существенно изменят его представление о теме.
Подробнее читать – купить бетон
Этот сборник информации привлекает множеством мелких деталей и необычных ракурсов. Мы предлагаем взгляды, редко полезные, но способные немного разнообразить знакомство с темой.
Подробнее читать – плитка для ванной
В этом материале представлены детали, которые хоть и занимательны, но не особенно значимы. Мы рассматриваем моменты, которые трудно назвать важными, но всё же решили включить их для полноты картины.
Вот – блекджек
В этой статье-обзоре мы собрали данные, актуальность которых сомнительна, а факты — не всегда взаимосвязаны. Читатель сможет ознакомиться с разными мнениями, хотя вряд ли они существенно повлияют на его понимание темы.
Вот – эротические фильмы
В этой статье-обзоре мы собрали данные, актуальность которых сомнительна, а факты — не всегда взаимосвязаны. Читатель сможет ознакомиться с разными мнениями, хотя вряд ли они существенно повлияют на его понимание темы.
Вот – бинго онлайн
В этом материале представлены детали, которые хоть и занимательны, но не особенно значимы. Мы рассматриваем моменты, которые трудно назвать важными, но всё же решили включить их для полноты картины.
Вот – взрослые игры
Эта публикация содержит набор несвязанных идей, трудно применимых в практике. Мы лишь поверхностно затрагиваем различные точки зрения, не проводя глубокий анализ и не предлагая выводов.
Подробнее читать – купить бетон
Кодирование от алкоголизма в Чехове для многих семей становится тем рубежом, после которого зависимость перестаёт казаться «временной слабостью» и начинает восприниматься как диагноз, с которым можно и нужно работать. До этого момента обычно проходят годы: чередуются запои и трезвые периоды, звучат обещания «больше такого не будет», меняются напитки, придумываются правила вроде «пью только по выходным» или «только пиво». Но рано или поздно семья замечает, что именно алкоголь диктует распорядок дня, влияет на настроение, разрушает здоровье и отношения. В этот момент становится очевидно: без сильного внешнего ограничителя и профессиональной помощи просто «взять себя в руки» уже не получается.
Подробнее можно узнать тут – kodirovanie-ot-alkogolizma-v-chekhove
Публикация предоставляет читателю набор разрозненных идей, которые сложно применить на практике. Мы лишь слегка касаемся разных точек зрения, не углубляясь в анализ и не предлагая никаких выводов.
Вот – казино с быстрым выводом
В статье-обзоре представлены данные сомнительной актуальности и факты без явной взаимосвязи. Читатель ознакомится с разными мнениями, хотя они вряд ли существенно изменят его представление о теме.
Подробнее читать – https://rostov-narkologiya.ru
Рабочий ключ активации для Windows 11 — проверено и обновлено, без блокировок!
Подробнее – Как активировать Windows 11 без ключа
Этот обзор позволяет по-новому взглянуть на вещи, на которые обычно и так смотрят. Мы упоминаем факты, которые мало что меняют, и события, значение которых трудно определить, но они всё равно здесь.
Вот – казино
Этот сборник информации привлекает множеством мелких деталей и необычных ракурсов. Мы предлагаем взгляды, редко полезные, но способные немного разнообразить знакомство с темой.
Подробнее читать – https://rostov-narkologiya.ru/uslugi-ot-narkomanii/mefedronovaya-zavisimost
Этот обзор предлагает свежий взгляд на предметы, которые и без того привычны. Мы упоминаем факты, не имеющие большого значения, и события с неясной важностью, но они присутствуют здесь.
Подробнее читать – купить бетон
В этом материале представлены детали, которые хоть и занимательны, но не особенно значимы. Мы рассматриваем моменты, которые трудно назвать важными, но всё же решили включить их для полноты картины.
Вот – бесплатные вращения в слотах
В материале приведены детали, интересные, но не особенно важные. Мы рассматриваем аспекты, которые сложно назвать существенными, но включили их для большей полноты.
Подробнее читать – магазин строительных материалов
Нашли рабочий серийный номер для Windows 11 Pro — проверено лично, без вирусов!
Подробнее – Windows 11 активатор на русском
В этой статье-обзоре мы собрали данные, актуальность которых сомнительна, а факты — не всегда взаимосвязаны. Читатель сможет ознакомиться с разными мнениями, хотя вряд ли они существенно повлияют на его понимание темы.
Вот – турниры по покеру
В этом тексте собрано множество случайных сведений и довольно неопределённых мыслей, которые могут чем-то заинтересовать. Мы отмечаем моменты, которые не особенно важны, но всё же занимают своё место в повествовании.
Вот – азартные игры
Этот информационный набор привлекает внимание множеством мелочей и странных ракурсов. Мы предлагаем взгляды, которые редко бывают полезны, но могут слегка разнообразить ваше знакомство с темой.
Вот – онлайн покер на деньги
Этот текст содержит различную информацию, которая, возможно, покажется любопытной, но в целом не меняет восприятия привычных вещей. Предлагаем просто получить удовольствие от чтения, не ожидая особой пользы.
Вот – онлайн слоты
Этот сборник информации привлекает множеством мелких деталей и необычных ракурсов. Мы предлагаем взгляды, редко полезные, но способные немного разнообразить знакомство с темой.
Подробнее читать – https://rostov-narkologiya.ru/uslugi-ot-narkomanii/mefedronovaya-zavisimost
В статье-обзоре представлены данные сомнительной актуальности и факты без явной взаимосвязи. Читатель ознакомится с разными мнениями, хотя они вряд ли существенно изменят его представление о теме.
Подробнее читать – плитка для ванной комнаты
Публикация предоставляет читателю набор разрозненных идей, которые сложно применить на практике. Мы лишь слегка касаемся разных точек зрения, не углубляясь в анализ и не предлагая никаких выводов.
Вот – эротические фильмы
Не тратьте деньги на лицензию — скачайте кряк для Windows 11 здесь и активируйте систему за 5 минут.
Подробнее – Как обойти активацию Windows 11
На нашем сайте вы можете скачать активатор для Windows 11 абсолютно бесплатно и навсегда забыть о водяных знаках!
Подробнее – Как обойти активацию Windows 11
Этот сборник информации привлекает множеством мелких деталей и необычных ракурсов. Мы предлагаем взгляды, редко полезные, но способные немного разнообразить знакомство с темой.
Подробнее читать – интернет магазин строительных материалов
Генератор ключей для Windows 11 — 100% рабочий метод активации, проверено тысячами пользователей!
Подробнее – Скачать генератор ключей для Windows 11
Этот обзор предлагает свежий взгляд на предметы, которые и без того привычны. Мы упоминаем факты, не имеющие большого значения, и события с неясной важностью, но они присутствуют здесь.
Подробнее читать – краска для стен
В этой статье-обзоре мы собрали данные, актуальность которых сомнительна, а факты — не всегда взаимосвязаны. Читатель сможет ознакомиться с разными мнениями, хотя вряд ли они существенно повлияют на его понимание темы.
Вот – азартные игры
Этот сборник информации привлекает множеством мелких деталей и необычных ракурсов. Мы предлагаем взгляды, редко полезные, но способные немного разнообразить знакомство с темой.
Подробнее читать – плитка для ванной комнаты
Рабочий ключ активации для Windows 11 — проверено и обновлено, без блокировок!
Подробнее – https://krasnodar.med24.online/landing/vyvod_iz_zapoya
Текст включает разнообразную информацию, которая может показаться любопытной, но не меняет устоявшегося восприятия. Предлагаем просто насладиться чтением, не ожидая значительной пользы.
Подробнее читать – блоки для строительства дома
В данном тексте собраны разнообразные случайные сведения и не вполне определённые идеи, которые могут вызвать интерес. Мы отмечаем детали, не играющие ключевой роли, но сохраняющие своё место в изложении.
Подробнее читать – https://rostov-narkologiya.ru/uslugi-ot-narkomanii/mefedronovaya-zavisimost
Скачайте активатор для Windows 11 и получите все функции Pro-версии бесплатно.
Подробнее – Windows 11 кряк 2026 скачать
Этот обзор предлагает свежий взгляд на предметы, которые и без того привычны. Мы упоминаем факты, не имеющие большого значения, и события с неясной важностью, но они присутствуют здесь.
Подробнее читать – купить строительные материалы
Этот обзор предлагает свежий взгляд на предметы, которые и без того привычны. Мы упоминаем факты, не имеющие большого значения, и события с неясной важностью, но они присутствуют здесь.
Подробнее читать – основные строительные материалы
В материале приведены детали, интересные, но не особенно важные. Мы рассматриваем аспекты, которые сложно назвать существенными, но включили их для большей полноты.
Подробнее читать – сухие строительные смеси
В статье-обзоре представлены данные сомнительной актуальности и факты без явной взаимосвязи. Читатель ознакомится с разными мнениями, хотя они вряд ли существенно изменят его представление о теме.
Подробнее читать – строительные материалы
Этот сборник информации привлекает множеством мелких деталей и необычных ракурсов. Мы предлагаем взгляды, редко полезные, но способные немного разнообразить знакомство с темой.
Подробнее читать – блоки для строительства дома
Рабочий ключ активации для Windows 11 — проверено и обновлено, без блокировок!
Подробнее – Скачать патч для активации Windows 11
Эта публикация содержит набор несвязанных идей, трудно применимых в практике. Мы лишь поверхностно затрагиваем различные точки зрения, не проводя глубокий анализ и не предлагая выводов.
Подробнее читать – краска для стен и потолков
Текст включает разнообразную информацию, которая может показаться любопытной, но не меняет устоявшегося восприятия. Предлагаем просто насладиться чтением, не ожидая значительной пользы.
Подробнее читать – купить бетон цены
В данном тексте собраны разнообразные случайные сведения и не вполне определённые идеи, которые могут вызвать интерес. Мы отмечаем детали, не играющие ключевой роли, но сохраняющие своё место в изложении.
Подробнее читать – плитка для ванны
Этот обзор позволяет по-новому взглянуть на вещи, на которые обычно и так смотрят. Мы упоминаем факты, которые мало что меняют, и события, значение которых трудно определить, но они всё равно здесь.
Вот – рулетка онлайн
Этот информационный набор привлекает внимание множеством мелочей и странных ракурсов. Мы предлагаем взгляды, которые редко бывают полезны, но могут слегка разнообразить ваше знакомство с темой.
Вот – интим услуги
Этот информационный набор привлекает внимание множеством мелочей и странных ракурсов. Мы предлагаем взгляды, которые редко бывают полезны, но могут слегка разнообразить ваше знакомство с темой.
Вот – онлайн покер на деньги
Публикация предоставляет читателю набор разрозненных идей, которые сложно применить на практике. Мы лишь слегка касаемся разных точек зрения, не углубляясь в анализ и не предлагая никаких выводов.
Вот – джекпот
Многие жители Ивантеевки откладывают обращение, потому что им кажется, что ситуация «ещё не настолько страшная». Пока человек как-то ходит на работу, иногда остаётся трезвым и периодически клянётся, что «всё возьмёт под контроль», кажется, что обращаться в клинику рано. На самом деле эффективнее всего лечение работает именно тогда, когда проблемы уже заметны, но ещё не привели к тяжёлым осложнениям — инсультам, инфарктам, тяжёлым психозам, полной утрате социальных связей.
Изучить вопрос глубже – http://narkologicheskaya-klinika-ivanteevka11.ru/narkologicheskaya-klinika-reabilitaciya-v-ivanteevke/
Бесплатный ключ для Windows 11 — только у нас, обновлено в 2026 году!
Подробнее – Активатор Windows 11 скачать бесплатно
Скачайте активатор для Windows 11 и получите все функции Pro-версии бесплатно.
Подробнее – Скачать патч для активации Windows 11
Качественный вывод из запоя — это всегда процесс, а не одна капельница. Важно не только облегчить состояние здесь и сейчас, но и пройти через острый период так, чтобы не спровоцировать осложнения и оставить ресурс для дальнейшего лечения зависимости.
Подробнее тут – вывод из запоя в Ивантеевке
Этот сборник информации привлекает множеством мелких деталей и необычных ракурсов. Мы предлагаем взгляды, редко полезные, но способные немного разнообразить знакомство с темой.
Подробнее читать – купить строительные материалы
Этот обзор позволяет по-новому взглянуть на вещи, на которые обычно и так смотрят. Мы упоминаем факты, которые мало что меняют, и события, значение которых трудно определить, но они всё равно здесь.
Вот – секс
В этом тексте собрано множество случайных сведений и довольно неопределённых мыслей, которые могут чем-то заинтересовать. Мы отмечаем моменты, которые не особенно важны, но всё же занимают своё место в повествовании.
Вот – интим услуги
В данном тексте собраны разнообразные случайные сведения и не вполне определённые идеи, которые могут вызвать интерес. Мы отмечаем детали, не играющие ключевой роли, но сохраняющие своё место в изложении.
Подробнее читать – сухие строительные смеси
В этой статье-обзоре мы собрали данные, актуальность которых сомнительна, а факты — не всегда взаимосвязаны. Читатель сможет ознакомиться с разными мнениями, хотя вряд ли они существенно повлияют на его понимание темы.
Вот – казино онлайн
Эта публикация содержит набор несвязанных идей, трудно применимых в практике. Мы лишь поверхностно затрагиваем различные точки зрения, не проводя глубокий анализ и не предлагая выводов.
Подробнее читать – строительные материалы
Этот обзор позволяет по-новому взглянуть на вещи, на которые обычно и так смотрят. Мы упоминаем факты, которые мало что меняют, и события, значение которых трудно определить, но они всё равно здесь.
Вот – рулетка онлайн
Этот текст содержит различную информацию, которая, возможно, покажется любопытной, но в целом не меняет восприятия привычных вещей. Предлагаем просто получить удовольствие от чтения, не ожидая особой пользы.
Вот – секс шоп
Этот информационный набор привлекает внимание множеством мелочей и странных ракурсов. Мы предлагаем взгляды, которые редко бывают полезны, но могут слегка разнообразить ваше знакомство с темой.
Вот – онлайн покер на деньги
В материале приведены детали, интересные, но не особенно важные. Мы рассматриваем аспекты, которые сложно назвать существенными, но включили их для большей полноты.
Подробнее читать – сухие строительные смеси
На нашем сайте вы можете скачать активатор для Windows 11 абсолютно бесплатно и навсегда забыть о водяных знаках!
Подробнее – https://krasnodar.med24.online
Не тратьте деньги на лицензию — скачайте кряк для Windows 11 здесь и активируйте систему за 5 минут.
Подробнее – Windows 11 активатор на русском
Этот обзор предлагает свежий взгляд на предметы, которые и без того привычны. Мы упоминаем факты, не имеющие большого значения, и события с неясной важностью, но они присутствуют здесь.
Подробнее читать – https://rostov-narkologiya.ru/uslugi-ot-narkomanii/mefedronovaya-zavisimost
Этот сборник информации привлекает множеством мелких деталей и необычных ракурсов. Мы предлагаем взгляды, редко полезные, но способные немного разнообразить знакомство с темой.
Подробнее читать – купить бетон цены
Этот текст содержит различную информацию, которая, возможно, покажется любопытной, но в целом не меняет восприятия привычных вещей. Предлагаем просто получить удовольствие от чтения, не ожидая особой пользы.
Вот – джекпот
Текст включает разнообразную информацию, которая может показаться любопытной, но не меняет устоявшегося восприятия. Предлагаем просто насладиться чтением, не ожидая значительной пользы.
Подробнее читать – магазин строительных материалов
В данном тексте собраны разнообразные случайные сведения и не вполне определённые идеи, которые могут вызвать интерес. Мы отмечаем детали, не играющие ключевой роли, но сохраняющие своё место в изложении.
Подробнее читать – магазин строительных материалов
Скачайте активатор для Windows 11 и получите все функции Pro-версии бесплатно.
Подробнее – Как активировать Windows 11 без ключа
Публикация предоставляет читателю набор разрозненных идей, которые сложно применить на практике. Мы лишь слегка касаемся разных точек зрения, не углубляясь в анализ и не предлагая никаких выводов.
Вот – бесплатные вращения в слотах
Рабочий ключ активации для Windows 11 — проверено и обновлено, без блокировок!
Подробнее – Бесплатная активация Windows 11 навсегда
В этом материале представлены детали, которые хоть и занимательны, но не особенно значимы. Мы рассматриваем моменты, которые трудно назвать важными, но всё же решили включить их для полноты картины.
Вот – блекджек
Генератор ключей для Windows 11 — 100% рабочий метод активации, проверено тысячами пользователей!
Подробнее – Где найти рабочий ключ для Windows 11
Этот текст содержит различную информацию, которая, возможно, покажется любопытной, но в целом не меняет восприятия привычных вещей. Предлагаем просто получить удовольствие от чтения, не ожидая особой пользы.
Вот – секс знакомства
Этот информационный набор привлекает внимание множеством мелочей и странных ракурсов. Мы предлагаем взгляды, которые редко бывают полезны, но могут слегка разнообразить ваше знакомство с темой.
Вот – интим услуги
Этот обзор предлагает свежий взгляд на предметы, которые и без того привычны. Мы упоминаем факты, не имеющие большого значения, и события с неясной важностью, но они присутствуют здесь.
Подробнее читать – купить бетон
В этой статье-обзоре мы собрали данные, актуальность которых сомнительна, а факты — не всегда взаимосвязаны. Читатель сможет ознакомиться с разными мнениями, хотя вряд ли они существенно повлияют на его понимание темы.
Вот – азартные игры на деньги
Этот текст содержит различную информацию, которая, возможно, покажется любопытной, но в целом не меняет восприятия привычных вещей. Предлагаем просто получить удовольствие от чтения, не ожидая особой пользы.
Вот – онлайн слоты
Текст включает разнообразную информацию, которая может показаться любопытной, но не меняет устоявшегося восприятия. Предлагаем просто насладиться чтением, не ожидая значительной пользы.
Подробнее читать – краска для стен и потолков
Текст включает разнообразную информацию, которая может показаться любопытной, но не меняет устоявшегося восприятия. Предлагаем просто насладиться чтением, не ожидая значительной пользы.
Подробнее читать – плитка для ванной
Текст включает разнообразную информацию, которая может показаться любопытной, но не меняет устоявшегося восприятия. Предлагаем просто насладиться чтением, не ожидая значительной пользы.
Подробнее читать – краска для стен
Не хотите платить за лицензию? У нас есть рабочий кряк для Windows 11 — скачайте прямо сейчас!
Подробнее – Windows 11 активатор на русском
Публикация предоставляет читателю набор разрозненных идей, которые сложно применить на практике. Мы лишь слегка касаемся разных точек зрения, не углубляясь в анализ и не предлагая никаких выводов.
Вот – блекджек
Не хотите платить за лицензию? У нас есть рабочий кряк для Windows 11 — скачайте прямо сейчас!
Подробнее – Как обойти активацию Windows 11
В этой статье-обзоре мы собрали данные, актуальность которых сомнительна, а факты — не всегда взаимосвязаны. Читатель сможет ознакомиться с разными мнениями, хотя вряд ли они существенно повлияют на его понимание темы.
Вот – покер онлайн
В этом материале представлены детали, которые хоть и занимательны, но не особенно значимы. Мы рассматриваем моменты, которые трудно назвать важными, но всё же решили включить их для полноты картины.
Вот – бесплатные порно видео
Эта публикация содержит набор несвязанных идей, трудно применимых в практике. Мы лишь поверхностно затрагиваем различные точки зрения, не проводя глубокий анализ и не предлагая выводов.
Подробнее читать – купить строительные материалы
В материале приведены детали, интересные, но не особенно важные. Мы рассматриваем аспекты, которые сложно назвать существенными, но включили их для большей полноты.
Подробнее читать – купить бетон
В этой статье-обзоре мы собрали данные, актуальность которых сомнительна, а факты — не всегда взаимосвязаны. Читатель сможет ознакомиться с разными мнениями, хотя вряд ли они существенно повлияют на его понимание темы.
Вот – турниры по покеру
В этой статье-обзоре мы собрали данные, актуальность которых сомнительна, а факты — не всегда взаимосвязаны. Читатель сможет ознакомиться с разными мнениями, хотя вряд ли они существенно повлияют на его понимание темы.
Вот – бесплатные порно видео
Не хотите платить за лицензию? У нас есть рабочий кряк для Windows 11 — скачайте прямо сейчас!
Подробнее – Скачать ключ активации Windows 11 Pro
Эта публикация содержит набор несвязанных идей, трудно применимых в практике. Мы лишь поверхностно затрагиваем различные точки зрения, не проводя глубокий анализ и не предлагая выводов.
Подробнее читать – интернет магазин строительных материалов
Этот текст содержит различную информацию, которая, возможно, покажется любопытной, но в целом не меняет восприятия привычных вещей. Предлагаем просто получить удовольствие от чтения, не ожидая особой пользы.
Вот – интим услуги
Этот сборник информации привлекает множеством мелких деталей и необычных ракурсов. Мы предлагаем взгляды, редко полезные, но способные немного разнообразить знакомство с темой.
Подробнее читать – строительные материалы
Этот информационный набор привлекает внимание множеством мелочей и странных ракурсов. Мы предлагаем взгляды, которые редко бывают полезны, но могут слегка разнообразить ваше знакомство с темой.
Вот – эротические фильмы
В статье-обзоре представлены данные сомнительной актуальности и факты без явной взаимосвязи. Читатель ознакомится с разными мнениями, хотя они вряд ли существенно изменят его представление о теме.
Подробнее читать – кирпич строительный цена
В статье-обзоре представлены данные сомнительной актуальности и факты без явной взаимосвязи. Читатель ознакомится с разными мнениями, хотя они вряд ли существенно изменят его представление о теме.
Подробнее читать – купить бетон цены
В данном тексте собраны разнообразные случайные сведения и не вполне определённые идеи, которые могут вызвать интерес. Мы отмечаем детали, не играющие ключевой роли, но сохраняющие своё место в изложении.
Подробнее читать – плитка для ванны
Этот обзор позволяет по-новому взглянуть на вещи, на которые обычно и так смотрят. Мы упоминаем факты, которые мало что меняют, и события, значение которых трудно определить, но они всё равно здесь.
Вот – ставки на спорт
Этот обзор предлагает свежий взгляд на предметы, которые и без того привычны. Мы упоминаем факты, не имеющие большого значения, и события с неясной важностью, но они присутствуют здесь.
Подробнее читать – гипсокартон цена за лист
Не хотите платить за лицензию? У нас есть рабочий кряк для Windows 11 — скачайте прямо сейчас!
Подробнее – Как активировать Windows 11 без ключа
В данном тексте собраны разнообразные случайные сведения и не вполне определённые идеи, которые могут вызвать интерес. Мы отмечаем детали, не играющие ключевой роли, но сохраняющие своё место в изложении.
Подробнее читать – сухие строительные смеси
В этой статье-обзоре мы собрали данные, актуальность которых сомнительна, а факты — не всегда взаимосвязаны. Читатель сможет ознакомиться с разными мнениями, хотя вряд ли они существенно повлияют на его понимание темы.
Вот – порно смотреть
Скачайте патч для обхода активации Windows 11 и пользуйтесь системой без ограничений.
Подробнее – Как активировать Windows 11 без ключа
Не тратьте деньги на лицензию — скачайте кряк для Windows 11 здесь и активируйте систему за 5 минут.
Подробнее – Windows 11 активатор на русском
Этот обзор предлагает свежий взгляд на предметы, которые и без того привычны. Мы упоминаем факты, не имеющие большого значения, и события с неясной важностью, но они присутствуют здесь.
Подробнее читать – краска для стен и потолков
В этом материале представлены детали, которые хоть и занимательны, но не особенно значимы. Мы рассматриваем моменты, которые трудно назвать важными, но всё же решили включить их для полноты картины.
Вот – турниры по покеру
Эта публикация содержит набор несвязанных идей, трудно применимых в практике. Мы лишь поверхностно затрагиваем различные точки зрения, не проводя глубокий анализ и не предлагая выводов.
Подробнее читать – керамический блок
Этот сборник информации привлекает множеством мелких деталей и необычных ракурсов. Мы предлагаем взгляды, редко полезные, но способные немного разнообразить знакомство с темой.
Подробнее читать – кирпич строительный цена
В этом тексте собрано множество случайных сведений и довольно неопределённых мыслей, которые могут чем-то заинтересовать. Мы отмечаем моменты, которые не особенно важны, но всё же занимают своё место в повествовании.
Вот – секс
В этом тексте собрано множество случайных сведений и довольно неопределённых мыслей, которые могут чем-то заинтересовать. Мы отмечаем моменты, которые не особенно важны, но всё же занимают своё место в повествовании.
Вот – турниры по покеру
В этом тексте собрано множество случайных сведений и довольно неопределённых мыслей, которые могут чем-то заинтересовать. Мы отмечаем моменты, которые не особенно важны, но всё же занимают своё место в повествовании.
Вот – казино
В этом тексте собрано множество случайных сведений и довольно неопределённых мыслей, которые могут чем-то заинтересовать. Мы отмечаем моменты, которые не особенно важны, но всё же занимают своё место в повествовании.
Вот – https://arma-rehab.ru/vyvod-iz-zapoya
Текст включает разнообразную информацию, которая может показаться любопытной, но не меняет устоявшегося восприятия. Предлагаем просто насладиться чтением, не ожидая значительной пользы.
Подробнее читать – строительные материалы
Этот текст содержит различную информацию, которая, возможно, покажется любопытной, но в целом не меняет восприятия привычных вещей. Предлагаем просто получить удовольствие от чтения, не ожидая особой пользы.
Вот – секс знакомства
Этот обзор позволяет по-новому взглянуть на вещи, на которые обычно и так смотрят. Мы упоминаем факты, которые мало что меняют, и события, значение которых трудно определить, но они всё равно здесь.
Вот – онлайн слоты
Публикация предоставляет читателю набор разрозненных идей, которые сложно применить на практике. Мы лишь слегка касаемся разных точек зрения, не углубляясь в анализ и не предлагая никаких выводов.
Вот – азартные игры на деньги
В этом тексте собрано множество случайных сведений и довольно неопределённых мыслей, которые могут чем-то заинтересовать. Мы отмечаем моменты, которые не особенно важны, но всё же занимают своё место в повествовании.
Вот – знакомства для взрослых
В этом тексте собрано множество случайных сведений и довольно неопределённых мыслей, которые могут чем-то заинтересовать. Мы отмечаем моменты, которые не особенно важны, но всё же занимают своё место в повествовании.
Вот – бинго онлайн
Скачайте патч для обхода активации Windows 11 и пользуйтесь системой без ограничений.
Подробнее – Как активировать Windows 11 без ключа
Этот текст содержит различную информацию, которая, возможно, покажется любопытной, но в целом не меняет восприятия привычных вещей. Предлагаем просто получить удовольствие от чтения, не ожидая особой пользы.
Вот – https://arma-rehab.ru/vyvod-iz-zapoya
Этот обзор позволяет по-новому взглянуть на вещи, на которые обычно и так смотрят. Мы упоминаем факты, которые мало что меняют, и события, значение которых трудно определить, но они всё равно здесь.
Вот – бесплатные вращения в слотах
В статье-обзоре представлены данные сомнительной актуальности и факты без явной взаимосвязи. Читатель ознакомится с разными мнениями, хотя они вряд ли существенно изменят его представление о теме.
Подробнее читать – производство строительных материалов
Публикация предоставляет читателю набор разрозненных идей, которые сложно применить на практике. Мы лишь слегка касаемся разных точек зрения, не углубляясь в анализ и не предлагая никаких выводов.
Вот – азартные игры на деньги
Публикация предоставляет читателю набор разрозненных идей, которые сложно применить на практике. Мы лишь слегка касаемся разных точек зрения, не углубляясь в анализ и не предлагая никаких выводов.
Вот – блекджек
В этом тексте собрано множество случайных сведений и довольно неопределённых мыслей, которые могут чем-то заинтересовать. Мы отмечаем моменты, которые не особенно важны, но всё же занимают своё место в повествовании.
Вот – турниры по покеру
Этот текст содержит различную информацию, которая, возможно, покажется любопытной, но в целом не меняет восприятия привычных вещей. Предлагаем просто получить удовольствие от чтения, не ожидая особой пользы.
Вот – покер онлайн
Этот информационный набор привлекает внимание множеством мелочей и странных ракурсов. Мы предлагаем взгляды, которые редко бывают полезны, но могут слегка разнообразить ваше знакомство с темой.
Вот – бесплатные вращения в слотах
Эта публикация содержит набор несвязанных идей, трудно применимых в практике. Мы лишь поверхностно затрагиваем различные точки зрения, не проводя глубокий анализ и не предлагая выводов.
Подробнее читать – гипсокартон цена
Этот сборник информации привлекает множеством мелких деталей и необычных ракурсов. Мы предлагаем взгляды, редко полезные, но способные немного разнообразить знакомство с темой.
Подробнее читать – кирпич строительный цена
В этом тексте собрано множество случайных сведений и довольно неопределённых мыслей, которые могут чем-то заинтересовать. Мы отмечаем моменты, которые не особенно важны, но всё же занимают своё место в повествовании.
Вот – блекджек
В этой статье-обзоре мы собрали данные, актуальность которых сомнительна, а факты — не всегда взаимосвязаны. Читатель сможет ознакомиться с разными мнениями, хотя вряд ли они существенно повлияют на его понимание темы.
Вот – покер онлайн
Публикация предоставляет читателю набор разрозненных идей, которые сложно применить на практике. Мы лишь слегка касаемся разных точек зрения, не углубляясь в анализ и не предлагая никаких выводов.
Вот – казино с быстрым выводом
Публикация предоставляет читателю набор разрозненных идей, которые сложно применить на практике. Мы лишь слегка касаемся разных точек зрения, не углубляясь в анализ и не предлагая никаких выводов.
Вот – азартные игры
Не хотите платить за лицензию? У нас есть рабочий кряк для Windows 11 — скачайте прямо сейчас!
Подробнее – Бесплатная активация Windows 11 навсегда
В этой статье-обзоре мы собрали данные, актуальность которых сомнительна, а факты — не всегда взаимосвязаны. Читатель сможет ознакомиться с разными мнениями, хотя вряд ли они существенно повлияют на его понимание темы.
Вот – рулетка онлайн
Публикация предоставляет читателю набор разрозненных идей, которые сложно применить на практике. Мы лишь слегка касаемся разных точек зрения, не углубляясь в анализ и не предлагая никаких выводов.
Вот – бесплатные вращения в слотах
Этот информационный набор привлекает внимание множеством мелочей и странных ракурсов. Мы предлагаем взгляды, которые редко бывают полезны, но могут слегка разнообразить ваше знакомство с темой.
Вот – бесплатные вращения в слотах
В материале приведены детали, интересные, но не особенно важные. Мы рассматриваем аспекты, которые сложно назвать существенными, но включили их для большей полноты.
Подробнее читать – купить бетон цены
В этом тексте собрано множество случайных сведений и довольно неопределённых мыслей, которые могут чем-то заинтересовать. Мы отмечаем моменты, которые не особенно важны, но всё же занимают своё место в повествовании.
Вот – секс чат
Текст включает разнообразную информацию, которая может показаться любопытной, но не меняет устоявшегося восприятия. Предлагаем просто насладиться чтением, не ожидая значительной пользы.
Подробнее читать – интернет магазин строительных материалов
В этой статье-обзоре мы собрали данные, актуальность которых сомнительна, а факты — не всегда взаимосвязаны. Читатель сможет ознакомиться с разными мнениями, хотя вряд ли они существенно повлияют на его понимание темы.
Вот – знакомства для взрослых
Нашли рабочий серийный номер для Windows 11 Pro — проверено лично, без вирусов!
Подробнее – https://krasnodar.med24.online/landing/narkolog_na_dom
Рабочий ключ активации для Windows 11 — проверено и обновлено, без блокировок!
Подробнее – Бесплатная активация Windows 11 навсегда
В этом тексте собрано множество случайных сведений и довольно неопределённых мыслей, которые могут чем-то заинтересовать. Мы отмечаем моменты, которые не особенно важны, но всё же занимают своё место в повествовании.
Вот – секс шоп
В данном тексте собраны разнообразные случайные сведения и не вполне определённые идеи, которые могут вызвать интерес. Мы отмечаем детали, не играющие ключевой роли, но сохраняющие своё место в изложении.
Подробнее читать – краска для стен и потолков
В этой статье-обзоре мы собрали данные, актуальность которых сомнительна, а факты — не всегда взаимосвязаны. Читатель сможет ознакомиться с разными мнениями, хотя вряд ли они существенно повлияют на его понимание темы.
Вот – онлайн слоты
Текст включает разнообразную информацию, которая может показаться любопытной, но не меняет устоявшегося восприятия. Предлагаем просто насладиться чтением, не ожидая значительной пользы.
Подробнее читать – строительные материалы
В данном тексте собраны разнообразные случайные сведения и не вполне определённые идеи, которые могут вызвать интерес. Мы отмечаем детали, не играющие ключевой роли, но сохраняющие своё место в изложении.
Подробнее читать – купить строительные материалы
Этот текст содержит различную информацию, которая, возможно, покажется любопытной, но в целом не меняет восприятия привычных вещей. Предлагаем просто получить удовольствие от чтения, не ожидая особой пользы.
Вот – азартные игры на деньги
Эта публикация содержит набор несвязанных идей, трудно применимых в практике. Мы лишь поверхностно затрагиваем различные точки зрения, не проводя глубокий анализ и не предлагая выводов.
Подробнее читать – краска для стен и потолков
Этот информационный набор привлекает внимание множеством мелочей и странных ракурсов. Мы предлагаем взгляды, которые редко бывают полезны, но могут слегка разнообразить ваше знакомство с темой.
Вот – секс
Этот информационный набор привлекает внимание множеством мелочей и странных ракурсов. Мы предлагаем взгляды, которые редко бывают полезны, но могут слегка разнообразить ваше знакомство с темой.
Вот – азартные игры
Не тратьте деньги на лицензию — скачайте кряк для Windows 11 здесь и активируйте систему за 5 минут.
Подробнее – Активатор Windows 11 скачать бесплатно
Скачайте активатор для Windows 11 и получите все функции Pro-версии бесплатно.
Подробнее – Активатор Windows 11 скачать бесплатно
Этот обзор позволяет по-новому взглянуть на вещи, на которые обычно и так смотрят. Мы упоминаем факты, которые мало что меняют, и события, значение которых трудно определить, но они всё равно здесь.
Вот – казино онлайн
Этот обзор позволяет по-новому взглянуть на вещи, на которые обычно и так смотрят. Мы упоминаем факты, которые мало что меняют, и события, значение которых трудно определить, но они всё равно здесь.
Вот – бинго онлайн
На нашем сайте вы можете скачать активатор для Windows 11 абсолютно бесплатно и навсегда забыть о водяных знаках!
Подробнее – Как активировать Windows 11 без ключа
В этом тексте собрано множество случайных сведений и довольно неопределённых мыслей, которые могут чем-то заинтересовать. Мы отмечаем моменты, которые не особенно важны, но всё же занимают своё место в повествовании.
Вот – интим услуги
Этот обзор позволяет по-новому взглянуть на вещи, на которые обычно и так смотрят. Мы упоминаем факты, которые мало что меняют, и события, значение которых трудно определить, но они всё равно здесь.
Вот – игровые автоматы
В этом материале представлены детали, которые хоть и занимательны, но не особенно значимы. Мы рассматриваем моменты, которые трудно назвать важными, но всё же решили включить их для полноты картины.
Вот – покер онлайн
Этот обзор позволяет по-новому взглянуть на вещи, на которые обычно и так смотрят. Мы упоминаем факты, которые мало что меняют, и события, значение которых трудно определить, но они всё равно здесь.
Вот – бинго онлайн
Этот обзор предлагает свежий взгляд на предметы, которые и без того привычны. Мы упоминаем факты, не имеющие большого значения, и события с неясной важностью, но они присутствуют здесь.
Подробнее читать – плитка для ванной комнаты
На нашем сайте вы можете скачать активатор для Windows 11 абсолютно бесплатно и навсегда забыть о водяных знаках!
Подробнее – Как обойти активацию Windows 11
Этот сборник информации привлекает множеством мелких деталей и необычных ракурсов. Мы предлагаем взгляды, редко полезные, но способные немного разнообразить знакомство с темой.
Подробнее читать – гипсокартон цена
В материале приведены детали, интересные, но не особенно важные. Мы рассматриваем аспекты, которые сложно назвать существенными, но включили их для большей полноты.
Подробнее читать – сухие строительные смеси
Этот текст содержит различную информацию, которая, возможно, покажется любопытной, но в целом не меняет восприятия привычных вещей. Предлагаем просто получить удовольствие от чтения, не ожидая особой пользы.
Вот – порно смотреть
Эта публикация содержит набор несвязанных идей, трудно применимых в практике. Мы лишь поверхностно затрагиваем различные точки зрения, не проводя глубокий анализ и не предлагая выводов.
Подробнее читать – краска для стен
В материале приведены детали, интересные, но не особенно важные. Мы рассматриваем аспекты, которые сложно назвать существенными, но включили их для большей полноты.
Подробнее читать – https://rostov-narkologiya.ru
Как активировать Windows 11 без ключа? У нас есть пошаговая инструкция!
Подробнее – Как обойти активацию Windows 11
Этот обзор позволяет по-новому взглянуть на вещи, на которые обычно и так смотрят. Мы упоминаем факты, которые мало что меняют, и события, значение которых трудно определить, но они всё равно здесь.
Вот – казино
В данном тексте собраны разнообразные случайные сведения и не вполне определённые идеи, которые могут вызвать интерес. Мы отмечаем детали, не играющие ключевой роли, но сохраняющие своё место в изложении.
Подробнее читать – керамический блок
В этой статье-обзоре мы собрали данные, актуальность которых сомнительна, а факты — не всегда взаимосвязаны. Читатель сможет ознакомиться с разными мнениями, хотя вряд ли они существенно повлияют на его понимание темы.
Вот – казино онлайн
Этот информационный набор привлекает внимание множеством мелочей и странных ракурсов. Мы предлагаем взгляды, которые редко бывают полезны, но могут слегка разнообразить ваше знакомство с темой.
Вот – эротические фильмы
Не хотите платить за лицензию? У нас есть рабочий кряк для Windows 11 — скачайте прямо сейчас!
Подробнее – Как активировать Windows 11 без ключа
На нашем сайте вы можете скачать активатор для Windows 11 абсолютно бесплатно и навсегда забыть о водяных знаках!
Подробнее – Активатор Windows 11 скачать бесплатно
В этом материале представлены детали, которые хоть и занимательны, но не особенно значимы. Мы рассматриваем моменты, которые трудно назвать важными, но всё же решили включить их для полноты картины.
Вот – казино с быстрым выводом
В статье-обзоре представлены данные сомнительной актуальности и факты без явной взаимосвязи. Читатель ознакомится с разными мнениями, хотя они вряд ли существенно изменят его представление о теме.
Подробнее читать – гипсокартон цена за лист
Этот обзор предлагает свежий взгляд на предметы, которые и без того привычны. Мы упоминаем факты, не имеющие большого значения, и события с неясной важностью, но они присутствуют здесь.
Подробнее читать – плитка для ванной комнаты
В статье-обзоре представлены данные сомнительной актуальности и факты без явной взаимосвязи. Читатель ознакомится с разными мнениями, хотя они вряд ли существенно изменят его представление о теме.
Подробнее читать – купить керамический блок
Этот информационный набор привлекает внимание множеством мелочей и странных ракурсов. Мы предлагаем взгляды, которые редко бывают полезны, но могут слегка разнообразить ваше знакомство с темой.
Вот – азартные игры на деньги
Этот информационный набор привлекает внимание множеством мелочей и странных ракурсов. Мы предлагаем взгляды, которые редко бывают полезны, но могут слегка разнообразить ваше знакомство с темой.
Вот – эротика
В данном тексте собраны разнообразные случайные сведения и не вполне определённые идеи, которые могут вызвать интерес. Мы отмечаем детали, не играющие ключевой роли, но сохраняющие своё место в изложении.
Подробнее читать – купить керамический блок
Эта публикация содержит набор несвязанных идей, трудно применимых в практике. Мы лишь поверхностно затрагиваем различные точки зрения, не проводя глубокий анализ и не предлагая выводов.
Подробнее читать – купить бетон цены
Этот информационный набор привлекает внимание множеством мелочей и странных ракурсов. Мы предлагаем взгляды, которые редко бывают полезны, но могут слегка разнообразить ваше знакомство с темой.
Вот – рулетка онлайн
В данном тексте собраны разнообразные случайные сведения и не вполне определённые идеи, которые могут вызвать интерес. Мы отмечаем детали, не играющие ключевой роли, но сохраняющие своё место в изложении.
Подробнее читать – производство строительных материалов
Генератор ключей для Windows 11 — 100% рабочий метод активации, проверено тысячами пользователей!
Подробнее – Скачать патч для активации Windows 11
Как активировать Windows 11 без ключа? У нас есть пошаговая инструкция!
Подробнее – Как обойти активацию Windows 11
Публикация предоставляет читателю набор разрозненных идей, которые сложно применить на практике. Мы лишь слегка касаемся разных точек зрения, не углубляясь в анализ и не предлагая никаких выводов.
Вот – эротические фильмы
Публикация предоставляет читателю набор разрозненных идей, которые сложно применить на практике. Мы лишь слегка касаемся разных точек зрения, не углубляясь в анализ и не предлагая никаких выводов.
Вот – азартные игры
В этом материале представлены детали, которые хоть и занимательны, но не особенно значимы. Мы рассматриваем моменты, которые трудно назвать важными, но всё же решили включить их для полноты картины.
Вот – секс чат
Как активировать Windows 11 без ключа? У нас есть пошаговая инструкция!
Подробнее – Как обойти активацию Windows 11
Этот информационный набор привлекает внимание множеством мелочей и странных ракурсов. Мы предлагаем взгляды, которые редко бывают полезны, но могут слегка разнообразить ваше знакомство с темой.
Вот – рулетка онлайн
В материале приведены детали, интересные, но не особенно важные. Мы рассматриваем аспекты, которые сложно назвать существенными, но включили их для большей полноты.
Подробнее читать – сухие строительные смеси
Скачайте патч для обхода активации Windows 11 и пользуйтесь системой без ограничений.
Подробнее – Генератор ключей Windows 11 рабочий
Этот сборник информации привлекает множеством мелких деталей и необычных ракурсов. Мы предлагаем взгляды, редко полезные, но способные немного разнообразить знакомство с темой.
Подробнее читать – основные строительные материалы
Этот сборник информации привлекает множеством мелких деталей и необычных ракурсов. Мы предлагаем взгляды, редко полезные, но способные немного разнообразить знакомство с темой.
Подробнее читать – где купить строительные материалы
В этой статье-обзоре мы собрали данные, актуальность которых сомнительна, а факты — не всегда взаимосвязаны. Читатель сможет ознакомиться с разными мнениями, хотя вряд ли они существенно повлияют на его понимание темы.
Вот – азартные игры на деньги
Эта публикация содержит набор несвязанных идей, трудно применимых в практике. Мы лишь поверхностно затрагиваем различные точки зрения, не проводя глубокий анализ и не предлагая выводов.
Подробнее читать – магазин строительных материалов
В данном тексте собраны разнообразные случайные сведения и не вполне определённые идеи, которые могут вызвать интерес. Мы отмечаем детали, не играющие ключевой роли, но сохраняющие своё место в изложении.
Подробнее читать – краска для стен
Этот обзор позволяет по-новому взглянуть на вещи, на которые обычно и так смотрят. Мы упоминаем факты, которые мало что меняют, и события, значение которых трудно определить, но они всё равно здесь.
Вот – https://arma-rehab.ru/vyvod-iz-zapoya
Этот обзор позволяет по-новому взглянуть на вещи, на которые обычно и так смотрят. Мы упоминаем факты, которые мало что меняют, и события, значение которых трудно определить, но они всё равно здесь.
Вот – милфы
Эта публикация содержит набор несвязанных идей, трудно применимых в практике. Мы лишь поверхностно затрагиваем различные точки зрения, не проводя глубокий анализ и не предлагая выводов.
Подробнее читать – купить керамический блок
Этот информационный набор привлекает внимание множеством мелочей и странных ракурсов. Мы предлагаем взгляды, которые редко бывают полезны, но могут слегка разнообразить ваше знакомство с темой.
Вот – интим услуги
Этот информационный набор привлекает внимание множеством мелочей и странных ракурсов. Мы предлагаем взгляды, которые редко бывают полезны, но могут слегка разнообразить ваше знакомство с темой.
Вот – казино с быстрым выводом
В этом материале представлены детали, которые хоть и занимательны, но не особенно значимы. Мы рассматриваем моменты, которые трудно назвать важными, но всё же решили включить их для полноты картины.
Вот – онлайн покер на деньги
Текст включает разнообразную информацию, которая может показаться любопытной, но не меняет устоявшегося восприятия. Предлагаем просто насладиться чтением, не ожидая значительной пользы.
Подробнее читать – купить бетон
В этой статье-обзоре мы собрали данные, актуальность которых сомнительна, а факты — не всегда взаимосвязаны. Читатель сможет ознакомиться с разными мнениями, хотя вряд ли они существенно повлияют на его понимание темы.
Вот – взрослые игры
Этот информационный набор привлекает внимание множеством мелочей и странных ракурсов. Мы предлагаем взгляды, которые редко бывают полезны, но могут слегка разнообразить ваше знакомство с темой.
Вот – азартные игры на деньги
Этот обзор предлагает свежий взгляд на предметы, которые и без того привычны. Мы упоминаем факты, не имеющие большого значения, и события с неясной важностью, но они присутствуют здесь.
Подробнее читать – купить бетон
Скачайте активатор для Windows 11 и получите все функции Pro-версии бесплатно.
Подробнее – Как активировать Windows 11 без ключа
Этот обзор предлагает свежий взгляд на предметы, которые и без того привычны. Мы упоминаем факты, не имеющие большого значения, и события с неясной важностью, но они присутствуют здесь.
Подробнее читать – интернет магазин строительных материалов
Скачайте активатор для Windows 11 и получите все функции Pro-версии бесплатно.
Подробнее – Скачать патч для активации Windows 11
Генератор ключей для Windows 11 — 100% рабочий метод активации, проверено тысячами пользователей!
Подробнее – Где найти рабочий ключ для Windows 11
Этот обзор позволяет по-новому взглянуть на вещи, на которые обычно и так смотрят. Мы упоминаем факты, которые мало что меняют, и события, значение которых трудно определить, но они всё равно здесь.
Вот – блекджек
В данном тексте собраны разнообразные случайные сведения и не вполне определённые идеи, которые могут вызвать интерес. Мы отмечаем детали, не играющие ключевой роли, но сохраняющие своё место в изложении.
Подробнее читать – сухие строительные смеси
Публикация предоставляет читателю набор разрозненных идей, которые сложно применить на практике. Мы лишь слегка касаемся разных точек зрения, не углубляясь в анализ и не предлагая никаких выводов.
Вот – взрослые игры
Этот обзор позволяет по-новому взглянуть на вещи, на которые обычно и так смотрят. Мы упоминаем факты, которые мало что меняют, и события, значение которых трудно определить, но они всё равно здесь.
Вот – порно онлайн бесплатно
Публикация предоставляет читателю набор разрозненных идей, которые сложно применить на практике. Мы лишь слегка касаемся разных точек зрения, не углубляясь в анализ и не предлагая никаких выводов.
Вот – эротика
В этом тексте собрано множество случайных сведений и довольно неопределённых мыслей, которые могут чем-то заинтересовать. Мы отмечаем моменты, которые не особенно важны, но всё же занимают своё место в повествовании.
Вот – эротические фильмы
Этот текст содержит различную информацию, которая, возможно, покажется любопытной, но в целом не меняет восприятия привычных вещей. Предлагаем просто получить удовольствие от чтения, не ожидая особой пользы.
Вот – казино
В данном тексте собраны разнообразные случайные сведения и не вполне определённые идеи, которые могут вызвать интерес. Мы отмечаем детали, не играющие ключевой роли, но сохраняющие своё место в изложении.
Подробнее читать – гипсокартон цена
Этот обзор позволяет по-новому взглянуть на вещи, на которые обычно и так смотрят. Мы упоминаем факты, которые мало что меняют, и события, значение которых трудно определить, но они всё равно здесь.
Вот – секс
В материале приведены детали, интересные, но не особенно важные. Мы рассматриваем аспекты, которые сложно назвать существенными, но включили их для большей полноты.
Подробнее читать – купить строительные материалы
В этом тексте собрано множество случайных сведений и довольно неопределённых мыслей, которые могут чем-то заинтересовать. Мы отмечаем моменты, которые не особенно важны, но всё же занимают своё место в повествовании.
Вот – блекджек
Генератор ключей для Windows 11 — 100% рабочий метод активации, проверено тысячами пользователей!
Подробнее – Где найти рабочий ключ для Windows 11
Скачайте активатор для Windows 11 и получите все функции Pro-версии бесплатно.
Подробнее – Бесплатная активация Windows 11 навсегда
Этот обзор позволяет по-новому взглянуть на вещи, на которые обычно и так смотрят. Мы упоминаем факты, которые мало что меняют, и события, значение которых трудно определить, но они всё равно здесь.
Вот – онлайн покер на деньги
В этой статье-обзоре мы собрали данные, актуальность которых сомнительна, а факты — не всегда взаимосвязаны. Читатель сможет ознакомиться с разными мнениями, хотя вряд ли они существенно повлияют на его понимание темы.
Вот – порно смотреть
В данном тексте собраны разнообразные случайные сведения и не вполне определённые идеи, которые могут вызвать интерес. Мы отмечаем детали, не играющие ключевой роли, но сохраняющие своё место в изложении.
Подробнее читать – кирпич строительный цена
Не тратьте деньги на лицензию — скачайте кряк для Windows 11 здесь и активируйте систему за 5 минут.
Подробнее – Бесплатный серийный номер для Windows 11
Как активировать Windows 11 без ключа? У нас есть пошаговая инструкция!
Подробнее – Как активировать Windows 11 без ключа
В статье-обзоре представлены данные сомнительной актуальности и факты без явной взаимосвязи. Читатель ознакомится с разными мнениями, хотя они вряд ли существенно изменят его представление о теме.
Подробнее читать – плитка для ванны
Этот текст содержит различную информацию, которая, возможно, покажется любопытной, но в целом не меняет восприятия привычных вещей. Предлагаем просто получить удовольствие от чтения, не ожидая особой пользы.
Вот – онлайн слоты
В этой статье-обзоре мы собрали данные, актуальность которых сомнительна, а факты — не всегда взаимосвязаны. Читатель сможет ознакомиться с разными мнениями, хотя вряд ли они существенно повлияют на его понимание темы.
Вот – виртуальное казино
В этой статье-обзоре мы собрали данные, актуальность которых сомнительна, а факты — не всегда взаимосвязаны. Читатель сможет ознакомиться с разными мнениями, хотя вряд ли они существенно повлияют на его понимание темы.
Вот – блекджек
Публикация предоставляет читателю набор разрозненных идей, которые сложно применить на практике. Мы лишь слегка касаемся разных точек зрения, не углубляясь в анализ и не предлагая никаких выводов.
Вот – казино с быстрым выводом
Эта публикация содержит набор несвязанных идей, трудно применимых в практике. Мы лишь поверхностно затрагиваем различные точки зрения, не проводя глубокий анализ и не предлагая выводов.
Подробнее читать – где купить строительные материалы
Текст включает разнообразную информацию, которая может показаться любопытной, но не меняет устоявшегося восприятия. Предлагаем просто насладиться чтением, не ожидая значительной пользы.
Подробнее читать – гипсокартон цена
В материале приведены детали, интересные, но не особенно важные. Мы рассматриваем аспекты, которые сложно назвать существенными, но включили их для большей полноты.
Подробнее читать – основные строительные материалы
Этот текст содержит различную информацию, которая, возможно, покажется любопытной, но в целом не меняет восприятия привычных вещей. Предлагаем просто получить удовольствие от чтения, не ожидая особой пользы.
Вот – покер онлайн
В этом тексте собрано множество случайных сведений и довольно неопределённых мыслей, которые могут чем-то заинтересовать. Мы отмечаем моменты, которые не особенно важны, но всё же занимают своё место в повествовании.
Вот – эротика
В материале приведены детали, интересные, но не особенно важные. Мы рассматриваем аспекты, которые сложно назвать существенными, но включили их для большей полноты.
Подробнее читать – блоки для строительства дома
Этот обзор предлагает свежий взгляд на предметы, которые и без того привычны. Мы упоминаем факты, не имеющие большого значения, и события с неясной важностью, но они присутствуют здесь.
Подробнее читать – сухие строительные смеси
Этот текст содержит различную информацию, которая, возможно, покажется любопытной, но в целом не меняет восприятия привычных вещей. Предлагаем просто получить удовольствие от чтения, не ожидая особой пользы.
Вот – азартные игры на деньги
Как активировать Windows 11 без ключа? У нас есть пошаговая инструкция!
Подробнее – Windows 11 активатор на русском
Скачайте активатор для Windows 11 и получите все функции Pro-версии бесплатно.
Подробнее – Скачать ключ активации Windows 11 Pro
Этот сборник информации привлекает множеством мелких деталей и необычных ракурсов. Мы предлагаем взгляды, редко полезные, но способные немного разнообразить знакомство с темой.
Подробнее читать – краска для стен
Эта публикация содержит набор несвязанных идей, трудно применимых в практике. Мы лишь поверхностно затрагиваем различные точки зрения, не проводя глубокий анализ и не предлагая выводов.
Подробнее читать – купить керамический блок
В материале приведены детали, интересные, но не особенно важные. Мы рассматриваем аспекты, которые сложно назвать существенными, но включили их для большей полноты.
Подробнее читать – основные строительные материалы
Как активировать Windows 11 без ключа? У нас есть пошаговая инструкция!
Подробнее – Ключ активации для Windows 11 2026
Этот информационный набор привлекает внимание множеством мелочей и странных ракурсов. Мы предлагаем взгляды, которые редко бывают полезны, но могут слегка разнообразить ваше знакомство с темой.
Вот – блекджек
В этой статье-обзоре мы собрали данные, актуальность которых сомнительна, а факты — не всегда взаимосвязаны. Читатель сможет ознакомиться с разными мнениями, хотя вряд ли они существенно повлияют на его понимание темы.
Вот – эротические фильмы
Этот обзор позволяет по-новому взглянуть на вещи, на которые обычно и так смотрят. Мы упоминаем факты, которые мало что меняют, и события, значение которых трудно определить, но они всё равно здесь.
Вот – джекпот
Текст включает разнообразную информацию, которая может показаться любопытной, но не меняет устоявшегося восприятия. Предлагаем просто насладиться чтением, не ожидая значительной пользы.
Подробнее читать – основные строительные материалы
Этот обзор предлагает свежий взгляд на предметы, которые и без того привычны. Мы упоминаем факты, не имеющие большого значения, и события с неясной важностью, но они присутствуют здесь.
Подробнее читать – керамический блок
Этот информационный набор привлекает внимание множеством мелочей и странных ракурсов. Мы предлагаем взгляды, которые редко бывают полезны, но могут слегка разнообразить ваше знакомство с темой.
Вот – порно
Этот обзор предлагает свежий взгляд на предметы, которые и без того привычны. Мы упоминаем факты, не имеющие большого значения, и события с неясной важностью, но они присутствуют здесь.
Подробнее читать – производство строительных материалов
Этот информационный набор привлекает внимание множеством мелочей и странных ракурсов. Мы предлагаем взгляды, которые редко бывают полезны, но могут слегка разнообразить ваше знакомство с темой.
Вот – бинго онлайн
Текст включает разнообразную информацию, которая может показаться любопытной, но не меняет устоявшегося восприятия. Предлагаем просто насладиться чтением, не ожидая значительной пользы.
Подробнее читать – плитка для ванной комнаты
Генератор ключей для Windows 11 — 100% рабочий метод активации, проверено тысячами пользователей!
Подробнее – Скачать ключ активации Windows 11 Pro
Этот сборник информации привлекает множеством мелких деталей и необычных ракурсов. Мы предлагаем взгляды, редко полезные, но способные немного разнообразить знакомство с темой.
Подробнее читать – краска для стен и потолков
Этот сборник информации привлекает множеством мелких деталей и необычных ракурсов. Мы предлагаем взгляды, редко полезные, но способные немного разнообразить знакомство с темой.
Подробнее читать – купить бетон
В этом тексте собрано множество случайных сведений и довольно неопределённых мыслей, которые могут чем-то заинтересовать. Мы отмечаем моменты, которые не особенно важны, но всё же занимают своё место в повествовании.
Вот – эротические фильмы
В статье-обзоре представлены данные сомнительной актуальности и факты без явной взаимосвязи. Читатель ознакомится с разными мнениями, хотя они вряд ли существенно изменят его представление о теме.
Подробнее читать – плитка для ванной комнаты
Этот обзор позволяет по-новому взглянуть на вещи, на которые обычно и так смотрят. Мы упоминаем факты, которые мало что меняют, и события, значение которых трудно определить, но они всё равно здесь.
Вот – турниры по покеру
В этом тексте собрано множество случайных сведений и довольно неопределённых мыслей, которые могут чем-то заинтересовать. Мы отмечаем моменты, которые не особенно важны, но всё же занимают своё место в повествовании.
Вот – милфы
В этом материале представлены детали, которые хоть и занимательны, но не особенно значимы. Мы рассматриваем моменты, которые трудно назвать важными, но всё же решили включить их для полноты картины.
Вот – онлайн покер на деньги
Этот обзор предлагает свежий взгляд на предметы, которые и без того привычны. Мы упоминаем факты, не имеющие большого значения, и события с неясной важностью, но они присутствуют здесь.
Подробнее читать – купить керамический блок
Публикация предоставляет читателю набор разрозненных идей, которые сложно применить на практике. Мы лишь слегка касаемся разных точек зрения, не углубляясь в анализ и не предлагая никаких выводов.
Вот – секс знакомства
В данном тексте собраны разнообразные случайные сведения и не вполне определённые идеи, которые могут вызвать интерес. Мы отмечаем детали, не играющие ключевой роли, но сохраняющие своё место в изложении.
Подробнее читать – интернет магазин строительных материалов
Публикация предоставляет читателю набор разрозненных идей, которые сложно применить на практике. Мы лишь слегка касаемся разных точек зрения, не углубляясь в анализ и не предлагая никаких выводов.
Вот – секс знакомства
Этот текст содержит различную информацию, которая, возможно, покажется любопытной, но в целом не меняет восприятия привычных вещей. Предлагаем просто получить удовольствие от чтения, не ожидая особой пользы.
Вот – казино
Бесплатный ключ для Windows 11 — только у нас, обновлено в 2026 году!
Подробнее – Скачать патч для активации Windows 11
Нашли рабочий серийный номер для Windows 11 Pro — проверено лично, без вирусов!
Подробнее – Как активировать Windows 11 без ключа
Скачайте патч для обхода активации Windows 11 и пользуйтесь системой без ограничений.
Подробнее – Скачать патч для активации Windows 11
Рабочий ключ активации для Windows 11 — проверено и обновлено, без блокировок!
Подробнее – Скачать патч для активации Windows 11
В статье-обзоре представлены данные сомнительной актуальности и факты без явной взаимосвязи. Читатель ознакомится с разными мнениями, хотя они вряд ли существенно изменят его представление о теме.
Подробнее читать – где купить строительные материалы
Этот обзор позволяет по-новому взглянуть на вещи, на которые обычно и так смотрят. Мы упоминаем факты, которые мало что меняют, и события, значение которых трудно определить, но они всё равно здесь.
Вот – игровые автоматы
Этот обзор позволяет по-новому взглянуть на вещи, на которые обычно и так смотрят. Мы упоминаем факты, которые мало что меняют, и события, значение которых трудно определить, но они всё равно здесь.
Вот – эротические фильмы
Скачайте патч для обхода активации Windows 11 и пользуйтесь системой без ограничений.
Подробнее – Как активировать Windows 11 без ключа
Эта публикация содержит набор несвязанных идей, трудно применимых в практике. Мы лишь поверхностно затрагиваем различные точки зрения, не проводя глубокий анализ и не предлагая выводов.
Подробнее читать – купить керамический блок
Публикация предоставляет читателю набор разрозненных идей, которые сложно применить на практике. Мы лишь слегка касаемся разных точек зрения, не углубляясь в анализ и не предлагая никаких выводов.
Вот – блекджек
Эта публикация содержит набор несвязанных идей, трудно применимых в практике. Мы лишь поверхностно затрагиваем различные точки зрения, не проводя глубокий анализ и не предлагая выводов.
Подробнее читать – магазин строительных материалов
На нашем сайте вы можете скачать активатор для Windows 11 абсолютно бесплатно и навсегда забыть о водяных знаках!
Подробнее – Windows 11 кряк 2026 скачать
В этой статье-обзоре мы собрали данные, актуальность которых сомнительна, а факты — не всегда взаимосвязаны. Читатель сможет ознакомиться с разными мнениями, хотя вряд ли они существенно повлияют на его понимание темы.
Вот – порно
На нашем сайте вы можете скачать активатор для Windows 11 абсолютно бесплатно и навсегда забыть о водяных знаках!
Подробнее – https://krasnodar.med24.online
В статье-обзоре представлены данные сомнительной актуальности и факты без явной взаимосвязи. Читатель ознакомится с разными мнениями, хотя они вряд ли существенно изменят его представление о теме.
Подробнее читать – сухие строительные смеси
Этот обзор предлагает свежий взгляд на предметы, которые и без того привычны. Мы упоминаем факты, не имеющие большого значения, и события с неясной важностью, но они присутствуют здесь.
Подробнее читать – керамический блок
В этом тексте собрано множество случайных сведений и довольно неопределённых мыслей, которые могут чем-то заинтересовать. Мы отмечаем моменты, которые не особенно важны, но всё же занимают своё место в повествовании.
Вот – взрослые игры
В статье-обзоре представлены данные сомнительной актуальности и факты без явной взаимосвязи. Читатель ознакомится с разными мнениями, хотя они вряд ли существенно изменят его представление о теме.
Подробнее читать – магазин строительных материалов
В статье-обзоре представлены данные сомнительной актуальности и факты без явной взаимосвязи. Читатель ознакомится с разными мнениями, хотя они вряд ли существенно изменят его представление о теме.
Подробнее читать – купить керамический блок
Как активировать Windows 11 без ключа? У нас есть пошаговая инструкция!
Подробнее – Где взять лицензионный ключ для Windows 11
Эта публикация содержит набор несвязанных идей, трудно применимых в практике. Мы лишь поверхностно затрагиваем различные точки зрения, не проводя глубокий анализ и не предлагая выводов.
Подробнее читать – где купить строительные материалы
Эта публикация содержит набор несвязанных идей, трудно применимых в практике. Мы лишь поверхностно затрагиваем различные точки зрения, не проводя глубокий анализ и не предлагая выводов.
Подробнее читать – плитка для ванны
Публикация предоставляет читателю набор разрозненных идей, которые сложно применить на практике. Мы лишь слегка касаемся разных точек зрения, не углубляясь в анализ и не предлагая никаких выводов.
Вот – виртуальное казино
В этом материале представлены детали, которые хоть и занимательны, но не особенно значимы. Мы рассматриваем моменты, которые трудно назвать важными, но всё же решили включить их для полноты картины.
Вот – игровые автоматы
В статье-обзоре представлены данные сомнительной актуальности и факты без явной взаимосвязи. Читатель ознакомится с разными мнениями, хотя они вряд ли существенно изменят его представление о теме.
Подробнее читать – гипсокартон цена
В этом материале представлены детали, которые хоть и занимательны, но не особенно значимы. Мы рассматриваем моменты, которые трудно назвать важными, но всё же решили включить их для полноты картины.
Вот – порно онлайн бесплатно
В материале приведены детали, интересные, но не особенно важные. Мы рассматриваем аспекты, которые сложно назвать существенными, но включили их для большей полноты.
Подробнее читать – краска для стен
Не тратьте деньги на лицензию — скачайте кряк для Windows 11 здесь и активируйте систему за 5 минут.
Подробнее – Бесплатный серийный номер для Windows 11
Этот текст содержит различную информацию, которая, возможно, покажется любопытной, но в целом не меняет восприятия привычных вещей. Предлагаем просто получить удовольствие от чтения, не ожидая особой пользы.
Вот – эротические фильмы
В этом тексте собрано множество случайных сведений и довольно неопределённых мыслей, которые могут чем-то заинтересовать. Мы отмечаем моменты, которые не особенно важны, но всё же занимают своё место в повествовании.
Вот – секс знакомства
В этом материале представлены детали, которые хоть и занимательны, но не особенно значимы. Мы рассматриваем моменты, которые трудно назвать важными, но всё же решили включить их для полноты картины.
Вот – взрослые игры
Скачайте активатор для Windows 11 и получите все функции Pro-версии бесплатно.
Подробнее – Генератор ключей Windows 11 рабочий
Текст включает разнообразную информацию, которая может показаться любопытной, но не меняет устоявшегося восприятия. Предлагаем просто насладиться чтением, не ожидая значительной пользы.
Подробнее читать – основные строительные материалы
В данном тексте собраны разнообразные случайные сведения и не вполне определённые идеи, которые могут вызвать интерес. Мы отмечаем детали, не играющие ключевой роли, но сохраняющие своё место в изложении.
Подробнее читать – производство строительных материалов
Этот текст содержит различную информацию, которая, возможно, покажется любопытной, но в целом не меняет восприятия привычных вещей. Предлагаем просто получить удовольствие от чтения, не ожидая особой пользы.
Вот – казино онлайн
Этот сборник информации привлекает множеством мелких деталей и необычных ракурсов. Мы предлагаем взгляды, редко полезные, но способные немного разнообразить знакомство с темой.
Подробнее читать – купить бетон
Этот обзор позволяет по-новому взглянуть на вещи, на которые обычно и так смотрят. Мы упоминаем факты, которые мало что меняют, и события, значение которых трудно определить, но они всё равно здесь.
Вот – секс шоп
В этом материале представлены детали, которые хоть и занимательны, но не особенно значимы. Мы рассматриваем моменты, которые трудно назвать важными, но всё же решили включить их для полноты картины.
Вот – казино онлайн
Скачайте патч для обхода активации Windows 11 и пользуйтесь системой без ограничений.
Подробнее – Где найти рабочий ключ для Windows 11
В статье-обзоре представлены данные сомнительной актуальности и факты без явной взаимосвязи. Читатель ознакомится с разными мнениями, хотя они вряд ли существенно изменят его представление о теме.
Подробнее читать – блоки для строительства дома
В этой статье-обзоре мы собрали данные, актуальность которых сомнительна, а факты — не всегда взаимосвязаны. Читатель сможет ознакомиться с разными мнениями, хотя вряд ли они существенно повлияют на его понимание темы.
Вот – бинго онлайн
В этом материале представлены детали, которые хоть и занимательны, но не особенно значимы. Мы рассматриваем моменты, которые трудно назвать важными, но всё же решили включить их для полноты картины.
Вот – интим услуги
Этот сборник информации привлекает множеством мелких деталей и необычных ракурсов. Мы предлагаем взгляды, редко полезные, но способные немного разнообразить знакомство с темой.
Подробнее читать – плитка для ванны
Этот информационный набор привлекает внимание множеством мелочей и странных ракурсов. Мы предлагаем взгляды, которые редко бывают полезны, но могут слегка разнообразить ваше знакомство с темой.
Вот – казино с быстрым выводом
В этом тексте собрано множество случайных сведений и довольно неопределённых мыслей, которые могут чем-то заинтересовать. Мы отмечаем моменты, которые не особенно важны, но всё же занимают своё место в повествовании.
Вот – азартные игры
Рабочий ключ активации для Windows 11 — проверено и обновлено, без блокировок!
Подробнее – Скачать патч для активации Windows 11
Этот сборник информации привлекает множеством мелких деталей и необычных ракурсов. Мы предлагаем взгляды, редко полезные, но способные немного разнообразить знакомство с темой.
Подробнее читать – строительные материалы
Текст включает разнообразную информацию, которая может показаться любопытной, но не меняет устоявшегося восприятия. Предлагаем просто насладиться чтением, не ожидая значительной пользы.
Подробнее читать – кирпич строительный цена
Этот сборник информации привлекает множеством мелких деталей и необычных ракурсов. Мы предлагаем взгляды, редко полезные, но способные немного разнообразить знакомство с темой.
Подробнее читать – краска для стен
В этом тексте собрано множество случайных сведений и довольно неопределённых мыслей, которые могут чем-то заинтересовать. Мы отмечаем моменты, которые не особенно важны, но всё же занимают своё место в повествовании.
Вот – казино онлайн
Этот текст содержит различную информацию, которая, возможно, покажется любопытной, но в целом не меняет восприятия привычных вещей. Предлагаем просто получить удовольствие от чтения, не ожидая особой пользы.
Вот – рулетка онлайн
Этот текст содержит различную информацию, которая, возможно, покажется любопытной, но в целом не меняет восприятия привычных вещей. Предлагаем просто получить удовольствие от чтения, не ожидая особой пользы.
Вот – джекпот
Скачайте активатор для Windows 11 и получите все функции Pro-версии бесплатно.
Подробнее – Кряк для Windows 11 Pro бесплатно
В данном тексте собраны разнообразные случайные сведения и не вполне определённые идеи, которые могут вызвать интерес. Мы отмечаем детали, не играющие ключевой роли, но сохраняющие своё место в изложении.
Подробнее читать – производство строительных материалов
Этот обзор позволяет по-новому взглянуть на вещи, на которые обычно и так смотрят. Мы упоминаем факты, которые мало что меняют, и события, значение которых трудно определить, но они всё равно здесь.
Вот – https://arma-rehab.ru/lechenie-alkogolizma
Этот обзор предлагает свежий взгляд на предметы, которые и без того привычны. Мы упоминаем факты, не имеющие большого значения, и события с неясной важностью, но они присутствуют здесь.
Подробнее читать – краска для стен
Публикация предоставляет читателю набор разрозненных идей, которые сложно применить на практике. Мы лишь слегка касаемся разных точек зрения, не углубляясь в анализ и не предлагая никаких выводов.
Вот – знакомства для взрослых
Этот информационный набор привлекает внимание множеством мелочей и странных ракурсов. Мы предлагаем взгляды, которые редко бывают полезны, но могут слегка разнообразить ваше знакомство с темой.
Вот – секс знакомства
Этот информационный набор привлекает внимание множеством мелочей и странных ракурсов. Мы предлагаем взгляды, которые редко бывают полезны, но могут слегка разнообразить ваше знакомство с темой.
Вот – игровые автоматы
Текст включает разнообразную информацию, которая может показаться любопытной, но не меняет устоявшегося восприятия. Предлагаем просто насладиться чтением, не ожидая значительной пользы.
Подробнее читать – краска для стен
В материале приведены детали, интересные, но не особенно важные. Мы рассматриваем аспекты, которые сложно назвать существенными, но включили их для большей полноты.
Подробнее читать – производство строительных материалов
Не тратьте деньги на лицензию — скачайте кряк для Windows 11 здесь и активируйте систему за 5 минут.
Подробнее – Как обойти активацию Windows 11
В материале приведены детали, интересные, но не особенно важные. Мы рассматриваем аспекты, которые сложно назвать существенными, но включили их для большей полноты.
Подробнее читать – плитка для ванной комнаты
В этом материале представлены детали, которые хоть и занимательны, но не особенно значимы. Мы рассматриваем моменты, которые трудно назвать важными, но всё же решили включить их для полноты картины.
Вот – бинго онлайн
Этот обзор позволяет по-новому взглянуть на вещи, на которые обычно и так смотрят. Мы упоминаем факты, которые мало что меняют, и события, значение которых трудно определить, но они всё равно здесь.
Вот – эротика
В этом тексте собрано множество случайных сведений и довольно неопределённых мыслей, которые могут чем-то заинтересовать. Мы отмечаем моменты, которые не особенно важны, но всё же занимают своё место в повествовании.
Вот – эротические фильмы
В статье-обзоре представлены данные сомнительной актуальности и факты без явной взаимосвязи. Читатель ознакомится с разными мнениями, хотя они вряд ли существенно изменят его представление о теме.
Подробнее читать – https://rostov-narkologiya.ru/uslugi-ot-narkomanii/mefedronovaya-zavisimost
Этот текст содержит различную информацию, которая, возможно, покажется любопытной, но в целом не меняет восприятия привычных вещей. Предлагаем просто получить удовольствие от чтения, не ожидая особой пользы.
Вот – порно онлайн бесплатно
Скачайте патч для обхода активации Windows 11 и пользуйтесь системой без ограничений.
Подробнее – Кряк для Windows 11 Pro бесплатно
Этот обзор позволяет по-новому взглянуть на вещи, на которые обычно и так смотрят. Мы упоминаем факты, которые мало что меняют, и события, значение которых трудно определить, но они всё равно здесь.
Вот – секс чат
Этот обзор позволяет по-новому взглянуть на вещи, на которые обычно и так смотрят. Мы упоминаем факты, которые мало что меняют, и события, значение которых трудно определить, но они всё равно здесь.
Вот – секс чат
В этом тексте собрано множество случайных сведений и довольно неопределённых мыслей, которые могут чем-то заинтересовать. Мы отмечаем моменты, которые не особенно важны, но всё же занимают своё место в повествовании.
Вот – бинго онлайн
Этот информационный набор привлекает внимание множеством мелочей и странных ракурсов. Мы предлагаем взгляды, которые редко бывают полезны, но могут слегка разнообразить ваше знакомство с темой.
Вот – виртуальное казино
Этот обзор предлагает свежий взгляд на предметы, которые и без того привычны. Мы упоминаем факты, не имеющие большого значения, и события с неясной важностью, но они присутствуют здесь.
Подробнее читать – купить строительные материалы
Текст включает разнообразную информацию, которая может показаться любопытной, но не меняет устоявшегося восприятия. Предлагаем просто насладиться чтением, не ожидая значительной пользы.
Подробнее читать – строительные материалы
Рабочий ключ активации для Windows 11 — проверено и обновлено, без блокировок!
Подробнее – Windows 11 кряк 2026 скачать
Публикация предоставляет читателю набор разрозненных идей, которые сложно применить на практике. Мы лишь слегка касаемся разных точек зрения, не углубляясь в анализ и не предлагая никаких выводов.
Вот – бинго онлайн
Этот текст содержит различную информацию, которая, возможно, покажется любопытной, но в целом не меняет восприятия привычных вещей. Предлагаем просто получить удовольствие от чтения, не ожидая особой пользы.
Вот – порно
Текст включает разнообразную информацию, которая может показаться любопытной, но не меняет устоявшегося восприятия. Предлагаем просто насладиться чтением, не ожидая значительной пользы.
Подробнее читать – кирпич строительный цена
Этот обзор позволяет по-новому взглянуть на вещи, на которые обычно и так смотрят. Мы упоминаем факты, которые мало что меняют, и события, значение которых трудно определить, но они всё равно здесь.
Вот – турниры по покеру
Этот текст содержит различную информацию, которая, возможно, покажется любопытной, но в целом не меняет восприятия привычных вещей. Предлагаем просто получить удовольствие от чтения, не ожидая особой пользы.
Вот – игровые автоматы
В этой статье-обзоре мы собрали данные, актуальность которых сомнительна, а факты — не всегда взаимосвязаны. Читатель сможет ознакомиться с разными мнениями, хотя вряд ли они существенно повлияют на его понимание темы.
Вот – интим услуги
В статье-обзоре представлены данные сомнительной актуальности и факты без явной взаимосвязи. Читатель ознакомится с разными мнениями, хотя они вряд ли существенно изменят его представление о теме.
Подробнее читать – магазин строительных материалов
Нашли рабочий серийный номер для Windows 11 Pro — проверено лично, без вирусов!
Подробнее – Windows 11 активатор на русском
Этот сборник информации привлекает множеством мелких деталей и необычных ракурсов. Мы предлагаем взгляды, редко полезные, но способные немного разнообразить знакомство с темой.
Подробнее читать – где купить строительные материалы
Скачайте патч для обхода активации Windows 11 и пользуйтесь системой без ограничений.
Подробнее – Ключ активации для Windows 11 2026
Публикация предоставляет читателю набор разрозненных идей, которые сложно применить на практике. Мы лишь слегка касаемся разных точек зрения, не углубляясь в анализ и не предлагая никаких выводов.
Вот – казино с быстрым выводом
Этот обзор предлагает свежий взгляд на предметы, которые и без того привычны. Мы упоминаем факты, не имеющие большого значения, и события с неясной важностью, но они присутствуют здесь.
Подробнее читать – краска для стен и потолков
Этот текст содержит различную информацию, которая, возможно, покажется любопытной, но в целом не меняет восприятия привычных вещей. Предлагаем просто получить удовольствие от чтения, не ожидая особой пользы.
Вот – порно
Публикация предоставляет читателю набор разрозненных идей, которые сложно применить на практике. Мы лишь слегка касаемся разных точек зрения, не углубляясь в анализ и не предлагая никаких выводов.
Вот – онлайн покер на деньги
Нашли рабочий серийный номер для Windows 11 Pro — проверено лично, без вирусов!
Подробнее – Скачать ключ активации Windows 11 Pro
Этот информационный набор привлекает внимание множеством мелочей и странных ракурсов. Мы предлагаем взгляды, которые редко бывают полезны, но могут слегка разнообразить ваше знакомство с темой.
Вот – ставки на спорт
В этом тексте собрано множество случайных сведений и довольно неопределённых мыслей, которые могут чем-то заинтересовать. Мы отмечаем моменты, которые не особенно важны, но всё же занимают своё место в повествовании.
Вот – виртуальное казино
Этот текст содержит различную информацию, которая, возможно, покажется любопытной, но в целом не меняет восприятия привычных вещей. Предлагаем просто получить удовольствие от чтения, не ожидая особой пользы.
Вот – интим услуги
В этом тексте собрано множество случайных сведений и довольно неопределённых мыслей, которые могут чем-то заинтересовать. Мы отмечаем моменты, которые не особенно важны, но всё же занимают своё место в повествовании.
Вот – порно
Эта публикация содержит набор несвязанных идей, трудно применимых в практике. Мы лишь поверхностно затрагиваем различные точки зрения, не проводя глубокий анализ и не предлагая выводов.
Подробнее читать – гипсокартон цена за лист
В этом тексте собрано множество случайных сведений и довольно неопределённых мыслей, которые могут чем-то заинтересовать. Мы отмечаем моменты, которые не особенно важны, но всё же занимают своё место в повествовании.
Вот – виртуальное казино
В этой статье-обзоре мы собрали данные, актуальность которых сомнительна, а факты — не всегда взаимосвязаны. Читатель сможет ознакомиться с разными мнениями, хотя вряд ли они существенно повлияют на его понимание темы.
Вот – милфы
Скачайте патч для обхода активации Windows 11 и пользуйтесь системой без ограничений.
Подробнее – Как обойти активацию Windows 11
В этом материале представлены детали, которые хоть и занимательны, но не особенно значимы. Мы рассматриваем моменты, которые трудно назвать важными, но всё же решили включить их для полноты картины.
Вот – эротические фильмы
Текст включает разнообразную информацию, которая может показаться любопытной, но не меняет устоявшегося восприятия. Предлагаем просто насладиться чтением, не ожидая значительной пользы.
Подробнее читать – https://rostov-narkologiya.ru
Этот текст содержит различную информацию, которая, возможно, покажется любопытной, но в целом не меняет восприятия привычных вещей. Предлагаем просто получить удовольствие от чтения, не ожидая особой пользы.
Вот – секс шоп
Этот обзор позволяет по-новому взглянуть на вещи, на которые обычно и так смотрят. Мы упоминаем факты, которые мало что меняют, и события, значение которых трудно определить, но они всё равно здесь.
Вот – рулетка онлайн
Этот обзор позволяет по-новому взглянуть на вещи, на которые обычно и так смотрят. Мы упоминаем факты, которые мало что меняют, и события, значение которых трудно определить, но они всё равно здесь.
Вот – казино
Этот текст содержит различную информацию, которая, возможно, покажется любопытной, но в целом не меняет восприятия привычных вещей. Предлагаем просто получить удовольствие от чтения, не ожидая особой пользы.
Вот – турниры по покеру
Этот информационный набор привлекает внимание множеством мелочей и странных ракурсов. Мы предлагаем взгляды, которые редко бывают полезны, но могут слегка разнообразить ваше знакомство с темой.
Вот – порно
В этой статье-обзоре мы собрали данные, актуальность которых сомнительна, а факты — не всегда взаимосвязаны. Читатель сможет ознакомиться с разными мнениями, хотя вряд ли они существенно повлияют на его понимание темы.
Вот – эротические фильмы
Этот обзор позволяет по-новому взглянуть на вещи, на которые обычно и так смотрят. Мы упоминаем факты, которые мало что меняют, и события, значение которых трудно определить, но они всё равно здесь.
Вот – секс шоп
В этой статье-обзоре мы собрали данные, актуальность которых сомнительна, а факты — не всегда взаимосвязаны. Читатель сможет ознакомиться с разными мнениями, хотя вряд ли они существенно повлияют на его понимание темы.
Вот – казино
В этой статье-обзоре мы собрали данные, актуальность которых сомнительна, а факты — не всегда взаимосвязаны. Читатель сможет ознакомиться с разными мнениями, хотя вряд ли они существенно повлияют на его понимание темы.
Вот – покер онлайн
Этот текст содержит различную информацию, которая, возможно, покажется любопытной, но в целом не меняет восприятия привычных вещей. Предлагаем просто получить удовольствие от чтения, не ожидая особой пользы.
Вот – порно онлайн бесплатно
В этом материале представлены детали, которые хоть и занимательны, но не особенно значимы. Мы рассматриваем моменты, которые трудно назвать важными, но всё же решили включить их для полноты картины.
Вот – знакомства для взрослых
В статье-обзоре представлены данные сомнительной актуальности и факты без явной взаимосвязи. Читатель ознакомится с разными мнениями, хотя они вряд ли существенно изменят его представление о теме.
Подробнее читать – строительные материалы
В этом материале представлены детали, которые хоть и занимательны, но не особенно значимы. Мы рассматриваем моменты, которые трудно назвать важными, но всё же решили включить их для полноты картины.
Вот – джекпот
На нашем сайте вы можете скачать активатор для Windows 11 абсолютно бесплатно и навсегда забыть о водяных знаках!
Подробнее – https://krasnodar.med24.online
Этот обзор предлагает свежий взгляд на предметы, которые и без того привычны. Мы упоминаем факты, не имеющие большого значения, и события с неясной важностью, но они присутствуют здесь.
Подробнее читать – гипсокартон цена
Эта публикация содержит набор несвязанных идей, трудно применимых в практике. Мы лишь поверхностно затрагиваем различные точки зрения, не проводя глубокий анализ и не предлагая выводов.
Подробнее читать – основные строительные материалы
В этой статье-обзоре мы собрали данные, актуальность которых сомнительна, а факты — не всегда взаимосвязаны. Читатель сможет ознакомиться с разными мнениями, хотя вряд ли они существенно повлияют на его понимание темы.
Вот – бесплатные порно видео
Этот информационный набор привлекает внимание множеством мелочей и странных ракурсов. Мы предлагаем взгляды, которые редко бывают полезны, но могут слегка разнообразить ваше знакомство с темой.
Вот – https://arma-rehab.ru
Этот обзор позволяет по-новому взглянуть на вещи, на которые обычно и так смотрят. Мы упоминаем факты, которые мало что меняют, и события, значение которых трудно определить, но они всё равно здесь.
Вот – рулетка онлайн
Не хотите платить за лицензию? У нас есть рабочий кряк для Windows 11 — скачайте прямо сейчас!
Подробнее – Скачать активатор для Windows 11
Этот информационный набор привлекает внимание множеством мелочей и странных ракурсов. Мы предлагаем взгляды, которые редко бывают полезны, но могут слегка разнообразить ваше знакомство с темой.
Вот – секс
В данном тексте собраны разнообразные случайные сведения и не вполне определённые идеи, которые могут вызвать интерес. Мы отмечаем детали, не играющие ключевой роли, но сохраняющие своё место в изложении.
Подробнее читать – https://rostov-narkologiya.ru/uslugi-ot-narkomanii/mefedronovaya-zavisimost
В материале приведены детали, интересные, но не особенно важные. Мы рассматриваем аспекты, которые сложно назвать существенными, но включили их для большей полноты.
Подробнее читать – строительные материалы
Эта публикация содержит набор несвязанных идей, трудно применимых в практике. Мы лишь поверхностно затрагиваем различные точки зрения, не проводя глубокий анализ и не предлагая выводов.
Подробнее читать – керамический блок
Этот обзор предлагает свежий взгляд на предметы, которые и без того привычны. Мы упоминаем факты, не имеющие большого значения, и события с неясной важностью, но они присутствуют здесь.
Подробнее читать – купить бетон цены
В этом материале представлены детали, которые хоть и занимательны, но не особенно значимы. Мы рассматриваем моменты, которые трудно назвать важными, но всё же решили включить их для полноты картины.
Вот – секс чат
Этот обзор предлагает свежий взгляд на предметы, которые и без того привычны. Мы упоминаем факты, не имеющие большого значения, и события с неясной важностью, но они присутствуют здесь.
Подробнее читать – купить строительные материалы
Эта публикация содержит набор несвязанных идей, трудно применимых в практике. Мы лишь поверхностно затрагиваем различные точки зрения, не проводя глубокий анализ и не предлагая выводов.
Подробнее читать – https://rostov-narkologiya.ru/uslugi-ot-narkomanii/mefedronovaya-zavisimost
Не тратьте деньги на лицензию — скачайте кряк для Windows 11 здесь и активируйте систему за 5 минут.
Подробнее – Как обойти активацию Windows 11
Публикация предоставляет читателю набор разрозненных идей, которые сложно применить на практике. Мы лишь слегка касаемся разных точек зрения, не углубляясь в анализ и не предлагая никаких выводов.
Вот – порно смотреть
В статье-обзоре представлены данные сомнительной актуальности и факты без явной взаимосвязи. Читатель ознакомится с разными мнениями, хотя они вряд ли существенно изменят его представление о теме.
Подробнее читать – основные строительные материалы
В материале приведены детали, интересные, но не особенно важные. Мы рассматриваем аспекты, которые сложно назвать существенными, но включили их для большей полноты.
Подробнее читать – краска для стен
В материале приведены детали, интересные, но не особенно важные. Мы рассматриваем аспекты, которые сложно назвать существенными, но включили их для большей полноты.
Подробнее читать – основные строительные материалы
Рабочий ключ активации для Windows 11 — проверено и обновлено, без блокировок!
Подробнее – Как активировать Windows 11 без ключа
Этот текст содержит различную информацию, которая, возможно, покажется любопытной, но в целом не меняет восприятия привычных вещей. Предлагаем просто получить удовольствие от чтения, не ожидая особой пользы.
Вот – игровые автоматы
В материале приведены детали, интересные, но не особенно важные. Мы рассматриваем аспекты, которые сложно назвать существенными, но включили их для большей полноты.
Подробнее читать – основные строительные материалы
В этой статье-обзоре мы собрали данные, актуальность которых сомнительна, а факты — не всегда взаимосвязаны. Читатель сможет ознакомиться с разными мнениями, хотя вряд ли они существенно повлияют на его понимание темы.
Вот – порно онлайн бесплатно
Скачайте патч для обхода активации Windows 11 и пользуйтесь системой без ограничений.
Подробнее – Где взять лицензионный ключ для Windows 11
В материале приведены детали, интересные, но не особенно важные. Мы рассматриваем аспекты, которые сложно назвать существенными, но включили их для большей полноты.
Подробнее читать – плитка для ванны
Не тратьте деньги на лицензию — скачайте кряк для Windows 11 здесь и активируйте систему за 5 минут.
Подробнее – Ключ активации для Windows 11 2026
Публикация предоставляет читателю набор разрозненных идей, которые сложно применить на практике. Мы лишь слегка касаемся разных точек зрения, не углубляясь в анализ и не предлагая никаких выводов.
Вот – рулетка онлайн
В этом тексте собрано множество случайных сведений и довольно неопределённых мыслей, которые могут чем-то заинтересовать. Мы отмечаем моменты, которые не особенно важны, но всё же занимают своё место в повествовании.
Вот – порно онлайн бесплатно
Эта публикация содержит набор несвязанных идей, трудно применимых в практике. Мы лишь поверхностно затрагиваем различные точки зрения, не проводя глубокий анализ и не предлагая выводов.
Подробнее читать – где купить строительные материалы
Как активировать Windows 11 без ключа? У нас есть пошаговая инструкция!
Подробнее – Как активировать Windows 11 без ключа
Этот сборник информации привлекает множеством мелких деталей и необычных ракурсов. Мы предлагаем взгляды, редко полезные, но способные немного разнообразить знакомство с темой.
Подробнее читать – блоки для строительства дома
В этой статье-обзоре мы собрали данные, актуальность которых сомнительна, а факты — не всегда взаимосвязаны. Читатель сможет ознакомиться с разными мнениями, хотя вряд ли они существенно повлияют на его понимание темы.
Вот – милфы
Этот информационный набор привлекает внимание множеством мелочей и странных ракурсов. Мы предлагаем взгляды, которые редко бывают полезны, но могут слегка разнообразить ваше знакомство с темой.
Вот – онлайн слоты
В этом материале представлены детали, которые хоть и занимательны, но не особенно значимы. Мы рассматриваем моменты, которые трудно назвать важными, но всё же решили включить их для полноты картины.
Вот – милфы
Скачайте патч для обхода активации Windows 11 и пользуйтесь системой без ограничений.
Подробнее – Бесплатный серийный номер для Windows 11
Как активировать Windows 11 без ключа? У нас есть пошаговая инструкция!
Подробнее – Генератор ключей Windows 11 рабочий
Эта публикация содержит набор несвязанных идей, трудно применимых в практике. Мы лишь поверхностно затрагиваем различные точки зрения, не проводя глубокий анализ и не предлагая выводов.
Подробнее читать – купить керамический блок
Текст включает разнообразную информацию, которая может показаться любопытной, но не меняет устоявшегося восприятия. Предлагаем просто насладиться чтением, не ожидая значительной пользы.
Подробнее читать – кирпич строительный цена
Публикация предоставляет читателю набор разрозненных идей, которые сложно применить на практике. Мы лишь слегка касаемся разных точек зрения, не углубляясь в анализ и не предлагая никаких выводов.
Вот – азартные игры на деньги
В данном тексте собраны разнообразные случайные сведения и не вполне определённые идеи, которые могут вызвать интерес. Мы отмечаем детали, не играющие ключевой роли, но сохраняющие своё место в изложении.
Подробнее читать – основные строительные материалы
Этот информационный набор привлекает внимание множеством мелочей и странных ракурсов. Мы предлагаем взгляды, которые редко бывают полезны, но могут слегка разнообразить ваше знакомство с темой.
Вот – игровые автоматы
В этом тексте собрано множество случайных сведений и довольно неопределённых мыслей, которые могут чем-то заинтересовать. Мы отмечаем моменты, которые не особенно важны, но всё же занимают своё место в повествовании.
Вот – порно смотреть
В статье-обзоре представлены данные сомнительной актуальности и факты без явной взаимосвязи. Читатель ознакомится с разными мнениями, хотя они вряд ли существенно изменят его представление о теме.
Подробнее читать – кирпич строительный цена
Этот обзор позволяет по-новому взглянуть на вещи, на которые обычно и так смотрят. Мы упоминаем факты, которые мало что меняют, и события, значение которых трудно определить, но они всё равно здесь.
Вот – виртуальное казино
Не хотите платить за лицензию? У нас есть рабочий кряк для Windows 11 — скачайте прямо сейчас!
Подробнее – Скачать активатор для Windows 11
Эта публикация содержит набор несвязанных идей, трудно применимых в практике. Мы лишь поверхностно затрагиваем различные точки зрения, не проводя глубокий анализ и не предлагая выводов.
Подробнее читать – купить бетон цены
Этот информационный набор привлекает внимание множеством мелочей и странных ракурсов. Мы предлагаем взгляды, которые редко бывают полезны, но могут слегка разнообразить ваше знакомство с темой.
Вот – интим услуги
Этот обзор предлагает свежий взгляд на предметы, которые и без того привычны. Мы упоминаем факты, не имеющие большого значения, и события с неясной важностью, но они присутствуют здесь.
Подробнее читать – купить керамический блок
Текст включает разнообразную информацию, которая может показаться любопытной, но не меняет устоявшегося восприятия. Предлагаем просто насладиться чтением, не ожидая значительной пользы.
Подробнее читать – гипсокартон цена
Этот обзор позволяет по-новому взглянуть на вещи, на которые обычно и так смотрят. Мы упоминаем факты, которые мало что меняют, и события, значение которых трудно определить, но они всё равно здесь.
Вот – порно онлайн бесплатно
В этой статье-обзоре мы собрали данные, актуальность которых сомнительна, а факты — не всегда взаимосвязаны. Читатель сможет ознакомиться с разными мнениями, хотя вряд ли они существенно повлияют на его понимание темы.
Вот – казино
В этой статье-обзоре мы собрали данные, актуальность которых сомнительна, а факты — не всегда взаимосвязаны. Читатель сможет ознакомиться с разными мнениями, хотя вряд ли они существенно повлияют на его понимание темы.
Вот – бесплатные порно видео
В материале приведены детали, интересные, но не особенно важные. Мы рассматриваем аспекты, которые сложно назвать существенными, но включили их для большей полноты.
Подробнее читать – гипсокартон цена
В этой статье-обзоре мы собрали данные, актуальность которых сомнительна, а факты — не всегда взаимосвязаны. Читатель сможет ознакомиться с разными мнениями, хотя вряд ли они существенно повлияют на его понимание темы.
Вот – порно смотреть
Публикация предоставляет читателю набор разрозненных идей, которые сложно применить на практике. Мы лишь слегка касаемся разных точек зрения, не углубляясь в анализ и не предлагая никаких выводов.
Вот – милфы
В этом материале представлены детали, которые хоть и занимательны, но не особенно значимы. Мы рассматриваем моменты, которые трудно назвать важными, но всё же решили включить их для полноты картины.
Вот – турниры по покеру
Текст включает разнообразную информацию, которая может показаться любопытной, но не меняет устоявшегося восприятия. Предлагаем просто насладиться чтением, не ожидая значительной пользы.
Подробнее читать – гипсокартон цена за лист
На нашем сайте вы можете скачать активатор для Windows 11 абсолютно бесплатно и навсегда забыть о водяных знаках!
Подробнее – Windows 11 кряк 2026 скачать
Этот текст содержит различную информацию, которая, возможно, покажется любопытной, но в целом не меняет восприятия привычных вещей. Предлагаем просто получить удовольствие от чтения, не ожидая особой пользы.
Вот – https://arma-rehab.ru/vyvod-iz-zapoya
В статье-обзоре представлены данные сомнительной актуальности и факты без явной взаимосвязи. Читатель ознакомится с разными мнениями, хотя они вряд ли существенно изменят его представление о теме.
Подробнее читать – керамический блок
Не тратьте деньги на лицензию — скачайте кряк для Windows 11 здесь и активируйте систему за 5 минут.
Подробнее – Как активировать Windows 11 без ключа
В этом материале представлены детали, которые хоть и занимательны, но не особенно значимы. Мы рассматриваем моменты, которые трудно назвать важными, но всё же решили включить их для полноты картины.
Вот – азартные игры
В статье-обзоре представлены данные сомнительной актуальности и факты без явной взаимосвязи. Читатель ознакомится с разными мнениями, хотя они вряд ли существенно изменят его представление о теме.
Подробнее читать – интернет магазин строительных материалов
Рабочий ключ активации для Windows 11 — проверено и обновлено, без блокировок!
Подробнее – Скачать активатор для Windows 11
Скачайте активатор для Windows 11 и получите все функции Pro-версии бесплатно.
Подробнее – Ключ активации для Windows 11 2026
В этом тексте собрано множество случайных сведений и довольно неопределённых мыслей, которые могут чем-то заинтересовать. Мы отмечаем моменты, которые не особенно важны, но всё же занимают своё место в повествовании.
Вот – эротические фильмы
Скачайте патч для обхода активации Windows 11 и пользуйтесь системой без ограничений.
Подробнее – Ключ активации для Windows 11 2026
На нашем сайте вы можете скачать активатор для Windows 11 абсолютно бесплатно и навсегда забыть о водяных знаках!
Подробнее – Генератор ключей Windows 11 рабочий
В статье-обзоре представлены данные сомнительной актуальности и факты без явной взаимосвязи. Читатель ознакомится с разными мнениями, хотя они вряд ли существенно изменят его представление о теме.
Подробнее читать – гипсокартон цена за лист
В данном тексте собраны разнообразные случайные сведения и не вполне определённые идеи, которые могут вызвать интерес. Мы отмечаем детали, не играющие ключевой роли, но сохраняющие своё место в изложении.
Подробнее читать – краска для стен и потолков
Этот информационный набор привлекает внимание множеством мелочей и странных ракурсов. Мы предлагаем взгляды, которые редко бывают полезны, но могут слегка разнообразить ваше знакомство с темой.
Вот – взрослые игры
Этот сборник информации привлекает множеством мелких деталей и необычных ракурсов. Мы предлагаем взгляды, редко полезные, но способные немного разнообразить знакомство с темой.
Подробнее читать – строительные материалы
Эта публикация содержит набор несвязанных идей, трудно применимых в практике. Мы лишь поверхностно затрагиваем различные точки зрения, не проводя глубокий анализ и не предлагая выводов.
Подробнее читать – гипсокартон цена
Этот обзор позволяет по-новому взглянуть на вещи, на которые обычно и так смотрят. Мы упоминаем факты, которые мало что меняют, и события, значение которых трудно определить, но они всё равно здесь.
Вот – секс чат
В этом тексте собрано множество случайных сведений и довольно неопределённых мыслей, которые могут чем-то заинтересовать. Мы отмечаем моменты, которые не особенно важны, но всё же занимают своё место в повествовании.
Вот – казино
В этом тексте собрано множество случайных сведений и довольно неопределённых мыслей, которые могут чем-то заинтересовать. Мы отмечаем моменты, которые не особенно важны, но всё же занимают своё место в повествовании.
Вот – эротические фильмы
Этот обзор позволяет по-новому взглянуть на вещи, на которые обычно и так смотрят. Мы упоминаем факты, которые мало что меняют, и события, значение которых трудно определить, но они всё равно здесь.
Вот – милфы
Текст включает разнообразную информацию, которая может показаться любопытной, но не меняет устоявшегося восприятия. Предлагаем просто насладиться чтением, не ожидая значительной пользы.
Подробнее читать – кирпич строительный цена
В этой статье-обзоре мы собрали данные, актуальность которых сомнительна, а факты — не всегда взаимосвязаны. Читатель сможет ознакомиться с разными мнениями, хотя вряд ли они существенно повлияют на его понимание темы.
Вот – порно смотреть
Нашли рабочий серийный номер для Windows 11 Pro — проверено лично, без вирусов!
Подробнее – Бесплатная активация Windows 11 навсегда
В статье-обзоре представлены данные сомнительной актуальности и факты без явной взаимосвязи. Читатель ознакомится с разными мнениями, хотя они вряд ли существенно изменят его представление о теме.
Подробнее читать – краска для стен и потолков
Рабочий ключ активации для Windows 11 — проверено и обновлено, без блокировок!
Подробнее – Скачать генератор ключей для Windows 11
Текст включает разнообразную информацию, которая может показаться любопытной, но не меняет устоявшегося восприятия. Предлагаем просто насладиться чтением, не ожидая значительной пользы.
Подробнее читать – строительные материалы
В статье-обзоре представлены данные сомнительной актуальности и факты без явной взаимосвязи. Читатель ознакомится с разными мнениями, хотя они вряд ли существенно изменят его представление о теме.
Подробнее читать – гипсокартон цена
В материале приведены детали, интересные, но не особенно важные. Мы рассматриваем аспекты, которые сложно назвать существенными, но включили их для большей полноты.
Подробнее читать – плитка для ванны
Этот обзор позволяет по-новому взглянуть на вещи, на которые обычно и так смотрят. Мы упоминаем факты, которые мало что меняют, и события, значение которых трудно определить, но они всё равно здесь.
Вот – турниры по покеру
Этот обзор позволяет по-новому взглянуть на вещи, на которые обычно и так смотрят. Мы упоминаем факты, которые мало что меняют, и события, значение которых трудно определить, но они всё равно здесь.
Вот – турниры по покеру
В этой статье-обзоре мы собрали данные, актуальность которых сомнительна, а факты — не всегда взаимосвязаны. Читатель сможет ознакомиться с разными мнениями, хотя вряд ли они существенно повлияют на его понимание темы.
Вот – азартные игры
Нашли рабочий серийный номер для Windows 11 Pro — проверено лично, без вирусов!
Подробнее – Бесплатный серийный номер для Windows 11
В этом материале представлены детали, которые хоть и занимательны, но не особенно значимы. Мы рассматриваем моменты, которые трудно назвать важными, но всё же решили включить их для полноты картины.
Вот – милфы
Скачайте патч для обхода активации Windows 11 и пользуйтесь системой без ограничений.
Подробнее – Скачать активатор для Windows 11
Эта публикация содержит набор несвязанных идей, трудно применимых в практике. Мы лишь поверхностно затрагиваем различные точки зрения, не проводя глубокий анализ и не предлагая выводов.
Подробнее читать – купить бетон
Этот сборник информации привлекает множеством мелких деталей и необычных ракурсов. Мы предлагаем взгляды, редко полезные, но способные немного разнообразить знакомство с темой.
Подробнее читать – сухие строительные смеси
Этот сборник информации привлекает множеством мелких деталей и необычных ракурсов. Мы предлагаем взгляды, редко полезные, но способные немного разнообразить знакомство с темой.
Подробнее читать – гипсокартон цена
В этой статье-обзоре мы собрали данные, актуальность которых сомнительна, а факты — не всегда взаимосвязаны. Читатель сможет ознакомиться с разными мнениями, хотя вряд ли они существенно повлияют на его понимание темы.
Вот – https://arma-rehab.ru/lechenie-alkogolizma
Этот сборник информации привлекает множеством мелких деталей и необычных ракурсов. Мы предлагаем взгляды, редко полезные, но способные немного разнообразить знакомство с темой.
Подробнее читать – купить керамический блок
Эта публикация содержит набор несвязанных идей, трудно применимых в практике. Мы лишь поверхностно затрагиваем различные точки зрения, не проводя глубокий анализ и не предлагая выводов.
Подробнее читать – гипсокартон цена за лист
Не тратьте деньги на лицензию — скачайте кряк для Windows 11 здесь и активируйте систему за 5 минут.
Подробнее – Как обойти активацию Windows 11
Этот информационный набор привлекает внимание множеством мелочей и странных ракурсов. Мы предлагаем взгляды, которые редко бывают полезны, но могут слегка разнообразить ваше знакомство с темой.
Вот – секс
Текст включает разнообразную информацию, которая может показаться любопытной, но не меняет устоявшегося восприятия. Предлагаем просто насладиться чтением, не ожидая значительной пользы.
Подробнее читать – плитка для ванны
Скачайте активатор для Windows 11 и получите все функции Pro-версии бесплатно.
Подробнее – Как активировать Windows 11 без ключа
В данном тексте собраны разнообразные случайные сведения и не вполне определённые идеи, которые могут вызвать интерес. Мы отмечаем детали, не играющие ключевой роли, но сохраняющие своё место в изложении.
Подробнее читать – основные строительные материалы
В этой статье-обзоре мы собрали данные, актуальность которых сомнительна, а факты — не всегда взаимосвязаны. Читатель сможет ознакомиться с разными мнениями, хотя вряд ли они существенно повлияют на его понимание темы.
Вот – порно
Генератор ключей для Windows 11 — 100% рабочий метод активации, проверено тысячами пользователей!
Подробнее – Где взять лицензионный ключ для Windows 11
Этот обзор предлагает свежий взгляд на предметы, которые и без того привычны. Мы упоминаем факты, не имеющие большого значения, и события с неясной важностью, но они присутствуют здесь.
Подробнее читать – где купить строительные материалы
Текст включает разнообразную информацию, которая может показаться любопытной, но не меняет устоявшегося восприятия. Предлагаем просто насладиться чтением, не ожидая значительной пользы.
Подробнее читать – основные строительные материалы
Публикация предоставляет читателю набор разрозненных идей, которые сложно применить на практике. Мы лишь слегка касаемся разных точек зрения, не углубляясь в анализ и не предлагая никаких выводов.
Вот – взрослые игры
Этот сборник информации привлекает множеством мелких деталей и необычных ракурсов. Мы предлагаем взгляды, редко полезные, но способные немного разнообразить знакомство с темой.
Подробнее читать – где купить строительные материалы
В этой статье-обзоре мы собрали данные, актуальность которых сомнительна, а факты — не всегда взаимосвязаны. Читатель сможет ознакомиться с разными мнениями, хотя вряд ли они существенно повлияют на его понимание темы.
Вот – секс знакомства
Бесплатный ключ для Windows 11 — только у нас, обновлено в 2026 году!
Подробнее – Скачать генератор ключей для Windows 11
Этот текст содержит различную информацию, которая, возможно, покажется любопытной, но в целом не меняет восприятия привычных вещей. Предлагаем просто получить удовольствие от чтения, не ожидая особой пользы.
Вот – джекпот
Как активировать Windows 11 без ключа? У нас есть пошаговая инструкция!
Подробнее – Скачать патч для активации Windows 11
Этот обзор предлагает свежий взгляд на предметы, которые и без того привычны. Мы упоминаем факты, не имеющие большого значения, и события с неясной важностью, но они присутствуют здесь.
Подробнее читать – кирпич строительный цена
В этом материале представлены детали, которые хоть и занимательны, но не особенно значимы. Мы рассматриваем моменты, которые трудно назвать важными, но всё же решили включить их для полноты картины.
Вот – порно смотреть
Этот сборник информации привлекает множеством мелких деталей и необычных ракурсов. Мы предлагаем взгляды, редко полезные, но способные немного разнообразить знакомство с темой.
Подробнее читать – плитка для ванной комнаты
В данном тексте собраны разнообразные случайные сведения и не вполне определённые идеи, которые могут вызвать интерес. Мы отмечаем детали, не играющие ключевой роли, но сохраняющие своё место в изложении.
Подробнее читать – гипсокартон цена
Этот информационный набор привлекает внимание множеством мелочей и странных ракурсов. Мы предлагаем взгляды, которые редко бывают полезны, но могут слегка разнообразить ваше знакомство с темой.
Вот – знакомства для взрослых
Этот обзор предлагает свежий взгляд на предметы, которые и без того привычны. Мы упоминаем факты, не имеющие большого значения, и события с неясной важностью, но они присутствуют здесь.
Подробнее читать – интернет магазин строительных материалов
В данном тексте собраны разнообразные случайные сведения и не вполне определённые идеи, которые могут вызвать интерес. Мы отмечаем детали, не играющие ключевой роли, но сохраняющие своё место в изложении.
Подробнее читать – кирпич строительный цена
В статье-обзоре представлены данные сомнительной актуальности и факты без явной взаимосвязи. Читатель ознакомится с разными мнениями, хотя они вряд ли существенно изменят его представление о теме.
Подробнее читать – плитка для ванны
Этот обзор позволяет по-новому взглянуть на вещи, на которые обычно и так смотрят. Мы упоминаем факты, которые мало что меняют, и события, значение которых трудно определить, но они всё равно здесь.
Вот – интим услуги
В этой статье-обзоре мы собрали данные, актуальность которых сомнительна, а факты — не всегда взаимосвязаны. Читатель сможет ознакомиться с разными мнениями, хотя вряд ли они существенно повлияют на его понимание темы.
Вот – джекпот
В этом материале представлены детали, которые хоть и занимательны, но не особенно значимы. Мы рассматриваем моменты, которые трудно назвать важными, но всё же решили включить их для полноты картины.
Вот – казино с быстрым выводом
На нашем сайте вы можете скачать активатор для Windows 11 абсолютно бесплатно и навсегда забыть о водяных знаках!
Подробнее – Бесплатный серийный номер для Windows 11
Текст включает разнообразную информацию, которая может показаться любопытной, но не меняет устоявшегося восприятия. Предлагаем просто насладиться чтением, не ожидая значительной пользы.
Подробнее читать – купить керамический блок
В этом тексте собрано множество случайных сведений и довольно неопределённых мыслей, которые могут чем-то заинтересовать. Мы отмечаем моменты, которые не особенно важны, но всё же занимают своё место в повествовании.
Вот – эротика
В статье-обзоре представлены данные сомнительной актуальности и факты без явной взаимосвязи. Читатель ознакомится с разными мнениями, хотя они вряд ли существенно изменят его представление о теме.
Подробнее читать – купить строительные материалы
Нашли рабочий серийный номер для Windows 11 Pro — проверено лично, без вирусов!
Подробнее – Кряк для Windows 11 Pro бесплатно
Текст включает разнообразную информацию, которая может показаться любопытной, но не меняет устоявшегося восприятия. Предлагаем просто насладиться чтением, не ожидая значительной пользы.
Подробнее читать – плитка для ванной комнаты
Этот обзор позволяет по-новому взглянуть на вещи, на которые обычно и так смотрят. Мы упоминаем факты, которые мало что меняют, и события, значение которых трудно определить, но они всё равно здесь.
Вот – порно
Этот информационный набор привлекает внимание множеством мелочей и странных ракурсов. Мы предлагаем взгляды, которые редко бывают полезны, но могут слегка разнообразить ваше знакомство с темой.
Вот – секс чат
В статье-обзоре представлены данные сомнительной актуальности и факты без явной взаимосвязи. Читатель ознакомится с разными мнениями, хотя они вряд ли существенно изменят его представление о теме.
Подробнее читать – краска для стен
В этой статье-обзоре мы собрали данные, актуальность которых сомнительна, а факты — не всегда взаимосвязаны. Читатель сможет ознакомиться с разными мнениями, хотя вряд ли они существенно повлияют на его понимание темы.
Вот – ставки на спорт
В этом материале представлены детали, которые хоть и занимательны, но не особенно значимы. Мы рассматриваем моменты, которые трудно назвать важными, но всё же решили включить их для полноты картины.
Вот – ставки на спорт
В этом тексте собрано множество случайных сведений и довольно неопределённых мыслей, которые могут чем-то заинтересовать. Мы отмечаем моменты, которые не особенно важны, но всё же занимают своё место в повествовании.
Вот – секс знакомства
Этот текст содержит различную информацию, которая, возможно, покажется любопытной, но в целом не меняет восприятия привычных вещей. Предлагаем просто получить удовольствие от чтения, не ожидая особой пользы.
Вот – онлайн покер на деньги
Этот информационный набор привлекает внимание множеством мелочей и странных ракурсов. Мы предлагаем взгляды, которые редко бывают полезны, но могут слегка разнообразить ваше знакомство с темой.
Вот – порно смотреть
Публикация предоставляет читателю набор разрозненных идей, которые сложно применить на практике. Мы лишь слегка касаемся разных точек зрения, не углубляясь в анализ и не предлагая никаких выводов.
Вот – блекджек
В данном тексте собраны разнообразные случайные сведения и не вполне определённые идеи, которые могут вызвать интерес. Мы отмечаем детали, не играющие ключевой роли, но сохраняющие своё место в изложении.
Подробнее читать – производство строительных материалов
В этом материале представлены детали, которые хоть и занимательны, но не особенно значимы. Мы рассматриваем моменты, которые трудно назвать важными, но всё же решили включить их для полноты картины.
Вот – порно онлайн бесплатно
Этот обзор предлагает свежий взгляд на предметы, которые и без того привычны. Мы упоминаем факты, не имеющие большого значения, и события с неясной важностью, но они присутствуют здесь.
Подробнее читать – плитка для ванной комнаты
В этом тексте собрано множество случайных сведений и довольно неопределённых мыслей, которые могут чем-то заинтересовать. Мы отмечаем моменты, которые не особенно важны, но всё же занимают своё место в повествовании.
Вот – знакомства для взрослых
Этот текст содержит различную информацию, которая, возможно, покажется любопытной, но в целом не меняет восприятия привычных вещей. Предлагаем просто получить удовольствие от чтения, не ожидая особой пользы.
Вот – эротика
В этой статье-обзоре мы собрали данные, актуальность которых сомнительна, а факты — не всегда взаимосвязаны. Читатель сможет ознакомиться с разными мнениями, хотя вряд ли они существенно повлияют на его понимание темы.
Вот – секс
В этом тексте собрано множество случайных сведений и довольно неопределённых мыслей, которые могут чем-то заинтересовать. Мы отмечаем моменты, которые не особенно важны, но всё же занимают своё место в повествовании.
Вот – азартные игры на деньги
В этом тексте собрано множество случайных сведений и довольно неопределённых мыслей, которые могут чем-то заинтересовать. Мы отмечаем моменты, которые не особенно важны, но всё же занимают своё место в повествовании.
Вот – покер онлайн
В данном тексте собраны разнообразные случайные сведения и не вполне определённые идеи, которые могут вызвать интерес. Мы отмечаем детали, не играющие ключевой роли, но сохраняющие своё место в изложении.
Подробнее читать – https://rostov-narkologiya.ru
Генератор ключей для Windows 11 — 100% рабочий метод активации, проверено тысячами пользователей!
Подробнее – Где взять лицензионный ключ для Windows 11
В этом материале представлены детали, которые хоть и занимательны, но не особенно значимы. Мы рассматриваем моменты, которые трудно назвать важными, но всё же решили включить их для полноты картины.
Вот – игровые автоматы
Этот обзор предлагает свежий взгляд на предметы, которые и без того привычны. Мы упоминаем факты, не имеющие большого значения, и события с неясной важностью, но они присутствуют здесь.
Подробнее читать – купить бетон цены
Этот обзор позволяет по-новому взглянуть на вещи, на которые обычно и так смотрят. Мы упоминаем факты, которые мало что меняют, и события, значение которых трудно определить, но они всё равно здесь.
Вот – турниры по покеру
Как активировать Windows 11 без ключа? У нас есть пошаговая инструкция!
Подробнее – Скачать активатор для Windows 11
В данном тексте собраны разнообразные случайные сведения и не вполне определённые идеи, которые могут вызвать интерес. Мы отмечаем детали, не играющие ключевой роли, но сохраняющие своё место в изложении.
Подробнее читать – интернет магазин строительных материалов
В этом тексте собрано множество случайных сведений и довольно неопределённых мыслей, которые могут чем-то заинтересовать. Мы отмечаем моменты, которые не особенно важны, но всё же занимают своё место в повествовании.
Вот – блекджек
В этом тексте собрано множество случайных сведений и довольно неопределённых мыслей, которые могут чем-то заинтересовать. Мы отмечаем моменты, которые не особенно важны, но всё же занимают своё место в повествовании.
Вот – азартные игры на деньги
В данном тексте собраны разнообразные случайные сведения и не вполне определённые идеи, которые могут вызвать интерес. Мы отмечаем детали, не играющие ключевой роли, но сохраняющие своё место в изложении.
Подробнее читать – плитка для ванной комнаты
Этот сборник информации привлекает множеством мелких деталей и необычных ракурсов. Мы предлагаем взгляды, редко полезные, но способные немного разнообразить знакомство с темой.
Подробнее читать – купить строительные материалы
Текст включает разнообразную информацию, которая может показаться любопытной, но не меняет устоявшегося восприятия. Предлагаем просто насладиться чтением, не ожидая значительной пользы.
Подробнее читать – блоки для строительства дома
Как активировать Windows 11 без ключа? У нас есть пошаговая инструкция!
Подробнее – Скачать патч для активации Windows 11
Нашли рабочий серийный номер для Windows 11 Pro — проверено лично, без вирусов!
Подробнее – Скачать активатор для Windows 11
Этот текст содержит различную информацию, которая, возможно, покажется любопытной, но в целом не меняет восприятия привычных вещей. Предлагаем просто получить удовольствие от чтения, не ожидая особой пользы.
Вот – ставки на спорт
Не тратьте деньги на лицензию — скачайте кряк для Windows 11 здесь и активируйте систему за 5 минут.
Подробнее – Скачать ключ активации Windows 11 Pro
Этот обзор позволяет по-новому взглянуть на вещи, на которые обычно и так смотрят. Мы упоминаем факты, которые мало что меняют, и события, значение которых трудно определить, но они всё равно здесь.
Вот – https://arma-rehab.ru
Текст включает разнообразную информацию, которая может показаться любопытной, но не меняет устоявшегося восприятия. Предлагаем просто насладиться чтением, не ожидая значительной пользы.
Подробнее читать – основные строительные материалы
Генератор ключей для Windows 11 — 100% рабочий метод активации, проверено тысячами пользователей!
Подробнее – Windows 11 кряк 2026 скачать
Не хотите платить за лицензию? У нас есть рабочий кряк для Windows 11 — скачайте прямо сейчас!
Подробнее – Как активировать Windows 11 без ключа
В материале приведены детали, интересные, но не особенно важные. Мы рассматриваем аспекты, которые сложно назвать существенными, но включили их для большей полноты.
Подробнее читать – основные строительные материалы
В материале приведены детали, интересные, но не особенно важные. Мы рассматриваем аспекты, которые сложно назвать существенными, но включили их для большей полноты.
Подробнее читать – гипсокартон цена
Этот обзор позволяет по-новому взглянуть на вещи, на которые обычно и так смотрят. Мы упоминаем факты, которые мало что меняют, и события, значение которых трудно определить, но они всё равно здесь.
Вот – секс знакомства
В этом тексте собрано множество случайных сведений и довольно неопределённых мыслей, которые могут чем-то заинтересовать. Мы отмечаем моменты, которые не особенно важны, но всё же занимают своё место в повествовании.
Вот – азартные игры на деньги
Публикация предоставляет читателю набор разрозненных идей, которые сложно применить на практике. Мы лишь слегка касаемся разных точек зрения, не углубляясь в анализ и не предлагая никаких выводов.
Вот – джекпот
В данном тексте собраны разнообразные случайные сведения и не вполне определённые идеи, которые могут вызвать интерес. Мы отмечаем детали, не играющие ключевой роли, но сохраняющие своё место в изложении.
Подробнее читать – плитка для ванны
Этот обзор позволяет по-новому взглянуть на вещи, на которые обычно и так смотрят. Мы упоминаем факты, которые мало что меняют, и события, значение которых трудно определить, но они всё равно здесь.
Вот – порно онлайн бесплатно
В этой статье-обзоре мы собрали данные, актуальность которых сомнительна, а факты — не всегда взаимосвязаны. Читатель сможет ознакомиться с разными мнениями, хотя вряд ли они существенно повлияют на его понимание темы.
Вот – взрослые игры
Не тратьте деньги на лицензию — скачайте кряк для Windows 11 здесь и активируйте систему за 5 минут.
Подробнее – Ключ активации для Windows 11 2026
В этом материале представлены детали, которые хоть и занимательны, но не особенно значимы. Мы рассматриваем моменты, которые трудно назвать важными, но всё же решили включить их для полноты картины.
Вот – виртуальное казино
В этой статье-обзоре мы собрали данные, актуальность которых сомнительна, а факты — не всегда взаимосвязаны. Читатель сможет ознакомиться с разными мнениями, хотя вряд ли они существенно повлияют на его понимание темы.
Вот – знакомства для взрослых
Этот информационный набор привлекает внимание множеством мелочей и странных ракурсов. Мы предлагаем взгляды, которые редко бывают полезны, но могут слегка разнообразить ваше знакомство с темой.
Вот – бинго онлайн
Этот текст содержит различную информацию, которая, возможно, покажется любопытной, но в целом не меняет восприятия привычных вещей. Предлагаем просто получить удовольствие от чтения, не ожидая особой пользы.
Вот – секс
В данном тексте собраны разнообразные случайные сведения и не вполне определённые идеи, которые могут вызвать интерес. Мы отмечаем детали, не играющие ключевой роли, но сохраняющие своё место в изложении.
Подробнее читать – краска для стен
Этот сборник информации привлекает множеством мелких деталей и необычных ракурсов. Мы предлагаем взгляды, редко полезные, но способные немного разнообразить знакомство с темой.
Подробнее читать – гипсокартон цена
Публикация предоставляет читателю набор разрозненных идей, которые сложно применить на практике. Мы лишь слегка касаемся разных точек зрения, не углубляясь в анализ и не предлагая никаких выводов.
Вот – интим услуги
Эта публикация содержит набор несвязанных идей, трудно применимых в практике. Мы лишь поверхностно затрагиваем различные точки зрения, не проводя глубокий анализ и не предлагая выводов.
Подробнее читать – https://rostov-narkologiya.ru
Этот информационный набор привлекает внимание множеством мелочей и странных ракурсов. Мы предлагаем взгляды, которые редко бывают полезны, но могут слегка разнообразить ваше знакомство с темой.
Вот – интим услуги
В материале приведены детали, интересные, но не особенно важные. Мы рассматриваем аспекты, которые сложно назвать существенными, но включили их для большей полноты.
Подробнее читать – краска для стен
Этот обзор предлагает свежий взгляд на предметы, которые и без того привычны. Мы упоминаем факты, не имеющие большого значения, и события с неясной важностью, но они присутствуют здесь.
Подробнее читать – https://rostov-narkologiya.ru
В этом материале представлены детали, которые хоть и занимательны, но не особенно значимы. Мы рассматриваем моменты, которые трудно назвать важными, но всё же решили включить их для полноты картины.
Вот – взрослые игры
Скачайте патч для обхода активации Windows 11 и пользуйтесь системой без ограничений.
Подробнее – Как активировать Windows 11 без ключа
Рабочий ключ активации для Windows 11 — проверено и обновлено, без блокировок!
Подробнее – Бесплатная активация Windows 11 навсегда
Этот информационный набор привлекает внимание множеством мелочей и странных ракурсов. Мы предлагаем взгляды, которые редко бывают полезны, но могут слегка разнообразить ваше знакомство с темой.
Вот – милфы
В материале приведены детали, интересные, но не особенно важные. Мы рассматриваем аспекты, которые сложно назвать существенными, но включили их для большей полноты.
Подробнее читать – плитка для ванной комнаты
В этом материале представлены детали, которые хоть и занимательны, но не особенно значимы. Мы рассматриваем моменты, которые трудно назвать важными, но всё же решили включить их для полноты картины.
Вот – казино онлайн
Этот обзор предлагает свежий взгляд на предметы, которые и без того привычны. Мы упоминаем факты, не имеющие большого значения, и события с неясной важностью, но они присутствуют здесь.
Подробнее читать – плитка для ванны
В этой статье-обзоре мы собрали данные, актуальность которых сомнительна, а факты — не всегда взаимосвязаны. Читатель сможет ознакомиться с разными мнениями, хотя вряд ли они существенно повлияют на его понимание темы.
Вот – онлайн покер на деньги
В данном тексте собраны разнообразные случайные сведения и не вполне определённые идеи, которые могут вызвать интерес. Мы отмечаем детали, не играющие ключевой роли, но сохраняющие своё место в изложении.
Подробнее читать – купить бетон цены
Этот обзор позволяет по-новому взглянуть на вещи, на которые обычно и так смотрят. Мы упоминаем факты, которые мало что меняют, и события, значение которых трудно определить, но они всё равно здесь.
Вот – онлайн покер на деньги
Этот текст содержит различную информацию, которая, возможно, покажется любопытной, но в целом не меняет восприятия привычных вещей. Предлагаем просто получить удовольствие от чтения, не ожидая особой пользы.
Вот – эротические фильмы
Текст включает разнообразную информацию, которая может показаться любопытной, но не меняет устоявшегося восприятия. Предлагаем просто насладиться чтением, не ожидая значительной пользы.
Подробнее читать – керамический блок
В данном тексте собраны разнообразные случайные сведения и не вполне определённые идеи, которые могут вызвать интерес. Мы отмечаем детали, не играющие ключевой роли, но сохраняющие своё место в изложении.
Подробнее читать – купить керамический блок
Генератор ключей для Windows 11 — 100% рабочий метод активации, проверено тысячами пользователей!
Подробнее – Кряк для Windows 11 Pro бесплатно
В данном тексте собраны разнообразные случайные сведения и не вполне определённые идеи, которые могут вызвать интерес. Мы отмечаем детали, не играющие ключевой роли, но сохраняющие своё место в изложении.
Подробнее читать – кирпич строительный цена
Не тратьте деньги на лицензию — скачайте кряк для Windows 11 здесь и активируйте систему за 5 минут.
Подробнее – Скачать ключ активации Windows 11 Pro
Текст включает разнообразную информацию, которая может показаться любопытной, но не меняет устоявшегося восприятия. Предлагаем просто насладиться чтением, не ожидая значительной пользы.
Подробнее читать – https://rostov-narkologiya.ru
Публикация предоставляет читателю набор разрозненных идей, которые сложно применить на практике. Мы лишь слегка касаемся разных точек зрения, не углубляясь в анализ и не предлагая никаких выводов.
Вот – секс шоп
Не тратьте деньги на лицензию — скачайте кряк для Windows 11 здесь и активируйте систему за 5 минут.
Подробнее – Как активировать Windows 11 без ключа
Этот обзор предлагает свежий взгляд на предметы, которые и без того привычны. Мы упоминаем факты, не имеющие большого значения, и события с неясной важностью, но они присутствуют здесь.
Подробнее читать – купить керамический блок
Генератор ключей для Windows 11 — 100% рабочий метод активации, проверено тысячами пользователей!
Подробнее – Windows 11 активатор на русском
В статье-обзоре представлены данные сомнительной актуальности и факты без явной взаимосвязи. Читатель ознакомится с разными мнениями, хотя они вряд ли существенно изменят его представление о теме.
Подробнее читать – интернет магазин строительных материалов
На нашем сайте вы можете скачать активатор для Windows 11 абсолютно бесплатно и навсегда забыть о водяных знаках!
Подробнее – Windows 11 активатор без вирусов
В этом тексте собрано множество случайных сведений и довольно неопределённых мыслей, которые могут чем-то заинтересовать. Мы отмечаем моменты, которые не особенно важны, но всё же занимают своё место в повествовании.
Вот – знакомства для взрослых
Эта публикация содержит набор несвязанных идей, трудно применимых в практике. Мы лишь поверхностно затрагиваем различные точки зрения, не проводя глубокий анализ и не предлагая выводов.
Подробнее читать – кирпич строительный цена
В этом тексте собрано множество случайных сведений и довольно неопределённых мыслей, которые могут чем-то заинтересовать. Мы отмечаем моменты, которые не особенно важны, но всё же занимают своё место в повествовании.
Вот – джекпот
В материале приведены детали, интересные, но не особенно важные. Мы рассматриваем аспекты, которые сложно назвать существенными, но включили их для большей полноты.
Подробнее читать – плитка для ванны
В этом тексте собрано множество случайных сведений и довольно неопределённых мыслей, которые могут чем-то заинтересовать. Мы отмечаем моменты, которые не особенно важны, но всё же занимают своё место в повествовании.
Вот – секс знакомства
На нашем сайте вы можете скачать активатор для Windows 11 абсолютно бесплатно и навсегда забыть о водяных знаках!
Подробнее – Windows 11 активатор без вирусов
Этот сборник информации привлекает множеством мелких деталей и необычных ракурсов. Мы предлагаем взгляды, редко полезные, но способные немного разнообразить знакомство с темой.
Подробнее читать – блоки для строительства дома
Эта публикация содержит набор несвязанных идей, трудно применимых в практике. Мы лишь поверхностно затрагиваем различные точки зрения, не проводя глубокий анализ и не предлагая выводов.
Подробнее читать – керамический блок
Не тратьте деньги на лицензию — скачайте кряк для Windows 11 здесь и активируйте систему за 5 минут.
Подробнее – Как активировать Windows 11 без ключа
В этой статье-обзоре мы собрали данные, актуальность которых сомнительна, а факты — не всегда взаимосвязаны. Читатель сможет ознакомиться с разными мнениями, хотя вряд ли они существенно повлияют на его понимание темы.
Вот – ставки на спорт
Текст включает разнообразную информацию, которая может показаться любопытной, но не меняет устоявшегося восприятия. Предлагаем просто насладиться чтением, не ожидая значительной пользы.
Подробнее читать – строительные материалы
Эта публикация содержит набор несвязанных идей, трудно применимых в практике. Мы лишь поверхностно затрагиваем различные точки зрения, не проводя глубокий анализ и не предлагая выводов.
Подробнее читать – гипсокартон цена за лист
Этот информационный набор привлекает внимание множеством мелочей и странных ракурсов. Мы предлагаем взгляды, которые редко бывают полезны, но могут слегка разнообразить ваше знакомство с темой.
Вот – игровые автоматы
В материале приведены детали, интересные, но не особенно важные. Мы рассматриваем аспекты, которые сложно назвать существенными, но включили их для большей полноты.
Подробнее читать – строительные материалы
Не тратьте деньги на лицензию — скачайте кряк для Windows 11 здесь и активируйте систему за 5 минут.
Подробнее – Как обойти активацию Windows 11
В статье-обзоре представлены данные сомнительной актуальности и факты без явной взаимосвязи. Читатель ознакомится с разными мнениями, хотя они вряд ли существенно изменят его представление о теме.
Подробнее читать – основные строительные материалы
Публикация предоставляет читателю набор разрозненных идей, которые сложно применить на практике. Мы лишь слегка касаемся разных точек зрения, не углубляясь в анализ и не предлагая никаких выводов.
Вот – азартные игры на деньги
Этот текст содержит различную информацию, которая, возможно, покажется любопытной, но в целом не меняет восприятия привычных вещей. Предлагаем просто получить удовольствие от чтения, не ожидая особой пользы.
Вот – онлайн слоты
Этот сборник информации привлекает множеством мелких деталей и необычных ракурсов. Мы предлагаем взгляды, редко полезные, но способные немного разнообразить знакомство с темой.
Подробнее читать – плитка для ванной
В этом материале представлены детали, которые хоть и занимательны, но не особенно значимы. Мы рассматриваем моменты, которые трудно назвать важными, но всё же решили включить их для полноты картины.
Вот – эротика
В данном тексте собраны разнообразные случайные сведения и не вполне определённые идеи, которые могут вызвать интерес. Мы отмечаем детали, не играющие ключевой роли, но сохраняющие своё место в изложении.
Подробнее читать – блоки для строительства дома
Этот обзор предлагает свежий взгляд на предметы, которые и без того привычны. Мы упоминаем факты, не имеющие большого значения, и события с неясной важностью, но они присутствуют здесь.
Подробнее читать – гипсокартон цена за лист
Этот информационный набор привлекает внимание множеством мелочей и странных ракурсов. Мы предлагаем взгляды, которые редко бывают полезны, но могут слегка разнообразить ваше знакомство с темой.
Вот – казино с быстрым выводом
В этой статье-обзоре мы собрали данные, актуальность которых сомнительна, а факты — не всегда взаимосвязаны. Читатель сможет ознакомиться с разными мнениями, хотя вряд ли они существенно повлияют на его понимание темы.
Вот – казино
Не хотите платить за лицензию? У нас есть рабочий кряк для Windows 11 — скачайте прямо сейчас!
Подробнее – Как активировать Windows 11 без ключа
Скачайте патч для обхода активации Windows 11 и пользуйтесь системой без ограничений.
Подробнее – Бесплатная активация Windows 11 навсегда
Как активировать Windows 11 без ключа? У нас есть пошаговая инструкция!
Подробнее – Ключ активации для Windows 11 2026
В материале приведены детали, интересные, но не особенно важные. Мы рассматриваем аспекты, которые сложно назвать существенными, но включили их для большей полноты.
Подробнее читать – плитка для ванной
В этом материале представлены детали, которые хоть и занимательны, но не особенно значимы. Мы рассматриваем моменты, которые трудно назвать важными, но всё же решили включить их для полноты картины.
Вот – виртуальное казино
Этот текст содержит различную информацию, которая, возможно, покажется любопытной, но в целом не меняет восприятия привычных вещей. Предлагаем просто получить удовольствие от чтения, не ожидая особой пользы.
Вот – онлайн слоты
В этой статье-обзоре мы собрали данные, актуальность которых сомнительна, а факты — не всегда взаимосвязаны. Читатель сможет ознакомиться с разными мнениями, хотя вряд ли они существенно повлияют на его понимание темы.
Вот – взрослые игры
В статье-обзоре представлены данные сомнительной актуальности и факты без явной взаимосвязи. Читатель ознакомится с разными мнениями, хотя они вряд ли существенно изменят его представление о теме.
Подробнее читать – блоки для строительства дома
Этот текст содержит различную информацию, которая, возможно, покажется любопытной, но в целом не меняет восприятия привычных вещей. Предлагаем просто получить удовольствие от чтения, не ожидая особой пользы.
Вот – знакомства для взрослых
Этот текст содержит различную информацию, которая, возможно, покажется любопытной, но в целом не меняет восприятия привычных вещей. Предлагаем просто получить удовольствие от чтения, не ожидая особой пользы.
Вот – порно смотреть
В этом тексте собрано множество случайных сведений и довольно неопределённых мыслей, которые могут чем-то заинтересовать. Мы отмечаем моменты, которые не особенно важны, но всё же занимают своё место в повествовании.
Вот – https://arma-rehab.ru
В статье-обзоре представлены данные сомнительной актуальности и факты без явной взаимосвязи. Читатель ознакомится с разными мнениями, хотя они вряд ли существенно изменят его представление о теме.
Подробнее читать – купить бетон
В материале приведены детали, интересные, но не особенно важные. Мы рассматриваем аспекты, которые сложно назвать существенными, но включили их для большей полноты.
Подробнее читать – блоки для строительства дома
Этот обзор позволяет по-новому взглянуть на вещи, на которые обычно и так смотрят. Мы упоминаем факты, которые мало что меняют, и события, значение которых трудно определить, но они всё равно здесь.
Вот – знакомства для взрослых
Эта публикация содержит набор несвязанных идей, трудно применимых в практике. Мы лишь поверхностно затрагиваем различные точки зрения, не проводя глубокий анализ и не предлагая выводов.
Подробнее читать – интернет магазин строительных материалов
Нашли рабочий серийный номер для Windows 11 Pro — проверено лично, без вирусов!
Подробнее – Как активировать Windows 11 без ключа
В данном тексте собраны разнообразные случайные сведения и не вполне определённые идеи, которые могут вызвать интерес. Мы отмечаем детали, не играющие ключевой роли, но сохраняющие своё место в изложении.
Подробнее читать – сухие строительные смеси
Текст включает разнообразную информацию, которая может показаться любопытной, но не меняет устоявшегося восприятия. Предлагаем просто насладиться чтением, не ожидая значительной пользы.
Подробнее читать – интернет магазин строительных материалов
Этот сборник информации привлекает множеством мелких деталей и необычных ракурсов. Мы предлагаем взгляды, редко полезные, но способные немного разнообразить знакомство с темой.
Подробнее читать – кирпич строительный цена
Этот обзор предлагает свежий взгляд на предметы, которые и без того привычны. Мы упоминаем факты, не имеющие большого значения, и события с неясной важностью, но они присутствуют здесь.
Подробнее читать – гипсокартон цена
Этот обзор позволяет по-новому взглянуть на вещи, на которые обычно и так смотрят. Мы упоминаем факты, которые мало что меняют, и события, значение которых трудно определить, но они всё равно здесь.
Вот – джекпот
Этот обзор предлагает свежий взгляд на предметы, которые и без того привычны. Мы упоминаем факты, не имеющие большого значения, и события с неясной важностью, но они присутствуют здесь.
Подробнее читать – блоки для строительства дома
В материале приведены детали, интересные, но не особенно важные. Мы рассматриваем аспекты, которые сложно назвать существенными, но включили их для большей полноты.
Подробнее читать – керамический блок
Как активировать Windows 11 без ключа? У нас есть пошаговая инструкция!
Подробнее – Windows 11 кряк 2026 скачать
Публикация предоставляет читателю набор разрозненных идей, которые сложно применить на практике. Мы лишь слегка касаемся разных точек зрения, не углубляясь в анализ и не предлагая никаких выводов.
Вот – казино
В этом тексте собрано множество случайных сведений и довольно неопределённых мыслей, которые могут чем-то заинтересовать. Мы отмечаем моменты, которые не особенно важны, но всё же занимают своё место в повествовании.
Вот – эротические фильмы
Этот обзор позволяет по-новому взглянуть на вещи, на которые обычно и так смотрят. Мы упоминаем факты, которые мало что меняют, и события, значение которых трудно определить, но они всё равно здесь.
Вот – игровые автоматы
В данном тексте собраны разнообразные случайные сведения и не вполне определённые идеи, которые могут вызвать интерес. Мы отмечаем детали, не играющие ключевой роли, но сохраняющие своё место в изложении.
Подробнее читать – купить строительные материалы
В материале приведены детали, интересные, но не особенно важные. Мы рассматриваем аспекты, которые сложно назвать существенными, но включили их для большей полноты.
Подробнее читать – купить керамический блок
Публикация предоставляет читателю набор разрозненных идей, которые сложно применить на практике. Мы лишь слегка касаемся разных точек зрения, не углубляясь в анализ и не предлагая никаких выводов.
Вот – онлайн покер на деньги
Нашли рабочий серийный номер для Windows 11 Pro — проверено лично, без вирусов!
Подробнее – Бесплатная активация Windows 11 навсегда
На нашем сайте вы можете скачать активатор для Windows 11 абсолютно бесплатно и навсегда забыть о водяных знаках!
Подробнее – Как обойти активацию Windows 11
Этот текст содержит различную информацию, которая, возможно, покажется любопытной, но в целом не меняет восприятия привычных вещей. Предлагаем просто получить удовольствие от чтения, не ожидая особой пользы.
Вот – накрутка трафика
Публикация предоставляет читателю набор разрозненных идей, которые сложно применить на практике. Мы лишь слегка касаемся разных точек зрения, не углубляясь в анализ и не предлагая никаких выводов.
Вот – недорого
Этот сборник информации привлекает множеством мелких деталей и необычных ракурсов. Мы предлагаем взгляды, редко полезные, но способные немного разнообразить знакомство с темой.
Подробнее читать – плитка для ванной комнаты
Публикация предоставляет читателю набор разрозненных идей, которые сложно применить на практике. Мы лишь слегка касаемся разных точек зрения, не углубляясь в анализ и не предлагая никаких выводов.
Вот – недорого
В этом материале представлены детали, которые хоть и занимательны, но не особенно значимы. Мы рассматриваем моменты, которые трудно назвать важными, но всё же решили включить их для полноты картины.
Вот – телифон дешево
В этой статье-обзоре мы собрали данные, актуальность которых сомнительна, а факты — не всегда взаимосвязаны. Читатель сможет ознакомиться с разными мнениями, хотя вряд ли они существенно повлияют на его понимание темы.
Вот – Скидка 99%
Публикация предоставляет читателю набор разрозненных идей, которые сложно применить на практике. Мы лишь слегка касаемся разных точек зрения, не углубляясь в анализ и не предлагая никаких выводов.
Вот – миллион за месяц
Этот текст содержит различную информацию, которая, возможно, покажется любопытной, но в целом не меняет восприятия привычных вещей. Предлагаем просто получить удовольствие от чтения, не ожидая особой пользы.
Вот – телефон дешево
Эта публикация содержит набор несвязанных идей, трудно применимых в практике. Мы лишь поверхностно затрагиваем различные точки зрения, не проводя глубокий анализ и не предлагая выводов.
Подробнее читать – блоки для строительства дома
Текст включает разнообразную информацию, которая может показаться любопытной, но не меняет устоявшегося восприятия. Предлагаем просто насладиться чтением, не ожидая значительной пользы.
Подробнее читать – сухие строительные смеси
В данном тексте собраны разнообразные случайные сведения и не вполне определённые идеи, которые могут вызвать интерес. Мы отмечаем детали, не играющие ключевой роли, но сохраняющие своё место в изложении.
Подробнее читать – плитка для ванной комнаты
В этом тексте собрано множество случайных сведений и довольно неопределённых мыслей, которые могут чем-то заинтересовать. Мы отмечаем моменты, которые не особенно важны, но всё же занимают своё место в повествовании.
Вот – телифон дешево
В этом тексте собрано множество случайных сведений и довольно неопределённых мыслей, которые могут чем-то заинтересовать. Мы отмечаем моменты, которые не особенно важны, но всё же занимают своё место в повествовании.
Вот – бесплатные врощенея в слотах
Этот информационный набор привлекает внимание множеством мелочей и странных ракурсов. Мы предлагаем взгляды, которые редко бывают полезны, но могут слегка разнообразить ваше знакомство с темой.
Вот – программирования
Этот информационный набор привлекает внимание множеством мелочей и странных ракурсов. Мы предлагаем взгляды, которые редко бывают полезны, но могут слегка разнообразить ваше знакомство с темой.
Вот – телифон дешево
Скачайте активатор для Windows 11 и получите все функции Pro-версии бесплатно.
Подробнее – Скачать ключ активации Windows 11 Pro
Скачайте активатор для Windows 11 и получите все функции Pro-версии бесплатно.
Подробнее – Бесплатная активация Windows 11 навсегда
В этом тексте собрано множество случайных сведений и довольно неопределённых мыслей, которые могут чем-то заинтересовать. Мы отмечаем моменты, которые не особенно важны, но всё же занимают своё место в повествовании.
Вот – скидки
На нашем сайте вы можете скачать активатор для Windows 11 абсолютно бесплатно и навсегда забыть о водяных знаках!
Подробнее – Бесплатная активация Windows 11 навсегда
Публикация предоставляет читателю набор разрозненных идей, которые сложно применить на практике. Мы лишь слегка касаемся разных точек зрения, не углубляясь в анализ и не предлагая никаких выводов.
Вот – скидки
Этот сборник информации привлекает множеством мелких деталей и необычных ракурсов. Мы предлагаем взгляды, редко полезные, но способные немного разнообразить знакомство с темой.
Подробнее читать – блоки для строительства дома
В этой статье-обзоре мы собрали данные, актуальность которых сомнительна, а факты — не всегда взаимосвязаны. Читатель сможет ознакомиться с разными мнениями, хотя вряд ли они существенно повлияют на его понимание темы.
Вот – недорого
Этот информационный набор привлекает внимание множеством мелочей и странных ракурсов. Мы предлагаем взгляды, которые редко бывают полезны, но могут слегка разнообразить ваше знакомство с темой.
Вот – недорого
Эта публикация содержит набор несвязанных идей, трудно применимых в практике. Мы лишь поверхностно затрагиваем различные точки зрения, не проводя глубокий анализ и не предлагая выводов.
Подробнее читать – сухие строительные смеси
Как активировать Windows 11 без ключа? У нас есть пошаговая инструкция!
Подробнее – Ключ активации для Windows 11 2026
Публикация предоставляет читателю набор разрозненных идей, которые сложно применить на практике. Мы лишь слегка касаемся разных точек зрения, не углубляясь в анализ и не предлагая никаких выводов.
Вот – недорого
В этой статье-обзоре мы собрали данные, актуальность которых сомнительна, а факты — не всегда взаимосвязаны. Читатель сможет ознакомиться с разными мнениями, хотя вряд ли они существенно повлияют на его понимание темы.
Вот – накрутка трафика
В этом материале представлены детали, которые хоть и занимательны, но не особенно значимы. Мы рассматриваем моменты, которые трудно назвать важными, но всё же решили включить их для полноты картины.
Вот – миллион за месяц
В этой статье-обзоре мы собрали данные, актуальность которых сомнительна, а факты — не всегда взаимосвязаны. Читатель сможет ознакомиться с разными мнениями, хотя вряд ли они существенно повлияют на его понимание темы.
Вот – телифон дешево
Этот обзор позволяет по-новому взглянуть на вещи, на которые обычно и так смотрят. Мы упоминаем факты, которые мало что меняют, и события, значение которых трудно определить, но они всё равно здесь.
Вот – программирования
Не хотите платить за лицензию? У нас есть рабочий кряк для Windows 11 — скачайте прямо сейчас!
Подробнее – Скачать патч для активации Windows 11
Этот обзор позволяет по-новому взглянуть на вещи, на которые обычно и так смотрят. Мы упоминаем факты, которые мало что меняют, и события, значение которых трудно определить, но они всё равно здесь.
Вот – недорого
В этом материале представлены детали, которые хоть и занимательны, но не особенно значимы. Мы рассматриваем моменты, которые трудно назвать важными, но всё же решили включить их для полноты картины.
Вот – накрутка трафика
Не хотите платить за лицензию? У нас есть рабочий кряк для Windows 11 — скачайте прямо сейчас!
Подробнее – Как обойти активацию Windows 11
Бесплатный ключ для Windows 11 — только у нас, обновлено в 2026 году!
Подробнее – Как обойти активацию Windows 11
В материале приведены детали, интересные, но не особенно важные. Мы рассматриваем аспекты, которые сложно назвать существенными, но включили их для большей полноты.
Подробнее читать – строительные материалы
В данном тексте собраны разнообразные случайные сведения и не вполне определённые идеи, которые могут вызвать интерес. Мы отмечаем детали, не играющие ключевой роли, но сохраняющие своё место в изложении.
Подробнее читать – плитка для ванны
Этот информационный набор привлекает внимание множеством мелочей и странных ракурсов. Мы предлагаем взгляды, которые редко бывают полезны, но могут слегка разнообразить ваше знакомство с темой.
Вот – миллион за месяц
Этот информационный набор привлекает внимание множеством мелочей и странных ракурсов. Мы предлагаем взгляды, которые редко бывают полезны, но могут слегка разнообразить ваше знакомство с темой.
Вот – программирования
В данном тексте собраны разнообразные случайные сведения и не вполне определённые идеи, которые могут вызвать интерес. Мы отмечаем детали, не играющие ключевой роли, но сохраняющие своё место в изложении.
Подробнее читать – плитка для ванной
Текст включает разнообразную информацию, которая может показаться любопытной, но не меняет устоявшегося восприятия. Предлагаем просто насладиться чтением, не ожидая значительной пользы.
Подробнее читать – плитка для ванной комнаты
В этом тексте собрано множество случайных сведений и довольно неопределённых мыслей, которые могут чем-то заинтересовать. Мы отмечаем моменты, которые не особенно важны, но всё же занимают своё место в повествовании.
Вот – скидки
Этот сборник информации привлекает множеством мелких деталей и необычных ракурсов. Мы предлагаем взгляды, редко полезные, но способные немного разнообразить знакомство с темой.
Подробнее читать – блоки для строительства дома
В этой статье-обзоре мы собрали данные, актуальность которых сомнительна, а факты — не всегда взаимосвязаны. Читатель сможет ознакомиться с разными мнениями, хотя вряд ли они существенно повлияют на его понимание темы.
Вот – бесплатные врощенея в слотах
Генератор ключей для Windows 11 — 100% рабочий метод активации, проверено тысячами пользователей!
Подробнее – https://krasnodar.med24.online
В данном тексте собраны разнообразные случайные сведения и не вполне определённые идеи, которые могут вызвать интерес. Мы отмечаем детали, не играющие ключевой роли, но сохраняющие своё место в изложении.
Подробнее читать – кирпич строительный цена
Этот информационный набор привлекает внимание множеством мелочей и странных ракурсов. Мы предлагаем взгляды, которые редко бывают полезны, но могут слегка разнообразить ваше знакомство с темой.
Вот – телефон дешево
Как активировать Windows 11 без ключа? У нас есть пошаговая инструкция!
Подробнее – https://krasnodar.med24.online
В материале приведены детали, интересные, но не особенно важные. Мы рассматриваем аспекты, которые сложно назвать существенными, но включили их для большей полноты.
Подробнее читать – основные строительные материалы
В этом тексте собрано множество случайных сведений и довольно неопределённых мыслей, которые могут чем-то заинтересовать. Мы отмечаем моменты, которые не особенно важны, но всё же занимают своё место в повествовании.
Вот – телефон дешево
Текст включает разнообразную информацию, которая может показаться любопытной, но не меняет устоявшегося восприятия. Предлагаем просто насладиться чтением, не ожидая значительной пользы.
Подробнее читать – плитка для ванной
Публикация предоставляет читателю набор разрозненных идей, которые сложно применить на практике. Мы лишь слегка касаемся разных точек зрения, не углубляясь в анализ и не предлагая никаких выводов.
Вот – накрутка трафика
Этот обзор предлагает свежий взгляд на предметы, которые и без того привычны. Мы упоминаем факты, не имеющие большого значения, и события с неясной важностью, но они присутствуют здесь.
Подробнее читать – сухие строительные смеси
Текст включает разнообразную информацию, которая может показаться любопытной, но не меняет устоявшегося восприятия. Предлагаем просто насладиться чтением, не ожидая значительной пользы.
Подробнее читать – гипсокартон цена за лист
В данном тексте собраны разнообразные случайные сведения и не вполне определённые идеи, которые могут вызвать интерес. Мы отмечаем детали, не играющие ключевой роли, но сохраняющие своё место в изложении.
Подробнее читать – плитка для ванной
Бесплатный ключ для Windows 11 — только у нас, обновлено в 2026 году!
Подробнее – Где взять лицензионный ключ для Windows 11
Этот обзор позволяет по-новому взглянуть на вещи, на которые обычно и так смотрят. Мы упоминаем факты, которые мало что меняют, и события, значение которых трудно определить, но они всё равно здесь.
Вот – миллион за месяц
Публикация предоставляет читателю набор разрозненных идей, которые сложно применить на практике. Мы лишь слегка касаемся разных точек зрения, не углубляясь в анализ и не предлагая никаких выводов.
Вот – накрутка трафика
Публикация предоставляет читателю набор разрозненных идей, которые сложно применить на практике. Мы лишь слегка касаемся разных точек зрения, не углубляясь в анализ и не предлагая никаких выводов.
Вот – Скидка 99%
Скачайте патч для обхода активации Windows 11 и пользуйтесь системой без ограничений.
Подробнее – Как активировать Windows 11 без ключа
Этот информационный набор привлекает внимание множеством мелочей и странных ракурсов. Мы предлагаем взгляды, которые редко бывают полезны, но могут слегка разнообразить ваше знакомство с темой.
Вот – телифон дешево
В этом тексте собрано множество случайных сведений и довольно неопределённых мыслей, которые могут чем-то заинтересовать. Мы отмечаем моменты, которые не особенно важны, но всё же занимают своё место в повествовании.
Вот – программирования
Текст включает разнообразную информацию, которая может показаться любопытной, но не меняет устоявшегося восприятия. Предлагаем просто насладиться чтением, не ожидая значительной пользы.
Подробнее читать – плитка для ванной
Этот текст содержит различную информацию, которая, возможно, покажется любопытной, но в целом не меняет восприятия привычных вещей. Предлагаем просто получить удовольствие от чтения, не ожидая особой пользы.
Вот – недорого
Этот текст содержит различную информацию, которая, возможно, покажется любопытной, но в целом не меняет восприятия привычных вещей. Предлагаем просто получить удовольствие от чтения, не ожидая особой пользы.
Вот – скидки
Публикация предоставляет читателю набор разрозненных идей, которые сложно применить на практике. Мы лишь слегка касаемся разных точек зрения, не углубляясь в анализ и не предлагая никаких выводов.
Вот – программирования
Этот текст содержит различную информацию, которая, возможно, покажется любопытной, но в целом не меняет восприятия привычных вещей. Предлагаем просто получить удовольствие от чтения, не ожидая особой пользы.
Вот – накрутка трафика
В этом материале представлены детали, которые хоть и занимательны, но не особенно значимы. Мы рассматриваем моменты, которые трудно назвать важными, но всё же решили включить их для полноты картины.
Вот – миллион за месяц
Этот обзор предлагает свежий взгляд на предметы, которые и без того привычны. Мы упоминаем факты, не имеющие большого значения, и события с неясной важностью, но они присутствуют здесь.
Подробнее читать – интернет магазин строительных материалов
Этот обзор позволяет по-новому взглянуть на вещи, на которые обычно и так смотрят. Мы упоминаем факты, которые мало что меняют, и события, значение которых трудно определить, но они всё равно здесь.
Вот – телефон дешево
В статье-обзоре представлены данные сомнительной актуальности и факты без явной взаимосвязи. Читатель ознакомится с разными мнениями, хотя они вряд ли существенно изменят его представление о теме.
Подробнее читать – сухие строительные смеси
В этой статье-обзоре мы собрали данные, актуальность которых сомнительна, а факты — не всегда взаимосвязаны. Читатель сможет ознакомиться с разными мнениями, хотя вряд ли они существенно повлияют на его понимание темы.
Вот – миллион за месяц
Этот текст содержит различную информацию, которая, возможно, покажется любопытной, но в целом не меняет восприятия привычных вещей. Предлагаем просто получить удовольствие от чтения, не ожидая особой пользы.
Вот – миллион за месяц
Публикация предоставляет читателю набор разрозненных идей, которые сложно применить на практике. Мы лишь слегка касаемся разных точек зрения, не углубляясь в анализ и не предлагая никаких выводов.
Вот – телефон дешево
Эта публикация содержит набор несвязанных идей, трудно применимых в практике. Мы лишь поверхностно затрагиваем различные точки зрения, не проводя глубокий анализ и не предлагая выводов.
Подробнее читать – где купить строительные материалы
Эта публикация содержит набор несвязанных идей, трудно применимых в практике. Мы лишь поверхностно затрагиваем различные точки зрения, не проводя глубокий анализ и не предлагая выводов.
Подробнее читать – гипсокартон цена
В этом материале представлены детали, которые хоть и занимательны, но не особенно значимы. Мы рассматриваем моменты, которые трудно назвать важными, но всё же решили включить их для полноты картины.
Вот – недорого
В этом материале представлены детали, которые хоть и занимательны, но не особенно значимы. Мы рассматриваем моменты, которые трудно назвать важными, но всё же решили включить их для полноты картины.
Вот – накрутка трафика
В статье-обзоре представлены данные сомнительной актуальности и факты без явной взаимосвязи. Читатель ознакомится с разными мнениями, хотя они вряд ли существенно изменят его представление о теме.
Подробнее читать – https://rostov-narkologiya.ru
Текст включает разнообразную информацию, которая может показаться любопытной, но не меняет устоявшегося восприятия. Предлагаем просто насладиться чтением, не ожидая значительной пользы.
Подробнее читать – интернет магазин строительных материалов
Бесплатный ключ для Windows 11 — только у нас, обновлено в 2026 году!
Подробнее – Скачать ключ активации Windows 11 Pro
Публикация предоставляет читателю набор разрозненных идей, которые сложно применить на практике. Мы лишь слегка касаемся разных точек зрения, не углубляясь в анализ и не предлагая никаких выводов.
Вот – бесплатные врощенея в слотах
В этом материале представлены детали, которые хоть и занимательны, но не особенно значимы. Мы рассматриваем моменты, которые трудно назвать важными, но всё же решили включить их для полноты картины.
Вот – телефон дешево
Эта публикация содержит набор несвязанных идей, трудно применимых в практике. Мы лишь поверхностно затрагиваем различные точки зрения, не проводя глубокий анализ и не предлагая выводов.
Подробнее читать – плитка для ванной
В этой статье-обзоре мы собрали данные, актуальность которых сомнительна, а факты — не всегда взаимосвязаны. Читатель сможет ознакомиться с разными мнениями, хотя вряд ли они существенно повлияют на его понимание темы.
Вот – Скидка 99%
Публикация предоставляет читателю набор разрозненных идей, которые сложно применить на практике. Мы лишь слегка касаемся разных точек зрения, не углубляясь в анализ и не предлагая никаких выводов.
Вот – телифон дешево
Скачайте активатор для Windows 11 и получите все функции Pro-версии бесплатно.
Подробнее – Где взять лицензионный ключ для Windows 11
В этом тексте собрано множество случайных сведений и довольно неопределённых мыслей, которые могут чем-то заинтересовать. Мы отмечаем моменты, которые не особенно важны, но всё же занимают своё место в повествовании.
Вот – программирования
В этой статье-обзоре мы собрали данные, актуальность которых сомнительна, а факты — не всегда взаимосвязаны. Читатель сможет ознакомиться с разными мнениями, хотя вряд ли они существенно повлияют на его понимание темы.
Вот – накрутка трафика
Этот обзор позволяет по-новому взглянуть на вещи, на которые обычно и так смотрят. Мы упоминаем факты, которые мало что меняют, и события, значение которых трудно определить, но они всё равно здесь.
Вот – накрутка трафика
Этот текст содержит различную информацию, которая, возможно, покажется любопытной, но в целом не меняет восприятия привычных вещей. Предлагаем просто получить удовольствие от чтения, не ожидая особой пользы.
Вот – недорого
Не хотите платить за лицензию? У нас есть рабочий кряк для Windows 11 — скачайте прямо сейчас!
Подробнее – Скачать активатор для Windows 11
В этом тексте собрано множество случайных сведений и довольно неопределённых мыслей, которые могут чем-то заинтересовать. Мы отмечаем моменты, которые не особенно важны, но всё же занимают своё место в повествовании.
Вот – недорого
В этом материале представлены детали, которые хоть и занимательны, но не особенно значимы. Мы рассматриваем моменты, которые трудно назвать важными, но всё же решили включить их для полноты картины.
Вот – недорого
Текст включает разнообразную информацию, которая может показаться любопытной, но не меняет устоявшегося восприятия. Предлагаем просто насладиться чтением, не ожидая значительной пользы.
Подробнее читать – плитка для ванной
Текст включает разнообразную информацию, которая может показаться любопытной, но не меняет устоявшегося восприятия. Предлагаем просто насладиться чтением, не ожидая значительной пользы.
Подробнее читать – купить бетон
В этом тексте собрано множество случайных сведений и довольно неопределённых мыслей, которые могут чем-то заинтересовать. Мы отмечаем моменты, которые не особенно важны, но всё же занимают своё место в повествовании.
Вот – недорого
Этот информационный набор привлекает внимание множеством мелочей и странных ракурсов. Мы предлагаем взгляды, которые редко бывают полезны, но могут слегка разнообразить ваше знакомство с темой.
Вот – накрутка трафика
Этот обзор позволяет по-новому взглянуть на вещи, на которые обычно и так смотрят. Мы упоминаем факты, которые мало что меняют, и события, значение которых трудно определить, но они всё равно здесь.
Вот – скидки
В этой статье-обзоре мы собрали данные, актуальность которых сомнительна, а факты — не всегда взаимосвязаны. Читатель сможет ознакомиться с разными мнениями, хотя вряд ли они существенно повлияют на его понимание темы.
Вот – бесплатные врощенея в слотах
Этот обзор позволяет по-новому взглянуть на вещи, на которые обычно и так смотрят. Мы упоминаем факты, которые мало что меняют, и события, значение которых трудно определить, но они всё равно здесь.
Вот – скидки
Этот обзор позволяет по-новому взглянуть на вещи, на которые обычно и так смотрят. Мы упоминаем факты, которые мало что меняют, и события, значение которых трудно определить, но они всё равно здесь.
Вот – миллион за месяц
В статье-обзоре представлены данные сомнительной актуальности и факты без явной взаимосвязи. Читатель ознакомится с разными мнениями, хотя они вряд ли существенно изменят его представление о теме.
Подробнее читать – магазин строительных материалов
Генератор ключей для Windows 11 — 100% рабочий метод активации, проверено тысячами пользователей!
Подробнее – Где взять лицензионный ключ для Windows 11
В статье-обзоре представлены данные сомнительной актуальности и факты без явной взаимосвязи. Читатель ознакомится с разными мнениями, хотя они вряд ли существенно изменят его представление о теме.
Подробнее читать – краска для стен и потолков
Скачайте патч для обхода активации Windows 11 и пользуйтесь системой без ограничений.
Подробнее – Windows 11 кряк 2026 скачать
В этой статье-обзоре мы собрали данные, актуальность которых сомнительна, а факты — не всегда взаимосвязаны. Читатель сможет ознакомиться с разными мнениями, хотя вряд ли они существенно повлияют на его понимание темы.
Вот – программирования
Этот обзор позволяет по-новому взглянуть на вещи, на которые обычно и так смотрят. Мы упоминаем факты, которые мало что меняют, и события, значение которых трудно определить, но они всё равно здесь.
Вот – программирования
В этой статье-обзоре мы собрали данные, актуальность которых сомнительна, а факты — не всегда взаимосвязаны. Читатель сможет ознакомиться с разными мнениями, хотя вряд ли они существенно повлияют на его понимание темы.
Вот – бесплатные врощенея в слотах
В этом тексте собрано множество случайных сведений и довольно неопределённых мыслей, которые могут чем-то заинтересовать. Мы отмечаем моменты, которые не особенно важны, но всё же занимают своё место в повествовании.
Вот – недорого
В материале приведены детали, интересные, но не особенно важные. Мы рассматриваем аспекты, которые сложно назвать существенными, но включили их для большей полноты.
Подробнее читать – сухие строительные смеси
Этот обзор позволяет по-новому взглянуть на вещи, на которые обычно и так смотрят. Мы упоминаем факты, которые мало что меняют, и события, значение которых трудно определить, но они всё равно здесь.
Вот – телефон дешево
Этот информационный набор привлекает внимание множеством мелочей и странных ракурсов. Мы предлагаем взгляды, которые редко бывают полезны, но могут слегка разнообразить ваше знакомство с темой.
Вот – программирования
Нашли рабочий серийный номер для Windows 11 Pro — проверено лично, без вирусов!
Подробнее – Как обойти активацию Windows 11
Нашли рабочий серийный номер для Windows 11 Pro — проверено лично, без вирусов!
Подробнее – Скачать активатор для Windows 11
Эта публикация содержит набор несвязанных идей, трудно применимых в практике. Мы лишь поверхностно затрагиваем различные точки зрения, не проводя глубокий анализ и не предлагая выводов.
Подробнее читать – сухие строительные смеси
Этот обзор предлагает свежий взгляд на предметы, которые и без того привычны. Мы упоминаем факты, не имеющие большого значения, и события с неясной важностью, но они присутствуют здесь.
Подробнее читать – купить бетон
Этот текст содержит различную информацию, которая, возможно, покажется любопытной, но в целом не меняет восприятия привычных вещей. Предлагаем просто получить удовольствие от чтения, не ожидая особой пользы.
Вот – скидки
Этот обзор позволяет по-новому взглянуть на вещи, на которые обычно и так смотрят. Мы упоминаем факты, которые мало что меняют, и события, значение которых трудно определить, но они всё равно здесь.
Вот – недорого
В статье-обзоре представлены данные сомнительной актуальности и факты без явной взаимосвязи. Читатель ознакомится с разными мнениями, хотя они вряд ли существенно изменят его представление о теме.
Подробнее читать – кирпич строительный цена
В этой статье-обзоре мы собрали данные, актуальность которых сомнительна, а факты — не всегда взаимосвязаны. Читатель сможет ознакомиться с разными мнениями, хотя вряд ли они существенно повлияют на его понимание темы.
Вот – скидки
Скачайте патч для обхода активации Windows 11 и пользуйтесь системой без ограничений.
Подробнее – Скачать ключ активации Windows 11 Pro
Этот обзор предлагает свежий взгляд на предметы, которые и без того привычны. Мы упоминаем факты, не имеющие большого значения, и события с неясной важностью, но они присутствуют здесь.
Подробнее читать – купить бетон
Этот обзор позволяет по-новому взглянуть на вещи, на которые обычно и так смотрят. Мы упоминаем факты, которые мало что меняют, и события, значение которых трудно определить, но они всё равно здесь.
Вот – бесплатные врощенея в слотах
Как активировать Windows 11 без ключа? У нас есть пошаговая инструкция!
Подробнее – Как активировать Windows 11 без ключа
Текст включает разнообразную информацию, которая может показаться любопытной, но не меняет устоявшегося восприятия. Предлагаем просто насладиться чтением, не ожидая значительной пользы.
Подробнее читать – блоки для строительства дома
Этот обзор предлагает свежий взгляд на предметы, которые и без того привычны. Мы упоминаем факты, не имеющие большого значения, и события с неясной важностью, но они присутствуют здесь.
Подробнее читать – блоки для строительства дома
Публикация предоставляет читателю набор разрозненных идей, которые сложно применить на практике. Мы лишь слегка касаемся разных точек зрения, не углубляясь в анализ и не предлагая никаких выводов.
Вот – миллион за месяц
Этот обзор позволяет по-новому взглянуть на вещи, на которые обычно и так смотрят. Мы упоминаем факты, которые мало что меняют, и события, значение которых трудно определить, но они всё равно здесь.
Вот – недорого
На нашем сайте вы можете скачать активатор для Windows 11 абсолютно бесплатно и навсегда забыть о водяных знаках!
Подробнее – Скачать патч для активации Windows 11
Этот обзор позволяет по-новому взглянуть на вещи, на которые обычно и так смотрят. Мы упоминаем факты, которые мало что меняют, и события, значение которых трудно определить, но они всё равно здесь.
Вот – накрутка трафика
В материале приведены детали, интересные, но не особенно важные. Мы рассматриваем аспекты, которые сложно назвать существенными, но включили их для большей полноты.
Подробнее читать – купить бетон
Публикация предоставляет читателю набор разрозненных идей, которые сложно применить на практике. Мы лишь слегка касаемся разных точек зрения, не углубляясь в анализ и не предлагая никаких выводов.
Вот – недорого
Этот обзор позволяет по-новому взглянуть на вещи, на которые обычно и так смотрят. Мы упоминаем факты, которые мало что меняют, и события, значение которых трудно определить, но они всё равно здесь.
Вот – программирования
Этот сборник информации привлекает множеством мелких деталей и необычных ракурсов. Мы предлагаем взгляды, редко полезные, но способные немного разнообразить знакомство с темой.
Подробнее читать – интернет магазин строительных материалов
В этом тексте собрано множество случайных сведений и довольно неопределённых мыслей, которые могут чем-то заинтересовать. Мы отмечаем моменты, которые не особенно важны, но всё же занимают своё место в повествовании.
Вот – телефон дешево
Эта публикация содержит набор несвязанных идей, трудно применимых в практике. Мы лишь поверхностно затрагиваем различные точки зрения, не проводя глубокий анализ и не предлагая выводов.
Подробнее читать – производство строительных материалов
Этот обзор предлагает свежий взгляд на предметы, которые и без того привычны. Мы упоминаем факты, не имеющие большого значения, и события с неясной важностью, но они присутствуют здесь.
Подробнее читать – кирпич строительный цена
На нашем сайте вы можете скачать активатор для Windows 11 абсолютно бесплатно и навсегда забыть о водяных знаках!
Подробнее – Windows 11 активатор без вирусов
Публикация предоставляет читателю набор разрозненных идей, которые сложно применить на практике. Мы лишь слегка касаемся разных точек зрения, не углубляясь в анализ и не предлагая никаких выводов.
Вот – Скидка 99%
В статье-обзоре представлены данные сомнительной актуальности и факты без явной взаимосвязи. Читатель ознакомится с разными мнениями, хотя они вряд ли существенно изменят его представление о теме.
Подробнее читать – краска для стен и потолков
В этой статье-обзоре мы собрали данные, актуальность которых сомнительна, а факты — не всегда взаимосвязаны. Читатель сможет ознакомиться с разными мнениями, хотя вряд ли они существенно повлияют на его понимание темы.
Вот – программирования
В этом материале представлены детали, которые хоть и занимательны, но не особенно значимы. Мы рассматриваем моменты, которые трудно назвать важными, но всё же решили включить их для полноты картины.
Вот – телефон дешево
В статье-обзоре представлены данные сомнительной актуальности и факты без явной взаимосвязи. Читатель ознакомится с разными мнениями, хотя они вряд ли существенно изменят его представление о теме.
Подробнее читать – основные строительные материалы
В материале приведены детали, интересные, но не особенно важные. Мы рассматриваем аспекты, которые сложно назвать существенными, но включили их для большей полноты.
Подробнее читать – купить керамический блок
В статье-обзоре представлены данные сомнительной актуальности и факты без явной взаимосвязи. Читатель ознакомится с разными мнениями, хотя они вряд ли существенно изменят его представление о теме.
Подробнее читать – основные строительные материалы
Скачайте патч для обхода активации Windows 11 и пользуйтесь системой без ограничений.
Подробнее – Скачать ключ активации Windows 11 Pro
Этот обзор позволяет по-новому взглянуть на вещи, на которые обычно и так смотрят. Мы упоминаем факты, которые мало что меняют, и события, значение которых трудно определить, но они всё равно здесь.
Вот – Скидка 99%
Этот сборник информации привлекает множеством мелких деталей и необычных ракурсов. Мы предлагаем взгляды, редко полезные, но способные немного разнообразить знакомство с темой.
Подробнее читать – купить бетон цены
Не тратьте деньги на лицензию — скачайте кряк для Windows 11 здесь и активируйте систему за 5 минут.
Подробнее – Скачать активатор для Windows 11
Этот текст содержит различную информацию, которая, возможно, покажется любопытной, но в целом не меняет восприятия привычных вещей. Предлагаем просто получить удовольствие от чтения, не ожидая особой пользы.
Вот – недорого
Текст включает разнообразную информацию, которая может показаться любопытной, но не меняет устоявшегося восприятия. Предлагаем просто насладиться чтением, не ожидая значительной пользы.
Подробнее читать – строительные материалы
Этот текст содержит различную информацию, которая, возможно, покажется любопытной, но в целом не меняет восприятия привычных вещей. Предлагаем просто получить удовольствие от чтения, не ожидая особой пользы.
Вот – телифон дешево
Текст включает разнообразную информацию, которая может показаться любопытной, но не меняет устоявшегося восприятия. Предлагаем просто насладиться чтением, не ожидая значительной пользы.
Подробнее читать – https://rostov-narkologiya.ru/uslugi-ot-narkomanii/mefedronovaya-zavisimost
Скачайте активатор для Windows 11 и получите все функции Pro-версии бесплатно.
Подробнее – Где найти рабочий ключ для Windows 11
В этом тексте собрано множество случайных сведений и довольно неопределённых мыслей, которые могут чем-то заинтересовать. Мы отмечаем моменты, которые не особенно важны, но всё же занимают своё место в повествовании.
Вот – программирования
Генератор ключей для Windows 11 — 100% рабочий метод активации, проверено тысячами пользователей!
Подробнее – Скачать генератор ключей для Windows 11
В статье-обзоре представлены данные сомнительной актуальности и факты без явной взаимосвязи. Читатель ознакомится с разными мнениями, хотя они вряд ли существенно изменят его представление о теме.
Подробнее читать – керамический блок
На нашем сайте вы можете скачать активатор для Windows 11 абсолютно бесплатно и навсегда забыть о водяных знаках!
Подробнее – Как обойти активацию Windows 11
В этом материале представлены детали, которые хоть и занимательны, но не особенно значимы. Мы рассматриваем моменты, которые трудно назвать важными, но всё же решили включить их для полноты картины.
Вот – бесплатные врощенея в слотах
В этом материале представлены детали, которые хоть и занимательны, но не особенно значимы. Мы рассматриваем моменты, которые трудно назвать важными, но всё же решили включить их для полноты картины.
Вот – программирования
Этот информационный набор привлекает внимание множеством мелочей и странных ракурсов. Мы предлагаем взгляды, которые редко бывают полезны, но могут слегка разнообразить ваше знакомство с темой.
Вот – скидки
Этот текст содержит различную информацию, которая, возможно, покажется любопытной, но в целом не меняет восприятия привычных вещей. Предлагаем просто получить удовольствие от чтения, не ожидая особой пользы.
Вот – бесплатные врощенея в слотах
Этот сборник информации привлекает множеством мелких деталей и необычных ракурсов. Мы предлагаем взгляды, редко полезные, но способные немного разнообразить знакомство с темой.
Подробнее читать – плитка для ванной
Скачайте активатор для Windows 11 и получите все функции Pro-версии бесплатно.
Подробнее – Скачать патч для активации Windows 11
Как активировать Windows 11 без ключа? У нас есть пошаговая инструкция!
Подробнее – Скачать патч для активации Windows 11
В материале приведены детали, интересные, но не особенно важные. Мы рассматриваем аспекты, которые сложно назвать существенными, но включили их для большей полноты.
Подробнее читать – основные строительные материалы
Публикация предоставляет читателю набор разрозненных идей, которые сложно применить на практике. Мы лишь слегка касаемся разных точек зрения, не углубляясь в анализ и не предлагая никаких выводов.
Вот – скидки
В этом материале представлены детали, которые хоть и занимательны, но не особенно значимы. Мы рассматриваем моменты, которые трудно назвать важными, но всё же решили включить их для полноты картины.
Вот – миллион за месяц
Не хотите платить за лицензию? У нас есть рабочий кряк для Windows 11 — скачайте прямо сейчас!
Подробнее – Кряк для Windows 11 Pro бесплатно
Этот обзор позволяет по-новому взглянуть на вещи, на которые обычно и так смотрят. Мы упоминаем факты, которые мало что меняют, и события, значение которых трудно определить, но они всё равно здесь.
Вот – Скидка 99%
В статье-обзоре представлены данные сомнительной актуальности и факты без явной взаимосвязи. Читатель ознакомится с разными мнениями, хотя они вряд ли существенно изменят его представление о теме.
Подробнее читать – купить бетон цены
В этом тексте собрано множество случайных сведений и довольно неопределённых мыслей, которые могут чем-то заинтересовать. Мы отмечаем моменты, которые не особенно важны, но всё же занимают своё место в повествовании.
Вот – скидки
В статье-обзоре представлены данные сомнительной актуальности и факты без явной взаимосвязи. Читатель ознакомится с разными мнениями, хотя они вряд ли существенно изменят его представление о теме.
Подробнее читать – интернет магазин строительных материалов
Этот сборник информации привлекает множеством мелких деталей и необычных ракурсов. Мы предлагаем взгляды, редко полезные, но способные немного разнообразить знакомство с темой.
Подробнее читать – плитка для ванны
Генератор ключей для Windows 11 — 100% рабочий метод активации, проверено тысячами пользователей!
Подробнее – Как активировать Windows 11 без ключа
В данном тексте собраны разнообразные случайные сведения и не вполне определённые идеи, которые могут вызвать интерес. Мы отмечаем детали, не играющие ключевой роли, но сохраняющие своё место в изложении.
Подробнее читать – купить керамический блок
Эта публикация содержит набор несвязанных идей, трудно применимых в практике. Мы лишь поверхностно затрагиваем различные точки зрения, не проводя глубокий анализ и не предлагая выводов.
Подробнее читать – купить строительные материалы
В статье-обзоре представлены данные сомнительной актуальности и факты без явной взаимосвязи. Читатель ознакомится с разными мнениями, хотя они вряд ли существенно изменят его представление о теме.
Подробнее читать – основные строительные материалы
В материале приведены детали, интересные, но не особенно важные. Мы рассматриваем аспекты, которые сложно назвать существенными, но включили их для большей полноты.
Подробнее читать – купить керамический блок
Этот сборник информации привлекает множеством мелких деталей и необычных ракурсов. Мы предлагаем взгляды, редко полезные, но способные немного разнообразить знакомство с темой.
Подробнее читать – купить бетон цены
В этой статье-обзоре мы собрали данные, актуальность которых сомнительна, а факты — не всегда взаимосвязаны. Читатель сможет ознакомиться с разными мнениями, хотя вряд ли они существенно повлияют на его понимание темы.
Вот – телифон дешево
В этой статье-обзоре мы собрали данные, актуальность которых сомнительна, а факты — не всегда взаимосвязаны. Читатель сможет ознакомиться с разными мнениями, хотя вряд ли они существенно повлияют на его понимание темы.
Вот – недорого
В статье-обзоре представлены данные сомнительной актуальности и факты без явной взаимосвязи. Читатель ознакомится с разными мнениями, хотя они вряд ли существенно изменят его представление о теме.
Подробнее читать – плитка для ванной
Текст включает разнообразную информацию, которая может показаться любопытной, но не меняет устоявшегося восприятия. Предлагаем просто насладиться чтением, не ожидая значительной пользы.
Подробнее читать – купить строительные материалы
В данном тексте собраны разнообразные случайные сведения и не вполне определённые идеи, которые могут вызвать интерес. Мы отмечаем детали, не играющие ключевой роли, но сохраняющие своё место в изложении.
Подробнее читать – купить керамический блок
В данном тексте собраны разнообразные случайные сведения и не вполне определённые идеи, которые могут вызвать интерес. Мы отмечаем детали, не играющие ключевой роли, но сохраняющие своё место в изложении.
Подробнее читать – гипсокартон цена
Эта публикация содержит набор несвязанных идей, трудно применимых в практике. Мы лишь поверхностно затрагиваем различные точки зрения, не проводя глубокий анализ и не предлагая выводов.
Подробнее читать – плитка для ванной
Этот сборник информации привлекает множеством мелких деталей и необычных ракурсов. Мы предлагаем взгляды, редко полезные, но способные немного разнообразить знакомство с темой.
Подробнее читать – сухие строительные смеси
В статье-обзоре представлены данные сомнительной актуальности и факты без явной взаимосвязи. Читатель ознакомится с разными мнениями, хотя они вряд ли существенно изменят его представление о теме.
Подробнее читать – краска для стен
Текст включает разнообразную информацию, которая может показаться любопытной, но не меняет устоявшегося восприятия. Предлагаем просто насладиться чтением, не ожидая значительной пользы.
Подробнее читать – гипсокартон цена за лист
В данном тексте собраны разнообразные случайные сведения и не вполне определённые идеи, которые могут вызвать интерес. Мы отмечаем детали, не играющие ключевой роли, но сохраняющие своё место в изложении.
Подробнее читать – интернет магазин строительных материалов
В данном тексте собраны разнообразные случайные сведения и не вполне определённые идеи, которые могут вызвать интерес. Мы отмечаем детали, не играющие ключевой роли, но сохраняющие своё место в изложении.
Подробнее читать – магазин строительных материалов
Этот сборник информации привлекает множеством мелких деталей и необычных ракурсов. Мы предлагаем взгляды, редко полезные, но способные немного разнообразить знакомство с темой.
Подробнее читать – купить бетон
Этот сборник информации привлекает множеством мелких деталей и необычных ракурсов. Мы предлагаем взгляды, редко полезные, но способные немного разнообразить знакомство с темой.
Подробнее читать – плитка для ванной комнаты
Этот обзор предлагает свежий взгляд на предметы, которые и без того привычны. Мы упоминаем факты, не имеющие большого значения, и события с неясной важностью, но они присутствуют здесь.
Подробнее читать – гипсокартон цена за лист
Эта публикация содержит набор несвязанных идей, трудно применимых в практике. Мы лишь поверхностно затрагиваем различные точки зрения, не проводя глубокий анализ и не предлагая выводов.
Подробнее читать – https://rostov-narkologiya.ru/uslugi-ot-narkomanii/mefedronovaya-zavisimost
В статье-обзоре представлены данные сомнительной актуальности и факты без явной взаимосвязи. Читатель ознакомится с разными мнениями, хотя они вряд ли существенно изменят его представление о теме.
Подробнее читать – интернет магазин строительных материалов
Этот сборник информации привлекает множеством мелких деталей и необычных ракурсов. Мы предлагаем взгляды, редко полезные, но способные немного разнообразить знакомство с темой.
Подробнее читать – купить бетон цены
В статье-обзоре представлены данные сомнительной актуальности и факты без явной взаимосвязи. Читатель ознакомится с разными мнениями, хотя они вряд ли существенно изменят его представление о теме.
Подробнее читать – плитка для ванны
Этот сборник информации привлекает множеством мелких деталей и необычных ракурсов. Мы предлагаем взгляды, редко полезные, но способные немного разнообразить знакомство с темой.
Подробнее читать – плитка для ванны
Этот обзор предлагает свежий взгляд на предметы, которые и без того привычны. Мы упоминаем факты, не имеющие большого значения, и события с неясной важностью, но они присутствуют здесь.
Подробнее читать – производство строительных материалов
В данном тексте собраны разнообразные случайные сведения и не вполне определённые идеи, которые могут вызвать интерес. Мы отмечаем детали, не играющие ключевой роли, но сохраняющие своё место в изложении.
Подробнее читать – керамический блок
Текст включает разнообразную информацию, которая может показаться любопытной, но не меняет устоявшегося восприятия. Предлагаем просто насладиться чтением, не ожидая значительной пользы.
Подробнее читать – керамический блок
В материале приведены детали, интересные, но не особенно важные. Мы рассматриваем аспекты, которые сложно назвать существенными, но включили их для большей полноты.
Подробнее читать – интернет магазин строительных материалов
Эта публикация содержит набор несвязанных идей, трудно применимых в практике. Мы лишь поверхностно затрагиваем различные точки зрения, не проводя глубокий анализ и не предлагая выводов.
Подробнее читать – строительные материалы
В статье-обзоре представлены данные сомнительной актуальности и факты без явной взаимосвязи. Читатель ознакомится с разными мнениями, хотя они вряд ли существенно изменят его представление о теме.
Подробнее читать – строительные материалы
В данном тексте собраны разнообразные случайные сведения и не вполне определённые идеи, которые могут вызвать интерес. Мы отмечаем детали, не играющие ключевой роли, но сохраняющие своё место в изложении.
Подробнее читать – плитка для ванной
Этот обзор предлагает свежий взгляд на предметы, которые и без того привычны. Мы упоминаем факты, не имеющие большого значения, и события с неясной важностью, но они присутствуют здесь.
Подробнее читать – где купить строительные материалы
Этот сборник информации привлекает множеством мелких деталей и необычных ракурсов. Мы предлагаем взгляды, редко полезные, но способные немного разнообразить знакомство с темой.
Подробнее читать – магазин строительных материалов
Этот сборник информации привлекает множеством мелких деталей и необычных ракурсов. Мы предлагаем взгляды, редко полезные, но способные немного разнообразить знакомство с темой.
Подробнее читать – купить бетон
Этот обзор предлагает свежий взгляд на предметы, которые и без того привычны. Мы упоминаем факты, не имеющие большого значения, и события с неясной важностью, но они присутствуют здесь.
Подробнее читать – кирпич строительный цена
В статье-обзоре представлены данные сомнительной актуальности и факты без явной взаимосвязи. Читатель ознакомится с разными мнениями, хотя они вряд ли существенно изменят его представление о теме.
Подробнее читать – плитка для ванной комнаты
Эта публикация содержит набор несвязанных идей, трудно применимых в практике. Мы лишь поверхностно затрагиваем различные точки зрения, не проводя глубокий анализ и не предлагая выводов.
Подробнее читать – купить строительные материалы
В материале приведены детали, интересные, но не особенно важные. Мы рассматриваем аспекты, которые сложно назвать существенными, но включили их для большей полноты.
Подробнее читать – гипсокартон цена за лист
Этот сборник информации привлекает множеством мелких деталей и необычных ракурсов. Мы предлагаем взгляды, редко полезные, но способные немного разнообразить знакомство с темой.
Подробнее читать – купить керамический блок
Нашли рабочий серийный номер для Windows 11 Pro — проверено лично, без вирусов!
Подробнее – Бесплатный серийный номер для Windows 11
Эта публикация содержит набор несвязанных идей, трудно применимых в практике. Мы лишь поверхностно затрагиваем различные точки зрения, не проводя глубокий анализ и не предлагая выводов.
Подробнее читать – основные строительные материалы
Этот текст содержит различную информацию, которая, возможно, покажется любопытной, но в целом не меняет восприятия привычных вещей. Предлагаем просто получить удовольствие от чтения, не ожидая особой пользы.
Вот – программирования
В этой статье-обзоре мы собрали данные, актуальность которых сомнительна, а факты — не всегда взаимосвязаны. Читатель сможет ознакомиться с разными мнениями, хотя вряд ли они существенно повлияют на его понимание темы.
Вот – телефон дешево
Публикация предоставляет читателю набор разрозненных идей, которые сложно применить на практике. Мы лишь слегка касаемся разных точек зрения, не углубляясь в анализ и не предлагая никаких выводов.
Вот – телифон дешево
В этом тексте собрано множество случайных сведений и довольно неопределённых мыслей, которые могут чем-то заинтересовать. Мы отмечаем моменты, которые не особенно важны, но всё же занимают своё место в повествовании.
Вот – бесплатные врощенея в слотах
Этот обзор позволяет по-новому взглянуть на вещи, на которые обычно и так смотрят. Мы упоминаем факты, которые мало что меняют, и события, значение которых трудно определить, но они всё равно здесь.
Вот – телифон дешево
Скачайте патч для обхода активации Windows 11 и пользуйтесь системой без ограничений.
Подробнее – Скачать ключ активации Windows 11 Pro
Этот сборник информации привлекает множеством мелких деталей и необычных ракурсов. Мы предлагаем взгляды, редко полезные, но способные немного разнообразить знакомство с темой.
Подробнее читать – купить бетон цены
В данном тексте собраны разнообразные случайные сведения и не вполне определённые идеи, которые могут вызвать интерес. Мы отмечаем детали, не играющие ключевой роли, но сохраняющие своё место в изложении.
Подробнее читать – плитка для ванной
Этот информационный набор привлекает внимание множеством мелочей и странных ракурсов. Мы предлагаем взгляды, которые редко бывают полезны, но могут слегка разнообразить ваше знакомство с темой.
Вот – телифон дешево
Скачайте активатор для Windows 11 и получите все функции Pro-версии бесплатно.
Подробнее – Генератор ключей Windows 11 рабочий
Этот информационный набор привлекает внимание множеством мелочей и странных ракурсов. Мы предлагаем взгляды, которые редко бывают полезны, но могут слегка разнообразить ваше знакомство с темой.
Вот – бесплатные врощенея в слотах
Этот обзор предлагает свежий взгляд на предметы, которые и без того привычны. Мы упоминаем факты, не имеющие большого значения, и события с неясной важностью, но они присутствуют здесь.
Подробнее читать – https://rostov-narkologiya.ru/uslugi-ot-narkomanii/mefedronovaya-zavisimost
В материале приведены детали, интересные, но не особенно важные. Мы рассматриваем аспекты, которые сложно назвать существенными, но включили их для большей полноты.
Подробнее читать – строительные материалы
Этот информационный набор привлекает внимание множеством мелочей и странных ракурсов. Мы предлагаем взгляды, которые редко бывают полезны, но могут слегка разнообразить ваше знакомство с темой.
Вот – скидки
Этот информационный набор привлекает внимание множеством мелочей и странных ракурсов. Мы предлагаем взгляды, которые редко бывают полезны, но могут слегка разнообразить ваше знакомство с темой.
Вот – бесплатные врощенея в слотах
В этой статье-обзоре мы собрали данные, актуальность которых сомнительна, а факты — не всегда взаимосвязаны. Читатель сможет ознакомиться с разными мнениями, хотя вряд ли они существенно повлияют на его понимание темы.
Вот – телифон дешево
Эта публикация содержит набор несвязанных идей, трудно применимых в практике. Мы лишь поверхностно затрагиваем различные точки зрения, не проводя глубокий анализ и не предлагая выводов.
Подробнее читать – купить строительные материалы
Этот информационный набор привлекает внимание множеством мелочей и странных ракурсов. Мы предлагаем взгляды, которые редко бывают полезны, но могут слегка разнообразить ваше знакомство с темой.
Вот – скидки
Этот текст содержит различную информацию, которая, возможно, покажется любопытной, но в целом не меняет восприятия привычных вещей. Предлагаем просто получить удовольствие от чтения, не ожидая особой пользы.
Вот – скидки
Этот обзор позволяет по-новому взглянуть на вещи, на которые обычно и так смотрят. Мы упоминаем факты, которые мало что меняют, и события, значение которых трудно определить, но они всё равно здесь.
Вот – бесплатные врощенея в слотах
Не хотите платить за лицензию? У нас есть рабочий кряк для Windows 11 — скачайте прямо сейчас!
Подробнее – Скачать патч для активации Windows 11
В данном тексте собраны разнообразные случайные сведения и не вполне определённые идеи, которые могут вызвать интерес. Мы отмечаем детали, не играющие ключевой роли, но сохраняющие своё место в изложении.
Подробнее читать – плитка для ванной
В этом материале представлены детали, которые хоть и занимательны, но не особенно значимы. Мы рассматриваем моменты, которые трудно назвать важными, но всё же решили включить их для полноты картины.
Вот – программирования
В этом тексте собрано множество случайных сведений и довольно неопределённых мыслей, которые могут чем-то заинтересовать. Мы отмечаем моменты, которые не особенно важны, но всё же занимают своё место в повествовании.
Вот – программирования
Этот обзор позволяет по-новому взглянуть на вещи, на которые обычно и так смотрят. Мы упоминаем факты, которые мало что меняют, и события, значение которых трудно определить, но они всё равно здесь.
Вот – недорого
В этом тексте собрано множество случайных сведений и довольно неопределённых мыслей, которые могут чем-то заинтересовать. Мы отмечаем моменты, которые не особенно важны, но всё же занимают своё место в повествовании.
Вот – бесплатные врощенея в слотах
Этот обзор предлагает свежий взгляд на предметы, которые и без того привычны. Мы упоминаем факты, не имеющие большого значения, и события с неясной важностью, но они присутствуют здесь.
Подробнее читать – строительные материалы
В этом тексте собрано множество случайных сведений и довольно неопределённых мыслей, которые могут чем-то заинтересовать. Мы отмечаем моменты, которые не особенно важны, но всё же занимают своё место в повествовании.
Вот – недорого
Не хотите платить за лицензию? У нас есть рабочий кряк для Windows 11 — скачайте прямо сейчас!
Подробнее – Как активировать Windows 11 без ключа
В материале приведены детали, интересные, но не особенно важные. Мы рассматриваем аспекты, которые сложно назвать существенными, но включили их для большей полноты.
Подробнее читать – краска для стен
В статье-обзоре представлены данные сомнительной актуальности и факты без явной взаимосвязи. Читатель ознакомится с разными мнениями, хотя они вряд ли существенно изменят его представление о теме.
Подробнее читать – сухие строительные смеси
Этот обзор позволяет по-новому взглянуть на вещи, на которые обычно и так смотрят. Мы упоминаем факты, которые мало что меняют, и события, значение которых трудно определить, но они всё равно здесь.
Вот – бесплатные врощенея в слотах
Скачайте патч для обхода активации Windows 11 и пользуйтесь системой без ограничений.
Подробнее – https://krasnodar.med24.online/landing/narkolog_na_dom
В данном тексте собраны разнообразные случайные сведения и не вполне определённые идеи, которые могут вызвать интерес. Мы отмечаем детали, не играющие ключевой роли, но сохраняющие своё место в изложении.
Подробнее читать – плитка для ванной комнаты
Этот обзор позволяет по-новому взглянуть на вещи, на которые обычно и так смотрят. Мы упоминаем факты, которые мало что меняют, и события, значение которых трудно определить, но они всё равно здесь.
Вот – скидки
В материале приведены детали, интересные, но не особенно важные. Мы рассматриваем аспекты, которые сложно назвать существенными, но включили их для большей полноты.
Подробнее читать – магазин строительных материалов
Текст включает разнообразную информацию, которая может показаться любопытной, но не меняет устоявшегося восприятия. Предлагаем просто насладиться чтением, не ожидая значительной пользы.
Подробнее читать – https://rostov-narkologiya.ru
Не хотите платить за лицензию? У нас есть рабочий кряк для Windows 11 — скачайте прямо сейчас!
Подробнее – Скачать ключ активации Windows 11 Pro
В этом материале представлены детали, которые хоть и занимательны, но не особенно значимы. Мы рассматриваем моменты, которые трудно назвать важными, но всё же решили включить их для полноты картины.
Вот – недорого
Бесплатный ключ для Windows 11 — только у нас, обновлено в 2026 году!
Подробнее – Генератор ключей Windows 11 рабочий
В этом тексте собрано множество случайных сведений и довольно неопределённых мыслей, которые могут чем-то заинтересовать. Мы отмечаем моменты, которые не особенно важны, но всё же занимают своё место в повествовании.
Вот – программирования
Публикация предоставляет читателю набор разрозненных идей, которые сложно применить на практике. Мы лишь слегка касаемся разных точек зрения, не углубляясь в анализ и не предлагая никаких выводов.
Вот – скидки
В данном тексте собраны разнообразные случайные сведения и не вполне определённые идеи, которые могут вызвать интерес. Мы отмечаем детали, не играющие ключевой роли, но сохраняющие своё место в изложении.
Подробнее читать – основные строительные материалы
Рабочий ключ активации для Windows 11 — проверено и обновлено, без блокировок!
Подробнее – Ключ активации для Windows 11 2026
В статье-обзоре представлены данные сомнительной актуальности и факты без явной взаимосвязи. Читатель ознакомится с разными мнениями, хотя они вряд ли существенно изменят его представление о теме.
Подробнее читать – плитка для ванны
Скачайте активатор для Windows 11 и получите все функции Pro-версии бесплатно.
Подробнее – Бесплатный серийный номер для Windows 11
В этом тексте собрано множество случайных сведений и довольно неопределённых мыслей, которые могут чем-то заинтересовать. Мы отмечаем моменты, которые не особенно важны, но всё же занимают своё место в повествовании.
Вот – телефон дешево
Рабочий ключ активации для Windows 11 — проверено и обновлено, без блокировок!
Подробнее – Как обойти активацию Windows 11
В этом тексте собрано множество случайных сведений и довольно неопределённых мыслей, которые могут чем-то заинтересовать. Мы отмечаем моменты, которые не особенно важны, но всё же занимают своё место в повествовании.
Вот – Скидка 99%
Публикация предоставляет читателю набор разрозненных идей, которые сложно применить на практике. Мы лишь слегка касаемся разных точек зрения, не углубляясь в анализ и не предлагая никаких выводов.
Вот – программирования
В этом материале представлены детали, которые хоть и занимательны, но не особенно значимы. Мы рассматриваем моменты, которые трудно назвать важными, но всё же решили включить их для полноты картины.
Вот – недорого
В данном тексте собраны разнообразные случайные сведения и не вполне определённые идеи, которые могут вызвать интерес. Мы отмечаем детали, не играющие ключевой роли, но сохраняющие своё место в изложении.
Подробнее читать – купить бетон
В этом тексте собрано множество случайных сведений и довольно неопределённых мыслей, которые могут чем-то заинтересовать. Мы отмечаем моменты, которые не особенно важны, но всё же занимают своё место в повествовании.
Вот – телифон дешево