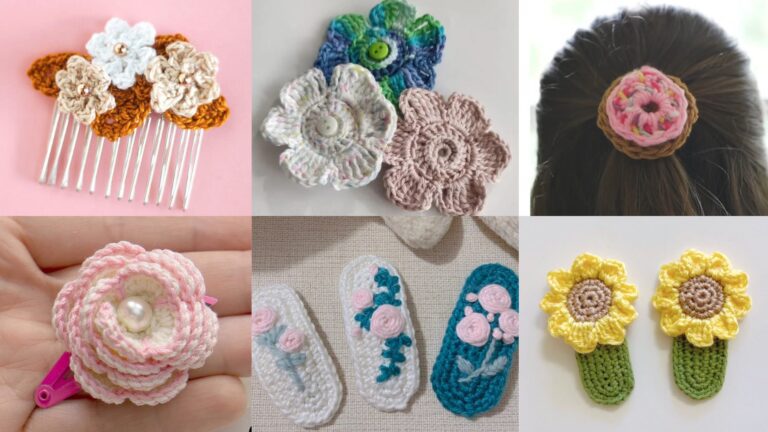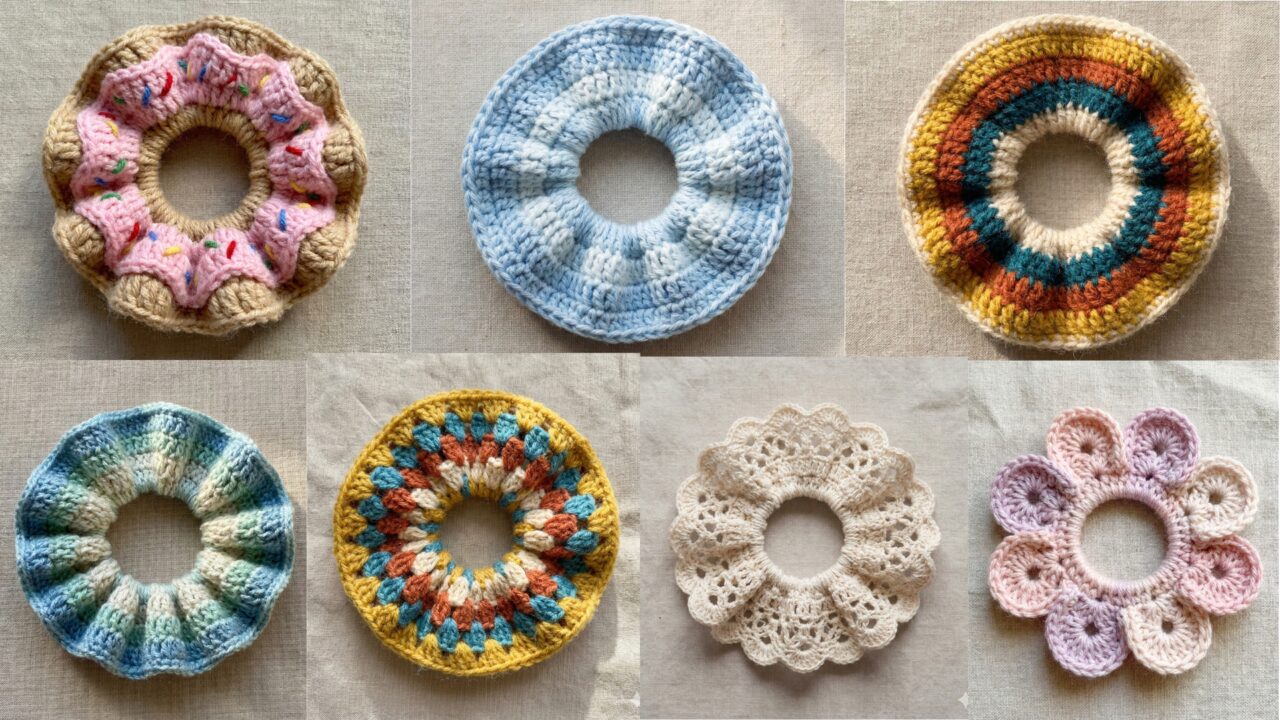
A crochet scrunchie is one of the fastest, most satisfying accessories to make — tiny, portable, and instantly giftable. They’re also a brilliant way to use scraps, practice stitches, and create functional art: light-as-air lace for brunch, absorbent cotton for workouts, or texture-rich puff stitches for a statement. Below you’ll find a single practical introduction (materials, sizing, how to measure), followed by seven full patterns — Donut, Colorful Retro Striped, Cotton Spring Blue Stripe, Lace, Falmore River (wave/ripple), Granny Stitch, and Flower Scrunchie. Each pattern includes:
- Skill level
- Materials & sample yardage
- Gauge guidance and how to size to any elastic
- Very detailed step-by-step instructions you can follow now (US terms)
- Variations, finishing tips, and care instructions
Read the introduction once, then jump to whichever design you want to make first.
Quick introduction — tools, elastic sizing, yarn choices & gauge
Tools & notions (general)
- Small sharp scissors, tapestry needle, stitch marker (optional), stitch gauge ruler.
- Hair elastic (flat hair elastic or round elastic band) in the length you want — typical small/medium elastic circumference when laid flat is 6–8 in (15–20 cm). I’ll show how to measure and calculate stitches below.
- Optional: 3 mm — 6 mm crochet hooks depending on yarn weight; blocking pins & mat if using cotton thread or lace.
Yarn choices (how they affect look & size)
- Thread / size 10 crochet cotton — very delicate, crisp scrunchies (bridal, vintage).
- Fingering / sock weight — light and drapey.
- DK / light worsted — balanced body and softness.
- Worsted / Aran — chunky, voluminous scrunchies (statement).
- Cotton — best for washability and workouts; less elastic than acrylic; choose a cotton-blend for softer stretch.
- Acrylic / blends — fluffy, soft, forgiving for beginners.
How to size a scrunchie to an elastic (method you can reuse)
- Measure the elastic circumference: lay the elastic flat in a circle and measure around the inside edge with a tape. Call this measurement E (in inches). Typical E = 6–8 in.
- Make a gauge swatch: choose a stitch you’ll use for the first round (sc or hdc) and make a 1″ swatch in the same yarn & hook. Count stitches per inch (spi). Example: if you used worsted yarn + 5.0 mm hook and get 4 sc per inch, spi = 4.
- Calculate foundation stitches: multiply E × spi to get S = number of stitches around the elastic. Example arithmetic (digit-by-digit): if E = 7 inches and spi = 4 → 7 × 4 = (7 × 4) = 28 stitches. Round S to match pattern repeat if the stitch pattern needs a multiple (I’ll call out repeats).
- Foundation chain or foundation single crochet (fsc): either chain S and join, or use foundation single crochet for a neat start. Always join carefully (no twist) to form the round that sits around the elastic.
Practical recommendation: many scrunchie patterns use a comfortable starting band of 24–36 stitches depending on yarn/gauge. If you are unsure, measure a sample elastic and do the simple math above. If you prefer one-size-fits-all, work a sample and fit around the elastic before continuing.
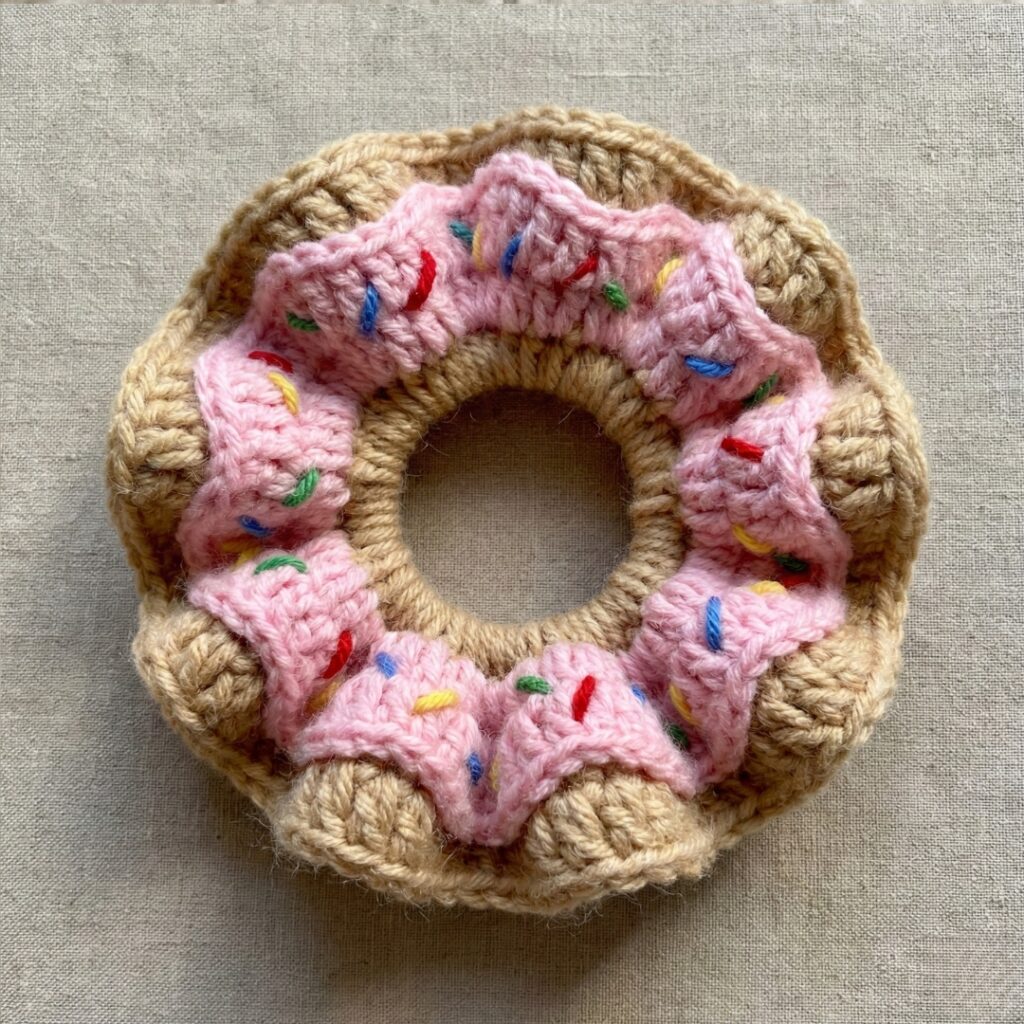
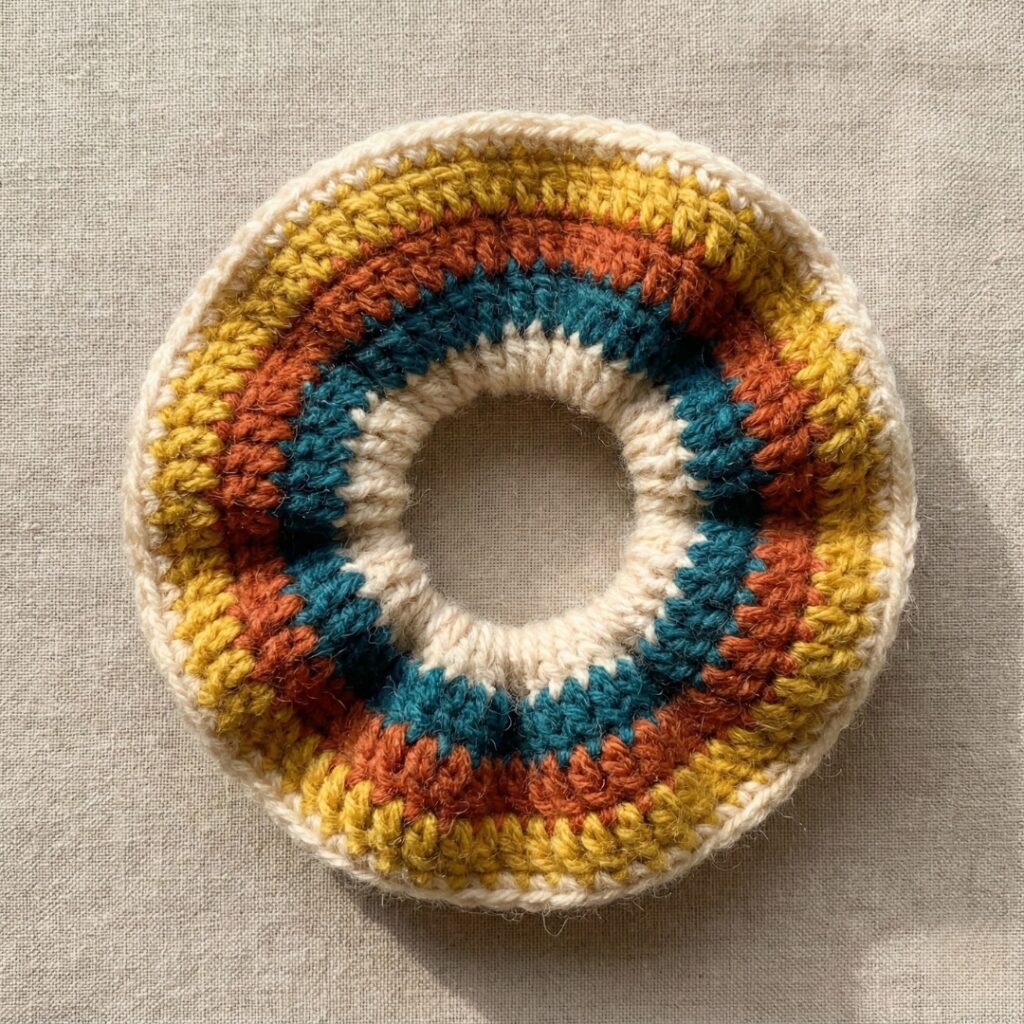
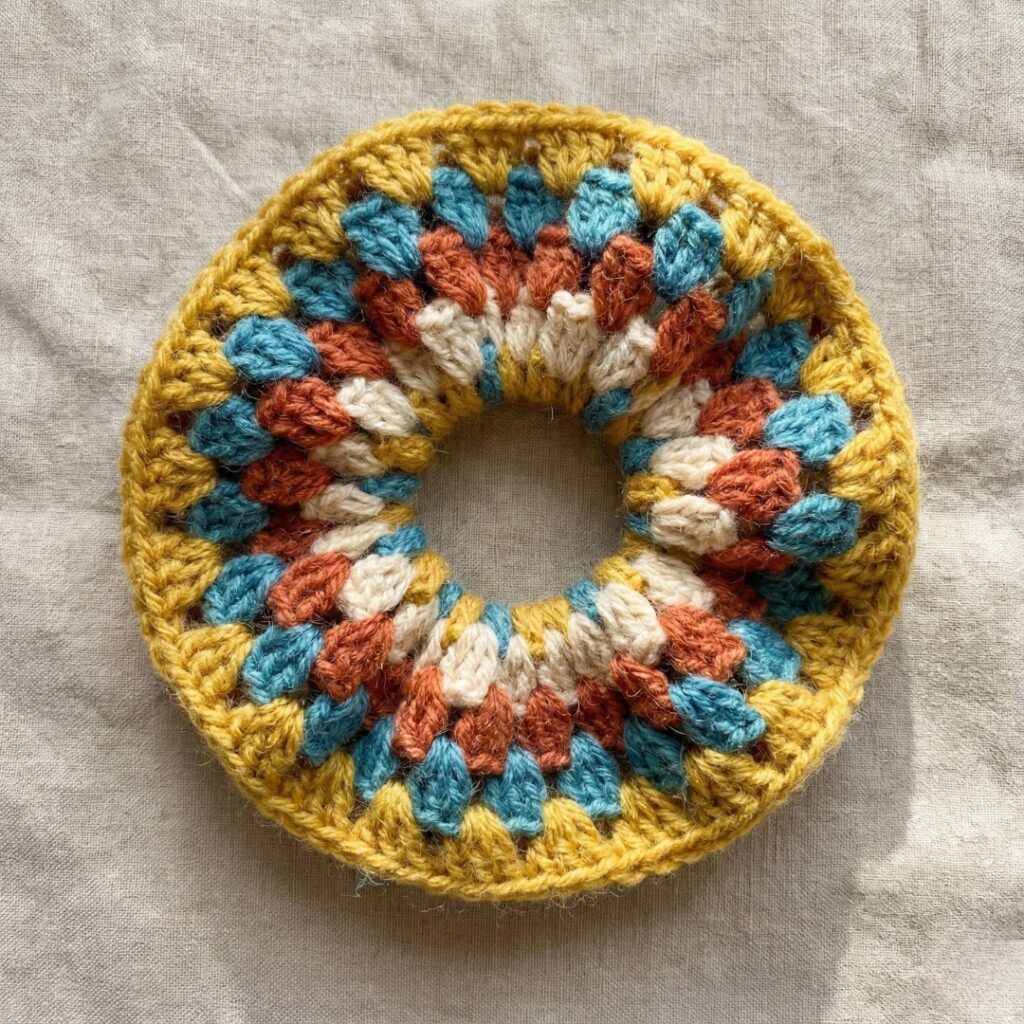
1. Crochet Donut Scrunchie Pattern
Skill level: Confident beginner — basic stitches plus working into back loops and post stitches.
Materials (sample medium scrunchie)
- Worsted weight acrylic or acrylic-blend (~15–25 yds).
- Hook: 5.0 mm (H) recommended for worsted; drop to 4.5 mm for a firmer fabric.
- 1 medium hair elastic (E ≈ 7 in).
- Tapestry needle.
Gauge example: ~4 sc = 1 in in worsted yarn with 5.0 mm hook (spi ≈ 4). For E = 7″ → S = 28 stitches.
Design concept
A plush “donut” scrunchie uses an inner tightly-worked base around the elastic and an outer plush textured layer (BLO rib + puff/fp stitches) that forms a voluminous ring.
Step-by-step
Foundation & base (secure the elastic)
- Measure your elastic (E). Using gauge above: E 7″ × spi 4 = S 28. Chain 28. Join carefully to a ring with a sl st — do not twist. (If you prefer, use fsc 28.)
- Round 1: ch1, sc in each ch around. Sl st to join. (28 sc) — this sets the base.
Important: To make the scrunchie hold the elastic tightly, fold the elastic inside the ring now and slip a few sc stitches around both elastic and ring to anchor it. You can also leave elastic out and insert later — both approaches work; anchoring now prevents twisting.
Round 2 (BLO rib anchor): ch1, sc in BLO in each st around. Join. This creates a neat ridge to hide elastic and begin the donut body.
Outer plush rounds (build volume)
3. Round 3: ch2, hdc in next st, fpdc around next st repeat around (hdc adds slight height, fpdc makes raised ridges). Join.
4. Round 4: ch2, fpdc around the post made in previous round, hdc in next st rep around. Join. Repeat Rounds 3–4 for 3–5 pairs until the outer fabric is a plush ring about 1–1.5″ wide. (Adjust repeats to preference.)
Optional Puff Accent (extra “dough”): In every 4th stitch of the outer round, replace hdc with a 3-loop puff: yo insert, pull up loop ×3, yo pull through all loops, ch1 to close. Work one locking sc round after puff row to secure.
Finish
- Work one last round of sc in both loops to tidy edges. Fasten off leaving a 6″ tail. Weave tail to the inside to hide.
If elastic inserted later: compress the ring, slip the elastic inside, and hand-stitch the inner seam closed with several passes to hold elastic inside.
Variations & tips
- Hold two strands together (worsted held double) for extra chunky donut. Use larger hook.
- Make fluffy “donut frosting” by adding an irregular bobble round with contrasting color.
- For fitness scrunchies, use cotton and fewer puff rounds — cotton absorbs sweat and is more durable.
Finishing & care
- Weave tails well. Machine wash gentle for acrylic; reshape and air dry. For cotton, hand wash and lay flat.
2. Crochet Colorful Retro Striped Scrunchie Pattern
Skill level: Confident beginner — color changes and even rounds.
Materials
- Several small scraps of fingering or DK yarn in retro colors (mustard, rust, teal, cream) — ~20–35 yds total.
- Hook: 3.5–4.5 mm depending on yarn.
- Elastic E ≈ 6–7 in.
- Tapestry needle.
Design concept
A simple, bold striped scrunchie made by working alternating rounds of dc (or hdc) in different colors. Stripes are clean, vintage-inspired, and easy to scale. Use visible color joins or carry color inside.
Step-by-step
Foundation
- Measure elastic; with DK gauge spi ≈ 4.5 sc/in and E 7″ → S ≈ 31.5 → round to nearest practical count — 32. Chain 32 and join. (Or do fsc 32.)
- Round 1: ch2 (counts as hdc), hdc in each st around. Join. (32 hdc)
Striped rounds
3. Round 2: change to Color A; ch2, hdc around; join. Rounds 3–4: change to Color B, work 2 rounds; Rounds 5–6: Color C, 2 rounds; repeat color sequence until scrunchie height is about 1–1.25″ tall (4–6 stripe bands). Tip: change color at the start of round by finishing preceding round with last yarn over using the new color so joins are neat.
Optional texture
- After stripes are established, add one round of shell or picot in contrast color for retro cuff: sc in next 2 sts, 5 dc in next st, sc in next 2 repeating.
Finish & insert elastic
4. If you anchored elastic at start, simply secure final tail. If elastic not inserted, fold ring and thread elastic through inside; hand-stitch the elastic ends together (overlap ½” and sew securely) then stitch opening closed.
Variations & tips
- Use thin metallic held together with main color if you want a subtle shimmer.
- For very neat color joins, weave in color ends as you go or use carry method when distances are short.
Care
- Machine-wash gentle for acrylic or cotton blends, reshape damp.
3. Crochet Cotton Spring Blue Stripe Scrunchie Pattern
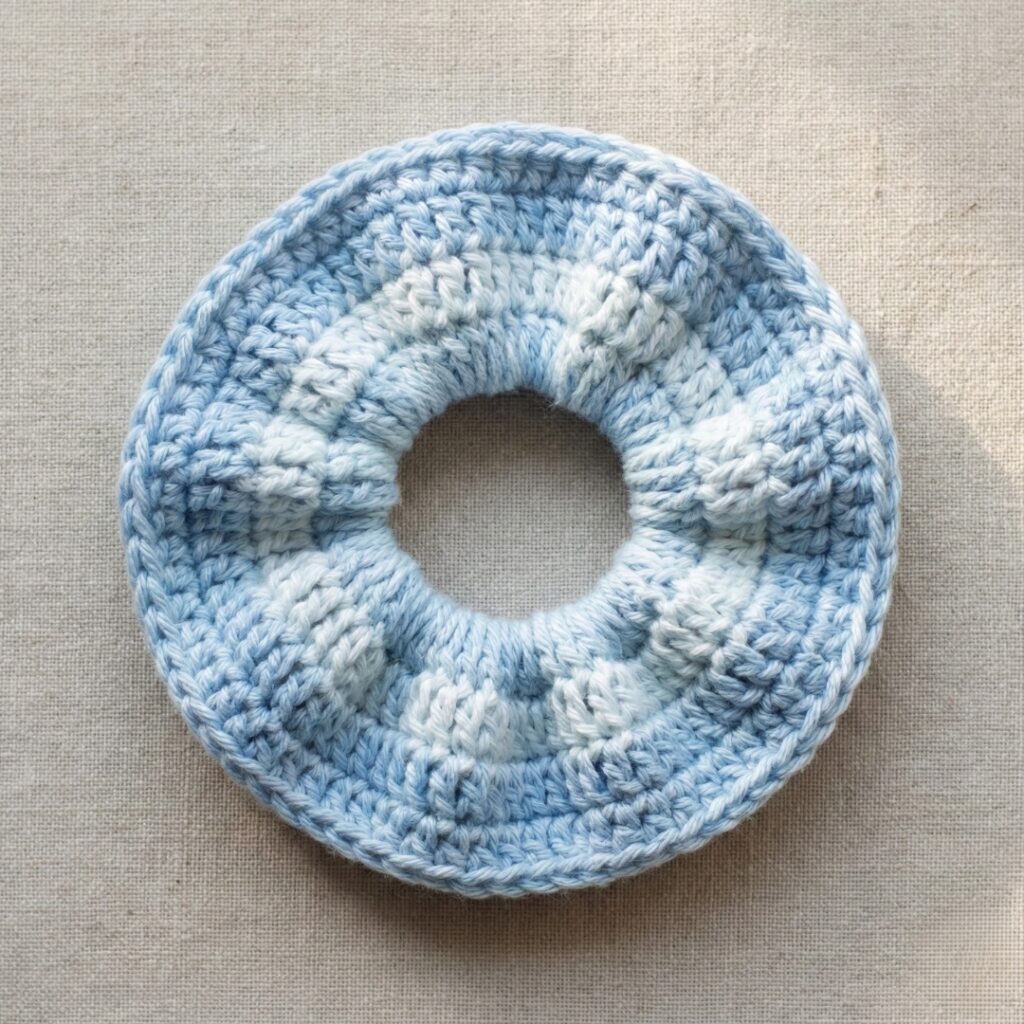
Skill level: Confident beginner — cotton yarn & clean stitches.
Materials
- 100% cotton DK in spring-blue gradient (or blue + white) — ~20–30 yds.
- Hook: 3.5–4.0 mm.
- Elastic E ≈ 6–7 in.
- Tapestry needle.
Design concept
A compact, absorbent cotton scrunchie with neat rows of hdc or half-twist rib so it holds hair firmly while being soft on hair.
Step-by-step (hdc rib band)
Foundation & band
- Measure elastic: E 7″ × spi in cotton hdc ~4 → S = 28 stitches. ch 28, join ring. (Or fhdc 28.)
- Round 1: ch2, hdc in each st around. Join. (28 hdc)
Rib rounds (BLO for subtle rib)
3. Round 2–6: ch2, hdc in BLO across (this creates a ribby texture that grips hair). Join. Repeat until scrunchie reaches 1.0–1.25″ band width (3–5 rounds depending on yarn thickness).
Finish & elastic
4. Insert elastic if not anchored. Pull the band up around the elastic and use the final tail to stitch the band closed neatly through the inside loops only so the outside shows a clean seam.
Variations & tips
- Add 1–2 rounds of reverse single crochet (crab stitch) on the outer round for a neat rope edge.
- Use mercerized cotton for a polished sheen.
Care
- Machine-wash cotton on gentle; reshape to keep ring elasticity.
4. Crochet Lace Scrunchie Pattern
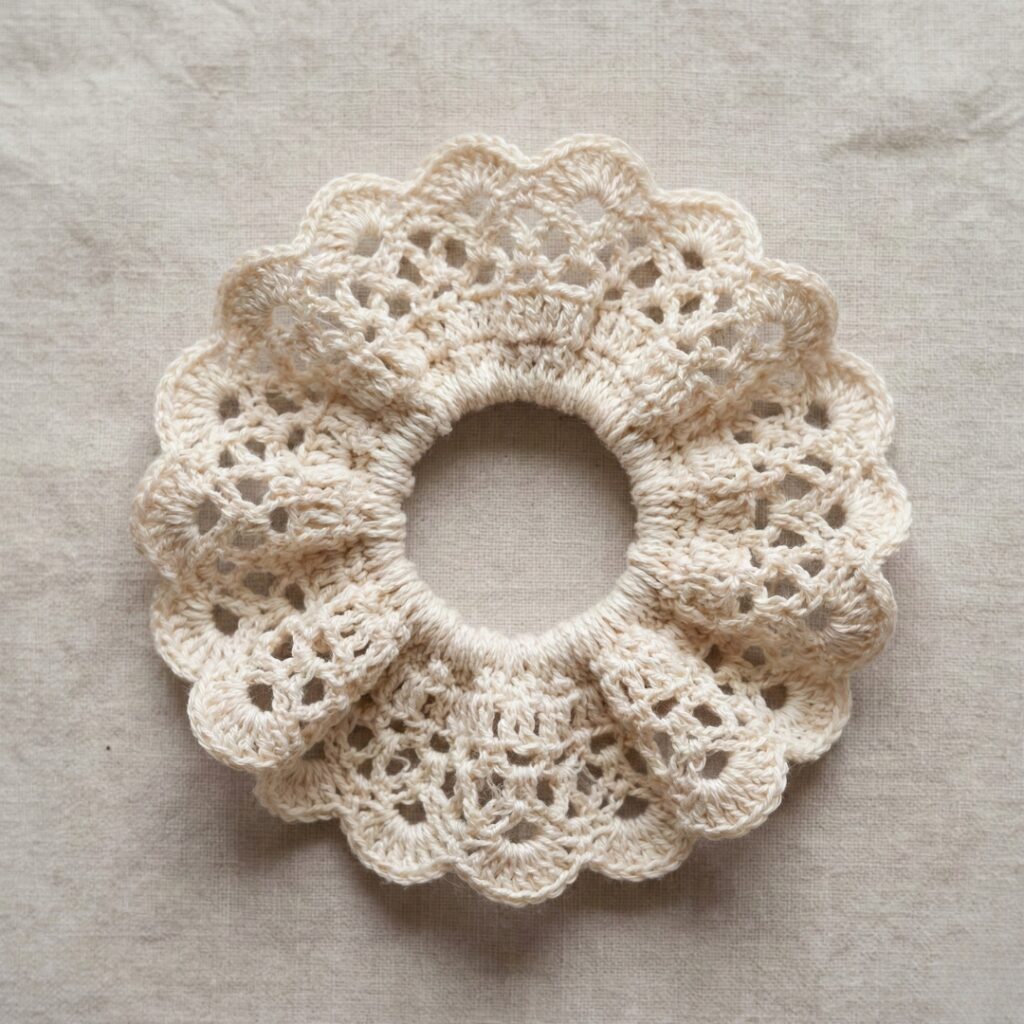
Skill level: Intermediate — small lace repeats and blocking optional.
Materials
- Size 10 cotton thread or fingering cotton — ~15–25 yds.
- Hook: 1.75–2.5 mm (thread) or 2.5–3.0 mm for fingering.
- Elastic E ≈ 6 in (smaller for vintage delicate).
- Blocking pins.
Design concept
A delicate, open lace scrunchie with pretty scalloped edges — airy, very feminine, ideal for dressy occasions.
Stitch multiple & example count
- Lace repeat often needs a multiple — e.g., multiple of 6 + 2. Using thread with spi ≈ 8 sc/in (very dense tiny stitches), for E 6″ → S = 48 stitches (6 × 8 = 48). Use foundation chain to match.
Step-by-step
Foundation & base
- Chain 48 and join; Round 1: ch1, sc around; join.
Lace rounds (sample pattern)
2. Round 2: ch4, sk2, sc in next rep around creating chain arches. Join.
3. Round 3: into each chain-4 arch work (sc, ch2, 3 dc, ch2, sc) to form delicate shells. Join.
4. Round 4: sc round to anchor shells. Repeat Rounds 2–4 until scrunchie height ≈ 1″ (2–3 shell rows).
Scalloped final edge
5. Last round: sc in next 2 sts, 7 dc shell in next ch2 sp, sc in next 2 sts — yields a lacy scallop. Block scrunchie flat and pin scallops evenly, allowing to dry.
Elastic handling
6. Insert elastic before blocking (or after — blocking helps keep shape). Anchor by sewing a few tight stitches through the elastic and the foundation ring.
Variations & tips
- Make an inner lining band of sc rounds to protect hair from thread friction if the lace is a bit rough.
- For bridal sets, pair matching lace scrunchie with headband.
Care
- Hand wash gently; reshape on blocking mat and air dry.
5. Crochet Falmore River Scrunchie Pattern
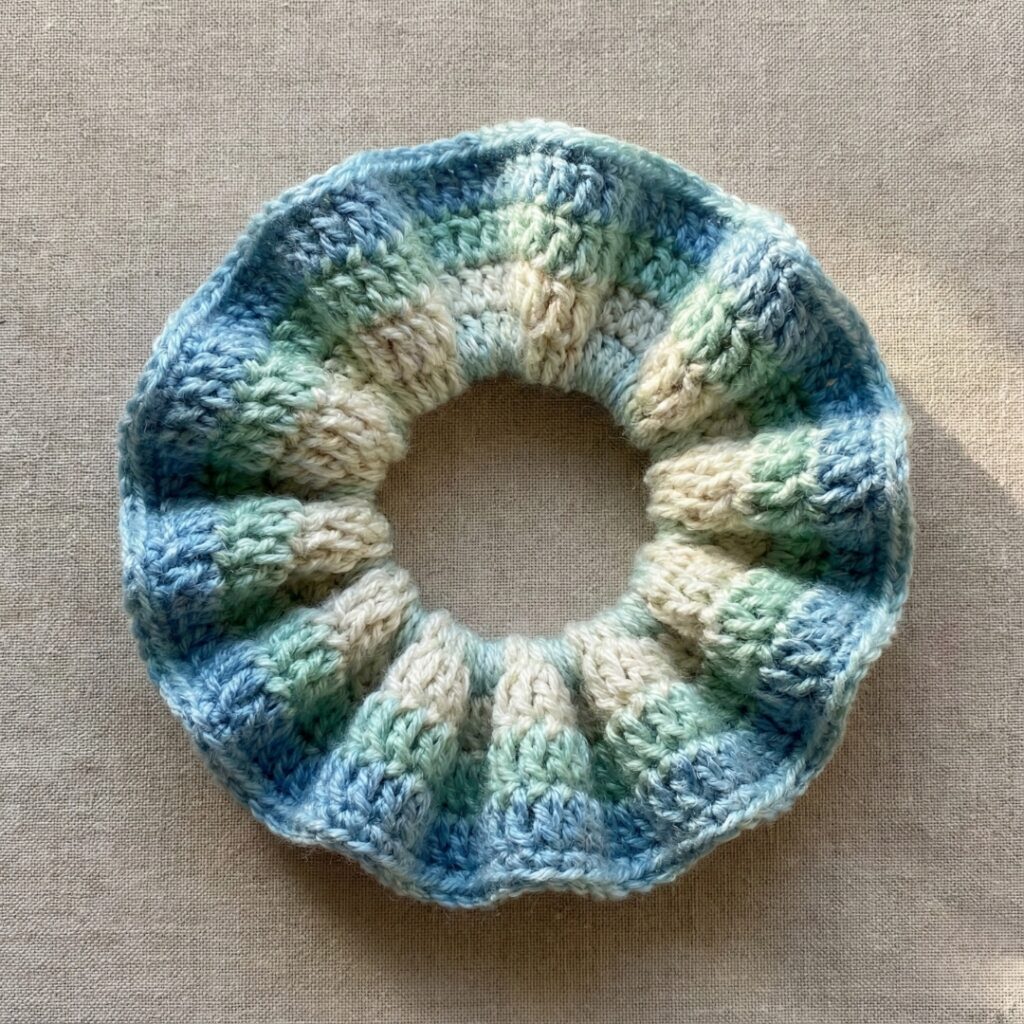
Skill level: Intermediate — ripple/chevron stitch in the round.
Materials
- DK yarn or fingering held double for soft waves — ~20–30 yds.
- Hook: 3.5–4.25 mm.
- Elastic E ≈ 6–7 in.
- Tapestry needle.
Design concept
A rippled outer ring that looks like flowing water — created with a small chevron/ripple stitch worked around the elastic so waves billow out.
Stitch multiple & sample count
- A chevron repeat often is multiple of 6 + 2. Example: for E 7″ and spi ≈ 4 sc/in → S = 28, round up to nearest multiple of 6 + 2 — 6×4 + 2 = 26; 6×5 + 2 = 32. Choose 32 for easier ripple symmetry. Chain 32 join.
Step-by-step
Foundation & base
- ch32, join ring. Round 1: ch1, sc in each st around. Join.
Ripple rounds (example)
2. Round 2: ch2, dc in next 2, tr3tog (decrease over next 3 sts) to create valley, dc in next 2, (2 dc, ch1, 2 dc) in next st (peak) , dc in next 2, tr3tog rep across — this is a compact ripple; adjust counts to fit S. Join.
- Round 3: ch2, sc in each st and into peak ch-sp to anchor. Join.
- Repeat the ripple & anchor sequence for 2–4 rows until the scrunchie has a wavy 1–1.25″ profile.
Finish
5. Last round sc in both loops for tidiness. Fasten off and weave ends. Insert elastic if not anchored.
Variations & tips
- Make the waves more pronounced by increasing the height of peaks (5 dc shells).
- Use gradient yarn to emphasize river flow.
Care
- Machine wash gentle for machine-washable yarns; reshape damp.
6. Crochet Granny Stitch Scrunchie Pattern
Skill level: Confident beginner — granny cluster repeats; excellent scrap-buster.
Materials
- Worsted or DK scrap yarns — ~20–30 yds total.
- Hook: 4.0–5.0 mm depending on yarn.
- Elastic E ≈ 6–7 in.
- Tapestry needle.
Design concept
A scrunchie built from classic little granny clusters (3 dc clusters) arranged in rounds to form a textured circular ring.
Stitch multiple & example count
- Granny cluster sequences use multiples of 3 (cluster groups). For E 7″ × spi 4 = 28 → choose multiple that divides by 3: 30 (3×10). Chain 30, join.
Step-by-step (classic granny rounds)
Foundation & first round
- ch30, join ring. R1: ch3 (counts as dc), ch2, 3 dc in ring repeated around until you have 10 clusters with ch2 spaces between. Join with sl st.
Round 2 (expand ring)
2. Join new color in any ch2 space; work (3 dc, ch2, 3 dc) into the same ch2 space to make corner clusters for round-by-round granny; continue repeating into each ch2 space around. Join.
Round 3 (build height)
3. If you want a bulkier scrunchie, add another round of granny clusters into each ch2 space; stop when width is ~1–1.25″.
Finish & elastic
4. Fold or gather inner round, insert elastic, and sew closed. For more stability, work one final round of sc around inner ring and sew elastic to several sc stitches to anchor.
Variations & tips
- Use two contrasting colors for a mod granny look.
- For a softer look, hold two strands together and make clusters over thicker yarn for puffier scrunchie.
Care
- Machine wash gentle for acrylic or cotton blend; reshape.
7. Crochet Flower Scrunchie Pattern
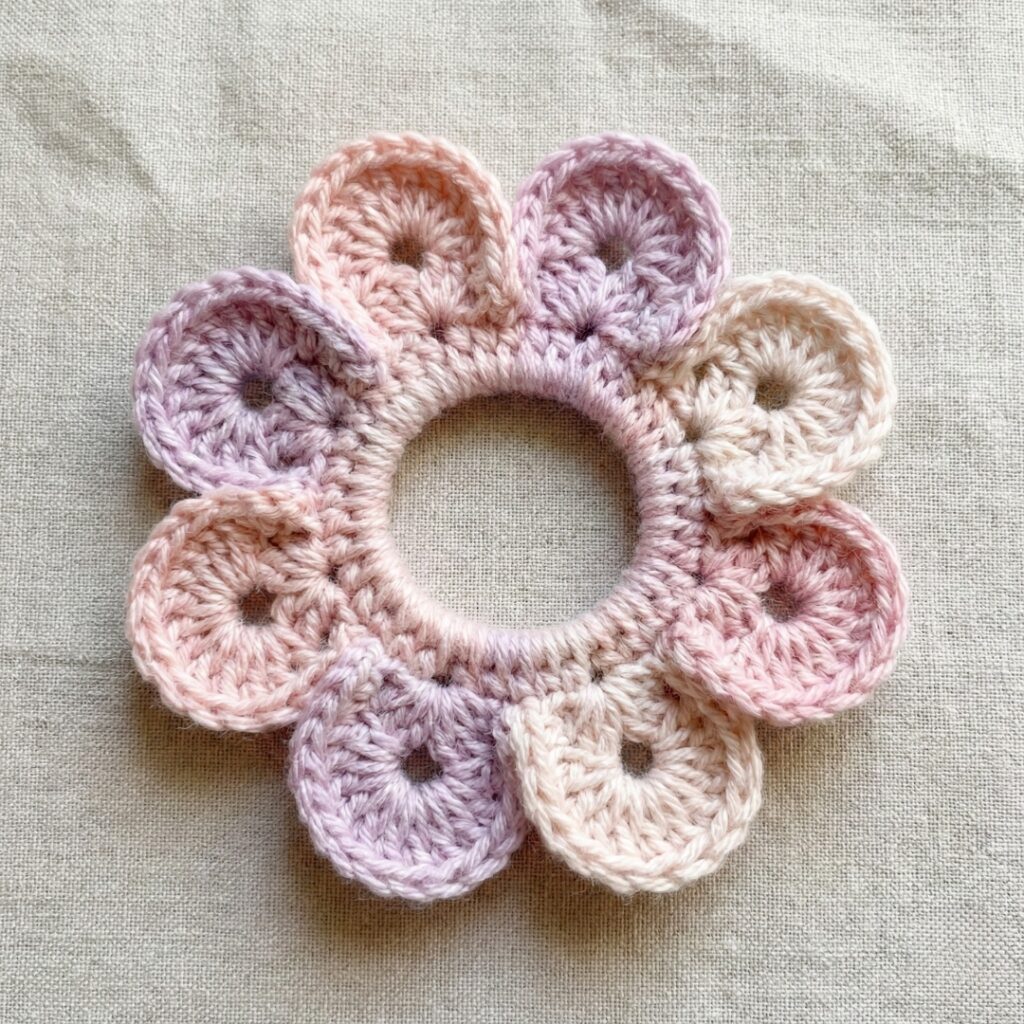
Skill level: Intermediate — 3D petals & assembly.
Materials
- Fingering or DK yarn for delicate petals — ~25–40 yds.
- Hook: 2.5–3.5 mm.
- Elastic E ≈ 6–7 in.
- Tapestry needle.
Design concept
A ring of small 3D petals worked directly onto a base ring; when fluffed they look like a flower crown around your ponytail.
Stitch multiple & example count
- Petal base uses simple sc ring; for E 7″ and spi 4 → S 28 sc as foundation.
Step-by-step
Base ring
- ch28, join. Round 1: ch1, sc in each st around; join. This creates foundation to which petals attach.
Petal motif (worked around the ring)
2. Round 2 (petals): ch6, sl st into next stitch to form a loop repeat around so you have 28 loops (one per stitch). Join.
- Round 3 (petal shaping): In each loop work (sc, hdc, dc, tr, dc, hdc, sc) then sl st to base and move to next loop. Each loop becomes a petal. Fasten off after last petal and weave tails.
Fluff & secure
4. Block petals lightly (steam or water as yarn type allows), then bend them outward and secure petal bases to the base ring with a couple of small stitches so petals stand up. Insert elastic by folding ring and stitching the inner round closed.
Finish
- Tidy off ends and trim any stray threads. Fluff petals to taste.
Variations & tips
- Make layered petals: after one petal round, add a smaller petal round between gaps for a fuller bloom.
- Use gradient yarn or two-tone petals (outer color + inner highlight).
Care
- Because petals are 3D, hand-wash lightly and reshape while damp.
Final finishing tips for all scrunchies
- Secure elastic: stitch elastic ends together with tight secure stitches (overlap ends ½” and use a whipping stitch) before tucking into casing. Sewing elastic to the scrunchie in several places prevents slipping.
- Hide ends neatly: weave tails at least 2–3″ into the fabric using a tapestry needle and trim closely. For bulky yarns bury ends inside clusters.
- Blocking for shape: for lace and petal scrunchies, wet-block or steam lightly to open stitches and shape petals/scallops.
- Gauge testing: if you’re making multiples for a shop, make a standard elastic-sized swatch and note spi so each scrunchie fits the same elastic type.
- Packaging & care note: include a small card with fiber content and care instructions (e.g., “Hand wash cool, reshape flat, air dry.”). If scrunchie sold as set, consider a small organza bag.
Conclusion
These seven aesthetic scrunchie designs — Donut, Colorful Retro Striped, Cotton Spring Blue Stripe, Lace, Falmore River (wavy ripple), Granny Stitch, and Flower — give you a wide creative palette: everyday sporty scrunchies in cotton, dreamy lace for special occasions, retro stripes for wardrobe accents, and sculptural petal scrunchies for statement looks. Each pattern is written so you can:
- scale to your elastic and yarn choice using the simple sizing formula,
- substitute yarns and hooks to change volume or delicacy, and
- add embellishments (beads, pearls, metallic threads) for seasonal or bridal versions.