A handmade hat is one of the most satisfying crochet projects: quick to stitch, endlessly customizable, and useful for every season. This collection gives you seven different hat concepts — from frilly, ruffled bucket hats to a sporty granny-stitch baseball hat — each written so you can make versions for babies, kids, and adults. Every pattern section includes: skill level, materials, sizing guidance, a clear step-by-step construction (with a practical method you can adapt to your gauge), variations, finishing & blocking tips, and styling ideas. Use these as full patterns or as starting points to mix-and-match textures and trims.
Note: yarns, hook sizes, and stitch/gauge vary by yarn and maker. I give a reliable method (crown → body → brim or ruffle) and example guidance for an Adult Medium (head circumference ≈ 22 in / 56 cm). Always make a small gauge swatch and adjust stitch counts to fit your chosen yarn and tension.
Quick sizing reference (choose target circumference)
- Newborn: 14 in / 35.5 cm
- Baby (6–12 months): 16 in / 41 cm
- Child (2–8 years): 18 in / 46 cm
- Teen / Adult Small: 20 in / 51 cm
- Adult Medium: 22 in / 56 cm (used in examples below)
- Adult Large: 24 in / 61 cm
Measure the wearer or an existing hat for best fit. Use your swatch stitches-per-inch to translate any example stitch counts to your gauge.
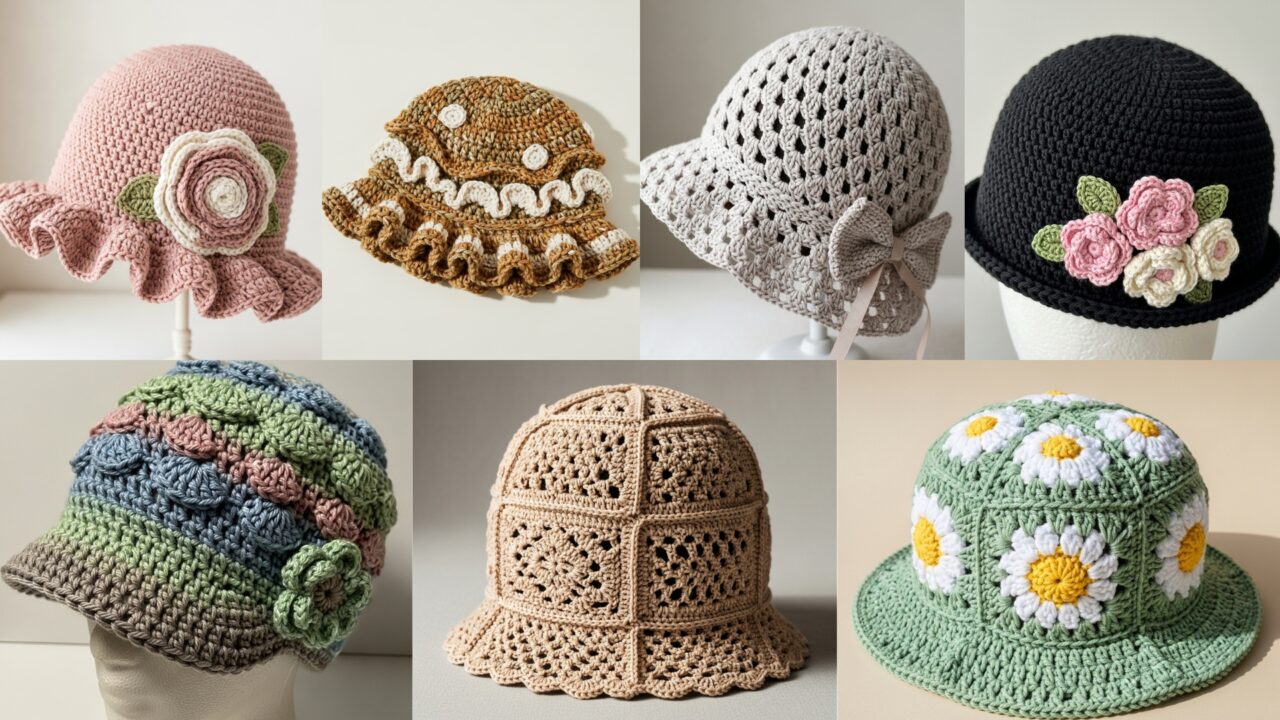
1. Crochet Rose Flower Ruffled Knit Bucket Hat Pattern
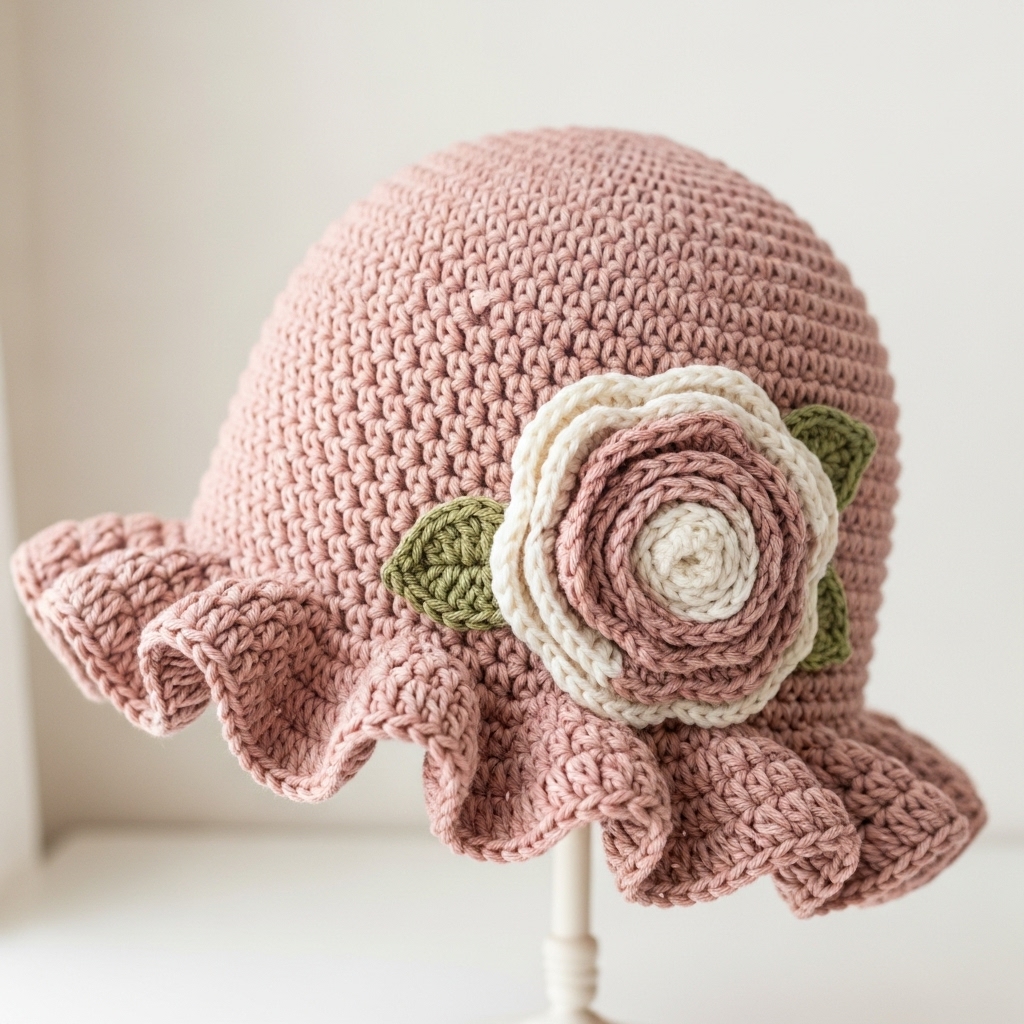
Style: Soft, feminine bucket hat with a curled ruffle brim and oversized crochet rose(s) sewn to one side. Looks knitted because of the stitch and drape.
Skill level: Intermediate (working in rounds, ruffles, appliqué)
Materials
- Soft worsted or DK yarn (merino blend recommended for drape) — approx. 150–250 g depending on size and brim.
- Crochet hook: 4.0 mm (DK) or 5.0 mm (worsted) to achieve drapey fabric.
- Tapestry needle, stitch marker, scissors, optional small amount of stuffing for rose center.
Construction summary
- Crown (top) worked in rounds with increases.
- Body (side) worked even to desired height.
- Ruffle brim worked with larger hook or taller stitches (shells or ruffled dc rows).
- Rose appliqué (separate) made by spiral or layered petals and sewn on.
Step-by-step (Adult Medium example — adapt using your gauge)
- Crown (worked in continuous rounds)
- MR: 6 sc in magic ring.
- Round 2: inc in each st (12).
- Round 3: sc 1, inc around (18).
- Round 4: sc 2, inc around (24).
- Continue increasing evenly (sc 3, inc; sc 4, inc; etc.) until crown diameter measures about 7–7.5 in (18–19 cm) flat (this creates a rounded top for Adult Medium). The number of increase rounds depends on your stitch density. Stop increasing when crown diameter equals your target head crown width (roughly head circumference / π).
- Body / Side
- Work even rounds of hdc or dc (hdc gives a denser knit-look; dc gives more drape) until hat body height (from crown to top of ear) is ~6–6.5 in (15–16.5 cm) for adult medium. For shallower bucket, stop sooner.
- Ruffle Brim
- Switch to a slightly larger hook (or same hook and larger stitch). Join yarn at brim edge. Work one round sc or hdc to firm edge.
- Ruffle row options:
- Option A (full ruffle): In next round, work 2–3 dc in each stitch around (2 dc in each st gives a moderate wave; 3 dc gives a fuller ruffle).
- Option B (shell ruffle): (5 dc, skip 2) repeat for a scalloped ruffle.
- Work 2–3 ruffle rounds depending on desired depth. Finish with a round of slip stitches in back loop only to curl brim slightly.
- Rose Appliqué
- Make a long crochet strip (for a flat spiral rose): ch 60 (adjust for desired rose size). Row 1: sc across. Row 2: sc 1, hdc 1, dc 3, hdc 1, sc 1 repeat to form petal segments. Fasten off, leave long tail; roll strip from one end, sew the underside as you curl to secure the rose. Attach rose to side of hat with stitching and hide ends inside hat. Add a small leaf or two if desired.
Variations
- Use textured stitch for body (linen stitch, waffle) for more interest.
- Make multiple small roses in a cluster for a vintage vibe.
- For summer version, use cotton and a looser ruffle.
Finishing & blocking
- Lightly block the crown and brim into shape with steam or wet block to set ruffle. For wool blends, pin ruffle into a gentle curve while drying.
Care
- Follow yarn instructions (merino—hand wash; cotton—machine gentle). Reshape after washing.
Styling
- Pair with trench coat or vintage dresses; makes a great photo prop.
2. Crochet Retro Daisy Bucket Hat Pattern
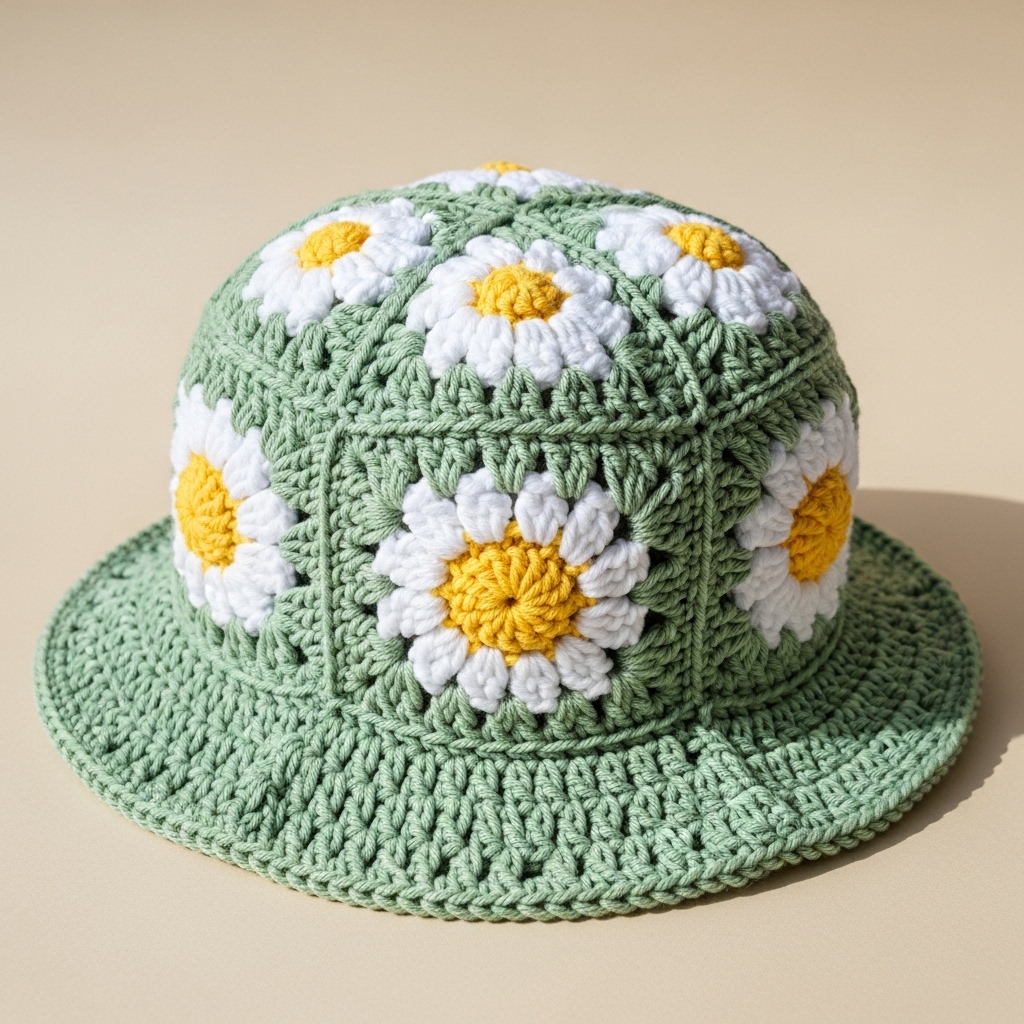
Style: Cheerful retro bucket hat featuring spaced daisy appliqués worked directly onto the hat or made separately and sewn on. Clean brim for structured look.
Skill level: Confident beginner → intermediate (appliqués, consistent spacing)
Materials
- Worsted-weight cotton yarn (durable, holds shape well), 150–250 g.
- Hook: 4.5–5.0 mm.
- Tapestry needle, stitch markers.
Construction summary
- Similar crown and body to standard bucket hat; daisies are small appliqués attached around the crown or grouped on one side.
Step-by-step
- Crown & body: Work crown increases as in Pattern 1 until desired crown diameter (example for adult medium: stop when crown diameter ≈ 7 in). Then work even rounds of sc or hdc to create the side wall height ~5.5–6 in.
- Brim: Work 1–2 rounds sc then 3 rounds of hdc in back loop only to create a slightly flared brim that holds shape. For a more dramatic brim work an increase round (e.g., hdc 6, inc) to add flare before finishing rows.
- Daisy appliqué (make several)
- Center: MR, 6 sc in ring (6); sl st to join.
- Petals: Join contrast yarn to each of the 6 center stitches; ch 3, sl st into same st repeat around to create 6 loops. In each loop work (sc, hdc, dc, hdc, sc). Fasten off and weave ends.
- Space daisies evenly around crown or cluster them on one side using a ruler to measure spacing and secure with hidden stitches.
- Optional band: Add a narrow band of contrasting color around base of crown (1 round sc) before attaching daisies for extra retro contrast.
Variations
- Make daisies in alternating colors for a playful 60s look.
- For toddlers, substitute embroidered or crocheted flat daisies to avoid three-dimensional parts that can be grabbed.
Finishing
- Weave ends; block slightly to flatten daisies. Cotton hats benefit from a firm steam blocking if needed.
Care
- Machine wash warm on cotton safe settings; reshape while damp.
Styling
- Perfect for picnic photos and summer festivals.
3. Crochet Mushroom Inspired Ruffled Bucket Hat Pattern
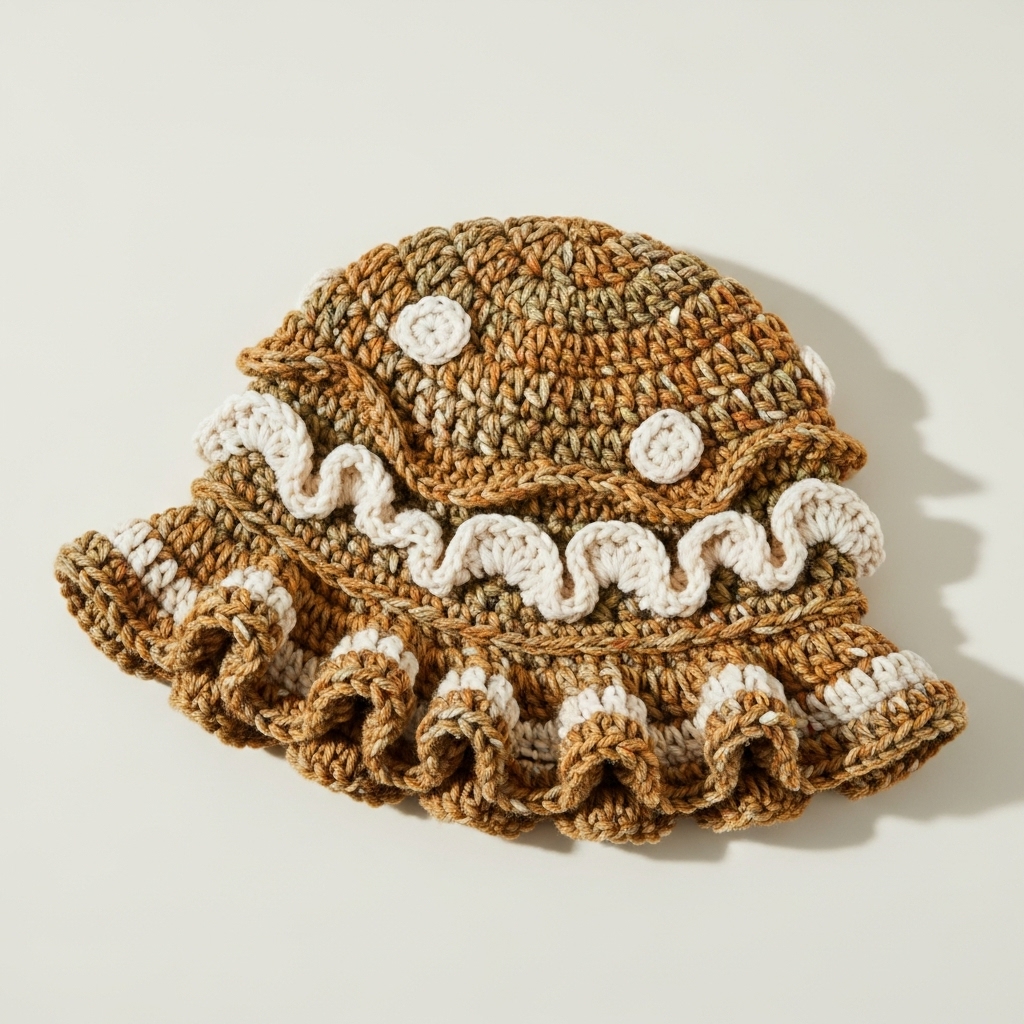
Style: Whimsical bucket hat with a soft, mushroom-like ruffle or undulating brim; use variegated or tweedy yarn for an organic look.
Skill level: Intermediate (ruffle shaping, carrying color)
Materials
- Bulky or worsted tweed yarn for texture; approx. 200–300 g.
- Hook: 5.5–6.5 mm for bulky, 5.0 mm for worsted depending on desired squish.
- Tapestry needle, stitch marker.
Construction summary
- Crown & body as standard; brim created with alternating shell rows and short rows to mimic mushroom edge.
Step-by-step
- Crown & body: Increase rounds for crown until flat diameter ≈ 7 in (adult medium). Work body rounds to desired height (5–6 in). Use sc or hdc.
- Mushroom brim shaping:
- Round 1 (edge reinforcement): sc around in BLO or standard sc to create a firm edge.
- Round 2 (undulating row): Work [2 dc, ch1, 2 dc] in one stitch (small shell), skip 2 sts, sc in next st repeat to create alternating shells and flats. This forms an uneven ruffle.
- Round 3 (short-row curl): On top of shells, work 1–2 rounds of dc only into shell areas; across flat areas work only 1 row—this creates uneven height and a natural mushroom curl.
- Repeat a second set for deeper ruffle if desired.
- Optional spots: Crochet small flat discs (MR, 6 sc) in a lighter color and sew sparsely on the crown to evoke mushroom spots.
Variations
- Make a child-size “Toadstool” hat with bright red and white.
- Use lightweight variegated yarn to create natural color transitions.
Finishing
- Block gently shaping the brim into soft undulations. Avoid aggressive stretching.
Care
- Bulky yarns may pill; follow fiber care instructions.
Styling
- Fun for costumes, garden parties, or whimsical photos.
4. Crochet Black Cotton Hat with Flowers Pattern
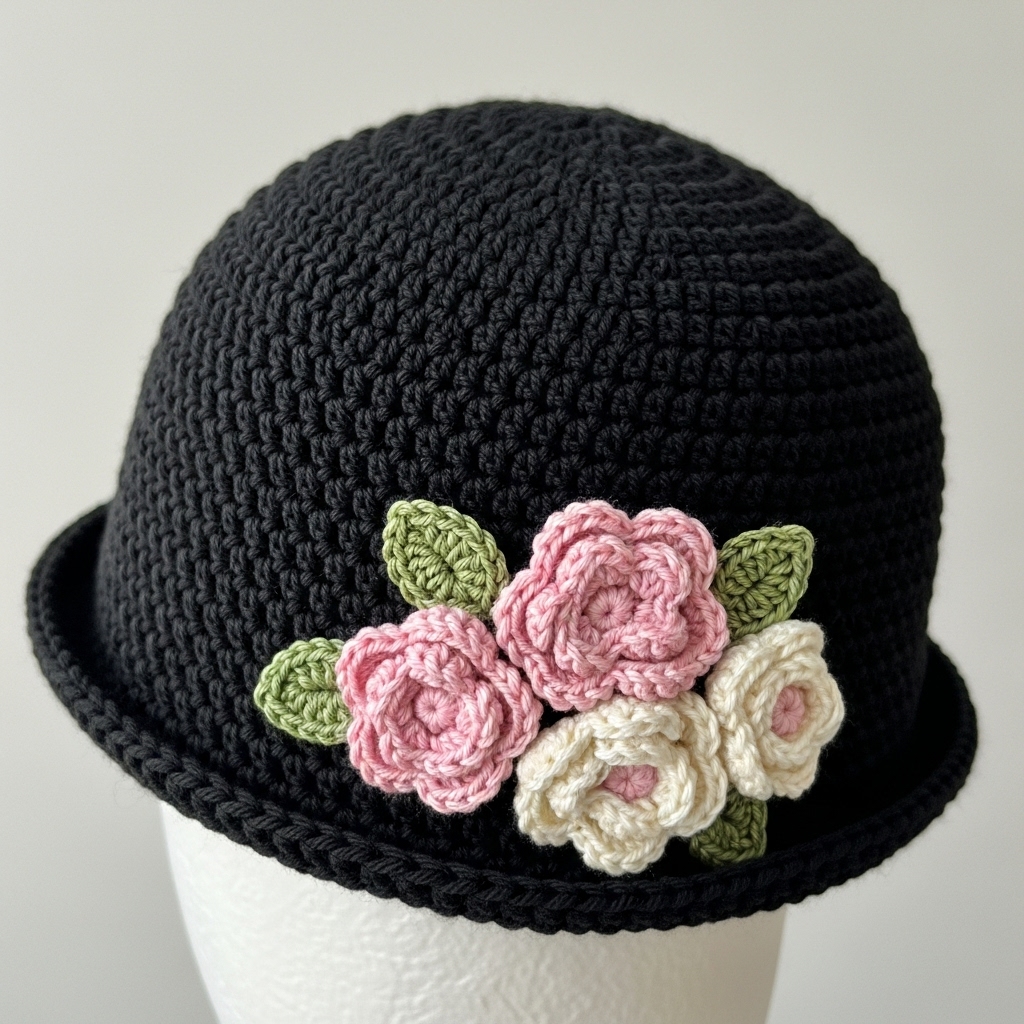
Style: Classic black cotton hat (versatile and practical) adorned with flat or textured flowers — dressy but durable.
Skill level: Confident beginner
Materials
- 100% cotton worsted yarn in black for main hat; 1–2 small contrast skeins for flowers (pink, cream, green).
- Hook: 4.5–5.0 mm.
- Yarn needle, optional small snap for detachable flower cluster.
Construction summary
- Focus on clean lines: tight stitches for a neat finish. Flowers are detachable (safer and machine-washable) if attached with a snap or safety stitch.
Step-by-step
- Crown: Work magic-ring increases until crown diameter ≈ 6.5–7 in for adult medium (cotton tends to relax less than wool). Example: MR 6, inc to 12, sc1 inc — continue as earlier.
- Body: Work even rounds of sc or hdc to desired height (5–6 in). For a neat edge, finish with a round of crab stitch (reverse sc).
- Flowers (make 2–3 in different sizes):
- Small flower: MR, 6 sc; R2: (ch 2, 2 dc, ch 2, sl st) repeat around for 6 petals.
- Layer flowers by varying petal counts or sizes and stack them. Sew small snap half to back of larger flower and the matching snap half to hat (so flowers can be removed for washing).
- Optional leaf cluster: Crochet small leaves and attach around flowers for color contrast.
Variations
- Make one oversized flower for dramatic look; for everyday wear use a small cluster.
- For a safer child version, permanently sew flat flowers with small, tightly stitched centers.
Finishing
- Cotton holds crisp edges — press lightly if needed. Remove removable flowers before machine wash.
Care
- Machine wash on gentle; reshape and air-dry.
Styling
- This black hat is elegant with a feminine floral accent — great for casual or semi-formal wear.
5. Crochet Mulberry Lace Patchwork Bonnie Hat Pattern
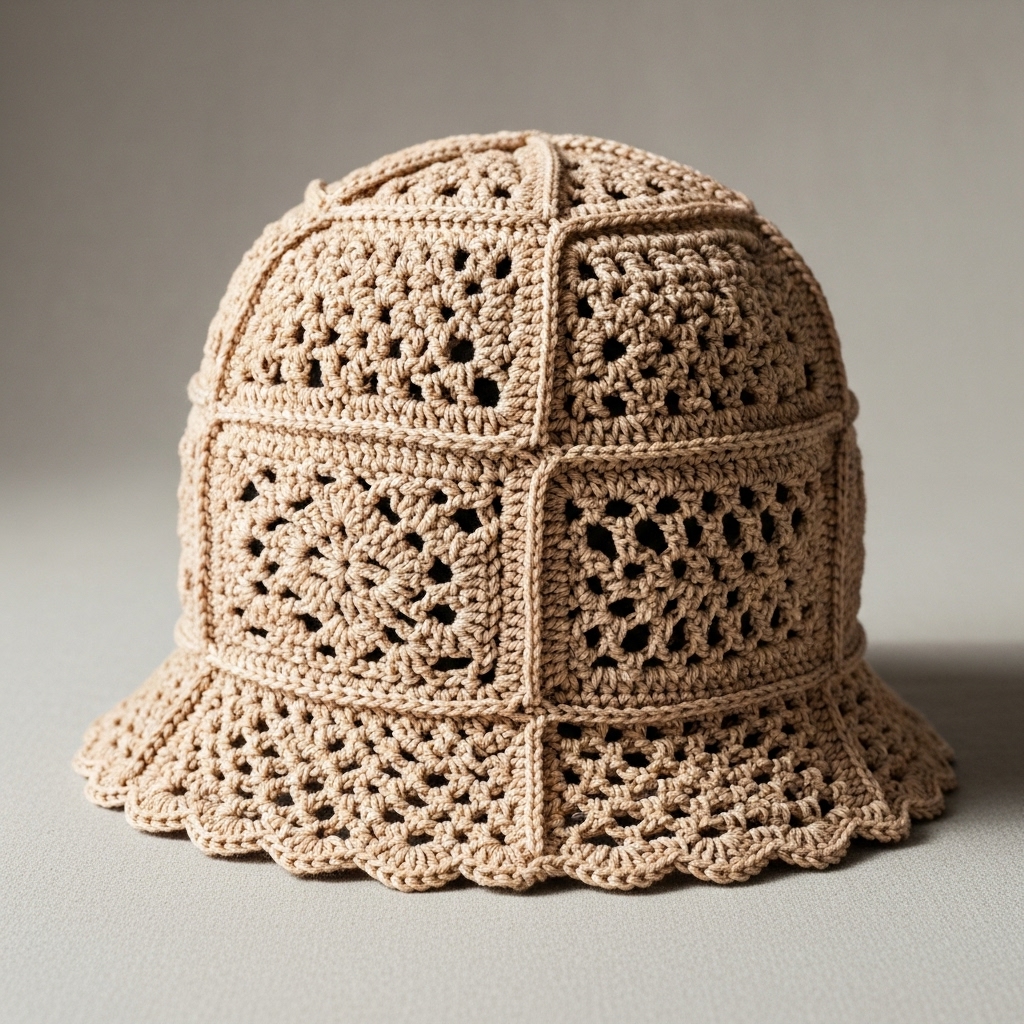
Style: A boho bonnie/bucket hat made from patchwork lace panels (mulberry/berry stitch clusters) joined together — romantic and textured.
Skill level: Intermediate → advanced (constructing panels and joining cleanly)
Materials
- Light worsted / DK yarn (soft wool blend or cotton) — total 200–300 g.
- Hook: 4.0 mm.
- Tapestry needle, blocking wires or pins.
Construction summary
- Create several lace panels (rectangles or wedges) featuring a mulberry/bobble/lacy repeat. Join panels in the round to form crown and body; add a simple brim.
Step-by-step
- Make lace panels: Decide on panel size — e.g., 6 panels that when joined form a circular crown. Work each panel as a vertical rectangle worked in a lace repeat (mulberry or cluster stitch). Sample panel width such that total joined width equals crown circumference.
- Join panels: Use join-as-you-go or whipstitch panels together to form a circular crown. Seam carefully to align lace pattern.
- Body & brim: After panels form crown, add a round of single crochet around join for stability, then work even rounds for body height. Finish with a small, simple brim — e.g., 1 round sc, 2 rounds hdc or dc with slight increases for flare.
- Edging: Add a picot or scallop edge around brim for vintage flair.
Variations
- Make panels in different colorways for patchwork look.
- Substitute crochet granny squares instead of panels for different geometry.
Finishing & blocking
- Block each panel flat to open lace before joining. Blocking is essential to set lace repeats and ensure hat fits uniformly.
Care
- Follow fiber care — wool blends hand wash; cotton machine-washable.
Styling
- Pair with a flowy dress or coat for boho-chic looks.
6. Crochet V-Stitch Bonnie Hat with Bow Pattern
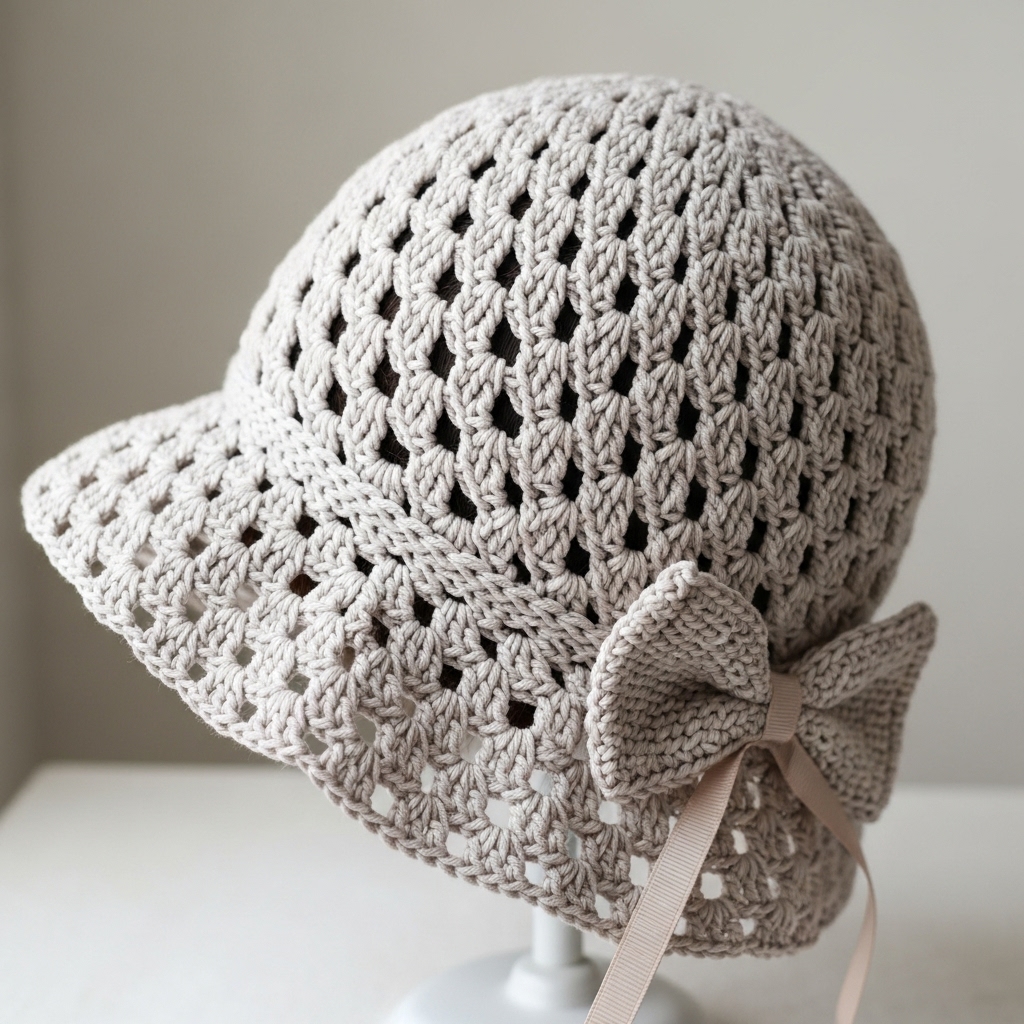
Style: Light, airy bonnet-style (bonnie) hat featuring V-stitch texture and a simple crocheted bow or ribbon accent on the side or back.
Skill level: Confident beginner
Materials
- DK or light worsted yarn — 150–200 g.
- Hook: 4.0 mm.
- Tapestry needle, optional button for bow center.
Construction summary
- Use V-stitch (dc, ch1, dc) repeats for texture. Work crown increases and a gently flared brim. Make a separate bow strip and attach.
Step-by-step
- Crown increases: Work in rounds increasing until crown diameter matches target (as described in previous patterns). For an adult medium crown diameter, aim for ~7 in.
- V-stitch body: Switch to V-stitch pattern and work even rounds until hat length is ~5–6 in from crown. V-stitch creates a pretty open texture perfect for spring/summer versions.
- Brim: Work 1–2 rounds of sc for firmness then 2–3 rounds of V-stitch with slight increases to create a soft bonnet brim that frames the face.
- Bow: Chain 30–40 (depending on bow size), row of sc across to make a narrow rectangle; fold and sew ends to center, wrap with a short length of yarn and secure. Sew bow on side of hat or attach with a small snap to make it removable. Add a button center if desired.
Variations
- Work bow in contrast color or make a long ribbon tie that can be fastened under chin for toddler versions. Use softer yarns for baby-safe versions.
Finishing
- Light block to open V stitches evenly. Attach bow firmly.
Care
- Machine wash gentle for cotton blends; hand wash for delicate fibers.
Styling
- Great for spring outfits or as a photo prop; bow adds a sweet vintage touch.
7. Crochet Granny Stitch Baseball Hat Pattern
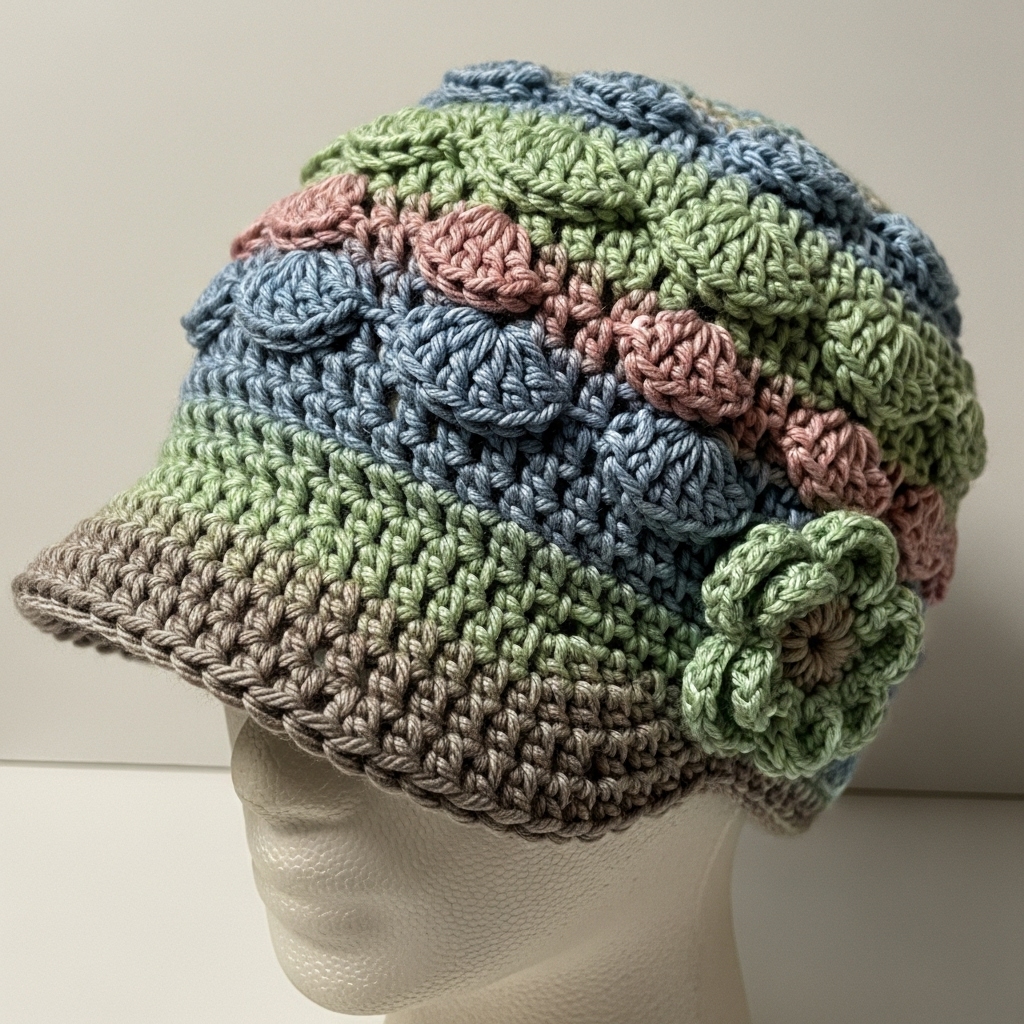
Style: Sporty hat inspired by granny-stitch texture, but shaped like a baseball cap (soft brim and rounded crown) — a playful hybrid between classic granny square texture and a casual cap silhouette.
Skill level: Intermediate (shaping from square/granny to cap shape)
Materials
- Worsted weight yarn — 200–300 g.
- Hook: 5.0 mm.
- Tapestry needle, lightweight interfacing or curved cap brim template (optional for a stiffer brim).
Construction summary
- The crown is made from joined granny segments or a continuous circular granny then shaped into a baseball-style cap with short curved brim.
Step-by-step
- Crown option A (circular granny crown): Start with a circular granny square motif and increase in rounds until the diameter matches crown needs; switch to rounds of granny-stitch shells worked as continuous rounds to form body.
- Example: MR, chain 3 (counts as dc), work 2 dc, ch 2, 3 dc in MR (first corner), ch1, (3 dc, ch2, 3 dc) next corner — expand until desired crown size then switch to shell rounds.
- Crown option B (classic increase rounds): Use sc or hdc increases as in other hats for a smoother crown and add a granny-textured overlay by working a round of shells as decorative band.
- Brim shaping: Make a short curved brim by crocheting a semi-circular piece: chain half the circumference width for adult medium (e.g., ch 20), work in semi-circle with increases to create a curved brim: work increasing rows of dc to create curve. For firmness, make two identical brim pieces and sandwich interfacing or lightly stiffen with fabric glue and insert between pieces, then whipstitch around to join. Attach firmly to hat front.
- Body shaping: If you used a flat circular top, work even rounds to form body and shape front down a bit to sit like a cap. Add a narrow band of sc around base for neatness.
Variations
- Use bright sporty color stripes.
- Keep brim soft for a slouchy cap or reinforce for structured look.
Finishing & care
- If you added interfacing, remove before washing or advise hand-wash only. For a fully crochet brim without interfacing, wash gently and reshape while damp.
Styling
- Casual and trendy — pairs well with jeans and sneakers or a sporty dress.
Final finishing tips for all hats
- Try on as you go: For cuff-down and round hats it’s helpful to try the hat on the intended wearer at the body stage (before adding brim/ruffles) to check height and circumference.
- Adjusting fit: If hat seems tight, add one extra round around the crown before working even. If too loose, work one round tighter hook in last round or add a round of sc in BLO to slightly cinch.
- Seams & joins: Use invisible mattress stitch or slip-stitch joins to keep seams neat. For appliqués, sew through both hat and lining (if used) to anchor securely.
- Lining: For delicate fibers or props, a light fabric lining hides tail ends and protects hair/skin. Sew lining by hand to maintain shape.
- Blocking: Block hats where appropriate to open lace or set ruffles. Avoid aggressive stretching that alters fit. For wool blends use steam carefully.
- Care & labels: Include fiber content and care instructions if you gift or sell hats. For small businesses this reduces customer returns.
Conclusion
These seven hat patterns cover a broad range of styles — ruffled florals, retro daisies, whimsical mushroom brims, elegant black cotton with removable flowers, patchwork lace bonnets, V-stitch bonnie hats with bows, and a sporty granny-stitch baseball hat. Each design is adaptable across sizes and yarns, letting you make cozy winterwear, lightweight spring toppers, or show-stopping accessories.