You want scarves that actually look designed, not like someone grabbed a ball of yarn and panicked. Good — scarves are the perfect project: useful, portable, and forgiving. Below you’ll find six distinct scarf patterns (from blazing-fast puff-stitch to elegant buttoned wraps) with full materials lists, stitch explanations, exact step-by-step instructions, sizing notes, shaping/adjustment options, finishing tips, and quick care advice. I’m not going to waste your time with fluff — just what works, how to make it, and how to make it look like you knew what you were doing.
Quick universal info (read this once and stop guessing)
Yarn & hook basics
- For each pattern I list suggested yarn weights. If you swap a thicker or thinner yarn, change hook size and expect different finished dimensions.
- Typical scarf finished dimensions (adult): length 60–72 in (152–183 cm) and width 6–12 in (15–30 cm) depending on style. I’ll give target stitch counts for example widths — adjust per your gauge.
Gauge
- Gauge matters for fit and drape. I’ll show an example gauge when it’s important. If you hate swatches (most people do), at least measure a 4×4 in square for any dense stitchwork.
Abbreviations (US terms)
- ch = chain
- sl st = slip stitch
- sc = single crochet
- hdc = half double crochet
- dc = double crochet
- tr = treble (triple) crochet
- puff = puff stitch (instructions given per pattern)
- rep = repeat
- st(s) = stitch(es)
- BLO = back loop only
Tools
- Tapestry needle, blocking pins, straight pins, measuring tape, scissors.
Okay. Let’s make scarves.
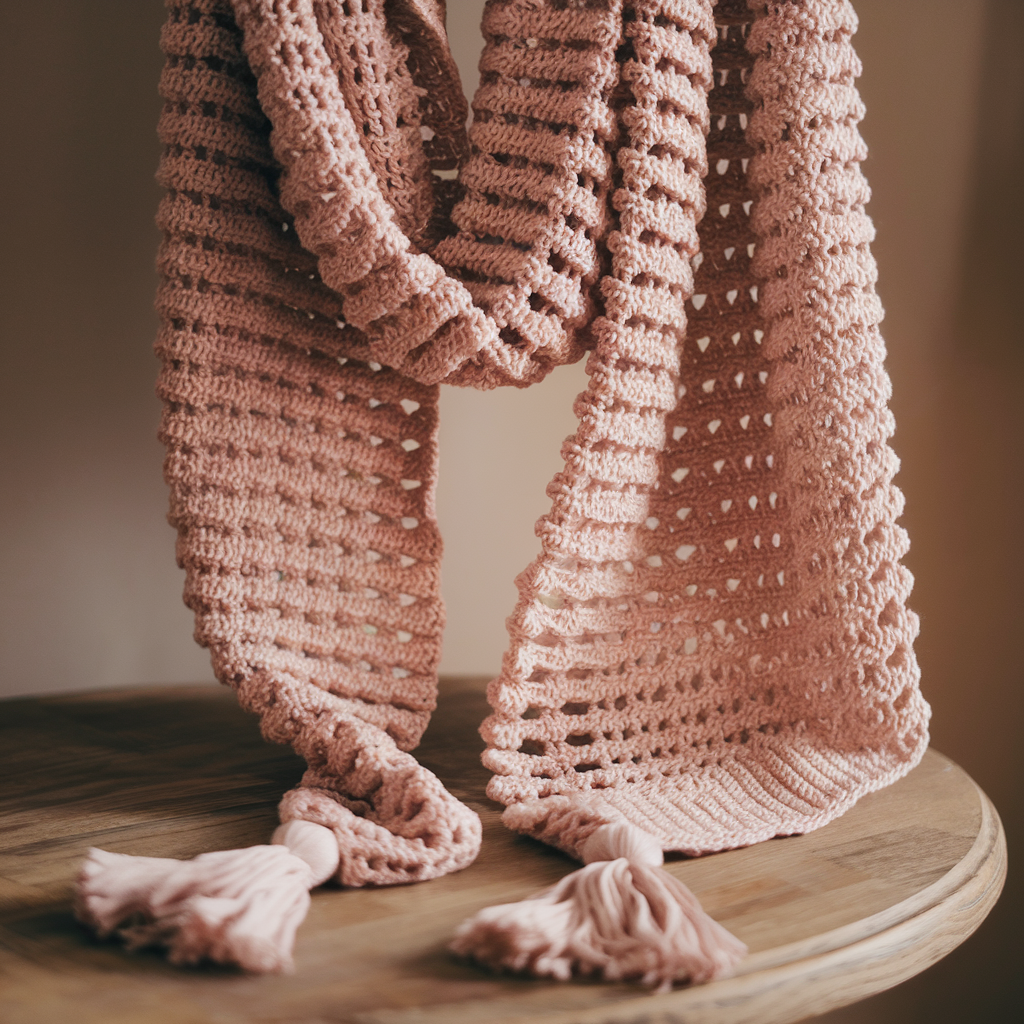
1. Crochet Puff Stitch Mile-A-Minute Scarf Pattern
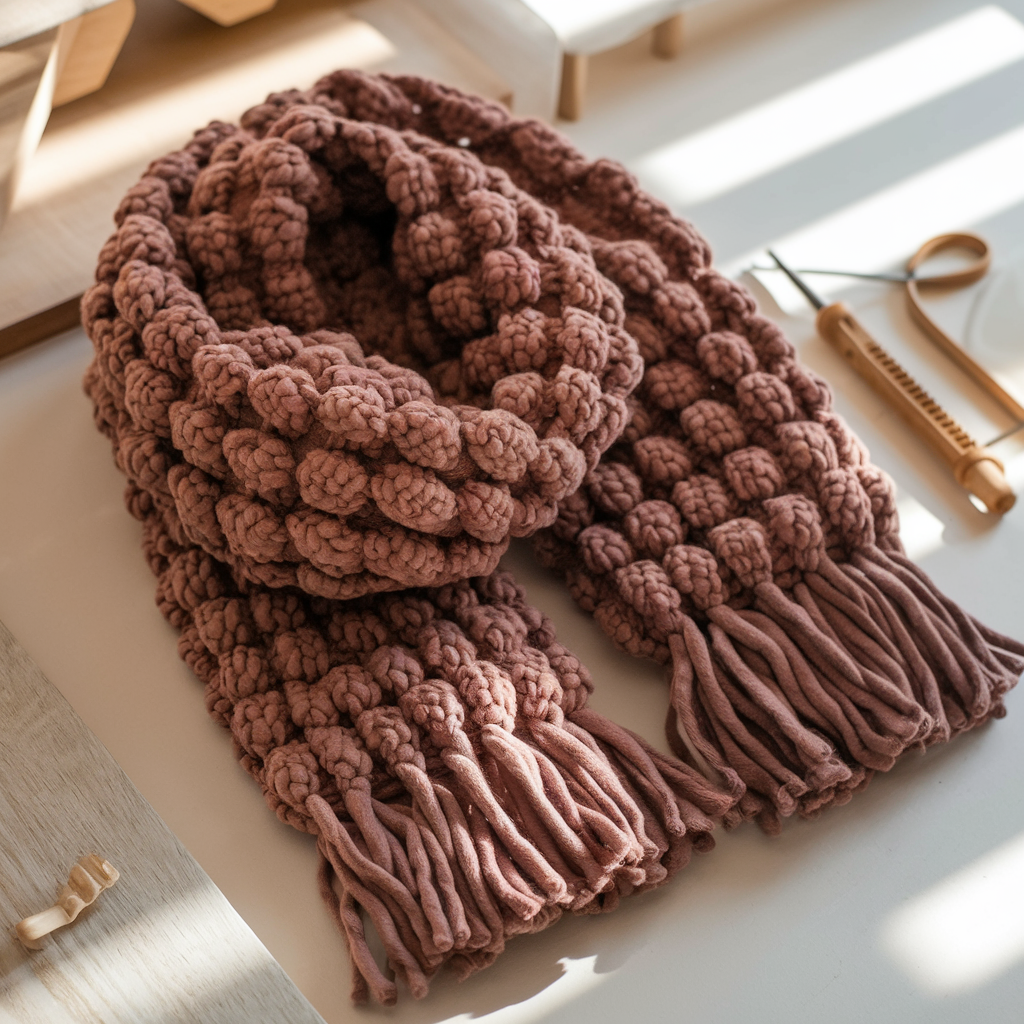
If you need a scarf fast that looks expensive: the puff stitch. Big texture, little fuss, works up unbelievably quickly.
Style: Chunky, highly textured — perfect with bulky yarn.
Skill level: Beginner+ (puff stitch familiarity helpful)
Yarn & hook
- Bulky (#5) or super bulky (#6) yarn, 2 skeins bulky for a 60–65 in scarf (approx 300–400 yds total)
- 8.0–10.0 mm hook (adjust to yarn label)
Finished size (example): 66 in × 8 in (168 × 20 cm) — adjustable
Stitch: Puff (standard)
- Yarn over, insert hook into stitch, yarn over and pull loop (repeat this 3–4 times to gather 4–5 loops on hook), yarn over and pull through all loops, ch1 to close the puff. Gently tug to even.
Pattern notes
- Multiple of 1 plus edge chains — basically flexible. We’ll target a foundation chain of 23 for an 8 in width in bulky; change chains in increments of 1 for wider/narrower.
Step-by-step
- Foundation: ch 24 (or ch desired width +1). Turn.
- Row 1 (setup row): sc in 2nd ch from hook and in each ch across. Turn. (23 sc)
- Row 2: ch1, puff in next st, sc in next st across ending with sc; turn. This alternates puff and sc so fabric lays nicely.
- Row 3: ch1, sc in puff (in the top loop of the puff) and sc in next sc across; turn.
- Repeat Rows 2–3 until scarf reaches desired length (~66 in). Finish with one or two rows of sc for a tidy edge.
- Optional fringe: Cut 6 in lengths of yarn, fold through edge and knot every 2–3 sts. Trim evenly.
Adjustments
- Want narrower? Reduce initial chain. Want wider? add chains. Puff stitch builds bulk — factor that into chain count.
Finishing
- Weave ends. Block lightly if using wool to even puffs (do not overblock bulky acrylic).
Care
- Check yarn label; usually gentle hand wash and lay flat.
Why you’ll like it: looks designer, works up fast, cozy as a heated blanket.
2. Crochet Chevron Chunky Scarf Pattern
Classic chevrons are never boring if you choose bold color or chunky yarn. This one has deep V’s for dramatic texture.
Style: Bold zig-zag; great with striping yarn or colorblocking.
Skill level: Beginner (color changes and decreases)
Yarn & hook
- Bulky (#5) yarn, 3 skeins for long adult scarf (approx 300–450 yds)
- 6.5–8.0 mm hook
Finished size (example): 68 in × 9 in (173 × 23 cm)
Stitch pattern
- Worked in dc with chevron increases/decreases: pattern repeat is multiple of 12 + 3 (for our example).
Step-by-step
- Foundation chain: ch 99 (that’s 8 repeats of 12 = 96 +3 = 99). If you want wider, add repeats of 12. Turn.
- Row 1 (Base): dc in 4th ch from hook (counts as dc + ch2 = turning?), but simpler: ch3 (counts as dc), dc in next 3 ch, [dc in next 2 ch, dc2tog over next 2 ch, ch1, dc2tog over next 2 ch, dc in next 2 ch, dc in next 3 ch] rep across ending last segment; dc into last ch. Turn. (This creates peaks and valleys.)
- More plainly: the chevron is made by working groups of dc with paired decreases (dc2tog) and a ch space to create the valley.
- Row 2+: ch3, dc across each dc and into ch1 as needed; at valley work dc2tog, sc into ch1 if pattern uses it; follow established chevron shaping. Repeat until length desired (~66–70 in).
- Color changes: Switch colors at row ends for stripes. Fasten and weave in ends for clean joins.
- Edging: Single crochet around for a clean border, or add a picot edge for fanciness.
Adjustments
- For a softer drape use hdc instead of dc. For a more dramatic chevron increase repeat counts and depth of the valley.
Finishing
- Block gently to open the chevrons. Fringe optional.
Care
- Bulky wool: hand wash and dry flat. Acrylic: machine gentle.
Why it stands out: crisp geometry, great in bold stripes or monochrome for a modern look.
3. Crochet V Stitch Scarf Pattern
The V-stitch is breathable, pretty, and screams “handmade without effort.” Great transitional weather scarf.
Style: Light, lacy, drapey — works in many yarn weights.
Skill level: Beginner
Yarn & hook
- Worsted (#4) yarn, ~300 yds (2–3 skeins depending on length)
- 5.0 mm hook
Finished size (example): 66 in × 7–8 in (168 × 18–20 cm)
V-stitch definition
- (dc, ch1, dc) all in same stitch — that’s a V.
Step-by-step
- Foundation chain: ch 115 + 1 (multiple of 2 plus 1). Example chain 116. Turn.
- Row 1: dc in 4th ch from hook, ch1, skip next ch, dc in next ch across (this establishes spacing). Turn.
- Row 2 (V row): ch3 (counts as dc), skip first st, (dc, ch1, dc) in ch1 space (V made), skip next st repeat across, end with dc in top of ch3. Turn.
- Row 3: ch3, (dc, ch1, dc) in each ch1 space repeat — basically V-stitch in each ch1 space. Continue for desired length.
- Edge stabilization: Work 2–3 rows of sc or hdc at the start and end to prevent edge ripple (V-stitch edges can scallop). Alternatively add a single crochet edging on both sides.
- Optional tassels: attach tassels at ends for boho vibes.
Adjustments
- Want wider? increase initial chain by multiples of 2. Want denser? use smaller hook or heavier yarn.
Finishing
- Block to open the V’s evenly. Weave in ends.
Care
- Per yarn label; worsted acrylic safe in machine on gentle.
Why this is easy: repetitive pattern, eye-catching texture without complicated shaping.
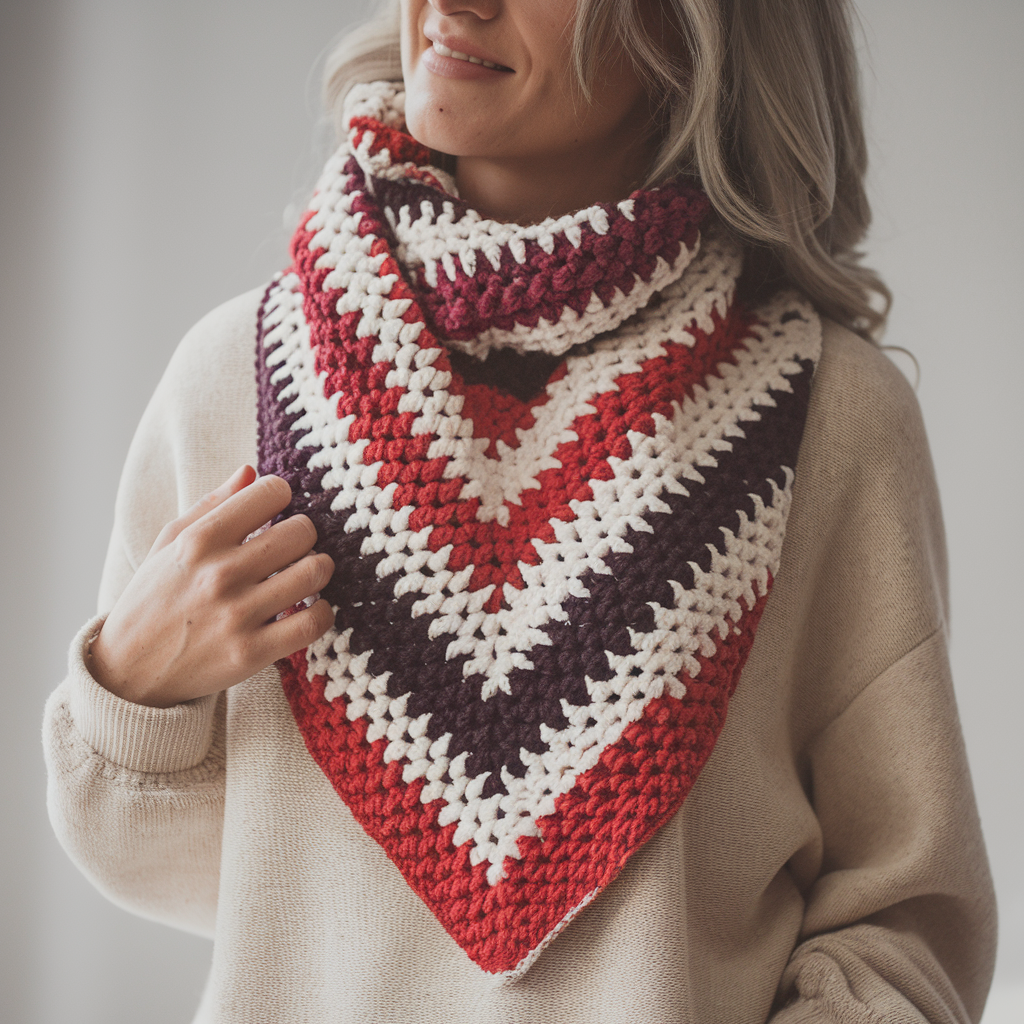
4. Crochet One Skein Mini Scarf Pattern
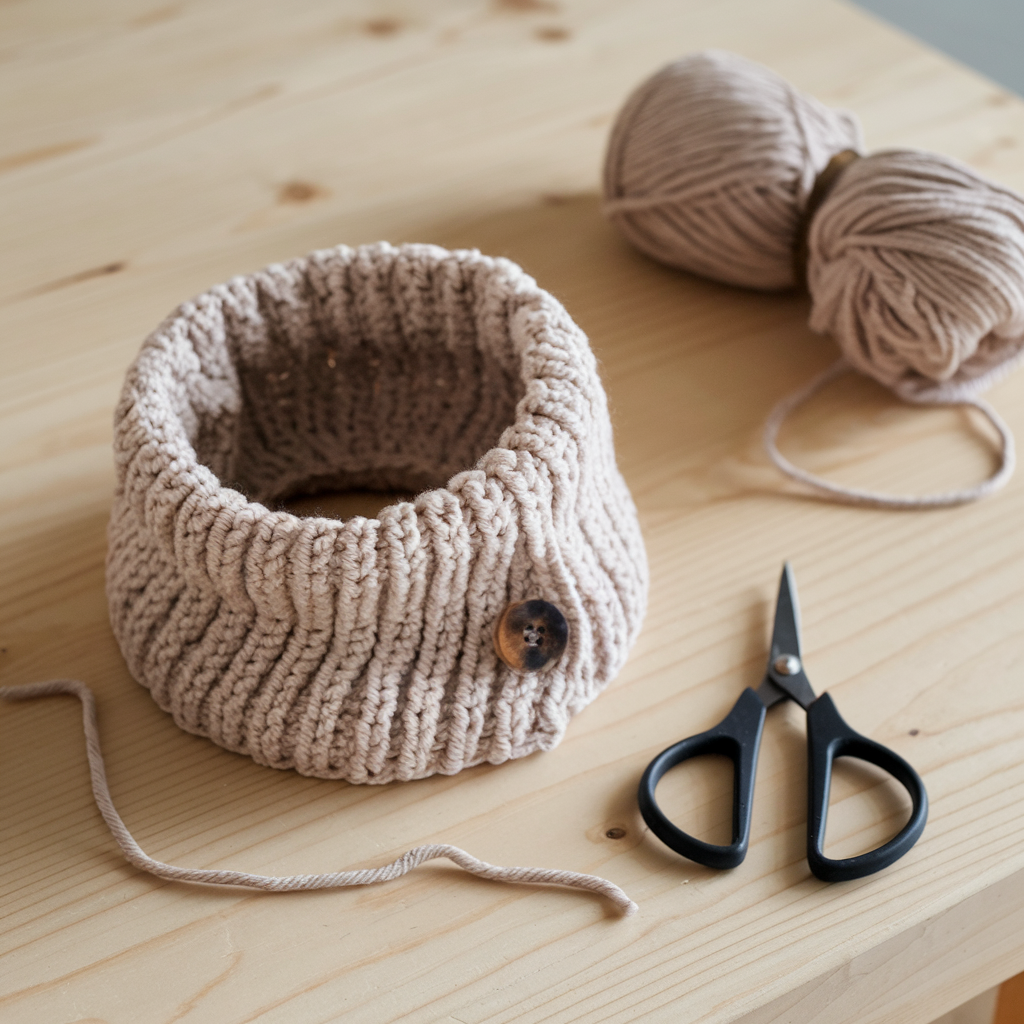
One-skein wonder: small neckerchief/snood that uses just one skein of bulky or worsted yarn — perfect for gifts, markets, or stash-busting.
Style: Short, cute, wearable as a neck warmer or headscarf.
Skill level: Beginner
Yarn & hook
- One skein bulky (#5) (~120–150 yds) or worsted (#4) ~200 yds for a slightly larger piece.
- 6.5–8.0 mm hook (bulky) or 5.0 mm (worsted).
Finished size (example): 22–28 in circumference (neck collar) × 6–8 in width — wearable as a small cowl or scarflette.
Pattern idea
- Worked flat into a short rectangle and seamed into a loop, or worked in joined rounds.
Step-by-step (flat rectangle → seam)
- Foundation: ch 22 (bulky) or 30 (worsted). Turn.
- Row 1: hdc in 3rd ch from hook and each across; turn. (hdc gives quick body)
- Row 2+: ch2, hdc across in BLO for 22 rows or until you have used most of your skein leaving ~6–8 in of yarn. For a thicker fabric, do 30–35 rows.
- Finish: Fold rectangle and sew short ends together with mattress stitch to form a snug tube (cowl). Alternatively seam offset for slouch.
- Optional closure: Add a button & loop to make a convertible piece framing a collar.
Seaming & finishing
- Use remaining yarn to seam invisibly. Block lightly to even stitches.
Care
- One-skein projects vary by yarn — check label.
Why this is useful: Quick gratification, great gift, minimal planning.
5. Crochet Seaside Scarf Pattern
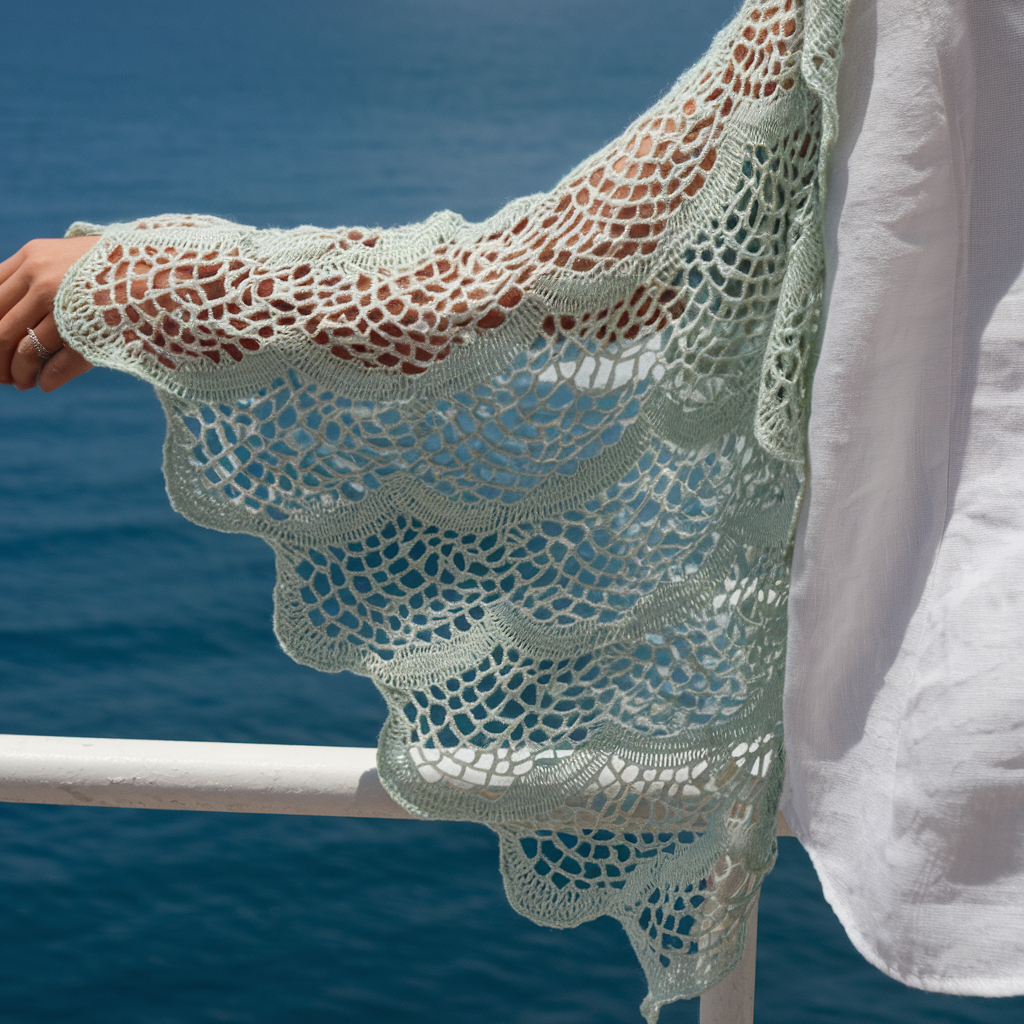
Airy, wave-like texture — think seaside breeze and linen shirts. Works beautifully in cotton blends or linen yarns.
Style: Lightweight, textured lace with wavy ripple effect.
Skill level: Confident beginner / intermediate (pattern repeats)
Yarn & hook
- Sport or DK weight cotton/linen blend, 350–500 yds depending on length.
- 4.0 mm hook
Finished size (example): 70 in × 9 in (178 × 23 cm) — drapey
Stitch pattern (wavy openwork)
- Repeat is multiple of 12 + 3 (for example). Uses shell clusters and chain spaces to make a scalloped, seaside ripple.
Step-by-step
- Foundation chain: ch 123 (12×10 = 120 +3). Turn.
- Row 1 (base): sc in 2nd ch from hook and across; turn.
- Row 2 (wave formation): ch3, skip next 2 sts, (dc, ch2, dc) in next st (shell), skip 2, sc in next 3 repeat across; turn.
- Row 3: ch1, sc in sc and ch2 spaces to anchor shells; turn.
- Row 4: ch3, in shell work 3 dc (to broaden shell), ch1, 3 dc in next shell, sc between shells — this creates stacked shells that give a wave effect. Repeat Rows 2–4 for pattern height until length desired.
- Edge finishing: Work 1–2 rows of sc for sturdy edges then a scallop edge (picot or 5 dc shells) if you like.
Adjustments
- Use linen yarn and a slightly smaller hook than recommended if you want crisp waves. For fluffier waves use a softer cotton and larger hook.
Finishing
- Wet-block to set the wave pattern — linen and cotton respond well to blocking; pin to shape.
Care
- Handwash or machine gentle, reshape while damp.
Why it’s worth it: grown-up texture with nautical, romantic vibes — not granny-ish, promise.
6. Crochet Buttoned Scarf Pattern
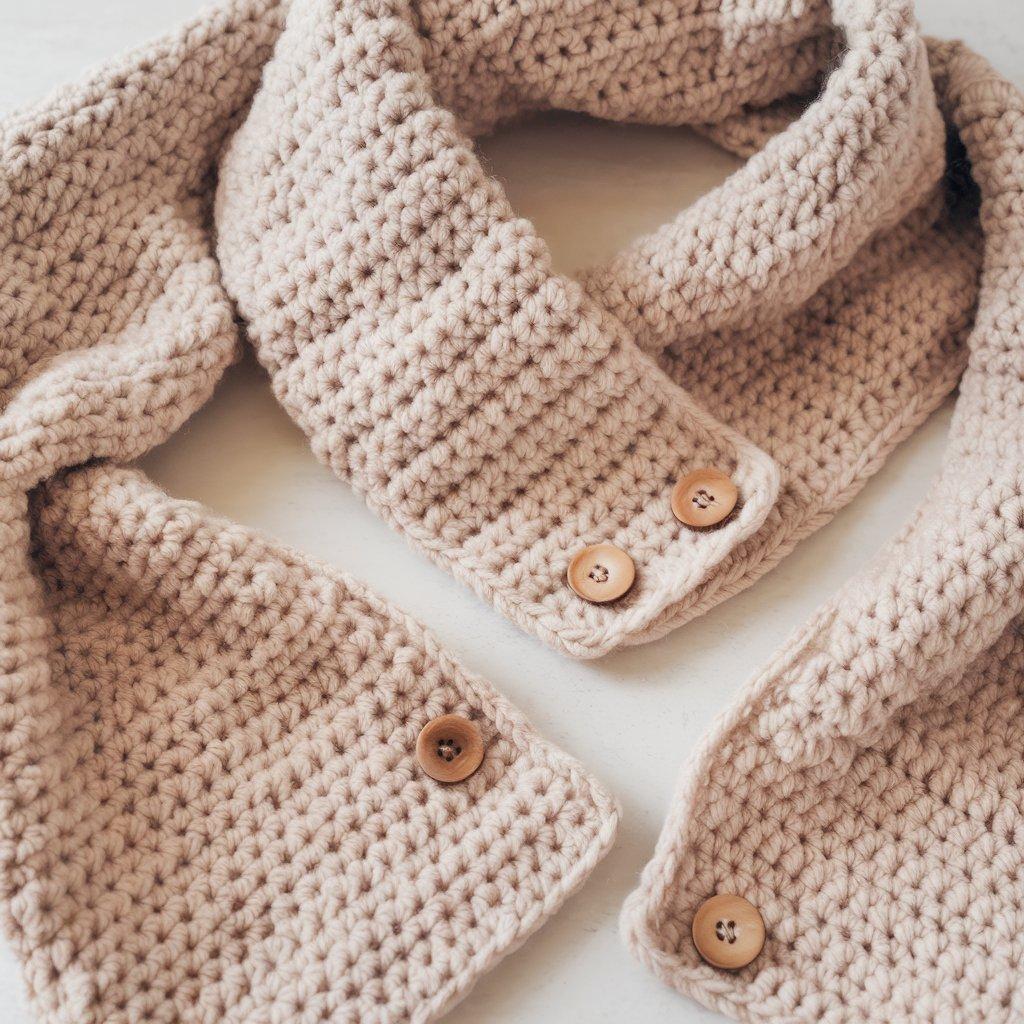
A versatile, elegant scarf with built-in buttonholes so you can wear it looped, belted, or buttoned into a cowl. Great for style and function.
Style: Structured, adaptable — button closure gives options.
Skill level: Beginner–Confident beginner
Yarn & hook
- Worsted (#4), approx 300–400 yds
- 5.0 mm hook
- 4–6 buttons (1 in / 2.5 cm) depending on length, plus needle/thread
Finished size (example): 68 in long × 8–10 in wide; with buttons 8–10 in apart for styling choices.
Stitch pattern (simple basketweave or waffle for stability)
- Basketweave in sc and hdc for a neat reversible fabric that shows buttons well.
Step-by-step
- Foundation chain: ch 36 (multiple of 4) for ~9 in width. Turn.
- Row 1: hdc in 3rd ch from hook and across; turn.
- Row 2–4 (basketweave start): Work blocks of hdc and sc in 4-st blocks as follows — Row 2: hdc in next 4, sc in next 4 repeat across; turn. Row 3: sc in next 4, hdc in next 4 to create checker blocks. Repeat these two rows to build texture until scarf is desired width.
- Button placement row (after making full length): Choose one short end to be the “buttoned” end. On that end, work a ch-loop buttonhole band: On last 4 rows at that end, work ch5, skip 5 sts, sc to create loops (adjust ch count to fit button size). Alternatively, make 3–4 evenly spaced buttonholes across the width.
- Button band: On the opposite end, whipstitch or sew corresponding buttons anchored on the band (test snug fit). You may want to make the button band double-thick: fold over 2–3 rows and sc across to reinforce before sewing buttons.
- Styling options: Button to overlap and make a cowl; button in center and loop through for a secure wrap; use as scarf with dangling buttons as decorative detail.
Finishing
- Weave ends. For a polished finish, sew a narrow lining onto inner button band to reduce wear.
Care
- As per yarn; buttons may prefer handwash.
Why it’s smart: functional fashion — no knots, lots of outfits, easy to gift.
Final finishing tips that apply to every scarf
- Weave in ends with a long tail and duplicate-stitch them back into the work for security — nothing is more embarrassing than a seam unraveling on the subway.
- Blocking matters for lace and textured stitches: wet block or steam lightly to set shape, especially chevron and seaside patterns.
- Edge tidy-up: a single round of sc can rescue a wavy, uneven edge and make your scarf look intentional.
- Personalization: add fringe, tassels, pom-poms, or sewn charms. Keep scale in mind — don’t over-accessorize a highly textured scarf.
- Label your project (if selling): note yarn, hook, care, and disclaimers like “hand wash recommended.”
conclusion
Here’s the brutal truth: the scarf that’ll get worn most is the one you finish. Not the one with the most complicated stitch or the prettiest photo. So pick a pattern that matches your time and yarn stash. Want instant gratification? Do Puff Stitch Mile-A-Minute. Need a classy piece for brunch and court dates? Go Chevon or Seaside. Want a functional gift? One-Skein Mini or Buttoned Scarf.