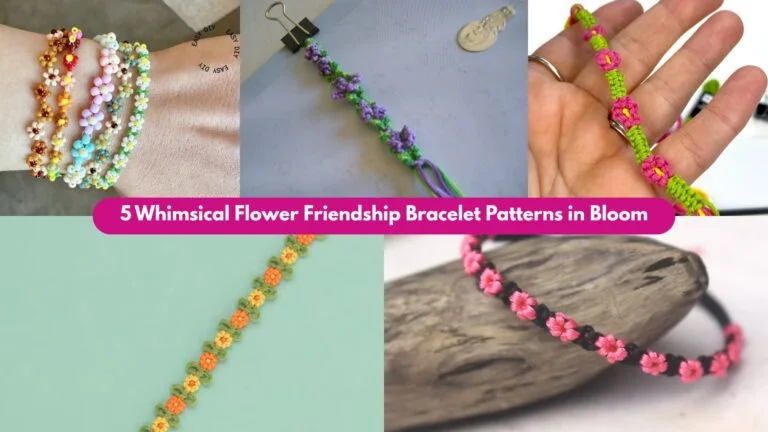
Handmade crochet chokers are compact, fast to make, and delightfully giftable — a little piece of textile jewelry that can be wildly delicate or boldly statement-making. Below you’ll find: one concise intro with sizing & materials guidance that applies to all six patterns, then six full pattern sections (each with skill level, materials, finished-size guidance, gauge and stitch-multiple notes, a clear step-by-step construction, finishing/closure options, variations, and care). Each pattern is written so you can adapt yarn weight and length to fit the recipient.
Read the sizing notes first — they’ll let you confidently scale every pattern to a precise neck measurement.
Quick notes — materials, sizing, gauge and basics
Abbreviations (US): ch = chain, sc = single crochet, hdc = half double crochet, dc = double crochet, tr = treble, sl st = slip stitch, sk = skip, st(s) = stitch(es), rep = repeat, BLO/FLO = back/front loop only, MR = magic ring.
Suggested tools: small sharp scissors, tapestry needle, blocking surface + pins (for lace), jewelry pliers (for clasps), small jump rings + lobster clasp or magnetic clasp, small beads/charms if desired.
Materials by feel:
- Delicate / bridal chokers: Size 10 cotton thread or fingering-weight yarn + 1.75–2.5 mm hook.
- Everyday dressy chokers: Lightweight fingering or sock yarn + 2.5–3.5 mm hook.
- Statement chokers: Light DK yarn + 3.5–4.5 mm hook.
Sizing basics (do this once):
- Measure the wearer’s neck where the choker will sit — call this N (in inches). Typical choker lengths: 12–16″.
- Decide how snug: add 0.25–0.75″ ease for comfort (call result L, the finished choker length). Example: N = 13″, add 0.5″ → L = 13.5″.
- Make a small swatch in your chosen stitch to get stitches per inch (spi). Multiply L × spi → foundation stitches (round up/down to nearest stitch repeat required by the pattern).
- Example arithmetic (digit-by-digit): Suppose L = 14 inches and spi = 4 sts/in. Multiply: 14 × 4 = (10 × 4) + (4 × 4) = 40 + 16 = 56 stitches.
Closures: standard options — lobster clasp + jump ring; small magnetic snap (sewn into lining); crocheted chain loop + small button; short chain extender for adjustability.
General finishing: Weave ends securely, block lace pieces gently, attach jumps/closures with reinforced stitching or a felt patch for strength. Always test workmanship for comfort and durability before gifting.
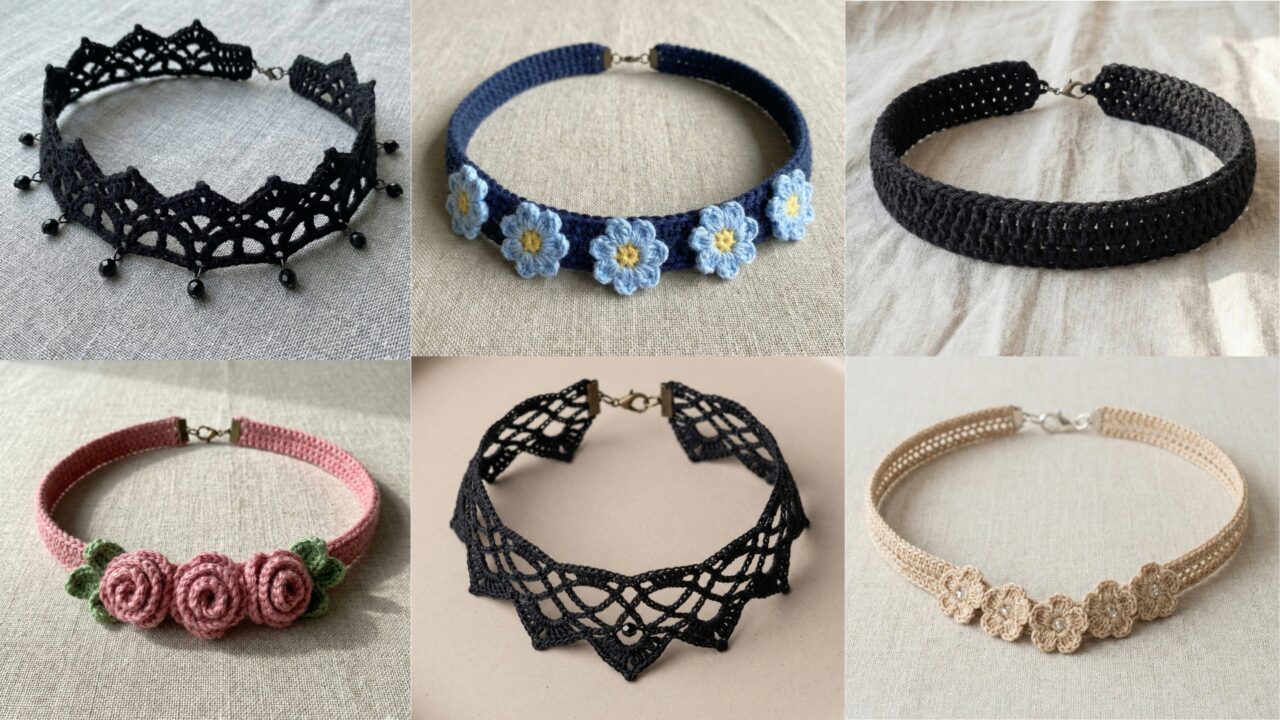
1. Crochet Simple Black Lace Choker Pattern
Vibe: Sleek, classic black lace — elegant and versatile for evening wear or Gothic/retro styling.
Skill level: Intermediate (lace repeat & blocking)
Materials (sample adult → finished L = 14″)
- Size 10 cotton thread or fingering-weight black yarn, ~40–60 yds.
- Hook: 1.75–2.5 mm (thread) or 2.5–3.0 mm (fingering).
- Small magnetic clasp or lobster clasp + jump ring.
- Blocking pins + mat.
Gauge & multiple (example): Make a 1″ swatch in the lace repeat. For this lace I recommend a multiple of 8 + 2 stitches to let the motif repeat cleanly.
Stitch concept (summary): a delicate chain-and-shell lace: a base of alternating V-stitches (dc, ch2, dc) and chain arches that form tiny arches and pointed scallops.
Step-by-step (sample counts using 56 sts from earlier example)
- Foundation: ch56, join careful to form a ring (do not twist). Mark start.
- Round 1 (set base): ch1, sc in each st around; join. (56 sc)
- Round 2 (mesh): ch4, sk 2 sts, sc in next st — rep around so you have evenly spaced chain-arcs. Join.
- Round 3 (lace shell row): ch3 (counts as dc), (dc, ch2, dc) into the next chain-4 space, ch2, sc in next sc — rep around. Join.
- Round 4 (anchor row): ch1, sc in each dc and sc to lock pattern; join.
- Round 5 (scallop finish): sc in next 2, 5-dc shell in next ch2 sp, sc in next 2 — rep to make pointed scallops. Join.
- Repeat Rounds 2–5 until height ~0.75–1.0″ (narrow choker band). Block flat and pin scallops evenly.
- Edge & closure: Add 1 round sc inside BLO for a foldable edge if you want interior comfort. Attach small jump rings to both ends — sew them through multiple stitches and reinforce with a tiny felt disc on the wrong side. Add clasp. Optionally attach a tiny central pendant with a jump ring.
Variations: Make it white/ivory for bridal; add tiny glass seed beads at shell points for sparkle (string beads before you start and slide up to stitch as needed).
Finishing & care: Block when wet for crisp lace. Hand wash gentle; reshape and dry flat.
2. Crochet Esperanza Choker Pattern
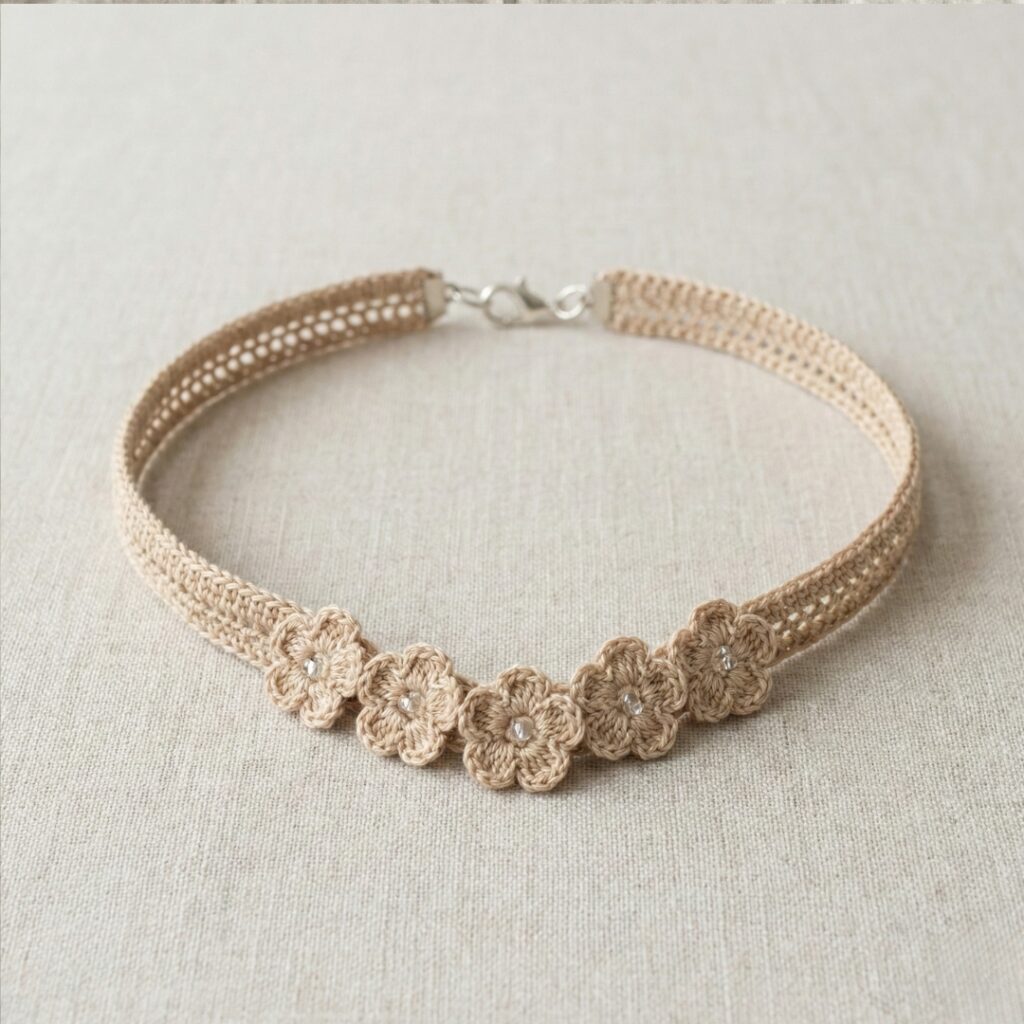
Vibe: Modern with soft floral accents — a narrow band with small attached floral motifs (“Esperanza” = hope, floral accent).
Skill level: Confident beginner → intermediate (motifs + join-as-you-go)
Materials
- Fingering weight cotton or cotton-blend yarn, 30–50 yds.
- Hook: 2.5–3.0 mm.
- Small lobster clasp or magnetic snap.
- Tiny glass seed beads (optional).
Design overview: A slender band in hdc/chain mesh with 4–6 small 5-petal flowers worked separately and joined to the front center.
Stitch multiple: band uses simple rows, no strict multiple — base is sc in the round.
Step-by-step
- Measure & foundation: Using target length L and your spi, chain L × spi stitches (round to nearest whole number). Example L = 14″, spi = 4 → 56 chains; join to ring. Work 2 rounds hdc for a smooth band.
- Flower motif (make 5–6): MR; R1: ch1, 6 sc in ring; sl st to join. R2: (ch3, sl st into next sc) × 6 to make 6 loops. R3: In each loop work (sc, hdc, dc, hdc, sc) to form petal. Finish, leave tail. Block petals flat.
- Placement & joining: Lay band flat and position flowers across the center (3–4 for small choker; 5 for slightly wider). Sew flower bases to band by stitching through motif center and band stitches. For join-as-you-go, in final petal round you can sl st into the band instead of sl st into base loop.
- Embellishment: Add a tiny seed bead sewn into each flower centre for shimmer.
- Finish: Add jump rings and clasp. For comfort, sew a thin strip of cotton ribbon inside the band under the flower area.
Variations: Use gradient yarn for the band while making flowers in solid white for contrast.
Care: Hand wash; reshape while damp.
3. Crochet Prim Choker Necklace Pattern
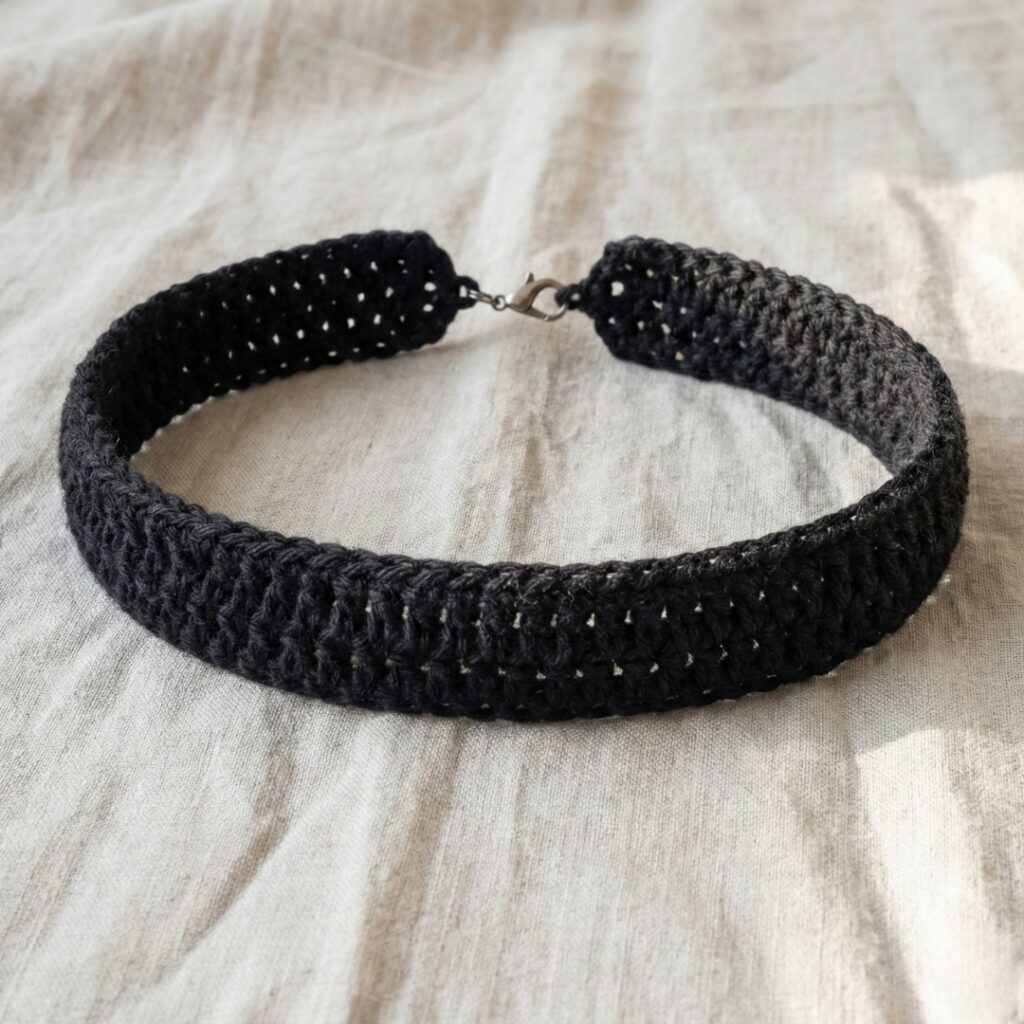
Vibe: Minimal, refined — narrow textured band with a neat geometric repeating stitch; great for minimal wardrobes.
Skill level: Confident beginner (post stitches or twisted rib)
Materials
- Lightweight DK or fingering yarn, 30–60 yds.
- Hook: 2.75–3.5 mm.
- Lobster clasp + jump ring.
Stitch concept: A tidy reversible rib built from alternating front-post and back-post hdc (or fpdc/bpdc for more height). Multiple = 2 stitches (alternating).
Step-by-step
- Foundation: Work foundation chain to reach target length × spi. Example 14″ × 4 = 56 ch; join.
- Round 1 (set): ch1, sc in each st around; join.
- Round 2 (rib row A): ch2 (counts as hdc), fpdc around next st, bpdc around next st rep to end; join.
- Round 3 (rib row B): ch2, bpdc around next st, fpdc around next st rep; join. Alternating these two rounds produces pronounced vertical ribs.
- Repeat Rounds 2–3 until desired band height ≈ 0.5–0.75″. This makes a neat, sturdy choker.
- Edge & closure: Work one round of sc in BLO to make a turning edge, attach jumps/clasp with reinforced stitches and felt backing.
Variations: Hold a strand of metallic thread with the main yarn for a subtle sparkle; make it wide (double band) for more presence.
Care: Machine wash gentle if yarn allows; otherwise hand wash.
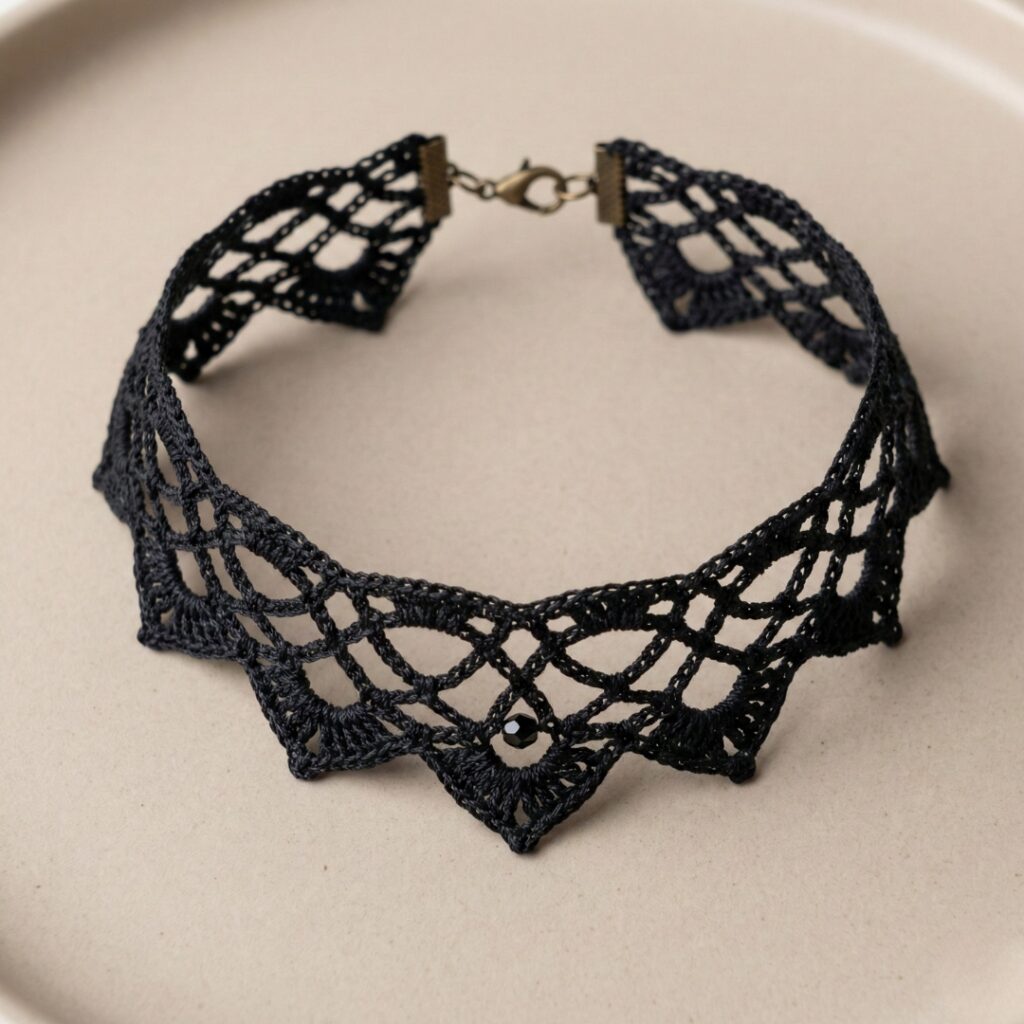
4. Crochet Gothic Choker Pattern
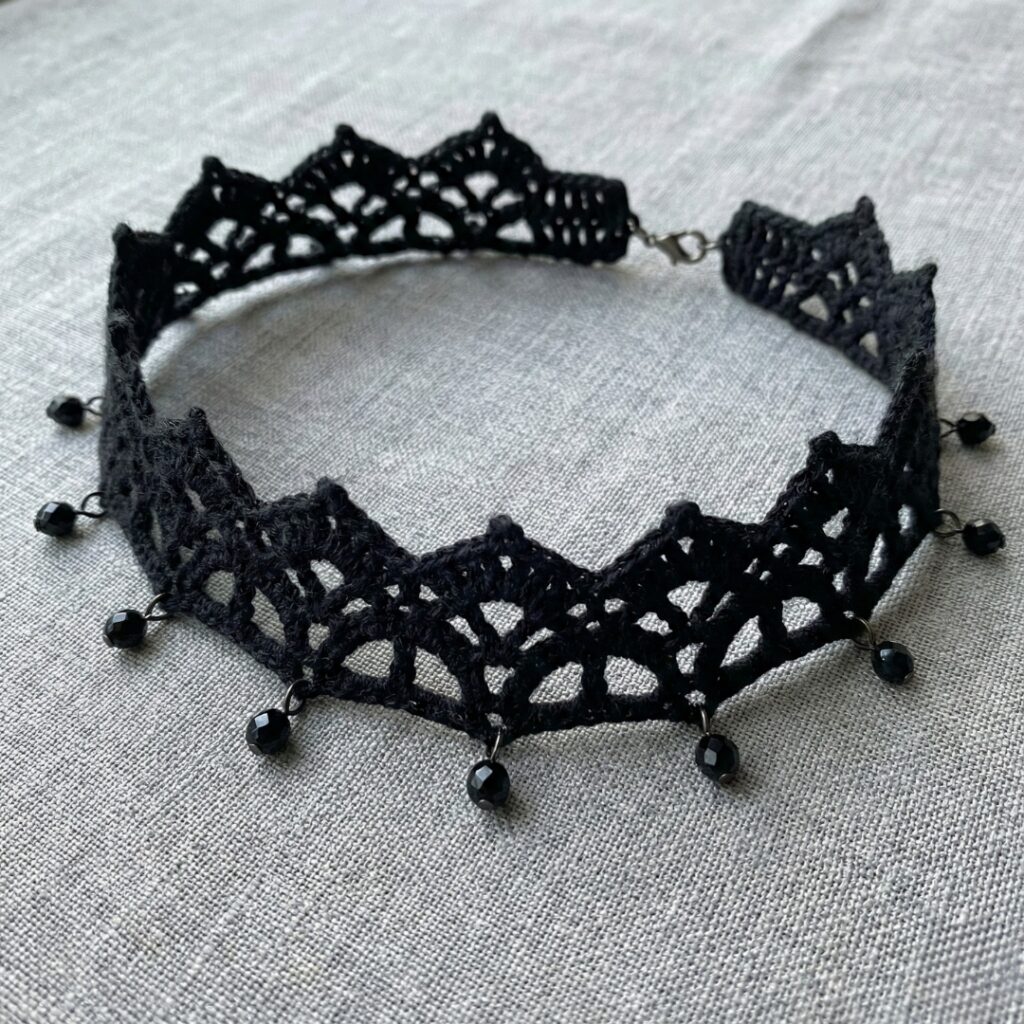
Vibe: Dramatic, Victorian-inspired with pointed arches and optional faux-gem drops — ideal for a Gothic or theatrical aesthetic.
Skill level: Intermediate → advanced (lace arches, points, embellishments)
Materials
- Size 10 cotton thread or fine lace yarn for crisp points; or fingering yarn for softer look. ~50–80 yds.
- Hook: 1.75–2.5 mm (thread) or 2.5–3.25 mm (fingering).
- Tiny pendants or drop beads, magnetic clasp.
Design concept: Band of alternating gothic arches (pointed picot peaks) with tiny pendant drops attached at each peak.
Stitch multiple: multiple of 10 + 2 (example pattern; round to nearest).
Step-by-step
- Foundation: Chain to match L × spi and adjust to multiple. Example 56 stitches (round to pattern multiple). Join into ring.
- Base rounds: ch1, sc around x2 rounds for a firm base.
- Arch row: ch6, sl st into sc four stitches ahead to create an arch — spacing depends on multiple, so plan to get evenly spaced arches (e.g., if pattern repeat is 10 stitches, ch6 then skip 4 is roughly equivalent).
- Peaked lace row: into each ch6 arch work a pointed motif: (sc, hdc, dc, tr, picot, tr, dc, hdc, sc) then sl st to base. The picot at the top creates the pointed Gothic peak.
- Anchor row: Work one round of sc across to lock the arches.
- Add drops: Sew a tiny jump ring through the picot top of each arch and attach a tiny charm or bead drop. For security, stitch the jump ring to the band with a few sewn passes.
- Finish & closure: Attach clasp. Optionally add a thin velvet ribbon backing for comfort.
Variations: Make it all-black for Gothic evening wear, or black cord with a single red glass bead drop for vampire-cinematic effect.
Care: Hand wash, dry flat. Remove charms before washing if metal may tarnish.
5. Crochet Rose Choker Pattern
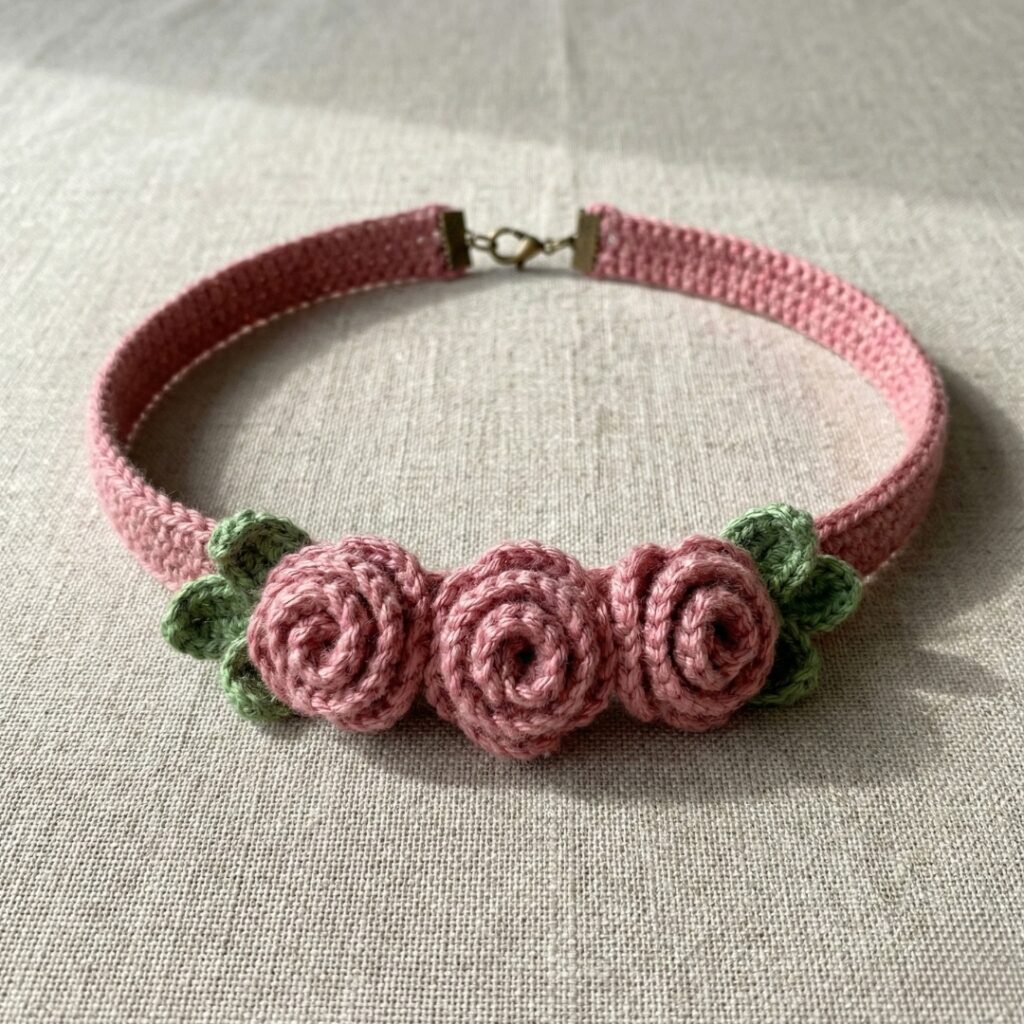
Vibe: Romantic — a narrow band decorated across the front with 3D rosebuds and tiny leaves.
Skill level: Intermediate (3D motifs + secure joining)
Materials
- Fingering-weight cotton or cotton-blend yarn for a crisp, wearable rose; ~50–90 yds.
- Hook: 2.5–3.0 mm.
- Clasp + jump rings.
Design concept: A slim base band plus 3D roses (rolled or layered petal construction) and small leaf motifs.
Step-by-step
- Band (foundation): Chain L × spi stitches, join, then work two rounds of hdc for stability.
- Small rose (rolled rose method):
- Make a long strip: ch 12; Row 1–Row 3: sc across forming a narrow strip (3 rows tall). Block flat.
- Roll strip tightly from one end into a spiral; secure center and base with needle and thread as you roll so the petals fan out. Sew the rose base to the band at centered positions (3 small roses across center works well for 14″ chokers).
- Leaf motif: ch6; sc in 2nd ch from hook, hdc, dc, hdc, sc to create a small leaf; sew leaf bases behind each rose.
- Attach: Sew roses and leaves securely to the band using strong thread through multiple stitches on both rose base and band. Reinforce with an interior small felt disc glued/sewn under each rose base to keep stitches from pulling and to protect skin.
- Finish: Add clasp & jump rings.
Variations: Use tonal roses (pale pink to rich rose); add metallic thread in center for sparkle.
Care: Hand wash; reshape roses while damp.
6. Crochet Blue and Navy Daisy Choker with Flowers Pattern
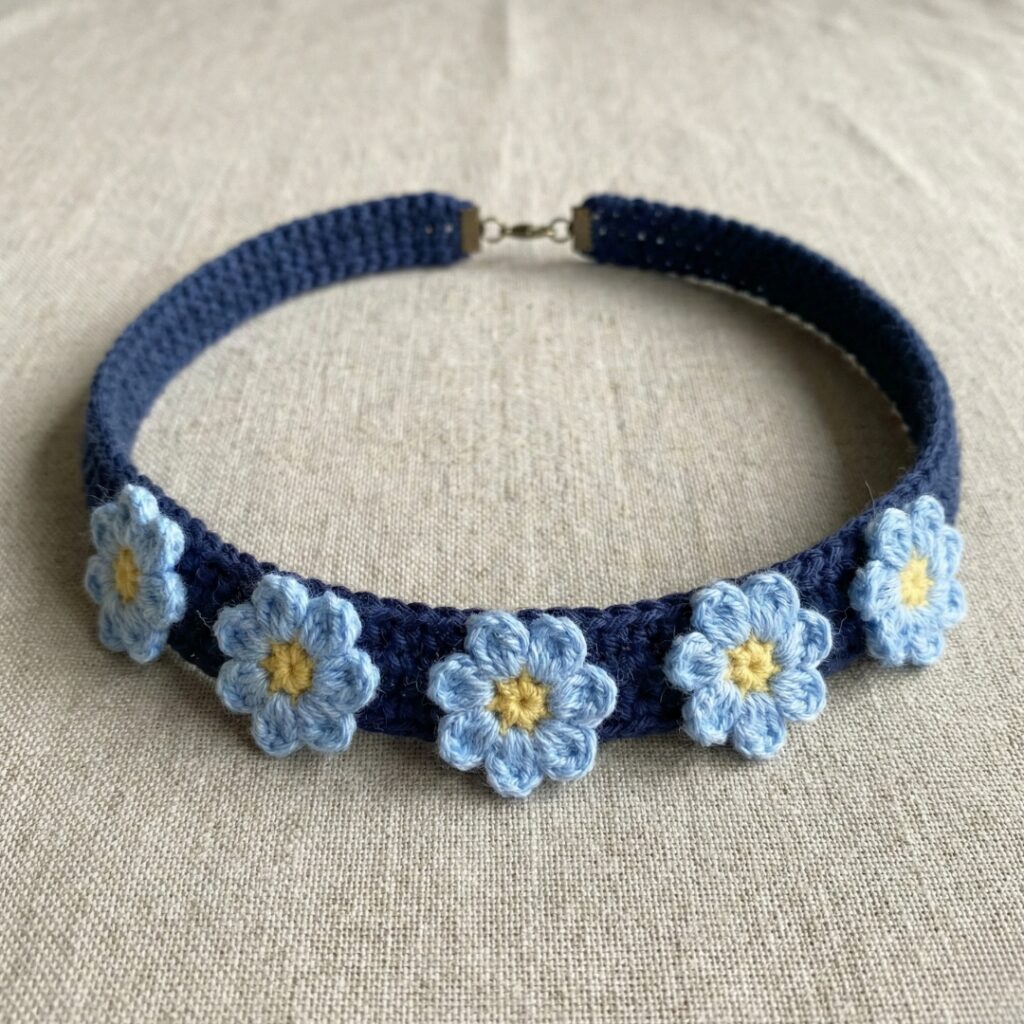
Vibe: Playful retro—two-tone blue daisies spaced across a narrow band; fresh, modern floral.
Skill level: Confident beginner → intermediate (motifs + color change)
Materials
- Fingering or light DK yarn in two blues (e.g., sky blue + navy), plus small yellow for centers — total ~60–100 yds.
- Hook: 2.5–3.5 mm.
- Clasp + jump rings.
Design concept: A simple narrow band with small crocheted daisy motifs worked separately or joined-as-you-go spaced across the front.
Step-by-step
- Band: Chain foundation using L × spi; join and work 2 rounds sc.
- Daisy motif (small):
- MR; R1: ch1, 8 sc in MR; sl st to join. (8 sc)
- R2 (petal loops): ch4, sl st into next sc × 8 → 8 loops.
- R3 (petal shaping): In each loop work (sc, hdc, dc, hdc, sc) to form petals (use sky blue for petals). Center with a tiny yellow surface stitch or a small sewn yellow French-knot-style bud (yarn-wrapped bead also works).
- Placement: Space daisies evenly across the front (e.g., 5–7 daisies across 14″ depending on motif width). Sew or join-as-you-go: in the last petal round slip-stitch into the band to join seamlessly.
- Finish: Add small navy edging round around band to frame daisies; attach clasp.
Variations: Make one central larger daisy as focal point. Add tiny bead centers for shimmer.
Care: Hand wash; lay flat.
Final finishing notes (applies to all patterns)
- Testing & reinforcement: Always reinforce clasp/jump-ring areas by sewing through multiple stitches and optionally adding a felt patch on inside before attaching hardware. This prevents stress tears.
- Blocking: Lace/flower motifs benefit from blocking. Pin motifs and band to dimensions and steam or wet-block per yarn fiber.
- Comfort: If metal or beads may irritate skin, sew a soft ribbon or felt strip on the choker’s inside or line the choker.
- Sizing checks: If you can, test the choker length on the intended wearer before adding final clasp; add a 1″ chain extender to make gifts more flexible.
- Gift presentation: Package on a small card with care instructions and note the fiber (e.g., “Hand wash cool, lay flat to dry”).
Conclusion
These six chokers — Simple Black Lace, Esperanza, Prim, Gothic, Rose, and Blue & Navy Daisy — give you a rich toolkit of styles to offer readers: from restrained, elegant lace and neat, minimalist ribs, to romantic roses and playful daisies. Each pattern is written so you can:
- scale to exact neck measurements using the quick sizing method,
- swap yarn and hook to change the choker’s weight and character, and
- add hardware (jump rings, magnetic snaps) for durable, gift-ready finishes.