

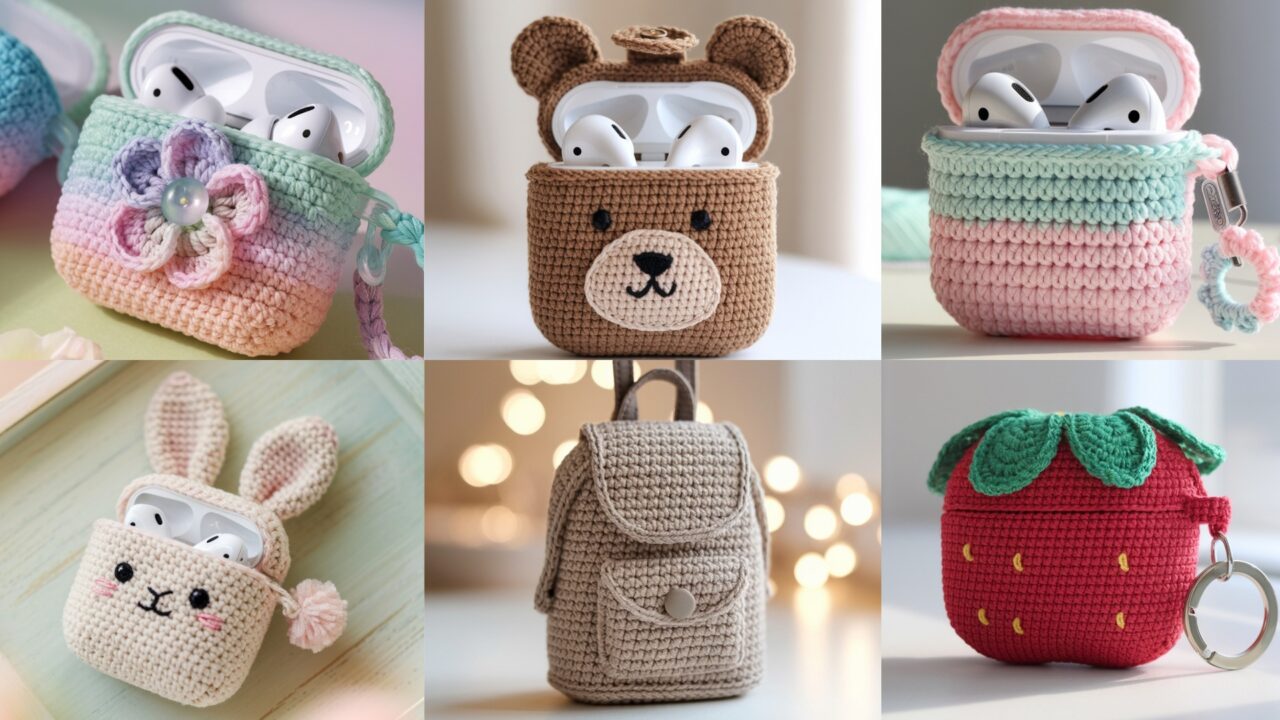
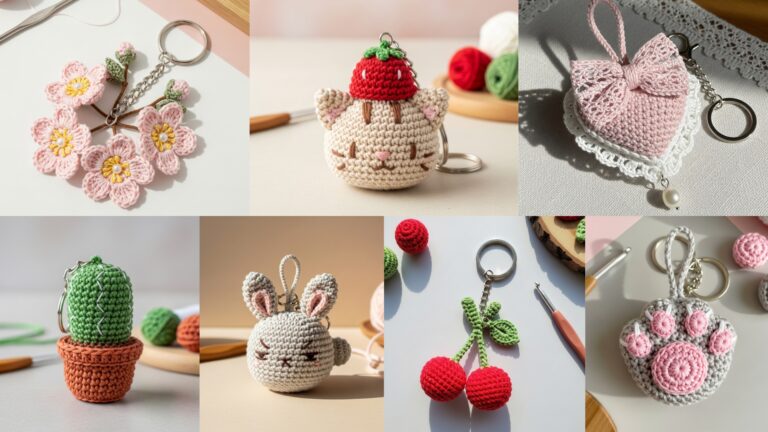
Crocheted AirPod cases are a tiny, fun way to personalize everyday tech — they protect your case from scratches, add grip, and make great gifts. Because an AirPod case is small, these projects work up fast and are ideal for trying out textures, colorwork, and tiny appliqués. Below are six distinct, detailed patterns (Bear, Strawberry, Tiny Backpack, Flower, Easy, Rabbit). Each pattern includes: Skill level • Finished size & fit notes • Materials • Gauge & sizing tips • Step-by-step construction (base + motif + lid/closure) • Finishing & assembly • Tips & variations • Care** so you can make case after case with confidence.
Two quick sizing notes before we begin
- There are minor size differences between Apple AirPods (1st/2nd gen), AirPods Pro, and other true wireless case shapes. Always measure the actual case you plan to cover (circumference and height) or test your cozy on the case as you go. I give a practical example stitch count for a standard AirPods (1/2 gen) case and explain how to scale up or down.
- I assume US crochet terms. Abbreviations used: ch, sc, hdc, dc, sl st, inc = 2 sc in same st, dec = sc2tog, FLO/BLO (front/back loop only), RS/WS. Use cotton or a cotton/acrylic blend for durability and grip.
Core method — universal AirPod case base (use this for every pattern)
This bottom-up oval base + body method is used in every pattern below; each pattern adds its own decoration.
Example target (standard AirPods 1/2 style)
- Example foundation chain: ch 22 (making a narrow oval base that works for many AirPods cases when using worsted #4 yarn with 4.0 mm hook).
- Example working stitch: sc in rounds.
If you prefer to size by measurement: measure your case circumference (around the widest area) and your stitches-per-inch (make a test row of sc). Multiply circumference × stitches-per-inch and round to the nearest even number for a chain length (or work a flat rectangle and seam).
Universal base (bottom-up oval — example with ch 22)
- Foundation chain: ch 22 (example). Do not join.
- Round 1 — form oval base: sc in 2nd ch from hook and across until last st, make 3 sc in last ch, rotate to work along underside of chain, sc across the other side, make 2 more sc in final chain to close the oval corner (total count ≈ 44 sc). Join with sl st to first sc OR work in continuous rounds (your choice).
- If you used 22 ch and worked 3 sc in one end and 2 sc in the other you should have an oval. Adjust increases to keep base flat.
- Rounds 2–4 — even the base: ch 1, sc in each st around, join. Repeat until base is about 1/2 inch high (this thickens the bottom). If base buckles, add or remove increases as needed.
- Body — work up sides: From now on work sc in the round (no increases) until the cozy reaches about 2.75–3.25 inches tall measured from base (example for standard case). Try on the case as you work — stop when the sides reach the bottom of the AirPod case lid hinge area (you want the lid to clear).
- Lid shaping (optional): You can either make a separate flap/lid or leave the top open and add a flap later. See pattern-specific lid options below.
Use this base as the starting point for each pattern; the motif instructions below assume you already have a base or will crochet motif as you work.
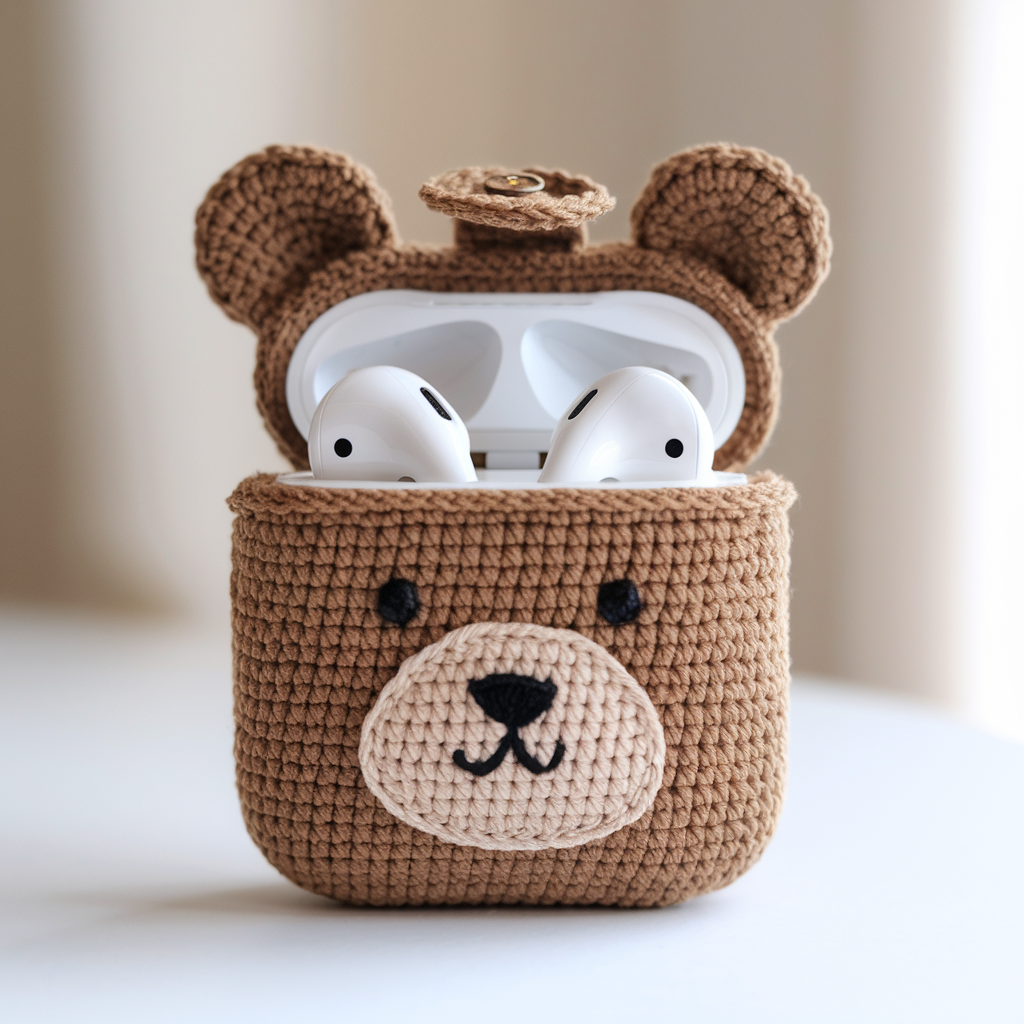
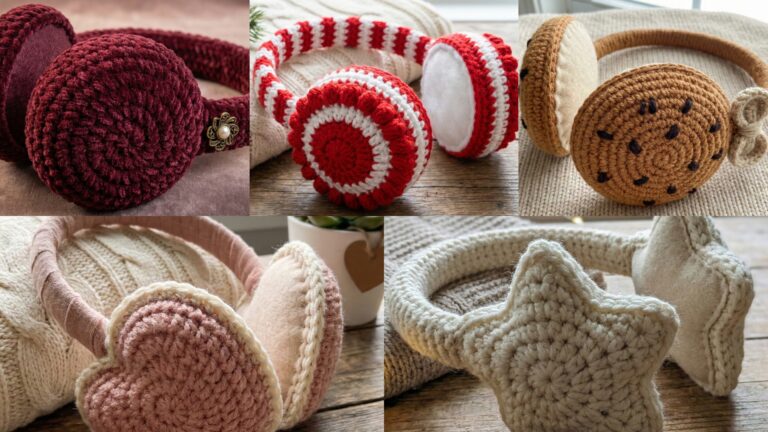
1. Crochet Bear AirPod Case Pattern
Skill level
Easy → Intermediate (basic shaping + small applique / sewn ears)
Finished size & fit notes
Fits a standard AirPods (example) using the base above. If you have AirPods Pro, add 4–6 rounds to the body height.
Materials
- Worsted weight cotton or cotton blend yarn: Main color (cozy body) ~30–40 yd, Accent color (bear muzzle/ears) ~10–15 yd
- 4.0 mm hook (adjust if your gauge differs)
- Small amount of black embroidery thread for nose/eyes (or 6 mm safety eyes if you prefer)
- Tapestry needle, scissors, small felt circle (optional), small snap or button for flap, small elastic loop (optional)
Step-by-step guide
A. Base & body (use universal base above). Follow the Universal base through the body rounds until the cozy reaches the height needed.
B. Bear face placement (worked after body reaches desired height)
- Decide the front center. With Accent color (brown), make a small muzzle applique: magic ring, 6 sc in ring; round 2: 2 sc in each st (12 sc); round 3: sc around — fasten off leaving tail to sew.
- Sew the muzzle to the front center of the cozy (secure tightly). Option: place a small felt circle under the muzzle before sewing to reinforce.
C. Eyes & nose
- Embroider two small eyes above the muzzle using black embroidery thread (French knots or satin stitch) OR insert small safety eyes before sewing the muzzle (if using safety eyes, attach before sewing muzzle!). Embroider a tiny nose on the muzzle and a small mouth.
D. Ears (make 2)
- Ch 6, row 1: sc in 2nd ch and next 3 ch (4 sc). Row 2: ch 1, sc across 4, Row 3: ch 1, sc2tog, sc2tog (makes a small triangle). Fasten off leaving tail and sew at top corners of the cozy. Reinforce stitches.
E. Lid / Closure (two options)
- Option 1 — Flap with button: At the top edge, ch 12 (or a length to reach from back top over front), join to the back top with sl st to form flap pivot, sc 1 round on the flap; attach a small button on the front.
- Option 2 — Elastic loop & button: Add a small loop on flap and sew a button on front.
F. Finishing & assembly
- Weave in ends, block lightly if needed. Insert a small felt backing behind the face to hide threads and give structure. Attach a small carabiner/keyring to the back seam if you want to clip to bag.
Tips & variations
- Make the bear in textured yarn for cozy, fuzzy ears (use boucle or mohair for a soft look but avoid too fuzzy if using safety eyes).
- Make a panda by using white for main and black for eye patches/ears.
- For machine-washable gifts, avoid glued-on embellishments and use embroidered eyes instead of safety eyes.
Care
Hand wash or machine wash gentle on cool in mesh bag; reshape and air dry.
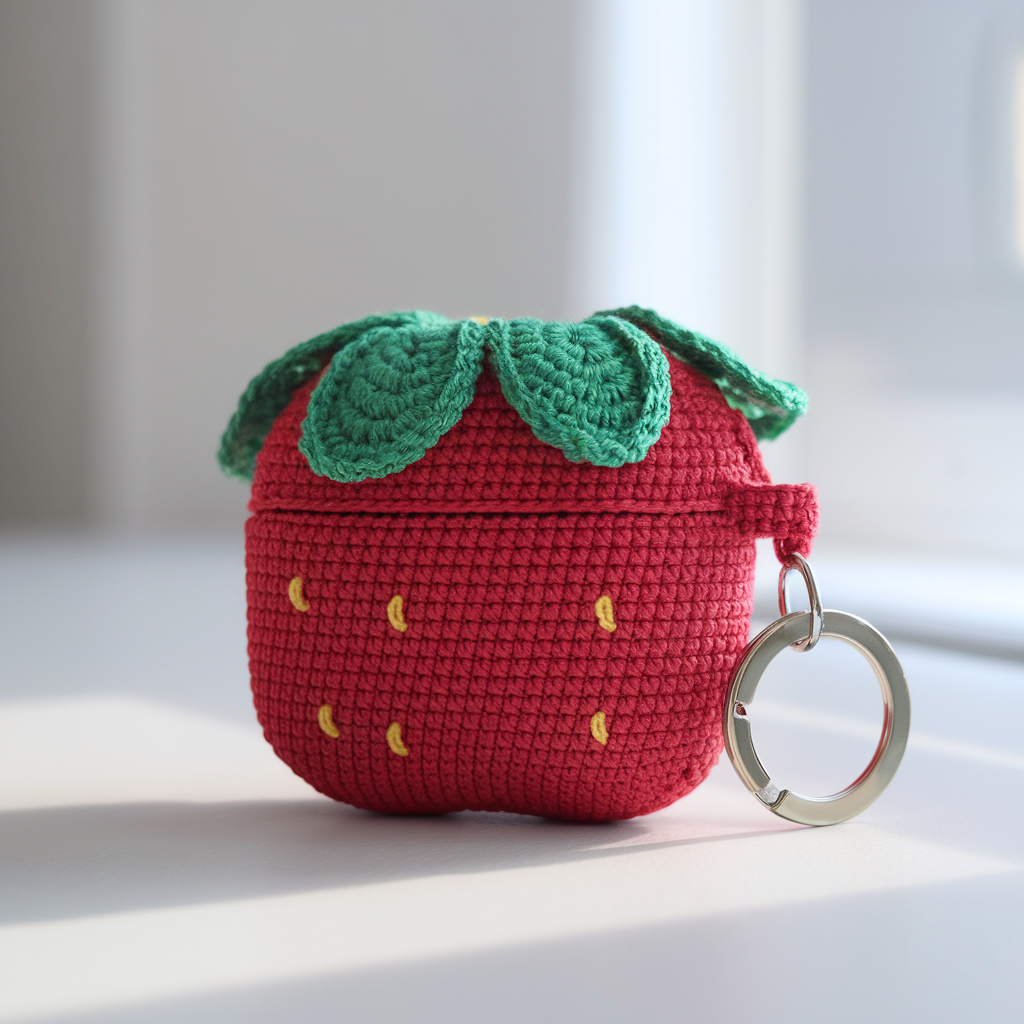
2. Crochet Strawberry AirPod Case Pattern
Skill level
Easy — worked in color blocks + small seed detailing
Finished size & fit notes
Same base size. Strawberry décor gives a rounded top look.
Materials
- Worsted weight yarn: Main (pink or red) ~30 yd, Leaf/Top (green) ~8 yd, Tiny contrast (yellow) for seeds = scrap
- 4.0 mm hook, tapestry needle, small snap or magnet for flap optional
Step-by-step guide
A. Base & body
Make base as above until cozy height ≈ 2″ (stop a bit shorter than usual so the strawberry “top” sits above the case).
B. Colorwork body (strawberry skin with seeds)
- Work sc rounds in red/pink for the body. After you have the body in your desired height, add small seed embroidery: with yellow embroidery thread or yarn, make tiny French knots or short sl st pads randomly across the front to mimic seeds. Alternatively, pre-crochet tiny seeds: ch 3, sl st into first ch to make small ring and sew on.
C. Leaf crown (top)
- Row of leaves as a scallop crown: join green at top edge, ch 6, sl st into base to make loop repeat around to create leaf loops.
- Into each loop work: sc, hdc, dc, hdc, sc (a small leaf). Fasten off. This creates a leafy crown that covers the hinge area and acts as a decorative lid concealer.
D. Lid option
- Make a small separate lid: continue working sc single rounds for 6–8 rounds over the top to create a domed lid (stop before you close it completely), then fasten off and sew a small button on the front; create a loop from ch to hook to the back side to close.
E. Finishing
- Securely sew leaf crown down so it won’t flop over the hinge too much. Add a small keyring to the back seam if desired.
Tips & variations
- Make “dotted” seeds by surface crochet with yellow for crisp little marks.
- Make strawberry keychains by leaving out the AirPod interior and adding a small zipperable pouch element.
Care
Hand wash recommended because of appliqué leaves; flatten leaves while drying.
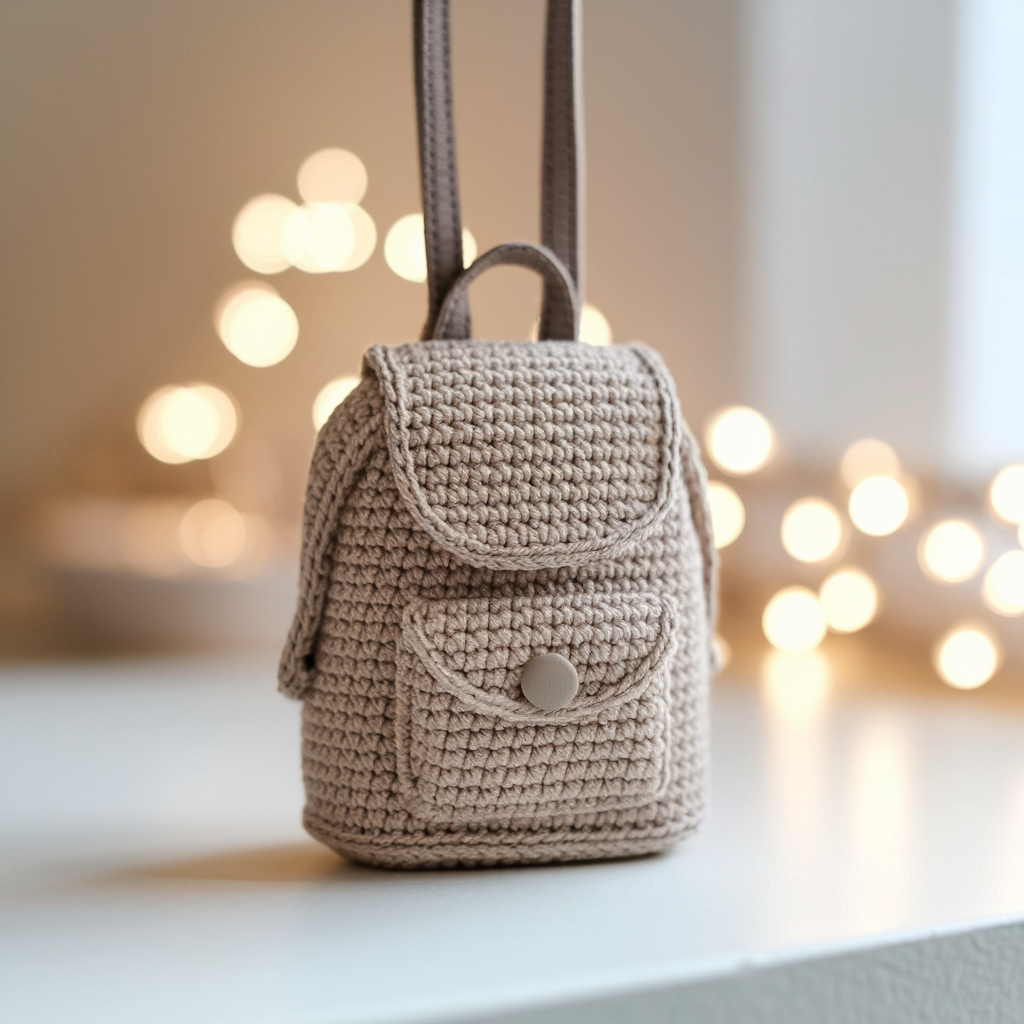
3. Crochet Tiny Backpack AirPod Case Pattern
Skill level
Intermediate — small structured elements: flap, tiny pocket, straps
Finished size & fit notes
Same base; backpack elements add charm. This makes an adorable bag charm.
Materials
- Worsted weight yarn in main color (bag) ~40 yd, accent color for straps/pocket ~10–15 yd
- 4.0 mm hook, small button or snap for pocket flap, two tiny split rings or small straps hardware optional
Step-by-step guide
A. Base & body
Make base/body as universal base until the cozy reaches slightly higher (approx 3.25″) to allow room for flap and pocket.
B. Front pocket
- Make a small rectangular pocket: ch 12, row 1: sc in 2nd ch across (11 sc), rows 2–5 sc across until pocket height ~ 1″. Fasten off leaving tail to sew.
- Sew pocket to front lower third of cozy; add a tiny flap: ch 6, sc back along chain 1–2 rows, fold and sew as flap. Sew a tiny button on pocket front and loop on flap.
C. Backpack flap & closure
- At top edge (back side), ch 12 and join to form a small hinge across the back width; sc around the small rectangle to form a flap tube; fold over the front to form flap and sew sides, or crochet a shaped semi-circle flap: attach yarn to back top, ch 1, sc evenly across 12 sts, then dec at each end over next rows to make rounded flap — sew down front and add a snap/button.
D. Tiny straps
- Make two thin straps by chaining 20 and sewing them to the top of the back, with the other ends sewn near bottom of cozy to look like straps — or make them removable with tiny split rings for realism.
E. Lining & interior
- Add fabric lining if you want more durability and to hide pocket seams.
F. Finishing
- Weave in ends and add any hardware. If you want this to be a real backpack charm, add a small carabiner or lobster clasp to the top to clip to bags.
Tips & variations
- Add tiny zipper tape atop pocket for realism.
- Create a “school” version by embroidering initials on pocket.
Care
Hand wash, reshape, avoid stressing tiny seams.
4. Crochet Flower AirPod Case Pattern
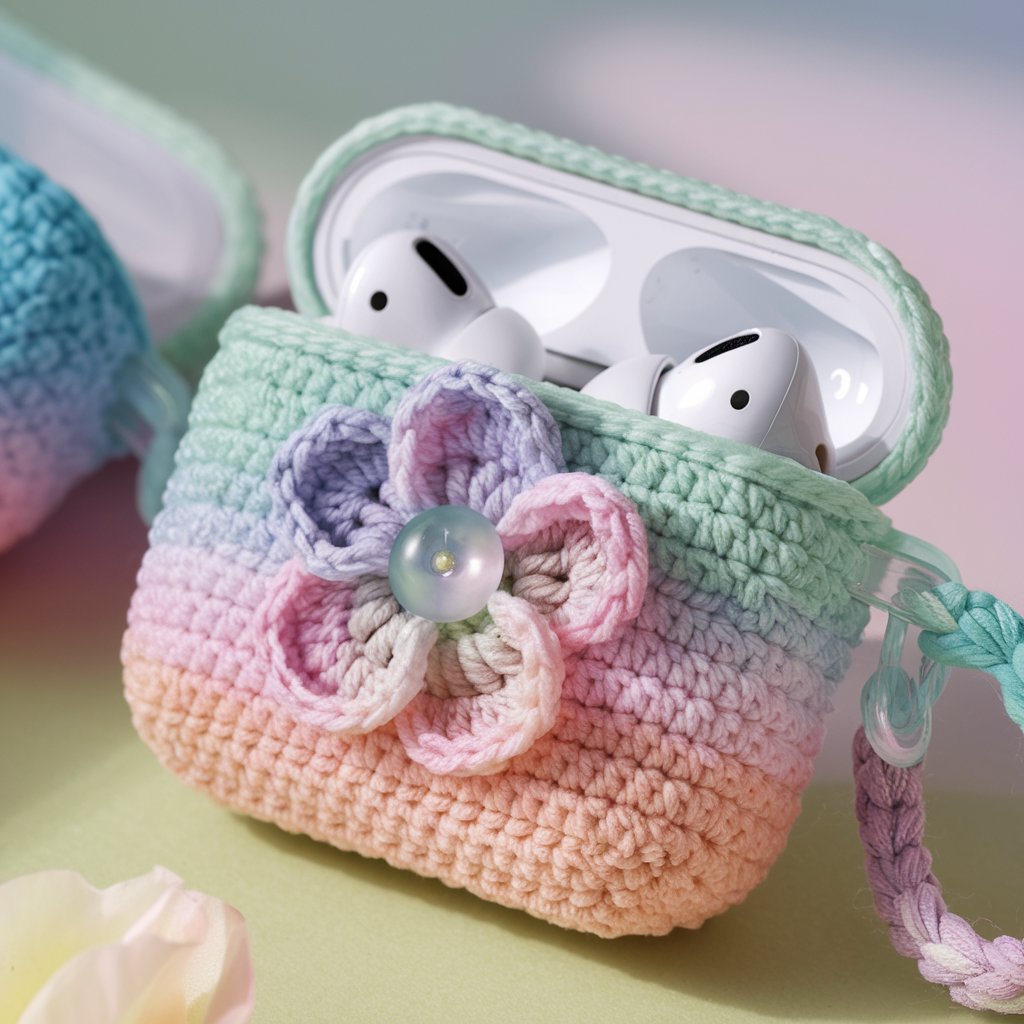
Skill level
Easy — uses flat flower appliqué added to basic cozy
Finished size & fit notes
Standard base. A big flower can be either flat on the front or be a 3D bloom that sits proud.
Materials
- Fingering or worsted yarn for base: ~30–40 yd; for petals: small amounts ~10–15 yd per color
- 4.0 mm hook (or smaller for tight petals), tapestry needle
Step-by-step guide
A. Base & body
Make base as described until you reach the height you want.
B. Flower motifs (simple layered 5-petal flower)
- Center (small disk): magic ring, ch 1, 6 sc in ring, pull tight, sl st, fasten off leaving tail.
- Petal round: join petal color in any st: ch 3, (3 dc, ch 3, sl st) into same st — repeat 5 times to make 5 petals. Fasten off.
- Make a second, slightly larger petal round or a ruff of picots to underlay the petals for fullness.
C. Attachment
- Sew the flower to one side of the cozy; secure through both the flower base and cozy body; add a felt disc inside for reinforcement.
D. Lid alternative
- Make the top as a petal cluster: instead of sewing a single flower, create a ring of petals around top to act as a decorative crown that also helps hide the hinge.
Tips & variations
- Use gradient yarn for petals that change color from center to tip.
- Add a bead cluster or button center for jewelry-like effect.
Care
Hand wash gentle; flatten petals while damp to preserve shape.
5. Crochet Easy AirPod Case Pattern
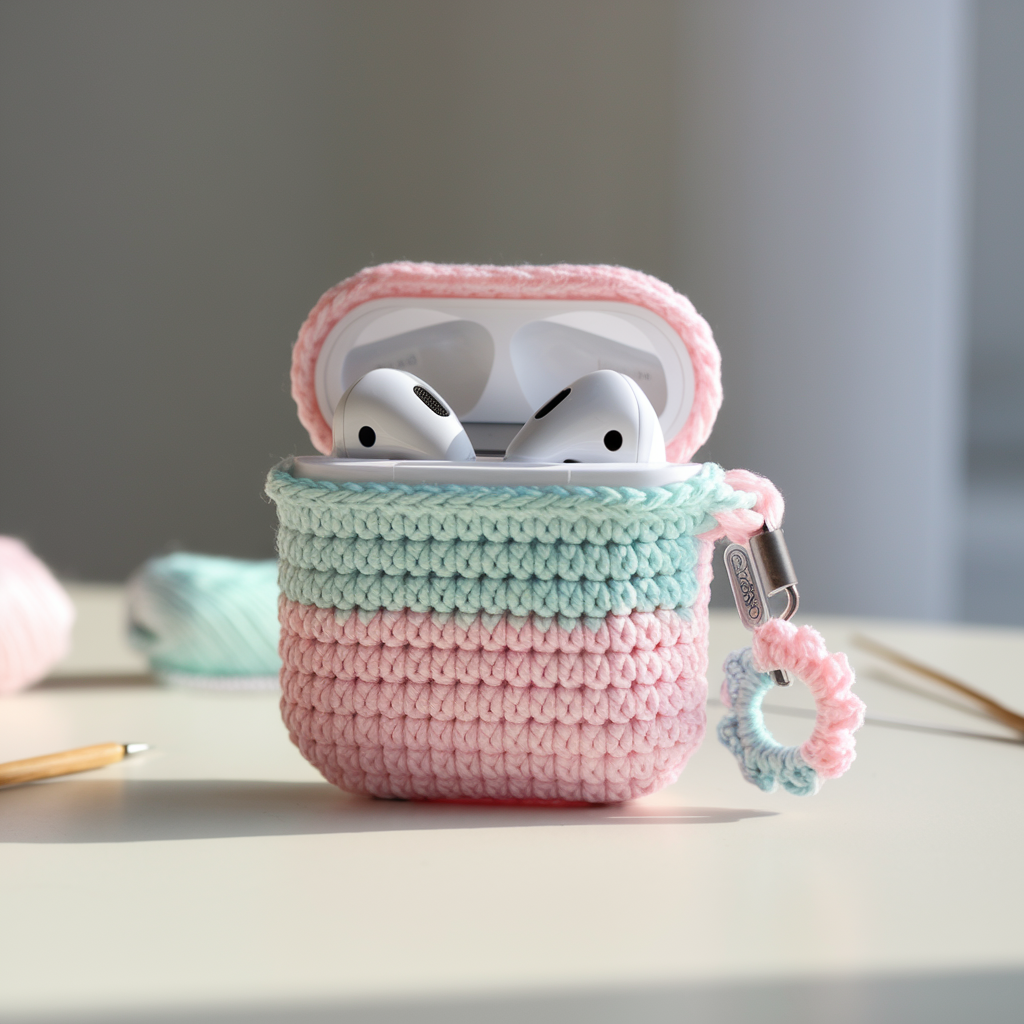
Skill level
Beginner — single crochet tube with optional zipper or button flap
Finished size & fit notes
Quick one-evening project; especially great if you just want protection without fuss.
Materials
- Worsted yarn ~40 yd, 4.5 mm hook for slightly looser, more flexible fabric, tapestry needle, small snap or zipper optional
Step-by-step guide (fast tube method)
- Chain to circumference: Measure case circumference. Example chain 24 and join to work in rounds. (If your chain is too tight, frog and retake with a larger hook.)
- Rounds: sc in each st around for 20–26 rounds until the tube height equals case height (plus a little for hinge).
- Top closure (quick): Fold a short chain flap from back to front (ch 14, attach at back edge, sc rounds on flap) and add a snap/button on front. Or sew a zipper vertically on one side.
Alternative — no-top pouch: Make tube and leave the top open — good for quick slip-on protection (not ideal for pocket carry).
Finishing
- Weave ends and trim neatly. Add clip if desired.
Tips & variations
- Use super-bulky yarn for a chunky, squishy case in one evening.
- Make matching cords or straps from i-cord for crossbody phone plus AirPod set.
Care
Machine wash gentle depending on yarn; reshape while damp.
6. Crochet Rabbit AirPod Case Pattern
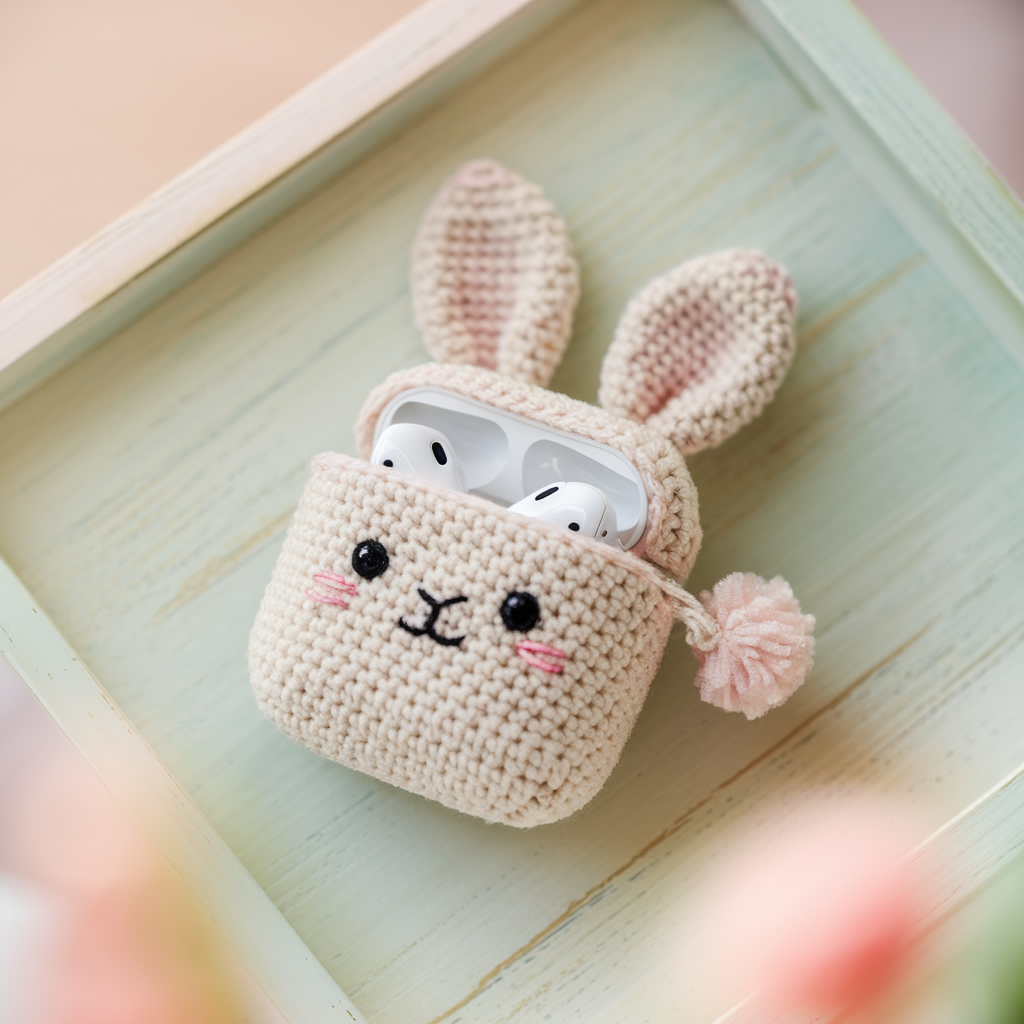
Skill level
Easy → Intermediate — shaped ears + embroidered face
Finished size & fit notes
Same base, tall floppy ears make this playful.
Materials
- Worsted weight yarn: main (rabbit body) ~35–45 yd, inner ear accent small amount ~5–10 yd, embroidery thread black/pink for face ~ small scraps
- 4.0 mm hook, tapestry needle
Step-by-step guide
A. Base & body
Make base per universal base; work the body higher than usual so the ears attach well — approx 3.25–3.5 in.
B. Rabbit ears (make 2)
- Ch 8. Row 1: sc in 2nd ch and across (7 sc). Row 2: ch 1, sc across. Row 3: ch 1, sc2tog, sc3, sc2tog (5 sts). Row 4: ch 1, sc across 5. Row 5: sc2tog, sc1, sc2tog (3 sts). Row 6: sc across 3. Fasten off leaving long tail to sew. Fold and sew base to round to make ear slightly concave. Sew ears to top front of cozy with a couple of rows inset so they point up.
- Optionally crochet smaller inner-ear piece in a contrasting pink: ch 6, sc across 4, row 2 sc across 4, fasten off and sew inside ear.
C. Face
- Embroider eyes (French knots) and a small nose and mouth using embroidery thread. For safety when selling, embroidery is preferred to glued-on plastic pieces.
D. Lid
- Optionally add a small button or loop to the back to create a cute tail closure (a small pompom tail sewn to the back is adorable and functions as a stop for a loop closure).
E. Finishing & assembly
- Tidy seams, reinforce ear bases with stitches. Add a felt backing behind the face if needed.
Tips & variations
- Make long floppy ears for a lop-eared bunny — lengthen ear foundation chain.
- Make seasonal bunnies (pastel colors for Easter); tie a tiny ribbon collar for charm.
Care
Hand wash and reshape; avoid rough laundering to keep ears intact.
Conclusion
These six AirPod case patterns are crafted to be fun, practical, and highly giftable. They give you options from quick and durable (Easy Case) to whimsical characters (Bear, Rabbit) and sweet novelty shapes (Strawberry, Tiny Backpack, Flower). A few final practical points before you start stitching:
- Measure & test as you go. Tiny differences in gauge or case model matter; try the cozy on the actual case before finishing so you can add or remove rounds.
- Reinforce stress points. If you add a flap or button, reinforce with a felt patch inside so the stitches don’t tear from repeated use.
- Consider lining. A thin cotton lining hides raw yarn ends and gives extra abrasion resistance — especially useful if you clip your case in a bag pocket with keys.
- Choose embellishments wisely. For items you intend to sell, prefer embroidered features over glued plastic bits (safer, more durable).
- Care labeling. Add a tiny care tag if you make these for a market: fiber content + “hand wash cold, reshape, air dry” or machine-wash guidance if the yarn permits.
Hey, I think your site might be having browser compatibility issues.
When I look at your blog in Chrome, it looks
fine but when opening in Internet Explorer, it has some overlapping.
I just wanted to give you a quick heads up! Other then that, superb blog!
My relatives every time say that I am killing my time here at net, however I know I am getting familiarity
daily by reading such good articles.
Hi there very nice website!! Guy .. Beautiful ..
Superb .. I will bookmark your web site and take the feeds additionally?
I am satisfied to seek out a lot of useful information here within the post,
we want develop extra strategies in this regard, thank you for sharing.
. . . . .
Hi there, all is going nicely here and ofcourse every one is
sharing data, that’s in fact fine, keep up writing.
Thanks a lot for sharing this with all folks you really recognise what you’re speaking
about! Bookmarked. Kindly also discuss with my site =).
We may have a link trade arrangement among us
Доставка по городу быстрая, букет красивый. Получатель рад!
заказ цветов томск