

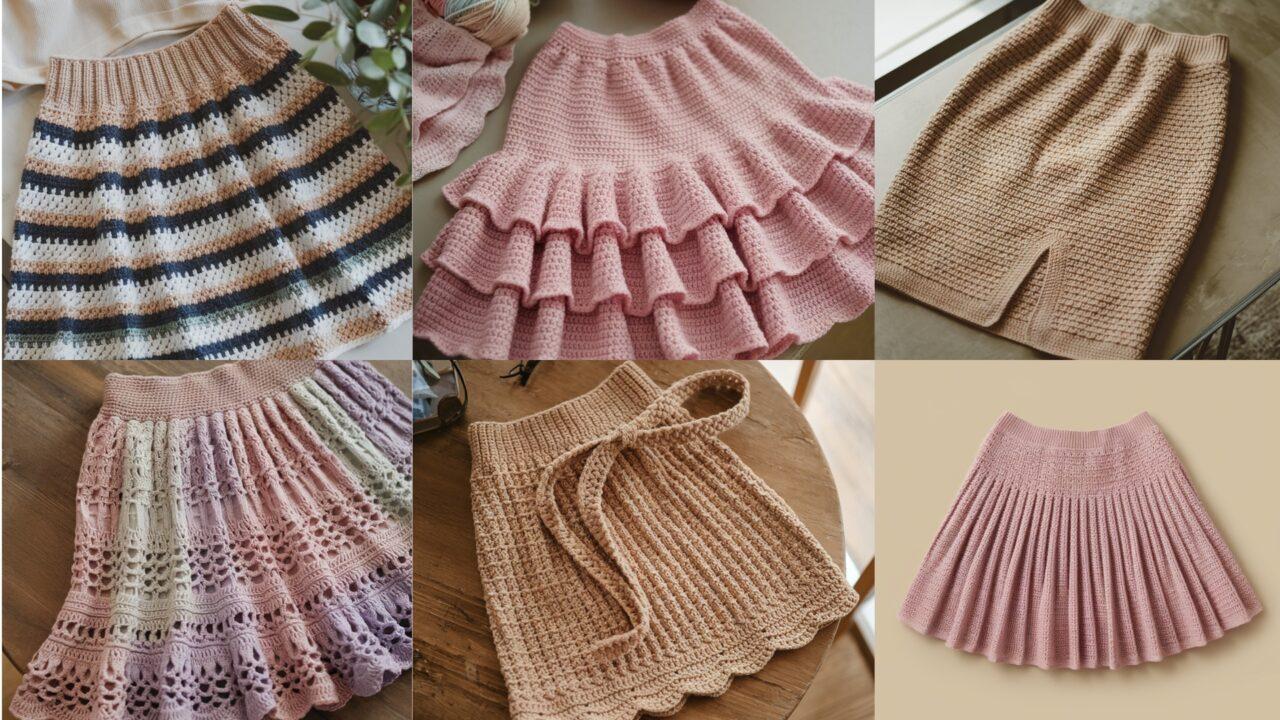
A handmade crochet mini skirt is an instant style statement — flirty, customizable, and surprisingly wearable when constructed with the right yarn and fits. Below are six fully-detailed mini-skirt patterns you can make: from preppy pleats to slinky pencil silhouettes, breezy beachy textures to ruffled tiers. Each section contains: materials, suggested yarn & hook, stitch glossary, a step-by-step construction guide (with how to measure and resize), finishing and styling tips, and variations so you can personalize the look.
Read the quick notes first — they’ll save time while you make accurate, flattering skirts.
Quick notes (read first)
- Skill levels: I mark each pattern Beginner → Advanced. If you’re comfortable reading a pattern and counting stitches, you can follow any of these — some only require basic stitches and shaping.
- Sizing approach: These patterns use waist-based construction: measure the wearer’s waist (or hip — I note when to use hips instead). Decide desired positive ease (how much extra room you want). For mini skirts positive ease is usually 1–3″ for a snug fit, 3–6″ for a looser fit. I provide calculation examples to change stitch counts.
- Gauge: Always make a gauge swatch (4″ x 4″). I give example gauges; if your gauge differs, use the formula:
stitches needed = (stitches per inch) × (desired waist circumference in inches) / (pattern stitch multiple)
I’ll show multiples where needed. - Yarn choices: For skirts, use cotton or cotton-blends, bamboo, linen blends, or soft acrylics depending on drape. Cotton/linen give structure (great for pleats and ruffles); bamboo and silk blends give slinkiness (great for pencil or Rosalina). Avoid yarns that pill heavily or stretch too much unless you intend to line the skirt.
- Hook selection: Patterns suggest typical hook sizes; choose smaller hook than label if you need firmer fabric (pleats hold better with denser stitches).
- Lining & elastic: For fitted skirts (pencil, pleated), consider sewing a fabric lining and inserting a casing with elastic for comfort and to prevent transparency. I explain lining steps in each pattern where recommended.
- Abbreviations used: ch, sl st, sc, hdc, dc, tr, BLO/FLO, st(s), rep, inc (2 sc in same st), dec (sc2tog). Read through stitch glossary in each pattern if you need a reminder.
1. Crochet Mini Pleated Skirt Pattern
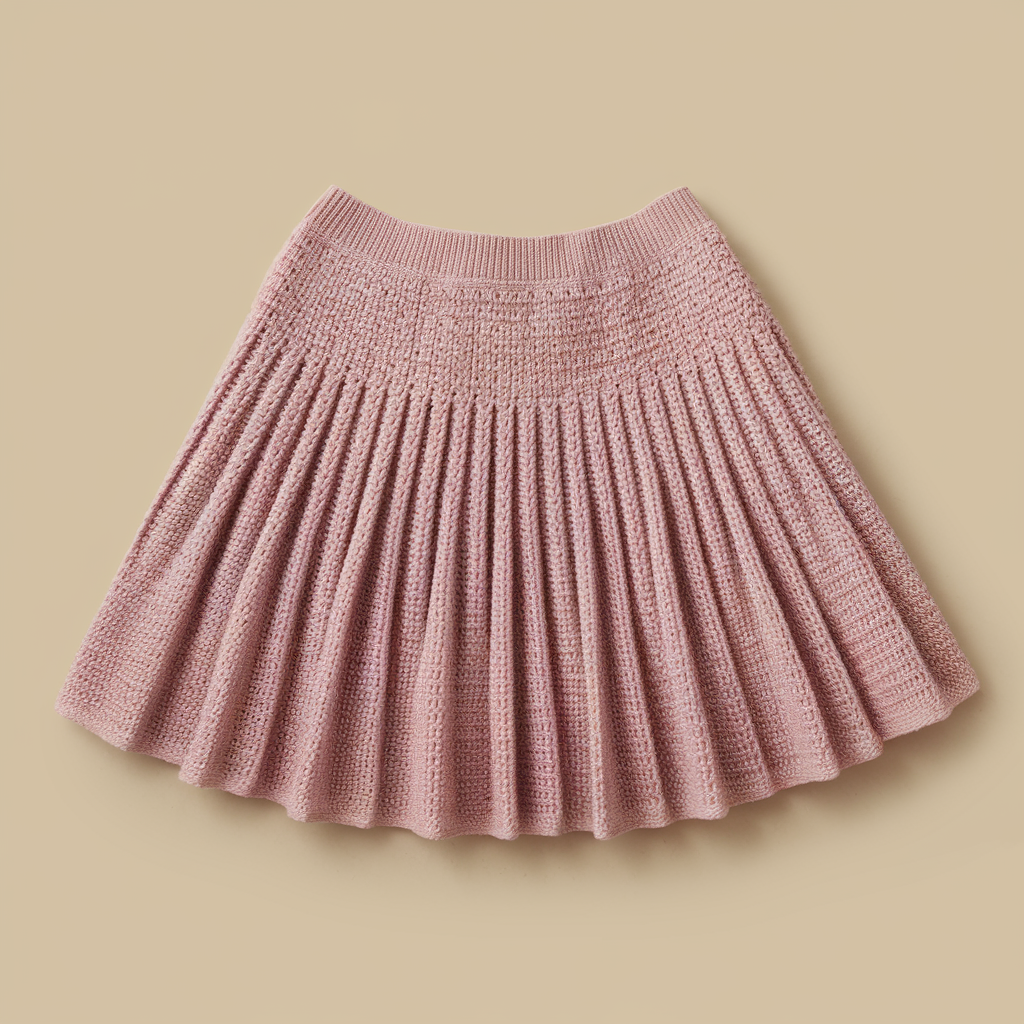
A structured, preppy mini with crisp pleats — great with sweaters, boots, or a tee. Construction: worked as a single rectangular tube with pleat shaping and elasticated waist for secure fit.
Skill level: Intermediate (pleat shaping + seaming)
Finished length example: 16″ from waist to hem (mini; adjust shorter/longer)
Materials: Worsted-weight cotton or cotton-blend yarn (approx 700–1000 yds depending on size & length), 4.0–5.0 mm hook, measuring tape, 1″ wide elastic (waist circumference minus few inches), tapestry needle, sewing machine & fabric for lining (optional).
Gauge (example): 16 sc × 18 rows = 4″ with 4.5 mm hook. (Your gauge will vary — use your swatch to calculate stitches per inch.)
Design concept & measurement
- Measure waist (W) and desired skirt length (L). Decide positive ease (PE) — for pleated skater mini, 1–2″. Target waist circumference = W + PE.
- Convert to stitch count: stitches per inch (SPI) = gauge sc / 4. Example SPI = 16/4 = 4 sts per inch. Required stitches = SPI × target waist circumference. Example: W=28″, PE=2″ → target 30″ → 30 × 4 = 120 sts.
Important: Pleats are formed by folding and seaming sections. Pleat width should be multiple of a pattern repeat; I use a pleat module of 6 sts (3 sts folded over 3 sts) for a crisp look. So round required stitches to nearest multiple of 6 (e.g., 120 already divisible by 6).
Step-by-step (rectangle + pleats)
- Foundation chain: ch the required number of sts (e.g., 120). Join carefully to form a flat tube? Not yet — we’ll work rows to create fabric then seam into a tube. Instead work flat rectangle with chain equal to number of sts. (If you prefer working in the round, chain a multiple for a round start and work rows in joined rounds — this pattern uses flat-to-seam to make pleats easier.)
- Body fabric: Row 1: sc in 2nd ch from hook and across; turn. Row 2–(enough rows to reach length L + 2″ for waist casing & hem allowance): sc across. Maintain tension; block lightly if needed. Alternate: use hdc for slightly taller rows (affects gauge — recalc stitches).
- Hem finishing (optional cable/edging): Add 2–4 rows of BLO sc or reverse single crochet (crab stitch) for a tidy edge.
Pleat placement & folding
- Mark pleats: On the rectangle lay it flat RS up. Measure across and mark pleat positions every 6 sts (or your chosen pleat module). Each pleat consumes 6 sts and when folded becomes a 3-st visible pleat front and 3-st hidden fold. Decide how many pleats you want across the skirt.
- Create pleats: For each pleat: fold the fabric so the right edge of the first 3 sts aligns with the left edge of the next 3 sts — this creates a knife pleat. Use long stitch markers or pins to hold. Repeat across entire rectangle.
- Baste seam: Using matching yarn and tapestry needle, mattress-stitch through the pleat layers at the top and along 1–2″ down from top to secure pleats in place. For a sharper pleat, sew a vertical tuck line ~1–2″ from the top into the fold to anchor the pleat ridge.
- Seam sides: With RS together, seam short edges using mattress stitch, leaving a small gap at top if you’ll insert elastic via casing. Sew slowly to keep pleats aligned.
Waistband & elastic
- Create casing: Fold top edge 1″ inward (or width of your elastic + ¼″ for ease) and stitch around leaving 1–2″ opening for elastic insertion. Use sewing machine for even casing.
- Insert elastic: Attach safety pin to elastic end, feed through casing, overlap elastic ends to match waist snugness (elastic length = waist measurement minus ~1–1.5″ depending on stretch comfort), sew ends together securely, then close casing opening.
Lining (recommended for structure and opacity)
- Cut lining fabric tube matching interior dimensions (slightly smaller). Sew lining and slip inside, tack to waistband at a few points or hand-sew seam for a polished finish.
Finishing & styling
- Block pleats by pinning and lightly steaming to set shape (test yarn heat tolerance!).
- Hem: if you prefer a flared look, leave hem free or add a small picot or scallop edge for feminine detail.
- Styling: pair with chunky knit for fall or tee for summer.
Variations & notes
- For deeper, box-pleat look, use a pleat module of 12 sts (two knife plies) and fold differently.
- Want a wrap-pleat? Make fewer, wider pleats and add a discreet side snap.
2. Crochet Rosalina Skirt Pattern

A lacy, feminine skirt with soft flounce — “Rosalina” here means a semi-sheer tier of elegant lace motifs. It’s flattering in bamboo/cotton blends for fluid drape.
Skill level: Intermediate (lace repeat + shaping)
Finished length example: 15–18″ (mini/mini-midi convertible)
Materials: DK-weight bamboo-cotton blend or fingering held double for drape (approx 800–1200 yds depending on length and size), 3.5–4.5 mm hook (use smaller for denser lace), tapestry needle, optional lining fabric.
Example gauge: lace pattern gives ~20 sts × 16 rows = 4″ in chosen lace stitch (varies widely).
Lace stitch & repeat
- Lace is worked in multiples of a pattern repeat (I’ll give a sample 8-st lace repeat with chains and shells). Example repeat: ch 3, skip 2, dc in next, ch 2, dc in same st (this is a simplified motif). For Rosalina we’ll use a gentle shell/chain motif that repeats across rows.
Construction concept
- The Rosalina skirt is made as a tube of lace worked in the round (no side seams), then gathered into a waist band. For opacity, add a short lining or slip.
Step-by-step (in the round)
- Measure waist & desired length (L). Decide positive ease (2–4″ for flowy lace). Calculate required stitches: IOSP = stitches per inch measured in lace pattern (use swatch). Required stitches = IOSP × waist circumference. Ensure total stitches are a multiple of lace repeat (e.g., multiple of 8). Chain that number then join carefully to work in the round.
- Foundation round: ch a multiple to match; join without twisting, ch 1, sc in each ch around to create stable foundation. Join.
- Establish lace pattern: Work sample lace rounds — e.g., Round A: ch 3, skip 2, dc in next, (ch 2, dc) in same st repeat. Round B: sc in ch-spaces to anchor. Repeat A–B set until skirt length from waist to desired hem is L minus 2″ for waistband & finishing.
- Optional flare: Add two increases rounds near hem: dc in each st, inc every 8th st or add an extra lace frill worked as shells to create a ruffled hem (see Tiered Ruffled pattern for transfer of ideas).
- Waist gather: At the top, switch to a more solid stitch for 2–3 rounds (hdc or sc) to stabilize. Chain a yarn or make a drawstring via eyelet row: sc 2, ch 3, sk 3 across round to make casing holes for elastic or cord. If skin shows through lace, plan a lining.
Elastic or drawstring waistband
- For elastic: Add a 1″ to 1.5″ wide fabric waistband inside (fabric casing) and insert elastic. For a soft waistband that lies flat use fold-over elastic covered with fabric.
- For a cord drawstring: Thread a cord and tie; this is decorative and adjustable.
Lining & modesty
- Make a short slip that ends ~1″ shorter than skirt length for modesty while preserving lace hem. Use lightweight cotton or acetate slip fabric and sew into waistband or attach at a few tacking points to lace.
Finishing & care
- Block lace very gently to open design; bamboo/linen reacts well to steaming.
- For machine-washable options, choose sturdy yarn and hand-wash only or gentle machine cycle in a laundry bag.
Styling
- Rosalina works as a summer staple over swimsuit or as date-night skirt with a silk camisole tucked in.
3. Crochet Striped Mini Skirt Pattern
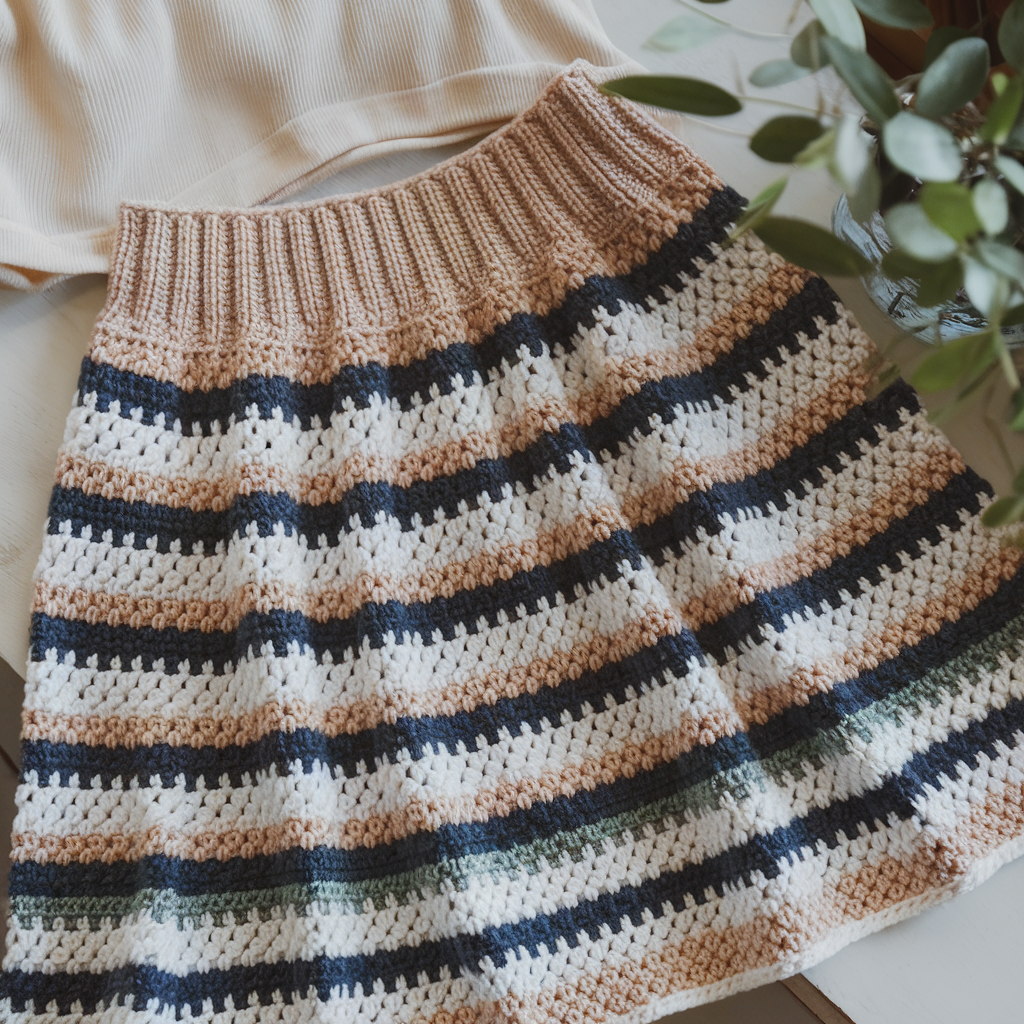
A classic, modern mini with horizontal stripes — easy to customize with color bands and skews to many aesthetics.
Skill level: Beginner → Intermediate
Finished length example: 15″ (mini)
Materials: Worsted or DK yarn in 2–4 colors, 4.0–4.5 mm hook, sewing needle, optional elastic & lining.
Gauge example: 18 sc × 20 rows = 4″ (recalculate for your yarn)
Construction concept
- A simple rectangle worked in rows or in the round for seamless horizontal stripes. Waist casing with elastic for secure fit. Stripes change color every N rows (I use 4 rows per stripe as default).
Step-by-step (worked in the round for no seams)
- Measure waist and decide target circumference (W + PE). Calculate stitch count: SPI = gauge sc / 4; stitches needed = SPI × target circumference. Round to nearest pattern multiple (striping can work on any multiple). Chain that number and join to work in the round.
- Foundation rounds: ch required stitches, join, ch 1, sc around for 2 rounds to create a neat base.
- Stripe color plan: choose stripe height (rows per stripe). Example 4 rows A, 4 rows B, repeat. Begin with color A and work 4 rounds sc in color A, join, then change to B by finishing last stitch with new color (carry color on WS if only 2–3 rows; otherwise fasten off and weave).
- Work to length: repeat stripes until skirt reaches desired length minus 2″ for casing & hem. For a tapered look, you can decrease rows slightly at the waist or use ribbing.
- Hem finishing: do 2 rounds of sc in last color. If you prefer a flared finish, switch to dc increase round to flare hem out slightly.
- Waist casing: fold top ~1″ and stitch to create casing for elastic. Leave opening to insert elastic; insert elastic (waist measurement minus 1–1.5″ depending on comfort), sew ends and close opening.
Alternative: ribbed top for fitted waist
- Pickup stitches along top and work 6–8 rounds BLO hdc for a ribbed waistband (elastic optional inside for extra hold).
Styling & variations
- Mix bold color combos for statement pieces or tonal neutrals for a chic look.
- Add a contrast hem color or small side slit for mobility.
4. Crochet Tiered Ruffled Mini Skirt Pattern
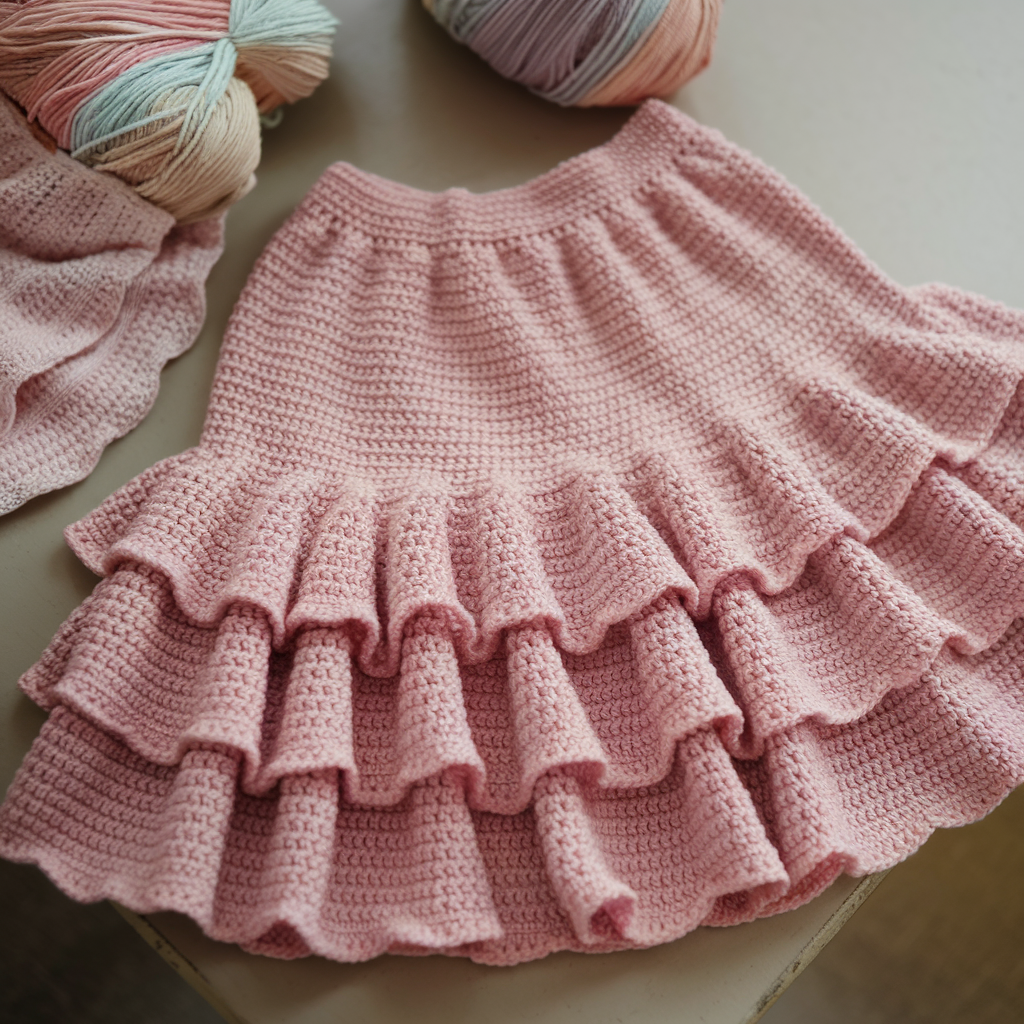
Playful and feminine — tiers of ruffles produce volume and movement while keeping the mini silhouette decidedly flirty.
Skill level: Intermediate (gathering & joining tiers)
Finished length example: 14–16″ (three tiers)
Materials: Sport or DK yarn for soft drape, 600–1000 yds (depends on tier fullness), 3.5–4.5 mm hook, elastic for waist, lining optional.
Construction concept
- Make a straight upper yoke (stable), then work 2–3 ruffled tiers joined to one another. Each tier is wider than the one above (gathered), giving a cascading ruffle effect.
Step-by-step
- Yoke: Decide yoke height (H1) ~3–4″. Work a rectangle circumference equal to waist (sc rounds or hdc in the round) until height H1. Work a couple rows of BLO sc for a crisp top edge. Add a 1″ casing or rib bed for elastic. Insert elastic as for previous skirts.
- Tier 1 (attached): Work directly onto the bottom of the yoke: attach yarn and make 1.5× to 2× the number of stitches around for gentle gather. E.g., if yoke has 120 sts, chain 180 sts or do rounds where you inc into each st every other stitch to expand to ~180. A simple method: Round A: sc in next st, 2 sc in next st repeat to add 50% more. Work 4–6 rounds in a forgiving stitch (dc or shell rows) to create a small ruffle.
- Tier 2 (more gathered): Join tier 1 base: make 1.75–2× the width of tier 1 using increases: sc in next 2, 2 sc in next repeat. Work 4–8 rounds depending on desired fullness.
- Tier 3 (hem ruffle): Repeat increase to 2–2.5× width of tier 2 for a dramatic hem. Work decorative borders — picots, shells, scallops — to finish.
- Join method: You can make tiers separately and seam them, or join-as-you-go for seamless flow. JAYG: when making the next tier, join to the previous tier as you go by slip-stitching to attach base loops periodically. This creates neat, no-seam edges.
- Hem & finish: Add a decorative scallop (shell stitch) or a simple 2 rounds of sc for a tidy hem.
Lining & modesty
- Because ruffles can be airy, add a short side-seam slip to maintain coverage. This can be a simple rectangle sewn inside attached at a few tacking points. For fuller skirts, thin lining helps prevent cling.
Styling
- Pair with fitted tops; the playful silhouette balances proportions.
5. Crochet Sandy Skirt Pattern

Inspired by beach textures — the Sandy skirt uses textured stitches (seed stitch, linen stitch, or knot stitch) and lighter yarn for a casual, summery mini.
Skill level: Beginner → Intermediate (texture stitches)
Finished length example: 14–16″
Materials: Linen/cotton blend or slub cotton (sport–DK), 3.5–4.5 mm hook, optional tie belt, lining optional.
Texture idea: Linen stitch (aka moss/seed) gives a sand-like pebbled texture: ch 1, sc in next st, ch 1, skip 1 across (worked in rows or in the round as adapted).
Step-by-step (worked in the round)
- Waist calculation & foundation: Calculate stitches for waist as earlier. Chain and join. Work 2 rounds sc to stabilize top.
- Yoke or rib: Work 2–3 rounds of BLO hdc or sc for a neat edge. For fitted waist, use 1–2″ rib in BLO hdc.
- Main texture (Linen/seed stitch): Round: sc in next st, ch 1, skip next st, sc in next st (or adapted for round: sc in next st, ch1, sc in back of skipped st) — the idea is to create offset scs that produce a pebbled texture. Work rounds until desired length minus hem allowance.
- Hem: Work 2 rounds of sc, then a tiny scallop or crab stitch for weight. If you want fluid sway, switch to dc increases in last round to add a slight flare.
Waist finishing & optional tie
- Make a casing or set a row of eyelets for a braided cord belt threaded through. For casual beach use, tie cord at front with small beaded ends (secure beads with strong knot and glue).
Styling & care
- Sandy skirt looks great with sandals and woven straw bag. Machine wash gentle for linen/cotton blends depends on fiber — follow yarn label, reshape while damp.
6. Crochet Mini Pencil Skirt Pattern
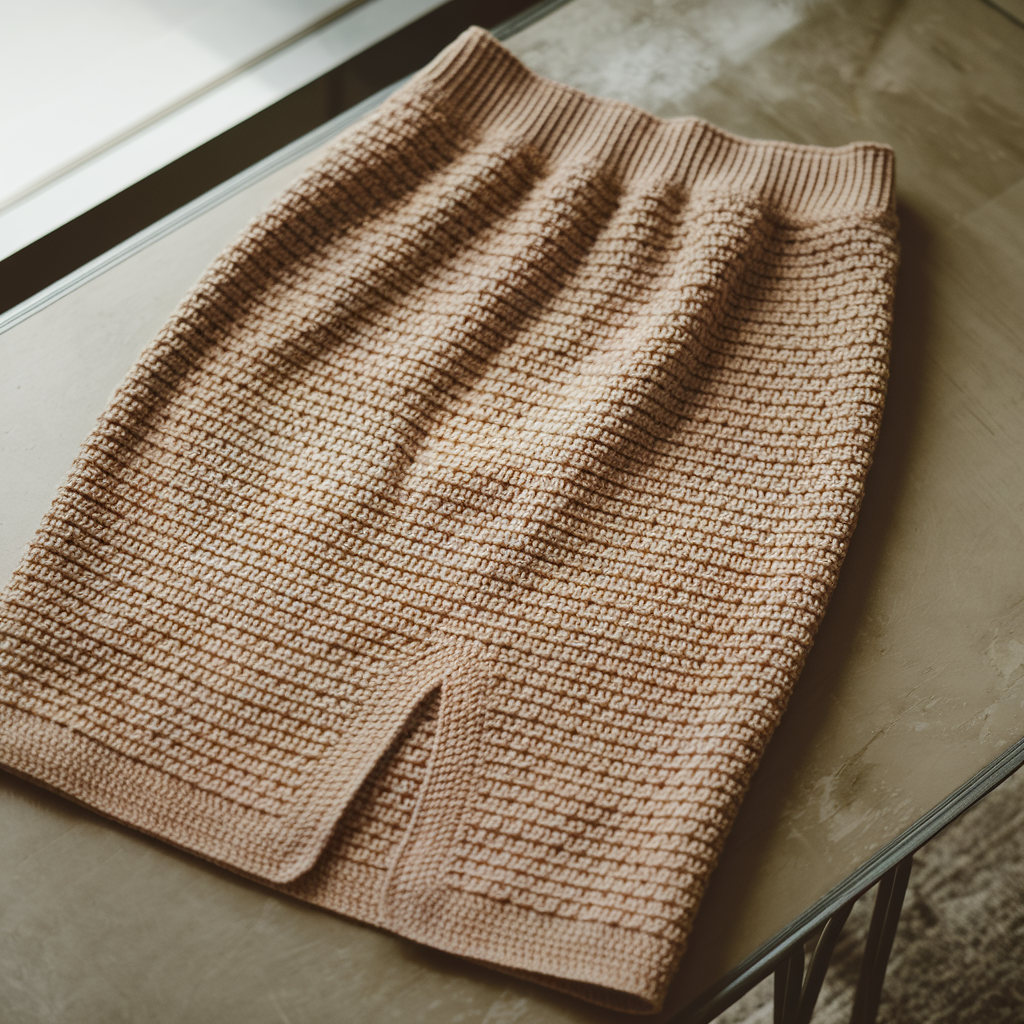
A sleek, body-skimming mini — sexy and sophisticated. Work with yarn that has good drape and a bit of elasticity (bamboo-blend, cotton with synthetic blend, or add front/back lining).
Skill level: Intermediate (shaping & fitting)
Finished length example: 16″ (mini pencil)
Materials: Bamboo-cotton or cotton-blend worsted, 600–900 yds (depends on sizes), 4.0–5.0 mm hook, wide elastic or high-quality waistband fabric, lining fabric recommended.
Design & fit notes: Pencil skirts are fitted at waist and hips; measure both waist & hip circumference. You’ll decrease or shape for hip curve and ensure comfortable ease.
Measurement & calculation
- Measure waist (W) and fullest hip (H). Pencil skirts sit at waist or slightly below; choose placement. Decide ease: for pencil, negative to small positive ease at hips (+1–2″ recommended so you can sit/move).
- If H > W considerably, skirt will have shaping: you’ll increase in hip area or shape with short rows.
Construction options
- Option A — Tube method: Work a rectangle equal to the hip circumference, seam sides and work waist shaping with elastic waist. Best for less pronounced waist/hip differences.
- Option B — Shaped panel method: Work back and front panels separately with increases/decreases for waist/hip shaping and seam at sides.
I’ll give Option B for the best fit.
Step-by-step (shaped panels)
- Front panel: Start with waist width half minus side seam allowance (e.g., for 30″ waist, half = 15″; with small seam allowances, set starting foundation width accordingly). Work rows in sc or hdc for fitted fabric. Use a smaller hook for denser fabric. Work vertical shaping: increase gradually from waist to fullest hip row by adding 1 st every 3–5 rows on each side until hip measurement achieved (follow your measurements). Then continue straight until desired length. Decrease toward hem if you prefer tapered look.
- Back panel: Repeat same width/shape but include a small center-back slit for mobility (work a slit by leaving central sts unworked for last N rows or by making short seam at hem with a small overlap). You can also add a zipper on center-back (requires lining attachment and zipper insertion).
- Seam panels: With RS together, sew side seams with mattress stitch. If you added a zipper, sew back panel halves around zipper and attach zipper neatly.
- Waistband: Fold top edge inward to create casing for elastic (1″ or wider). For a cleaner look, pick up stitches and crochet a 1.5–2″ wide ribbed band in BLO hdc — then insert a non-roll elastic or fold raw edges and sew lining and waistband into one. A high-quality elastic: waist measurement minus 1–1.5″ (depending on comfort).
- Hem finishing: Work 2 rows of sc or reverse single crochet, or pick up a short band and work a ½″ cuff to keep hem stable.
Lining & zipper insertion
- For a neat pencil skirt you’ll want full lining. Sew lining panels to match front/back, stitch lining at side seams and hand-stitch lining to waistband for polished finish. Insert center-back zipper between outer fabric and lining using machine/hand sew techniques; finish by understitching lining top to keep it from rolling.
Fit test & shaping tips
- Try on before inserting elastic to adjust shaping. Use pins to see where to take in or let out. For more comfort, add a small back vent (2–3″) or larger slit if you need to walk easily.
Styling
- Tuck a blouse or wear cropped knit. Pencil minis work well with ankle boots or heels.
Finishing, Blocking, Care & Troubleshooting
- Blocking: For structured skirts (pleated, Rosalina lace), block to measurements to set pleats and lace. Use steam or wet blocking depending on yarn tolerance — test a scrap.
- Care: follow yarn label. Cotton/linen can usually be machine-washed gentle & laid flat to dry (pretest). Silk/bamboo blends often need hand-wash. Avoid dryer for most crochet garments to prevent distortion.
- Translucency: many crochet stitches are slightly open — line fitted skirts or wear nude slip when necessary.
- Elastic care: use high-quality elastic that returns; test fit before final casing closure.
- Sizing adjustments: re-measure and swatch; use the formula (SPI × target circumference) and adjust to the nearest stitch multiple called for by pattern (pleat modules, lace repeats, etc.). If hips are larger, shape accordingly or choose tube vs shaped panel method.
Conclusion
These six crochet mini skirts give you a range of silhouettes and occasions:
- Pleated Mini: preppy and structured — holds shape, great with lining and elastic waist.
- Rosalina Skirt: lacy and romantic — perfect over a slip for summer evenings.
- Striped Mini: classic and easy — fully customizable with color bands.
- Tiered Ruffled Mini: flirty and textured — fun weekend piece.
- Sandy Skirt: casual, beach-ready texture — lightweight and breezy.
- Mini Pencil Skirt: sleek and sophisticated — tailored fit with lining and zip.
Pick the silhouette that matches your wardrobe and yarn stash. If you want, I can next:
66b nổi bật với ba trụ cột chính: đa dạng trò chơi, bảo mật cao cấp và dịch vụ khách hàng xuất sắc. Mỗi yếu tố này được thiết kế tỉ mỉ nhằm tạo ra môi trường giải trí trực tuyến đẳng cấp, khác biệt hoàn toàn so với các nền tảng thông thường trên thị trường.
66b nổi bật với ba trụ cột chính: đa dạng trò chơi, bảo mật cao cấp và dịch vụ khách hàng xuất sắc. Mỗi yếu tố này được thiết kế tỉ mỉ nhằm tạo ra môi trường giải trí trực tuyến đẳng cấp, khác biệt hoàn toàn so với các nền tảng thông thường trên thị trường.
I don’t think the title of your article matches the content lol. Just kidding, mainly because I had some doubts after reading the article.
Thank you for your sharing. I am worried that I lack creative ideas. It is your article that makes me full of hope. Thank you. But, I have a question, can you help me? https://accounts.binance.com/sv/register-person?ref=GQ1JXNRE
Thanks for sharing. I read many of your blog posts, cool, your blog is very good.
HQD Cuvie Ultimate Flavors showcase carefully blended fruits, bold aroma, and smooth performance, creating a flavorful vape that stays consistent throughout its lifespan.
Your point of view caught my eye and was very interesting. Thanks. I have a question for you.
Your point of view caught my eye and was very interesting. Thanks. I have a question for you. https://accounts.binance.com/si-LK/register-person?ref=LBF8F65G
Can you be more specific about the content of your article? After reading it, I still have some doubts. Hope you can help me.
Your point of view caught my eye and was very interesting. Thanks. I have a question for you. https://accounts.binance.info/sv/register-person?ref=GQ1JXNRE
Thanks for sharing. I read many of your blog posts, cool, your blog is very good.
Your point of view caught my eye and was very interesting. Thanks. I have a question for you.
Thank you for your sharing. I am worried that I lack creative ideas. It is your article that makes me full of hope. Thank you. But, I have a question, can you help me?
Thank you for your sharing. I am worried that I lack creative ideas. It is your article that makes me full of hope. Thank you. But, I have a question, can you help me?
Thank you for your sharing. I am worried that I lack creative ideas. It is your article that makes me full of hope. Thank you. But, I have a question, can you help me? https://www.binance.com/pl/register?ref=UM6SMJM3
I don’t think the title of your article matches the content lol. Just kidding, mainly because I had some doubts after reading the article.
I don’t think the title of your article matches the content lol. Just kidding, mainly because I had some doubts after reading the article. https://accounts.binance.com/fr/register-person?ref=T7KCZASX
I don’t think the title of your article matches the content lol. Just kidding, mainly because I had some doubts after reading the article. https://www.binance.com/join?ref=QCGZMHR6
Can you be more specific about the content of your article? After reading it, I still have some doubts. Hope you can help me.
Can you be more specific about the content of your article? After reading it, I still have some doubts. Hope you can help me.
Your point of view caught my eye and was very interesting. Thanks. I have a question for you.