

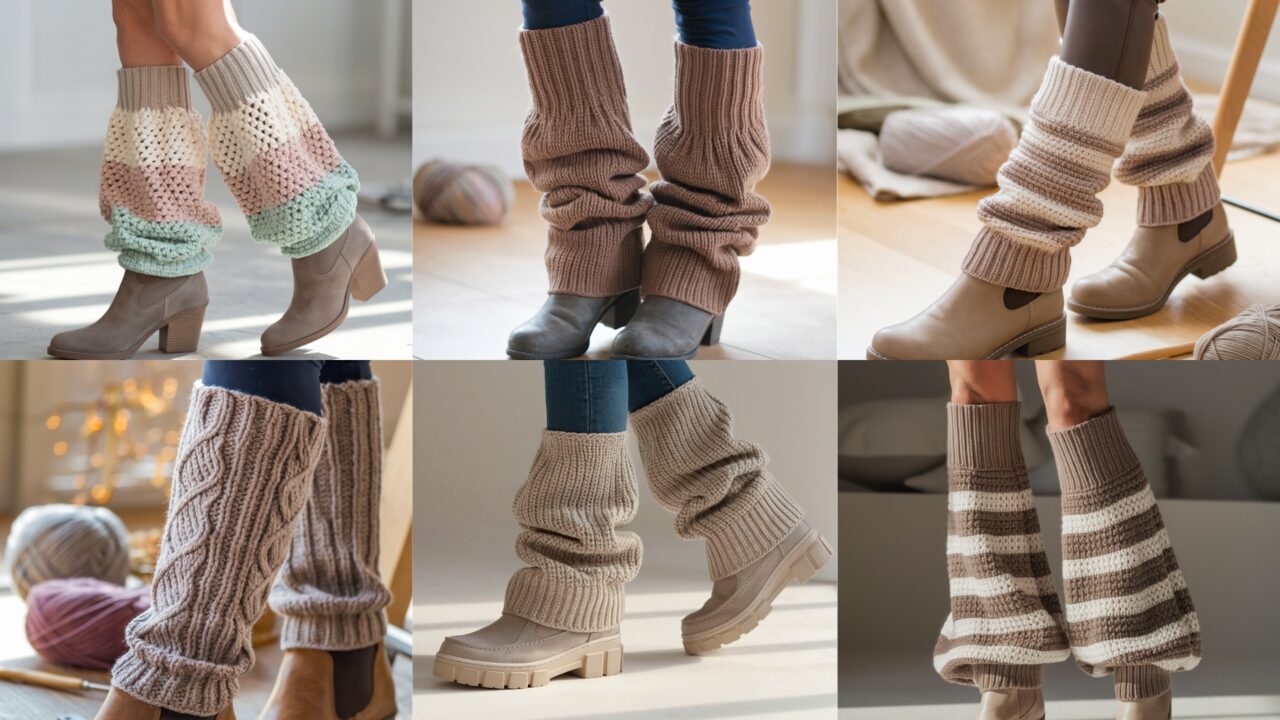
Leg warmers are the perfect cozy accessory: practical for chilly mornings, stylish layered over boots or tights, and quick to crochet. This post gives you six distinct leg-warmer designs — stripes, pebble texture, cables, slouchy, crunchy texture, and a neutral “Vanilla Latte” pair — each with complete materials lists, skill level, sample sizing (S / M / L), gauge guidance, clear step-by-step construction instructions, fitting rules so you can adapt to any leg measurement, finishing tips, styling ideas, variations, and care notes. All patterns use US crochet terms.
Quick note on sizing: leg warmers are tubes worn around ankle → calf → below knee. I give suggested finished circumferences and lengths for Small / Medium / Large, and show how to change stitch count to match your personal measurements.
General Notes (applies to every pattern)
- Abbreviations (US): ch = chain, sc = single crochet, hdc = half-double crochet, dc = double crochet, tr = treble (UK terms may differ), st(s) = stitch(es), sl st = slip stitch, BLO / FLO = back/front loop only, sk = skip, inc = increase (2 sts in same st), dec = decrease (sc2tog).
- Yarn & hook suggestions: I list recommended yarn weights and hooks for each design. Always make a 4″ × 4″ (10 × 10 cm) swatch in the main stitch to determine stitches per inch (SPI) and rows per inch (RPI) for your tension. Adjust hook size if your gauge differs.
- Fit basics: Measure the narrowest part of the ankle and the fullest part of the calf for best fit. Decide how much negative ease (snug) or positive ease (looser) you want. For a stable fit choose final circumference about 0–1 in smaller than the actual calf circumference (leg warmers rely on stretch); for slouchy keep it equal to calf circumference or +1–2 in.
- Worked flat vs in the round: Tube can be crocheted in the round (no seam) or worked flat and seamed. I give both where useful.
- Finishing: Weave ends, block lightly (if yarn allows), and reinforce top edge if you want less slippage (elastic thread or lining). For kids, prefer slightly tighter top cuff or added elastic for safety.
- Safety & care: Choose machine-washable yarn for frequently-worn items; follow yarn care instructions.
1. Crochet Striped Leg Warmers Pattern
Style: Classic, bold or subtle horizontal stripes — highly customizable and beginner-friendly.
Skill level: Beginner
Yarn & hook (sample): Worsted weight (Category 4) cotton/acrylic blend; 4.5 mm (G) hook
Yardage (pair): Approx. 300–400 yds total (depends on length & stripe count)
Sample finished sizes (laid flat tube circumference / length):
- S: 10 in circumference (unstretched) × 12 in length (ankle → mid-calf)
- M: 12 in × 15 in (classic calf length)
- L: 14 in × 18 in (tall / over-the-calf)
To check fit: Measure circumference around calf. Subtract ~0–1 in for snug fit (adjust as preference). Divide that circumference by your SPI to calculate foundation stitch count.
Gauge (example)
- 16 sc = 4 in (with worsted on 4.5 mm). Determine SPI from your swatch (e.g., 4 sc/in).
Construction overview
Work a flat rectangle and seam or work in joined rounds to make a tube. Add ribbed cuffs top/bottom with BLO for elasticity. Switch colors every N rounds to create stripes.
Step-by-step (worked in the round — no seam)
- Calculate foundation: Using your measured target circumference and stitches per inch (SPI), calculate stitches:
st = circumference_in_inches × SPI. Round to a comfortable even number. Example: for M (12 in) at 4 sc/in → 48 sts. Chain 48 (or make a foundation chain or a short round start). - Join for working in the round: Ch 1 (if using sc), join with sl st taking care not to twist chain. Place marker for round start.
- Cuff (ribbed): Work 8 rounds of sc in BLO to create a stretchy cuff. (If you prefer a long cuff, make 10–12 rounds.)
- Body & stripes:
- Switch to main color A, work
sc in each stfor X rounds (1–4 rounds per stripe; choose thickness). - Join new color B with a sl st, continue sc for same number of rounds. Carry the unused color up the inside (catch floats every 4–5 sts) or fasten off and weave ends for crisp color changes.
- Repeat color changes until tube reaches desired length minus bottom cuff height.
- Switch to main color A, work
- Bottom cuff/finish: Work 6–8 rounds BLO sc for bottom cuff to mirror the top. Fasten off and weave ends.
- Optional slip-stitch seam reinforcement: If desired, run 1 round of sl st through both layers at top edge for a crisp finish.
Variations & styling
- Use two or more colors for narrow or wide stripes.
- Use self-striping yarn for effortless gradient stripes.
- For a retro look, use 3–4 complementary colors with equal bands.
- Make a matching hat or arm warmers with the same stripe set.
Finishing & care
- Weave in color tails; block very lightly if needed. Machine wash gentle for acrylic/cotton; air dry to keep shape.
2. Crochet Pixie Pebble Leg Warmers Pattern
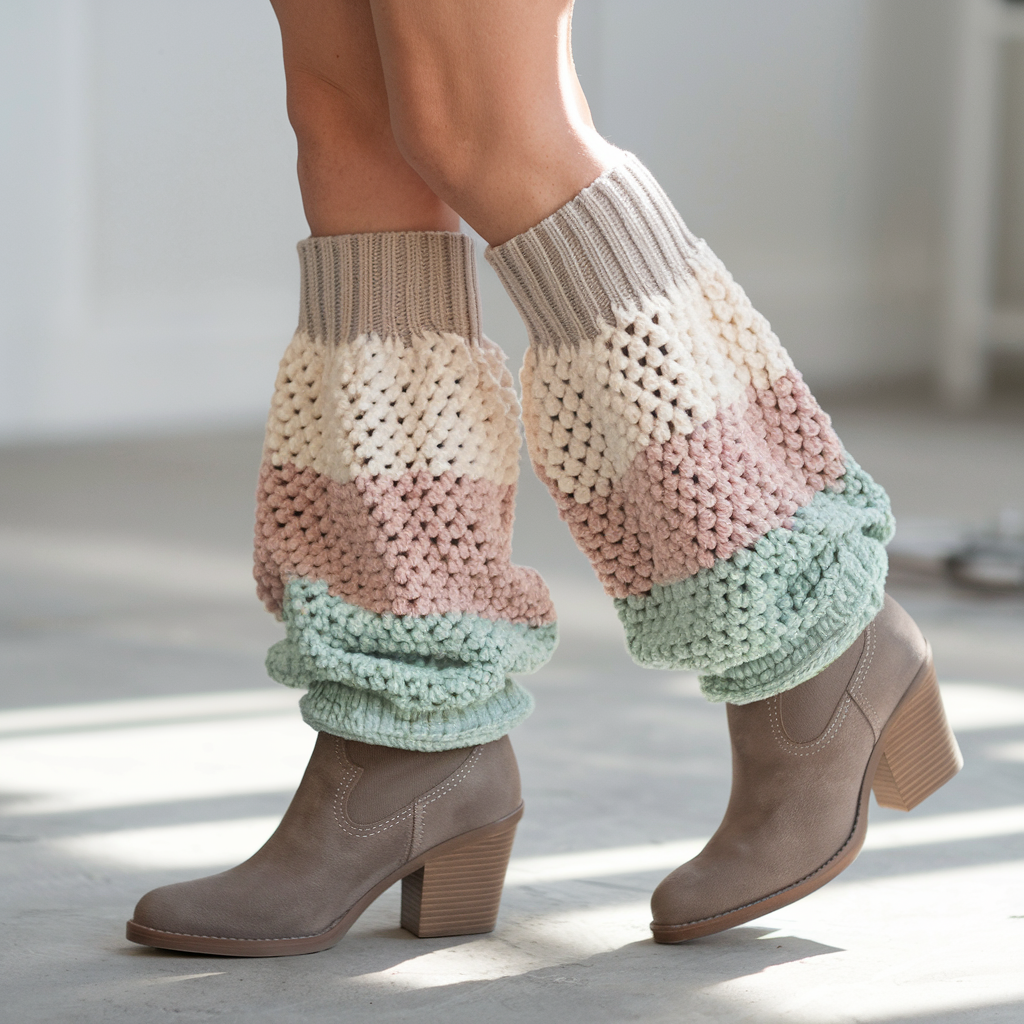
Style: Fun, pebble-textured stitches (small bobbles/pebbles) that read whimsical and cozy — great for cozy outfits or dancewear.
Skill level: Confident beginner — requires bobbles/puff stitches and counting repeats
Yarn & hook: DK to worsted weight (sample uses DK); 4.0 mm hook
Yardage (pair): ~300 yds
Sample sizes (finished circumference × length):
- S: 10 in × 12 in
- M: 12 in × 15 in
- L: 14 in × 18 in
Stitch pattern (Pebble stitch variant)
A reliable pebble/puff repeat is: [ch 1, puff in next st (yarn over 5 times and pull through all loops) , ch 1, sc in next st] — this alternates pebbles and small anchors.
Gauge (example)
- 20 sts × 20 rows = 4 in in pebble pattern (measure your swatch).
Construction overview
Work tube in rounds using pebble stitch repeat; add ribbed cuffs in BLO; adjust stitch count to retain pattern repeats.
Step-by-step (worked in rounds)
- Foundation round: Using measured circumference and SPI, calculate stitch count. Important: pattern repeat size = 2 sts (pebble + sc). Make foundation stitches a multiple of 2. Example: for M at 5 sts/in × 12 in = 60 sts (multiple of 2 OK).
- Round 1 (setup): sc in each st around. Join. Mark round start.
- Round 2 (pebble pattern):(ch 1, make puff stitch in next st — yarn over 5 times, insert hook, draw up loop, yarn over and pull through; repeat so you have 6 loops on hook, yarn over and pull through all loops to form puff; ch 1, sc in next st) — repeat across. Join.
- Notes: Keep consistent tension on puff loops. On the next round work sc into each ch-1 space then puff into sc of previous round to create offset pebble texture.
- Repeat rounds: Continue alternating rounds so pebbles are staggered (row of puffs then sc anchors) until piece reaches length minus cuff.
- Cuffs: Work 6–8 rounds of BLO hdc or sc to create a gathered cuff at top and bottom.
- Finish: Fasten off, weave ends into the inside. Block simply to even pebbles.
Variation tips
- Make pebbles larger by using more yarn overs in puff (but keep consistent across piece).
- Use variegated DK yarn to let pebbles appear in color pops.
Styling
- Pair with ballet flats or boots; pebbles add extra warmth and a playful look.
3. Crochet Cabled Warmers Pattern
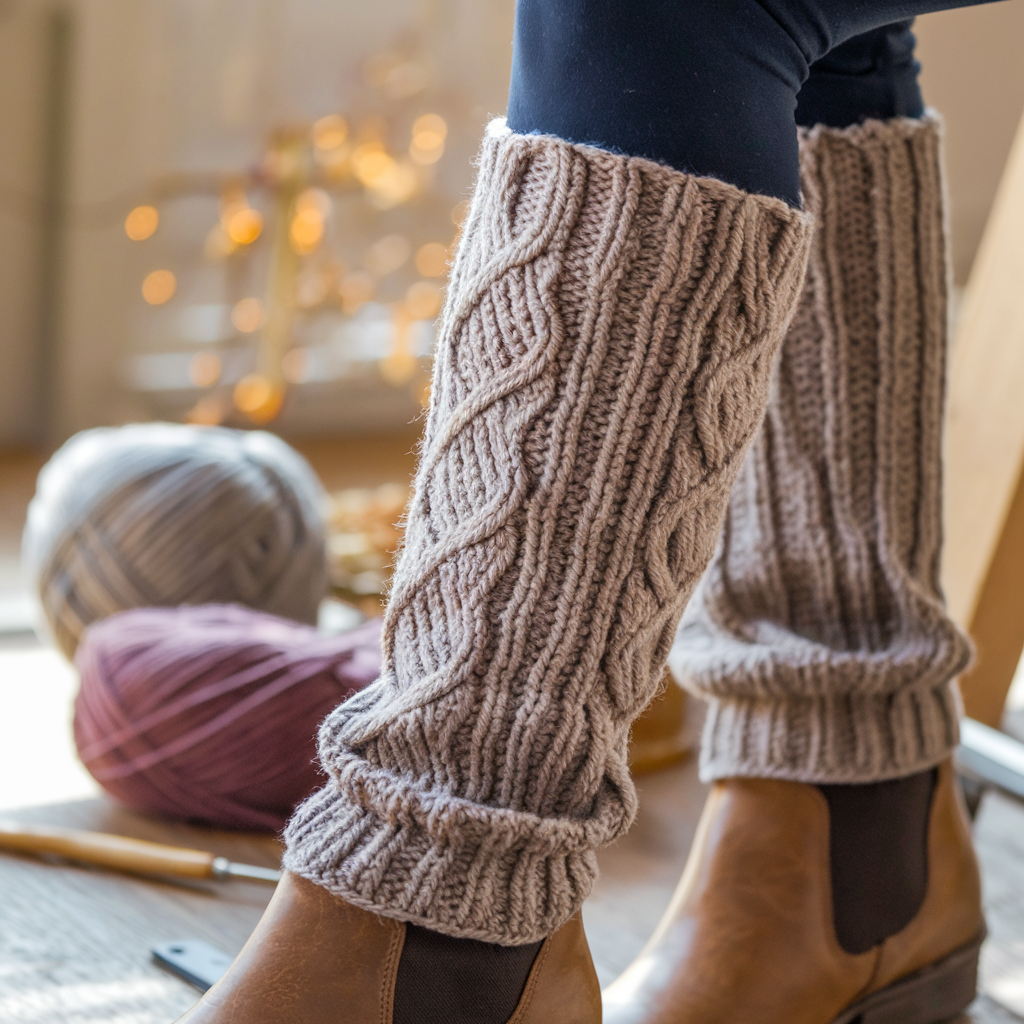
Style: Classic, textured cable columns using front/post and back/post stitches for a refined, heirloom look.
Skill level: Intermediate — comfortable with FPdc/BPdc and cable crosses
Yarn & hook: Worsted weight wool or wool blend for stitch definition; 5.0 mm hook
Yardage (pair): ~350–450 yds
Sample sizes (finished circumference × length):
- S: 10 in × 12 in
- M: 12 in × 15 in
- L: 14 in × 18 in
Cable design concept
Use a central 6-st cable panel (two 3-st columns crossing) flanked by rib or seed stitch. Cable crossings occur every N rows (6–8 rows) and are worked by re-ordering FPdc groups (no extra cable needle required — you work around posts to create the cross).
Gauge example
- 16 sts × 20 rows = 4 in in pattern (measure your swatch).
Construction overview
Work in the round (or flat and seam) with repeated cable panel(s) around the tube. Create a ribbed cuff in BLO.
Step-by-step (worked in the round, two cable columns around circumference)
- Plan placement & stitch multiples: Decide how many repeats around circumference. Example layout for M (12 in at 4 sts/in = 48 sts): [Rib 8 sts] + [Cable 8 sts] repeat 4 times → total 48 sts. Cable repeat width = 8 sts (6 cable + 2 anchors).
- Foundation & cuff: Ch required number of sts; join and work 8 rounds of BLO hdc (or sc) for cuff.
- Establish pattern rounds:
- Rib section: [k-like rib] — FPdc in next st, BPdc in next st, repeat for rib 8 sts. This gives a knit-like rib.
- Cable panel (8 sts): Use pattern: BPdc around 2, FPdc around 2, FPdc around 2, BPdc around 2 (this is a foundational column).
- Repeat rib + cable panels around.
- Cable crossing row (every 6th round): To cross cable 3-over-3 left (for example) do:
- Work rib sections as normal until reaching cable crossing. For cable: skip the next 3 FPdc posts and work FPdc around the following 3 posts (crossing them), then go back and work FPdc around the skipped 3 posts — this must be done carefully with a tapestry needle? No — in crochet you perform the cross by working around post stitches of previous rows: insert hook from front to back around the post of the post stitches that will be brought to front, complete FPdc — the exact sequence: Work FPdc around the post stitches of the column you want to bring forward, then FPdc around the column to be moved behind. Practice on a swatch to perfect. Repeat across each cable panel.
- Continue: Work rounds with cable crosses every 6–8 rounds to create braided effect. Continue until leg warmer reaches desired length minus top cuff.
- Top cuff: Work same BLO rib as bottom (6–8 rounds). Bind off & weave ends.
If working flat (seamed):
- Work back and forth in rows following same cable repeat and seam with mattress stitch. For a seamed seam, consider adding 2 extra sts for seam allowance.
Tips & variations
- For a simpler cable, use crossed puff columns or 2-sts cables; for more drama add more cable panels around circumference.
- For easy knit-look without crossing, repeat FPdc/BPdc rib only — still very textured.
Finishing
- Block gently (wool accepts steam) and weave in ends. If you want less slippage at top, consider adding a narrow elastic or work one round of elastic thread in the top BLO row — stitch carefully.
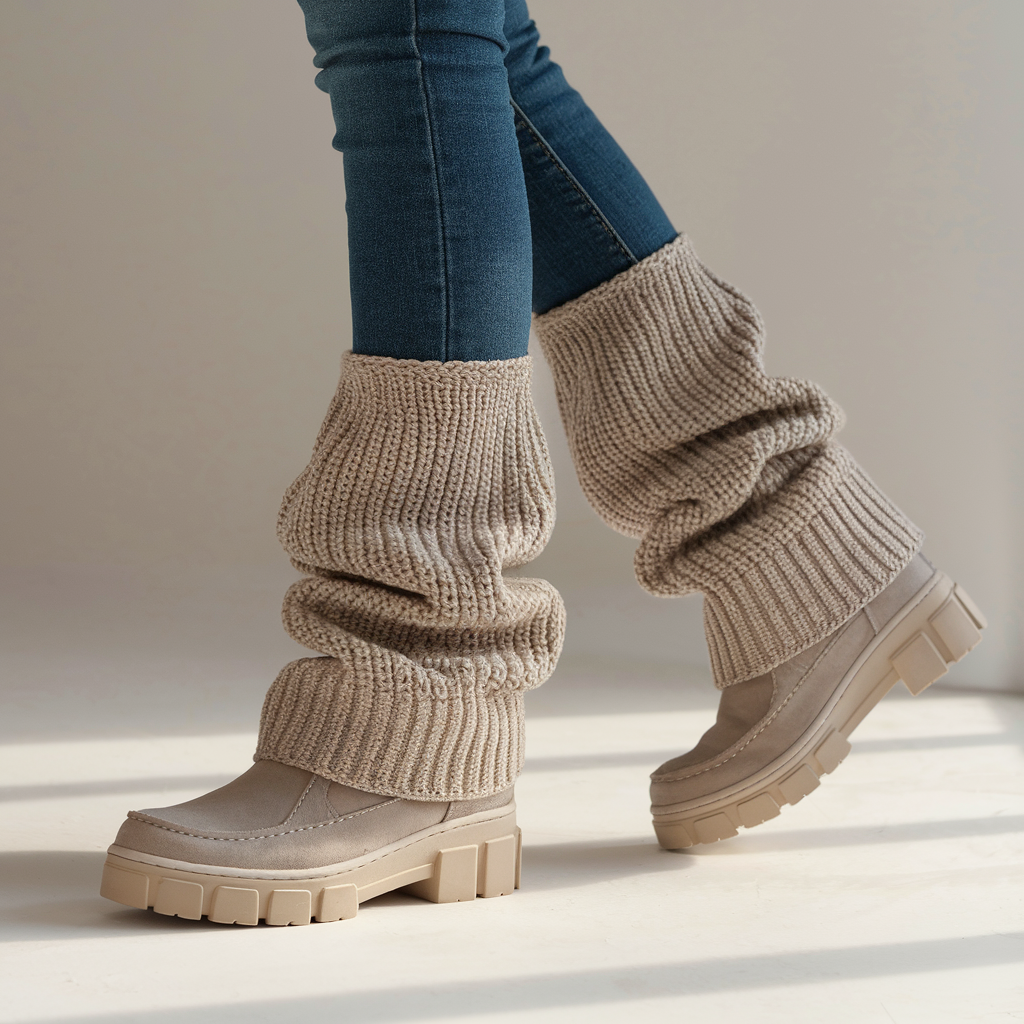
4. Crochet Slouchy Leg Warmers Pattern

Style: Relaxed, slouchy fit that pools slightly at the ankle — great over leggings and skinny jeans.
Skill level: Beginner → Confident beginner (shaping for slouch recommended)
Yarn & hook: Worsted weight (sample uses acrylic/wool blend for drape); 5.5 mm hook for slouchy drape
Yardage (pair): ~350–450 yds
Sample sizes (finished circumference × length):
- S: 12 in × 16 in (slouchy)
- M: 14 in × 18 in
- L: 16 in × 20 in
Note: Because of slouch you’ll make the tube slightly larger than the calf circumference and longer in length.
Construction overview
Work a wide tube with a gentle taper (narrower at cuff) or add deliberate gathering at ankle for a slouch. Use textured stitches like linen stitch or hdc for good drape.
Step-by-step (worked in the round)
- Measure & calculate stitch count: Choose target relaxed circumference — for slouch aim for 1–2 in positive ease beyond calf circumference to allow collapsing. Example: calf 13 in → slouch target 14 in. At 4 sts/in → 56 sts.
- Bottom cuff: Begin with a snug rib at ankle: Ch required number of sts, join and work 6–8 rounds of BLO sc (or hdc). This creates a neat ankle cuff that keeps slouch above.
- Body shaping for slouch:
- Option A (straight wide tube): Work in rounds sc or linen stitch until length desired (e.g., M 18 in). The drape of a bigger hook and softer yarn creates natural slouch.
- Option B (tapered then increase): Start with narrower ankle cuff for 4 rounds, then increase 4–8 sts evenly in next round to create extra width for slouch, then continue even for the remainder.
- Top finish: Add a folded cuff or wide rib to keep top in place: work 10–12 rounds BLO hdc then fold inside/outside and secure by working slipstitches or sewing the inside fold.
- Optional button tab: Add buttoned cuff or decorative strap for boho look.
Styling & variations
- For extreme slouch add more length (20–24 in).
- Add small tassels or fringe at top for festival look.
- Use a soft halo or mohair blend for ethereal slouch.
Finishing
- Block lightly to set drape. Avoid heavy blocking that removes natural slouch.
5. Crochet Crunchy Leg Warmers Pattern
Style: Dense, highly textured “crunch” created by seed/linen-like stitches (small ridges and nubby surface) — warm and visually interesting.
Skill level: Confident beginner — requires attention to stitch repeats
Yarn & hook: Bulky or worsted (bulky gives more “crunch”); 5.5–6.5 mm hook
Yardage (pair): ~300–450 yds
Sample sizes (finished circumference × length):
- S: 10 in × 12 in
- M: 12 in × 15 in
- L: 14 in × 18 in
Crunch stitch (a satisfying dense repeat)
A great crunchy texture is the linen/linen-like stitch or a star/waffle hybrid. Example linen stitch in the round (worked in rows normally) — you’ll adapt it to rounds:
In rounds (linen-like): Round 1: sc around. Round 2: sc in next st, ch1, skip next st repeat; Round 3: sc into chain1 spaces. This alternating creates a woven, crunchy texture.
A more pronounced crunchy stitch: waffle stitch: Front post double crochet based waffle creates strong vertical ridges.
Gauge (example)
- 18 sts × 20 rows = 4 in in chosen crunchy stitch on 5.5 mm.
Construction overview
Work tube in the crunchy stitch for rich texture; ribbed cuffs top & bottom; optional vertical seams for visual interest.
Step-by-step (waffle option in the round)
- Foundation: Calculate stitch count for circumference (multiple of 3 for waffle repeat usually). Example for M at 4 sts/in = 12 in × 4 = 48 sts (multiple of 3? round to 48 or 51).
- Round 1 (setup): sc in each st around; join.
- Round 2 (waffle setup): fpdc around next st, bpdc around next 2 sts repeat around. (FPdc/BPdc create ridges.)
- Round 3: sc around to anchor waffle.
- Repeat rounds 2–3 until desired length minus cuffs.
- Cuffs: Work 6–8 rounds BLO hdc for stretchy cuffs.
- Finish & block.
Variations
- Mix waffle bands with linen stitch bands to alternate texture.
- Make a two-color waffle by switching colors on established rounds.
Styling
- Crunchy warmers look excellent with combat boots or chunky sneakers.
6. Crochet Vanilla Latte Leg Warmers Pattern
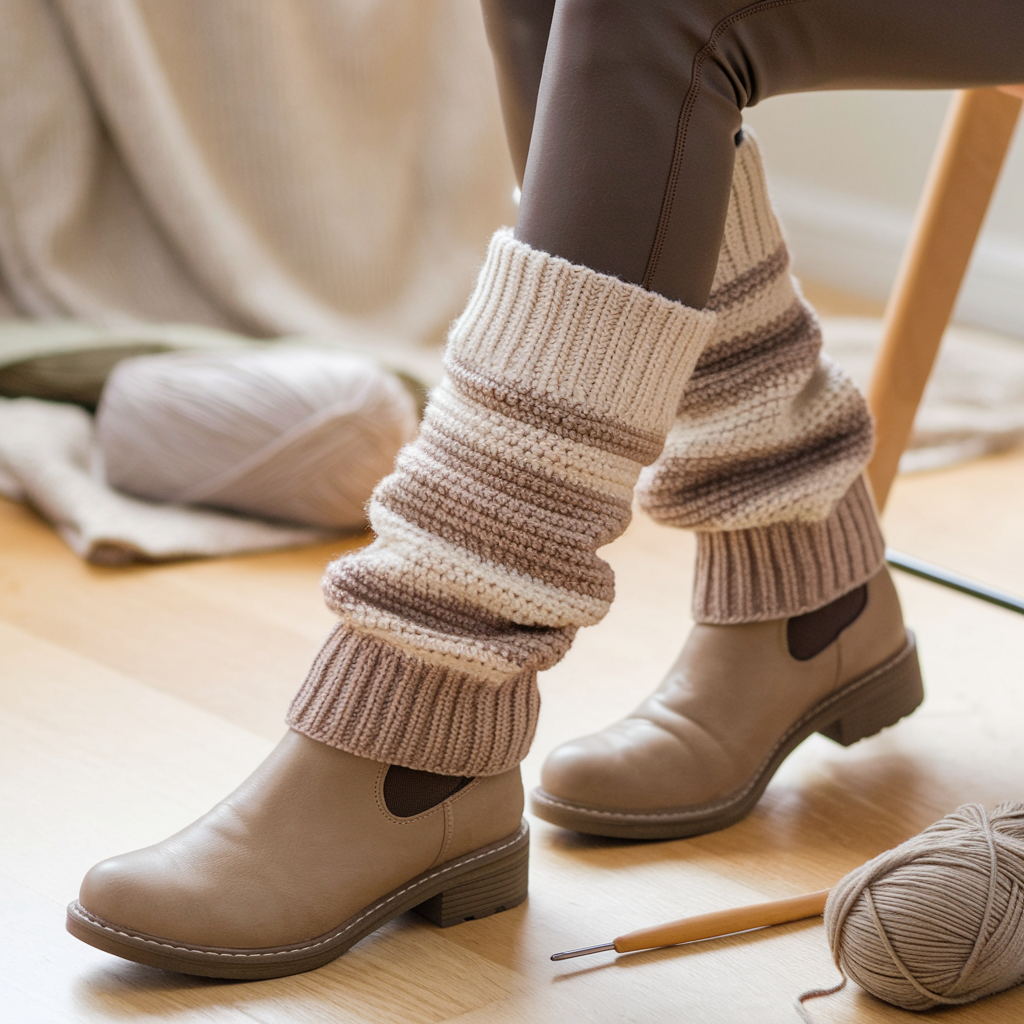
Style: Cozy, neutral, coffee-shop aesthetic — neutral stripes or tonal ribbing in soft creams, latte browns and warm taupes. Simple texture with an easy rib and optional button or pom detail.
Skill level: Beginner → Confident beginner
Yarn & hook: DK worsted blend in neutral palette; 4.5 mm hook
Yardage (pair): ~300 yds
Sample sizes (finished circumference × length):
- S: 10 in × 12 in
- M: 12 in × 15 in
- L: 14 in × 18 in
Design concept
A warm, neutral rib (hdc in BLO or FPdc/BPdc rib) with subtle tonal color blocks (e.g., cream base, coffee stripe, foam top).
Gauge example
- 18 hdc = 4 in in BLO hdc rib on 4.5 mm.
Construction overview
Work tube with BLO hdc rib for flexible fit; add color bands for mocha/latte aesthetics and finish with a smooth folded cuff.
Step-by-step
- Calculate stitch count: Use circumference × SPI as before. Because BLO rib makes fabric a little narrower, test with swatch and add a couple stitches if you want more ease.
- Cuff: Work 6 rounds of BLO hdc to create a folded cuff.
- Body: Work in BLO hdc rib continuously. After working 6–8 rounds in base color, switch to coffee color for 4 rounds, then a thin cream stripe (2 rounds), and continue. Carry colors up the inside for softer joins.
- Top fold (optional): To make a neat foldover top band, work 4 rounds in a smaller hook or 1–2 rounds tighter, then fold inside and slipstitch to create a double band.
- Decorative accents: Sew on a small wooden button or a loop closure to emulate latte foam art — purely decorative.
Variations
- Subtle vertical stripes: work panels in a knit-look rib (FPdc/BPdc) and seam vertically to create vertical accent stripes.
- For minimalist look, single color with tonal heather yarn is lovely.
Finishing
- Weave ends; block lightly. Add optional elastic thread in top round for secure fit if you plan to wear them over slick tights.
Final Finishing Notes (applies to all patterns)
- Seaming vs round: I recommend working leg warmers in the round to avoid a bulky seam. If you work flat, use mattress stitch for an invisible join.
- Top grip: If you find the warmers slip down, either pick a smaller top circumference, add a narrow elastic (crochet around the top BLO round with elastic thread), or make a folded cuff.
- Lining: Consider a fleece tube liner if you want windproof warmth — sew a removable liner with snaps.
- Care: Choose washable yarns for everyday wear. For wool blends, hand wash and lay flat to dry; for acrylics/cottons, machine wash on gentle and lay flat.
- Gift packaging tip: Fold with a small matching ribbon and attach a care note describing fiber content and wash instructions.
Styling & How to Wear Them
- Dance / studio: Pixie Pebble or Crunchy warmers pulled over leggings and ballet shoes.
- Street / casual: Slouchy leg warmers over skinny jeans with ankle boots.
- Cozy indoor: Vanilla Latte ribbed pairs with oversized sweaters and socks for home comfort.
- Retro / layered looks: Striped or cabled warmers over tights with skirt and oversized cardigan for a 1980s-inspired silhouette.
- Active / outdoors: Carried inside boots for hiking cooler mornings — pick wool blend for moisture management.
Conclusion
These six leg-warmer patterns give you styles for every mood and wardrobe — from clean graphic stripes to textured pebble stitches, timeless cables, relaxed slouch, crunchy texture, and neutral Vanilla Latte staples. Each pattern is intentionally adaptable: change yarn weight, stitch count, or length to match your leg measurements and preferred fit.
Bạn có thể xem nhanh tỷ lệ kèo khoảng 15 phút trước khi trận đấu chính thức bắt đầu. Chúng tôi cho phép người chơi so sánh ODDS trước khi vào tiền. Ngoài ra, xn88 lừa đảo còn phát sóng trực tiếp với hơn 4.500+ giải đấu mỗi ngày như: NHA, Primera, Ligue 1, Division, Bundesliga,…
slot365 là gì Giao diện website của nhà cái chính là điểm cộng lớn đối với các bet thủ lần đầu truy cập. Trang chủ có sự kết hợp hài hoà giữa 2 tone màu đỏ – đen vô cùng bắt mắt tạo nên vẻ đẹp sang trọng, đẳng cấp. Ngoài ra, các bố cục website cũng được sắp xếp rất logic để người mới dễ dàng thao tác.