Granny squares are the joyful building blocks of crochet — endlessly remixable, portable, and perfect for blankets, bags, pillows, garments, and home decor. Below you’ll find a full blog-ready article: a helpful introduction (tools, yarn, gauge, finishing and joining tips), then six long, detailed granny-square patterns with clear, step-by-step rounds you can follow now. Each pattern includes skill level, materials, stitch notes, worked example, variations, and ideas for how to use the squares in finished projects.
everything you need to know before you start
Why granny squares are great
- Modular: Make many identical or varied squares and join them however you like.
- Beginner-friendly: Most squares use basic stitches (ch, dc, sc) yet can produce very sophisticated looks.
- Scrap-friendly: They’re perfect for using leftover yarns.
- Portable: One square = one tiny project you can start and finish in a bus ride.
Tools & yarn
- Hooks: For DK/worsted yarn, 3.5–5.5 mm hooks are common. Use the hook that gives you a firm but not stiff fabric.
- Yarn: Cotton and cotton-blends show stitch definition beautifully; worsted-weight acrylics are forgiving and budget friendly. Use fingering or DK for delicate motifs.
- Notions: tapestry needle, small scissors, blocking pins, blocking mat, stitch markers (helpful for marking corners), tape measure. Optional: small row counter or sticky notes to record color changes.
Gauge & sizing
- Granny squares are measured by number of rounds and by finished dimensions. Make a test square in your chosen yarn and hook: measure sts/rows per inch in the stitch pattern you plan to use.
- Example: a 4-round granny will often be ~4–5 in across in worsted yarn with a 4.0 mm hook; more rounds = larger square.
Abbreviations (US)
- ch = chain
- sl st = slip stitch
- sc = single crochet
- hdc = half double crochet
- dc = double crochet
- tr = treble crochet
- st(s) = stitch(es)
- sp = space
- rep = repeat
- … = repeat between asterisks
- MR = magic ring
Construction & finishing basics
- Start options: Magic ring (MR) creates a tidy center; an adjustable chain ring is fine too.
- Corners: Most square granny patterns use a corner construction of (3 dc, ch 2, 3 dc) into the corner space. The ch-2 corner keeps corners turning 90°.
- Joining: Popular methods — whipstitch/seaming, join-as-you-go (JAYG), or crochet join (e.g., slip stitch join or single crochet join). Join-as-you-go is super efficient for blankets.
- Blocking: Block each square flat to even out tension and make joins easier. Spray/wet block cotton squares and pin them to size.
- Weaving ends: Leave a 3–4 in tail when changing colors; weave tails back into the same color area to hide them. If you plan a lining, hide ends under the lining stitches.
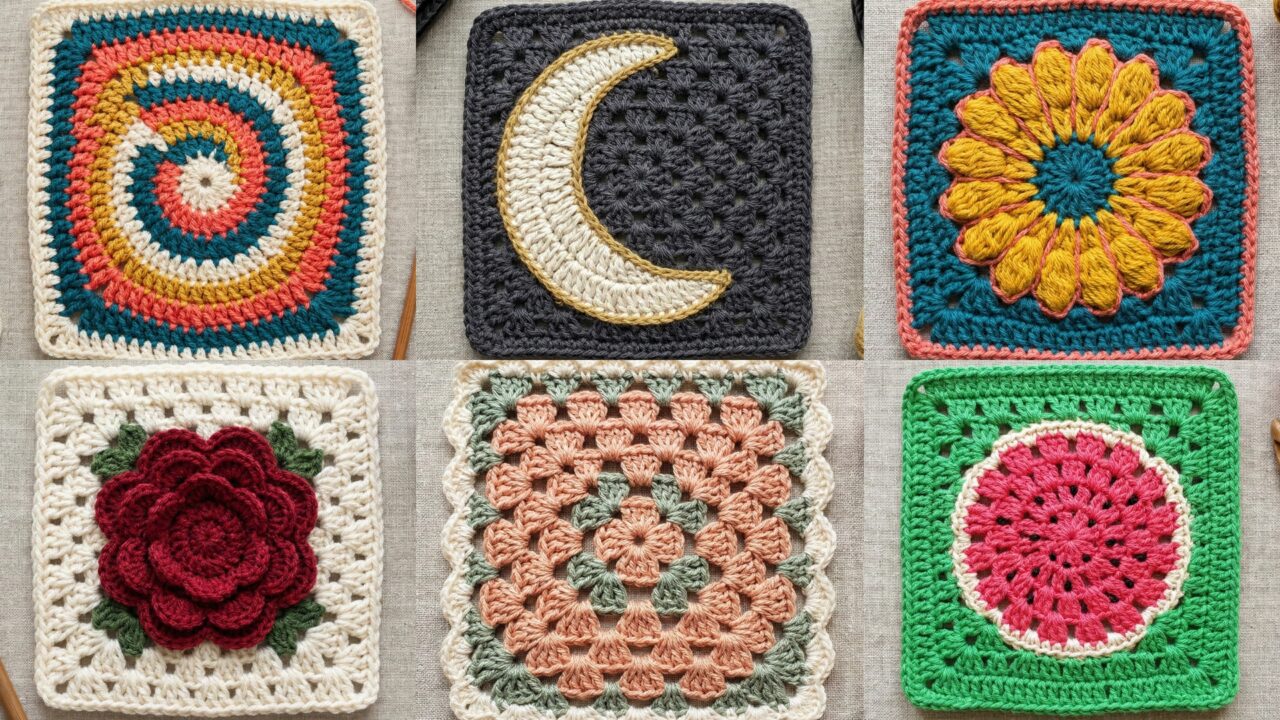
1. Crochet Spiral Granny Square Pattern
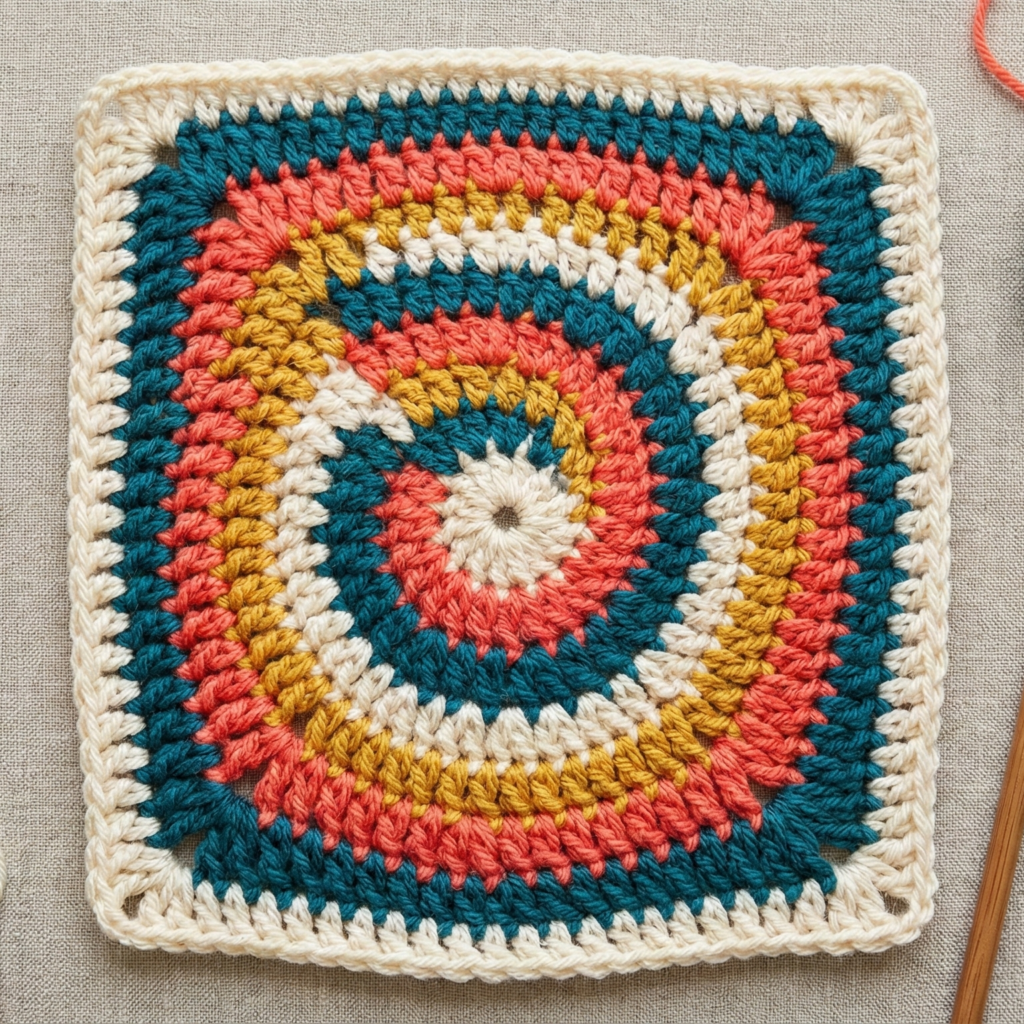
Skill level: confident beginner → intermediate
Vibe: hypnotic, continuous-color spiral effect inside a classic granny-outline — great for blankets and statement pillows.
Materials
- Worsted weight yarn in 3–4 contrasting colors (A, B, C, D). For a 6-round square expect ~40–60 yd per color.
- Hook: 4.0 mm (adjust to yarn).
Stitch notes
- This is a continuous-round granny square where color changes spiral out from the center rather than working distinct color rounds. You’ll work clusters and change color at the end of cluster groups to create a visible spiral.
Worked example — 6-round spiral granny (finishes ~5 in)
Center and Rounds use 3-dc clusters. Each round increases by adding clusters or corners.
Round 1 (center): MR, ch 3 (counts as dc), 2 dc in MR, ch 2, 3 dc in MR, ch 2 rep 3 times (total 4 clusters), sl st to top of ch 3 to join. Pull ring tight. (You now have 4 corner clusters separated by ch-2 spaces.)
Round 2 (establish spiral start): Change to Color B by finishing the last sl st or by joining in the next ch-2 space, ch 3, (3 dc, ch 2, 3 dc) in same ch-2 space, ch 1, 3 dc in next corner ch-2 space; here instead of making a full corner everywhere, place single clusters in side spaces to start a spiral offset. The technique: alternate placing full corner groups and single clusters, shifting the positions by 1 cluster each round so the color “walks” around the square — this creates a spiral. Complete round with sl st.
Practical note: the spiral is achieved by choosing where you place your corner groups vs side clusters each round; the result looks like a spiraling band. If you prefer simpler instructions, work a continuous granny but carry the next color up periodically to make it appear spiral-like.
Round 3: Continue in Color C. Repeat the pattern of corners (3 dc, ch 2, 3 dc) in the four corners and place single 3-dc clusters along the sides. Stagger the side clusters each round to produce the spiral offset. Increase the number of side clusters per side as the square grows to maintain flatness (typically 1 cluster per side for round 2, 2 clusters per side for round 3, etc., but stagger them so spiral thread forms).
Rounds 4–6: Continue alternating colors and adding clusters until you reach desired size. Finish with a final round of sc around for a neat edge or a decorative shell row.
Tips & variations
- Use high-contrast colors for dramatic spiral lines, or tone-on-tone for a subtler swirl.
- Work more rounds for a larger square; spiral effect becomes stronger with more rounds.
- Join squares with a continuous spiral join: work slip stitches in back loops to create a visible ridge between squares that echoes the spiral look.
Uses
- Turn a field of spiral squares into an eye-catching throw or make a single large spiral square for a cushion front.
2. Crochet Moon Granny Square Pattern
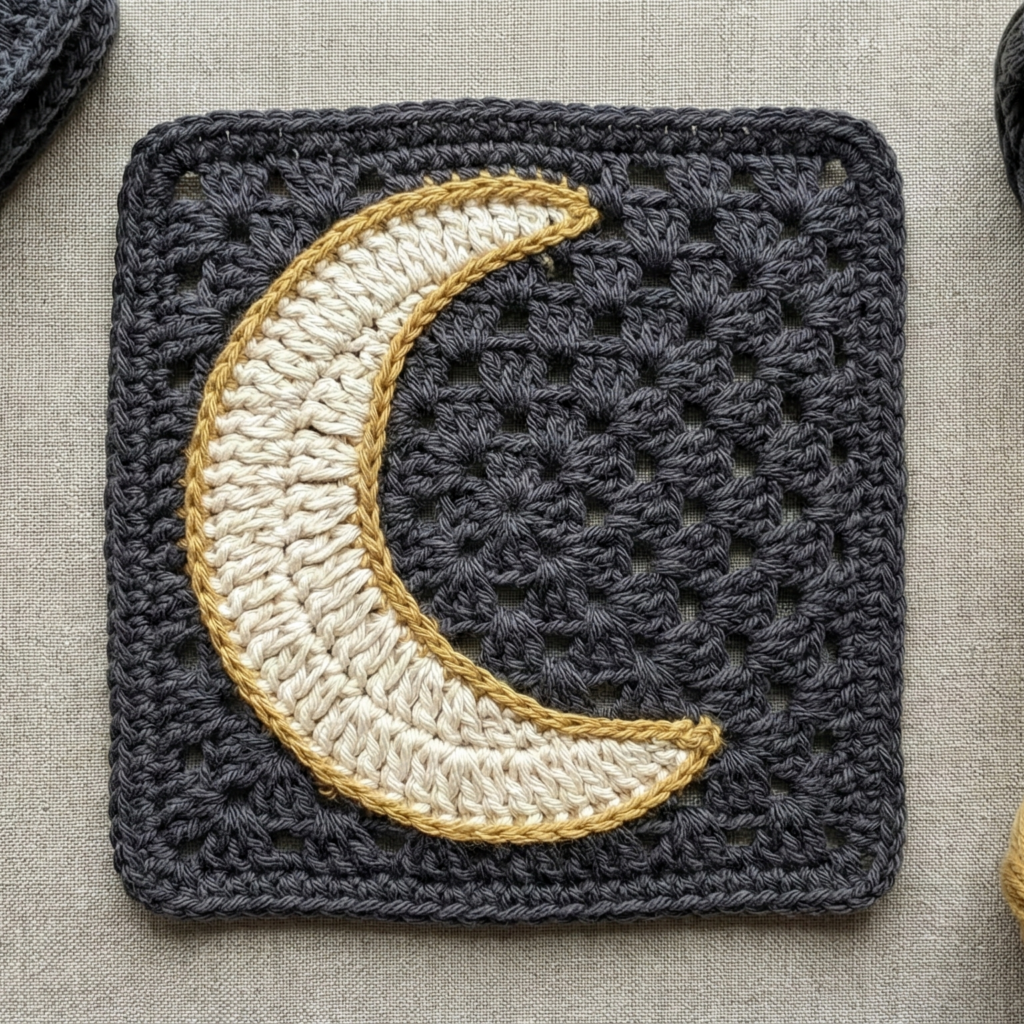
Skill level: intermediate
Vibe: crescent/“moon” shaped color blocking inside the square — great for modern blankets and color-blocked garments.
Materials
- 3 colors: background (BG), moon color (M), accent (A).
- Hook: 4.0 mm.
Stitch notes
- The Moon Granny uses placed increases and strategic color blocks to form a crescent within the square. You’ll work standard granny clusters but change colors on sides to shape the moon.
Worked example — 5-round moon granny (sample ~5 in)
Round 1 (center): MR; ch 3, 2 dc, ch 2, 3 dc, ch 2 rep 3 times. Join. (4 corner clusters)
Round 2 (BG): Join BG, ch 3, (2 dc, ch 2, 3 dc) in corner; ch 1, 3 dc in space between corner clusters across sides — follow a standard granny pattern for one round, placing one 3-dc cluster in each side space. Sl st to join.
Round 3 (start moon color): Join M on one side of the square where you want the moon to begin. Work (3 dc, ch 2, 3 dc) in the next corner to anchor; along the side, work 3-dc clusters with no ch-1 between clusters on the moon-facing side so they sit closely; for the part of the side outside the moon use BG with ch-1 spacing. The moon is formed by concentrated clusters of color M rounding into the corners to create a crescent.
Round 4: Continue alternating BG and M in sectors: where you want the crescent’s curve, place more clusters closer together (without ch-1 spacing) and on the BG side maintain ch-1 spacing. The visual curvature depends on where you change spacing and color — plan the crescent arc across two adjacent sides and a corner for a natural moon shape.
Round 5: Work a neat sc border in BG around the whole square to unify the edges and flatten the shape.
Tips & variations
- To sharpen the moon shape, add an accent border in A around the moon segment before the final BG border.
- Try a gradient moon using several colors from light to dark across the crescent.
Uses
- Arrange moon squares into a night-sky blanket, or make a row of moon squares to form a border for a throw.
3. Crochet Shell Stitch Granny Square Pattern
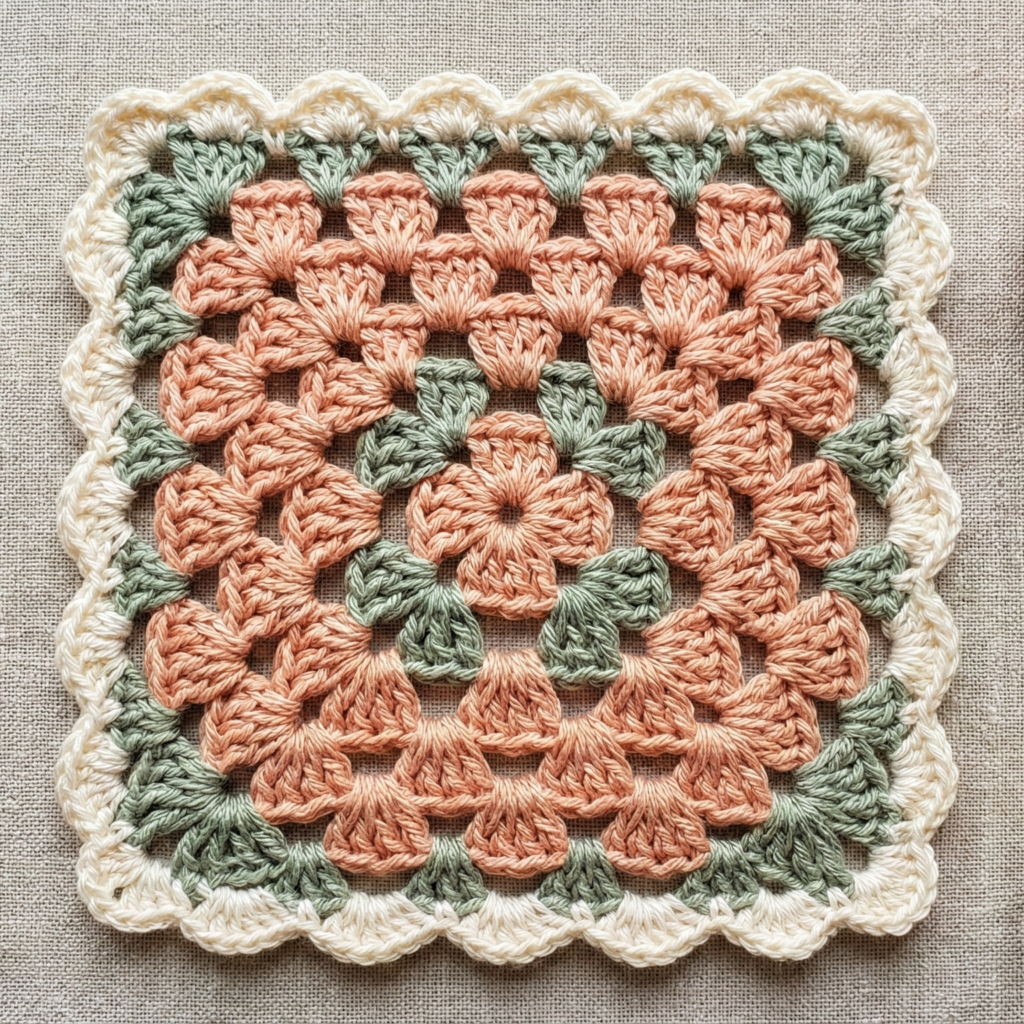
Skill level: confident beginner
Vibe: lacy, textured shell stitches within the granny framework — great for feminine blankets, shawl panels or cushion fronts.
Materials
- DK or worsted yarn depending on desired lacy or denser look.
- Hook: 4.0 mm (DK) or 5.0 mm (worsted).
Stitch notes
- Instead of classic 3-dc clusters, this square uses shell groups (5 dc shells) and modified corner spacing to produce scalloped shells across the square.
Worked example — 4-round shell granny (~5 in)
Round 1 (center): MR, ch 3, 2 dc, ch 2, 3 dc, ch 2 rep 3 times. Join.
Round 2 (shells start): Join color B, ch 1, sc in same space to create a solid anchor, ch 2, (5 dc shell) in next ch-2 corner space, ch 2, sc in next side space — this places shells at corners with anchored scs along sides. The scs between shells hold the shells apart.
Round 3: In each corner shell space work (5 dc shell, ch 2, 5 dc shell) to expand corners. Along sides, work sc, ch 2, (5 dc shell) in center space, ch 2, sc so shells repeat across the side. Repeat round until square is desired size.
Round 4 (border): Work 1 round sc or a small picot/shell border: sc, skip 2, 5 dc in next, skip 2, sc to get a scalloped edge.
Tips & variations
- Work shells tighter or looser by changing hook size for a more open or compact fabric.
- For a vintage vibe, use 3–4 pastel colors and a delicate border.
Uses
- Shell granny squares are striking when joined in a blanket — consider joining with a lacy join to keep the scalloped look.
4. Crochet African Flower Granny Square Pattern
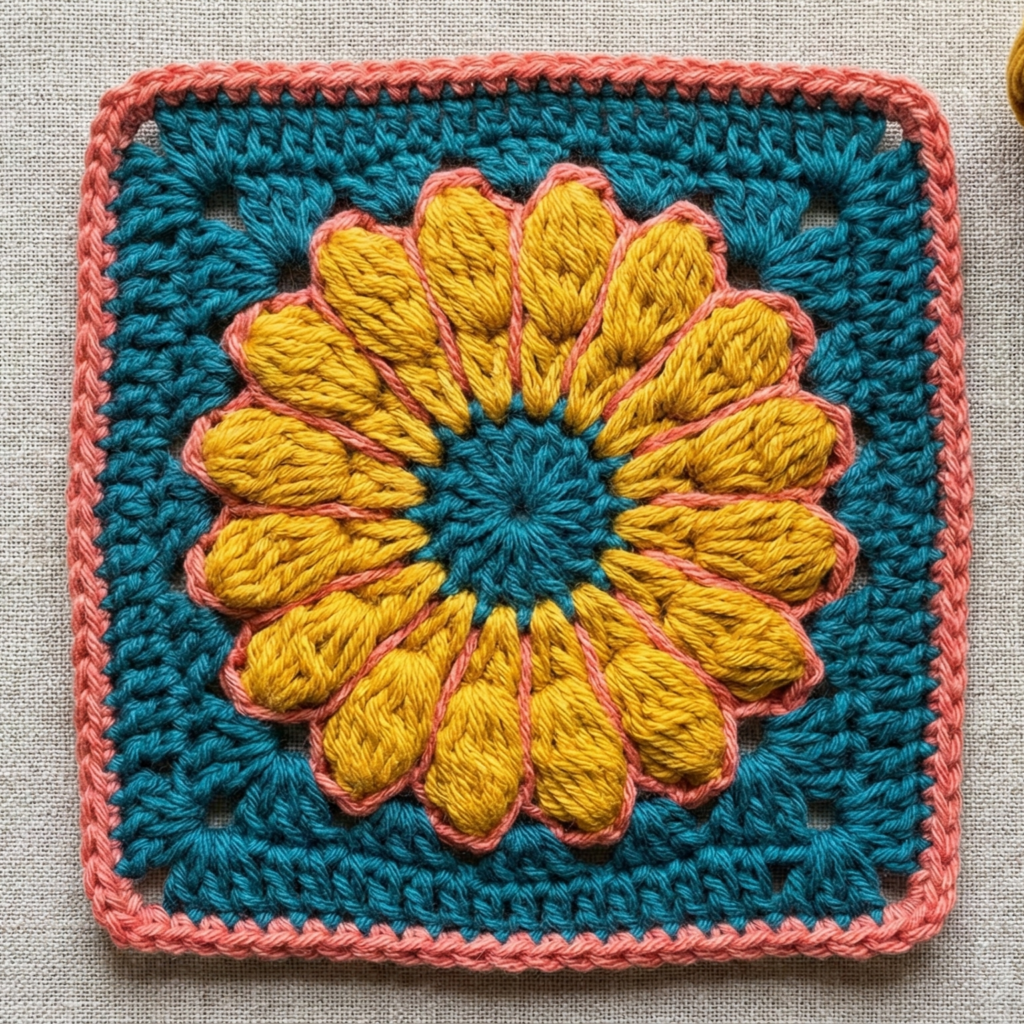
Skill level: intermediate
Vibe: classic African Flower motif — small daisy-like petals at center that grow into a square — colorful and textured.
Materials
- DK or worsted in 3–5 colors (petal color(s) + background).
- Hook: 4.0 mm.
Stitch notes
- The African Flower motif often begins as a flower (round of puff/petal stitches) inside a 5- or 6-sided granny formation, then square rounds are added to make it into a square granny.
Worked example — 5-round African Flower Square (~4–5 in)
Center flower (petals):
- MR, ch 2, (yo, insert hook into MR, pull up loop) repeat 3 more times (5 loops on hook), yo pull through all loops, ch 1 — this makes one petal (a 5-loop puff closed by pulling through). Repeat for 8 petals: [petal], ch 1 until you have 8 petals around center. Sl st to join.
Round 2 (petal base join): Join BG color behind petals and work sc into space between petals, ch 2 around to create a round of little anchor spaces.
Round 3 (transition to square): Use clusters anchored in selected spaces to begin forming corners: in every 2nd or 3rd space work (3 dc, ch 2, 3 dc) for corners; place single clusters or shells along the sides so the motif begins to square up.
Round 4–5 (square rounds): Continue adding standard Granny or shell rounds to square the motif: in each corner do (3 dc, ch 2, 3 dc); on sides place the number of clusters needed to make a flat square (often 2–3 clusters per side on small motifs). Finish with an sc border to tidy edges.
Tips & variations
- Petal counts vary — classic African Flower often uses 8 petals, but 6 or 10 give a different look.
- Make petals in a variegated color and background in a solid for striking contrast.
Uses
- African Flower squares are iconic in boho blankets, market bags, and appliquéd cushions.
5. Crochet Watermelon Granny Square Pattern

Skill level: confident beginner → intermediate
Vibe: playful seasonal square — green rind, white inner ring, pink/red center with tiny “seed” accents — perfect for summer placemats, picnic blankets, or kids’ projects.
Materials
- Colors: rind green (G), pale inner rind (W), flesh (P), seed color (black or brown).
- Hook: 4.0 mm (worsted recommended).
Stitch notes
- This pattern layers colors round by round to mimic a watermelon cross-section; seeds are small embroidered spots or French knots after the square is complete.
Worked example — 6-round watermelon granny (~5 in)
Round 1 (seeded center — flesh): MR, ch 3, 2 dc, ch 2, 3 dc, ch 2 rep 3 times. Join. Work in P.
Round 2 (expand flesh): Continue in P for 1–2 rounds, making additional clusters on sides to reach a small disc; count of side clusters increases gradually to keep disc flat.
Round 3 (white ring): Join W and work 1 round of sc or 1 round where you place a single sc between clusters to create a narrow white ring.
Round 4–5 (rind in green): Join G and work 2–3 rounds using corners as (3 dc, ch 2, 3 dc) and sides with evenly spaced clusters. This forms the thicker outer rind.
Round 6 (border & seeds): Finish with a sc round in G for the rim. With contrasting seed yarn (black), embroider tiny seed dashes onto the flesh area: use a small satin stitch or tiny french knot for each seed; scatter them unevenly for a natural look.
Tips & variations
- Make a larger watermelon by adding more flesh rounds and increasing rind thickness.
- For a slice shape, use a triangular granny variant (make a wedge by working half the square).
Uses
- Sew many watermelons into a picnic blanket or make coasters/placemats.
6. Crochet Rose Garden Granny Square Pattern
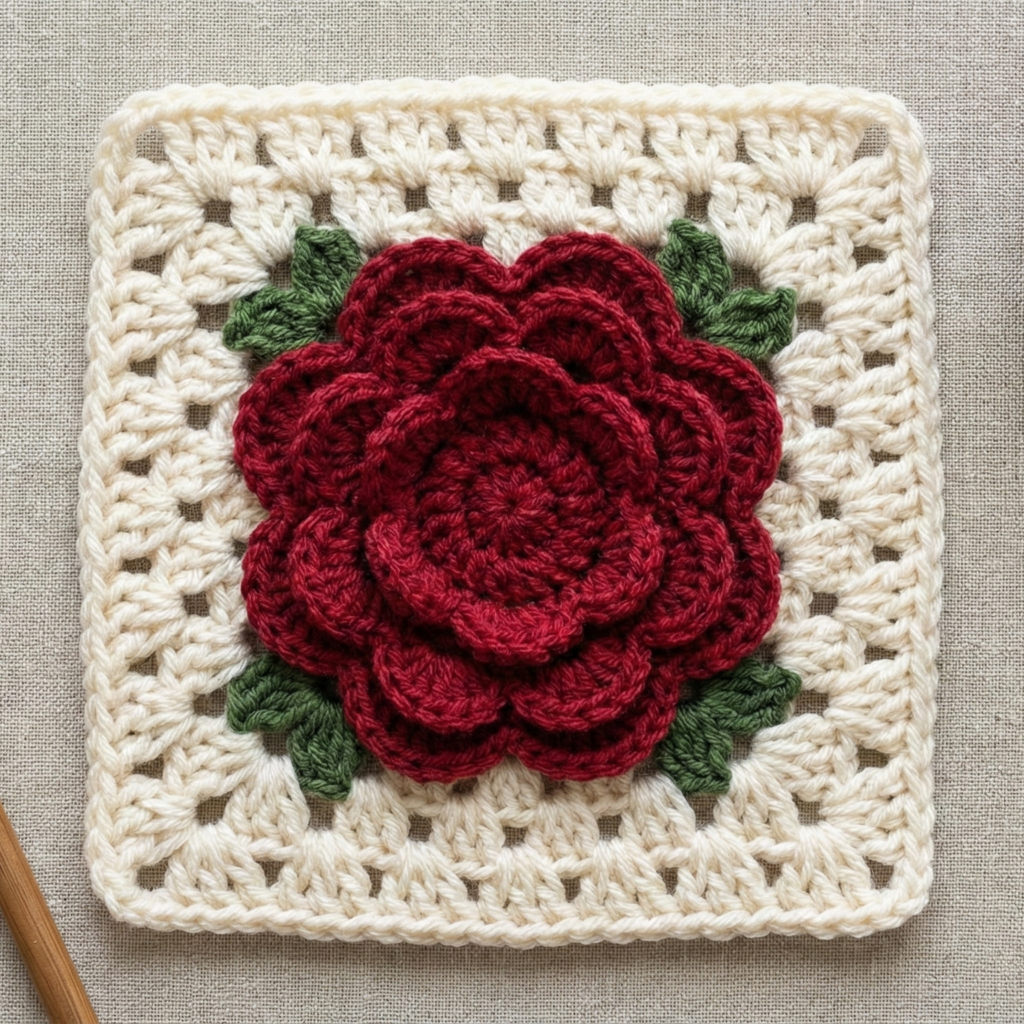
Skill level: intermediate → advanced (appliqué/overlay techniques)
Vibe: romantic, dimensional roses at the center of a granny square — ideal for heirloom blankets, bridal wraps, or decorative pillows.
Materials
- Several coordinating colors: rose(s) for petals, green for leaves, neutral for background.
- Hook: 4.0 mm (or smaller for very tight rose stitches).
Stitch notes
- The rose is often an appliqué made separately and sewn into the center, or worked as an overlay using layered puff stitches. The surrounding square uses classic granny rounds to frame the flower.
Worked example — layered rose appliqué + 4-round granny frame (~5–6 in)
Make rose appliqué:
- Magic ring, ch 1, work 8 hdc into MR; sl st to join.
- Round 2 (petals): ch 3, 3 treble cluster in same st, ch 3, sl st into next st — this forms a loopy petal. Repeat around to make several petals (6–8).
- Round 3 (layered petals): Work more textured petals around the first round by crocheting petals into sl st spaces from previous round: (ch 4, 5 dc in space, ch 4, sl st in next sl st) etc. Continue until you get the desired rose fullness. Fasten off and weave in tails.
Prepare a small circle base (optional): If your rose appliqué is loose, sew it onto a small circle of fabric or a small crocheted disc center to anchor it.
Make granny square frame:
- Join background color at a point near the center and work 1–2 rounds of sc to create a solid base around the rose. Then proceed with granny rounds: in each corner do (3 dc, ch 2, 3 dc) and place clusters along the sides to square up. Work 3–4 rounds or until square reaches desired size.
Attach rose:
- Sew the rose appliqué securely to the center using matching yarn and small stitches — make sure petals are flattened and arranged as you like. Weave ends under the petals.
Tips & variations
- Use a smaller hook and fine yarn for a delicate, compact rose; use thicker yarn for a bolder puff rose.
- Add embroidered leaves around the rose with simple long sc or surface slip stitches.
Uses
- Place rose squares as focal points on a blanket, or make a few for accent cushions and frame with neutral granny squares.
Assembly & finishing: turning squares into projects
Layout & planning
- Lay out squares on the floor in the arrangement you like. Photograph the layout with your phone so you can reproduce the placement when joining.
- For blankets, plan an odd-even repeat (e.g., alternate spiral and African Flower) for an organized look, or randomize for scrappy charm.
Joining methods (brief)
- Whipstitch / mattress stitch: neat and sturdy; sews squares with RS facing up for minimal ridge.
- Join-as-you-go (JAYG): crochet final round of new square while connecting to existing squares; great for continuous work without sewing later.
- Slip-stitch crochet join: creates a ridged decorative seam; work RS facing you and sl st through both edges.
- Single crochet join: sc through both layers for a raised seam that frames each square.
Border ideas
- Simple sc round: one or two rounds of sc in a unifying color.
- Lattice or filet border: convert the edge into an open airy border.
- Scalloped or picot edge: adds a feminine finish to shell/granny-style squares.
Blocking & final touches
- Block the finished piece on a flat surface using pins and water/steam to even shapes.
- Weave in ends securely; bury ends inside squares or under the lining.
- For wearable items, add a lining or backing to prevent stretch and protect stitches.
Conclusion
Granny squares are endlessly adaptable: dizzying spirals, moons, shells, African Flowers, playful watermelon slices, and romantic rose centers — each square has its own personality and purpose. Use them alone (a single, bold square as a cushion) or in great numbers (a blanket or a market tote). The patterns above are written to be practical and flexible: change yarn weight, hook size, and number of rounds to make each square larger or smaller, denser or airier.