Crochet + jewelry = tiny, wearable art. These six bracelet patterns mix thread, cord, beads, and simple crochet stitches so you can make pieces that look professional but are perfectly doable at home. Below you’ll find a clear, practical introduction (materials, sizing, tools, safety with beads), then six full bracelet patterns with materials, skill level, step-by-step instructions, stitch counts and math examples, finishing tips, troubleshooting, styling ideas, and care instructions.
I wrote each pattern so you can make one in an evening and adapt it for gifts, markets, or your own accessory box.
Quick intro — materials, tools, sizing, safety, and abbreviations
Materials & fibers (how to choose)
- Thread & yarn
- Cotton thread (#10 or #20) — crisp, classic for delicate lace bracelets.
- Fingering / lace weight yarn — soft drape for beaded work.
- Macramé cord or waxed cotton cord — great for braided/cord-style bracelets and for threading beads easily.
- Beads
- Seed beads (11/0 or 8/0), glass pearls, Czech glass, wooden beads, or gemstone beads. Make sure bead holes fit your thread/cord.
- Findings & hardware
- Crimp ends, end caps, jump rings, lobster clasps, toggle clasps, magnetic clasps, or elastic cord for stretch bracelets. Use jewelry-grade hardware if you plan to sell.
- Optional stabilizers
- Narrow nylon cord or fine beading wire as a core to crochet around if you want extra strength and shape.
Tools
- Crochet hooks appropriate for your thread (0.75 mm — 3.5 mm range depending on thread).
- Beading needle (for tiny beads), fine scissors, chain-nose pliers, crimping pliers, jeweler’s glue (tiny dot), tape measure, tapestry needle.
Sizing — how long should a bracelet be?
Bracelet lengths vary by wrist size and style. Common adult sizes:
- Small: 6.5 in (16.5 cm)
- Medium (average): 7.0–7.5 in (17.8–19.1 cm)
- Large: 8.0 in (20.3 cm) and up
Measure the wrist snug (no extra ease) and add desired ease:
- Fitted bracelets: add 0.25–0.5 in.
- Comfort fit: add 0.5–0.75 in.
- Loose cuff: add 1 in or more.
Example math (digit-by-digit): target wrist = 7.0 in, you want +0.5 in ease → final length = 7.0 + 0.5 = 7.5 in.
Gauge & stitch math (why it matters for thread work)
Make a small sample (e.g., 20 sts × 10 rows) in the stitch you plan to use and measure stitches per inch (spi).
- If your sample shows 8 sc = 1 in, and you need a finished length of 7.5 in, compute stitches: 8 × 7.5 = ?
- 8 × 7 = 56
- 8 × 0.5 = 4
- 56 + 4 = 60 stitches.
Always round to match your stitch repeat if needed.
Safety with beads & findings (important)
- Small beads and findings are choking hazards: avoid giving beaded bracelets to children under 3.
- If the bracelet will be worn by a teen or active adult, secure beads by knotting, crimping, or using glue where appropriate.
- Use breakaway or flexible closures if you expect the bracelet to be snagged in activities.
Abbreviations (US)
- ch = chain
- sc = single crochet
- hdc = half double crochet
- dc = double crochet
- tr = treble crochet
- sl st = slip stitch
- MR = magic ring
- sp = space
- rep = repeat
- BLO / FLO = back/front loop only
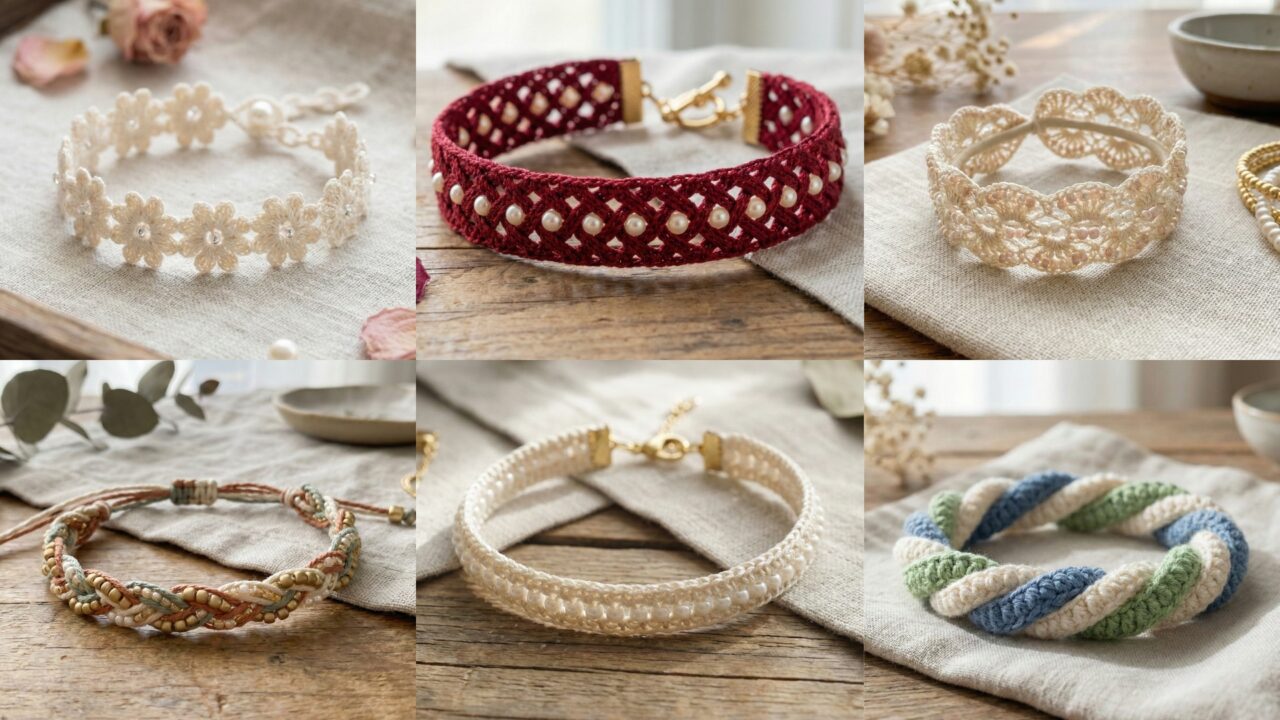
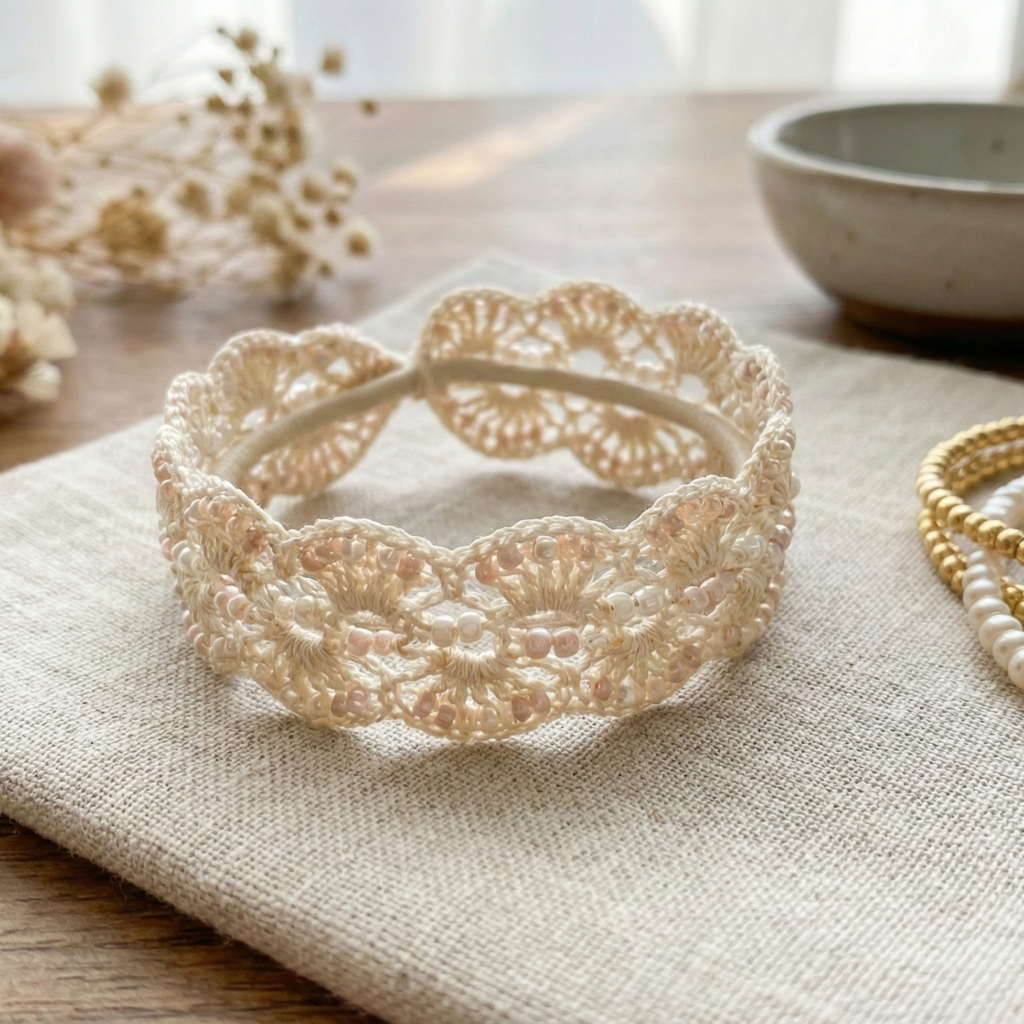
1. Crochet Turk Beaded Bracelet Pattern
A pretty beaded thread bracelet with a Turkish-style bead band — elegant, slightly vintage, perfect with pearls or glass beads.
Skill level: intermediate (beading + small hook crochet)
Finished size (example): 7.5 inches (final length)
Materials
- Size 10 mercerized cotton thread (or fingering yarn) — ~15–30 yd.
- Small glass seed beads (11/0) — ~120–200 depending on bead spacing and wrap.
- Hook: 1.5–2.5 mm (match thread).
- Clasp (3–4 mm lobster clasp or small magnetic clasp), jump rings, crimp tubes or small end caps.
- Beading needle (optional but helpful to pre-string beads).
Why this pattern
It combines a beaded center row with delicate crochet on either side; the result looks like a delicate Turkish bracelet: strong, sparkly, and refined.
Step-by-step
A. Prep — bead stringing
- Decide bead spacing: sample design uses 1 bead per crochet stitch (tucked onto the stitch when you make it). For a 7.5 in target and 8 beads per inch gauge, you’ll need 8 × 7.5 = 60 beads. We’ll add 10% extra for slack: 60 + 6 = 66 beads. Round up to 70 beads to be safe.
- Pre-string ~70 seed beads on your thread (use a beading needle or double-thread the thread).
B. Foundation chain
3. Compute stitch count from gauge: example spi = 8 sc/in → stitches = 8 × 7.5 = 60 stitches. Chain a foundation of 60 + 1 turning ch = 61 ch. (If you used a bead-per-stitch plan, keep that in mind — we want bead coverage along these stitches.)
C. Row 1 — attach beads while crocheting
4. Row 1 (RS): sc in 2nd ch from hook. Slide a bead up near the hook, insert hook, pull up loop, pull bead close so it sits on top of the stitch, complete sc. Repeat across: sc with bead in every stitch. End with sc in last ch. Turn.
- This method positions a bead on each sc.
D. Row 2 — frame with delicate edge
5. Row 2: ch1, sc across but work in FLO (front loop only) for a subtle ridge. This creates a neat frame under the beads. Fasten off leaving a long tail for finishing.
E. Optional: add second beaded row
6. For a double-bead look, work a second narrow row of beads on the opposite side by repeating Row 1 on the back side before finishing.
F. Finish & hardware
7. Weave in tails neatly. Attach end caps to each end of the strip: either fold the tail under and glue a tiny dab of jeweler’s glue inside the cap for security or use crimp tubes. Attach jump rings and clasp.
Variations
- Use pearls for the bead row for a bridal version.
- Make the base a 3-row strap and inset the bead row in the center for a chunkier cuff.
Troubleshooting
- Beads sliding: if beads slide too freely, add a tiny knot after every 6–8 beads while stringing, or use slightly larger seed beads.
- Curling edge: block the strip lightly and/or add an extra sc round around to stabilize.
Styling
- Elegant stacked with a slim chain or worn solo with an evening dress.
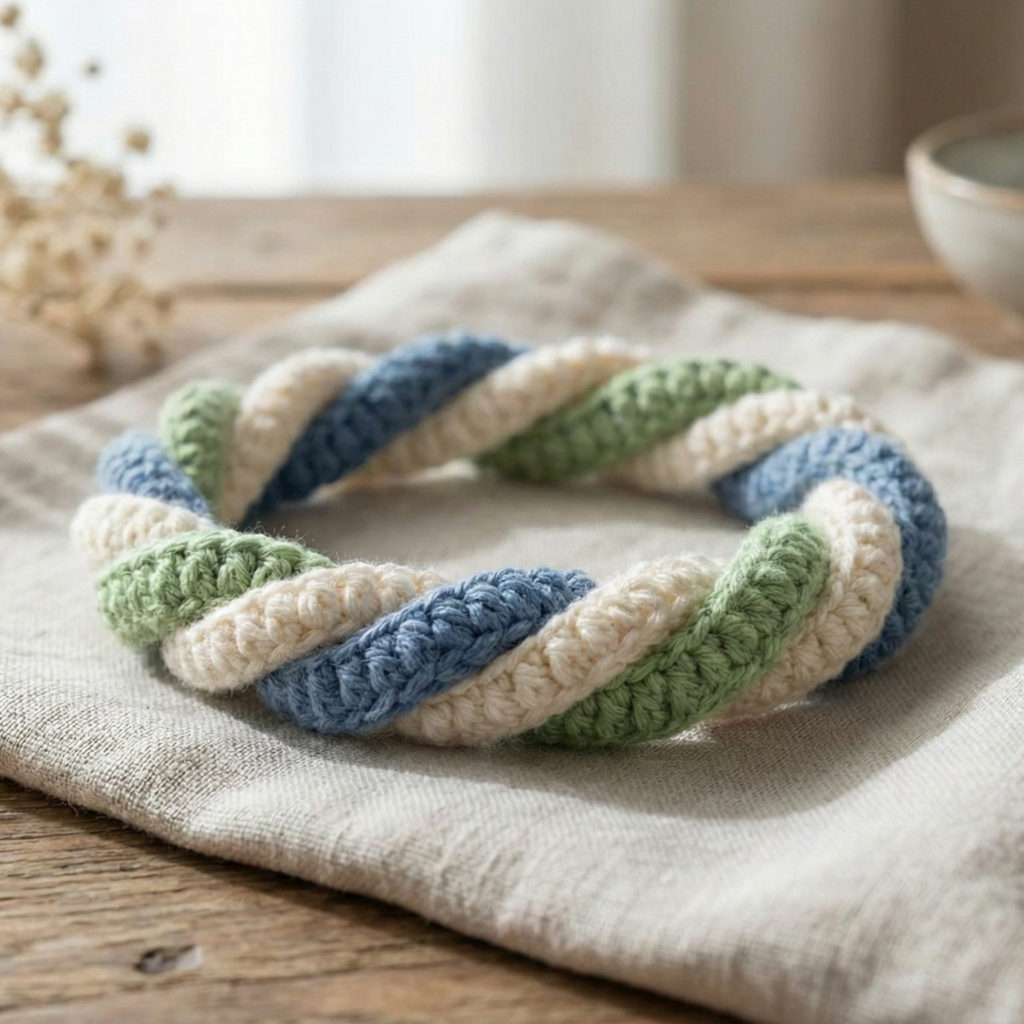
2. Crochet Beautiful Braided Beaded Cord Bracelet Pattern
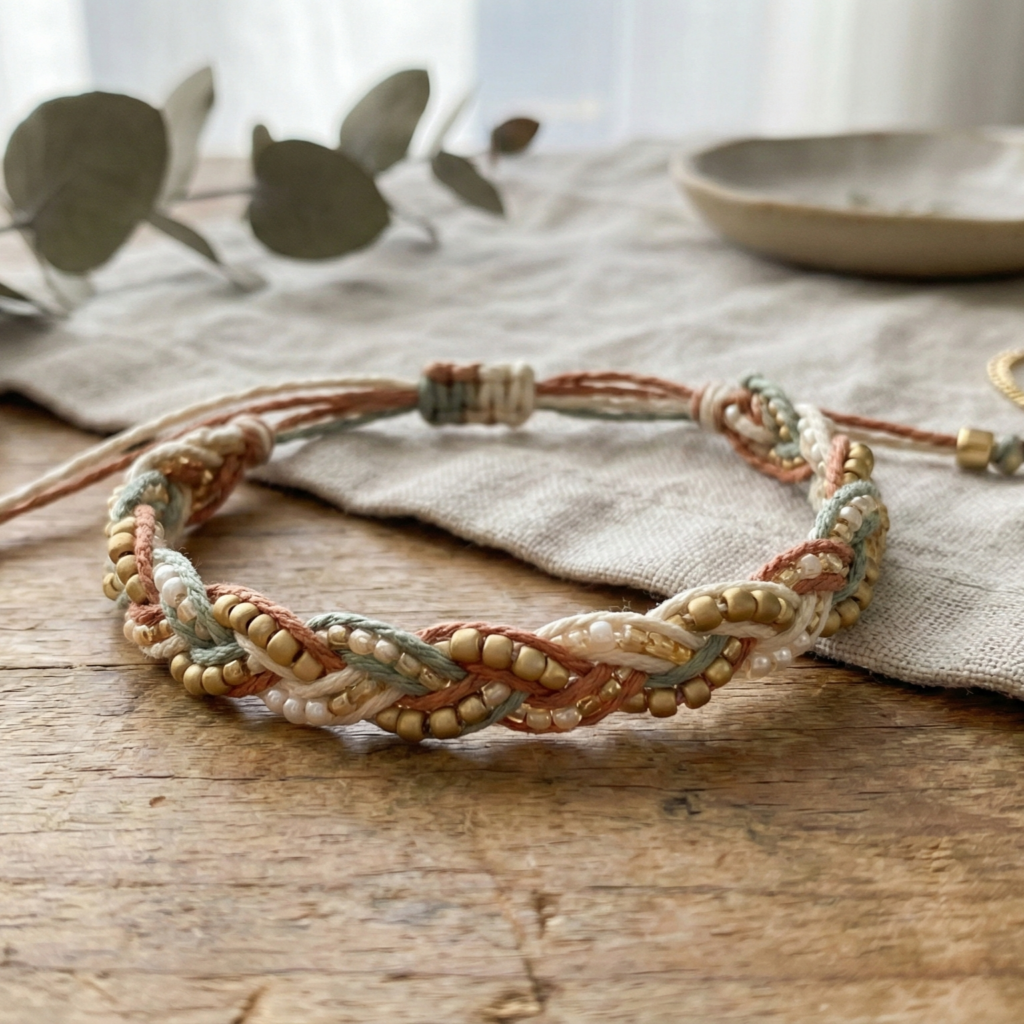
Braided cord plus beads = modern boho. You crochet three beaded cords and braid them, finishing with a clasp or sliding knot.
Skill level: confident beginner
Finished size (example): adjustable 6.75–8 in (sliding knot) or fixed with clasp at 7.5 in.
Materials
- Three lengths of waxed cotton cord or 2 strands of DK held together per cord.
- Beads with larger holes (2–3 mm).
- Hook matching cord size (e.g., 2.5–3.5 mm).
- Clasp or sliding knot hardware (optional).
Why this pattern
It’s tactile and strong — the braid gives structure and the beads sit nicely on the cords.
Step-by-step
A. Make a beaded crochet cord (one strand)
- Measure desired finished length for one strand: for a 7.5 in bracelet braided from three strands, make each strand about 22–24 in to allow braid and hardware. (Braiding shortens length.)
- Chain long enough to account for final length: if cord gauge is 10 ch/in, for a 24 in chain you need 10 × 24 = 240 ch (or make shorter and join).
- Work sc in rounds around the cord to create a neat tube that you can string beads onto OR pre-string beads before crocheting and slide them into place as you go.
- Another simpler method: make a tight i-cord (crocheted chain with sc in back loops) with beads slid on before you finish each bead placement.
B. Make three cord strands
4. Repeat for three strands, optionally making the middle strand with contrasting beads or color.
C. Braid
5. Braid the three strands tightly together until you reach desired braided length. Secure ends with a knot or small crimp tube.
D. Finish
6. Attach crimps or end caps and add a clasp, or make a sliding knot closure from one cord end for adjustability.
Example math for chain length and final braid
- If each single strand needs to be ~24 in and braiding shortens length by about 25%: multiply by 1.25 to get chain length before braiding: 24 × 1.25 = ?
- 24 × 1 = 24
- 24 × 0.25 = 6
- 24 + 6 = 30 in.
So make each strand ~30 in to end up with a 24 in braided cord before hardware. Then when fitting for wrist, ensure final clasp length equals wrist measurement + ease.
Variations & styling
- Add a few focal beads at the center only for minimalism.
- Use metallic thread for one strand to make the braid shimmer.
Tips
- Waxed cotton frays less — burn or glue ends for a neat finish.
- For selling, add crimp covers to hide glue.
3. Crochet Stretch Lace Bracelet Pattern
A comfy, no-clasp stretch bracelet in lacy crochet — perfect for teens and gifts you can slip on instantly.
Skill level: confident beginner
Finished size (example): fits 7–7.5 in wrist unstretched (stretches to put on)
Materials
- Cotton/elastic blend yarn or fingering yarn plus strong elastic cord for core — ~10–20 yd.
- Elastic cord (0.5–1 mm) — long enough to circle wrist + knot.
- Hook: small to match thread.
- Optional tiny beads threaded onto elastic before crocheting.
Why this pattern
Stretch bracelets are easy to wear and eliminate the need for hardware. The lace pattern makes it look delicate despite being elastic.
Step-by-step
A. Core elastic & beading
- Cut elastic about 9 in (for a 7.5 in wrist plus knots and stretch). If you plan to crochet over the elastic rather than around it, pre-string any beads onto elastic now (use a beading needle).
B. Crochet around the elastic (tube method)
2. Tie elastic into a loose circle with a temporary knot to measure, or hold ends together with a tiny drop of glue but leave knot accessible to pull through later. Work sc stitches around the elastic: insert hook under elastic loop and sc around to create a tight tube. Work for about 4 rounds of sc to make a narrow tube base.
C. Lace round
3. Work lace round on top: ch3, skip 2, sc in next around or use a small shell pattern: sc, ch2, 3 dc in next st, ch2, sc around. The tube will hug elastic and show lace on the outside.
D. Finish
4. Weave in yarn ends through the tube and carefully knot/secure the elastic ends inside the tube, trimming excess. Use a drop of jeweler’s glue on the elastic knot and tuck into the tube to hide it.
Example math (stitch count for tube)
- If your elastic circle circumference is 7.5 in, and your crocheted tube gauge is 6 sc = 1 in, compute stitches around: 6 × 7.5 = ?
- 6 × 7 = 42
- 6 × 0.5 = 3
- 42 + 3 = 45 stitches around.
Chain not required if you’re crocheting directly around elastic; simply sc continuously until you reach ~45 sc then join and continue in rounds.
Variations
- Use two rows of beads on outer lace row for sparkle.
- Make multiple narrow lace tubes stacked (three thin bracelets worn together).
Care
- Elastic wears out over time; offer replacement elastic instructions if gifting.
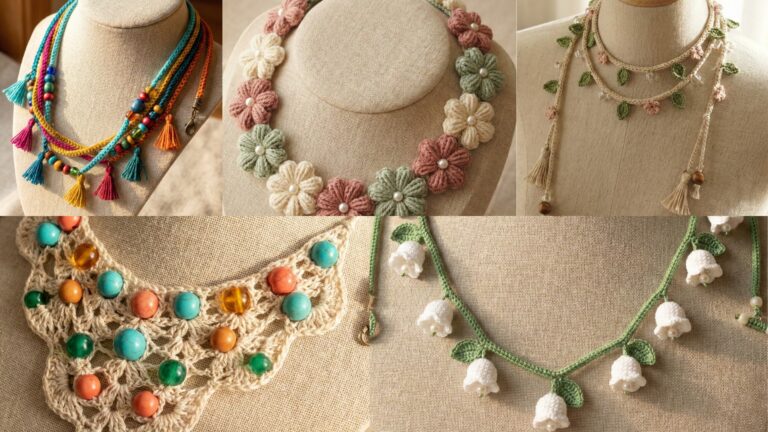
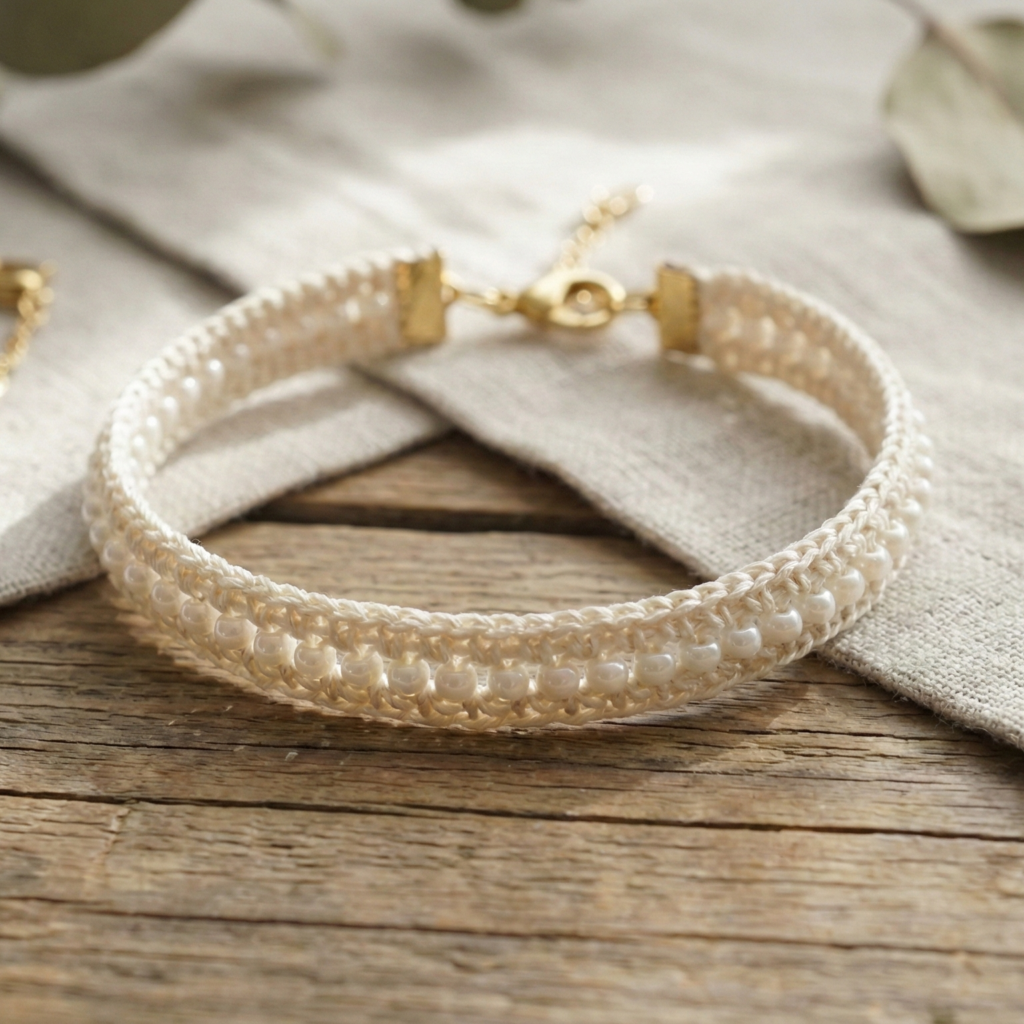
4. Crochet Red Woven Bracelet with Pearls Pattern
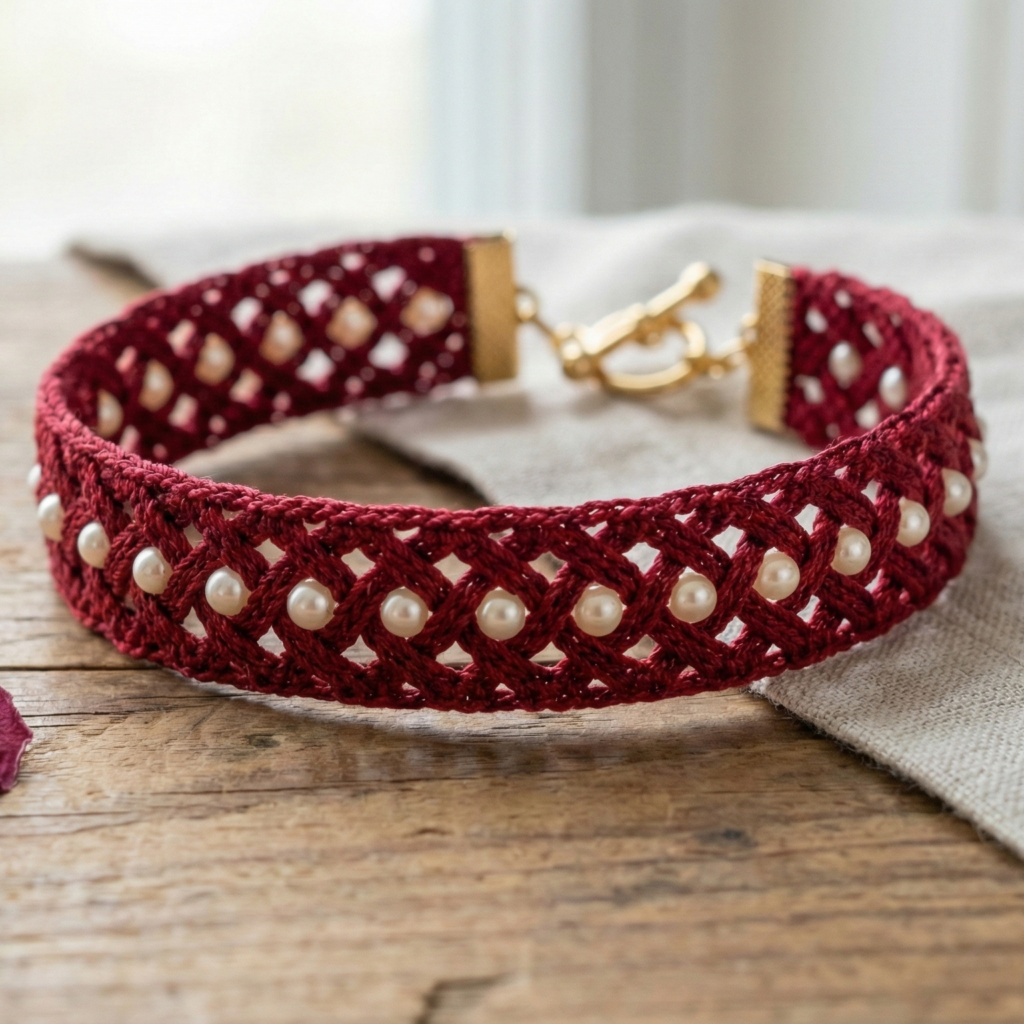
A romantic woven ribbon look with pearls — pairs beautifully with evening wear.
Skill level: intermediate (beading + neat finishing)
Finished size (example): 7.5 in with clasp
Materials
- DK cotton (main red) — small amount.
- Small glass or faux pearls (4–6 mm) — 6–10 pearls.
- Fine nylon cord (for weaving core) or thin beading wire.
- Hook: 2.5–3.5 mm.
- Small toggle or lobster clasp + jump rings.
Why this pattern
It mimics the look of ribbon and pearls woven together — classy and surprisingly simple.
Step-by-step
A. Core & pearls
- Pre-string pearls on your nylon cord or wire in the order you want them to appear along the bracelet. Place pearls spaced evenly: for 7.5 in length and 8 pearls, spacing ~0.9 in between pearls.
Example spacing math: 7.5 in total length ÷ 8 pearls = 0.9375 in ≈ 0.94 in spacing.
B. Crochet over core
2. Work a tight single-crochet tube over the cord/wire: hold cord as the center and sc around it to encase. Place a pearl on the cord where you want it and then crochet the sc so the pearl sits snugly in a small niche. Continue across.
C. Edge finishing (woven look)
3. After core tube length is done, add a decorative overlay: take the same thread and make tiny cross-stitches along the tube in a ladder pattern (like hand-sewn ribbon weaving) for the woven effect.
D. Attach hardware
4. Insert ends into tiny end caps or fold short cord ends and crimp into beads, attach jump rings and clasp.
Variations & styling
- Use ivory thread and golden pearls to vintage effect.
- Make a triple-wrap version for a layered pearl-chic look.
Troubleshooting
- Pearls slipping: make sure the pearls’ hole is snug on the cord or add a tiny knot/stop bead before crocheting over each pearl; or secure each pearl with a passing stitch of clear nylon thread before covering.
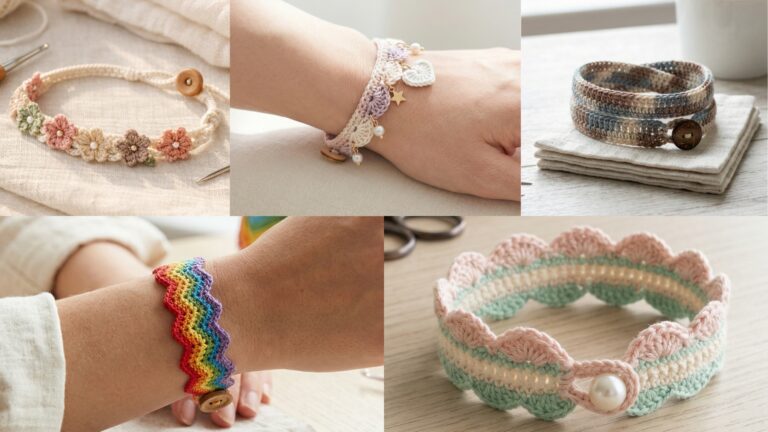
5. Crochet Floral Lace Bracelet Pattern
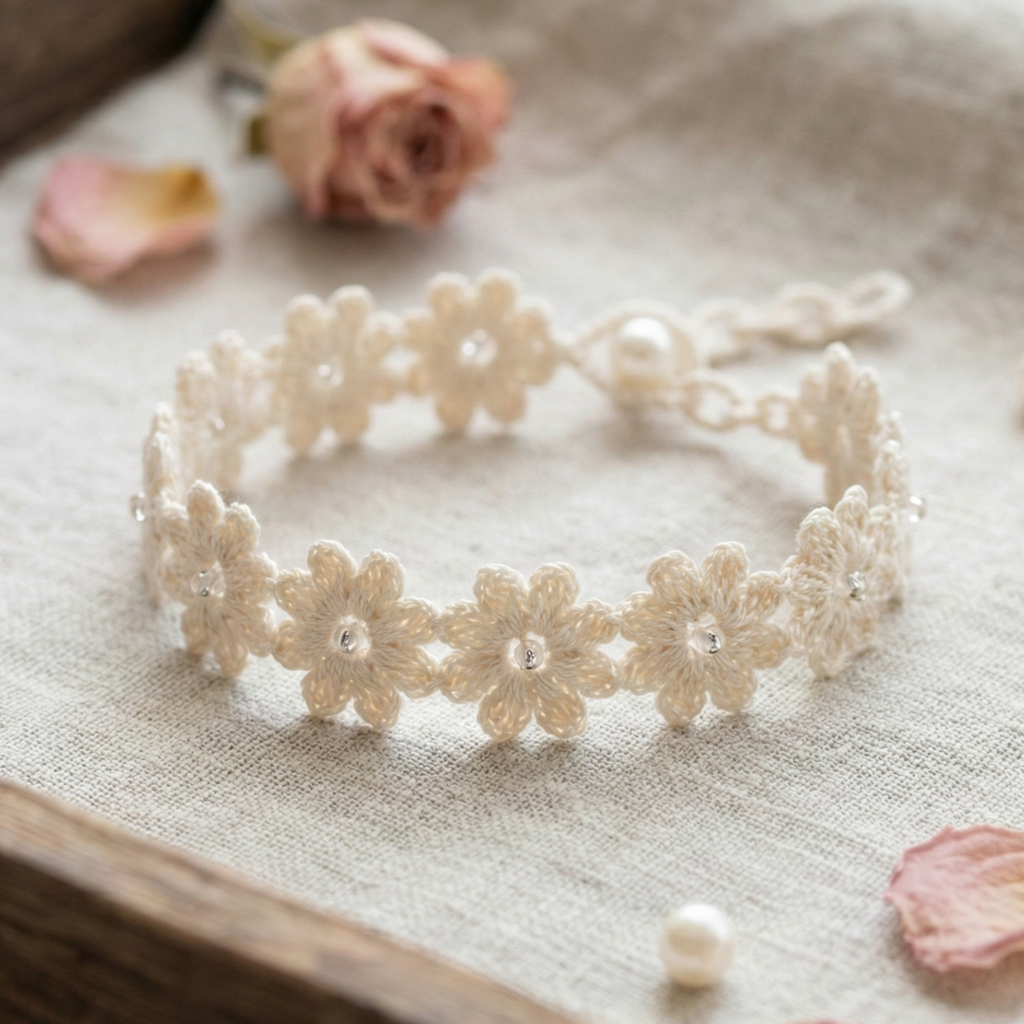
A delicate lace bracelet made of tiny floral motifs joined into a band — very feminine and perfect for bridesmaids.
Skill level: intermediate (motifs + join-as-you-go)
Finished size (example): 7.5 in long with button loop closure
Materials
- Size 10 crochet thread (or fingering yarn for larger scale) — ~20–40 yd.
- Hook: 1.75–2.5 mm.
- Tiny pearl or button for closure, small scrap of felt (optional for reinforcement).
Why this pattern
It’s romantic and lightweight; the motif approach lets you customize width and length easily.
Step-by-step
A. Make a single flower motif
- MR, ch1, 6 sc in MR; sl st to join (6).
- R2: ch3, sl st in next st around to make 6 loops — join.
- R3 (petals): in each ch3 loop work (sc, hdc, 3 dc, hdc, sc) — 6 petals. Fasten off but leave a tail for joining.
B. Join motifs
4. Make enough motifs to reach desired length plus 1 for closure: if a motif diameter is 3⁄4″ and you need 7.5 in, compute motifs = 7.5 ÷ 0.75 = ?
- 0.75 × 10 = 7.5 → 10 motifs. So make 10 motifs.
- Join-as-you-go on the last round of each new motif: when you reach a petal that should touch the neighbor, sl st into the neighbor’s petal tip instead of finishing the petal. This produces flat, pretty joins.
C. Closure
6. At one end attach a small button to the back of the motif; at the other end work a small chain loop (ch6) anchored into the motif to make a button loop. Reinforce with a drop of glue or a felt patch inside.
D. Finish
7. Weave ends and block flat so petals open nicely.
Styling
- Make a set in different colors as bridesmaid gifts.
- Add a tiny crystal bead to each flower center for sparkle.
Troubleshooting
- Motifs not lining up: ensure consistent blocking before joining and use join-as-you-go to place exactly.
6. Crochet Infinite Circles Bracelet Pattern
Linked tiny rings (infinite circles) create a repeating geometric bracelet — modern, light-catching, and slightly architectural.
Skill level: intermediate (small rings + connectors)
Finished size (example): 7.5 in long with clasp
Materials
- Fine thread or thin metallic yarn for shimmer — ~30 yd.
- Hook: 1.5–2.5 mm.
- Tiny jump rings or you can crochet small rings and join them directly.
- Clasp + jump rings.
Why this pattern
The repeating circle chain looks delicate, and making linked crochet rings is a satisfying hand-made take on metal chainmail styles.
Step-by-step
A. Make a crochet ring
- MR, ch1, work 10 sc in MR (or more for larger ring). Sl st to join and pull center closed. Fasten off leaving a tail.
- Make a second ring and while finishing the last slip stitch, join it through the first ring (or use a small jump ring to link them).
B. Chain rings
3. Repeat to create a chain of rings: each new ring should be linked through the previous ring before completing it. Continue until you reach desired length using the same math: if each ring is 5⁄8″ diameter and you need 7.5 in, compute rings = 7.5 ÷ 0.625 = ?
- 0.625 × 10 = 6.25
- 0.625 × 12 = 7.5 → 12 rings. So make 12 rings.
C. Make it infinite (2-row technique for fullness)
4. For a more 3D look, make two parallel chains and join rings laterally every other ring to create an “infinite” interlocked appearance.
D. Finish
5. Attach a small jump ring at each end and fix a clasp.
Variations & styling
- Use metallic thread for a “gold” look.
- Intermix tiny beads inside some rings for shimmer.
- Make a triple-wrap bracelet from one long chain.
Final finishing: closures, reinforcement, and care
- End caps & crimps: for thread ends that are too soft, slide the finished end into a small crimp tube or cap, crimp gently, add a jump ring and clasp.
- Knot security: use a small dot of jeweler’s glue on knots (tiny amount) and tuck into the fabric. For elastic bracelets, secure elastic knots with a dab of glue and hide inside the tube.
- Lining for strength: when using very thin thread and heavy beads, consider a thin nylon core or beading wire inside a crocheted tube.
- Care: hand wash delicate bracelets in cool water; lay flat to dry. Avoid water for leather, wooden beads, or dyed stones.
- Packaging: wrap on a small bracelet card or tuck into a velvet pouch for gifting.
conclusion
You now have six fully detailed crochet bracelet patterns: from delicate (Turk Beaded, Floral Lace) to modern (Infinite Circles, Braided Beaded Cord), from comfy everyday (Stretch Lace) to elegant (Red Woven with Pearls) — each with step-by-step guidance, digit-by-digit math examples, finishing tips, and variations so you can adapt designs for different wrists and tastes.