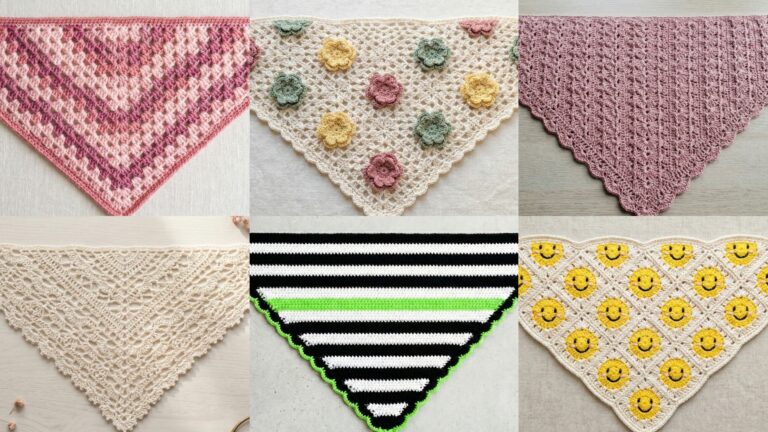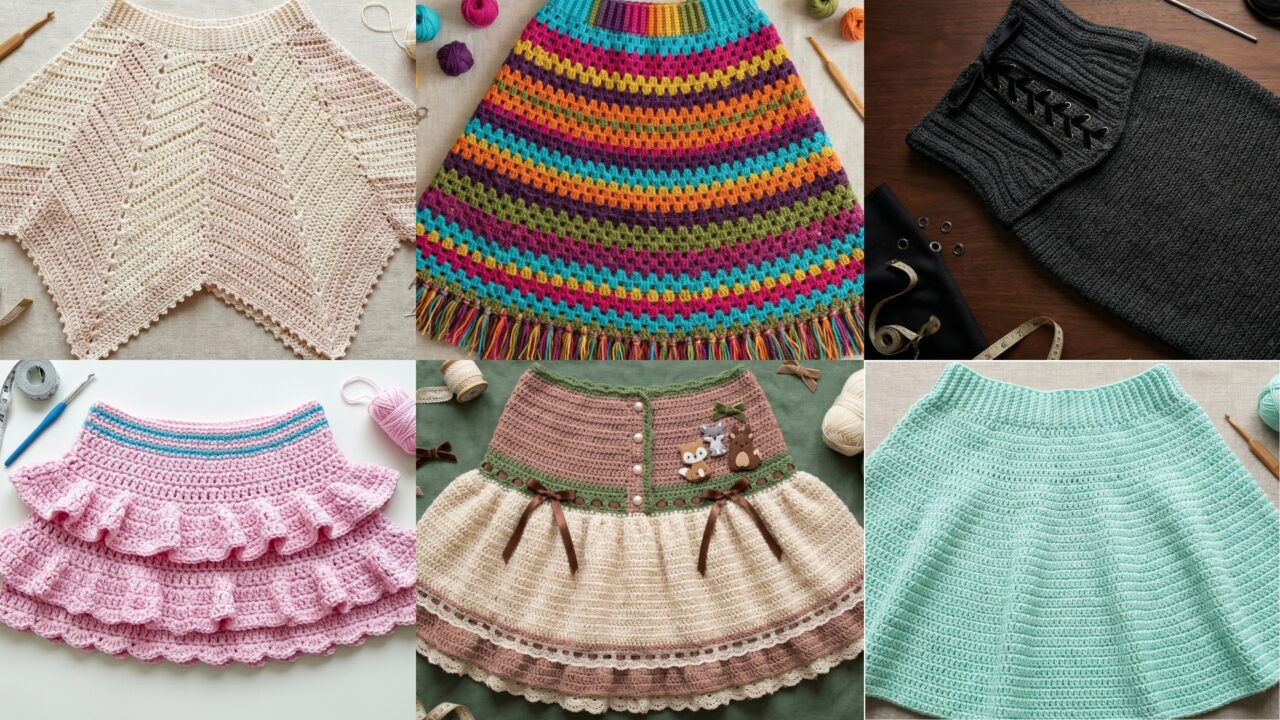
Crochet skirts are wonderfully versatile: they can be lightweight and breezy for summer, textured and cozy for cooler months, or layered and structured for an elevated look. Below you’ll find a single, practical introduction that covers yarn, hooks, measuring and sizing, shaping and grading, stitch choices and construction approaches. After that are six fully developed pattern blueprints — Skater Skirt, Easy Mini Ruffled, Granny Striped Festival Skirt, Handkerchief Skirt, Hidden Forest Lolita Mini, and Sucre Corset Crochet Skirt — each with skill level, sample materials, clear step-by-step construction method, grading notes (how to size up/down), finishing tips, variations and care. The language is direct and practical so you can paste these into your blog post.
yarn, hooks, measuring, sizing, construction approaches and abbreviations
Choosing yarn & hook
- Warm-weather skirts: choose DK / sport weight cotton, cotton blends, linen blends or bamboo for drape and breathability.
- All-season / structured skirts: choose worsted / aran weight (wool blends or acrylic blends) for body and warmth.
- Drape vs structure: lighter yarn + larger hook → softer drape; heavier yarn + smaller hook → firmer structure.
- Hook sizing: start with the yarn label’s recommendation; typical ranges used below: 3.5–5.5 mm. Always swatch.
Measuring & choosing finished size
- Waist measurement: measure natural waist (narrowest point) or where you want the skirt to sit.
- Hip measurement: measure the fullest part of the hips.
- Desired skirt length: measure from the waist (or placement) down to the hemline you want (mini, knee, midi).
- Ease: decide how much wearing ease you want at the waist and hips. Elasticized waistbands may require 0–2 in negative ease (snug to hold elastic), while pull-on or fitted corset skirts require accurate waist measurement + 0–1 in ease. For skirts with flared shaping, add hip ease 2–6 in depending on style.
Body shaping & waistband options
- Elastic waist (fast to make): crochet a band that holds elastic casing or top a single crocheted band and insert elastic. Good for quick sizing.
- Drawstring waist: crochet band with casing or use crochet ties through eyelets. Adjustable and forgiving for sizing.
- Fitted / yoke shaping: make fitted yoke at waist/hips with increases/decreases for shaping (great for skater, corset skirt).
- Panel or circular construction: skirts can be worked in the round (seamless tube) or as panels sewn together (good for panels, handkerchief hems, granny panels).
Grading across sizes (quick rules)
- Use your gauge (stitches per inch) to calculate the waist foundation:
foundation sts = desired waist circumference × stitches per inch
Round to the stitch multiple required by the stitch pattern (e.g., waffle repeat multiple of 3). - For vertical grading (length) multiply rows per inch by desired length.
- For flared skirts, add increments by increasing spacing between increases every few rounds.
Stitches & texture suggestions
- Stable body stitches: single crochet (sc), half double crochet (hdc), and double crochet (dc) give predictability.
- Textured options: waffle stitch, popcorn, puff, cables (post stitches) add thickness and visual interest.
- Lacy/airy options: shells, fans, V-stitch, filet and mesh for summery skirts.
- Motif construction: granny squares, motifs, and tapestry colorwork for festival/retro styles.
Abbreviations (US)
- ch — chain
- sc — single crochet
- hdc — half double crochet
- dc — double crochet
- tr — treble crochet
- fpdc / bpdc — front / back post double crochet
- sl st — slip stitch
- st(s) — stitch(es)
- inc — increase (2 sts in same st)
- dec — decrease (sc2tog etc.)
- MR — magic ring
- RS / WS — right side / wrong side
1. Crochet Skater Skirt Pattern
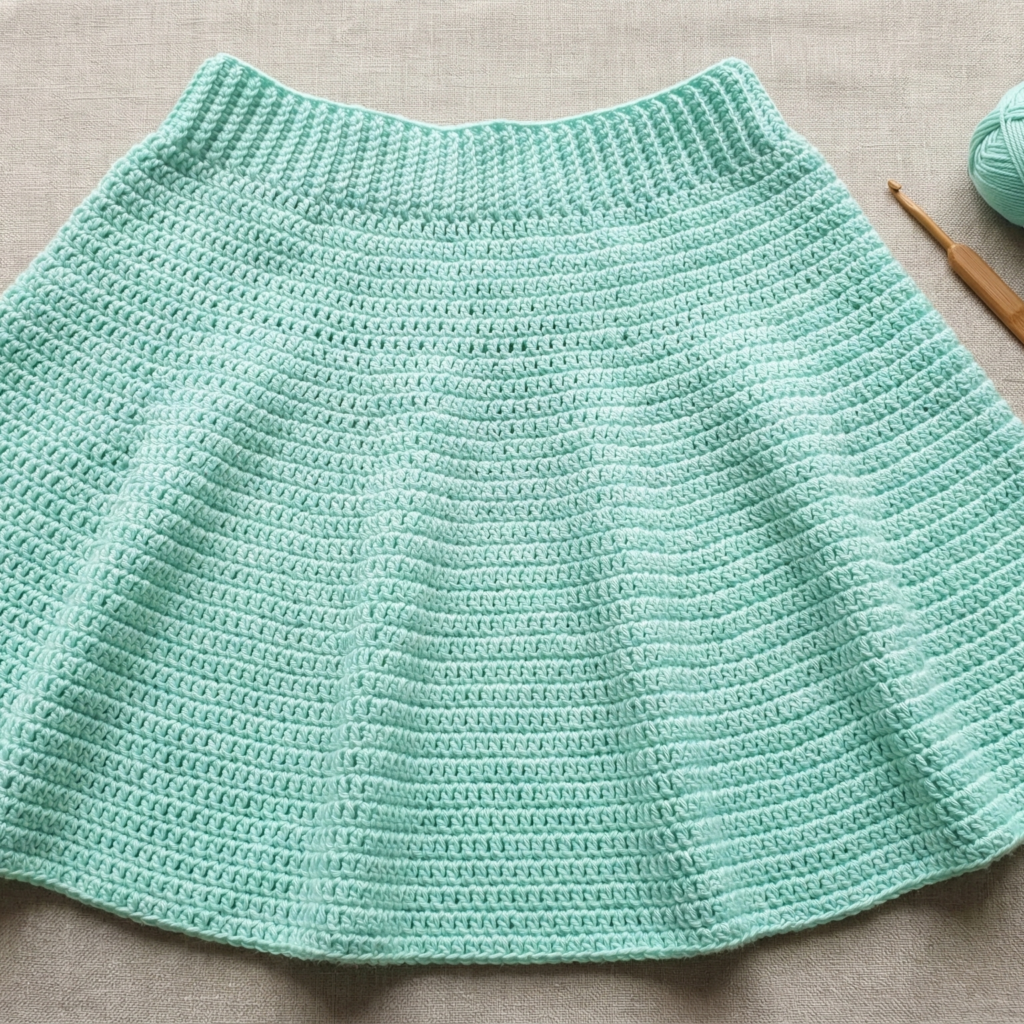
Vibe & use: Flattering, fitted at the waist with a gently flared body — great for casual wear and movement.
Skill level: Confident beginner → intermediate (basic shaping and working in the round)
Materials (sample for waist 28 in, finished length 16 in — mini to above-knee)
- DK yarn (cotton or cotton blend): ~700–900 yd depending on flare.
- Hook: 4.0 mm (adjust to get stated gauge).
- 1 in wide elastic for waist (optional), tapestry needle, stitch markers.
Sample gauge (illustrative): 18 hdc = 4 in in the round (blocked). Use your own swatch to calculate.
Construction overview
- Waistband (fitted yoke) worked in the round using hdc for a firm fabric. Option to make a drawstring casing or to crochet a band that holds elastic.
- Hip shaping by increasing evenly for two to three rounds to accommodate hips.
- Skirt body: add flared rounds using increases (for a soft A-line) and then work even rounds for length. Optionally add textured rounds for interest.
- Hem: tidy with a round of sc and optional picot or shell edging.
Step-by-step (waist 28 in sample)
A. Prepare
- Swatch hdc in the round to determine stitches per inch (spi). Example spi = 4.5 hdc/in. For 28 in waist: 28 × 4.5 = 126 sts (round to nearest multiple appropriate for stitch repeat). If using 4-stitch repeat, use 128 sts.
B. Waistband / yoke
- Ch 128, join carefully to work in the round (or foundation hdc 128). Place marker.
- Rounds 1–6: hdc in each st. This forms a stable waist band ~1.5–2 in tall. Try on and adjust. If you plan to insert elastic, leave a 1 in gap in the inside of band or create a casing by working BLO rows for the inner edge.
C. Hip shaping
3. To shape for hips, work two increase rounds: Round A: hdc 15, inc repeat around (this adds 1 increase every 16 sts); Round B: even rounds hdc to distribute—try to end with around 140–150 sts depending on desired ease.
D. Flare & body
4. For a gentle skater flare, increase by 6–8% over the next 4–6 rounds distributed evenly: e.g., Round X: hdc 10, inc repeat. Continue similarly until you reach desired hip fullness (measure hem circumference). For more dramatic skate, increase more frequently.
5. After achieving skirt circumference, work even rounds (hdc or switch to dc for quicker height and more drape) until skirt reaches 16 in length (or desired length) from waist.
E. Hem & finish
6. Work one round of sc for stability, then a decorative shell or picot round if desired: skip 1, 5 dc in next, skip 1, sc around for a soft scallop. Weave in ends. Block lightly if needed.
Grading tips
- For smaller sizes: reduce foundation sts based on gauge; for larger sizes: add repeat multiples and more increases at hip shaping. For a highly flared skater, add increases every 4–6 rounds instead of 8.
Variations
- Pleated skater: form shallow vertical pleats by working alternating shorter and longer segments (work sc panel then dc panel) or by gathering with slip stitches.
- Two-tone: change color at hip line or at hem.
Fit & finishing notes
- If you want a firm top without sewing in elastic: make waistband with ch length equal to waist minus ~1.5 in and work tightly (negative ease) so it grips. Alternatively create a casing: fold inner edge of waistband to the inside and stitch leaving 1 in opening to feed elastic.
2. Crochet Easy Mini Ruffled Skirt Pattern
Vibe & use: Playful mini skirt with ruffled tiers — fast to knit/crochet and great for layering over tights or for festival wear.
Skill level: Confident beginner (working tiers and gathering)
Materials (sample waist 26–30 in, length 14 in)
- Sport/DK cotton or acrylic for body and contrast for ruffle — ~800 yd.
- Hooks: 3.75–4.5 mm.
- Elastic for waistband (optional), tapestry needle, measuring tape.
Construction overview
- Elasticized waist comfortable fit. Work a simple band with a crochet-covered elastic or a fabric elastic casing.
- Tiers: Work two or three gathered tiers; each tier is worked wider than the one above to create ruffles. Gather by increasing stitches or by crocheting wider panels and attaching with gathering stitches.
Step-by-step (3-tier sample)
A. Waistband
- Decide on waist elastic length (example 26 in for small). Crochet a band wide enough to fold over: Ch = number of stitches for 26 in × spi. Rounds 1–6: sc in the round, working tightly (or use BLO ribbing for elasticity). Fold band inward and slip-stitch to create a casing leaving a small gap to insert elastic. Insert elastic and sew ends together. Close gap and continue.
B. First tier (upper)
2. Pick up stitches around bottom of waistband by evenly placing single crochet stitches around casing seam. Work 6–8 rounds in sc or hdc for an upper base (not too flared).
C. Ruffle construction
3. For each ruffle tier, you want the next panel to be about 1.5–2× the width of the top edge for a full ruffle. For example if upper panel has 120 sts, chain the foundation for the next panel to be 240 sts (or increase during the first round with 2 inc in every stitch). Work in rows or join in the round to create a panel of desired height (5 in for each ruffle).
4. Attach lower edge of panel to top edge using gathering stitches: either (A) sew it in with running stitches while pulling to gather evenly, or (B) join by working slip stitches with increases to ease fullness: sl st into next 2 sts of lower panel, sl st into next st of upper edge etc., distributing ease.
D. Repeat for subsequent tiers
5. Add a second ruffle panel (larger width) and attach to the bottom of the first ruffle. Keep proportions pleasing (top ruffle narrower, bottom ruffle fullest).
E. Hem
6. For prettiness, add a picot edge or tiny scallops: sc, ch3, sl st into sc around lower edge.
Grading & fit
- Shorten tiers for less volume; lengthen for midi skirts. For plus sizes, increase width ratio to keep ruffles proportional (2.5× width at bottom for dramatic look).
Variations
- Asymmetric ruffles: make ruffle lengths vary for a playful, layered look.
- Lace tier: make one tier in a lacy stitch (shells) to add texture.
Finishing tips
- Use a matching thread to sew elastic ends securely (many passes).
- Block tiers lightly to open lace; press gently if cotton.
3. Crochet Granny Striped Festival Style Skirt Pattern
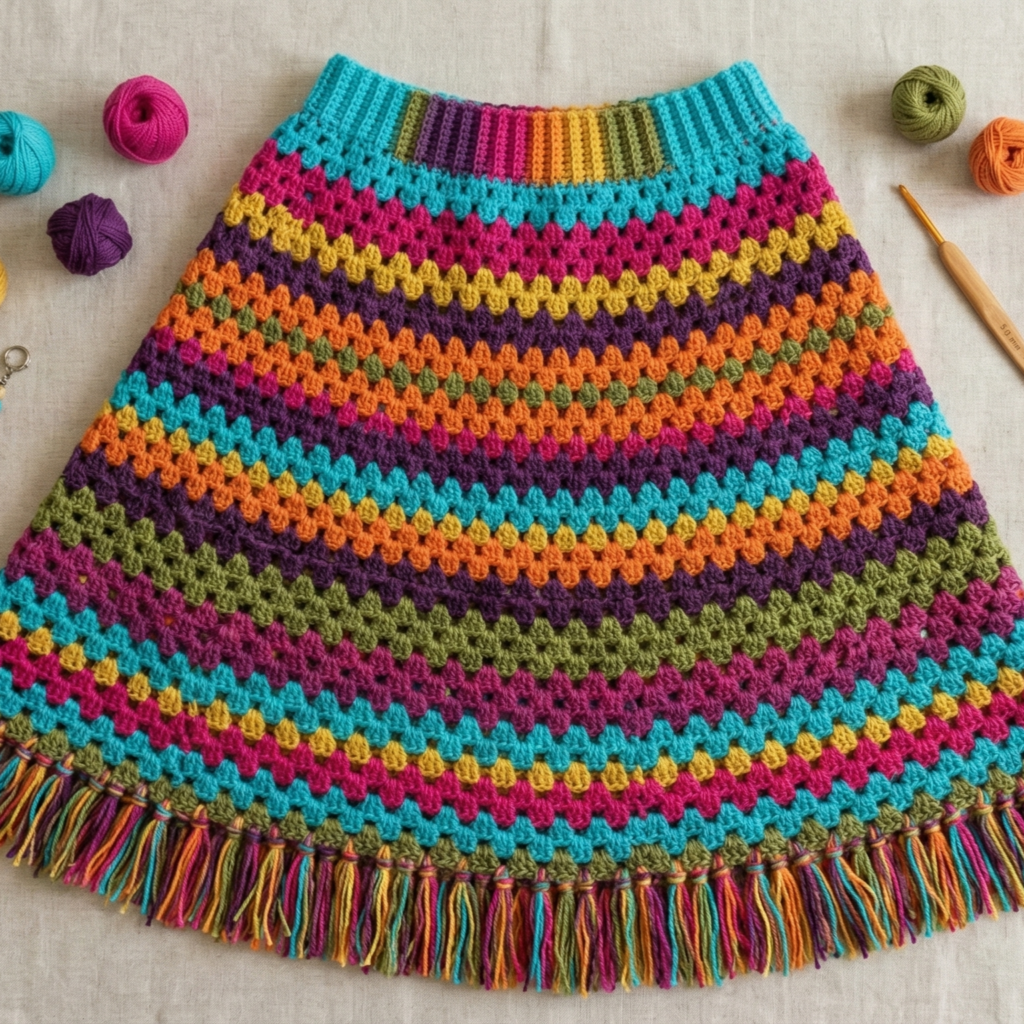
Vibe & use: Boho festival skirt built from horizontal granny stripe panels or joined granny motifs — colorful, scrap-friendly, and customizable.
Skill level: Confident beginner (granny squares/stripe joins + panel assembly)
Materials (sample waist 28 in, length 18 in)
- DK yarn in multiple colors (scraps accepted): ~1000–1400 yd.
- Hook: 4.0–5.0 mm (use larger hook for drapier granny).
- Elastic for waistband, tapestry needle, stitch markers.
Construction overview
- Option A: work horizontal granny stripe panels in the round (rows of granny clusters).
- Option B: make full granny squares/rectangles and join into a skirt shape. Option B gives retro look.
Step-by-step — horizontal granny stripes (Option A)
A. Waistband
- Crochet waistband as in Skater Skirt (elastic casing or ribbed band) to desired waist measurement.
B. Granny stripe body
2. Attach yarn and work rounds of granny clusters around waist: a classic granny cluster = (ch2, 3 dc) in space pattern. Example Round: [3 dc cluster, ch2] repeat across join spaces. Build rounds until you have ~6–8 rows of granny clusters — this becomes the first band.
C. Color changes & length
3. Change color every 2–4 rounds for stripes. Continue building bands until skirt length reaches 18 in. If you want a fuller festival skirt, increase by doing an increase round (work 2 clusters in one space) every 6–8 rounds to add flare.
D. Hem
4. Finish with a lacy shell or a short fringe for festival vibe: ch5, sl st to form loop or add a 2–3 in fringe of yarn tails every 3–4 sts.
Option B — motif assembly (granny squares)
- Make large granny squares (approximately 7–9 in square) in desired colors. Arrange into rows that wrap around the hips; join squares with slip-stitch or mattress stitch for a neat look.
- Add a waistband by crocheting into top edge across, fold and create casing for elastic.
Grading & fit
- For larger hips add extra squares in circumference or add more horizontal granny bands. For smaller sizes reduce repeats.
Variations
- Fringe hem: attach fringe for bohemian feel.
- Beaded fringe: add beads to some fringe ends for movement.
Finishing
- Weave in ends and block squares before joining to maintain straight seams. Use a strong join for durability.
4. Crochet Adorable Handkerchief Skirt Pattern
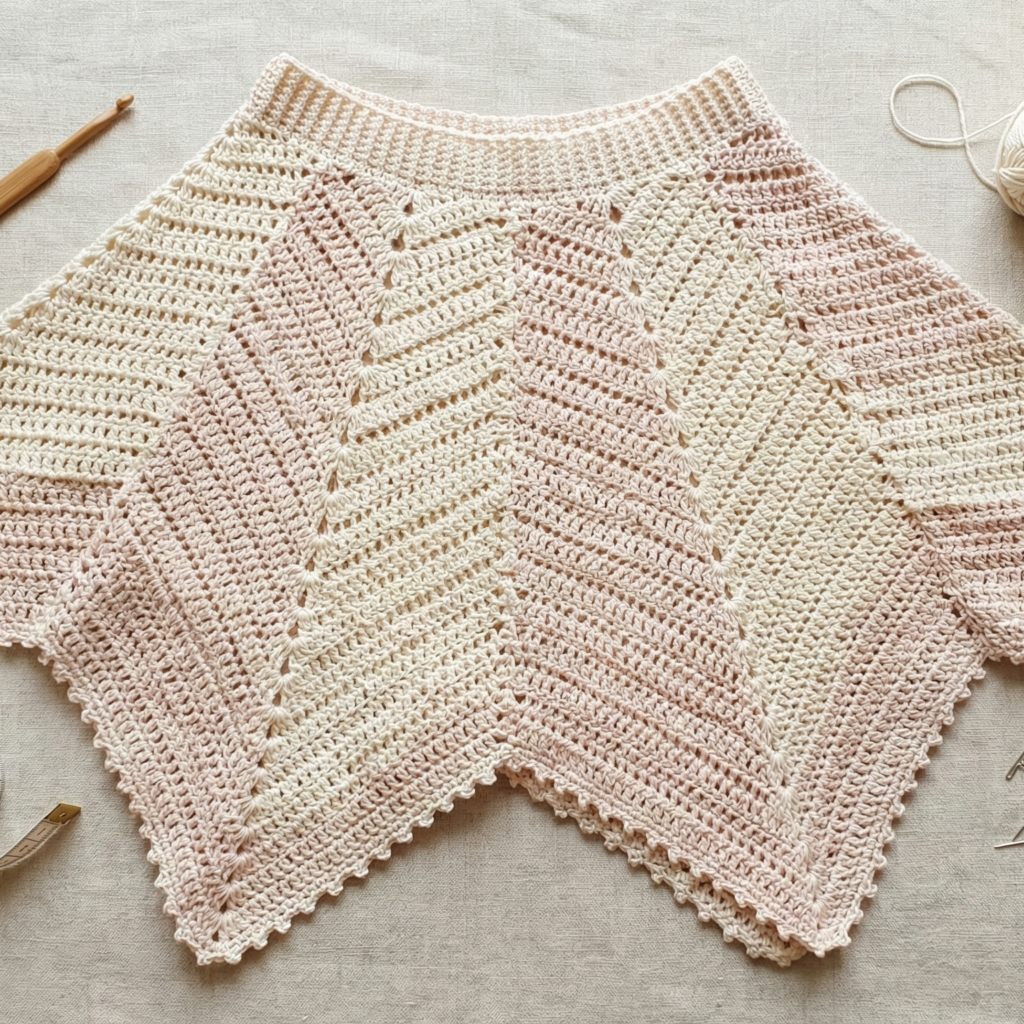
Vibe & use: Romantic, asymmetric hem (handkerchief points) built from panels or a flared circle with strategic decreases to form points. Light and ethereal for summer or overlay looks.
Skill level: Intermediate — planning points and even tapering needed
Materials (sample waist 26–32 in; knee-length)
- Sport-weight cotton or linen-blend for flow: ~900–1200 yd.
- Hook: 3.5–4.5 mm.
- Elastic or drawstring waist, tapestry needle.
Construction overview
- Construction options: make a circular skirt and cut/shape points by creating alternating longer and shorter segments, or assemble triangular panels (4–8 panels) with pointed hems. Panels are easiest for consistent points.
Step-by-step — 8-panel construction (reliable method)
A. Measure & compute
- Determine waist foundation as before and decide number of panels (8 gives 8 points). For waist 28 in with 8 panels: each panel top width = 28 ÷ 8 = 3.5 in (in stitches = 3.5 × spi).
B. Make one panel
2. Chain foundation for panel top width (stitches = inches × spi). Work panels in rows (flat) increasing at side edges to create A-line shape. For triangular panels, increase 1 st at each end every 6–8 rows to shape the panel outward. Work each panel to desired panel height (measured from waist to longest point), but for a handkerchief effect make the center of each panel slightly shorter — you will alternate long and short panels: make four panels at long length (L) and four panels at slightly shorter length (S) to create alternating points.
C. Assemble panels
3. Block panels flat. With RS facing, seam panels together (L next to S) until you form a ring. Attach waistband: pick up stitches around top edge and work a folded casing or rib band with insert for elastic.
D. Hem & shaping
4. After seaming, the hem will show handkerchief points — tidy with an edging (shell or picot). A lightweight skirt benefits from a narrow rolled hem or small sc round to keep points crisp.
Grading & fit
- Adjust number of panels for more/less dramatic points. For fuller skirt, increase panel width or make more panels. For slimmer look reduce increases per panel.
Variations
- Add lace insertion panels (mesh stitches) for airy look.
- Use variegated yarn for soft ombré effect on points.
Finishing
- Block each panel to exact measurements, join with small invisible seams, hide elastic in casing.
5. Crochet Hidden Forest Lolita Styled Mini Skirt Pattern
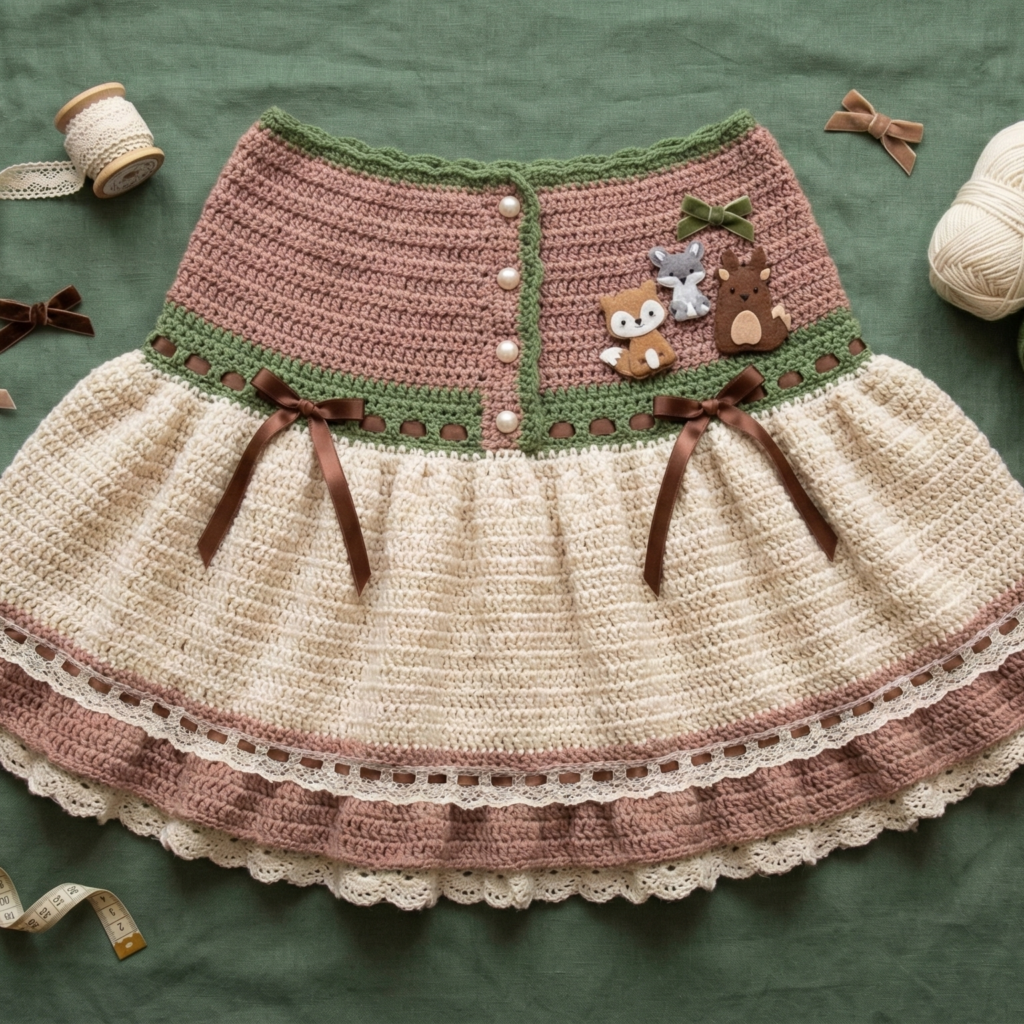
Vibe & use: Lolita-inspired mini with soft flounce, clip-on doll-like silhouette, decorative yoke and optional lace edge — cute, structured enough to hold a shape but feminine.
Skill level: Intermediate (shaping yoke, layered trims, optional decorative corsetry)
Materials (sample waist 24–30 in, length 14 in)
- Worsted or DK blend for body plus matching lace yarn for trim — ~900 yd.
- Hooks: 3.5–4.5 mm for body, 2.75–3.25 mm for lace trim.
- Light interfacing or tulle (optional) for underskirt to hold shape, elastic or structured waistband, tapestry needle, decorative buttons or bows.
Construction overview
- Structured yoke that sits fitted at waist, often with vertical shaping or paneling.
- Flared skirt attached to yoke with gathered edge for fullness.
- Optional underskirt (tulle or light interfacing) to hold the flared doll silhouette.
- Decorative trims: ruffles, lace, ribbons and bows.
Step-by-step (classic doll silhouette)
A. Yoke
- Decide on yoke height (3–4 in). Work fitted yoke in the round with hdc for stability using decreases or increases to achieve waist measurement with slight negative ease (so bodice stays in place). If you want corset effect add vertical columns of fpdc/bpdc for subtle shaping.
B. Skirt attachment & gathering
2. After yoke, the skirt is attached: pick up stitches around lower edge or join separate skirt panel. For gathering, make the skirt panel wider than yoke circumference (1.5–2×) depending on desired fullness. Work skirt panel in rows or rounds using dc or shell stitch. Gather evenly and join to yoke so fullness distributes.
C. Petticoat/Underskirt (optional)
3. For authentic Lolita silhouette, add a lightweight petticoat: layer 1: narrow tulle ruffles sewn to a simple elastic band; layer 2: attach petticoat to skirt inner seam with small stitches so it doesn’t shift.
D. Trim & decoration
4. Add ruffled hem: ch3, 4 dc in same st across to create short scallops. Adorn with ribbon, small bows or removable detachable bows attached by a small snap/button.
Grading & fit
- Cute dolly silhouette works best at shorter lengths; for larger sizes increase panel width ratio to maintain shape without being overly full.
Variations
- Buttoned yoke with faux-button row down front for a vintage flair.
- Convertible look: add detachable lapel-like bow belt to switch silhouette.
Finishing
- Stitch decorative elements securely. If attaching tulle, hand-sew to hide stitches and avoid bulk. Press lightly if allowed by fiber.
6. Crochet Sucre Corset Crochet Skirt Pattern
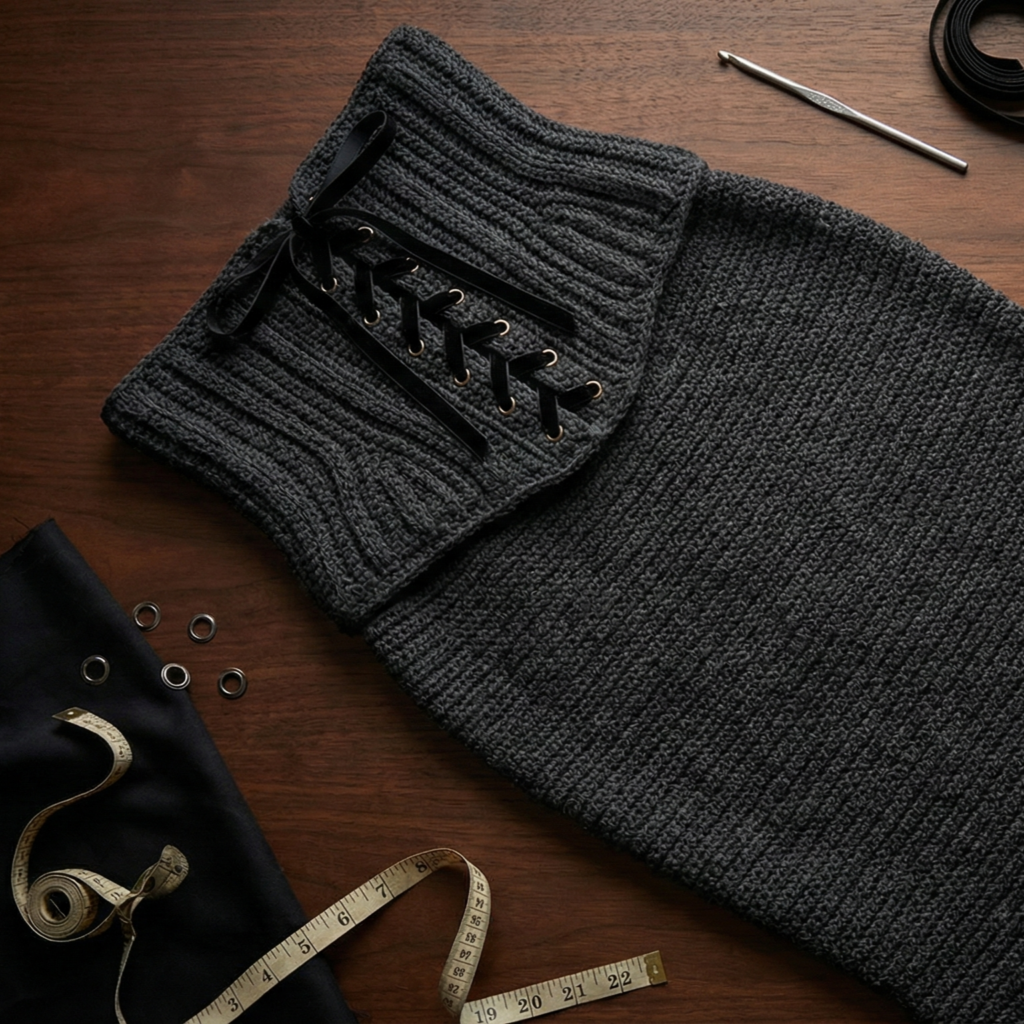
Vibe & use: Svelte, waist-focused skirt with corset-style yoke and a pencil/mermaid flare — a more tailored, statement piece.
Skill level: Advanced (corset shaping, lacing, structured fabric)
Materials (sample waist 26 in, pencil length 20 in)
- Worsted yarn with some elasticity (wool blend, wool/nylon, or acrylic blend): ~1100–1500 yd.
- Hook: 3.5–4.5 mm depending on comfort & gauge.
- Strong interfacing or lightweight lining, eyelets/grommets for lacing, cord or ribbon for corset ties, tapestry needle.
Construction overview
- Fitted corset yoke with built-in shaping (short rows, vertical panels, or post-stitch columns for shaping).
- Skirt body either straight pencil or with subtle flair at hem (mermaid) achieved with strategic increases or added panel.
- Lacing & boning (optional): for real corset feel add plastic boning channels sewn into lining (only if you have experience; otherwise decorative lacing is sufficient).
Step-by-step (corset-slim pencil sample)
A. Waist & corset yoke
- Take precise waist, high hip and low hip measurements. Decide corset height (top of yoke to hip). For a classic look, make yoke 6–8 in tall.
- Work yoke in vertical panels: create right and left front panels and back panel with increases/decreases to match waist curvature (decrease under bust/waist, increase at hip). Alternatively work yoke as tube and shape with short rows at front/back to create hourglass. Use post stitches (fpdc/bpdc) vertically to mimic corset ribs.
B. Lacing channel
3. At the back of yoke, leave a lacing gap: either work a panel with eyelets (ch holes) or install metal eyelets after assembly. Create reinforced band by working several rounds of sc for durability.
C. Skirt body
4. Once yoke fits well, pick up stitches and work fitted skirt down to knee area (work even hdc or dc in the round for pencil). For mermaid flair, start subtle increases at knee level — e.g., increase 2–4% per round over several rounds to create a gentle flare. For a fuller mermaid, add flared panels in shell stitch.
D. Lining & finishing
5. For a proper corset-feel, apply a lightweight lining or interfacing in yoke area; sew channels if you plan to include boning. Add lacing cord/ribbon through eyelets and test fit. For safety and comfort, avoid too rigid boning unless you are experienced in corsetry and the wearer is aware.
Grading & fit
- This skirt requires accurate waist and hip shaping. For grading size up, add extra stitches to panels proportionally; adjust boning channels and eyelets positions.
Variations
- Shorter corset waist with detachable belt for versatility.
- Gothic or romantic versions with lace insets and scalloped hems.
Finishing
- Secure all eyelets thoroughly. Provide care instructions: gentle hand wash and reshape; for lined corset pieces, consider dry clean depending on yarn and structure.
Conclusion
Fit & toile-first approach
- For fitted styles (skater yoke, corset): make a small test yoke or toile using inexpensive yarn to check fit before investing time/expensive yarn. Minor fit changes at yoke stage are much easier.
Blocking & shaping
- Always block cotton and linen-blend skirts to get consistent hemlines and flare. For structured pieces, lightly steam and pin to shape; for delicate lacy skirts, blocking is essential.
Seams & durability
- Use mattress stitch or slip-stitch join for panels for a flat seam. Reinforce the waistband region with extra rows or folded casing before inserting elastic. Use a strong upholstery or button thread to sew in elastics or eyelets.
Care & labeling
- Provide care instructions with any pattern or finished item: fiber-specific (e.g., “100% cotton — machine wash gentle, tumble low or lay flat to dry”). For corset/boned parts recommend hand wash or professional cleaning depending on the lining.
Photography & styling tips for your blog
- Show a fit gallery: flat lay, mannequin worn shots, close-ups of textures, and a movement shot (walk or twirl) for flared skirts.
- Include measurement chart and short fitting guide in the post (how to measure waist/hips/desired length).
- For Pinterest / social, create vertical images highlighting silhouette and key details (yoke, hem, texture).
Final encouragement
Each of these skirts can be made unique by your yarn choice, color palette, and trims. Start with the sample sizes and adjust using the supplied grading rules — partial fitting during yoke construction saves time — and don’t be afraid to experiment with lace panels, trims, or linings to make a truly personal garment.