

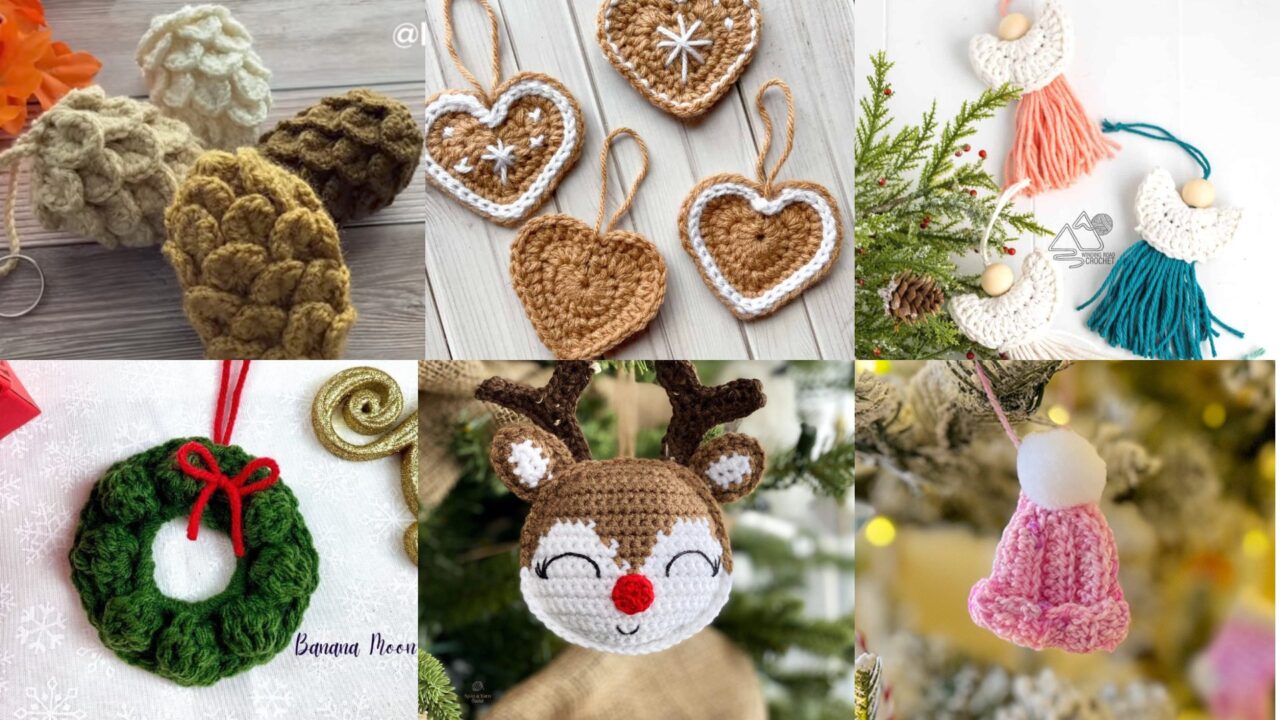
Crochet ornaments are perfect small projects — excellent for using yarn scraps, practicing tiny techniques, and making meaningful small gifts. This guide gives you both single-method recipes for fast, consistent results and alternate techniques for speed, child safety, or extra polish (felt, wire bases, sewn scales, glued “Decoden” style). Mix and match methods to suit your time, materials, and audience.
1. Rudolph Ornament Crochet Pattern

Skill level: Beginner → Intermediate
Finished size: ~3–4″ tall (depends on yarn/hook)
Stitch methods used: Amigurumi continuous rounds for head and muzzle; simple chain antlers or felt antlers option.
Materials
- Worsted weight yarn: brown (main), beige (muzzle), red (nose), small bit of black (mouth/eye embroidery)
- Hook 3.5–4.0 mm
- Polyester stuffing, tapestry needle, stitch marker
- 6 mm safety eyes (or use embroidered eyes for child-safe ornament)
- Ribbon for hanger
- Optional: felt sheet for antlers (brown), hot glue or sewing needle
Option A — Amigurumi Rudolph (crocheted antlers)
Head (worked in continuous rounds)
- Magic ring, 6 sc. (6)
- Rnd 2: inc around → 12.
- Rnd 3: sc 1, inc → 18.
- Rnd 4: sc 2, inc → 24.
- Rnds 5–8: sc around (work more rounds if you want a larger head). Place safety eyes between Rnds 6–7 about 6–8 sts apart (or embroider eyes later).
- Rnd 9: sc 3, dec → 24.
- Rnd 10: sc 2, dec → 18.
- Rnd 11: sc 1, dec → 12. Stuff firmly.
- Rnd 12: dec around to close. Fasten off and weave tail through remaining stitches; pull closed and secure.
Muzzle
- Magic ring, 6 sc.
- Rnd 2: sc, inc around → 9. Work 1 round sc. Lightly stuff. Sew centered to lower front of head.
Nose
- Red: magic ring, 6 sc; fasten off leaving tail. Sew to muzzle center.
Antlers (make 2)
- Ch 8. Sc in 2nd ch and next 3 ch (4 sc). Ch 3, sl st to base to create a small fork; repeat for second small prong. Fasten off leaving tail and sew antlers to top of head.
Finishing
- Embroider mouth with dark yarn. Sew a ribbon loop at top between antlers. Weave and hide ends.
Option B — Quick felt antlers (fast)
- Cut antler shapes from felt (simple Y-shape).
- Sew or glue felt antlers to top of head. This is faster and neat for gift batches.
Variations & tips
- Add a tiny jingle bell under the chin or a felt scarf for a full set. For baby-safe ornaments, embroider eyes and avoid glued pieces; secure all parts with multiple thread passes.
2. Mini Beanie Christmas Ornament Crochet Tutorial
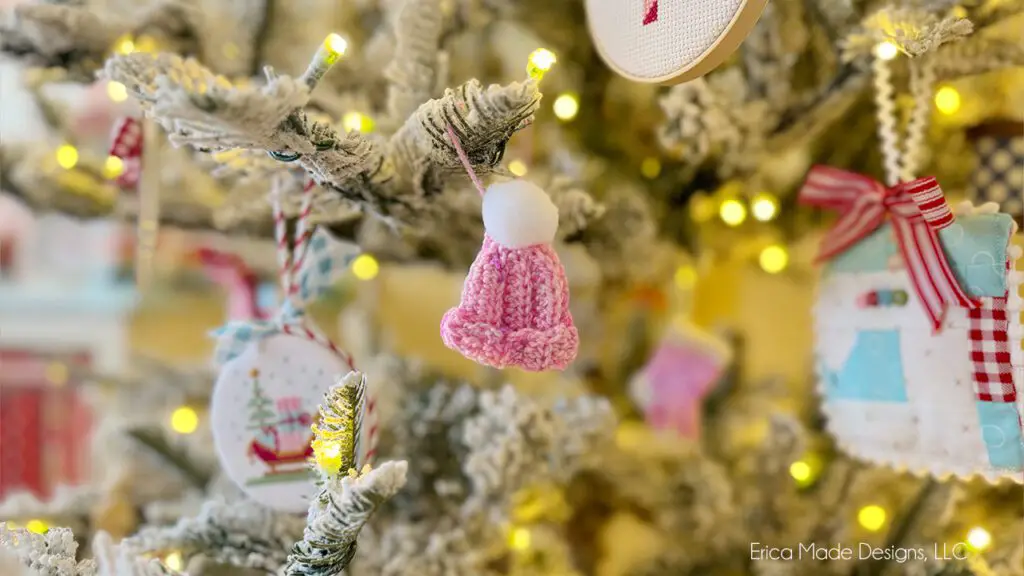
Skill level: Beginner
Finished size: ~2–3″ (beanie)
Stitch methods used: Magic ring crown increases + sc rounds; BLO for cuff; pompom or yarn pom option.
Materials
- DK yarn main + contrast, hook 3.5–4.0 mm, small pompom, tapestry needle, ribbon.
Pattern (single-method beanie)
- Crown: MR, 6 sc. (6)
- Rnd 2: inc in each st → 12.
- Rnd 3: sc, inc → 18.
- Rnd 4: sc2, inc → 24.
- Rnd 5: sc3, inc → 30. Continue increasing rounds until crown diameter ≈ 1.5–2″ depending on yarn.
- Work sc rounds until hat height ≈ 2″.
- Switch to contrast color and work 2 rounds sc in BLO for folded-look cuff. Fasten off.
- Attach pompom and sew a short ribbon loop inside crown for hanging.
Variations
- Stripes — change color every 2 rounds.
- Tiny applique (snowflake) embroidered onto the cuff.
Finishing
- Fluff pompom; weave in ends and trim.
3. Crochet Wreath Ornament Pattern
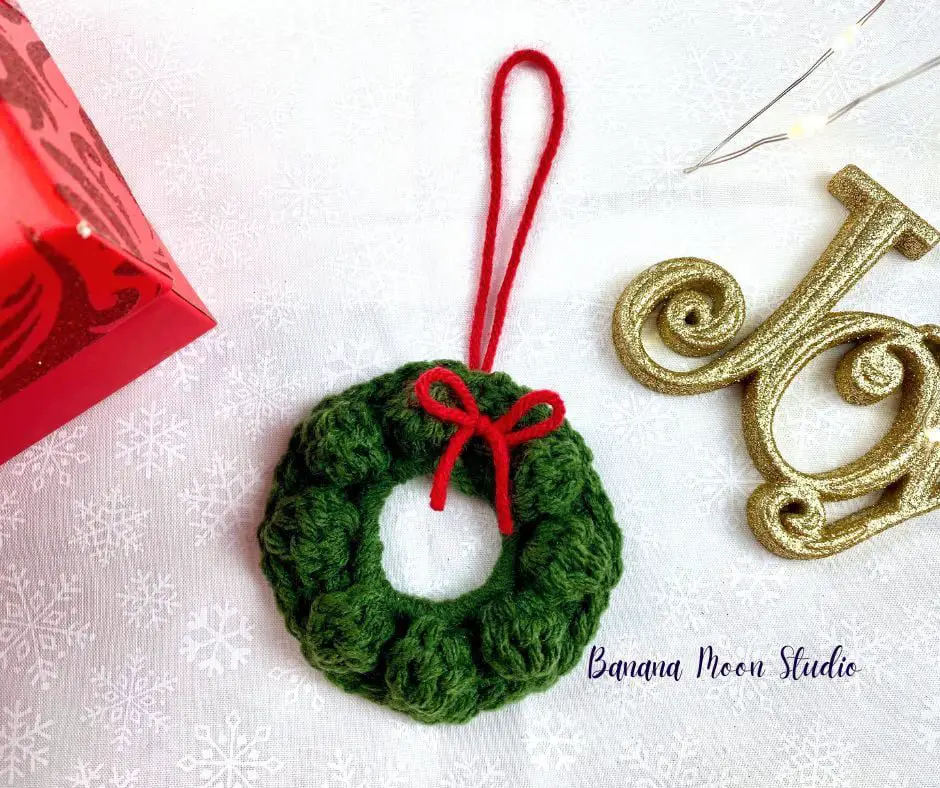
Skill level: Beginner → Intermediate
Finished size: ~3–4″ diameter
Stitch methods used: Chain-join ring base OR wire-wrapped ring; sc rounds for base; leaf clusters via shell/picot or 3-dc clusters.
Materials
- DK green yarn, small red yarn or seed beads, hook 3.5–4.0 mm, ribbon, tapestry needle. Optional small metal ring for wired version.
Method A — Crocheted ring base (no wire)
- Ch 20, join to form ring (careful not to twist).
- Rnd 1: sc in each ch around (20 sc). Join.
- Rnd 2 (leaf clusters): ch 3, 3 dc in next st, sl st in next st — repeat around. Work 2–3 rounds as needed to get a full, leafy look. Fasten off.
- Make 4–6 tiny berries: MR, 6 sc; fasten off and sew to wreath, or sew a few seed beads as berries.
- Make small bow (ch 12, sc back across 3–4 rows), cinch center and sew to bottom. Attach ribbon loop at top.
Method B — Wire ring wrapped (sturdy)
- Use a small metal ring (2.5–3″ diameter). Wrap tightly with green yarn by working hdc or sc stitches over the ring until covered.
- Optionally crochet small leaf motifs and sew onto wrapped ring, or chain picot leaves and attach directly.
Finishing & variations
- Glittered berries: brush small amount of glue and sprinkle fine glitter sparingly.
- Make sets in multiple sizes for garlands.
4. Easy Angel Ornament Crochet Tutorial
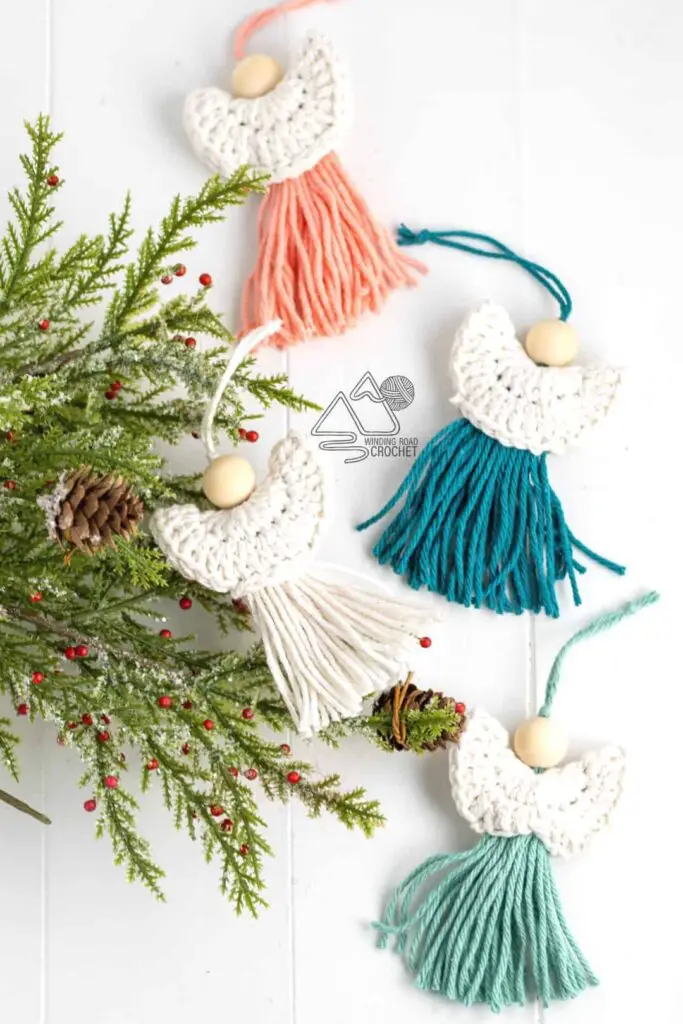
Skill level: Beginner
Finished size: ~3–5″ tall (depending on yarn)
Stitch methods used: Magic ring cone for body; bead or crocheted head; simple rectangular wings with scalloped edge; metallic halo.
Materials
- Fingering/DK white yarn, hook 2.75–3.5 mm, small wooden bead (or crochet head), tiny stuffing, metallic thread for halo, ribbon.
Method A — Bead head (fast, tidy)
Body (cone)
- MR, 6 sc.
- Rnd2: inc each → 12.
- Rnd3: sc 1, inc → 18.
- Rnd4: sc 2, inc → 24.
- Work even sc rounds 3–4 rounds until cone height ≈ 2–3″. Fasten off leaving tail.
Head
- Thread a small wooden bead onto yarn and sew to top of cone with several passes, anchoring from inside for security.
Wings (make 2)
- Ch 8, sc in 2nd ch and across (7 sc). Repeat for 3 rows. On final row work sc, hdc, dc, hdc, sc across to form scalloped top. Sew to back of cone.
Halo & hanger
- Metallic thread: ch 12 and join to small loop; sew behind bead as halo. Add ribbon loop at back for hanging.
Method B — Crocheted head (all-yarn)
Head
- MR 6 sc; Rnd2 inc to 12; Rnd3 sc, inc to 18. Fasten off leaving tail; stuff lightly and sew to cone.
Finishing touches
- Embroider two small French-knot eyes, or leave the angel minimal for a Scandinavian look. For delicate heirloom angels, use lace-weight yarn and an even smaller hook.
5. Crochet Gingerbread Heart Ornament Pattern
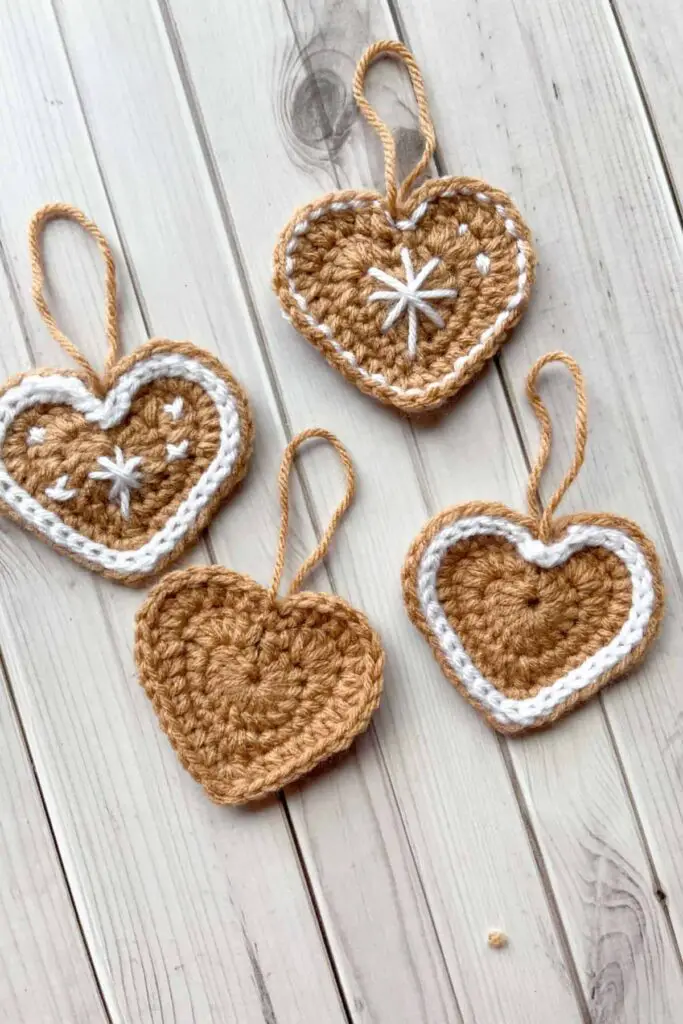
Skill level: Beginner–Intermediate
Finished size: ~3–4″ across heart
Stitch methods used: Two options — flat heart sewn/stuffed method OR amigurumi stuffed heart. Both include surface-embroidery icing.
Materials
- DK/light worsted yarn in gingerbread brown, white for icing, small colored accents, hook 3.5–4.0 mm, small stuffing, tapestry needle, ribbon.
Option A — Flat heart (quick, two-piece sewn)
Make two flat hearts
- Ch 12. Row 1: sc in 2nd ch from hook across to last ch, sc in last ch, then continue along the opposite side of chain to complete a heart outline (work back along chain to mirror first side).
- Row 2: Shape lobes by working a shell on each lobe: (sc 3, 5 dc in next st, sc 3) then sc to center to make the point. Fasten off and make a second heart.
Assembly
- Place wrong sides together; whipstitch around leaving a 1″ opening. Stuff lightly and finish stitching closed.
Icing & decoration
- Use white yarn to surface slip-stitch a scalloped “icing” edge. Sew small seed beads as gumdrops or use french knots in red/green.
Option B — Amigurumi heart (3D)
- MR 6 sc; Rnd2 inc → 12; Rnd3 sc, inc → 18; Rnd4 sc2, inc → 24; Rnd5 sc3, inc → 30. Work even rounds to establish lobes, then decrease symmetrically to form point. Stuff before final decreases and close. Add surface-stitched icing.
Finishing
- Attach a ribbon loop at top and add a small bow if desired. Optionally scent stuffing lightly with cinnamon oil for a gingerbread smell (test to avoid staining yarn).
6. Pinecone Christmas Ornament Crochet Tutorial
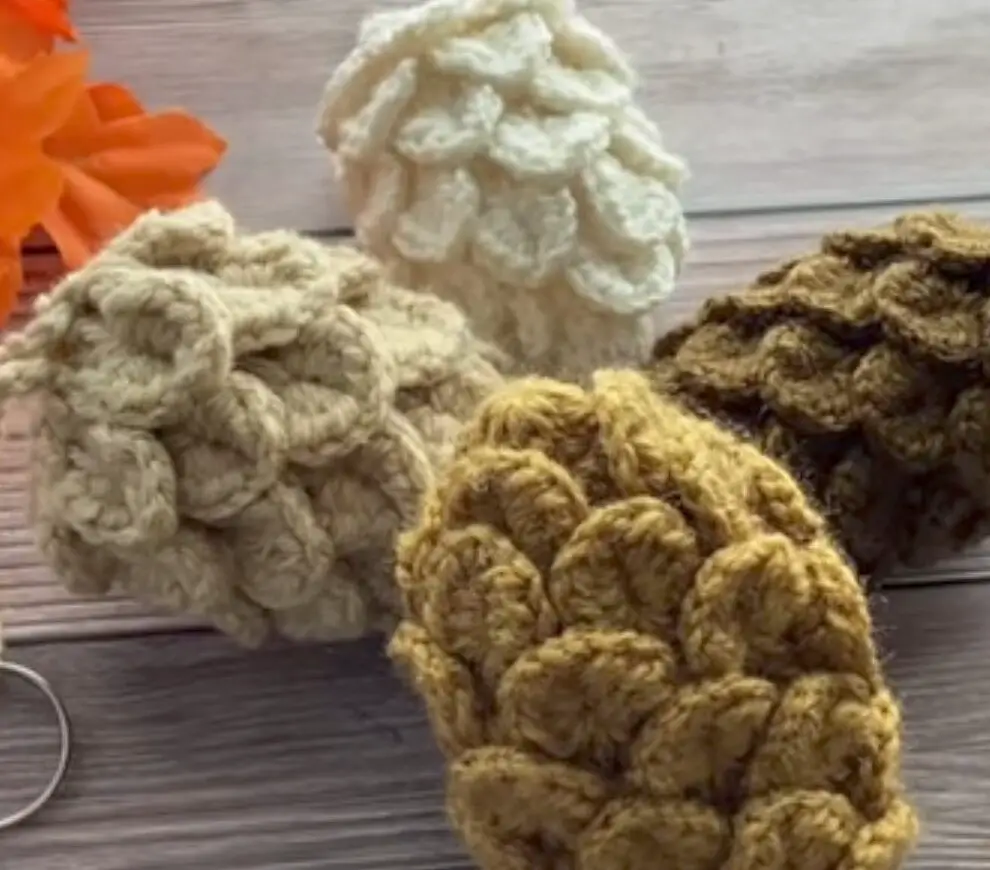
Skill level: Intermediate (patience + assembly)
Finished size: ~3–4″ tall
Stitch methods used: Amigurumi cone base + sewn-on overlapping shell scales (shell = small scarf/chain shell) OR glue-for-speed Decoden-style.
Materials
- DK/light worsted yarn in shades of brown, 3.5–4.0 mm hook, small fiberfill, tapestry needle, ribbon for hanger, optional seed beads/glitter for frosted effect.
Cone base (amigurumi)
- MR, 6 sc. Rnd2 inc → 12. Rnd3 sc1, inc → 18. Rnd4 sc2, inc → 24. Continue increasing rounds evenly until base ≈ 30–36 sts (≈2″ diameter). Then work even sc rounds 3–4 rounds for height. Fasten off leaving long tail.
Scale motif (shell-style; make many)
Scale (single shell)
- Make a small chain of 6: ch 6. Work back across chain: sc in 2nd ch, hdc in next, dc in next 2, hdc in next, sc in last. Fasten off leaving long tail for sewing.
Assembly — sewn method (durable & tidy)
- Start at base. Pin or tack first row of scales around the cone so the rounded edges point downwards and overlap the previous scale by ~50%. Sew each scale at its base to the cone with its tail, stitching through the cone base only (so the rounded top remains clean).
- Continue in concentric rows upward, reducing the number of scales per row as circumference shrinks. Stuff lightly as you near the top.
- Close top by sewing last few scales tightly; attach ribbon loop for hanging. Add a few seed beads or a light brush of glue + glitter on scale tips for frosted look.
Assembly — glued Decoden-style (fast)
- Use a strong clear craft glue (E6000). Glue scales to cone in overlapping rows. Press in place and let cure. Optionally add glitter or beads to scale tips while glue is tacky.
Variations & tips
- Use variegated yarn for natural color variation; stitch scales in two tones for depth.
- For sturdier keepsakes, sew scales rather than glue. For ornaments intended for quick gifts, glued method is faster.
General Finishing & Presentation Notes
- Hanging loops: Chain 10–20 and attach inside top seam, or sew a ribbon loop for a decorative hanger.
- Stuffing: Use a light amount of polyester fill — overstuffing makes seams bulge.
- Stiffening: If you want crisp shapes (wreaths, stars), use diluted fabric stiffener or spray starch; test on scrap yarn first.
- Safety: For ornaments for small children, avoid glued beads and small parts; embroider faces and sew parts thoroughly.
- Storage: Store ornaments flat or in a box with tissue to prevent crushing and color transfer.
- Gifting: Bundle a set of ornaments with a small care note (spot wash, reshape while damp) for a professional touch.
Conclusion
These six patterns give you a holiday toolkit that’s flexible, creative, and practical. Want speed? Use the felt antlers, quick beanie formula, or glue-on pinecone scales and mass-produce for neighbors. Want heirloom quality? Sew scales, stitch wreaths on a wire base, and add finely embroidered details for keepsakes that will be pulled out every year. Each ornament can be scaled up or down, adapted to scrap yarn, and personalized with beads, initials, or a scent for a truly handcrafted gift.

tải xn88 có mục “tin tức thị trường” – cập nhật biến động odds, sự kiện thể thao ảnh hưởng đến cược. TONY12-30