Hair clips are small projects with big payoff: they’re fast to make, useful, and a lovely way to show off color and stitch detail. Below is a single practical introduction that applies to all six patterns (materials, sizing, hardware options, safety and abbreviations), followed by six fully detailed patterns. Each pattern includes: skill level, exact materials for a sample clip, finished size, a step-by-step make & assembly guide, variations, finishing tips, and care instructions. The tone is professional and practical so you can drop this directly into a blog post.
materials, hardware, sizing, safety, and abbreviations
Materials & yarn suggestions
- Yarn weights:
- Size 10 crochet thread or fingering / sport weight — best for small, neat clips (snap clips, small alligator clips).
- DK / light worsted — good for slightly larger decorative pieces and claw clips.
- Chenille / velvet — plush, gentle on hair for scrunchie-style clips, but bulky for small motifs.
- Fiber choices: cotton/cotton blends (stable, washable), acrylic (durable, budget-friendly), bamboo/silk blends (drape, sheen). For kids’ clips prefer washable acrylic or cotton.
- Hook sizes: common: 1.5–2.5 mm for thread/fine yarn; 2.5–4.0 mm for sport/DK; 4.5–6.0 mm for bulky/chenille.
Hardware choices
- Snap clips (barrettes): flat, easy to sew crochet pieces onto; best for small motifs. Common lengths: 2″, 2.5″.
- Alligator clips: strong grip, good for small to medium crochet accents. Sew or glue crochet piece to top.
- French barrettes: sturdy with good hold for thick hair; require a slightly larger backing piece.
- Claw clips: large decorative pieces need a clip with a concave surface or an inner channel to attach securely.
- Buttons / press studs / snaps (optional): allow removable covers so the crochet piece can be washed separately.
Tools & notions
- Yarn, chosen hook, small scissors, tapestry needle, strong sewing thread (preferably matching yarn), hot glue (optional — use sparingly), pliers (for crimping snaps), small felt oval cutouts (for gluing between metal hardware and crochet to protect yarn), blocking tools (pins, small mat), fabric glue for non-sew attachment (optional).
Sizing & planning
Decide the hardware size first — your crochet piece should cover the metal top comfortably but not be so large it flops off the clip. Typical finished motif widths:
- Small snap/alligator accents: 1–1.75 in (25–45 mm)
- Medium barrette/french: 2–3 in (50–75 mm)
- Claw clips: 2.5–4 in (65–100 mm) decorative surface
Before you start, make a small test motif to ensure the stitch density and scale fit the clip.
Safety & durability
- For children under 3, avoid small beads or loosely sewn embellishments that could be a choking hazard. Prefer embroidered centers or felt appliqués.
- Secure attachments with multiple passes of sewing thread and, where appropriate, a dot of fabric glue on the inside underside for extra hold.
- If you plan to wash clips often, make the crochet piece removable (snap, button loop) or choose machine-washable yarn and secure hardware with stitches rather than glue.
Abbreviations (US)
- ch — chain
- sc — single crochet
- hdc — half double crochet
- dc — double crochet
- tr — treble crochet
- sl st — slip stitch
- st(s) — stitch(es)
- sk — skip
- inc — increase (2 sts in same st)
- dec — decrease (sc2tog etc.)
- MR — magic ring
- BLO / FLO — back loop only / front loop only
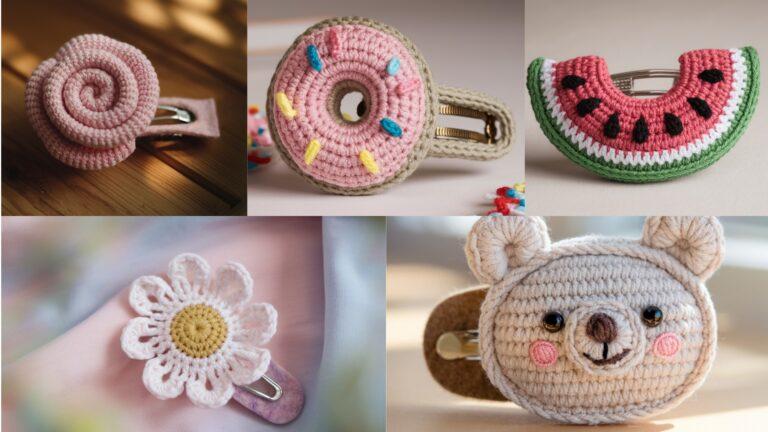
1. Crochet Cute Hair Clip Pattern
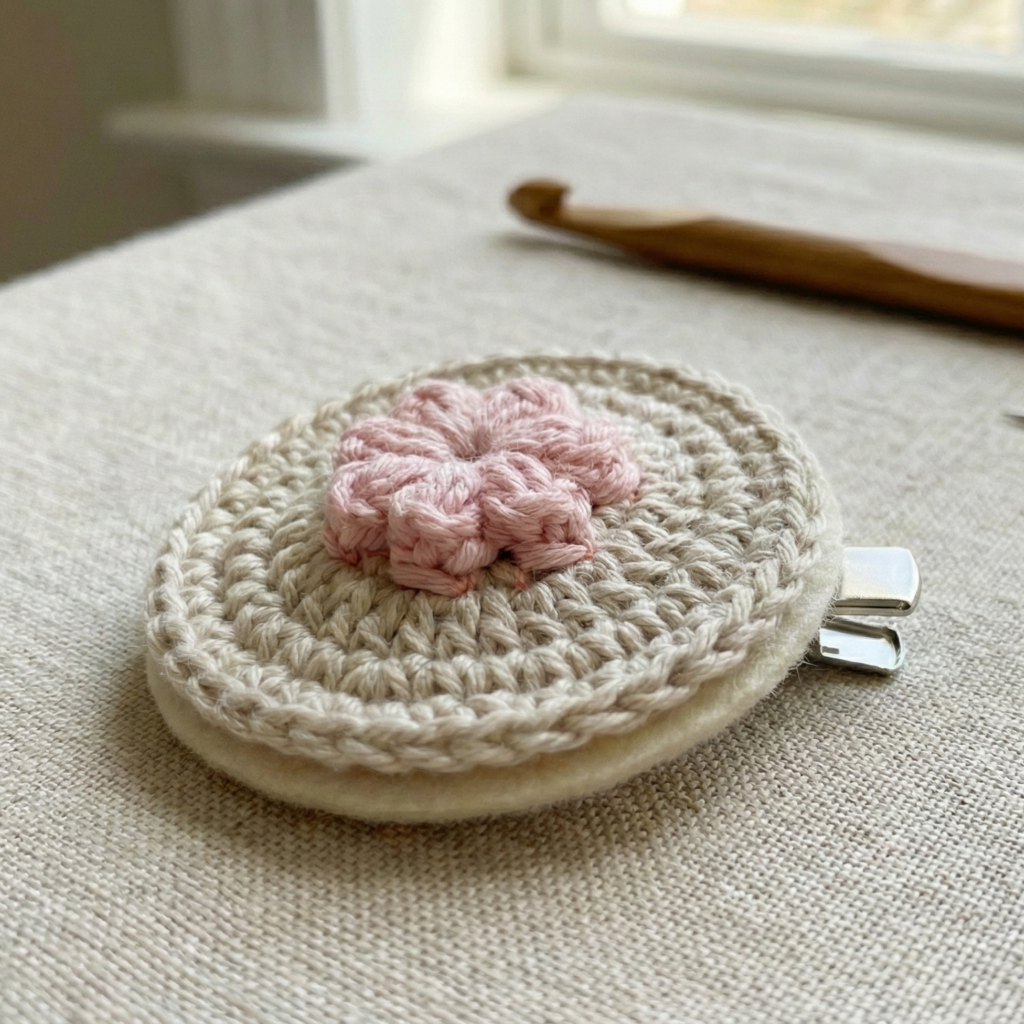
Style: Small, rounded, cozy accent that sits on a 2″ snap or small alligator clip — a go-to everyday clip.
Skill level: Beginner
Materials (sample):
- Sport weight cotton or acrylic, ~5–10 g (one accent color + small contrast for center).
- 2.0–2.75 mm hook (adjust for yarn).
- 2″ snap clip or small alligator clip.
- Tapestry needle, sewing thread, small felt oval.
Finished size: ~1.25–1.5 in (diameter) — fits a 2″ clip comfortably.
Step-by-step
- Make a small circle base (MR method)
- MR; R1: ch1, 8 sc in ring, pull tight (8 sc). Join with sl st to first sc.
- R2: ch1, sc in same st, inc in next around (12 sc). Join.
- R3: ch1, sc in next 1, inc around (16 sc). Join. Fasten off, leave long tail for sewing.
- Optional raised center (petal look)
- With contrast color, attach in center: MR; ch1, 6 sc in MR; join and pull tight; sl st to center of base to anchor. Alternatively, make a tiny puff: MR; ch3, (3 dc) in MR, ch3, sl st repeat 4–5 times to make a floral petal cluster. Fasten off.
- Block / flatten (if needed)
- Lightly wet and press flat or pin to small mat to flatten shape.
- Assemble to clip
- Cut a small felt oval to fit on top of the clip (protects metal and helps glue). Sew felt to underside of crochet base with a few whipstitches, or glue with fabric glue.
- Sew crochet base to felt with strong thread: stitch through felt and crochet base several times around, then through the clip (if clip has holes) or around metal if not — avoid visible glue if possible. For snap clips, slide the clip into the felt pocket and stitch the felt closed around it. Weave in ends.
- Finish
- Check security of stitches; add a tiny dab of glue between felt and clip underside only if extra reinforcement is desired.
Variations
- Make the base in chenille for a plush look.
- Add an embroidered heart or tiny bead center (securely sewn) for kids — avoid small beads on toddler clips.
Care
- Wipe metal hardware with damp cloth. Remove crochet cover (if removable) for machine wash on gentle; otherwise hand wash and air dry.
2. Crochet Granny Square Claw Clip Pattern

Style: A small rectangle made from miniature granny squares joined to cover a small claw or large barrette — boho/retro vibe.
Skill level: Confident beginner
Materials (sample):
- Fingering / sport or DK cotton in 2–3 colors, small amounts.
- 2.0–3.5 mm hook.
- Medium claw clip (approx. 2.5–3.5″ top surface) or 3″ French barrette.
- Sewing thread, tapestry needle, felt lining.
Finished size: panel about 2.5–3″ wide × 1.5–2″ tall (depending on hardware).
Step-by-step
- Make tiny granny squares (4 rounds mini granny) — make 4 or 6 depending on the hardware surface layout. Example for 4 squares (2 × 2 grid):
- MR; Round 1: ch3, 2 dc, ch2, 3 dc, ch2 repeat 3 times, join (4 clusters). R2: change color, in corner ch2 sp work (3 dc, ch2, 3 dc), along side ch1, 3 dc in next ch1 etc., do 2 rounds total to reach ~1–1.25″ square. Fasten off.
- Block squares to equal size.
- Join squares into a small rectangle using whipstitch or join-as-you-go; weave in ends. Add a single round of sc around the assembled rectangle for a tidy edge and to unify color.
- Cut felt backing slightly smaller than panel. Sew felt to back of crochet panel.
- Attach to claw/barrette
- For claw clips: If clip has a top channel, glue felted panel into channel and stitch through felt to clip hinge area. Alternatively, stitch felt to clip using small backstitches around metal edge.
- For French barrettes: slide barrette under panel and sew felt to barrette wings, or form a small pocket in felt that the barrette snaps into, and stitch closed.
- Finishing
- Check that no raw metal edges rub the yarn. Add top decorative button or a small shell if desired (secure well).
Variations
- Alternate square sizes for a mosaic.
- Make a long rectangle to cover a larger jaw (use more squares).
Care
- Remove panel before machine washing if glued; hand-wash crocheted panel and reshape.
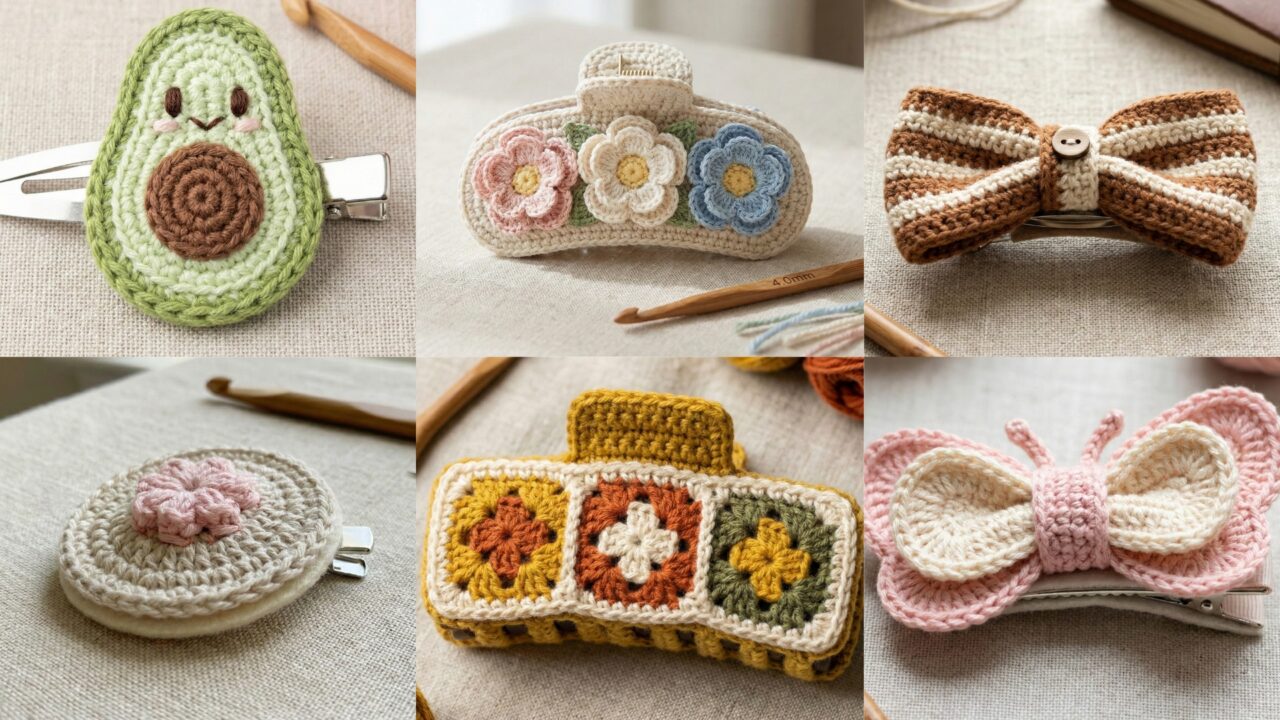
3. Crochet Butterfly Bow Hair Clip Pattern
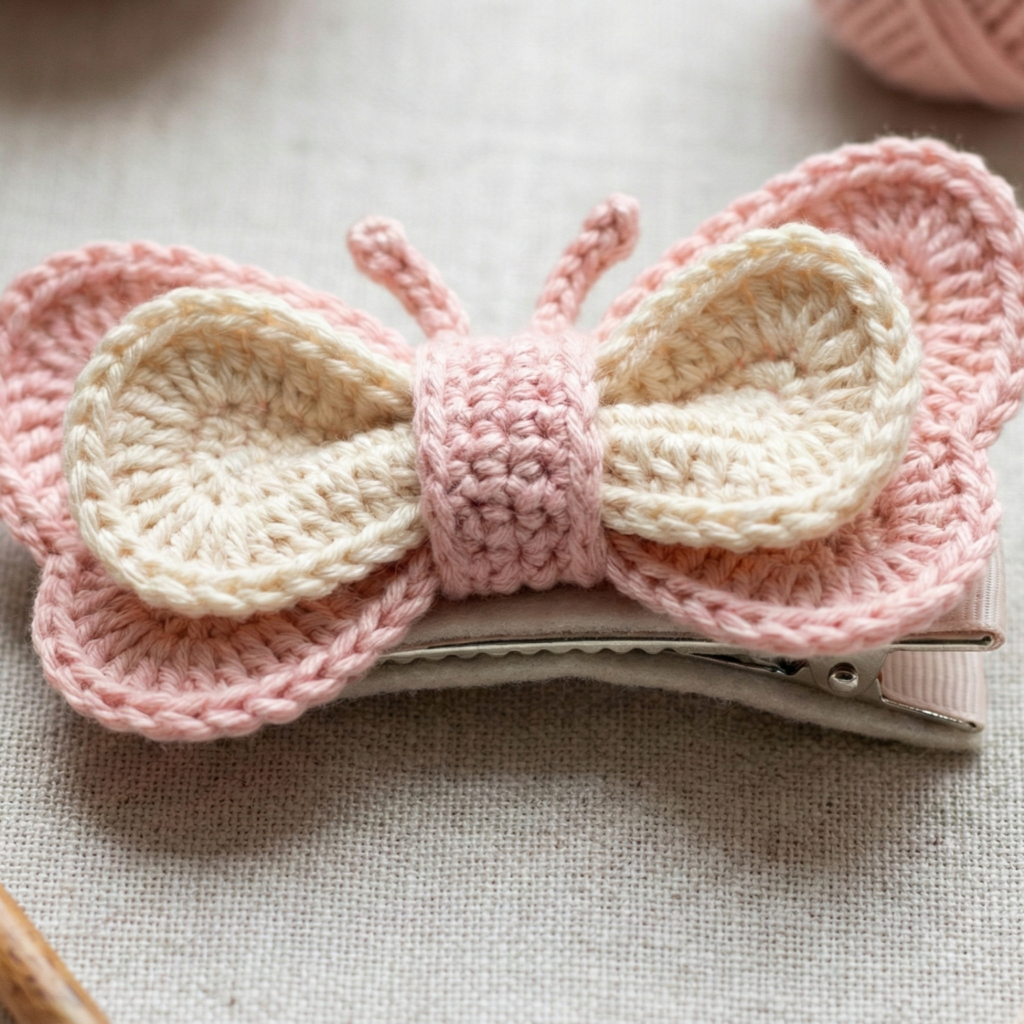
Style: Feminine butterfly-shaped bow with layered wings — mounted on a 2.5″ snap clip or small alligator clip.
Skill level: Confident beginner → intermediate (shaping & layering)
Materials (sample):
- Sport/DK yarn for body and wings (two complementary colors).
- Hook: 3.0–3.75 mm.
- 2.5″ snap clip or small alligator.
- Tapestry needle, thin ribbon (optional).
Finished size: ~2.25–2.75 in wingspan.
Step-by-step
- Make wing templates — two sizes
- Small inner wing (pair): ch10. Row1: sc in 2nd ch from hook across (9 sc). Turn. Rows2–4: hdc across. Row5: dec across to taper (hdc2tog). Fasten off leaving tail. Make 2 mirrored wings.
- Large outer wing (pair): ch12. Row1: sc across. Rows2–5: dc or hdc to make larger, curvier wing. Row6: shape top edge with shell stitches (5 dc in middle stitch) then finish and fasten off. Make 2 mirrored wings.
- Assemble butterfly
- Layer one small inner wing onto one large outer wing; sew centers together. Repeat for the other side.
- Join the two wing sets at center so butterfly shape appears; secure by stitching through layers at center.
- Make body & antennae
- Body: with contrasting color, ch6, then sl st back across chain to form a cord; wrap yarn around center several times and stitch securing underside (or crochet a small tube MR with 6 sc and leave tail).
- Antennae: ch6–8 with small bead at end (avoid for small children).
- Attach to clip
- Cut felt oval backing, place butterfly on felt and sew through the felt into the clip (if clip has holes), or glue felt to clip underside and stitch felt to butterfly center. Wrap body cord around center and around felt/clip base to hide stitches; secure by sewing tails under the body wrap.
- Finish
- Trim ends and fluff wings. Block wings gently to shape.
Variations
- Make wings with open lace for a delicate look (use shell stitch or picots).
- Add tiny embroidered veins with contrasting yarn for realism.
Care
- Hand wash the butterfly piece only; detach from clip for washing if possible.
4. Crochet Cute Avocado Hair Clip Pattern
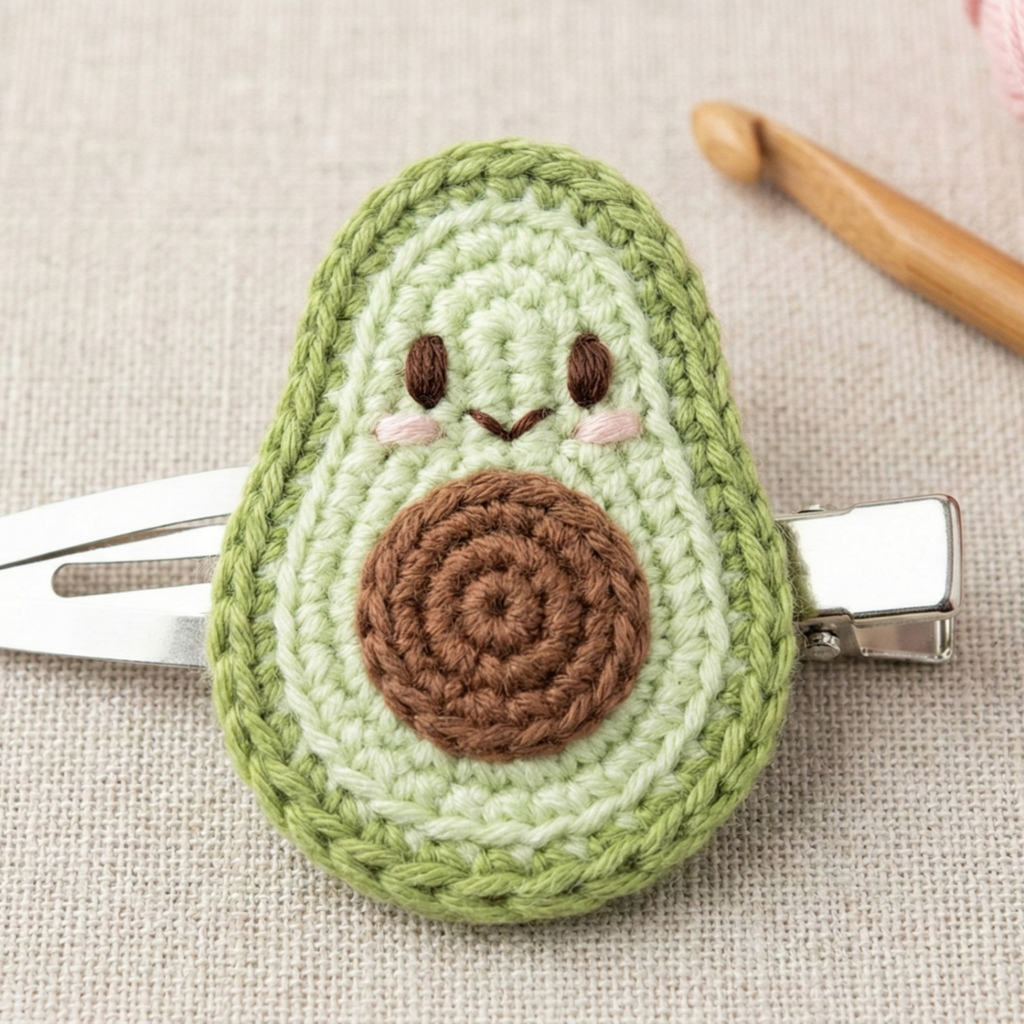
Style: Whimsical avocado half (soft green with “pit” appliqué) attached to a snap clip — a fun giftable clip.
Skill level: Confident beginner
Materials (sample):
- Fingering/sport or DK yarn in avocado green, pale green/cream for flesh, and brown for pit.
- Hook: 2.5–3.5 mm (depending on yarn).
- 2″ or 2.5″ snap clip.
- Small amount of stuffing for pit (optional).
- Felt backing, tapestry needle.
Finished size: ~1.5–2.0 in height (small avocado half).
Step-by-step
- Make avocado half (worked flat)
- Chain 9 (or adjust to desired width). Row1: sc in 2nd ch from hook across (8 sc). Row2–5: sc across to build height. To shape the curved top, on next rows sc2tog at each end until top narrows; optionally finish with a few sc and fasten off. Alternatively work an oval by starting MR and working oval increases.
- Make “flesh” layer
- Make a slightly smaller shape in pale green/cream for flesh layer using same method but 1–2 sts shorter in width. Sew flesh onto avocado green base, leaving a center hole for the pit.
- Make pit
- MR; 6 sc in ring; R2: inc around (12). R3–4: sc in rounds for small ball; stuff lightly; R5: dec rounds to close; fasten off leaving tail for sewing. Sew pit to center of avocado flesh.
- Assemble onto clip
- Cut felt oval; sew felt to underside of avocado (a few whipstitches). Place felted piece onto clip and sew through felt to clip (or glue if necessary). Ensure no raw stitches protrude to hair side.
- Finish
- Add a small embroidered smile or cheek blush with embroidery floss if desired (secure stitches on back).
Variations
- Make an avocado pair (two halves joined with contrasting pits).
- For kid-safe version: embroider pit instead of sewing a stuffed pit.
Care
- Hand wash applique only; detach clip if you used glue.
5. Crochet Brown Striped Bowknot Hair Clip Pattern
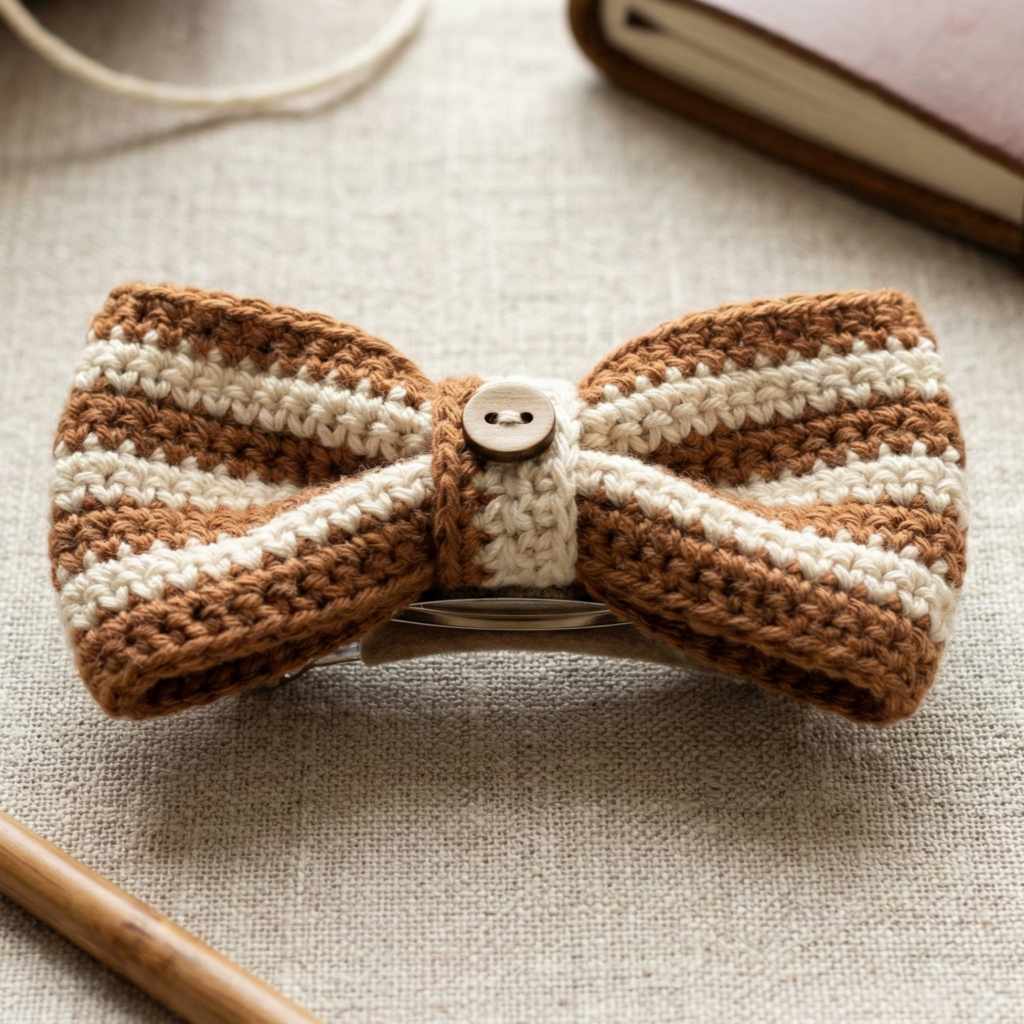
Style: Classic bowknot with stripes — polished, suitable for casual or office wear.
Skill level: Confident beginner
Materials (sample):
- DK yarn in brown and contrasting stripe color (cream).
- Hook: 3.25–4.0 mm.
- 2.5″ French barrette or 2″ snap clip.
- Tapestry needle, optional small button for center.
Finished size: Bow about 2.5–3.0 in wide.
Step-by-step
- Make rectangular bow piece
- Chain to desired length (e.g., ch22 for ~2.5″ width depending on gauge). Row1: sc in 2nd ch from hook across. Row2–6: change colors every 2 rows to make stripes — sc across until rectangle is approx 2–2.5″ tall. Fasten off.
- Shape bow
- Fold rectangle so short edges meet; cinch center tightly with a length of yarn to create bow shape. Wrap yarn around center several times and knot securely. Tuck ends in under center band.
- Make center band
- Ch10, sl st back to form a small loop band; fasten off leaving tail to sew. Wrap around bow center where you wrapped yarn, stitch underside to secure. Hide tails.
- Attach to clip
- For French barrette: slide barrette under bow and sew felt band to barrette wings or stitch directly through barrette holes. For snap clips: use felt backing and sew bow to felt and clip.
- Finish
- Topstitch small button or bead at bow center, but sew securely and avoid loose beads for children.
Variations
- Make larger bow by increasing rectangle size and changing stripe spacing.
- Add tails for a ribbon effect by crocheting a small V-shaped tail and sewing to underside.
Care
- Remove bow from clip if using glue; otherwise hand wash gently.
6. Crochet Floral Knit Claw Clip Pattern
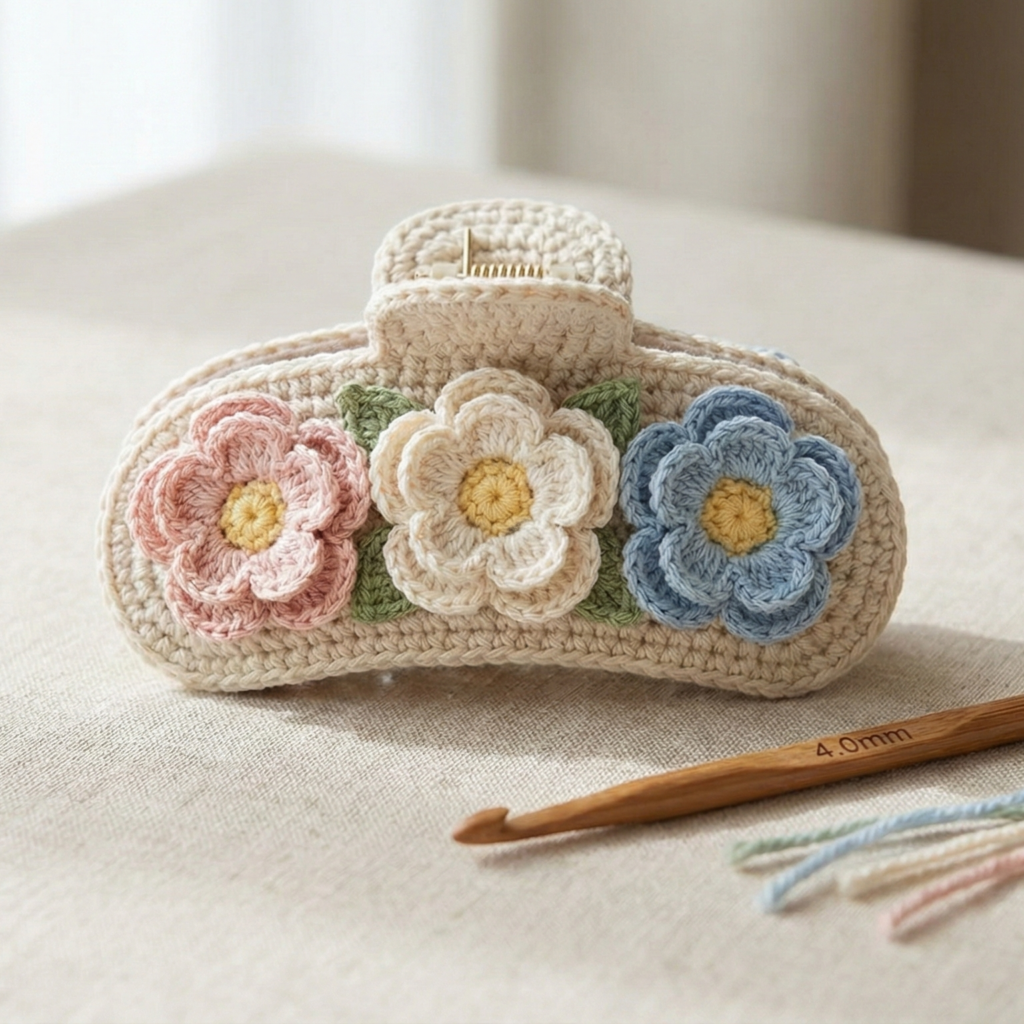
Style: A larger, sophisticated floral panel to decorate a medium claw clip — works well for updos and half-up styles.
Skill level: Intermediate (larger piece, layered elements)
Materials (sample):
- DK or light worsted yarn in several floral colors (petals, leaves, center).
- Hook: 3.5–4.5 mm.
- Medium claw clip with a relatively flat top surface (approx. 3–4″ width).
- Stiff felt backing, strong upholstery thread, optional thin craft wire for shaping.
Finished size: Floral panel about 3–3.5″ across to cover claw top.
Step-by-step
- Make base oval/rectangle
- Chain to match claw width (e.g., ch26). Work 6–8 rows of sc to create a dense backing panel. This acts as the base to sew flowers onto and anchor to clip.
- Crochet a variety of flowers and leaves
- Small rosette: MR; R1: ch1, 8 sc in MR; R2: ch3, 3 dc in next st, sl st repeat to form petals.
- Layered flower: Make larger petals by working (dc3, ch2, dc3) into a petal base. Use 2–3 sizes for dimension.
- Leaves: ch6, sc back along chain increasing at base to shape leaf; make several.
- Assemble flower cluster
- Arrange flowers on the base panel to taste — larger focal flower center and small cluster around. Pin placement using tapestry needle pointer or blocking pins.
- Sew flowers and leaves to base panel
- Use strong thread and multiple passes to secure, stitching underside of petals into base. If you want the flowers slightly raised, only sew centers and leave petal edges loose.
- Cut felt backing slightly smaller than panel; glue or sew felt to underside to hide stitches.
- Attach to claw
- If claw has an insert channel, slide felt-backed panel into the channel and whipstitch around through holes. If no channel, stitch through felt and around metal teeth where possible, or glue felt to clip with strong fabric glue and additionally sew through felt to metal (use small, tight stitches over the metal edge). For highest durability, sew felt to clip and then reinforce with a small dot of epoxy between felt and metal (allow curing time).
- Finish
- Trim stray yarn; fluff petals and steam-block if needed to shape.
Variations
- Use wired flower centers for dramatic petal shaping (wrap a small gauge wire into petal underside) — not recommended for kids’ clips.
- Make an entire detachable flower cluster that clips onto the claw with a small snap for removable washing.
Care
- Remove the floral panel before washing; hand wash crochet pieces and dry flat. Avoid getting metal lastingly wet.
Conclusion
You now have six practical, blog-ready crochet hair clip patterns that cover small accents through statement pieces. A few final practical tips that readers will appreciate:
- Attachment method matters: whenever possible sew the crochet piece to a felt backing and then attach the felt to the metal hardware — the felt protects yarn from metal rubbing and creates a stronger anchor for stitches.
- Stitch security: use multiple passes of strong sewing thread when attaching to hardware; for kids’ items, prefer sewing over gluing.
- Removable covers: consider making the crochet cover removable (button loop, snap, or small press stud) so the cover can be washed without damaging metal hardware. This is a strong selling point for gift-ready clips.
- Blocking & shaping: block motifs flat or shape wings and petals with a little steam. Use pins on a small foam mat for control.
- Photo tips for the blog: show the clip on a neutral background and in hair (bun, half-up, side-sweep) for scale. Include close-ups of the attachment underside and a short “how it’s attached” photo or diagram to reassure readers about durability.
- Care instructions: always include care info per yarn (e.g., “machine wash gentle on cold, lay flat to dry; remove crochet cover before washing metal clip”).