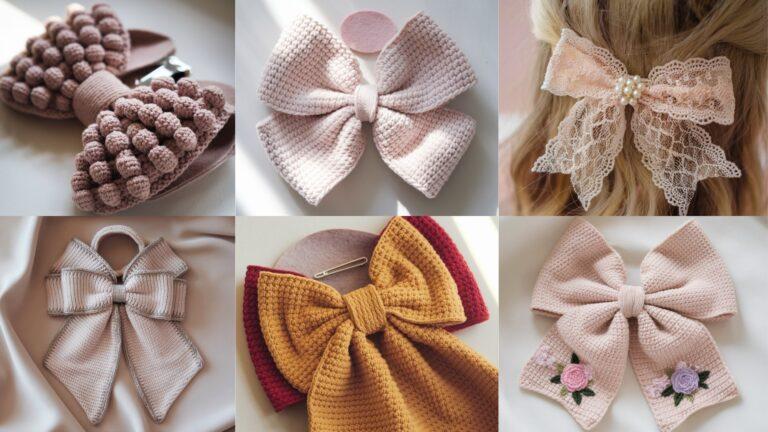
Handmade crochet earrings are fast, portable, and make delightful gifts — tiny canvases for color, texture, and a little sparkle. Below you’ll find a single concise introduction with materials, sizing, and hardware advice that applies to all six designs, followed by six full pattern sections. Each design includes skill level, exact materials, finished-size guidance, a clear step-by-step construction (US terms), finishing and assembly instructions, variations, and care tips. The instructions are written so you can follow them now and make a pair in an afternoon.
Quick common notes — materials, sizes, and hardware
Skill levels used in the patterns
- Confident Beginner — you know single crochet (sc), half double (hdc) and double crochet (dc), chains (ch), slip stitch (sl st).
- Intermediate — small motifs, joining, beads, working around hoops or shaping 3D elements.
Materials & tools (standard set for all patterns)
- Yarn/thread: choose based on desired look:
- Size 10 cotton thread (very fine) or fingering-weight yarn for delicate earrings.
- Light DK for bold, statement pieces.
- Crochet hook: 1.75–3.5 mm depending on thread/yarn choice (use smaller hooks for crisp detail).
- Small sharp scissors, tapestry needle, blocking surface + pins (for lace motifs).
- Jewelry hardware:
- Earring hooks (French hooks) — sterling silver, gold-filled or surgical steel (hypoallergenic).
- Jump rings (4–6 mm), small earwires, headpins (for bead dangles), and tiny split rings if needed.
- Small pliers (round-nose and flat-nose) for opening/closing jump rings.
- Lightweight earring posts and glue (E6000) if you prefer stud mounting.
- Optional: seed beads, tiny pearls, small wooden beads, metal ring (for hoops), small resin or wooden hoops (10–25 mm).
Sizing guidance
- Most crochet earrings are compact: finished drop ≈ 1″–3″ (25–75 mm) depending on style.
- Keep earring weight light — heavier yarns + metal findings can pull on the ear. For larger designs use lightweight materials (thread, lace yarn, or hollow wooden rings).
Care & safety
- Avoid precious metals + acidic cleaners near dyed thread. If you make earrings with glue-mounted studs, let glue cure 24 hours before wear.
- For care: hand wash gently with mild soap and water. Lay flat to dry. Remove before showering and sleeping. If metal findings tarnish, swap them for new hypoallergenic ones.
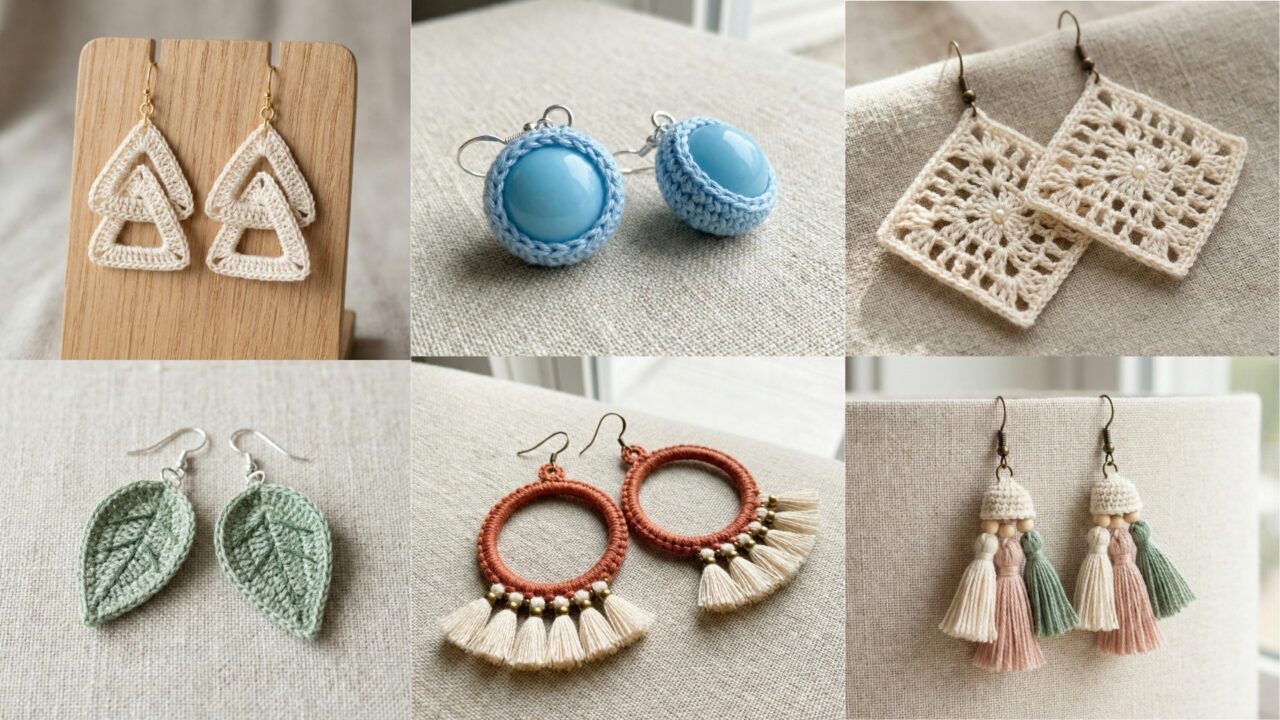
1. Crochet Pop Earrings Pattern
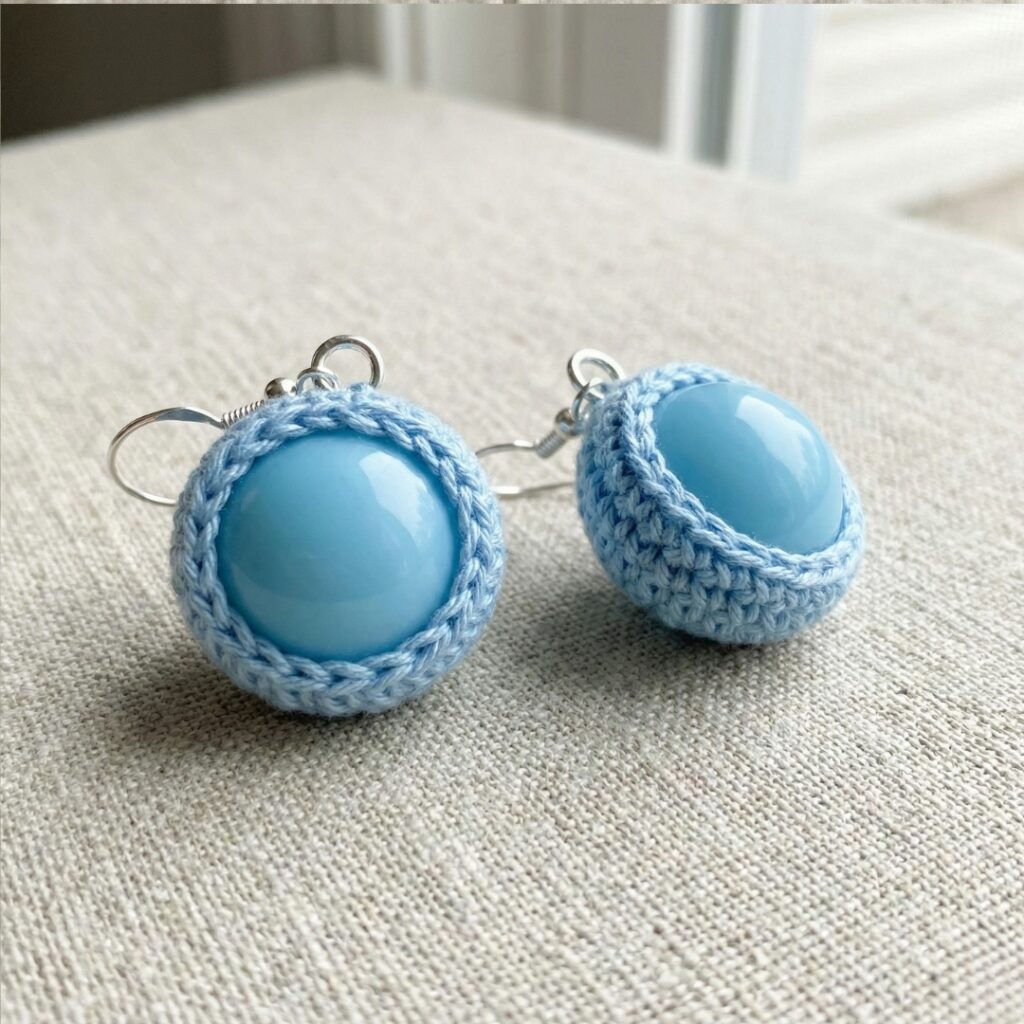
Vibe: Small, colorful, beaded studs or tiny hoops with a single “pop” bead — playful and modern.
Skill level: Confident beginner (bead crochet, tiny rounds)
Materials (pair)
- Size 10 cotton thread or fingering yarn — ~6–10 yds.
- Hook: 1.75–2.5 mm.
- Seed beads (size 10/0) or single glass bead — 2 beads.
- 2 ear hooks, 2 jump rings (3–4 mm), 2 small eye pins (if using bead drops).
- Tapestry needle, pliers.
Finished size: bead + crochet surround ~0.5–0.75″ (12–20 mm) diameter.
Concept
A tiny round bead (or cluster) is encased by a neat crochet bezel and finished with either a jump-ring loop to hang from a French hook or glue-mounted as a stud.
Step-by-step — Bead bezel studs (flat back bead option)
- Pre-string beads (optional): If you want a line of seed beads in the bezel, pre-string them on the working thread before starting. For a single bead, you can skip pre-stringing and crochet around it after placing the bead.
- Round 1 (bead anchor): MR, ch1, 6 sc in MR. Pull tight and sl st to join. (6 sc)
- Round 2 (increase): ch1, inc in next st rep 6 times. (12 sc)
- Round 3 (bezel formation): ch1, (sc in next st, inc) rep around. (18 sc) Try the bead in the center: place the bead on top, and work Round 4 to snug it.
- Round 4 (snug bezel): ch1, sc in next 2, dec rep around to tighten if needed (use sc2tog). Fasten off leaving a 6–8 inch tail.
- Seat the bead: Insert bead into the center; use the tail to stitch through the back and weave around base to pull bezel snugly around the bead. Weave the tail on the wrong side and trim.
- Mounting: Attach a tiny jump ring to the top of the bezel by stitching a small loop (ch3; sl st to base), close jump ring, and hang on ear hook; or glue bezel to a flat-back stud post with jewelry glue (let cure 24 hours).
Variation — Tiny beaded fringe pop
- Make the bezel with a tiny chain loop (ch6) at the top, then hang 1–3 short chains of seed beads from it using headpins.
Finishing
- If using glue-mount studs, press gently and allow full cure. For dangling style, ensure the jump ring is closed securely with pliers.
2. Crochet Festival Hoop Earrings Pattern

Vibe: Boho festival-ready hoops — wrap metal hoop with crochet and add tiny fringe/tassels or bead accents.
Skill level: Confident beginner → intermediate (working around hoops & tidy joins)
Materials (pair)
- Metal or wooden hoops 20–40 mm (0.8″–1.6″) diameter.
- Fingering yarn or cotton thread — ~10–20 yds per pair.
- Hook: 2.5–3.5 mm to match yarn.
- 2 ear hooks, 2 small jump rings, pliers.
- Optional: seed beads and small charms.
Finished size: hoop diameter determines overall drop; keep up to 40 mm for comfortable weight.
Concept
Wrap the hoop tightly with crocheted stitches (sc or hdc worked around the hoop) and add short crocheted loops, tassels, or bead fringe along the bottom edge.
Step-by-step — wrapped hoop with mini-tassel fringe
- Wrap foundation (join): Make a small slip knot around hoop and hold tail. Round 1: ch1, work 20–30 sc around the hoop (spacing depends on hoop circumference and yarn thickness). Keep each sc snug against the hoop so it looks wrapped. End with sl st to the first sc.
- Locking round: Work a second round of sc into the back loop of the first round (this smooths wraps and hides gaps). Join and fasten off.
- Fringe placement: Decide how many tassels — e.g., 5 tassels evenly spaced. For each tassel:
- Make a chain of 8–12 ch (length determines tassel tail) and attach to the hoop base with a sl st, then fold chains to create a tassel and secure the top with a few wraps of yarn to form a tiny tassel head. For a chunkier tassel make small pom-poms or tassels of looped yarn trimmed to even length.
- Bead accent option: Before you attach tassels, string small seed beads on the chain tails and secure with a tiny knot beneath the bead.
- Attach ear wire: On top of the hoop, attach a jump ring through a small crocheted loop (make ch3 loop at top before you finish last sc). Close the jump ring and attach the ear hook.
Variation — lacy crochet around hoop
- Instead of solid sc wraps, work ch1, sc in next st loops across to create a lacy scalloped trim; or make a row of tiny picot edges.
Finishing
- Trim tassel ends straight, use a drop of clear glue at tassel knots for extra security. Check for loose stitches and weave in ends.
3. Crochet Leaf Earrings Pattern
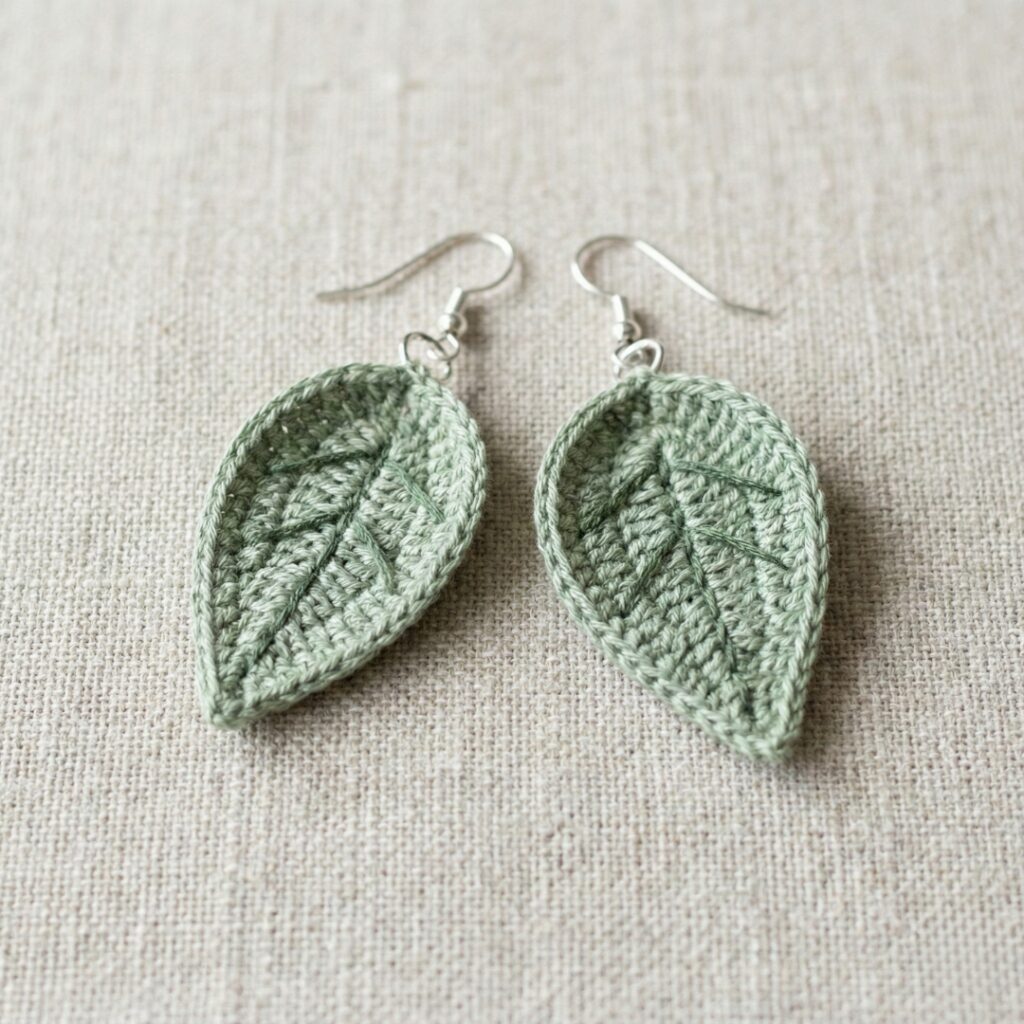
Vibe: Lightweight botanical leaves — elegant and wearable, great for bridesmaids or nature-inspired looks.
Skill level: Intermediate (small shaped motifs)
Materials (pair)
- Size 10 thread or fingering yarn in green shades — ~8–12 yds.
- Hook: 1.75–2.5 mm (thread) or 2.5–3.0 mm (yarn).
- 2 ear hooks, 2 small jump rings, pliers.
Finished size: leaf length ≈ 1–1.75″ (25–45 mm).
Leaf motif (tiny, tapered)
- Foundation: ch8.
- Row 1 (base): Sc in 2nd ch from hook, sc across to end. (7 sc)
- Row 2: ch1, turn, sc dec at first two sts (sc2tog), sc across to last two sts, sc2tog — this begins tapering. (5 sc)
- Row 3: ch1, turn, sc2tog in first two, sc in next, sc2tog — shape becomes narrower. (3 sc)
- Row 4 (tip): ch1, turn, sc3tog (if your stitch counts allow) or sc in remaining sts, slip stitch to end. Fasten off leaving tail for sewing.
- Edge & veins (optional): Using a contrast slightly darker green, surface-stitch a central vein: with tapestry needle sew a running stitch from base to tip. Or on RS, add tiny bar-stitch veins by sewing small diagonal stitches on each side.
Alternate (worked in rounds for fuller leaf)
- MR; Round 1: ch3, 8 dc in MR; pull tight to form a small round. Round 2: create petal-shape by making ch3, dc in same st, sl st to next repeated — gives 5 petal leaf. Block flat to shape.
Attachment
- Add a tiny jump ring to the leaf base by stitching a small stitched loop (ch3) to the top, tie off, and close jump ring through that loop; attach ear hook.
Variations
- Make two leaves joined by a tiny bead between them for a drop earring.
- Use variegated yarn for autumnal leaves.
- For a pair of mirror-image leaves, make one leaf and then mirror stitches by reversing increases/decreases when making the second.
Finishing
- Block on a pin cushion to flatten and define shape. Starch lightly for stiffness if desired.
4. Crochet Tassel Boho Earrings Pattern
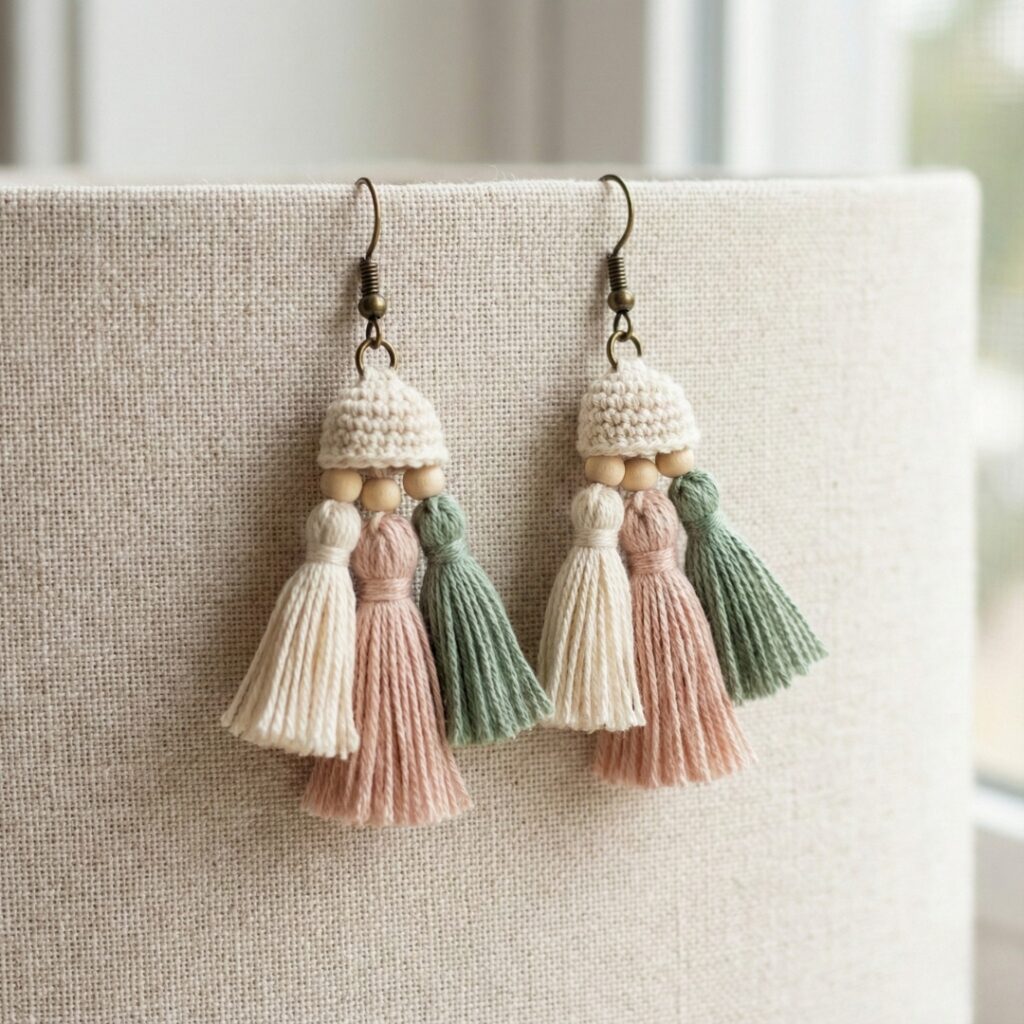
Vibe: Long, playful, layered tassels — festival and boho-chic.
Skill level: Confident beginner (tassels + multiple attachments)
Materials (pair)
- Lightweight yarn (fingering or light DK) — ~20–40 yds per pair.
- Hook: 2.5–3.5 mm.
- 2 ear hooks, 2 jump rings, 2 small metal or wooden beads for tops (optional).
Finished size: tassel length 1″–3″ depending on wraps.
Tassel construction (simple and secure)
- Make tassel body: Wrap yarn around a 1″–2″ wide object 10–40 times depending on thickness desired. Slide off, tie single knot at top with a short piece of yarn, fold in half and wrap the top tightly with 6–10 wraps of yarn, knot, and hide tail. Trim bottom evenly.
- Decorative head: Thread a small wooden or metal bead onto a short headpin; slip the bead over the top of tassel head and bend eye to form a loop or stitch tassel top directly to a crocheted mini-cap.
- Crocheted cap (optional): Create a tiny cap to slip over the top of the tassel:
- MR, ch1, 6 sc in ring; sl st to join. R2: sc in next st, inc rep to make 9–12 sc. R3: sc around to form small cup. Slip tassel stem into this cup and sew cap closed around tassel top.
- Create connector: Make a tiny crochet chain (ch4), sl st to form a loop, sew into cap, attach jump ring and ear wire.
- Layered tassels (boho look): Make 3 small tassels of graduated lengths (short, medium, long) and attach all three to a single cap; or attach tassels on a small hoop as in Festival Hoop Pattern.
Variations
- Add beads threaded on the tassel body or tie colorful metallic thread around the tassel head for shimmer.
- For delicate look, make micro-tassels from size 10 thread.
Finishing
- Use a tiny dab of clear glue inside the cap to glue the wrapped top in place for longevity. Press glue sparingly and let cure fully.
5. Crochet Interlocking Triangle Earrings Pattern
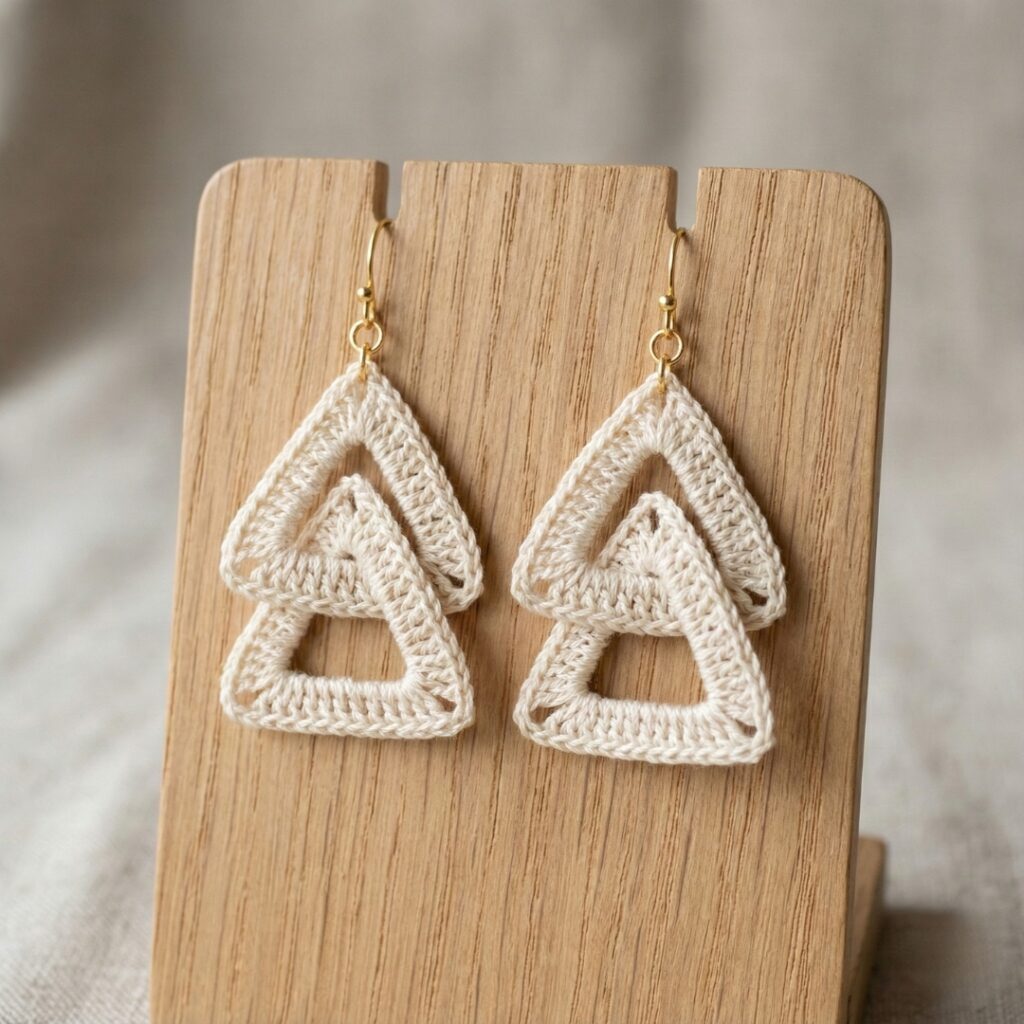
Vibe: Modern geometric style — tiny connected triangles stacked or interlocked for a contemporary look.
Skill level: Intermediate (small motif making + precise joining)
Materials (pair)
- Fingering yarn or fine cotton thread — ~10–20 yds.
- Hook: 2.0–3.0 mm.
- 2 ear hooks, 4–8 jump rings for interlocking.
- Pliers.
Finished size: Each triangle ~0.5″–1″; stack 2–3 for length 1″–3″.
Triangle motif (fast)
- Method A — tiny flat triangle: ch3, dc2 in 3rd ch from hook to make small triangle (very tiny). Or build slightly larger:
- Start MR; R1: ch3, 3 dc in MR; sl st to join (3 dc). R2: ch3, 2 dc in same st, turn, 1 dc in next, 2 dc in last to shape triangle. Adjust rounds to get desired width.
- Make multiples: Create as many triangles as you want to interlock (3–5 per earring). Block triangles to equal size.
- Join: Using small jump rings, connect triangle bases at corners so they interlock; or use slip stitch to join corners together for a cleaner finish (but that is less mobile). For interlocking effect, attach triangle A to triangle B via a tiny jump ring through two corner loops.
- Attach ear wire: Add a jump ring at top triangle corner and attach ear hook.
Variations
- Color-block triangles for a mid-century-modern look.
- Use metallic thread or hold a strand of metallic with the main yarn for sheen.
Finishing
- Make sure jump rings are closed fully with pliers. If motifs are very light, attach to small earring studs instead of hooks.
6. Crochet Beautiful Lace Square Earrings Pattern
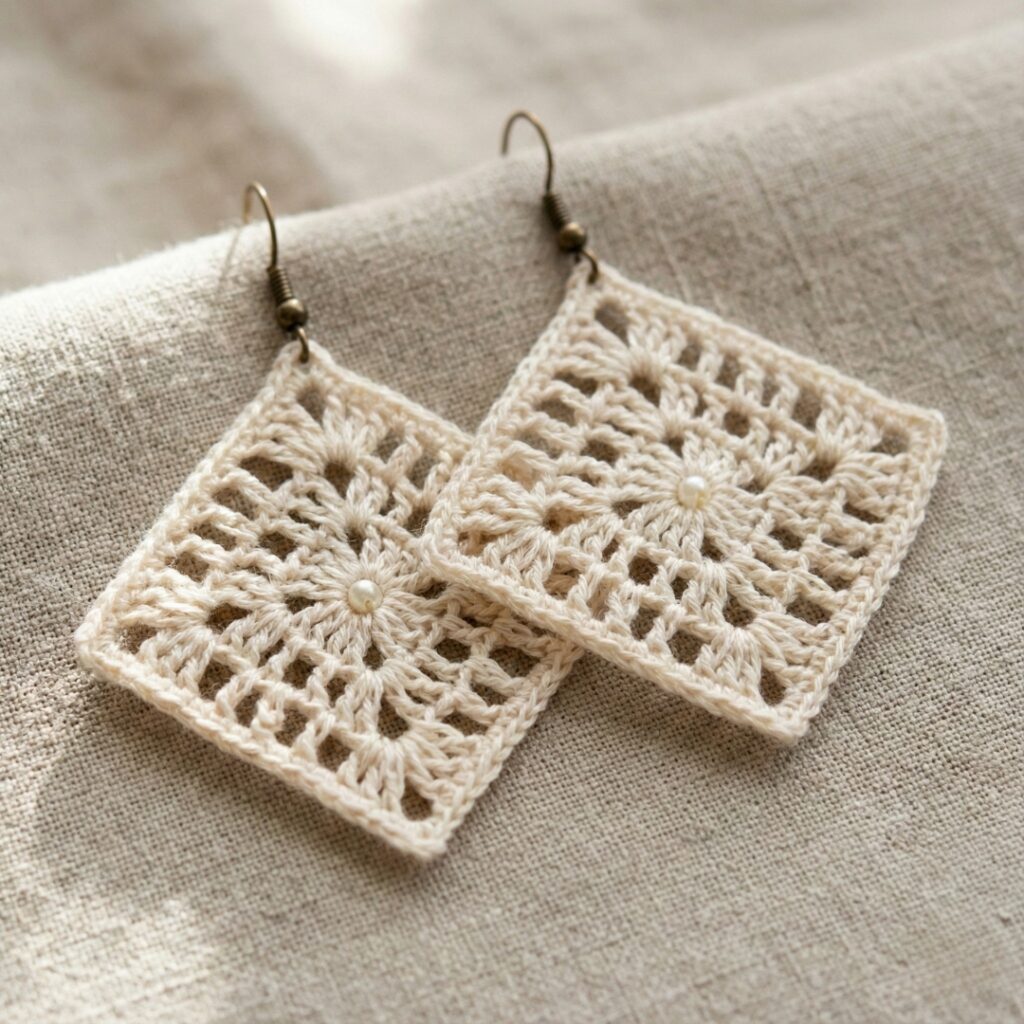
Vibe: Vintage lace squares reimagined as lightweight, elegant earrings — ideal for refined outfits.
Skill level: Intermediate → advanced (lace in miniature and blocking)
Materials (pair)
- Size 10 crochet thread or lace-weight yarn — ~10–20 yds.
- Hook: 1.75–2.25 mm.
- 2 ear hooks, 2 jump rings.
- Blocking pins and mat.
Finished size: square side ≈ 0.8″–1.5″ (20–40 mm) depending on motif and blocking.
Small lace square motif (filet or shell-based)
- Make motif: Example 6-round square
- R1: MR, ch3, 11 dc into MR (12 dc), sl st join.
- R2: ch3, 3 dc in next st to start first corner; across make (dc, ch2, dc) corners and dc clusters on sides — continue to make square shape. (You can use a small granny square variant or a miniature filet diamond.)
- R3–R5: Work a delicate shell row around making the square larger. Stop when the square is ~1″ across.
- Repeat: Make 2 identical squares for pair.
- Block: Wet-block each square pinned to exact size to open lace. Let dry completely.
- Mounting: Attach a tiny jump ring through one corner loop and attach ear hook. Alternatively, sew a tiny piece of felt to the back to reinforce and glue a stud post to make stud earrings (glue mount) — note: studs require a strong bond and allow 24-hour cure.
Variation — square with central cutwork
- Create a lacy square with a small cut-out center and add a tiny pearl sewn into the center for elegance.
Finishing
- After blocking, tack the center lightly through a few invisible stitches if the openwork is floppy; this helps maintain profile when worn.
Final tips for selling or gifting crochet earrings
- Make a small card with fiber content and care instructions to tuck into gift packaging.
- Quality control: Shake each earring gently and test jump rings & knots. Remove any loose threads.
- Lightweight design principle: If you plan to sell a lot, keep weight under ~3–4 grams per earring for comfort. Use hollow or wooden hoops and thread rather than bulky yarn for large shapes.
- Allergy note: Offer nickel-free or gold-filled findings and state the metal used.
Conclusion
These six patterns — Pop, Festival Hoop, Leaf, Tassel Boho, Interlocking Triangle, and Beautiful Lace Square — give you a compact but rich earring collection: playful, boho, botanical, geometric, and vintage-lace. Each pattern is written so you can:
- Make a pair quickly (often in under an hour for simpler designs),
- Scale and adapt yarn and hook to change the weight and look, and
- Add beads, metallic threads, or charms for personal flair.