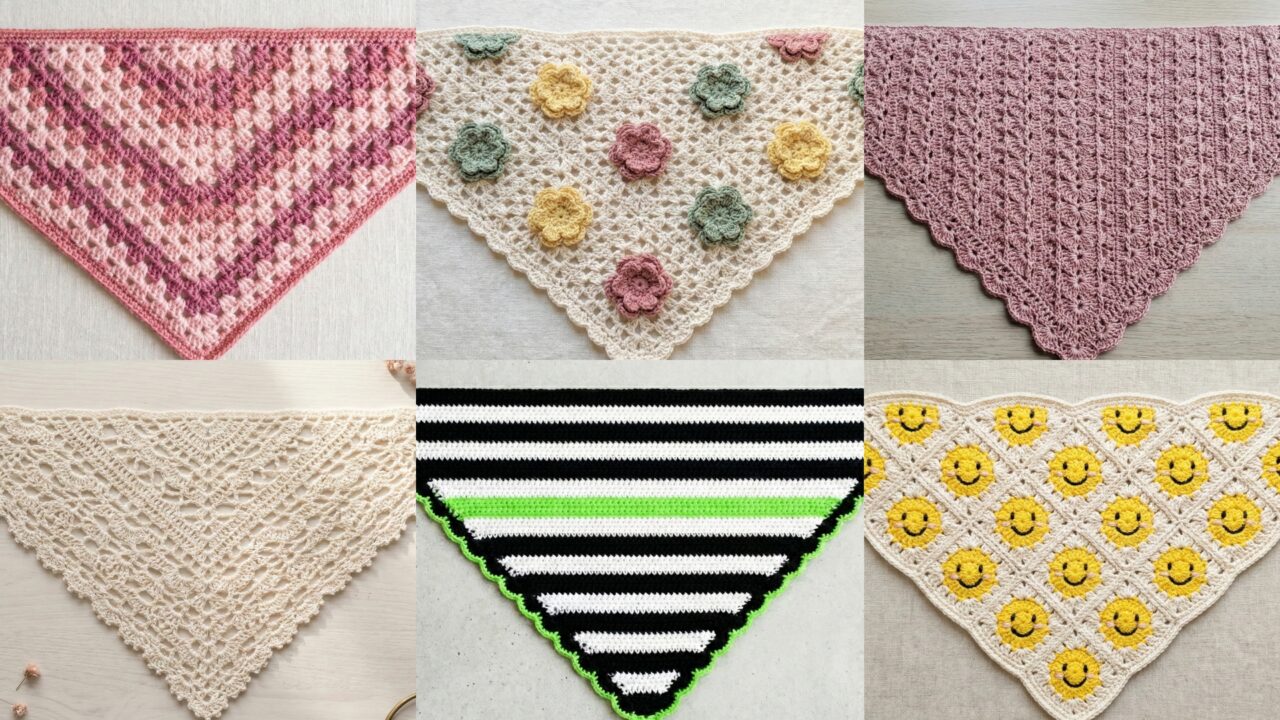
Bandanas are small, fast-to-make accessories that pack a lot of style: they’re wearable as headbands, neck scarves, bag accents, or pet bandanas. Below you’ll find one shared introduction that covers yarn, hooks, sizing and construction approaches followed by six fully detailed patterns you can use in your blog: Venus Shell Stitch Bandana, Beautiful Granny Square Bandana (pink shades only), Triangle Smiley Faces Bandana, Flower Bandana, Vintage Lacey Bandana, and Beetlejuice-Inspired Beautiful Bandana. Each pattern includes skill level, materials, a sample gauge and finished size, step-by-step instructions, variations, finishing and styling tips. The tone is clear, practical and human — written so makers from confident-beginners to intermediates can follow.
yarn, hooks, sizing, construction approaches & abbreviations
Yarn & fiber choices
- Cotton or cotton blends (DK or sport): breathable, great for warm weather bandanas and crisp stitch definition for shell and lace stitches.
- Merino/cotton blends or soft acrylic (DK): comfortable to wear against skin, drapes nicely for softer bandanas.
- Bulky / t-shirt yarn: for chunky, statement bandanas or those used as decorative bag accents (won’t fold into a small knot).
- Recommendation: DK or sport weight is the most versatile for bandanas — holds shape but still folds and ties comfortably.
Hook selection
- Use hook recommended by yarn label as starting point. For a firmer fabric (crisp shells or granny stitches) drop one hook size; for drapey lacy bandanas go up one size.
- Common hooks used here: 3.25–4.5 mm depending on stitch and yarn.
Sizes & how to plan
Bandanas are usually triangular. Decide the size you want:
- Small (headband / pet neck bandana): base width 14–16 in (35–40 cm), triangle height 6–8 in (15–20 cm).
- Medium (classic bandana for neck/head): base width 18–22 in, height 9–12 in.
- Large (wrap, large head scarf): base width 24–30 in, height 12–15 in.
I’ll give sample stitch counts for a medium size; scale by swatching:stitches per inch × target width.
Construction approaches used in these patterns
- Triangle worked flat from point to base (increase every row) — typical for shell and lace bandanas.
- Granny triangle (worked from center out) — great for granny square bandana made from partial granny motifs and fast color changes (pink shades only pattern).
- Motif assembly — join motifs (flowers, smiley faces) into triangular shape.
- Edging & finishing rounds — tidy edges and add decorative picots, loops or tassels for tying.
Blocking & finishing
- Blocking is key for lace, shell and vintage looks: wet-block or spray and pin to the correct triangular shape. For cotton, press gently or spray-block and allow to dry flat.
- Edgings: single crochet round for tidy edge, scallops for decoration, or eyelet round for drawstring loops.
Abbreviations (US)
- ch — chain
- sc — single crochet
- hdc — half double crochet
- dc — double crochet
- tr — treble (triple) crochet
- sl st — slip stitch
- st(s) — stitch(es)
- inc — increase (2 sts in same st)
- dec — decrease (sc2tog etc.)
- sp — space
- RS / WS — right side / wrong side
1. Crochet Venus Shell Stitch Bandana Pattern
Vibe: Feminine, textured shell stitch with a gentle scalloped edge — wearable as headband or neckerchief.
Skill level: Confident beginner (shell clusters, row increases).
Finished size (medium sample): Base ~20 in (50 cm); height ~10 in (25 cm).
Materials
- DK cotton or cotton-blend: ~120–160 yd.
- Hook: 4.0 mm (adjust to get drape you like).
- Stitch marker, tapestry needle, blocking pins.
Gauge (example): 18 dc = 4 in (10 cm) in shell pattern loosely worked; gauge less important — shape matters.
Construction overview
Work a center-out triangle from the lower point up to the base. Each row increases are placed symmetrically to keep triangle shape, and rows are worked in a shell pattern (clusters of dc) with odd rows building shells and even rows filling.
Abbreviations for this pattern
- shell = (2 dc, ch 1, 2 dc) in same st or space (adjust per row for visual balance).
Step-by-step
Foundation (point):
- ch 3, dc in 3rd ch from hook — this creates a small starting triangle point (counts as first shell center). OR MR, ch 3, dc 2 in MR, pull tight to make small starting shell (3 dc cluster).
Row 1 (RS): ch 3 (counts as dc), dc in same st to form 2 dc, turn — you have a tiny base.
Row 2: ch 3 (counts as dc), shell in same sp (2 dc, ch1, 2 dc), ch 1, shell in last st — turn. (Essentially you create two small shell clusters separated by ch spaces.)
Row 3 and onward (Increase rows): Working row increases on both edges and at the center:
- At the start of each row: ch 3 (counts as dc), work shell into the same st.
- Work shell clusters spaced by ch1 across the row.
- At center of each row, work an extra ch1 space (or ch2 depending on visual of shells) to create a visible center line and place a shell on either side — this is the standard triangle increase (one extra shell per row).
- End row with shell worked into turning chain area to create symmetrical edge.
Continue repeating Row 3-style until bandana reaches desired base width (measure across bottom). For a medium size, stop when base measures ~20 in.
Edging: After final row, work 1 round of sc around edges to tidy. Then optional scallop round: skip 1 st, 5 dc in next st, skip 1 st, sc in next st repeat to create shell edge. Weave in ends; block to shape, stretching base flat and pinning tip to a point.
Variations
- Make shells larger with (3 dc, ch1, 3 dc) or smaller with (2 dc, ch1, 2 dc).
- Work in gradient yarn for soft color transitions.
Finishing & styling
- Fold point to front for a neckerchief look or fold long sides and tie as headband. For a neater knot use a small picot or button loop on one corner.
2. Crochet Beautiful Granny Square Bandana Pattern

Vibe: Retro granny style updated with a monochrome pink palette — sweet, wearable and great for stash-busting pinks.
Skill level: Confident beginner (granny clusters and shaping).
Finished size (medium sample): Base ~18–20 in; height ~9–10 in (scalable by motifs).
Materials
- DK / worsted in shades of pink (light, rose, magenta, blush): total ~200–300 yd depending on number of squares.
- Hook: 4.0–4.5 mm (for classic granny look).
- Tapestry needle, sewing needle for join, blocking pins.
Construction overview
Assemble a triangular bandana by using a set number of half granny squares and quarter granny motifs arranged into a triangle (or make an actual triangle of granny clusters). Because user requested only pink shades, pick 3–4 pink values and alternate.
Method A — Triangle from concentric granny rounds (fast)
This method works a triangular granny by increasing granny clusters along the two diagonal edges in a shawl-like construction.
Foundation (center bottom point):
- MR, ch 3, 2 dc in ring, ch 2, 3 dc in ring — this forms first cluster with a ch2 space. (This is your base point.)
Row 1 (forming triangle): Turn to work along one side to increase: ch 3 (counts as dc), 2 dc in same ch-sp, ch 2, 3 dc in next ch-sp — but because it’s triangular you’ll place clusters on both sides and make increased corners: the standard crochet triangle granny shawl approach is to increase at the center ch-2 and at the end corners.
Simpler step-by-step approach:
- Row 1: Work 2 3-dc clusters separated by ch2 between them; at the end of row work a 3-dc cluster into the turning ch (so triangle grows).
- Row 2: ch 3, turn. Work clusters in each ch-2 space. At the center ch-2 space work 3 dc, ch 2, 3 dc (this makes the center increase). At the end work a cluster in the turning chain.
Repeat rows: each row the number of clusters increases by one on each side — the result is a triangle made from granny clusters. Alternate your pink shades every one or two rounds for stripes of pink. Keep consistent color order for pleasing gradient or shuffle for scrappy look.
Method B — Make granny squares and join into triangle
- Make a grid of full granny squares, then cut into triangles (less neat) or join squares in triangular arrangement: e.g., 3 squares base, 2 squares above, 1 square at top. Use half squares (modify pattern to start and stop earlier) to get perfect triangle. This is more advanced in planning; the concentric granny triangle above is simpler.
Edging & finishing
- Work 2 rounds of sc around triangle for a tidy edge. Add a decorative picot row or shell if desired. Block flat to even out squares and flatten granny texture.
Variations
- Add small crocheted flower appliqués in a deeper pink and sew them sparingly.
- Use small tassels at corners in alternating pinks.
Styling
- This monochrome pink granny bandana looks lovely against denim jackets, white tees or tied as a soft hairband. For a subtle look, pair with blush lip and minimal jewelry.
3. Crochet Triangle Smiley Faces Bandana Pattern

Vibe: Playful, youthful — tiny smiley face motifs worked into a triangular bandana using tapestry single crochet or appliqué.
Skill level: Intermediate (charted colorwork or appliqué placement).
Finished size (medium sample): Base ~20 in; height 10 in.
Materials
- DK cotton in background color (e.g., cream or grey) ~150–200 yd.
- Contrasting yarn for smileys (yellow, black, and optional cheek pink) ~50–80 yd total.
- Hook: 3.5–4.0 mm for tight tapestry work.
- Tapestry needle, stitch markers.
Construction overview
Two options: tapestry method (colorwork) — carry color and work small charted smileys into rows — or appliqué method — crochet tiny smiley discs and sew onto a simple triangle background.
Option A — Tapestry charted triangles (recommended for crisp motifs)
- Decide your chart resolution: e.g., make bandana 48 stitches wide. Plot small smiley charts that are 7–11 stitches wide and 6–8 rows tall so they’re recognizable.
- Work a basic triangle in single crochet in rows, carrying background and smiley colors per chart. Start point as ch 3, work triangle increases each row as explained in the shell bandana (increase at center and ends). Work row-by-row following chart: when you reach a column where smiley pixel is required, change to yellow for face, then add black eye/mouth pixels in appropriate stitches.
- Keep floats short; catch color every 3–4 stitches.
Option B — Appliqué smileys
- Make small round discs for faces (mr, 6 sc → increase rounds to make 7–9 st circle). Make many in yellow, then embroider eyes and mouth with black floss.
- Sew them onto a plain triangular bandana background (crocheted in sc or hdc). Arrange in rows or scattered for personality.
Step-by-step (tapestry triangle quick guide)
- Foundation: ch 3, dc to start small point or sc-based starting method. Use sc for dense tapestry.
- Working rows: each row increase at center and edges — mimic approach from shell bandana but using sc as fabric base.
- Chart placement: ensure smiley charts align on center rows or stagger for pattern. Keep smileys at least 4–6 sts from edges to ensure stable tie corners.
Variations
- Make different emoticons (hearts, winks, sunglasses).
- Use a bright background and contrasting black smileys for graphic appeal.
Finishing
- sc round to tidy; optional small fringe with yellow and black in corner for playful finish. Block carefully (tapestry can be heavy with color floats).
4. Crochet Flower Bandana Pattern
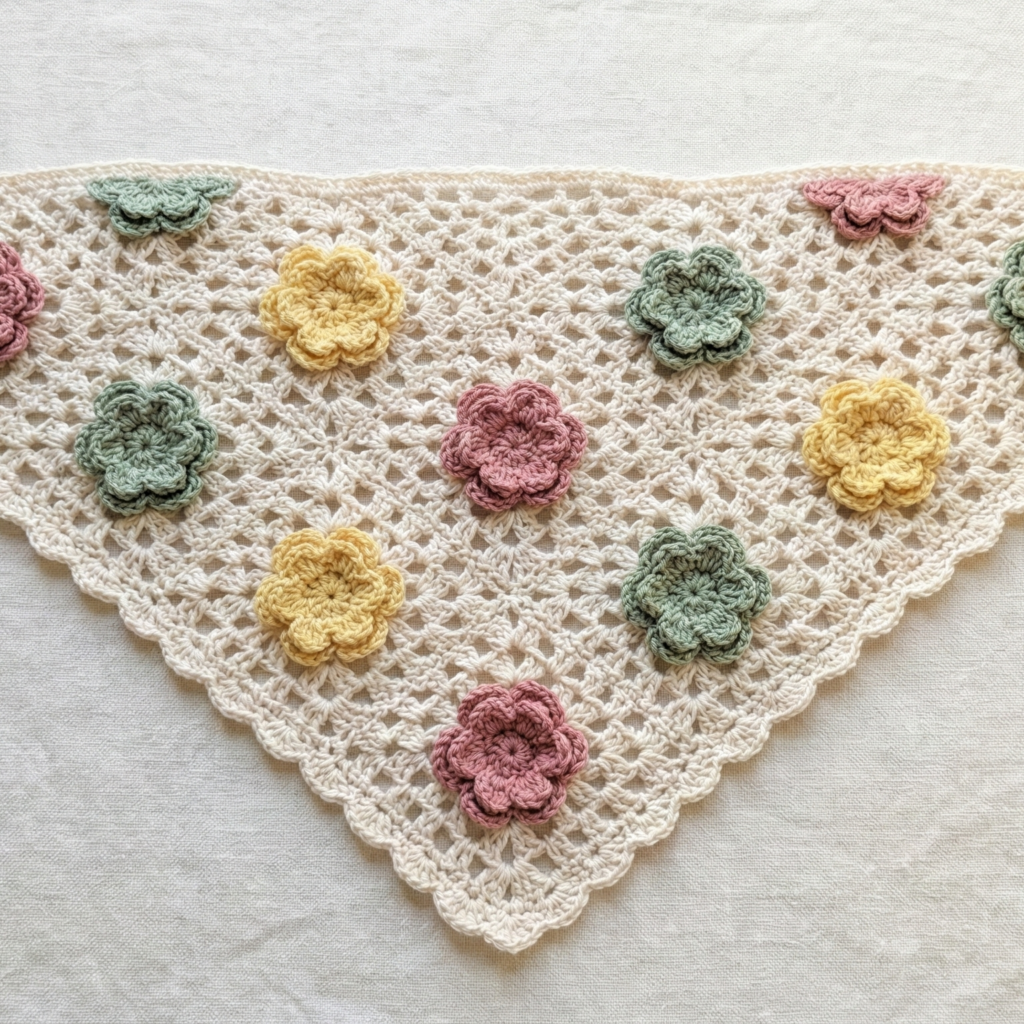
Vibe: Classic floral — central flower medallion(s) with lacy background or clustered small flowers across triangular bandana.
Skill level: Intermediate (appliqués, joining or lacy background stitches).
Finished size (medium sample): Base ~22 in; height ~11 in.
Materials
- DK yarn for background (neutral) ~150–200 yd.
- Contrasting colors for flowers (two or three shades) ~80–120 yd.
- Hook: 3.5–4.0 mm.
- Tapestry needle, blocking pins.
Construction overview
Make either a single large floral medallion at the triangle center (worked then shaped to triangle) or make many small floral appliqués and sew to a lacy triangle background worked in mesh or shell stitch.
Method A — Single medallion set into triangle
- Crochet a round floral mandala (6–8 in diameter) with layered petals.
- Work a triangular background panel with mesh or lacy stitch and leave an opening to inset the mandala, sewing it securely into place so that mandala sits centered.
Method B — Small flower cluster appliqués
- Make small 5-petal flowers (MR, ch1; 5 sc in MR; R2 ch3, 3 dc in same st, sl st in next etc.) — make 12–18 depending on size.
- Crochet triangle base in airy mesh (ch1, sc in next row with ch-spaces) or in shell stitch for more texture.
- Arrange and sew flowers across triangle in a balanced composition; tack only at centers to let petals float.
Step-by-step (triangle base in shell + appliqués)
Base: ch 4, join to make ring. Row 1: ch 3, dc 2 in ring, ch 1, dc 3 in ring — to form initial shell. For a triangular base you may prefer starting with a small ch and building rows with increases at center; choose triangle-from-point method in shell if you want the medallion centered.
Appliqués (5-petal small flower):
- MR, ch1, 5 sc in MR, pull tight (5).
- ch3, 3 dc in next st, ch3, sl st in next st repeat around to create petals. Fasten and leave tail to sew.
Assembly: Pin flowers in place, hand sew with matching yarn or embroidery thread through center multiple times for security. Block and steam lightly to flatten petals as desired.
Variations
- Add small leaves between flowers.
- Embroider tiny bead centers (for non-child toys) or French knots for texture.
Finishing & styling
- Sc round or narrow scallop edge to frame. Tie as bandana or fold into headband for a vintage vibe.
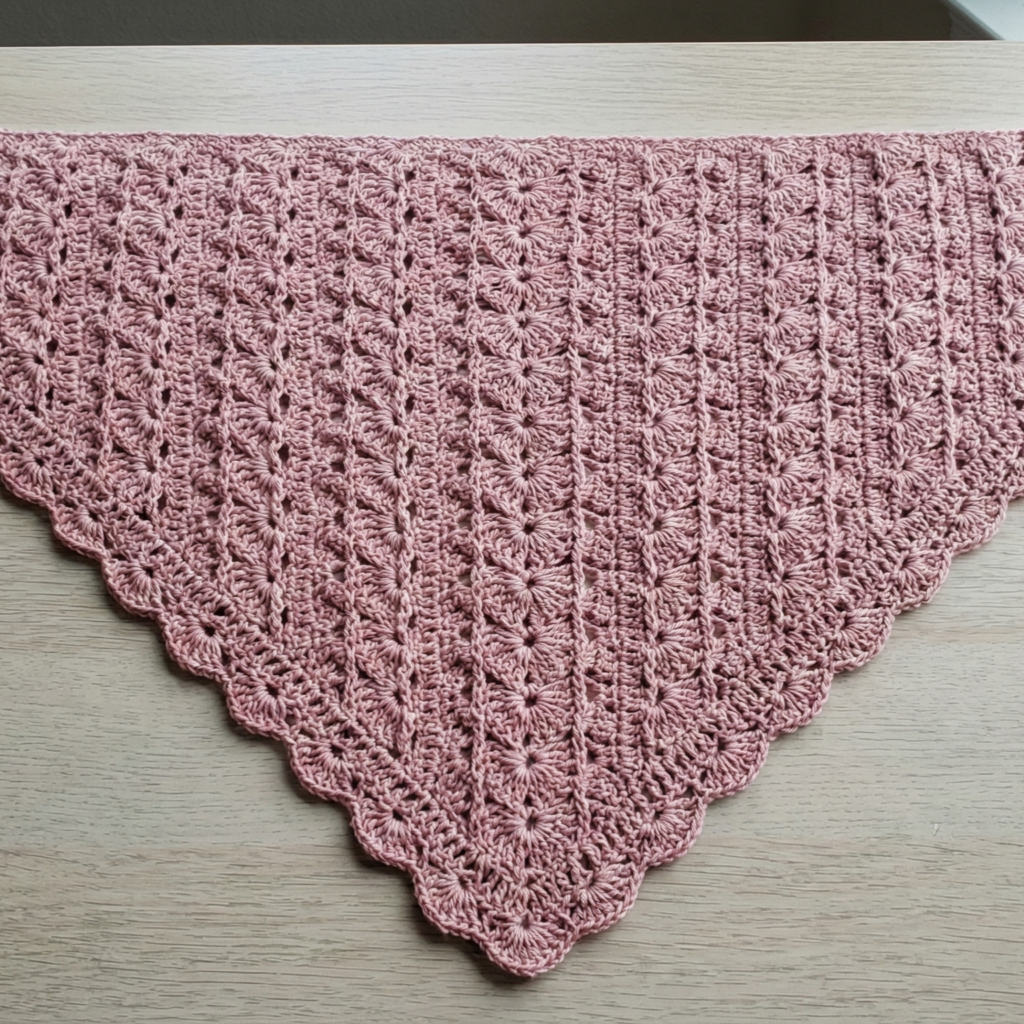
5. Crochet Vintage Lacey Bandana Pattern
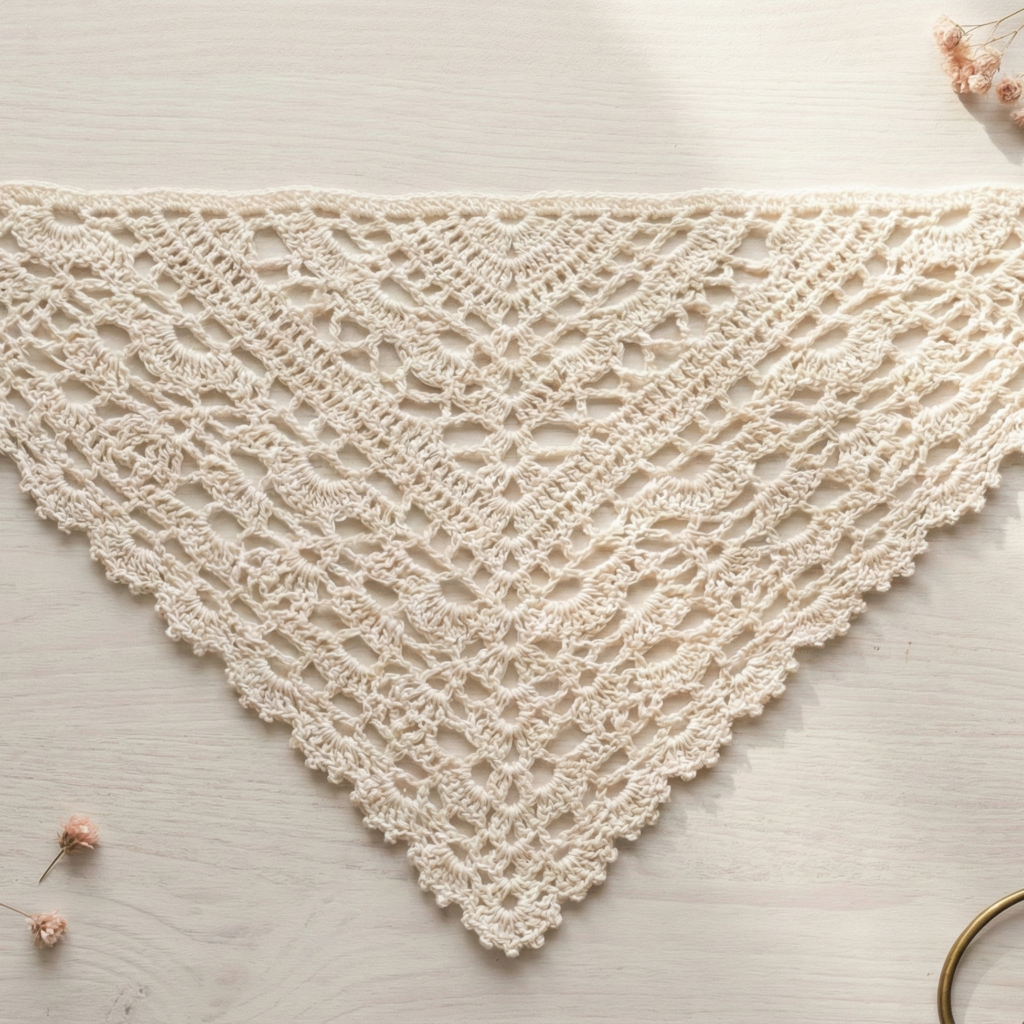
Vibe: Delicate, heirloom-inspired lace that reads vintage — airy but structured, perfect for dressing up.
Skill level: Intermediate → advanced (lace repeats, precise blocking).
Finished size (medium sample): Base 20–22 in; height 10–12 in.
Materials
- Fine DK / sport cotton for crisp lace — ~150–200 yd.
- Hook: 3.0–3.5 mm.
- Blocking wires, pins and a flat blocking surface.
Construction overview
Work triangular bandana in a repeating lace chart such as shell-and-chain or filet patterns to create open, floral-looking motifs. Use consistent stitch tension and block carefully to open the lace.
Example stitch repeat (lace V-stitch triangle)
- Pattern repeat: Row of V-stitches (dc, ch1, dc) separated by chains, alternating with rows of sc or treble chain rows to create openness.
Step-by-step (V-stitch triangle sample)
Foundation / point: ch 3, dc in 3rd ch from hook to make small starting point.
Row 1: ch 3 (counts as dc), dc in same st; turn.
Row 2 (increase): ch 3, dc in same st; ch 1, skip to center space, (dc, ch1, dc) in center chain space to form V; continue placing V-stitches across; end with two dc in last st.
Row 3 (filling row): ch 3, turn, work sc or dc across into V-stitch center spaces to stabilize.
Repeat rows following your chosen lace chart — increases occur at center and edges. Repeat until base width achieved.
Edging: Work a narrow picot or shell trim: sc across, picot (ch3, sl st into first ch), sc every few stitches for a pointed delicate edge.
Blocking
Because this is lace, blocking transforms the piece. Dampen (or spray) and pin to triangular dimensions, using wires along straight edges for smooth lines and pins at points to create crisp, open lace.
Variations
- Work filet blocks (solid vs open squares) to form small motifs like hearts or flowers across the triangle.
- Add a narrow crocheted lace fringe along the bottom for vintage charm.
Tips
- Use a stitch marker at center and edges to ensure increases are placed correctly.
- Lace benefits from a hook slightly larger than yarn label for airier openness — but test swatch and block.
6. Crochet Beetlejuice-Inspired Beautiful Bandana Pattern
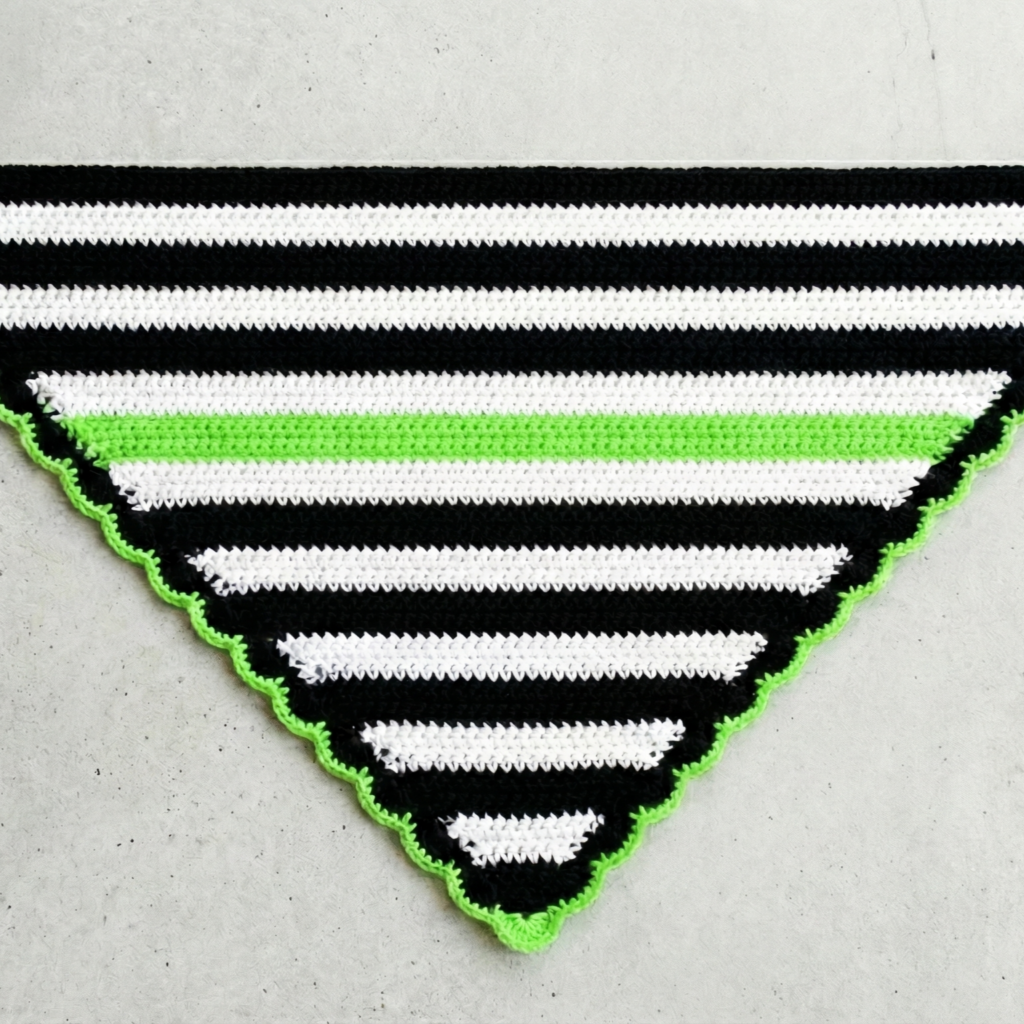
Vibe: Bold, graphic, retro — high-contrast stripes and playful edge details inspired by Beetlejuice-style black/white motifs with an accent color (neon green or purple). Great for streetwear or statement accessories.
Skill level: Confident beginner → intermediate (striping, color changes, crisp edges).
Finished size (medium sample): Base 22 in; height 10 in.
Materials
- DK yarn: black and white (~100 yd each), accent color (neon green or purple) ~40 yd.
- Hook: 4.0 mm.
- Tapestry needle, stitch markers.
Construction overview
Work a triangular bandana in rows of single or half-double crochet with bold stripes: alternate black and white stripes (2–4 rows per stripe) and an accent stripe along the bottom edge or center line. Crisp color changes are achieved by changing color in last yarn over of previous stitch so the new color starts the next stitch.
Step-by-step (striped triangle)
Start (point): ch 3, dc in 3rd ch from hook OR MR method for sc-based triangle.
Stripe pattern idea: For a bold Beetlejuice look alternate:
- 4 rows black, 4 rows white, 2 rows accent, then repeat.
- Place accent stripe either centered (via row count) or at bottom as a border.
Row increases: Standard triangle increases as used previously — increase at center (extra dc cluster or sc increase) and edges to maintain triangle shape.
Color technique: When switching colors, finish last stitch of old color to last yarn over with new color so the join is tidy. Carry colors up the side if only changing a few rows, or cut and weave ends for crisp clean edges.
Edge treatment: For a playful Hirsch twist, after final row work a bold accent scallop: with accent color, sc in next st, ch 3, skip 2 or do a pointed picot edge in black/white alternating for a striped effect.
Variations
- Add a small appliqué bat or beetle in accent color at the corner.
- Use a chevron (instead of triangle) by adjusting stitch pattern for zigzag stripes.
Styling & finishing
- This bandana is a statement piece — wear folded as a neckerchief, tied on a bag strap, or as a headband. Contrast it against solid neutral clothing.
conclusion
Final finishing checklist
- Weave in all ends securely on WS. For colorwork that will be washed frequently, weave tails back through several stitches for longevity.
- Block: lace and shell patterns benefit hugely from blocking. Pin to triangular dimensions and allow to dry fully. Use blocking wires for straight edges if you have them.
- Edges: tidy edges with a sc round or decorative scallop. Eyelets or picot edges add a button loop or tie option at a corner.
- Labeling & notes: include fiber and wash info in blog pattern: e.g., “100% cotton: machine wash gentle, reshape and lay flat to dry.”
Care instructions to include on your post
- Cotton & blends: machine wash gentle in cold water, reshape and lay flat to dry. Avoid tumble dry to preserve shape and blocking.
- Lace bandanas: hand wash recommended and re-block to shape.
Styling and photography tips for the blog
- Photograph bandanas both flat (to show stitch detail and shape) and worn (modeled or draped on a mannequin).
- Include close-up shots of stitch texture (especially for shell, granny and lace patterns) and of the tying/corner details.
- Use neutral backgrounds for colorful pieces, and consider including a scale object (ruler or coin) or a model shot to show finished size.
Selling & pattern promotion tips
- Offer downloadable PDF with printable charts for granny, smiley and lace charts.
- Provide ready-made variations (sizes S/M/L) and a short “how to scale” guide so readers can customize.
- Make short reels or step-by-step photos showing the bandana being tied and styled — great content for Pinterest & Instagram.