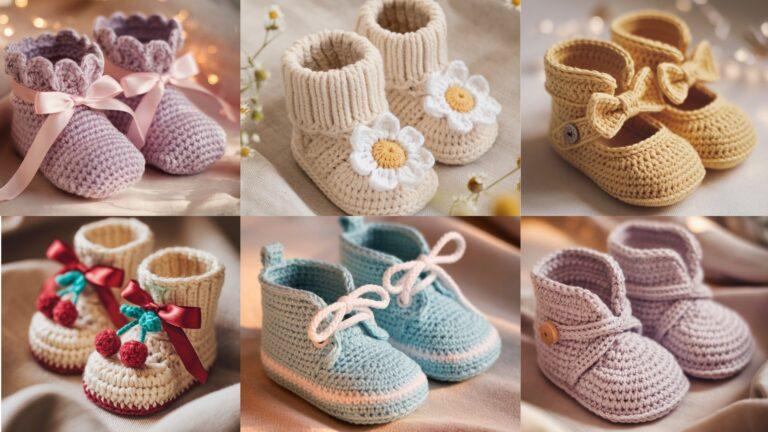
Crocheting baby socks is a joy: small projects that work up fast, make perfect handmade gifts, and give you practice in shaping (heels and toes) in a tiny, satisfying scale. Below you’ll find a single practical introduction (materials, sizing & gauge primer, safety notes, abbreviations) followed by six full, detailed patterns. Each pattern contains: skill level, materials and yardage, a sample gauge, finished sizes and how to scale (with clear digit-by-digit arithmetic examples), a step-by-step construction (cuff → leg → heel → gusset/foot → toe or toe-up alternative where noted), finishing, variations, and care.
All patterns use US crochet terms.
Before you start — materials, sizing & gauge primer, safety
Materials (per pair, newborn sample unless noted)
- Yarn: soft baby yarn (fingering/sport weight or DK depending on pattern). For newborn pairs ~50–100 yards total; for 3–6 months ~75–125 yards. Choose a soft, washable fiber (superwash wool, cotton blends, or acrylic blends).
- Hook: 2.5–4.0 mm depending on yarn weight and desired fabric tightness. Use a slightly smaller hook than label suggestion for socks so stitches are dense and don’t stretch open.
- Notions: tapestry needle, small stitch marker, removable stitch marker or scrap yarn. Optional: small amount of elastic thread for ankle stability (sewn into cuff), pom-pom maker for decorative tops.
- Safety note: do not add beads, buttons, bells, or anything detachable if the socks are for infants likely to mouth or chew. Embroidery should be secure and discreet.
Abbreviations (US)
- ch = chain
- sc = single crochet
- hdc = half double crochet
- dc = double crochet
- inc = increase (2 sc in same st)
- dec = decrease (sc2tog)
- sl st = slip stitch
- st(s) = stitch(es)
- RS / WS = right side / wrong side
- MR = magic ring
Baby sizes & sample foot lengths (common)
- Newborn (0–3 months): foot length ≈ 3.5 in
- 3–6 months: foot length ≈ 4.0 in
- 6–12 months: foot length ≈ 4.5–5.0 in
Always measure actual baby’s foot if possible. For this post we’ll use newborn (3.5 in) as the primary worked example; for other sizes scale as described.
Gauge & converting measurements to stitches — example (digit-by-digit)
Make a 4″ swatch in the stitch you intend to use and block it as you will finish the sock. Measure stitches per inch (spi) and rows per inch (rpi).
Sample swatch: suppose you get 8 stitches per inch (spi = 8) in sc with the hook/yarn you chose.
To calculate how many stitches to work across the sole/foot width from a desired foot length, do this:
- Desired foot length for newborn = 3.5 in.
- spi = 8 sts/in.
Calculate stitches across (assuming working in rounds with X stitches around heritage; target will vary by construction — here we show a simple conversion for foot circumference where needed):
- Multiply 3.5 × 8.
- Break 3.5 into 3 + 0.5:
- 3 × 8 = 24.
- 0.5 × 8 = 4.
- Add: 24 + 4 = 28 stitches.
So, for this sample gauge a 3.5 in foot will map to 28 stitches across that dimension. For parts worked in rounds (e.g., sole or cuff), you’ll split this number appropriately for the pattern (for example 28 stitches around foot circumference or half for toe-up starts). If your gauge is different, substitute your spi and recompute digit-by-digit the same way.
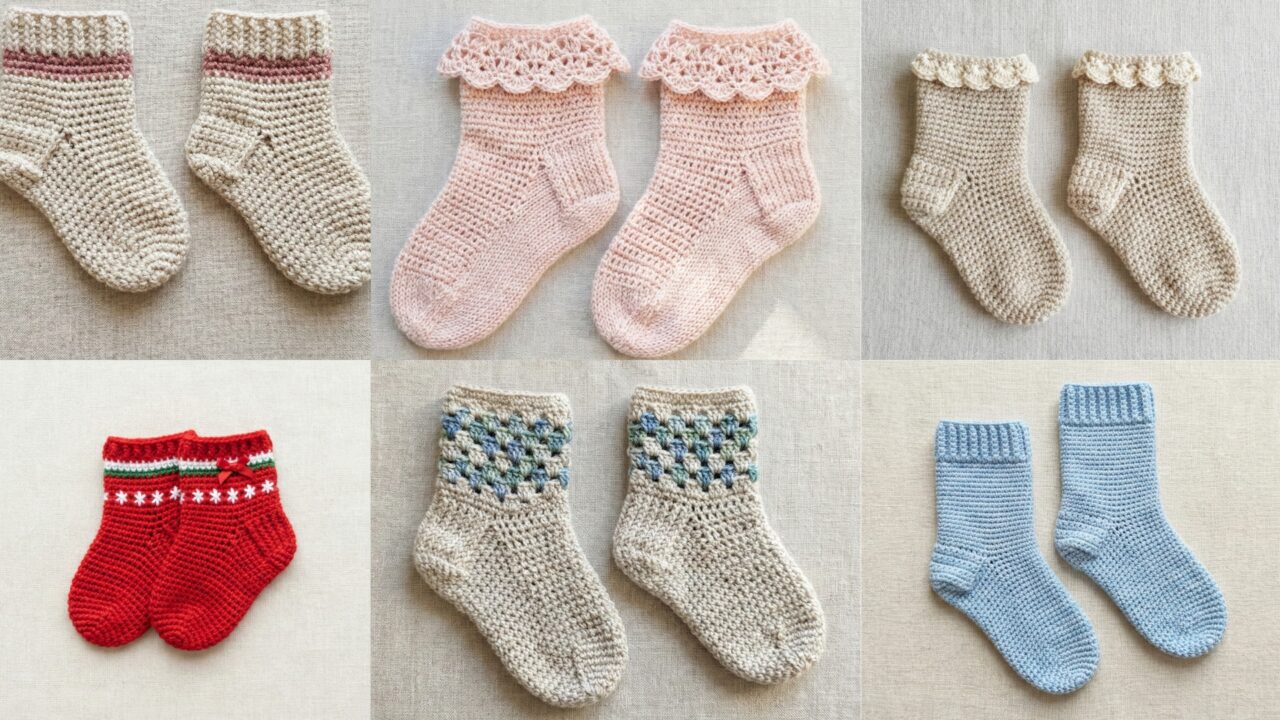
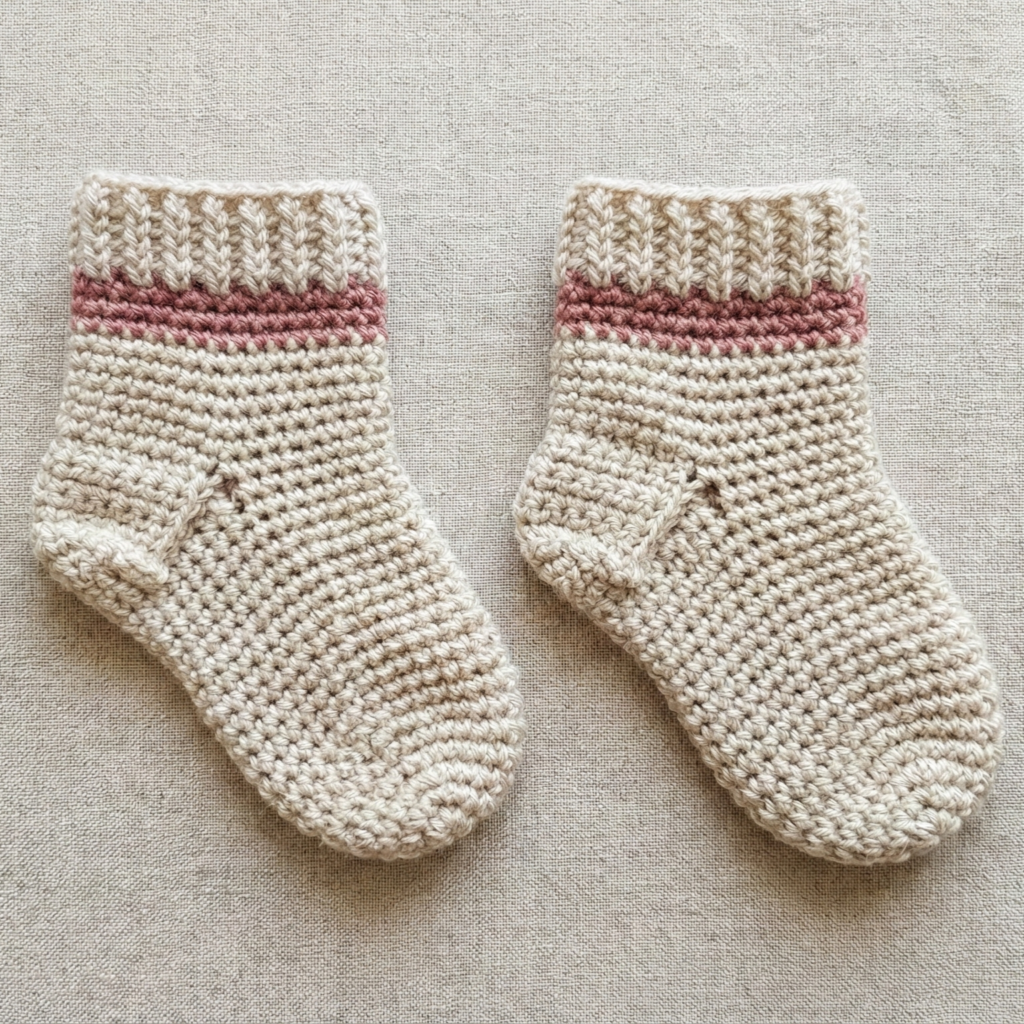
1. Crochet Two-Toned Baby Socks Pattern
Skill level: Confident beginner (basic shaping: heel flap & gusset)
Materials
- Fingering/sport weight baby yarn in MC and small contrast CC for cuff stripe. Approx 50–75 yd total for newborn pair.
- Hook: 3.25 mm (adjust to your gauge; sample uses 8 sts/in in sc).
- Notions: tapestry needle, stitch marker.
Sample gauge (sc in rounds): 8 sts × 10 rounds = 1 in (spi = 8; rpi = 10).
Finished size (sample newborn): foot length ≈ 3.5 in; see sample conversion above -> 28 stitches circumference sample.
Pattern multiple: none strict; however total round stitches should be even for heel shaping. We will aim for 28 sts around the foot at sample gauge.
Construction overview
Cuff-down construction:
- Rib cuff in alternating sc/hdc or front-loop sc for stretch.
- Leg body (simple rounds), optional color stripe.
- Heel flap (worked back and forth on half the stitches).
- Turn heel and pick up gusset sts, decrease to foot stitch count.
- Work foot to toe; close with invisible graft (kitchener-like) or decrease rounds and sl st.
Step-by-step (Newborn sample; digit math used where needed)
Cuff (two-toned stripe)
- With CC (contrast), ch 30 and join into ring carefully (or use foundation sc to avoid twist). We want 28 sts around; chain 30 accounts for a ch + 28 + join allowance. Alternatively work foundation sc 28. For clarity: chain 29 (28 + 1 turn), sl st to first chain to form ring (this is one way to start; fewer prefer foundation sc). If using foundation sc: work foundation sc 28 to create 28-stable ring.
- Round 1 (RS): sc in each st around — (28). Place marker.
- Rounds 2–8: work sc in FLO (front loop only) around to create ribbed band (7 rounds). Switch to MC on final round of rib and work one round even sc in MC to hide transitions.
(If you want a tighter cuff, do 10–12 rounds of FLO sc.)
Leg
4. With MC, work rounds in sc (or dc/hdc for a slouchier look). Work 6 rounds for a short newborn leg; measure as you go.
Heel flap
5. For heel flap, work back-and-forth on half the stitches = 28 ÷ 2 = 14 sts. (Digit calculation: 28 divided by 2 = 14.)
6. Join yarn at next st to be the first heel stitch. Row 1 (RS): sl st, ch1, sc in next 14 sts across the heel half, turn. (You are making a reinforced heel flap in sc.)
7. Rows 2–6: ch1, sc across 14 sts, turn — work 5 more rows (total 6 rows) to form a rectangular heel flap. For extra durability, work slip st reinforcement: on WS row, sl st into previous row’s edge sts.
Turn the heel
8. After last RS row, we shape the heel by short-row decreases:
- Row 1: Pick up and sc 10 sts across middle of heel flap, sc2tog, sc in next stitch, turn. (You’ll follow a standard heel turn sequence: sc to center, dec, sc on turn, etc.) Because heel shaping varies by technique, if unfamiliar use this standard:
- Continue working short rows decreasing one stitch at the end of RS and WS until about 6–8 sts remain; then close the gap by sc around the heel cup.
Gusset
9. Pick up stitches along the edge of the heel flap: pick up 7 stitches along one side, then work across instep stitches (need original 28 -14 =14 instep sts), then pick up 7 stitches on the other side = 7 + 14 + 7 = 28 stitches total again. (Digit math: 7 + 14 + 7 = 28).
10. Begin gusset decrease rounds: Round 1: sc around, noticing 28 sts. Round 2: sc to 3 sts before first picked-up group, sc2tog, sc in picked-up group, sc across instep, sc in picked-up group, sc2tog — one decrease pair per round. Repeat decrease round every other round until you are back to 28 sts total (or until desired snugness is reached). For newborn usually 1–2 decrease rounds suffice.
Foot
11. Work even rounds in sc for the foot length: convert desired foot length (3.5 in) to rows using rpi sample (10 rows/in): 3.5 × 10 = (3 × 10) + (0.5 × 10) = 30 + 5 = 35 rows. Several of those rows are already worked above (leg+heel), so work enough rounds to reach toe area leaving about 1 in before toe shaping.
Toe shaping
12. Toe decreases: Work decrease round: sc to 3 sts before marker, sc2tog, sc in next group, mirrored on opposite side — decrease 2 sts per round. Repeat decrease round every round until 8–10 sts remain. Fasten off leaving long tail, weave through remaining sts and pull closed (or graft if you prefer a flatter seam). Weave ends.
Finishing & stripe detail
13. Add one contrast stripe round in CC near cuff before finishing for the two-tone look: after leg rounds, change to CC for 1–2 rounds then return to MC for heel/foot.
Variations
- Replace sc with hdc for a loftier sock.
- For toe-up variation, start with magic ring toe of 8–10 sts and increase to 28 sts, then work foot → gusset → leg → cuff.
Care
- Machine wash gentle if yarn allows; dry flat.
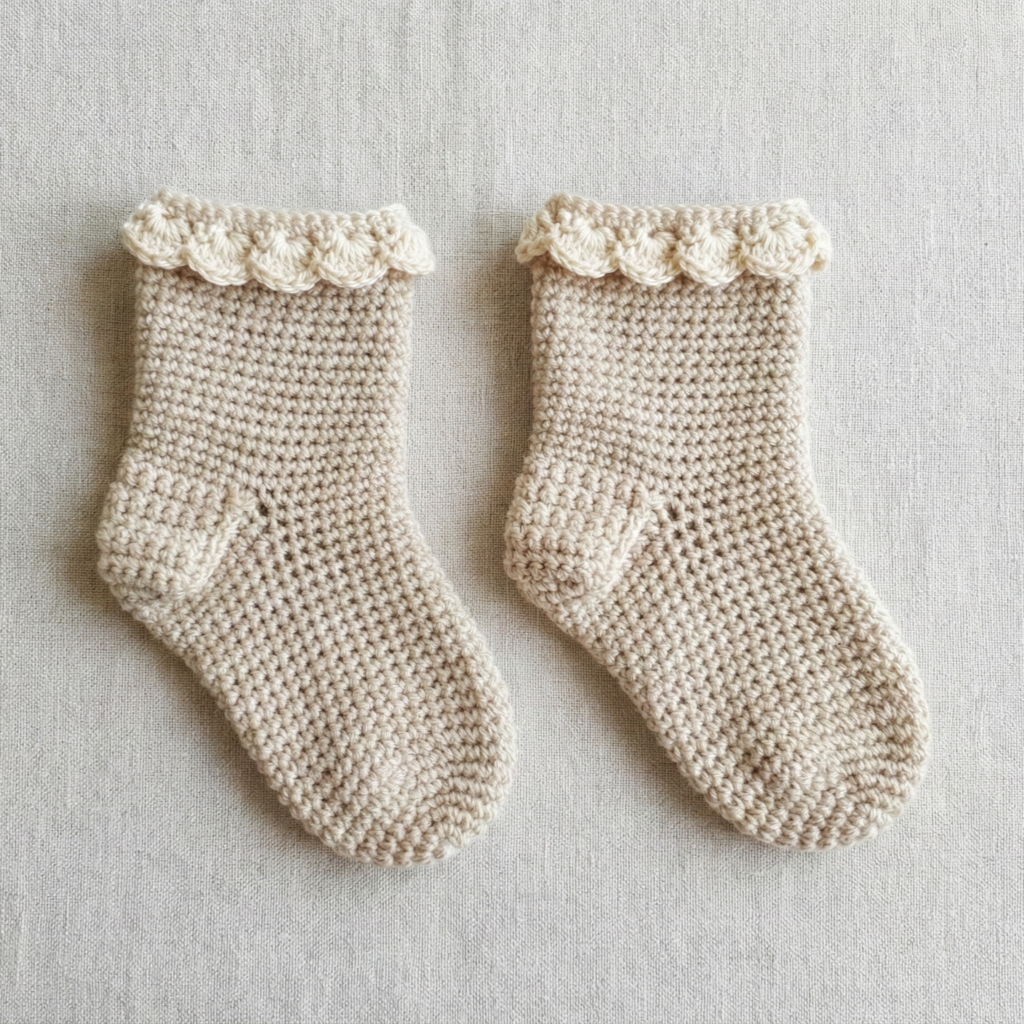
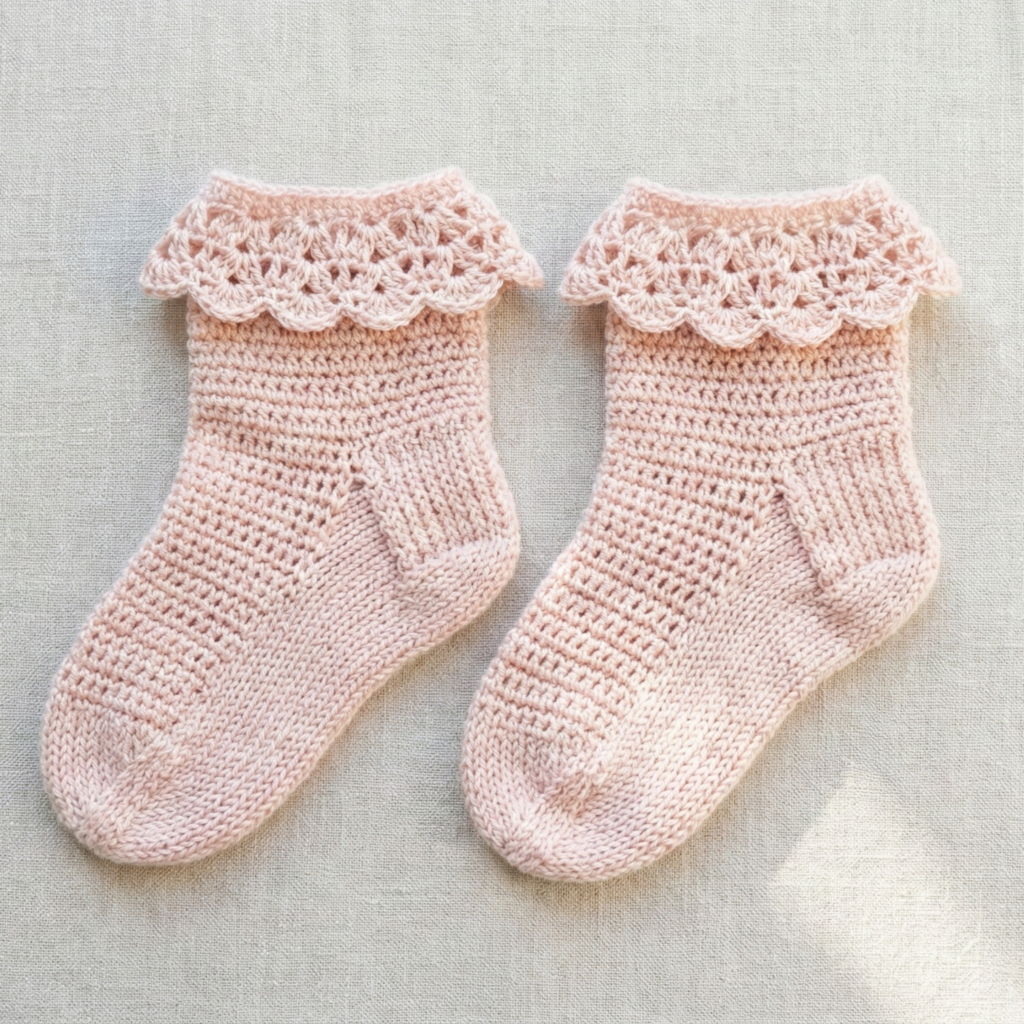
2. Crochet Baby Socks with Ruffles Pattern
Skill level: Intermediate (same construction as A plus ruffle work)
Materials
- Soft baby DK yarn ~75–100 yd.
- Hook: 3.25–3.5 mm.
- Notions: tapestry needle.
Idea
Same basic construction as Pattern A but finish cuff with a pretty ruffled edge (shells) and optional picot bind-off.
Key differences & steps
- Work cuff as in Pattern A but stop after 6 rounds. Switch to MC and work 3 rounds of sc to stabilize.
- Ruffles: Round (shell edge): sc in next st, skip 1, (5 dc) in next st, skip 1, sc in next st repeat around to create shells. For a tighter frill, do 7 dc per shell; for subtle ruffle do 3 dc per shell.
- Continue with heel/foot/toe as Pattern A. The ruffle remains at top and will flare outward.
- For a tiny decorative bow, crochet a small narrow band and tie into bow and stitch to side of cuff (do not use small sewn-on beads on baby items).
Care
- Ruffle may catch; machine wash gentle recommended.
3. Crochet Baby Lace Frills Socks Pattern
Skill level: Intermediate (lace patterns + toe shaping)
Materials
- Fingering weight baby yarn ~75–100 yd.
- Hook: 2.75–3.25 mm (smaller to hold lace neat).
- Notions: tapestry needle.
Construction overview
This pattern uses toe-up construction so the lace frill at the cuff is worked last and looks tidy. Toe-up is great because you can try on and fit length as you go.
Sample gauge: 9 sts/in in sc (tighter); adjust for lace.
Step-by-step (toe-up newborn sample)
Toe
- Start with MR, 6 sc in MR — (6). R2: inc in each st → 12. R3: sc, inc repeat → 18. R4: sc x2, inc → 24. Continue increases every round until you have 28 sts around (same digit conversion as sample earlier). Stop increases when you reach 28 sts.
Foot & gusset
2. Work even sc rounds until you reach about 2/3 of the foot length (for 3.5 in sample with rpi 10, do ~35 rows total; so maybe 20–22 rows before starting gusset/heel).
3. Divide for heel/gusset: mark midline, work heel flap flat on half of stitches (14 sts), row back and forth for 6 rows, turn heel similarly to heel-flap method but reversed for toe-up (create short rows to make a cup).
Leg & lace cuff
4. After gusset and joining, work leg rounds until desired leg height (for newborn maybe 1.5–2 in). Then work lace cuff pattern for 3–4 rounds: example lace repeat: ch2, sk1, sc in next st as base, then shell round 5 dc in next ch space to form frill. Because it’s toe-up, the lace cuff sits neatly at top.
Finishing
5. Add a small picot bind-off if desired: sc, ch3, sl st into same st every 3–4 sts. Weave in ends.
Variations
- Use an eyelet round (ch1 spaces) for tiny drawstring tie (soft ribbon or crocheted cord) — make sure ribbon loops are short and secure.
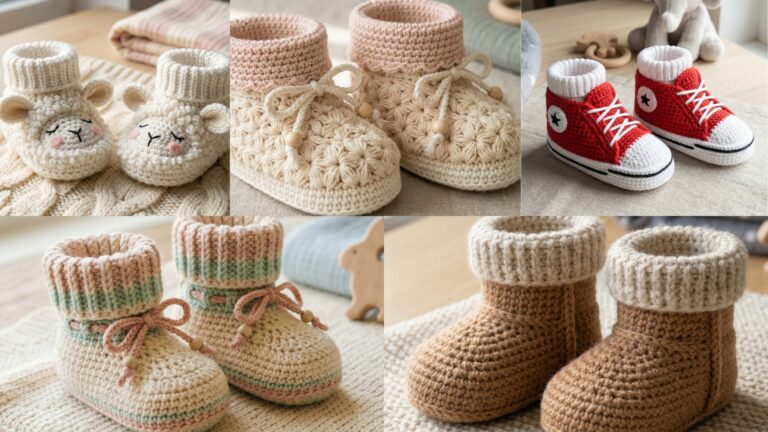
4. Crochet Paton Kroy Granny Baby Socks Pattern
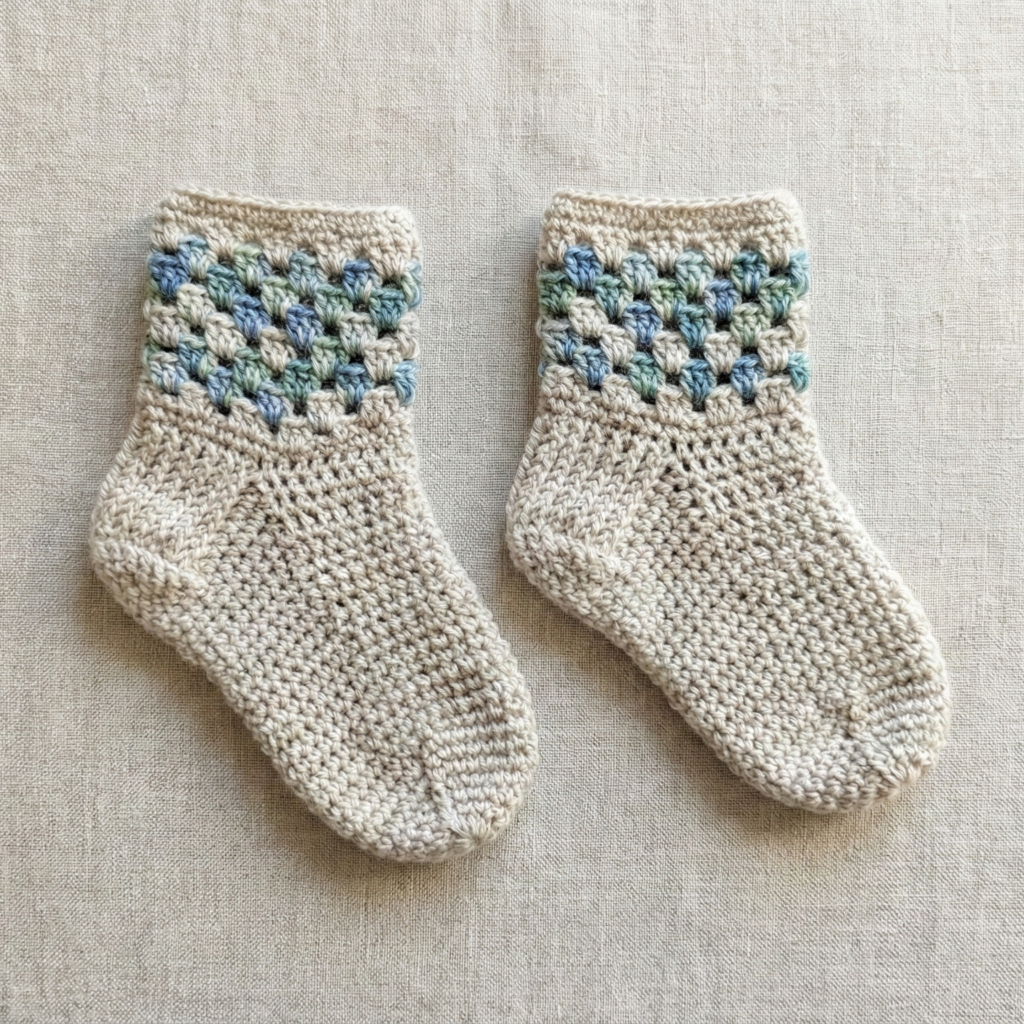
Skill level: Intermediate (granny motif panel + sock shaping)
Materials
- DK yarn (Patons Kroy or similar) variegated for granny accents ~75–100 yd.
- Hook: 3.5 mm.
- Notions: tapestry needle.
Concept
Use tiny granny clusters as decorative panels along the leg or cuff while the rest of the sock is worked in plain sc/hdc for structure.
Construction highlights
- Work the sole/foot as in Pattern A (cuff-down) with 28 sts target.
- When you reach the leg, break yarn and work 6 rounds of mini granny motifs spaced every 6 sts around the cuff: granny motif = (3 dc) cluster, ch2 in one st then skip to next motif position. Alternatively, work a band of granny rounds: Round granny band: (3 dc, ch2, 3 dc) in same st, skip 3, sl st repeat — this forms little granny shells around cuff.
- Continue with pattern, making sure motif rows remain balanced and stitches divisible by motif multiple. If total stitches 28, a motif repeat every 4 sts fits 7 motifs around (28 ÷ 4 = 7). Digit math: 28 ÷ 4 = 7 exactly.
Finishing
- Add small, soft tassels at cuff if desired (short, sewn securely).
5. Crochet Christmas Baby Socks Pattern

Skill level: Intermediate (simple colorwork / stranded or slip-stitch)
Materials
- Sport/DK yarn in red, white, and green small amounts; total ~75–100 yd.
- Hook: 3.25 mm.
- Notions: tapestry needle.
Idea
Add holiday motifs around the ankle using simple stranded slip-stitch colorwork or duplicate-stitch embroidery after finishing.
Key steps
- Work base sock as Pattern A (cuff-down). For newborn keep base color MC (e.g., red).
- At the leg, work a stranded round or two of motif: small fair-isle pattern such as white snowflake dot every 4 sts, or a slip-stitch chart (no floats required) so the inside remains smooth. Example: with MC red, work a round where every 6th stitch you do a white sc to create little dots. Because 28 sts ÷ 7 = 4, spacing works for small symmetrical repeats. Digit math example: 28 ÷ 7 = 4.
- Heel and foot proceed as usual. Add a tiny pom-pom or soft fabric bow at cuff (sewn and secured but avoid small detachable bits for infant safety).
Variations
- Make cuff in faux fur yarn for plush holiday look (ensure yarn is washable and not prone to shedding).
6. Crochet Baby Crew Socks Pattern
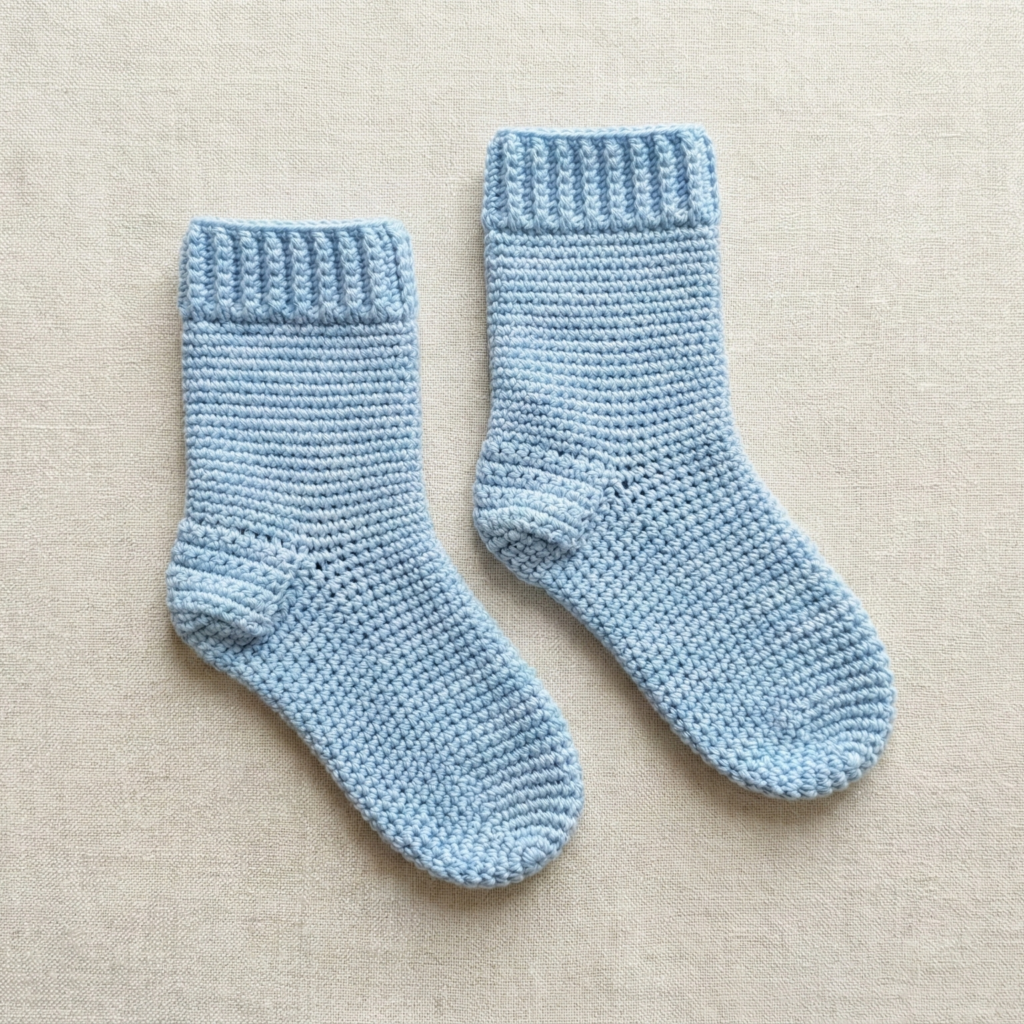
Skill level: Confident beginner (longer leg shaping and ribbing)
Materials
- DK yarn ~100–125 yd.
- Hook: 3.5 mm.
- Notions: tapestry needle.
Construction overview
Crew sock means longer leg (about 3–4 in above ankle), with mock rib cuff for grip.
Steps
- Cuff: Work mock rib by alternating sc in BLO and sc in both loops to create ridges: Round 1 sc in BLO, Round 2 sc in BLO, repeat 6–8 rounds to make 1–1.5 in tall rib depending on yarn. Alternatively use hdc in BLO for stretchy rib.
- Continue leg rounds to total crew height (for newborn maybe 3 in, for older baby 3.5–4 in).
- Heel flap & gusset as Pattern A but because leg is longer, ensure you try on to set heel placement.
- Foot & toe as in Pattern A.
Finishing
- Optionally add soft ankle reinforcement: after completing cuff, add one round of sc with elastic thread worked in with yarn (hand-sewn into inside of cuff) to keep socks from slipping.
Finishing, fit checks & general tips
- Try-on as you go: especially for older baby sizes; slip sock on foot at gusset stage to check length.
- Tension: tighter tension around heel/sole gives more durable fabric; leg can be slightly looser for comfort.
- Seams: minimize harsh seams inside sock — use a slipped, invisible join or weave tails on WS.
- Elastic: if adding elastic thread in cuff or using elastic in the casing, measure elastic for snugness — for newborn cuff, elastic about 1/2 – 3/4 in smaller than leg circumference; handle carefully and avoid too tight.
- Safety: avoid small decorative elements for newborns — embroidery and sewn motifs are OK if flat and secure.
Conclusion
These six baby sock patterns give you a full toolbox of techniques: classic heel-flap shaping (Two-Toned Socks), decorative frills and lace (Ruffles, Lace Frills), motif work (Granny-accent and Christmas), toe-up flexibility, and longer crew-style socks for extra ankle coverage. Start with the cuff-down classic to master heel shaping and gusset decreases — once that foundation is comfortable you can easily adapt stitch patterns, cuff treatments, and toe constructions.
Quick checklist before you begin:
- Swatch and measure your stitches per inch (spi) and rows per inch (rpi), then use digit-by-digit arithmetic (examples above) to convert desired foot length to stitch/row targets.
- Choose yarn that’s soft and washable and avoid detachable embellishments for infants.
- Try the sock on as you work the gusset and foot — small changes early prevent fit issues later.
- Weave in ends neatly and consider lining or soft cuff reinforcement for extra durability.