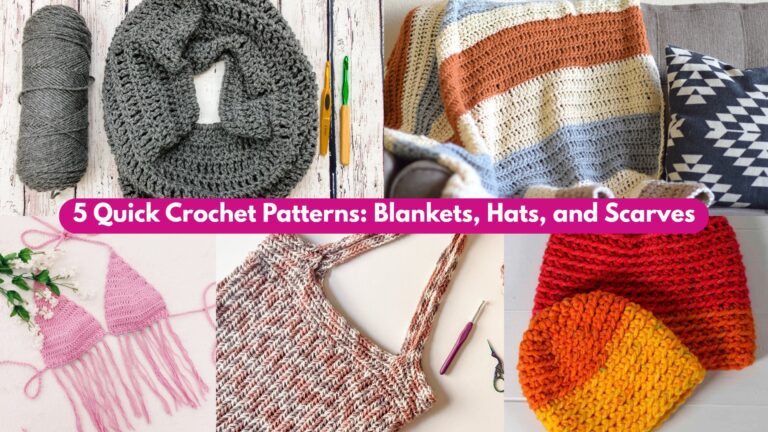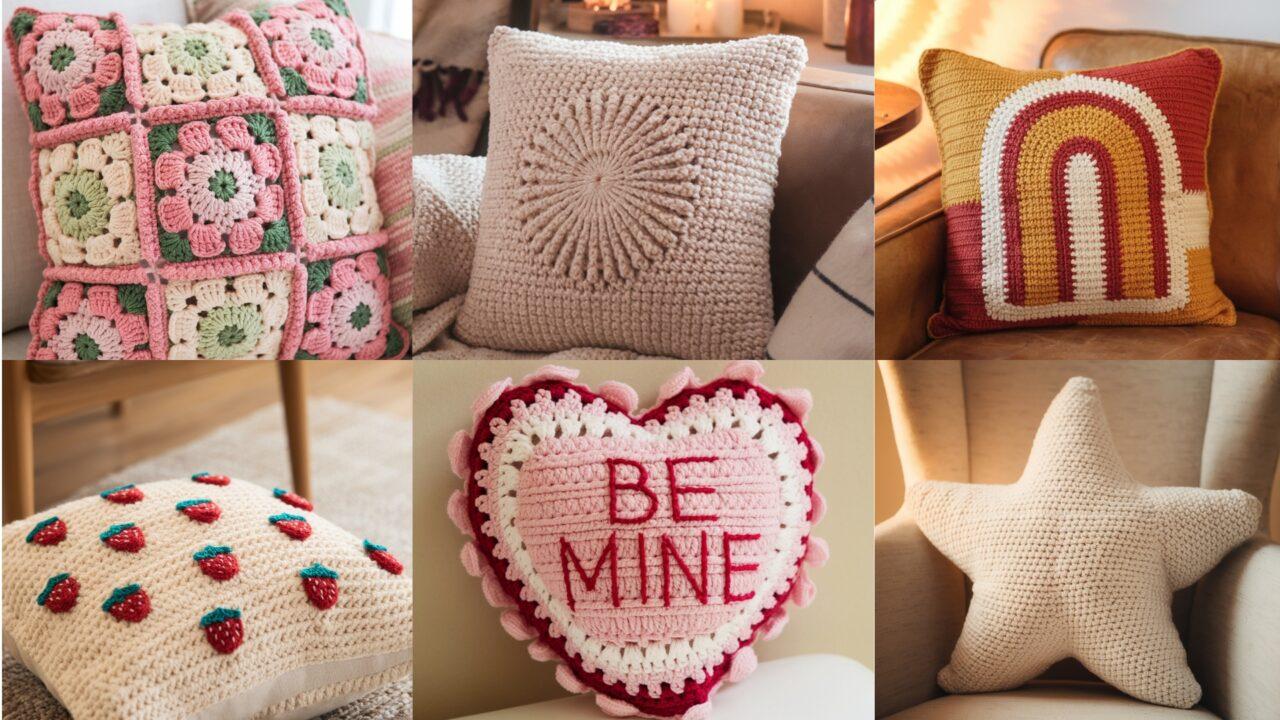
Pillows are the easiest way to change the feel of a room — they add color, texture, and personality without committing to a full re-do. These six crochet pillow patterns range from cozy hygge textures and retro stripes to playful candy hearts and strawberries, so there’s something for every room and skill level. Each pattern below includes: finished size, skill level, materials, stitch abbreviations, a very clear step-by-step pattern, finishing/assembly instructions, blocking/joining notes, styling ideas, and quick variations so you can make the pillow match your home.
Read the introduction for general pillow-making tips (stuffing choices, covers vs. in-the-round cushions, gauge). Then pick the pillow you love and jump into the full pattern.
Quick notes before you begin
Stuffing / inserts
- Use a ready-made pillow insert (polyfill, microbead, or feather/down) for a neat finish. Inserts are measured in inches — make your pillow cover 1–2″ smaller than the insert for a plump look (e.g., crochet 16″ square to fit a 17–18″ insert depending on yarn stretch).
- Polyfill is light and washable; feather inserts are luxurious and give weight/shape.
Yarn & hook
- I recommend worsted (weight 4) for most of these pillows unless noted. Use the hook size in each pattern to get recommended drape/texture. If you want very soft/fluffy pillows, hold a mohair or boucle with a solid strand for halo texture.
- Use washable yarn for frequently used cushions.
Finishing & care
- Sew or zipper the cover so you can remove and wash it. An invisible zipper gives the cleanest look; a simple flap/back-button is also fine. For children’s rooms, prefer washable materials and avoid small attached parts.
- Block flat before stuffing unless the yarn is unwashable.
Abbreviations used
- ch = chain
- sl st = slip stitch
- sc = single crochet
- hdc = half double crochet
- dc = double crochet
- tr = treble (UK = treble)
- st(s) = stitch(es)
- rep = repeat
- BLO/FLO = back/front loop only
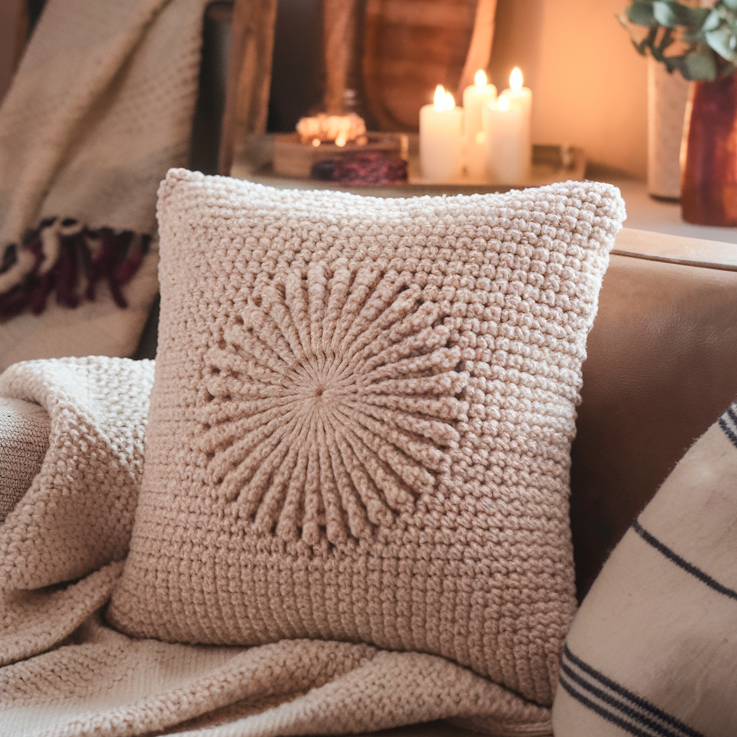
1. Crochet Hygge Burst Pillow Pattern
Finished size: 16″ × 16″ (make smaller/larger by adjusting repeats)
Skill level: Beginner → Intermediate
Estimated time: 4–6 hours (depending on experience and finishing)
Look & feel: Deep, squishy textured “burst” or starburst motif in the center with a softly rounded, cozy surface — very hygge and perfect for living rooms or reading nooks.
Materials
- Worsted weight yarn (approx. 400–600 yds total; one main color + optional contrast).
- Hook: 5.0 mm (or to gauge).
- 16″ pillow insert, tapestry needle, stitch markers, scissors.
- Optional: invisible zipper 16″, felt backing.
Stitches used
- dc, tr, puff stitch, sc, FLO or BLO accenting for texture.
Pattern — step-by-step (front panel; worked flat in rounds, then back panel)
Make the front starburst panel (center motif + rounds):
- Center magic ring: MR, ch 2, work 12 dc into MR. Pull tight and join with sl st. (12 dc)
- Burst spokes (Round 2): Ch 1, in same st puff stitch (yarn over, insert hook, pull up loop — repeat 4 times, yarn over and pull through all loops, ch 1) to form a puff; ch 1, sl st into next stitch — repeat to make 12 puff spokes (one per dc). Join.
- Petal expansion (Round 3): Join main color if needed. Ch 3 (counts as dc), (2 dc, ch 2, 3 dc) in the same puff base to form a petal corner; skip to next puff base, (3 dc) in base — you’re creating 6 petal clusters spaced around. Join and fasten off if changing color.
- Round 4 — even circle: Join main color, work sc evenly around to flatten the motif; add extra sc where needed so the motif lies flat.
- Textured rounds (make square shape): Ch 3, dc 2 in side spaces to build width, but plan to place 4 corner clusters at 90° increments: where you want corners, work (3 dc, ch 2, 3 dc). Continue granny-style rounds (3-dc clusters on sides, corner clusters with ch 2). Repeat until panel measures ~16″ across (measure as you go).
- Final tidy edge: Work 1 round of sc around the square to even edges. Weave in ends.
Back panel (simple solid for structure):
7. Chain 37 (or foundation to match front dimension gauge) and work dc rows (or work a matching granny square) until back matches front size. Alternatively, work 16″ square of sc or hdc for a dense backing. Add a zipper or leave a 6–8″ gap and plan a flap.
Assembly:
8. With right sides facing out, align front and back panels. Whipstitch, mattress stitch, or single-crochet three sides; insert pillow and finish closing the last side with neat edge stitches. If adding a zipper, sew it into the back panel before joining.
Styling & variations
- Use a chunky wool held double for an ultra-cozy look; reduce hook accordingly.
- Add fringe or pompom accents on corners for a Scandinavian vibe.
- Make a pair in muted neutrals for a hygge set.
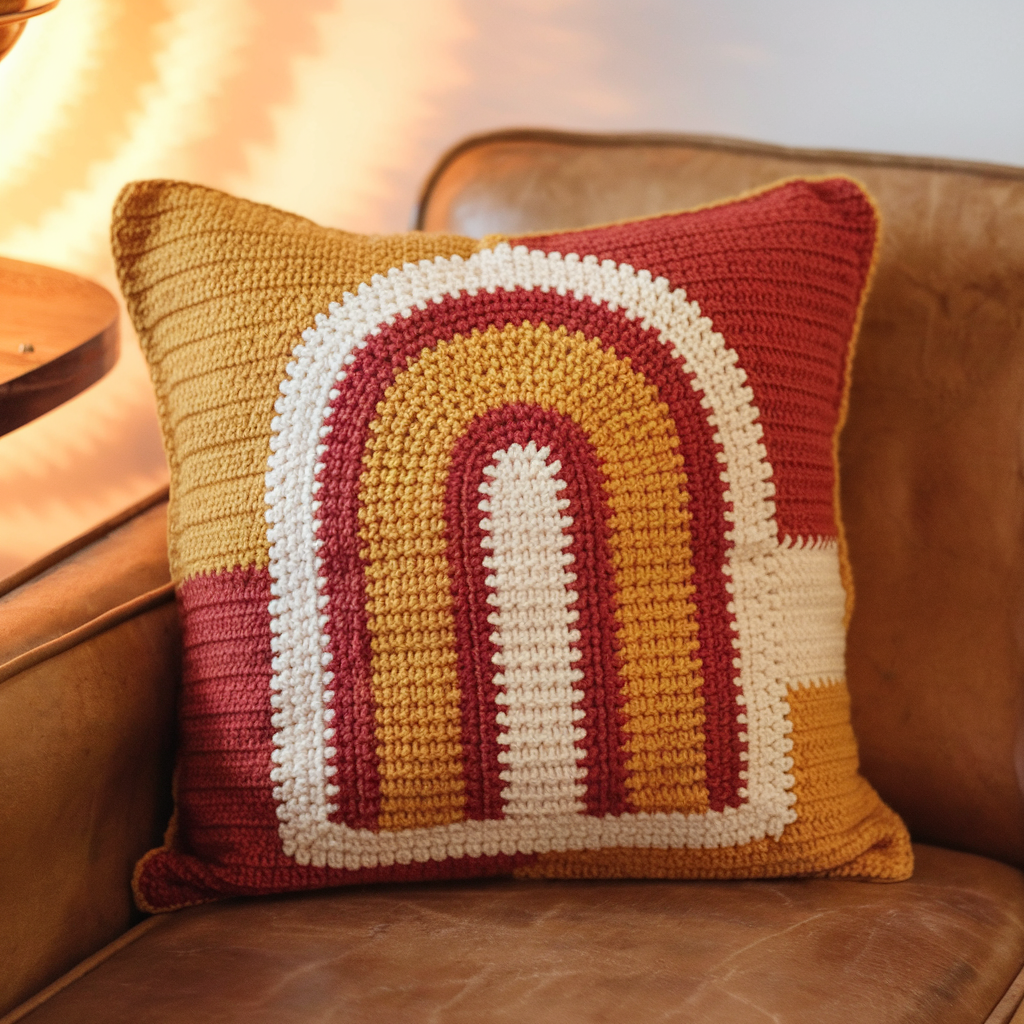
2. Crochet The Retro Throw Pillow Pattern
Finished size: 18″ × 18″ (works well as a statement pillow on sofas)
Skill level: Advanced beginner
Estimated time: 3–5 hours
Look & feel: Bold color blocks and stripes in retro 60s/70s palettes — think mustard, avocado, rust, cream — worked in tapestry or intarsia style for geometric charm.
Materials
- Worsted weight yarn in 3–4 colors (approx. 600 yds total).
- Hook: 4.5–5.0 mm depending on yarn.
- 18″ insert, tapestry needle, stitch markers.
Stitches & techniques
- dc (for quick coverage), color changes/tapestry crochet or intarsia, surface crochet for outlines.
Pattern — step-by-step (front panel in rows)
Design idea: Make a rectangle (or square) worked in dc rows, switching colors by a simple intarsia method or by carrying yarn along the back (tapestry). The pattern below is a simple block design (3 vertical stripes + central retro arch).
- Foundation: Ch 60 (or number to get 18″ width with chosen hook and yarn). Row 1: dc in 4th ch from hook and across. Turn.
- Stripe base: Work 6–8 rows in Color A (e.g., cream) for a neutral base.
- Retro arch row & blocks: Decide center column (e.g., columns 20–40). To make a simple arch, change to Color B (mustard) and work dc in that block across a set of rows to create an arch top; use Color C (rust) for side blocks. For neat color changes, finish the stitch with old color until last yarn over then yarn over with new color and complete stitch (standard color change technique). Continue rows until arch height is achieved.
- Reverse pattern: Mirror colors to create a balanced retro motif. Keep counts and mark where color boundaries fall to maintain symmetry.
- Edge row: Finish with 2–3 rows of Color A as border. Fasten off and weave ends.
Back panel & assembly:
6. Back panel can be single-color dense sc/hdc rows for contrast. Add zipper or sew panels together with whipstitch leaving opening for insert.
Optional finishing touches:
7. Surface crochet the arch outlines with sl st or sc in black/darker color to make shapes pop. You can also add a small embroidered detail (simple star or circle) on one corner for mid-century character.
Styling & variations
- Pick bold contrasting colors for a true retro feel or muted tones for a modern take.
- Make a set: two matching retro throw pillows plus a smaller lumbar pillow.
3. Crochet Candy Heart Pillow Pattern
Finished size: small 12″–14″ heart pillow (great for beds or kids’ rooms)
Skill level: Beginner → Intermediate
Estimated time: 2–4 hours
Look & feel: Sweet candy-heart shaped pillow with surface text option — perfect for seasonal gifts or cute accents.
Materials
- Worsted yarn in pinks, reds, white (approx. 300 yds), hook 4.0–4.5 mm.
- 12″ pillow insert (or small polyfill), felt for appliqué letters, tapestry needle.
Stitches & techniques
- dc, sc, shaping by increases/decreases, appliqué or embroidery for short message.
Pattern — step-by-step (worked flat shaped heart)
Option A — simple heart worked in rows (flat heart, then join into pillow):
- Foundation: Ch 24. Row 1: dc in 4th ch from hook and across (21 dc). Turn.
- Increase peak for lobes: Work 3–4 rows increasing at center to create two lobe foundations by dividing the work in two — or easier: work two identical semicircles and join them with a V-shaped lower portion.
Option B — two-lobe method (clearer):
Make two circles (lobes):
3. MR, ch 2, work 10 dc into MR, join — make 2 circles (adjust size by adding increase rounds). Flatten each circle by sl st across center to make a semi-lobed shape if desired.
Make the lower triangle (point):
4. Chain 6, dc across and decrease to shape into a tapered V: work rows decreasing 1 dc at each end until short. This becomes the point between lobes.
Assemble heart:
5. Arrange two lobes and the point together in heart shape (lobe, lobe, V). Use slip-stitch or whipstitch through inner layers to join them securely around edges, leaving a gap for stuffing.
- Turn right side out (if worked in the round), stuff lightly, and finish closing.
Text or applique:
7. Cut felt letters (LOVE, BE MINE, etc.) and glue/sew to the heart surface, or embroider short words. For kids’ safe version, sew letters rather than glue.
Backing & finishing:
- If you prefer a neat look, make a back panel in full sc/hdc, join with zipper or invisible seam. Block lightly if needed.
Variations & tips
- Use bulky yarn for a plush heart that holds shape — you may not need stuffing if the yarn is dense.
- Make a set in pastel candy colors and write different messages on each.
4. Crochet Star Pillow Pattern
Finished size: 14″ point-to-point star cushion (size adjustable)
Skill level: Intermediate (shape + seaming)
Estimated time: 3–6 hours
Look & feel: A geometric, sculptural star — great for modern nurseries, accent chairs, or holiday decor.
Materials
- Worsted yarn (approx. 400–600 yds), hook 4.5–5.0 mm.
- Star template (optional for blocking), pillow insert or polyfill, tapestry needle.
Stitches & techniques
- Working in the round and shaping points, joining panels, surface slip-stitching for definition.
Pattern — step-by-step (make two identical star panels, seam together)
Star panel (one side):
- Center hex: MR, ch 2, 10 dc into MR; join (10 dc). R2: ch 2, 2 dc in next around to 20 dc. R3: ch 2, [dc, 2 dc in next] to increase to ~30 dc — this creates a rounded hex you will shape into star points.
- Point shaping: Decide on 5 points (classic star). Mark 5 evenly spaced sectors around the round (use stitch markers every N stitches so you can place points symmetrically). For each point: work an elongated triangular wedge by working short rows or defined increases/decreases: (dc in sector 1 for X rows while decreasing/increasing at ends to create taper). Alternatively, make 5 petal-shaped wedges by chaining out and re-joining to create point protrusions (ch 6, dc back along chain, sl st to base) — repeat 5 times around.
- Refine edges: Work a round of sc around the panel, carefully shaping each point by placing extra sc in tips and fewer on indents.
Make second panel identical.
Assembly & stuffing:
4. With right sides facing out, align panels and single-crochet or whipstitch around, leaving an opening. Insert pillow or polyfill, then finish closing.
Surface definition (optional):
5. Outline each point with surface slip-stitch in contrasting color to highlight star geometry.
Variations & tips
- Stuff each point lightly for a plump look.
- For a minimalist modern star, make in a single neutral color and place on a monochrome sofa.
- Use plush/woven yarn for tactile softness.
5. Crochet In Bloom Cal Pillow Pattern
Finished size: 16″ × 16″ (modular floral panels joined)
Skill level: Intermediate (flower motifs + join-as-you-go)
Estimated time: 6–10 hours (depends on number of motifs)
Look & feel: A panel of in-bloom granny/flower motifs assembled into one square — charming, garden-inspired statement pillow.
Materials
- Worsted yarn in flower colors (pinks, corals, greens, cream), approx. 600 yds.
- Hook: 4.5 mm, tapestry needle, 16″ insert.
Stitches & techniques
- Magic ring, petal clusters, join-as-you-go (JAYG) or whipstitch joining, backing panel.
Pattern — step-by-step (motif + join)
Flower motif (one motif ~4–5″ across):
- Center: MR, ch 1, 8 sc in MR; join. (8 sc)
- Petals: In each sc: ch 3, 3 dc, ch 3, sl st in same sc — repeat for 8 petals. Join.
- Flat base round: Switch to background/leaf color. Work sc around petal bases to flatten motif and create a place to join.
- Make a 3×3 or 4×4 grid of motifs: Make enough motifs to reach at least 16″ square when joined (e.g., 9 motifs at 4.5″ each with small joins).
Join-as-you-go:
5. On the last round of each motif, join it to adjacent finished motifs by slip-stitching into the corresponding stitches of the neighbor motif as you work the round. This produces a neat seam with minimal finishing.
Backing & finishing:
6. Make a single solid 16″ square for the back in sc or hdc. Block motifs flat and seam to back by whipstitch or sew through back loops for hidden join. Insert pillow and close seam.
Styling & variations
- Add embroidered leaf veins between motifs.
- Make a patchwork of different flower motifs in contrasting centers for a boho pillow.
6. Crochet Small Motifs Strawberry Pillow Pattern
Finished size: 14″ × 14″ or 16″ × 16″ with multiple strawberries appliquéd over a solid back
Skill level: Beginner → Intermediate
Estimated time: 3–5 hours
Look & feel: Cute scatter of small strawberry motifs appliquéd on a solid pillow front — playful and great for kitchens, kids’ rooms, or summer décor.
Materials
- Worsted yarn: red, green, cream/white for seeds; approx. 400 yds.
- Hook 4.0–4.5 mm, 14–16″ insert.
Motif stitches
- MR, sc, dc clusters for shape, embroidery for seeds.
Pattern — step-by-step (small strawberry motif)
Strawberry motif (~1.5–2″ tall):
- Base: MR, ch 1, 6 sc into MR, pull tight and join. (6 sc)
- Increase to shape: R2: ch 1, 2 sc in each st around (12 sc). R3: sc, inc around to 18 sc (adjust for desired width). These rounds give a tapered berry base.
- Shape top: Start tapering: R4: sc 2, dec around to narrow toward the top; R5: sc around to finish berry body.
- Green calyx (top leaves): Join green at top, ch 5, sl st into same point to make small leaf loops; repeat 4 times around. Fasten off.
- Seeds: With cream or white embroidery thread, make tiny French knots or small straight stitches across the red berry for seeds. Secure threads on backside.
Make many motifs: Create 20–30 strawberries depending on pillow size and spacing.
Pillow front:
6. Work a solid background square in single color (e.g., cream) to match finished pillow size. Pin strawberries to desired arrangement and sew them flat using the long tails or tapestry needle. For durability, stitch through both motif base and pillow fabric with small tight stitches.
Back panel & assembly:
7. Make a matching back panel or use fabric backing with a zipper sewn in for easy washing. Whipstitch panels together, stuff, and finish.
Variations & tips
- Make different fruit motifs (tiny cherries, apples) for a fruit bowl pillow set.
- Add tiny embroidered faces for whimsical kids’ cushions.
Final finishing notes (applies to all pillows)
Zipper vs. envelope back vs. sewn shut
- Zipper: neat and practical; sew zipper into back panel before joining sides.
- Envelope: two overlapping back panels (simple and no hardware) — easy to remove for washing.
- Sewn shut: good for permanent inserts or gift pillows; not washable unless you remove the insert.
Blocking
- For motif-based pillows (flowers, star, burst), block squares/panels before seaming to ensure even size.
Washing & care
- Check yarn label. Most acrylic/wooled blends can be hand-washed or machine-washed on gentle inside a pillowcase; remove insert where possible. Air-dry to keep shapes.
Color & thread matching
- Use contrasting joins (visible join) as a design element or invisible mattress stitch for a seamless look. Test color combinations with a small swatch.
Conclusion
These six crochet pillow ideas give you a range to work from cozy hygge textures and retro statement pillows to playful candy hearts and strawberries. Each project is designed to be approachable and modifiable: change yarn weight and hook to create different finishes, mix and match motif colors, and use different joining/closing methods to suit your lifestyle.