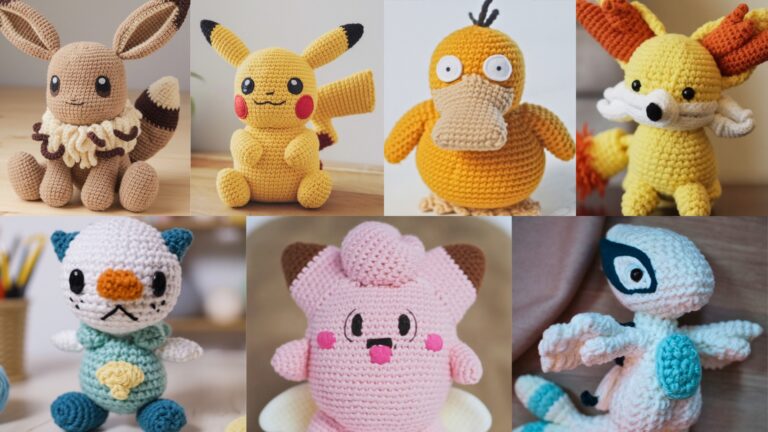
Pin cushions are the fastest, most useful little projects you can make between larger makes — they’re practical, adorable, and fantastic for using scraps. This post gives you six quick, gift-ready pin cushion patterns with full, step-by-step instructions so you (or your readers) can whip one up in an evening: Granny Square, Cute Teacup, Wrist Bracelet, Apple, Cookie, and Mini Cake. Each pattern includes: a short skill-level note, finished size, exact materials, stitch abbreviations, a detailed construction sequence (including stuffing & stabilizing tips), finishing, care, and quick variations so you can personalize the result.
Before you begin: use a slightly smaller hook than the yarn label suggests for firm fabric (prevents pins from slipping through). For cushions that will get heavy use, line the interior with a small fabric circle or add an inner pouch to protect stuffing and keep pins rust-free. Always use a rust-proof filling (polyester fiberfill) and consider adding a small sachet of silica or dried lavender for freshness.
Quick notation (US terms)
- MR = magic ring
- ch = chain
- sc = single crochet
- hdc = half double crochet
- dc = double crochet
- sl st = slip stitch
- inc = increase (2 sc in same st)
- dec = decrease (sc2tog)
- st(s) = stitch(es)
1. Crochet Granny Square Pin Cushion Pattern

Skill level: Beginner — classic stitches, quick seaming.
Finished size: ~3.5–4″ diameter (9–10 cm) as a small round cushion — adjustable by number of rounds.
Time estimate: 45–75 minutes.
Materials
- Worsted-weight cotton or cotton blend yarn — small amounts in 2–3 colors (20–40 g total)
- Crochet hook 4.0–4.5 mm (or smaller for firmer fabric)
- Polyester fiberfill (small amount)
- Small piece of cotton fabric for lining (circle ≈ 4.25″ / 11 cm) (optional but recommended)
- Tapestry needle, scissors
- Optional: small bag of silica or lavender sachet
Why this works
A granny square fabric is sturdy and makes a charming, slightly vintage pin cushion. Making two matching granny rounds, joining them, and stuffing yields a neat little pillow that sits well on a sewing table.
Pattern — make 2 granny square panels
We’ll make classic concentric granny rounds, then shape into a round-ish cushion.
- MR, ch3 (counts as dc), 2 dc in ring, ch2, 3 dc in ring, ch2 — repeat 3 more times. Join to top of ch3 with sl st. (4 corners)
- Round 2: Sl st into next corner ch-2 sp. ch3, 2 dc, ch2, 3 dc in same corner. Ch1, (3 dc, ch2, 3 dc) in next corner — repeat around. Join.
- Round 3: Repeat Round 2 but place 3-dc groups in each ch-1 side space and keep corners as (3 dc, ch2, 3 dc). Change color if you like each round. Continue until square measures about 4½” across point-to-point (usually 4–5 rounds depending on yarn/hook). Fasten off and weave ends. Make a matching second panel.
Tip: To make the square look rounder when finished, do one extra round but reduce some side increases (skip placing a 3-dc in every single ch-1 side occasionally) — this softens the corners.
Prepare lining (optional but recommended)
- Cut two fabric circles slightly smaller than finished panel (≈ 4.25″ / 11 cm) and sew right sides together leaving a 1.5″ opening. Turn right side out and lightly press. This creates an inner pouch to keep stuffing from migrating and to protect pins.
Join panels and stuff
- Place RS (right sides) of crochet panels facing out (so WS inside). With yarn and tapestry needle or with a crochet hook, join three sides with a whipstitch or sc-join, leaving top side open.
- Insert lining pouch (if using) through opening, then fill with polyester fiberfill to desired firmness. If using linen/cotton pouch, fill the pouch first, stitch it closed, then insert it into the crocheted shell. For a small professional touch, add a teaspoon of sand or a small washer sealed inside a tiny zip bag inside the lining to give weight (keeps cushion steady on a table).
- Close final seam by stitching the top closed, pulling yarn snug for a neat finish. Fasten off and weave in ends.
Finishing touches
- Use a decorative button pushed and secured in the center by sewing through the cushion a few times to create an upholstered look.
- Stitch a tiny loop of embroidery thread on one corner so you can hang or clip the cushion to a sewing basket.
Variations & gift ideas
- Make a set of three small granny-cushions in coordinating colors and present in a small tin.
- Use soft boucle yarn for a plush, textured pincushion (note: boucle makes it harder to remove pins cleanly).
2. Crochet Cute Teacup Pin Cushion Pattern

Skill level: Intermediate — shaping for 3D teacup and saucer.
Finished size: teacup ~3″ diameter × 2.5″ high (7.5 × 6.5 cm).
Time estimate: 1.5–2 hours.
Materials
- Worsted-weight cotton yarn (main teacup color + saucer color + small contrast for handle)
- Hook 3.5–4.0 mm
- Small amount polyfill stuffing
- Small plastic/paper cup form (optional) to help shape the cup while working — remove before final finishing
- Tapestry needle, scissors, optional tiny decorative button or bead for accent
Construction overview
We’ll crochet a shallow bowl (cup) and a small saucer disk, join them, fill with stuffing, and add a tiny handle. Optionally anchor the cushion to a small plastic saucer inside for stability.
Teacup bottom (worked in rounds)
- MR, 6 sc (6).
- inc 6 → 12.
- (sc, inc) ×6 → 18.
- (2 sc, inc) ×6 → 24.
- Work even sc rounds 2–3 rounds to get depth.
- To shape inward slightly for cup rim: (2 sc, dec) ×6 → 18. Then sc around 1 round. Fasten off leaving long tail for sewing.
Teacup side (worked in rounds)
- Reattach at last round edge and work hdc or dc around (depending on desired height) for about 4–6 rounds to create cup walls. Increase hook one size if you want softer walls. Finish with 1–2 rounds of sc for neat rim. Fasten off and leave tail.
Saucer (flat round)
- MR, ch1, 6 sc (6).
- inc ×6 → 12.
- (sc, inc) ×6 → 18.
- (2 sc, inc) ×6 → 24.
- Optional: 1 round of sc in BLO to create slight raised rim (the back loop only creates a ridge). Fasten off but leave tail for sewing.
Handle (make 1)
Option A — crocheted strip:
- Ch10, sc across in rounds to make a narrow tube or flat strip. Fold and whipstitch edges to make a tidy handle. Sew both ends to cup wall.
Option B — decorative chain handle:
- Ch12, sl st back along chain to make a short thick chain. Sew ends to cup sides. Reinforce with extra stitching.
Assembly & stuffing
- Sew cup to saucer: position cup center on saucer and whipstitch through both layers, leaving opening on top for stuffing. If you used a plastic insert, glue or place it inside saucer first.
- Fill cup with polyester fiberfill until firm. Insert tiny silica or lavender sachet in the center if desired.
- Tuck stuffing, fold cup top rim inward slightly and finish seam with neat whipstitch. Weave in tails.
Finishing touches
- Embroider a tiny flower or paint a small dot pattern on saucer (using fabric paint) for vintage charm.
- Add a small button in the center of the cushion for a tufted look.
Variations & tips
- Make a “teapot” matching pincushion by scaling up and adding spout.
- Use a contrast thread to top-stitch rim for a crisp tea-set look.
3. Crochet Wrist Bracelet Pin Cushion Pattern
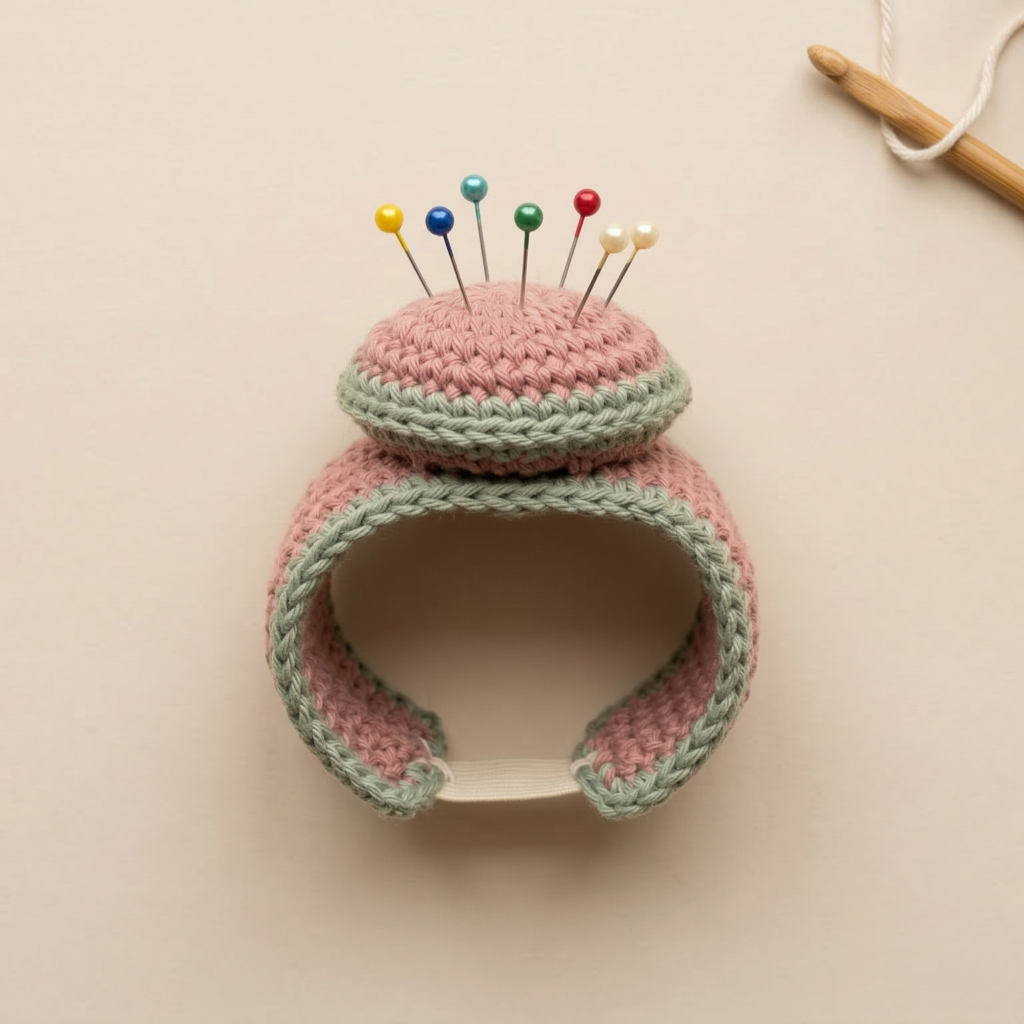
Skill level: Beginner — small tubular construction and elastic insertion.
Finished size: cuff length ~7″ circumference (stretchy) × 1.5–2″ wide; cushion pad ~2–2.5″ diameter.
Time estimate: 30–45 minutes.
Materials
- Worsted or DK cotton yarn (soft against skin)
- Hook 4.0 mm (or appropriate for yarn)
- ½”–¾” wide elastic band (short length ~1.5″–2″ to insert across the cuff interior for security)
- Tiny round cushion disk made from fiberfill (or small circle of felt stuffed)
- Tapestry needle, scissors, sewing needle & thread
Why this is useful
Wrist pincushions keep pins within reach. Making the cuff stretchy lets it fit a range of wrist sizes. Use cotton for comfort and washability.
Pattern — cuff (worked flat then seamed into a tube)
- Chain to desired width: ch 36 (gives ~2″ width depending on gauge). Turn.
- Row 1: sc in 2nd ch and across (35 sc). Turn.
- Rows 2–10: ch1, sc across to make a strip about 1.5–2″ tall. Adjust number of rows to change pad width. Fasten off.
Make cushion disk (small)
Option A — tiny flat round:
- MR, ch1, 6 sc. (6)
- inc ×6 → 12.
- (sc, inc) ×6 → 18. — sc rounds until disk is ~2–2.5″ diameter. Make two and stitch them together leaving opening for stuffing; stuff lightly and finish closing.
Option B — single padded spot: embroider cotton circle with heavy stuffing and secure.
Assembly
- Sew the cuff strip into a loop with mattress stitch, stretch slightly as you stitch for a snug fit.
- Insert elastic across inside seam (cut appropriate length for wrist size minus stretch) and tack it to inner cuff edges with a few stitches to prevent turning. The elastic holds cuff in place when worn.
- Sew the small cushion disk to the top center of cuff securely—stitch through many times to hold it flat and stable. Make sure no metal or sharp edges are exposed by covering knots with a few inside stitches.
Finishing & care
- To launder, remove elastic if you used large elastic loops, or spot clean with damp cloth. Cotton cuffs can be hand-washed and laid flat.
- Consider wrapping a short piece of velcro inside for kids’ safety (keeps cuff adjustable).
Variations
- Make cuff in novelty colors or add a small pocket for a needle threader.
- Replace elastic with an adjustable button loop for a one-size-fits-many cuff.
4. Crochet Apple Pin Cushion Pattern
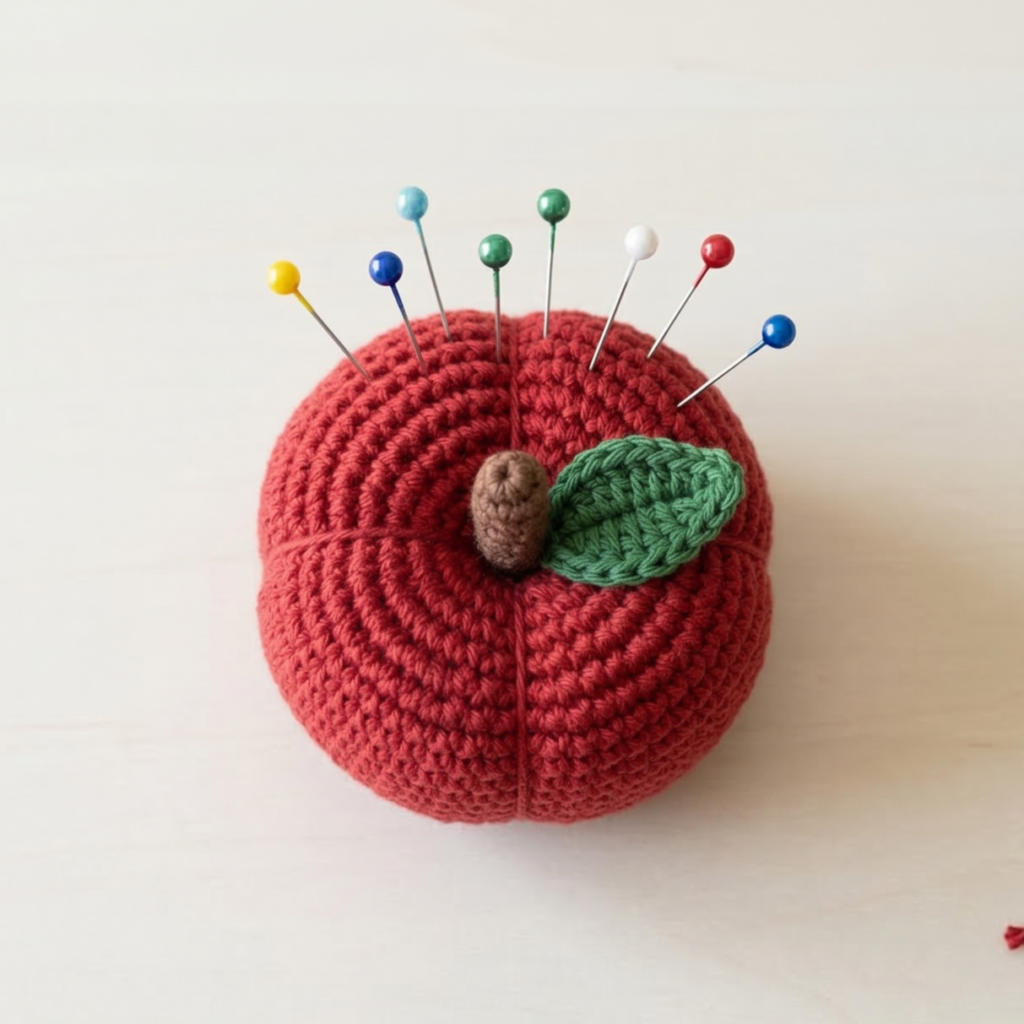
Skill level: Beginner — worked in rounds (amigurumi-style).
Finished size: ~2.5–3″ diameter (6–7.5 cm) — perfect for table-top pin cushions.
Time estimate: 45–60 minutes.
Materials
- Worsted yarn in apple red (or green) and brown for stem; small green scrap for leaf.
- Hook 3.25–4.0 mm (use small hook for tight stitches)
- Polyester fiberfill, tapestry needle, scissors
- Optional: small button in center or embroidery thread for tufting
Pattern — apple body (worked in continuous rounds)
- MR, 6 sc (6)
- inc ×6 → 12
- (sc, inc) ×6 → 18
- (2 sc, inc) ×6 → 24
- sc around 3–5 rounds (depending on desired height)
- (2 sc, dec) ×6 → 18
- (sc, dec) ×6 → 12 — begin stuffing firmly with fiberfill.
- dec ×6 → 6 — finish stuffing, close remaining stitches, weave in end.
Add stem and leaf
Stem
- With brown, ch4–5; sl st back along chain or make a small tube: MR, 6 sc, sc around 2–3 rounds, stuff lightly, close leaving tail and sew to top center.
Leaf
- Ch6; sc, hdc, dc, hdc, sc across, sl st to base. Fasten off and sew to side of stem.
Optional tufted center
- Thread a long strand of yarn from top through to bottom and back several times, pulling taut to create a tufted button look in center (like a salisbury-pin cushion). Tie knot securely inside and bury tail within stuffing.
Finishing & tips
- Add a small metal washer inside the base sealed within plastic bag for weight (optional).
- Present as a set (apple + cupcake pincushion) in a small sewing box.
5. Crochet Cookie Pin Cushion Pattern

Skill level: Beginner — flat circle, stuffed to look like cookie.
Finished size: ~3.5″ diameter (9 cm) — cookie-like and roomy for pins.
Time estimate: 45 minutes.
Materials
- Worsted yarn in tan (cookie base) and chocolate brown (chips) — small amounts
- Hook 4.0 mm
- Polyester fill, tapestry needle, scissors
- Optional: small beads or surface embroidery thread for “sprinkles”
Pattern — cookie base (make 2 rounds to join)
- MR, ch1, 8 sc in MR (8)
- inc ×8 → 16
- (sc, inc) ×8 → 24
- (2 sc, inc) ×8 → 32
- sc around 2 rounds to build thickness
- Join second disk to first by sc through both loops around leaving small opening; stuff with fiberfill and finish joining.
Chocolate chips (make many small)
- MR, 4 sc (4), pull tight, leave tail to sew onto cookie. Sew chips randomly on top surface, secure tail inside filling. For larger chips use 6 sc.
Surface details
- Embroider tiny “sugar” dots with white embroidery thread or sew a few tiny seed beads for sparkle (optional—but stitch beads securely).
Finishing & packaging
- Sandwich cookie cushion in a small cellophane bag tied with twine for a charming gift.
6. Crochet Mini Cake Pin Cushion Pattern

Skill level: Intermediate — stacked rounds with decorative icing rounds.
Finished size: ~3″ tall × 2.5–3″ diameter (7.5 × 7.5 cm).
Time estimate: 1–1.5 hours.
Materials
- Worsted yarn (cake color + icing color + tiny accent yarn for sprinkles/berries)
- Hook 3.5–4.0 mm
- Polyester fill, tapestry needle, scissors
- Small bead or felt cherry for top (optional)
- Optional: small disk of cardboard for base support (wrapped in fabric)
Cake layers (make 2–3 stacked tiers)
We’ll make two small round tiers: bottom tier larger, top tier smaller.
Bottom tier (base)
- MR, 8 sc (8)
- inc ×8 → 16
- (sc, inc) ×8 → 24
- sc around 2–3 rounds for height
- (sc, dec) rounds to slightly taper — finish and stuff lightly or wait to stuff after joining tiers.
Top tier
- Same as bottom but stop earlier — aim for diameter ~2/3 of base.
Icing rounds (decorative)
- With icing color, join at top edge of a tier and work a ruffled or shell round: ch3, 4 dc in same st, sl st in next — repeat to make dripping-icing look. Alternatively use picots to mimic frosting dots.
Assembly
- Stack tiers and whipstitch tiers together through SPRING of sc around bottom of top tier to top of bottom tier. Stuff as you go so cushion is plump. If you want a sturdy base, glue or stitch a small wrapped cardboard circle into bottom before stuffing.
- Add top decoration: a tiny cherry made from MR 6 sc, stuff, and sew to top center. Or sew a small felt berry.
- Embellish with tiny French knot “sprinkles” using embroidery thread for color contrast.
Finishing & display
- Place mini cake pin cushion on a small felt coaster or tiny saucer for a bakery display. It makes a delightful gift for sewing friends.
Final section — Care, stuffing choices, and finishing tips
Stuffing & stability
- Polyester fiberfill is best: inexpensive, washable, and holds pins well. For a heavier, table-stable cushion (especially for teacup and cake), place a few spoonfuls of rice or a small zip bag of sand inside the lining (inside a sealed inner pouch) to avoid moisture issues. Always keep sand/rice inside a sealed bag to prevent spills in washes.
Lining & protection
- A small fabric lining or inner pouch keeps oils from hands away from stuffing and makes pillows more durable. Sew a tiny inner bag (cotton) and fill it, then insert into crochet shell before final seaming.
Fastening & tufting
- For a “tufted” look, pass a strong yarn or upholstery thread through center multiple times and secure with a knot inside. This gives a classic pincushion look and helps pins sit upright.
Wash & care
- Most cotton or acrylic crochet pin cushions can be spot-cleaned. For full washing, remove any glued embellishments, wash gently by hand, reshape, and dry flat. Avoid high heat dryers.
Safety notes
- Keep pin cushions away from very young children (pins are a choking and injury hazard). If making as gifts for households with children, include a note about adult-only use and safe storage.
Conclusion
These six quick pin cushion patterns give you a mix of practical and whimsical options — from the classic Granny Square to tea-party teacups, wrist-ready cuffs, fruit- and dessert-themed cushions. Each one is intentionally compact so busy crafters can finish a satisfying project quickly while still getting a polished, giftable outcome. Use cotton yarn for easy care, add a little lining for durability, and personalize with tiny embroidered details, beads, or buttons.