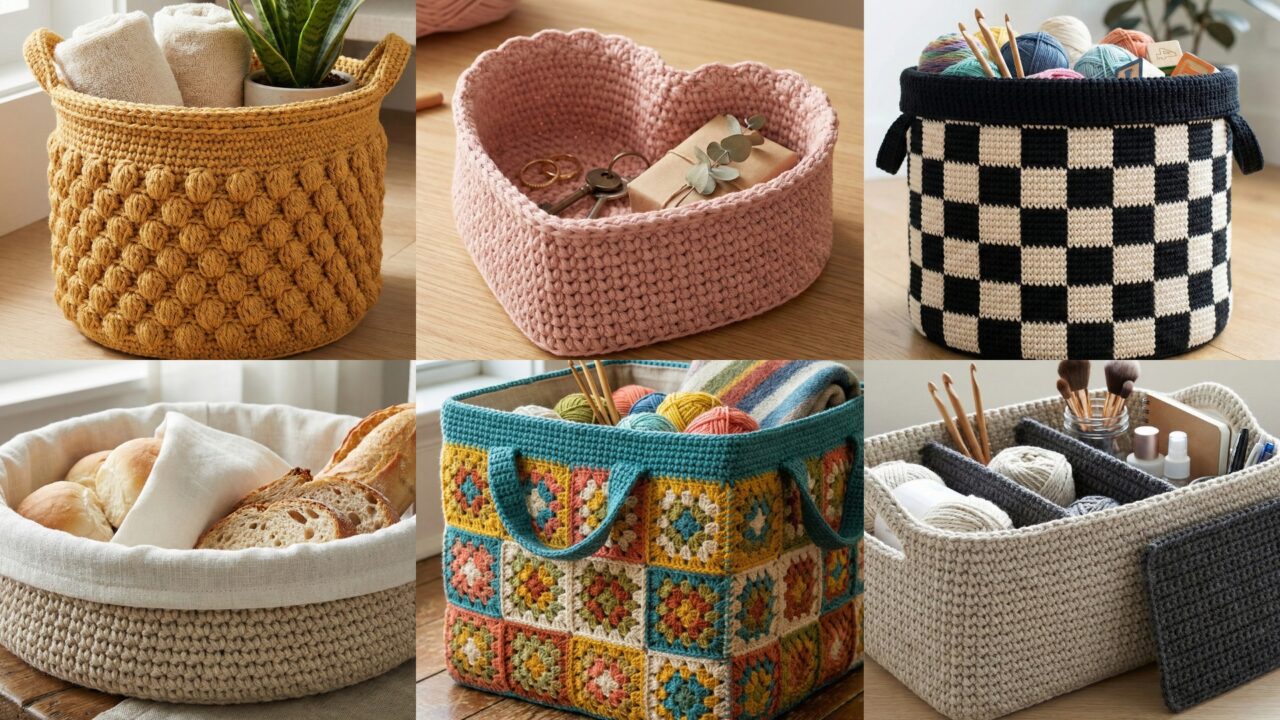
Baskets are one of the most useful crochet projects — fast to make, endlessly customizable, and they solve real clutter problems while looking great on a shelf. Below you’ll find a full, ready-to-publish blog post: a short introduction about materials and construction choices, then six detailed patterns (Heart Basket, Basket with Removable Dividers, Honeycomb Basket, Bread Basket, Granny Basket, Checkered Basket). Each pattern includes skill level, materials and yardage, finished size (example), stitch notes, a clear step-by-step construction guide, finishing tips, variations and care instructions. Read the intro once, then jump to whichever pattern you want.
Quick introduction — tools, yarn, and general basket-building tips
Why crocheted baskets work
A sturdy fabric (tight stitches + firm yarn) makes a basket that keeps shape. Choices that increase stability: thicker yarn (t-shirt yarn, bulky cotton, or holding 2 strands), smaller hook than label suggests, and a stiff lining or base insert if you need extra structure.
Tools & materials (general)
- Yarn: bulky cotton, t-shirt yarn, cotton rope, or hold two strands of worsted together. For small decorative baskets DK or worsted is fine if worked tightly.
- Hooks: large (8–12 mm) for t-shirt yarn / rope; 4.0–6.0 mm for worsted / DK held double. Use the hook that produces a tight fabric.
- Notions: tapestry needle, stitch markers, scissors, measuring tape, optional plastic canvas or cardboard for rigid base, fabric for lining, hot-glue or fabric glue (for inserting base), interfacing for panels, small dowel or metal rings for handles (optional).
- Optional: coarse thread + sewing needle to sew in a lining, or pre-cut oval plastic base.
General construction approaches
- Flat base increasing — work a circle or oval base, then stop increasing to form sides.
- Rectangular panel folded — make a rectangle and seam into a box (good for divided baskets).
- Granny & motif assembly — join squares or motifs and add a stiff liner.
- Inserts & reinforcement — insert a plastic canvas or a lined cardboard base for groceries/bread; sew or glue the lining to hold it.
Stitch & tension tips
- Use single crochet (sc) or half double (hdc) for dense walls. For texture or decoration use shells, bobbles, or puff stitches but keep the main walls dense.
- Work tightly — if your fabric is loose, switch to one hook size smaller.
- Count rounds when forming base so the transition to the sides is smooth (stop increases when base diameter = target).
- Measure as you go — it’s easier to add rows than to redo the whole basket.
Finishing
- Weave ends securely; hide tails inside a sewn lining if used.
- Block if using cotton to even stitches (spritz & shape).
- For handles: crochet straps, make rope handles, or attach leather strips.
1. Crochet Heart Basket Pattern
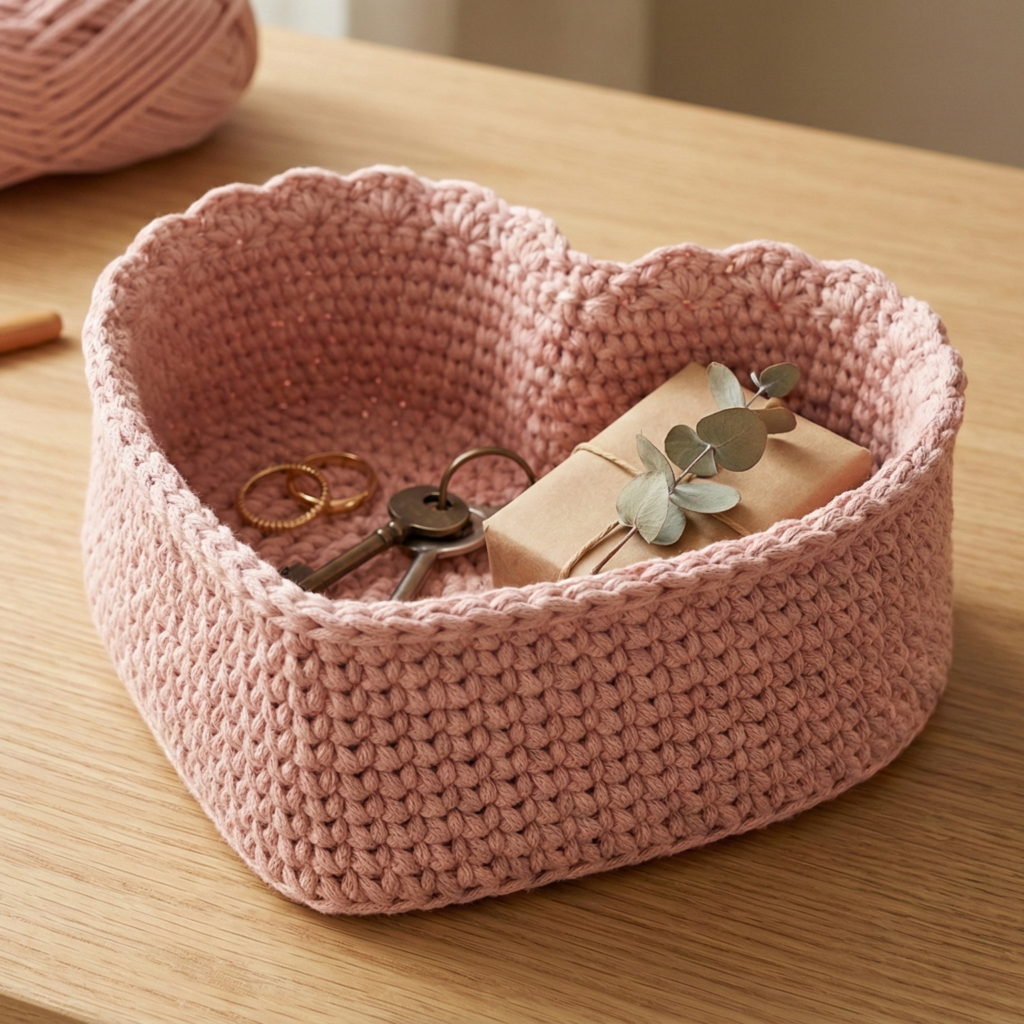
Skill level: confident beginner
Purpose / vibe: pretty small basket for jewelry, keys, or gifts — heart-shaped base and tall sides.
Materials (example small basket)
- Worsted cotton held double OR bulky cotton ~ 150–250 yd.
- Hook: 5.0 mm (or adjust to yarn).
- Tapestry needle, stitch marker, optional small oval insert (cardboard/plastic) for base.
Finished size (example)
- Base width: ~7 in across heart lobes; height: ~4–5 in (can be adjusted by adding rows).
Stitch notes
- Base uses shaped increases to form a heart (two semicircles joined by triangle). Sides are worked in sc in the round. Edge finished with a scallop for a decorative rim.
Step-by-step
1) Make a heart base (flat)
- Make a magic ring and ch 1. Work 6 sc into MR; pull tight, join with sl st = 6 sc. (You’ll expand two rounded lobes from here.)
- Round 2: inc in next 3 sts, sc in next 3 sts — distribute increases so you build two lobes opposite each other. Aim for 12–18 sts total (pattern below assumes 18 base).
- Round 3: Work increases around the two lobe areas: e.g., [inc, sc] × 3 at lobe 1, then [inc, sc] × 3 at lobe 2 — shape into a heart. (Sketching your increase plan on paper first helps.)
- Rounds 4–6: Continue increasing around the rounded lobes only — leave the triangular bottom with fewer increases so the two lobes form obvious hearts. You’ll end with a flat heart shape ~7 in across.
2) Optional rigid base
- Cut a heart shape from cardboard or plastic to match base diameter minus ~¼ in. Glue it to the wrong side of base or insert between base and lining for stability.
3) Build the sides
- Join with sc around the heart edge. Work 1–2 rounds sc in the back loop only (BLO) to create a fold-line if you want a cuff.
- Work even rounds of sc around to build height (do not increase). For a 4–5 in height, work ~12–16 rounds depending on gauge. Place stitch marker at beginning of each round.
4) Decorative edge
- For a scalloped rim: sc, skip 1, (5 dc in next), skip 1, sc repeat around. Or for a dainty scallop use sc, picot, sc.
5) Handles or loop (optional)
- Make two short chains of 10–14 ch, attach on opposite lobes inside the rim and reinforce with a row of sc. Or stitch a single loop at the top center for hanging.
Finishing & variations
- Attach a fabric lining cut to heart shape and sew inside to hide ends.
- Make larger hearts by adding more base rounds and taller sides.
- Use variegated cotton for a candy-stripe heart.
Care
- Cotton: machine wash gentle / reshape; lined baskets better hand-washed.
2. Crochet Basket with Removable Dividers Pattern
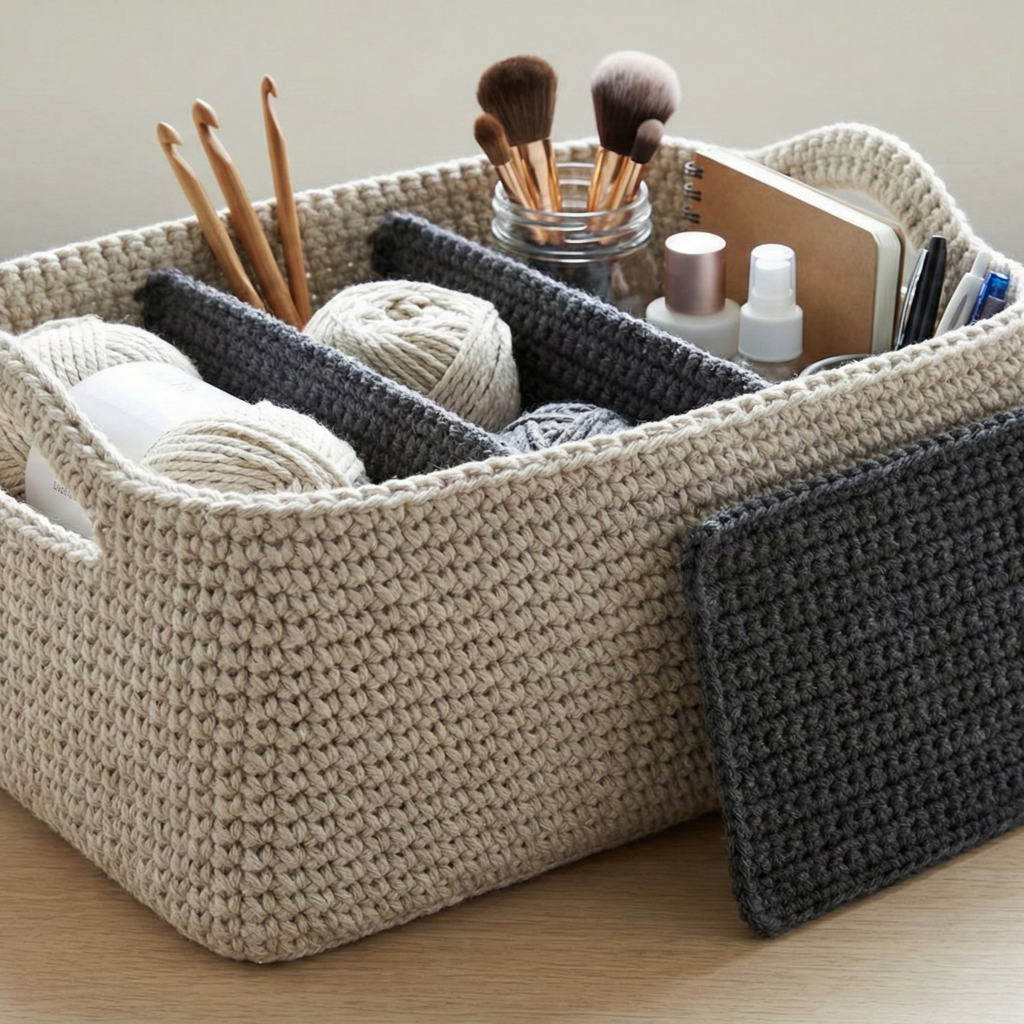
Skill level: intermediate (box construction + removable panels)
Purpose / vibe: practical organizer for craft supplies, cosmetics, office desk — internal removable dividers let you reconfigure storage.
Materials (example medium organizer)
- Bulky cotton or two strands of worsted held together — ~400–700 yd.
- Hook: 6.0–8.0 mm.
- Lining fabric, craft foam or thin plastic for rigid divider pieces (cut to size), Velcro or small tabs to hold dividers.
Finished size (example)
- Rectangle: 12 in × 8 in × 6 in tall (you can scale).
Stitch notes
- Use sc for dense sides. Work a rectangular base (flat oval or rectangle) then build box walls. Create slots or pockets inside to insert dividers.
Step-by-step
1) Base (rectangular panel)
- Chain a multiple that gives you the length (for 12 in at 4 sc/in ch ~48 + 1). Work sc across for desired width in rows creating a rectangle 12 × 8 in. Block and measure. (Alternatively work an oval base in the round if you prefer rounded corners.)
2) Make walls (work up from base)
- If you worked the base in rows, join short sides and start working in the round (sc evenly around). Work a joining round and continue in sc up the sides for 6 in height.
- For neat corners, pick up one st per foundation chain end and sc evenly.
3) Reinforce bottom
- Slip in a piece of craft foam or thin plastic cut to base size. Add fabric lining; sew liner to the bag bottom or glue the base inside liner to prevent slipping.
4) Create removable divider slots
Option A — internal pockets:
- Sew fabric pockets along the inside walls where dividers will slide in. Make pocket height the full inside height minus 1 in.
Option B — built-in channels: - Work two vertical strips of dense sc where the dividers should sit: sc in next st for 4 rows to form a “channel”, then attach a short strip of Velcro inside to lock a divider tab. Or sew short strong tabs to the top of the divider that hook into loops on the inside rim.
5) Make dividers
- Cut thin craft foam (or corrugated plastic) to the height and depth of inside space minus ~¼ in for easy sliding. Cover the foam with fabric or crochet a sleeve: ch to width of divider and sc around it to make a snug sleeve that slides into pockets/channels. Add tabs or Velcro pieces for securing.
6) Handles & finishing
- Add a wide strap across the top on both sides for carrying (sc strips attached with many passes). Add a top row of sc in BLO to create a firm rim.
Variations
- Make square cubbies by adding two long dividers and one short to create three compartments.
- Add transparent vinyl pockets on the outside for cards or labels.
Care
- Remove plastic/fabric inserts before washing; hand wash the crochet parts and air-dry.
3. Crochet Honeycomb Basket Pattern
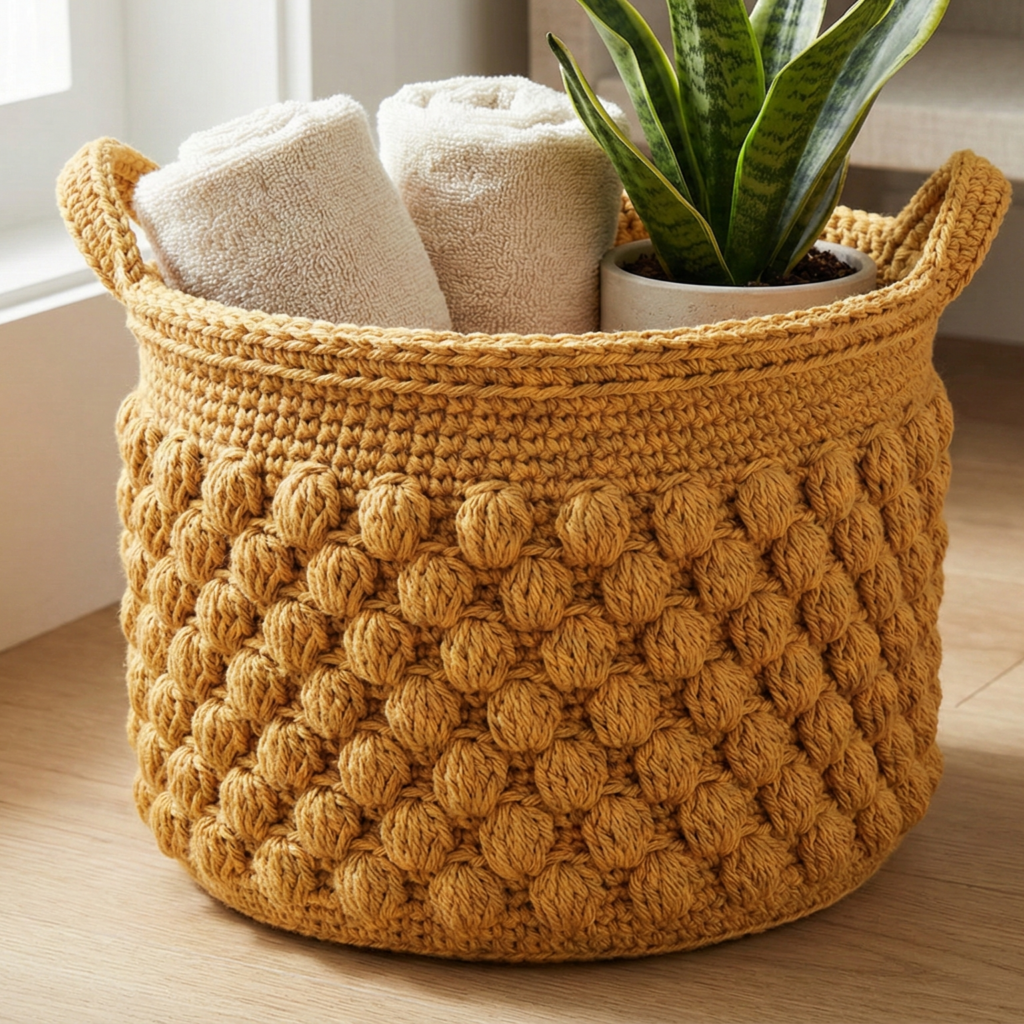
Skill level: intermediate (puff/cluster stitches in repeat)
Purpose / vibe: stylish textured storage — honeycomb (puff or bobble) panels create a sculptural look for decorative storage.
Materials (example medium)
- Worsted cotton or cotton-blend held single or double ~450–700 yd.
- Hook: 5.0 mm.
- Optional inner base insert.
Finished size (example)
- Diameter ~9–10 in, height ~8–9 in.
Stitch notes
- Honeycomb effect is achieved with alternating puff (or bobble) stitches and dense anchor rows. Use sc or hdc rows to lock in texture.
Step-by-step
1) Make a round base
- MR, ch1, 10 sc in MR, join = 10.
- Rnd 2: inc in each → 20 sc.
- Rnd 3: sc 1, inc → 30 sc.
- Rnd 4: sc 2, inc → 40 sc. Continue increasing until base = ~9–10 in (likely ~60–80 sc depending on hook and yarn).
2) Set up honeycomb pattern
- Rnd 1 (anchor round): sc in each st around. Place marker.
- Rnd 2 (puff row): ch 1, puff stitch in next st, ch 1, sc in next st repeat around. Puff: yo, insert, pull loop up 4 times (4 loops), yo draw through all, ch1 close.
- Rnd 3 (anchor): sc in each st around (including into ch-sp above puff) to lock puffs.
- Rnd 4 (offset puff row): shift puffs between previous puffs by working sc 1, puff in next ch-sp, sc 1 so the puffs sit in honeycomb geometry.
3) Build sides
- Continue alternating puff rows and anchor sc rows until sides reach desired height (~8–9 in). Keep good tension; puffs add height so fewer rows are needed.
4) Reinforce rim
- Work 2–3 rounds of hdc in BLO for a firm rim; fold and stitch down if you want a double-thick band.
5) Handles (optional)
- Crochet two sturdy straps: ch the required length, work sc back over chain for a 1–1.5 in strap; attach inside the rim and reinforce by sewing through multiple rounds and lining patch.
Finishing & variations
- For a more subtle honeycomb use small bobbles (3-loop) instead of full puffs.
- Colorwork: make honeycomb in a contrast color for each puff row to mimic a beehive look.
Care
- Hand wash or machine gentle; reshape while damp to keep puffs full.
4. Crochet Bread Basket Pattern
Skill level: confident beginner
Purpose / vibe: practical kitchen basket with rounded sides and a washable liner — perfect for serving bread or rolls.
Materials (example)
- Bulky cotton or held-double worsted for absorbency & sturdiness ~250–400 yd.
- Hook: 6.0–8.0 mm.
- Fabric for removable liner (cotton or linen; washable), optional plastic canvas base.
Finished size (example)
- Diameter ~10–12 in, height ~3–4 in (shallow, perfect for rolls).
Stitch notes
- Use sc or hdc for a dense, washable fabric. The liner protects the basket and the bread.
Step-by-step
1) Make a round base
- MR, ch1, 8 sc in MR, sl st join = 8.
- Rnd 2: inc each st → 16 sc.
- Rnd 3: sc 1, inc → 24 sc.
- Rnd 4+: continue increasing evenly (sc 2 inc, sc 3 inc, etc.) until base reaches ~10–12 in diameter. Stop increases when base is correct.
2) Sides
- Work even rounds of sc around from the edge (no increases) to create a shallow side — for 3–4 in height work ~6–8 rounds depending on gauge.
- For neat rim, work 1 round of sc in BLO to define the top, then fold and work 1–2 rounds of sc to create a small fold-over rim that hides raw edge of lining if inserting.
3) Lining
- Cut a circle and side wall for the liner — allow ¼ in seam allowances. Sew liner into a pouch, turn right side out. Tuck liner inside basket and stitch the top edge of liner to the top inside of the basket with slipstitch or whipstitch to hold in place. Make the liner removable by sewing small button tabs on liner that loop over a small crocheted button on the basket interior.
4) Decorative finish (optional)
- Add a simple rope twist around rim — chain long cord and whipstitch along outside top for a rustic look. Or make a scalloped rim.
Serving & care
- Remove liner for washing. Clean basket with damp cloth and air dry. Liner machine wash warm.
Variations
- Make a smaller version for breakfast croissants or a larger shallow tray for focaccia.
5. Crochet Granny Basket Pattern
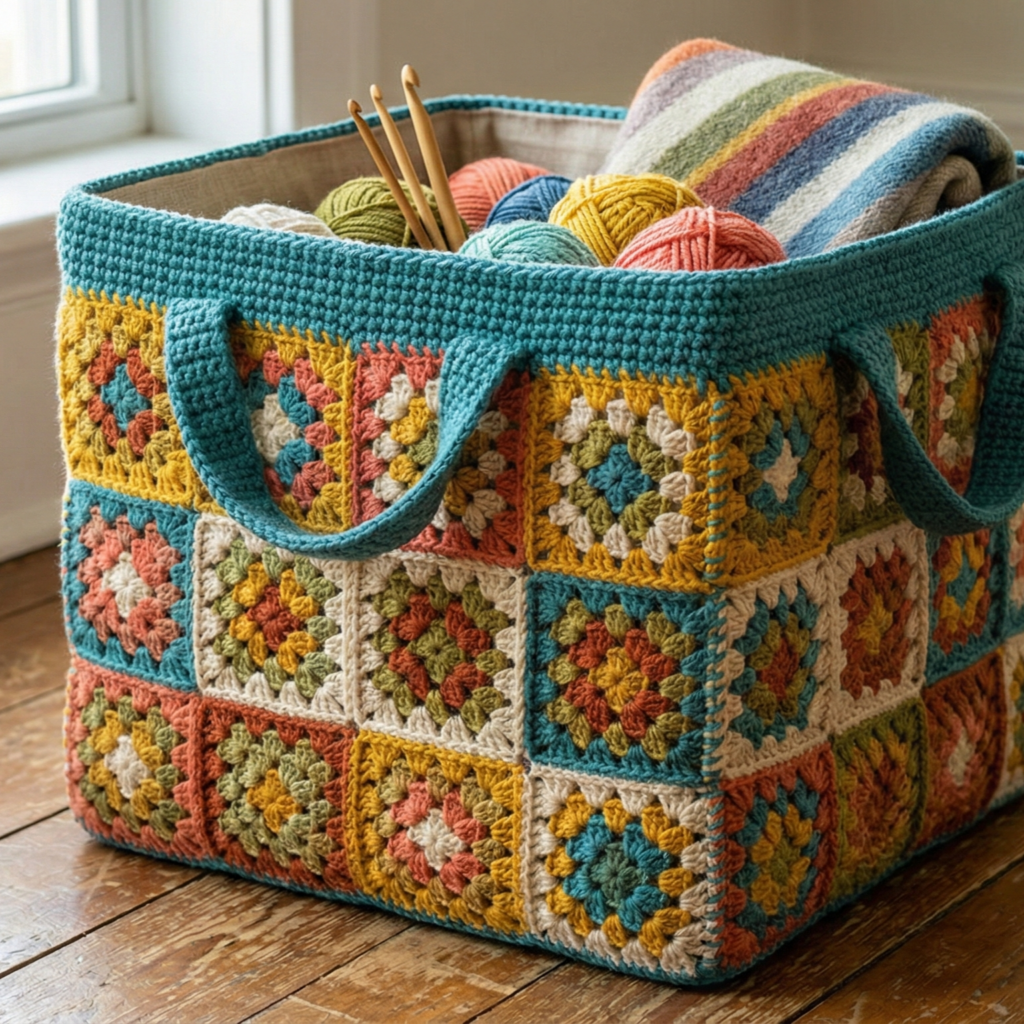
Skill level: confident beginner → intermediate (motif joining)
Purpose / vibe: colorful, modular storage — make from granny squares for a charming, vintage look.
Materials (example medium)
- Assorted worsted/DK scraps or full skeins ~600–900 yd total depending on size & number of squares.
- Hook: 4.0–5.0 mm.
- Fabric lining recommended for gaps.
Finished size (example)
- Constructed from 3 × 3 squares of 4 in = ~12 × 12 in box; height depends on squares used (e.g., 3 rows = 12 in height).
Stitch notes
- Classic granny squares joined by whipstitch or join-as-you-go. For structure make squares denser (3–4 rounds) or add a doubled border.
Step-by-step
1) Make granny squares
- Standard 3-round granny: MR, ch 3 (counts dc), 2 dc, ch 2, 3 dc rep 3 more times → rounds to your size. Make 9 (3 × 3) for a medium basket; block squares flat.
2) Join squares into panels
- Lay out in 3 columns × 3 rows. Join squares into rows with join-as-you-go or whipstitch, then join rows to form a flat rectangle: front (3 across), back (3 across) and a long strip of squares for the base/gusset if you prefer.
3) Add a bottom
Option A — square bottom: make a large square of rounds to match the internal bottom size and sew to the assembled wall rectangle.
Option B — crochet a long narrow strip (gusset) and seam around edges to form a box (this creates depth).
4) Reinforce
- Pick up loops around top edge and work 3–4 rounds of sc in a firm gauge to give the top rim strength.
5) Lining
- Because granny squares have holes, cut a lining to match internal dimensions and sew into the bag to hide ends and create a stable interior.
6) Handles
- Crochet strong handles as wide straps and attach through reinforced square corners — stitch multiple times through the border and lining patch.
Variations
- Make a tall granny cylinder by stacking more rows of squares.
- Add fringe around the top for boho flair.
Care
- Lined baskets can be spot-washed; remove the lining for machine washing if desired.
6. Crochet Checkered Basket Pattern
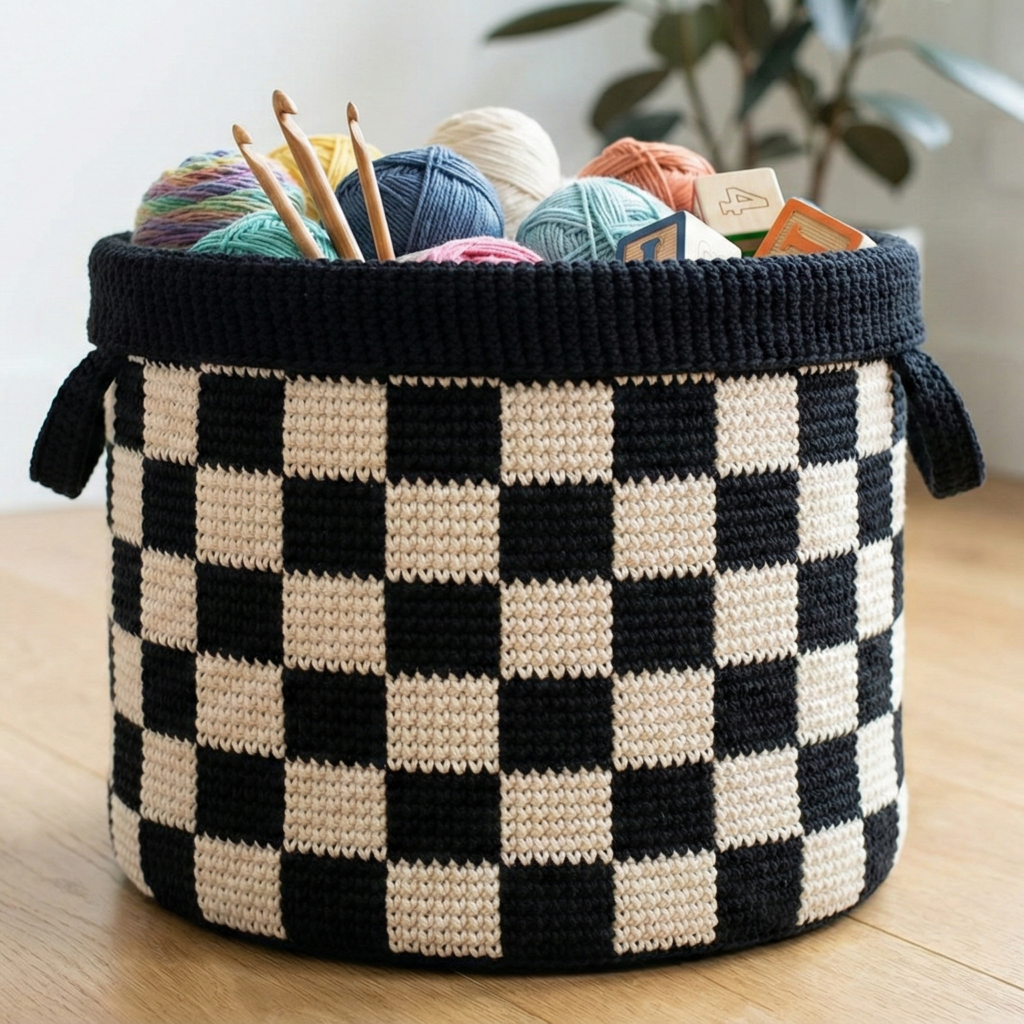
Skill level: intermediate (colorwork / tapestry single crochet or mosaic)
Purpose / vibe: a bold modern storage basket with checkerboard color blocks — great for toy storage or craft supplies.
Materials (example)
- Two contrasting colors worsted cotton ~500–800 yd.
- Hook: 4.0–5.0 mm.
- Optional base insert for rigidity.
Finished size (example)
- Diameter ~12 in, height ~10 in (can be scaled by base rounds and side rows).
Stitch notes
- Tapestry single crochet (sc) is a good choice: carry floats inside or crochet over them. Alternatively work stripes and seam color blocks for easier floats.
Step-by-step
1) Base
- MR, 8 sc in MR; Rnd 2: inc each = 16; Rnd 3: sc 1, inc = 24; continue increasing evenly until base = desired diameter (e.g., 12 in). Change colors to create a checkered base if you like (work blocks of color in radial sectors).
2) Prepare a checkerboard chart
- Decide on block size (e.g., 6 sts × 6 rows per square). Prepare a simple chart or work stripes and change color every N sts in a modular fashion to create squares. If tapestry sc, you will change color within a round by finishing the stitch in the new color.
3) Build sides with check pattern
- Once base diameter is reached, stop increasing. Continue working rounds of tapestry sc following your chart to make alternating color blocks. Keep floats snug but not tight. Use stitch markers at every block boundary to keep alignment.
4) Rim
- When side height reaches ~10 in, work 2–3 rounds sc in one solid color for a tidy rim. Consider folding the top and stitching down a 1 in cuff for extra stability.
5) Handles
- Make short handles by skipping stitches and chaining a handle loop then sc across chain; reinforce with sc rounds around attachment points.
Finishing & variations
- For large baskets, consider inserting a plastic canvas ring into the rim to keep shape.
- Make the checkerboard subtle by using tonal colors (e.g., cream + oatmeal) for a minimalist look.
Care
- Cotton baskets: spot/hand wash; dry flat to preserve shape. Remove inserts before washing.
Conclusion
Crocheted baskets are practical, fast to make, and a great way to use yarn you already own. These six patterns cover a wide range of uses and styles — from the romantic Heart Basket and the highly functional Basket with Removable Dividers, to sculptural texture in the Honeycomb Basket, the kitchen-friendly Bread Basket, the colorful Granny Basket, and the modern Checkered Basket.
Quick checklist to get perfect results:
- Choose a sturdy yarn and work tight tension for structure.
- Measure your base as you increase so the sides start at the correct diameter.
- Reinforce the base and rim if the basket will carry weight.
- Add a fabric lining if you need to hide holes, make it washable, or protect contents.
- Try one small test basket first to dial in hook size and number of increase rounds for the shape you want.