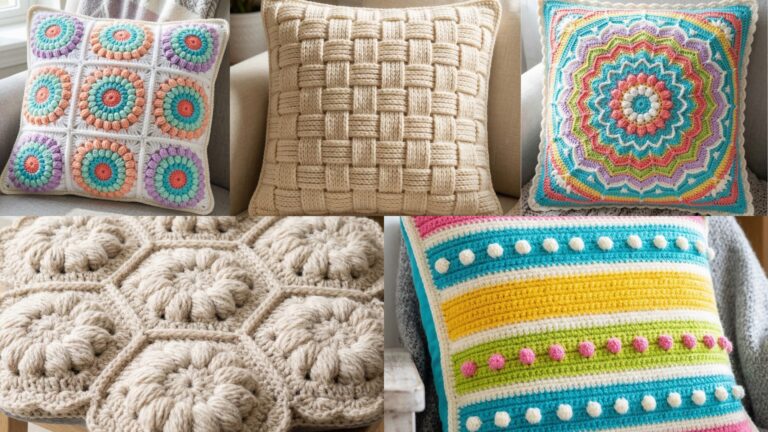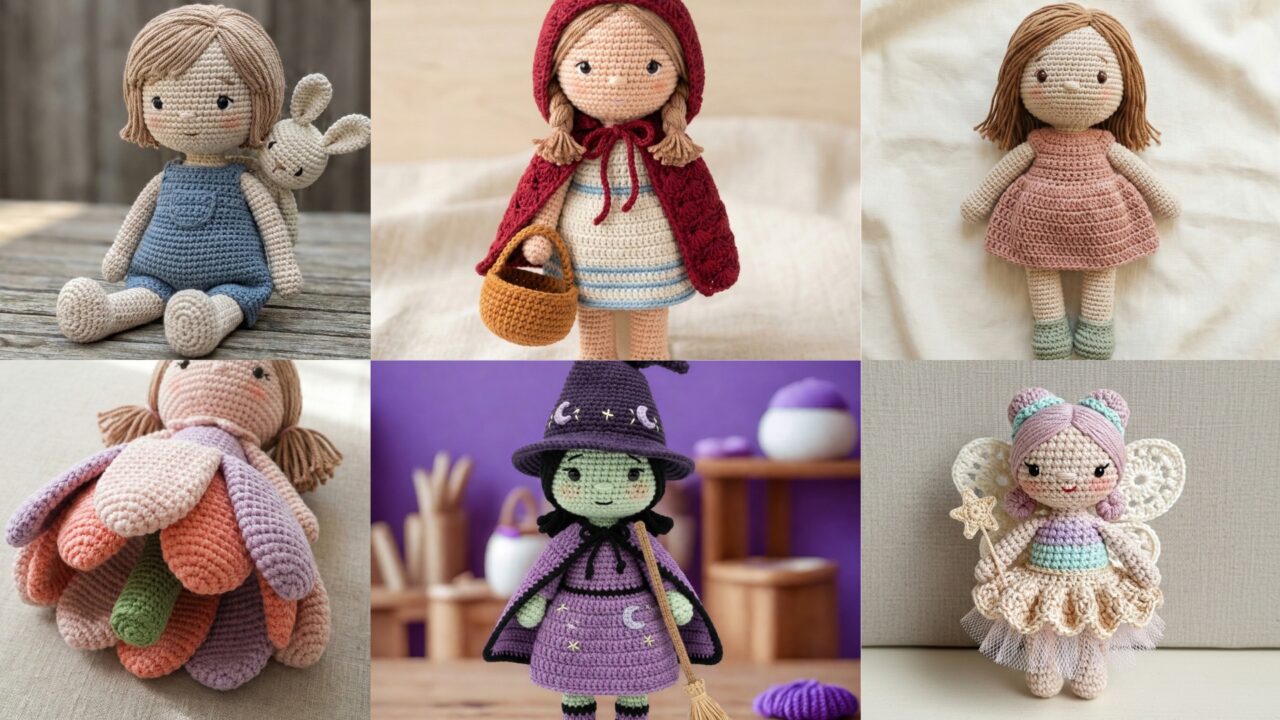
Handmade dolls are the ultimate amigurumi joy — tiny personalities that wear mini clothes, pose for photos, and become keepsakes or gifts. In this post you’ll get one practical introduction that covers materials, safety, sizing & gauge, and useful tips — then six full doll designs with: skill level, very specific materials, finished size, gauge guidance, step-by-step construction for head/body/limbs/hair/clothes, assembly instructions, finishing + safety, variations, and styling/photo tips. Each pattern is written so you can scale the doll up or down, change outfits, and adapt accessories.
materials, safety, gauge & sizing basics (must read)
Yarn, hooks & stuffing
- Yarn: For classic amigurumi I recommend DK (light worsted) or sport/fingering if you want smaller dolls. Cotton or cotton blends give crisp stitches and hold shape; acrylic is softer and easier on a budget. For hair you can use acrylic, novelty, or yarn specifically for hair (loop yarn, eyelash, etc.).
- Hooks: Use a hook 0.5–1.0 mm smaller than the yarn label to make tight fabric (prevents stuffing showing). Typical doll sizes: 2.5–3.5 mm for fingering/sport; 3.5–4.5 mm for DK.
- Stuffing: Polyester fiberfill; small amounts of poly pellets for weighted bases optional; pipe cleaners or wire for posable limbs (wrap carefully; not for toys for very young children).
- Notions: tapestry needle, stitch markers, scissors, small safety eyes (if age-appropriate), embroidery floss (for facial features), sewing needle, optional small buttons, felt, fabric glue.
Safety first
- If the doll is for a child under 3, do not use safety eyes, beads, or removable small parts. Use embroidered eyes and details only. Secure all attachments with extra stitching.
- Sew seams closed thoroughly and reinforce straps. Avoid thin wires unless you wrap them and encase them inside fabric channels.
Gauge, sizing & scaling (digit-by-digit conversion example)
Amigurumi is more row/round based than flat garments, but you still need to check gauge to predict doll height.
- Make a 2 in × 2 in sample in single crochet (in the round or in rows depending on stitch used).
- Count stitches per inch (spi) and rows per inch (rpi). Example: your swatch shows 6 stitches per inch and 8 rows per inch.
- If you want a doll of 10 in total height in this style, multiply: 10 × 6 = (10 × 6) = 60 total stitches around the chest circumference — more importantly, use rows to control height: 10 × 8 = (10 × 8) = 80 rows (or rounds equivalent) from top to bottom if working top-to-toe. In practice you will divide these rows across head, body, legs, and feet — this arithmetic helps scale.
Abbreviations (US)
- MR = magic ring
- ch = chain
- sc = single crochet
- hdc = half double crochet
- dc = double crochet
- inc = 2 sc in same st
- dec = sc2tog (single crochet 2 together)
- sl st = slip stitch
- BLO / FLO = back/front loop only
- RS / WS = right side / wrong side
General assembly & finishing tips
- Stuff firmly but not overstuffed. Overstuffing distorts stitches; under-stuffing makes shapes floppy.
- Weave ends securely and bury tails inside stuffing. Use two passes to anchor garments.
- Sew pieces on with ladder/mattress stitch for invisible joins.
- Try pieces on the doll as you go — clothing and hair often need slight adjustments.
- Blocking hair: for yarn hair you can lightly steam and shape after attaching (avoid synthetic yarns that melt).
- Photographing: use neutral backgrounds, natural light, and a prop (mini chair or tiny mug) to show scale.
1. Crochet Louise Doll Pattern
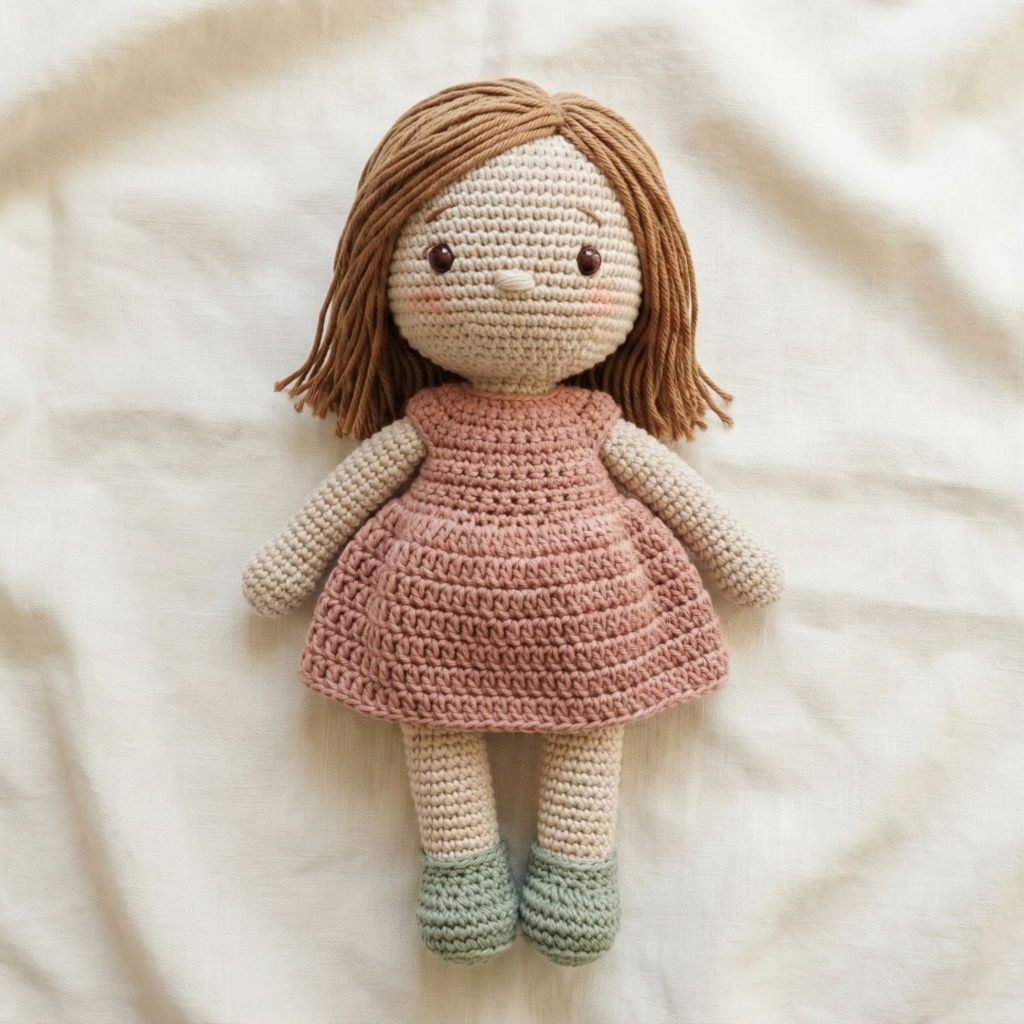
Overview / Vibe: A sweet, classic ragdoll-style Louise with simple dress and embroidered face. Timeless, cuddly, great for beginners who want a full doll build.
Skill level: Confident beginner → intermediate (basic shaping, sewn-on limbs, simple dress)
Materials
- DK cotton yarn (main skin color): ~50–75 g
- DK cotton yarn (hair color): ~25 g
- DK cotton for dress & shoes: 25–50 g each color
- Hook: 3.5 mm (adjust to your gauge)
- Fiberfill, tapestry needle, stitch markers, small embroidery floss for face, optional safety eyes 6 mm (or embroider eyes)
Finished size: ≈ 12 in (30 cm) tall using listed yarn/hook. Scale by changing hook or yarn.
Gauge sample: 6 sc = 1 in (spi = 6) — check swatch.
Construction — step by step
Head (worked in continuous rounds)
- MR: 6 sc (6)
- R2: inc around (12)
- R3: sc, inc around (18)
- R4: sc x2, inc around (24)
- R5–R10: sc around (24) — build height (adjust for desired head proportion)
- R11: sc x2, dec around (18)
- R12: sc, dec around (12) — stuff firmly from here onward
- R13: dec around to close (6), fasten off and weave in.
Face details — before stuffing fully or after with embroidery needle:
- Mark eye positions symmetrically ~6–8 rounds down from crown. Embroider eyes with satin stitch or French knots. Add small blush with diluted fabric paint or pastel chalk.
Neck & Body
- Attach yarn at base of head. Work sc rounds to form neck: 2–4 rounds sc (8–12 sts depending on gauge).
- Increase to body width: sc, inc repeat to reach desired bust circumference (e.g., 36–40 sts). Work in rounds downwards for torso: sc rounds for length ~3.5–4 in.
- For waist, work even or add slight decreases to create subtle waist shaping. Stuff as you go.
Arms (make 2)
- MR 6 sc. R2: inc around → 12. R3–R10: sc around (length about 3 in). Stuff lightly. Flatten last round and sc across to close or continue to make shoulder and sew to body with ladder stitch.
Legs (make 2)
- MR 6 sc; R2: inc to 12; R3–R6 sc around to form foot base; shape toe by short rounds/increasing and decreasing for foot shape. Continue to ankle and thigh length (~4–5 in). Stuff firmly; attach to lower body or sew to torso seam.
Hair
- Option A: Loop method — create hair by attaching multiple strands via latch-hook method. Cut yarn to desired length double; insert hook through head stitch, fold loop over hook, pull loop through stitch, pull ends through loop & tighten (creates a knot). Trim and style.
- Option B: Crocheted wig cap — make a cap that fits head and sew it on; add bangs or braids.
Dress (simple pullover)
- Create a skirt by picking up stitches around waist and work rounds in dc or shell pattern for 6–8 rounds for skirt length. Add bodice as short rows or make a separate top and sew.
Shoes / booties
- Work small rounds in contrast color around foot area: sc around with increases to form toe, then hdc rounds for ankle cuff. Add tiny bows.
Assembly & finishing
- Sew arms and legs onto torso with strong mattress stitch; weave tails into body.
- Embroider mouth, eyebrows, and small nose (a soft nub) with cotton thread.
- Secure hair and dress seams. Block dress for tidy look.
Variations & tips
- Make Louise a boy version with shorts and a tie.
- Add wire inside arms for posability (wrap with tape, then insert). Not for toddlers.
Care
- Machine wash gentle in a laundry bag or hand wash; reshape and air dry.
2. Crochet Cute Amigurumi Doll with Tiny Bunny pattern
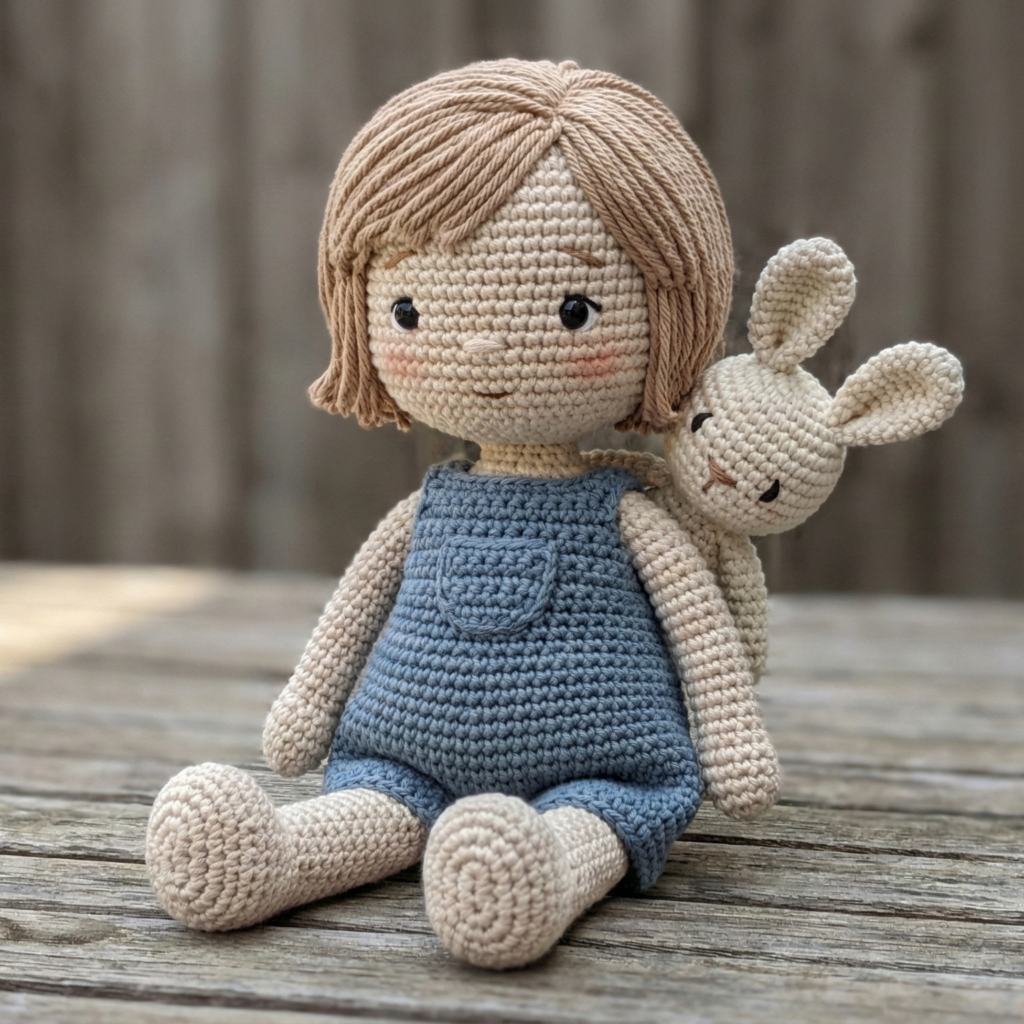
Overview / Vibe: A sweet mini doll (≈8–9 in) who comes with a tiny floppy bunny friend. Great gift set.
Skill level: Intermediate (two toys in one, small accessory shaping)
Materials
- Sport or DK yarn for doll: 50 g main + 25 g contrast (clothes)
- Fingering yarn small amount for tiny bunny (about 10 g)
- Hooks: 3.0–3.5 mm for doll; 2.0–2.5 mm for bunny for tight fabric
- Fiberfill, embroidery floss, safety eyes 4–6 mm optionally (bunny eyes embroidered for child safety)
Finished sizes: Doll ≈ 9 in; Bunny ≈ 3–4 in
Key design notes: Work bunny in smaller hook and slightly thicker yarn if you want a chunkier friend; use smaller stitches for safety and durability.
Doll construction (head/body/limbs)
Follow similar head & body steps as Louise but scale down using smaller numbers: MR6→12→18 increases etc, end body ~30 sts circumference.
Tiny Bunny (worked in very tight rounds)
Head & body (one piece)
- MR 6 sc (6)
- inc around (12)
- sc, inc repeat to 18
- sc rounds to build height for head (2–3 rounds), inc to 24 for body, sc rounds for body length ~8–10 rounds, dec & stuff; leave tail to sew.
Ears (make 2)
- ch6, sc across back loops to shape narrow ear; flatten and sew to head. Make floppy by sewing one side lower.
Arms & legs mini — make simple tube shapes and attach.
Accessories & finishing
- Give the doll a pocket to carry the bunny: crochet a small rectangle (ch10, sc rows 3) and sew to dress front.
- Embroider matching tiny bow on bunny ear.
Assembly & safety
- Sew bunny to doll hand with secure stitches for gifting. If giving to young children, make bunny and doll fully embroidered without beads.
Variations
- Make bunny reversible color (two-tone).
- Add a miniature blanket or scarf.
Care
- Hand wash recommended; reshape.
3. Crochet Two-in-One Flower Reversible Doll Pattern
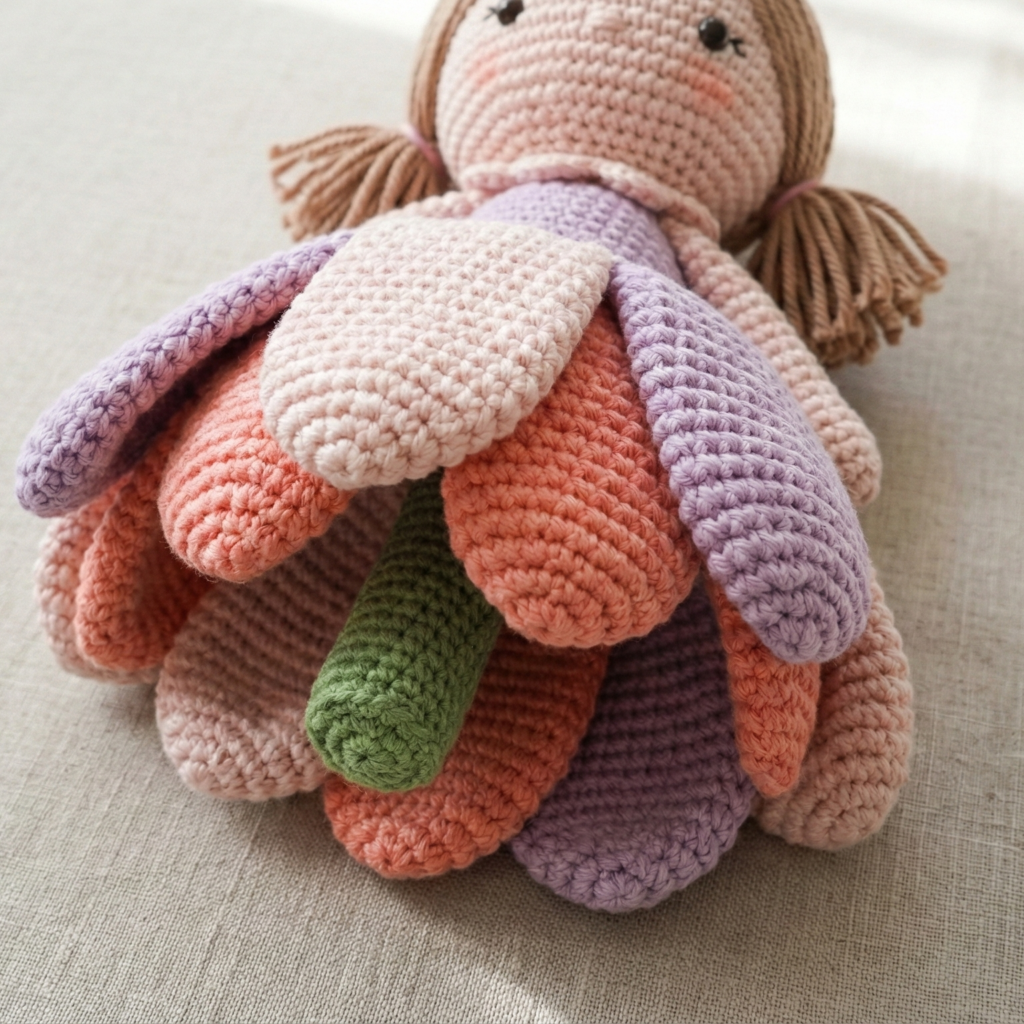
Overview / Vibe: A playful doll whose dress reverses into a flower (petals fold out) — one toy, two play modes.
Skill level: Advanced beginner → Intermediate (construction of reversible skirt/petal engineering)
Materials
- DK yarn (skin, hair, dress main, petal contrast).
- Hook 3.5 mm, tapestry needle, stuffing.
Finished size: ≈ 10–11 in tall; flower footprint ≈ 8–10 in diameter when petals open.
Concept & construction overview
- Make a standard doll body and design the skirt as attached petals that can fold over the doll’s head (turning dress into flower) or fold in to form a normal skirt. Each petal is a semi-circular piece stitched to the skirt band with a small snap to hold closed for normal dress mode.
Skirt / petals — step-by-step
- Pick up stitches around waist to form skirt band sized to waist circumference. Work 2–3 rounds of sc.
- For each petal (make 6 petals): make a semicircular motif: MR, inc rounds to form half circle approx 3–4 in wide at base, end with shell edging. Block each petal into shape.
- Sew petals evenly around band with bottom edge anchored and petal top free. Add small snaps at petal tips so they can fasten together to form a flower top (when folded up). Use snaps rated for toys and sew through backing.
Body, head & limbs — worked as standard doll (see Louise template), with slightly longer skirt attachment.
Assembly
- Sew petals to skirt band, test reversing action. Reinforce snaps and seams.
Variations
- Make petals all different colors for rainbow flower.
- Add embroidered leaves or tiny felt bees.
Care
- Remove snaps before machine wash if possible; hand wash otherwise.
4. Crochet Little Fairy Doll Pattern
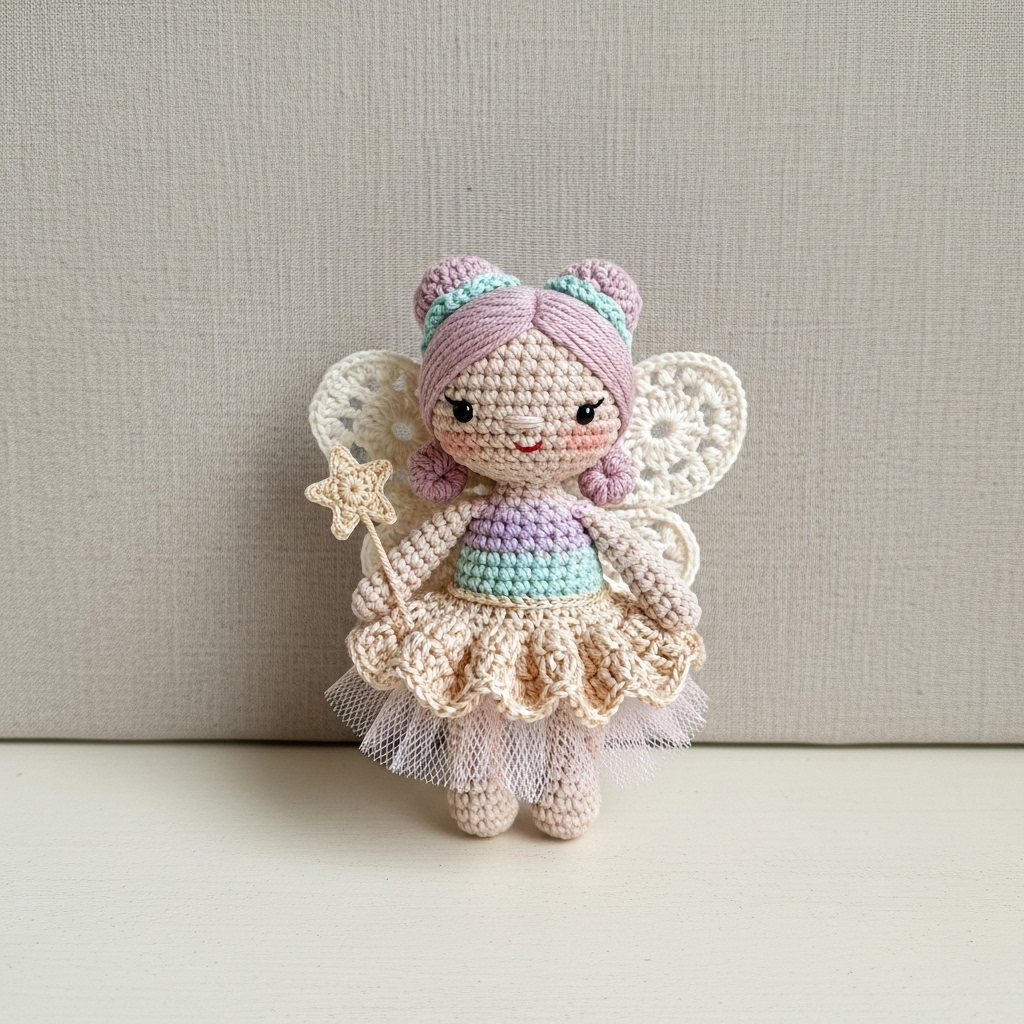
Overview / Vibe: A tiny whimsical fairy with yarn hair, tiny wings, and a removable tutu. Playful, perfect for shelf display or imaginative play.
Skill level: Intermediate (light shaping, wings, tutu, decorative stitchwork)
Materials
- Fingering yarn for body (soft cotton), glitter or halo yarn for wings (optional).
- Hook 2.75–3.5 mm, fiberfill, small embroidery thread.
- Thin wire optional for wing support (wrap and encase).
Finished size: ≈ 8–9 in
Construction — body, limbs (compact)
- Make head and torso as smaller proportions (head slightly larger relative to body for fairy charm). Use the same head recipe scaled down: MR6→12→18 then limited sc rounds.
Wings
- Make two identical wing shapes: ch12, row1 sc across, row2 ch3, skip, sc to create lacy pattern; finish with shell edging. If you want structure, stitch a thin pipe cleaner/soft wire into wing perimeter and encase by sewing a round of slipstitch over it (wire fully encased — not suitable for toddlers).
Tutu / dress
- Make a small circle of shells: ch foundation around doll waist, work shell rounds (dc3 in same stitch) to create ruffled tutu. Attach with a hidden seam or removeability via snap.
Hair
- Attach long strands and braid or style into buns. Use yarn glue at scalp if you want hair to stay fixed.
Accessories
- Tiny wand: a short dowel or wrapped wire coated with yarn and topped with a small crocheted star (MR, 5 petals). For safety, for kids under 3 do not include pointed objects.
Assembly & finishing
- Sew wings to back firmly. Add embroidered facial features (tiny smile, blushed cheeks). Add tiny sequin or bead star carefully — skip for baby-safe versions.
Variations
- Make seasonal fairies: autumn leaf wings, winter snowflake motif, etc.
Care
- Hand wash recommended for glitter yarn; reshape and air dry.
5. Crochet Little Red Riding Hood Amigurumi Doll Pattern
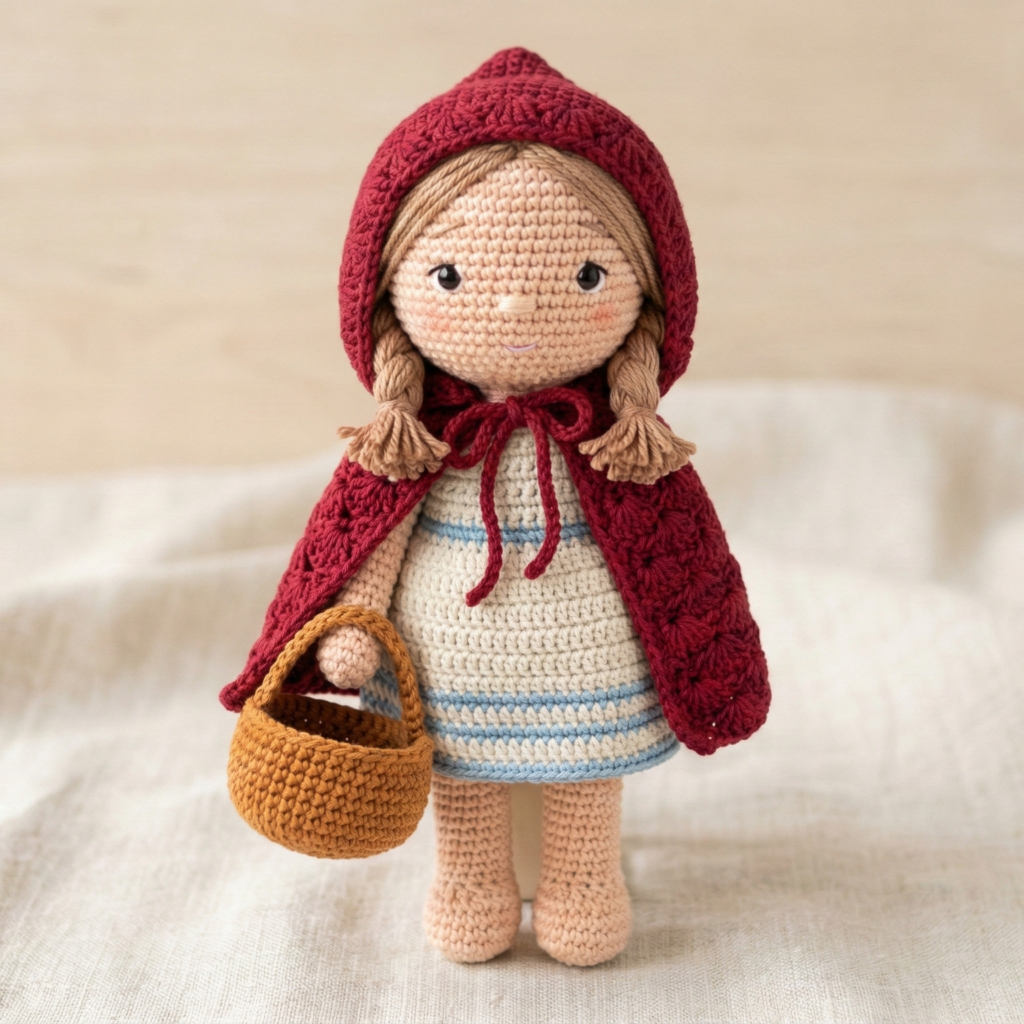
Overview / Vibe: A classic storybook doll with a removable red hooded cape, basket accessory, and printed-style dress.
Skill level: Intermediate (clothing pieces + small props)
Materials
- DK yarn for body, red worsted or DK for hood, contrasting yarn for dress, small bit of brown yarn for basket.
- Hook 3.5 mm, fiberfill, small wooden bead for basket handle (optional).
Finished size: ≈ 11–12 in (storybook proportions)
Construction — doll + hooded cape + basket
Doll body — standard proportions; consider slightly longer legs to allow dress and cape layering.
Hood & cape
- Hood: ch foundation loop that fits over doll head then work shaped rounds in sc to make a hood (smaller at neck, wider at face). Edge with picot or small scallop.
- Cape: pick up stitches around hood neck edge and work outwards in dc shells for cape flare; add a tiny button and loop or tie strings.
Basket
- Small oval basket: MR 6, increase rounds to form flat oval base, then work sides up with sc rounds and add tiny handle (chain 8, sc back along chain, sew ends to sides). For a wood handle, thread thin twine or a small stick and secure; for child-safe version use yarn only.
Dress
- Make a simple sleeveless dress by crocheting a rectangle to wrap front/back and seam sides, or pick up stitches at the waist for a circular skirt.
Assembly
- Dress the doll, put on cape; place basket in hand and sew small hidden stitch to anchor for photography, but leave removable for play.
Variations & styling
- Make matching wolf plushie (mini sheepish wolf).
- Embroider tiny floral hem on dress.
Care
- Wash gentle; basket may need spot-clean only.
6. Crochet Green Witch Doll Pattern
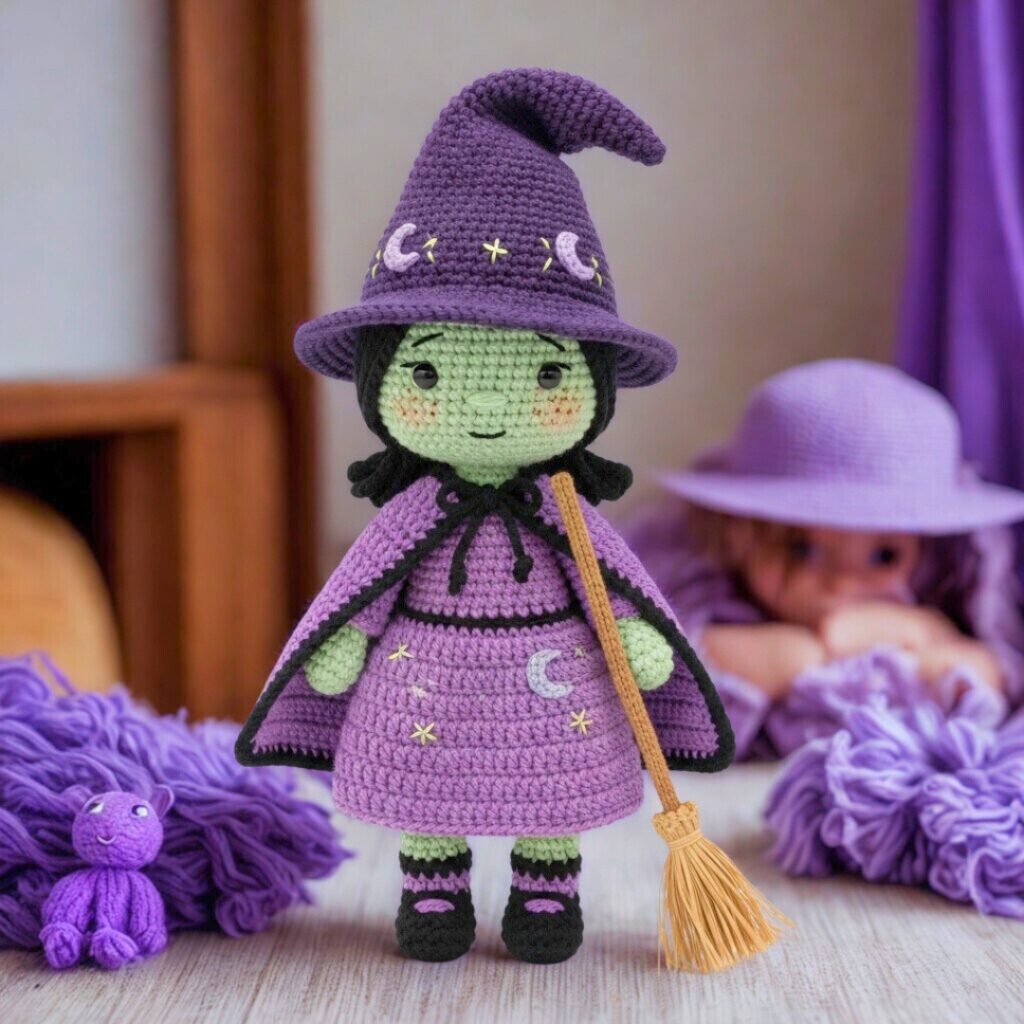
Overview / Vibe: Playful spooky charm — a tiny witch in green with a pointed crochet hat, broom accessory, and detachable cloak. Great for Halloween or whimsical decor.
Skill level: Intermediate (hat shaping & small accessory broom)
Materials
- DK yarn in skin tone, green, black, orange for accents.
- Hook 3.5 mm, small wooden dowel or wrapped twig for broom handle (optional), short piece of raffia or brown yarn for broom bristles.
Finished size: ≈ 10–11 in
Construction — doll, hat, broom
Hat
- MR 6, increase rounds to base ring size matching head circumference, then work tapered rounds decreasing slowly to form cone shape. Optionally bend tip by stuffing lightly and inserting a thin wire (not for gifts to small children).
Broom accessory
- Handle: thin dowel or crocheted small rod (MR, 6 sc, sc rounds to 3–4 in).
- Bristles: wrap raffia around end and bind with yarn or crochet a short fringe and tie to handle.
Cloak & dress
- Cloak: semicircle or rectangle fastened at neck with button. Work in green, edge in black.
- Dress: simple dress tube shortened at waist; add embroidery of moons, stars.
Finishing & personality
- Embroider tiny freckles, mischievous mouth, and add optional tiny mole. Add glitter thread sparingly for magical effect.
Assembly & finishing
- Sew hat to head lightly (so it’s removable if desired). Attach broom as a prop — for play attach with a small loop so witch can hold it.
Care
- Use natural materials carefully; spot clean for dowel.
Conclusion
You now have six complete doll projects that span classic ragdoll charm (Louise), sweet companion sets (doll + bunny), interactive play (reversible flower dress), fantasy (fairy), storybook character (Little Red Riding Hood), and seasonal whimsy (Green Witch). A few final pro tips:
- Make a test mini first. If you want to scale a pattern, try a miniature version to check proportions before working a full 10–12 in doll.
- Coordinate outfits. Make interchangeable clothes (pullovers, hats, capes) so each doll becomes a small wardrobe project.
- Photo-ready props. Tiny chairs, baskets, or teacups make your blog photos sing — photograph at doll eye level with soft lighting.
- Safety & gifting. For gifts to toddlers, convert every small part to embroidered equivalents and avoid wires/dowels. Label handwash only if any wooden bits are used.