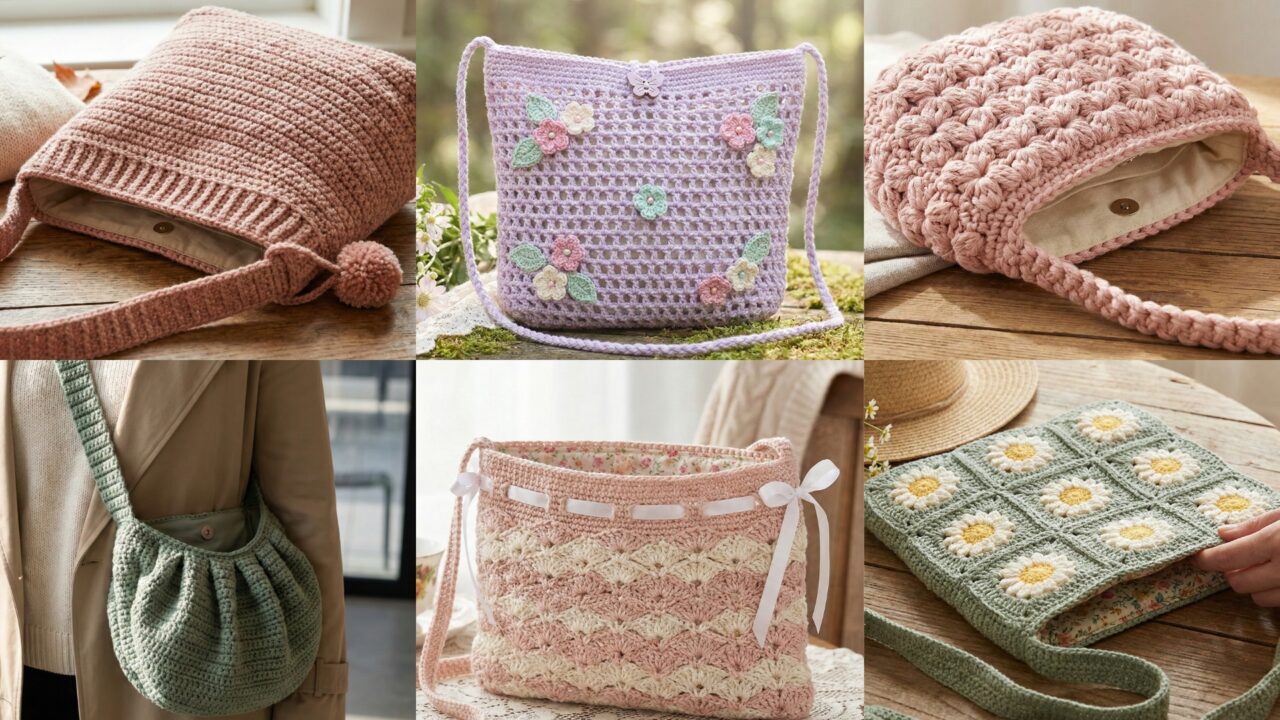
Shoulder bags are one of the most satisfying crochet projects: they’re useful, fast to finish, and let you show off texture, color and technique in small packages. Below you’ll find a long, ready-to-publish blog post with a helpful introduction (tools, sizing, materials and general construction notes) followed by six complete shoulder-bag patterns. Each pattern includes: skill level, materials and yardage, finished measurements, stitch notes, a step-by-step construction guide you can follow straight away, assembly & finishing, styling ideas and care instructions. Everything is written in a clear, human tone and designed to be easy to read.
tools, materials, general bag building tips
Before you pick a design, gather a few essentials and make a quick plan. That’ll save time and make the finished bag more durable.
Tools & notions (general)
- Crochet hooks: most bags below use hooks between 4.0 mm and 6.5 mm depending on yarn thickness.
- Yarn: for shoulder bags choose sturdy yarns — cotton, cotton blends, tapestry/mercerized cotton, T-shirt yarn, or worsted acrylic for structured bags. For soft, drapey bags use DK or held-double DK.
- Notions: tapestry needle, stitch markers, scissors, measuring tape, craft glue (optional), sewing needle + strong thread (for attaching straps/linings), coordinating fabric and sewing supplies if you want a lining, magnetic snaps / buttons / sturdy zippers for closures, interfacing (if lining), small rivets or bag hardware if desired.
- Optional: purse feet, leather strap pieces, or thin foam (for rigid base).
Sizing & finished measurements (what to target)
- Small shoulder bag: 8–9 in wide × 6–7 in tall.
- Medium day bag: 10–12 in wide × 8–10 in tall.
- Large shoulder bag/tote: 14–16 in wide × 12–14 in tall.
Each worked example below includes a recommended finished size (medium or one-size example) and how to change it.
General construction choices (common approaches)
- Bottom-up in the round — flat base worked first, then walls worked up in the round. Great for structured bags and even shaping.
- Flat panels & gusset — make front/back panels and a long strip for the side/bottom gusset; seam together and add strap. Works well for motif bags (granny, lace panels).
- One-piece folded bag — work a large rectangle, fold, seam sides and add strap — quick and simple for lined bags.
Stability & durability tips
- Use tight tension to avoid bag sag. Consider a hook 0.5–1 mm smaller than the yarn label suggests.
- Add a fabric lining to protect seams and keep the bag from stretching. Sew lining to the top edge or stitch inside.
- For a firmer base, cut a piece of thin plastic canvas or leather to insert between lining and crochet base.
- Reinforce strap attachments by sewing extra passes and, if possible, using hardware or rivets.
Finishing touches
- Magnetic snaps and zippers make bags secure.
- Decorative hardware (metal rings, toggle buttons) raises perceived quality.
- Block pieces lightly before assembly to make seams neat and to align pattern repeats.
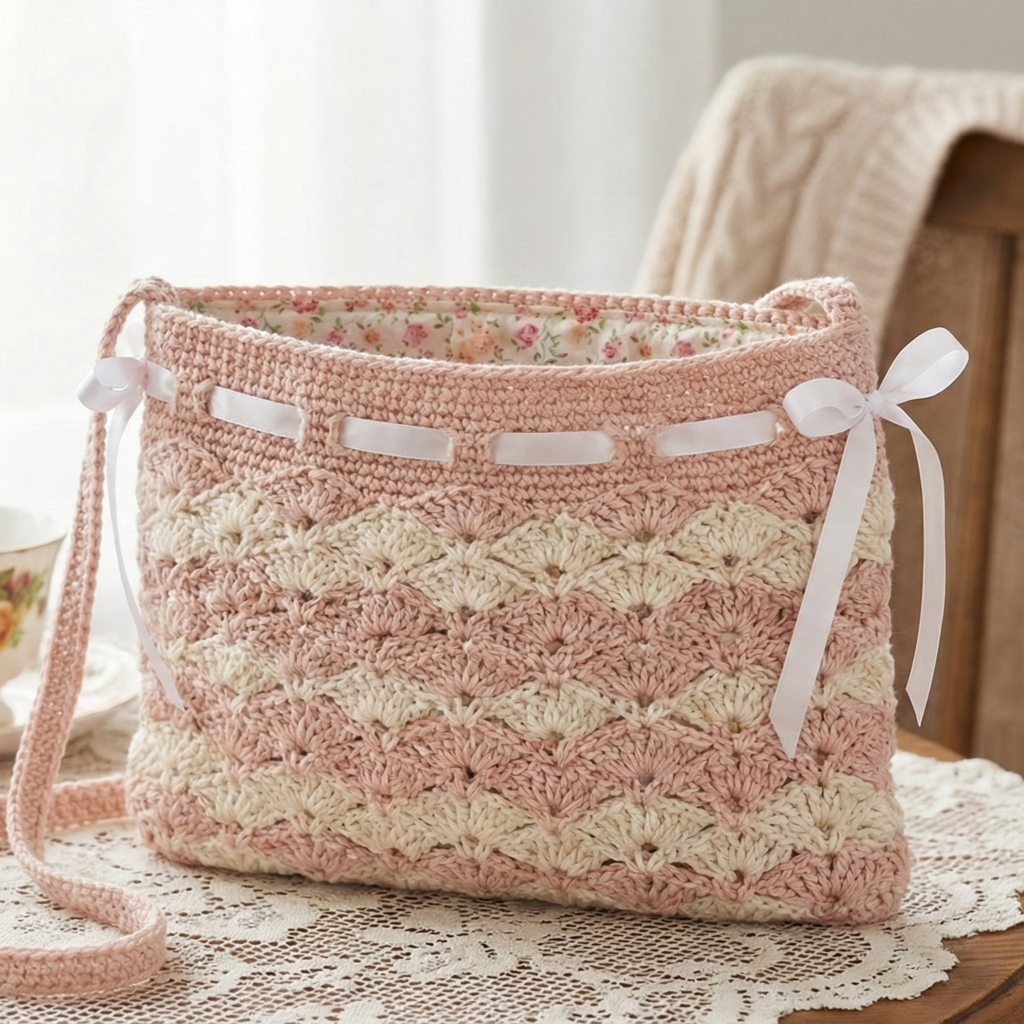
1. Crochet Wool Pink Handmade Shoulder Bag Pattern
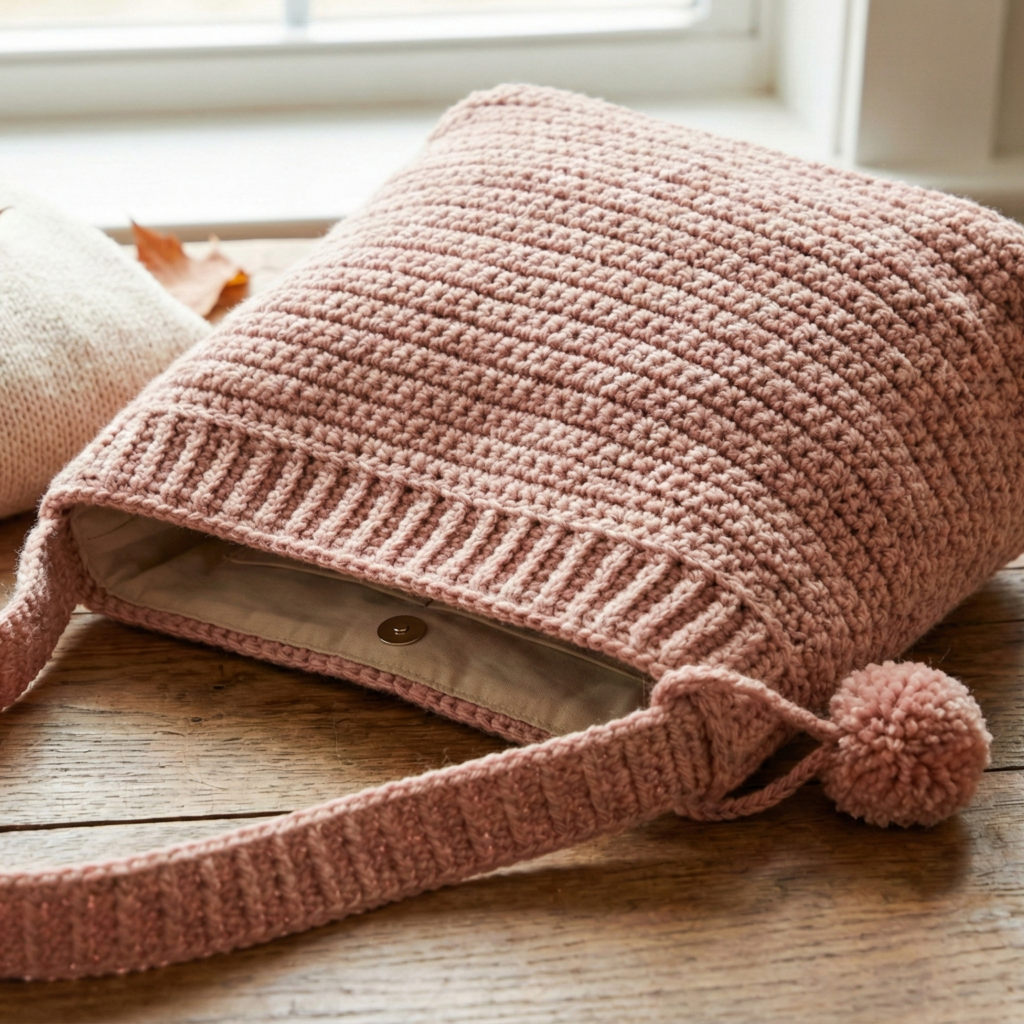
Skill level: confident beginner (basic shapes + simple lining)
Vibe: soft wooly look in a pretty pink — slightly slouchy, warm, cozy for fall/winter outfits.
Materials (one medium bag ~10–11 in × 8–9 in)
- Worsted wool or wool-blend yarn (superwash for easier washing) — approx. 450–600 yd depending on depth/lining.
- Hook: 5.0 mm (or adjust to get a dense fabric).
- 1 magnetic snap, tapestry needle, stitch markers, optional wooden base insert.
- Fabric for lining: cotton or light canvas, matching thread.
Finished measurements (example)
- Width: 11 in, height: 9 in, strap drop: 10–11 in (shoulder length).
Stitch pattern & texture
- Use a dense single/double combo to limit stretch: main body = hdc rounds with occasional front/post hdc rows for subtle ribbing.
Step-by-step
Base (flat oval)
- MR, ch 2, work 8 hdc in MR, sl st to join — 8 sts.
- Rnd 2: hdc inc in each st → 16 hdc.
- Rnd 3: (hdc in next st, hdc inc in next) around → 24 hdc.
- Continue increasing rounds by adding evenly spaced increases until base measures ~10 in wide (or the width you want). Keep count and increase consistently to keep an oval shape. Example stops after reaching ~56–72 hdc (your swatch/gauge will determine actual numbers).
Walls
5. Once base is sized, work even rounds of hdc (no increases) around in continuous spiral or joined rounds to build walls. Work ~9–10 in of height for medium bag (measure as you go). At about 2 in from top, work a round of BLO hdc for a neat foldline if you plan a folded cuff.
Rib band (optional)
6. For reinforced top, work 4 rounds of fpHdc, bpHdc alternating to form subtle vertical ribs.
Strap
7. Option A (crochet): Attach to top edge and chain foundation long enough for strap drop (for 10 in drop with 2× wrap, chain ~60–70 ch depending on gauge); work 6–8 rows of hdc in back loop for a flat strap, fold and seam or work both sides and join for double thickness. Secure ends to bag with multiple passes.
Option B (leather): add leather strap with rivets for stylish contrast.
Lining
8. Cut lining from fabric (subtract 1/4 in seam allowance from bag interior) — sew into a simple pouch and hand-stitch into bag’s interior top, catching the lining in top rounds so it won’t sag. Add a pocket inside if desired.
Closure
9. Sew a magnetic snap centered under top edge (on lining if easier).
Assembly & finishing
- Weave in ends; block lightly if wool.
- If you want stiffer structure, insert a thin plastic or leather base beneath the lining at the bottom.
Styling & variations
- Use ombré or tonal pink for a modern look.
- Add a small tassel or pom as a charm.
Care
- Wool: hand wash cold or machine on gentle if superwash; reshape dry flat. Lined bag: unzip/turn lining out if possible to spot clean.
2. Crochet Stylish Ruched Shoulder Bag Pattern
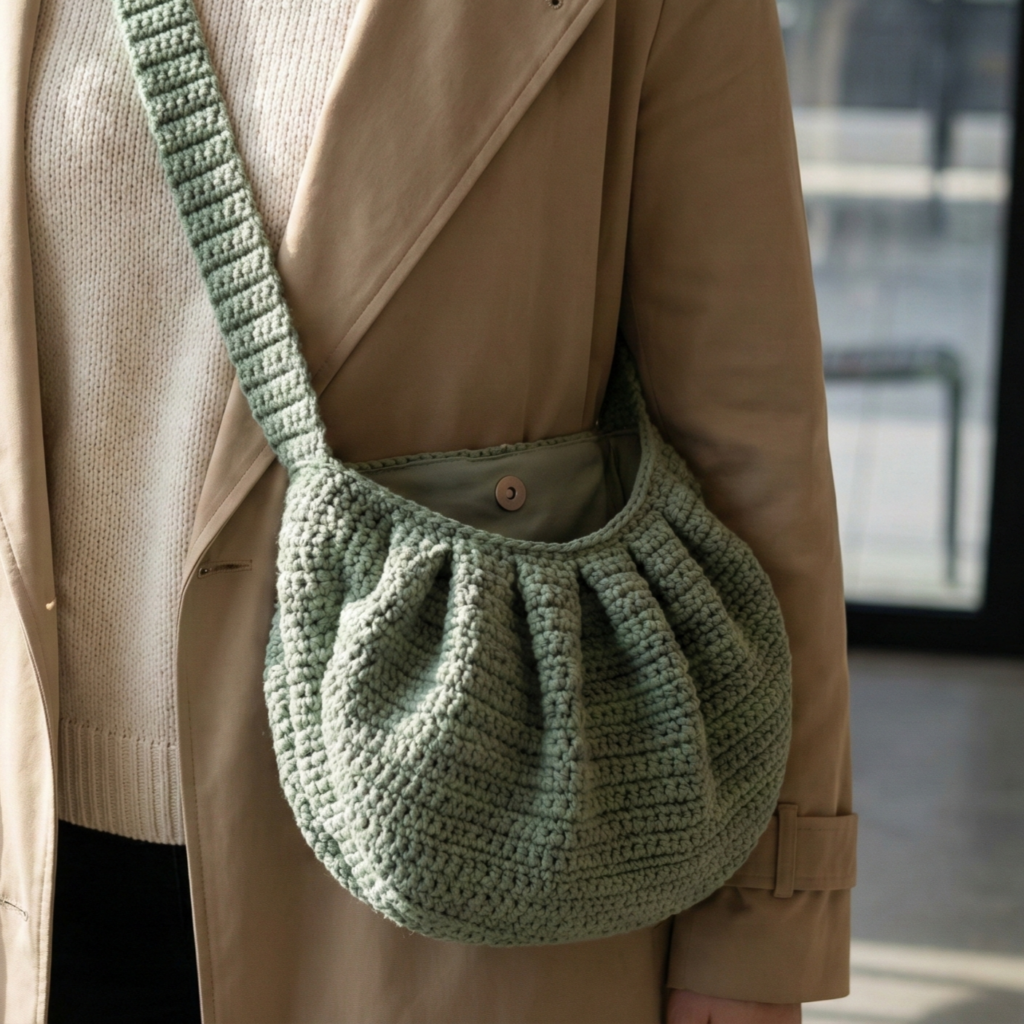
Skill level: intermediate (gathering/ruched shaping + strap finishing)
Vibe: contemporary ruched texture — gathered body with soft drape and a flattering shoulder fold.
Materials (one medium bag)
- Soft worsted DK or bulky cotton blend — ~500–700 yd for a roomy ruched bag.
- Hook: 6.0–6.5 mm to create slouch and visible ruching.
- 1 magnetic snap or button; tapestry needle; lining fabric optional.
Finished measurements (example)
- Width: 12 in, height (ungathered): 10 in, depth (gathered): 3–5 in, strap drop: 11 in.
Technique concept
- Ruching is created by working a slightly wider rectangle and then gathering it along a parallel axis to create tight pleats (like a ruched clutch, but wearable). Another method is to work a tube and use an internal cord threaded through eyelets to create ruched regions.
Step-by-step (tube + drawcord ruching method)
Tube body
- Chain foundation to desired circumference before ruching: for an 12 in wide bag and chunky stitch yielding 3.5 sts/in, ch ≈ 42 + 1. Join to work in the round.
- Work hdc rounds in the round until body height = ~8–9 in.
Gathering channel
3. Choose where you want the ruching band(s). For a top-band ruching effect, work 2 rounds of sc, then eyelet round: sc 4, ch 3, sk 3 (or spacing that matches your cord thickness). The ch-spaced eyelets will form the cord channel. Work 1–2 rounds sc after eyelet to secure.
Ruching cord
4. Make a long crocheted cord (i-cord or twisted chain) about 2–3× length around bag where channel sits. Thread cord through eyelets and pull to gather to desired ruching fullness. Tie ends and conceal in lining.
Shoulder strap
5. Because ruched bags are slouchy, a wide strap balances the look. Crochet a strap by making a thick strap: chain desired length then work sc back and forth to get 1.5–2 in width, fold and stitch into double thickness for strength. Sew strap securely with many passes to side seams or reinforced base.
Lining & finish
6. Add lining and hand-stitch into top edge hiding cord ends. Add the snap closure at the center if desired.
Assembly tips
- Keep ruching even by tightening cord gradually and distributing pleats with your fingers.
- Reinforce attachment points of strap with a small fabric patch inside before sewing through to yarn.
Styling & variations
- Make multiple ruching channels (one near top and one lower) for tiered look.
- Use variegated or slub yarn to emphasize folds.
Care
- Cotton blends: machine wash gentle if yarn allows; reshape while damp.
3. Crochet Coquette Cute Ribbon Shoulder Bag Pattern
Skill level: confident beginner (simple motifs + ribbon details)
Vibe: feminine, ribbon bows and scallops — cute everyday bag for dates or casual outings.
Materials (one small-to-medium bag)
- Cotton DK (contrasting colors) — ~350–500 yd.
- 1 narrow decorative ribbon (or crochet a ribbon), small button, magnetic snap.
- Hook: 4.0 mm. Fabric lining optional.
Finished measurements (example)
- Width: 10 in, height: 8 in, strap drop: 9 in.
Design notes
- Body is worked in a textured shell or scallop stitch with an upper band that holds a ribbon threaded through eyelets; ribbon bows at side create the coquette look.
Step-by-step
Base & body (flat panel folded)
- Work a rectangle: ch to the width (e.g., ch 30 to get ~10 in). Row 1: sc across.
- Rows 2–30: work shell stitch rows — a common shell: (skip 2, 5 dc in next, skip 2, sc in next) across with adaptions at edges. Shells create scalloped texture. Work until panel height is ~16 in (this will fold to 8 in height). Block the panel flat.
Fold & seam
3. Fold rectangle in half widthwise (RS facing out). Seam sides with mattress stitch leaving the top edge open.
Ribbon channel & bow
4. At top edge, pick up loops and work 2 rounds sc. Then work an eyelet round: sc 3, ch 4, sk 2 across (adjust spacing for ribbon size). Work 1–2 more sc rounds to secure. Thread narrow ribbon through eyelets and tie decorative bows on one or both sides.
Strap
5. Make a strap by crocheting a strip (sc back and forth) or chain and single crochet into the chains for a braided ribbon strap. Attach to inside of bag with multiple stitched passes. For added detail, stitch small bow appliqués or create a ribbon bow with wired ribbon.
Lining & pocket
6. Add a cotton lining and a small inside pocket for a phone or keys. Attach lining at top with neat whipstitch so ribbon channel remains functional.
Variations & styling
- Use eyelet spacing to thread a wider satin ribbon for an extra girly look.
- Replace ribbon with crocheted chain for a textural version.
Care
- Cotton: handwash recommended to preserve ribbon; if ribbon removable, remove before washing.
4. Crochet Daisy Granny Square Shoulder Bag Pattern

Skill level: confident beginner → intermediate (motifs + join-as-you-go)
Vibe: sweet granny squares with daisy centers — retro meets cottagecore.
Materials (one medium bag)
- DK cotton in 3–4 colors (petal + center + background) — ~700–900 yd depending on square size & number.
- Hook: 4.0 mm.
- Lining fabric optional, strap (crocheted or leather).
Finished measurements (example)
- Width: 12 in (constructed from a 3 × 3 grid of 4 in squares), height: 9 in.
Motif plan
- Make granny squares with a daisy centre (small puff or popcorn stitches form the flower) and standard granny rounds to reach your desired square size (3–4 in recommended).
Step-by-step
Daisy granny square (example 4-round)
- MR, ch 1, (work 8 hdc as daisy petals using puff technique or small cluster) or create 8 petals with ch 3, sl st in MR for surface petals; secure center. (Alternate flower techniques vary — pick your favorite small daisy pattern.)
- Round 2: join background color and make corners: [3 dc, ch 2, 3 dc] into each petal gap to form corners.
- Round 3: continue granny rounds adding 3 dc clusters, ch 2 corners until you have a 4 in square. Block.
Make squares & join
4. Make enough squares for the front and back panels (3 × 3 for medium). Lay out and join-as-you-go or seam with whipstitch, leaving a side seam to shape strap attachments.
Gusset & base
5. For more depth, crochet a side strip (long rectangle) wide enough to create 3 in depth and join to square panels so the bag becomes a 3D shape. Alternatively, seam squares leaving a bottom edge and add a small oval base crocheted separately and sewn in.
Strap & finishing
6. Create a strap wide enough (1.5–2 in) by working a dense strap or use a leather strap for contrast. Attach with reinforced stitching through square corners. Add lining for durability.
Styling & variations
- Use pastel daisies for spring or bold saturated colors for festival vibes.
- Make mini versions as coin pouches using a single square.
Care
- Cotton: machine wash gentle depending on yarn—block after washing.
5. Crochet Fairycore Whimsy Shoulder Bag Pattern
Skill level: intermediate (lace stitches, appliqués, delicate finishing)
Vibe: ethereal fairycore bag with lacy panels, tiny flower appliqués, and soft pastel palette.
Materials (one medium bag)
- DK or light worsted cotton (soft pastel shades) — ~600 yd.
- Hook: 4.0 mm.
- Small beads or sequins optional (sew onto appliqués), ribbon, lining.
Finished measurements (example)
- Width: 10–11 in, height: 8–9 in, strap drop: 10 in.
Design elements
- Lace mesh (V-stitch or shell) panels worked flat or in the round; delicate appliqué flowers and leaves sewn on; optional seed-bead accents.
Step-by-step (flat panel, lined & appliquéd)
Front & back panels
- Make two identical panels: ch foundation to width (e.g., ch 36 for ~11 in). Work V-stitch mesh: dc, ch 1, dc into spaces across, shifting each row to create staggered mesh. Work until panel height ~8–9 in. Block panels to open lace.
Lining
2. Cut lining from lightweight fabric and sew pockets if desired.
Appliqués (flowers & leaves)
3. Make small 3-round flower appliqués: MR, ch 2, work 8 dc in ring; Round 2: ch 2, 3 dc in next st around to form petals; Round 3: small picot edge if desired. Make several and lightly block. Make tiny leaves by chaining and sc back.
Assembly
4. Sew appliqués to the front panel in an arc or scattered pattern; add a few seed beads in centers for sparkle (securely sewn). Sew lining to the inside of each panel, then join side seams and bottom seam through both crochet and lining to hide seam allowances.
Strap
5. Crochet a thin braided strap (chain + crochet over or small woven strap) and attach at panel corners. Reinforce with sewn patch inside.
Closure
6. Add a small snap or button + loop closure. For extra charm, attach a tiny embroidered moth or butterfly tag.
Styling & variations
- Use shimmer thread in a couple of rounds for a subtle ethereal sheen.
- Swap beads for tiny pearls for a more romantic look.
Care
- Hand wash gentle if beads are used; dry flat.
6. Crochet Handcrafted Flower Puff Mini Shoulder Bag Pattern
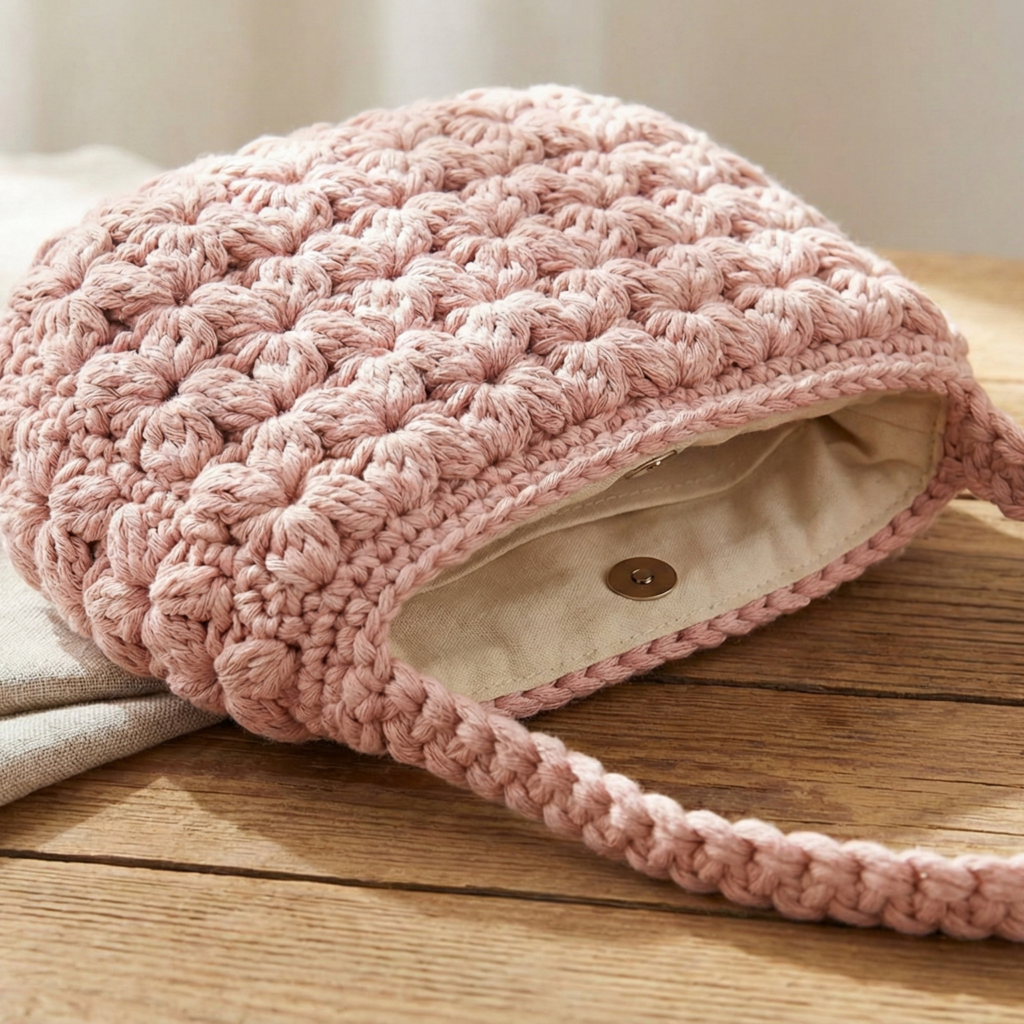
Skill level: intermediate (puff stitches, joining & finishing)
Vibe: puff-flower texture in a mini, cute shoulder bag — tactile and very giftable.
Materials (one mini bag)
- Bulky cotton or held-double DK for puff effect — ~350–500 yd.
- Hook: 5.5 mm.
- Lining optional, small snap or button.
Finished measurements (example)
- Width: 8–9 in, height: 6–7 in, strap drop: 8–10 in.
Technique & texture
- Puff stitches arranged in rows or as clustered flower motifs create dense puffy texture.
Step-by-step
Panel & puff pattern
- Chain to width (e.g., ch 28). Row 1: hdc across to create a firm base.
- Row 2: puff stitch in next st, sc in next 2 sts repeat across to produce puff-spacing. Puff stitch example: yo, insert hook, pull up loop repeatedly 4 times (for a full puff), yo and pull through all loops, ch 1 to close. Alternate rows of sc to anchor puffs. Work until panel height ~12–14 in (this will fold to make bag).
Fold & join
3. Fold panel and seam sides, leaving top open and sealing the bottom seam to create a puffy textured bag surface.
Strap & trim
4. Make a short strap to match the mini scale: chain a length and slipstitch back to form a rope, or crochet a small strap 1.5 in wide and fold to double thickness. Attach to inside with secure stitching.
Lining & closure
5. Add a lining to protect puffs and the interior; attach a small snap inside for closure.
Styling & variations
- Make a cluster of embroidered leaves in one corner for a modern take.
- Accent each puff center with a tiny bead (securely sewn).
Care
- Bulky cotton: machine wash gentle if yarn permits; reshape dry flat to keep puff texture.
Conclusion
These six shoulder-bag patterns cover a wide range of tastes: timeless wooly textures, modern ruched shapes, dainty ribbon-frilled coquette styles, granny daisy nostalgia, fairycore lace, and tactile puff-flower minis. A few final tips to make your bag look professional:
- Swatch first: test the stitch pattern and see how dense the fabric is — bags need tighter fabric than garments.
- Line and reinforce: lining makes a bag last longer and adds a professional interior finish — it’s worth the extra minute.
- Reinforce high-stress points: strap attachments, base corners and snap or zipper areas should be sewn through multiple rounds and (if possible) backed with fabric scraps for strength.
- Personalize: use contrasting linings, hand-stitched labels, or small charms — tiny details elevate the finished piece.