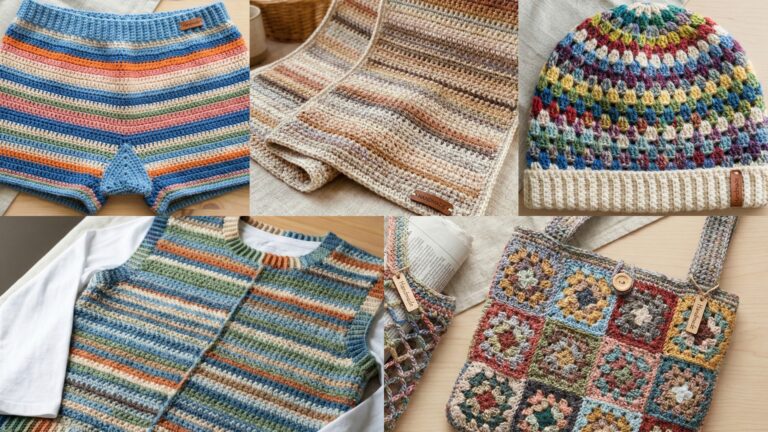
Lightweight crochet cardigans are the wardrobe workhorses of spring and summer: they add warmth without bulk, translate yarn texture into flattering drape, and are ideal for layering over dresses, tees, and cami tops. In this guide you’ll find a single, practical introduction (materials, sizing & measurements, gauge, common techniques, and finishing tips) followed by six full cardigan patterns — each with skill level, exact materials, finished measurements, step-by-step construction, fitting notes, helpful variations, finishing instructions, and care. The language is intentionally workshop-style so you can pick up your hook and start with confidence.
Before you begin — primer (materials, sizing, gauge, vocabulary, and workflow)
Yarn & hook
- Yarn choice for lightweight cardigans: fingering / sport / light DK (category 2–3) cotton, linen blends, bamboo blends, or lightweight cotton-acrylic. These fibers give breathable fabric and soft drape. Choose yarn labeled with recommended hook; for crisp stitch definition use a hook 0.25–1.0 mm smaller than the label if you want denser fabric, or the label size for more drape.
- Sample yarn amounts (approx., vary by size & length):
- Cropped cardigan (XS–M): 600–900 yards (550–820 m)
- Relaxed or longer cardigan (XS–M): 900–1400 yards (820–1280 m)
- Add 10–20% for larger sizes or long sleeves.
- Hooks: commonly 3.0–4.5 mm depending on yarn and desired drape.
Tools & notions
- Tapestry needle, stitch markers, blocking pins & mat, measuring tape, fabric for lining if desired, small buttons or toggles, optional elastic thread for discreet wrist fit or to stabilize bands.
Sizing & fit (how to measure)
- Key measurements: bust full circumference, upper arm circumference, shoulder-to-shoulder width, desired cardigan length (shoulder to hem), sleeve length and circumference.
- Typical ease: for lightweight layering cardigans choose positive ease of 1–4 in (2.5–10 cm) over your bust measurement for a relaxed fit, or 0–1 in for a close fit.
- Example: if your bust is 36 in and you want a relaxed fit choose finished bust 38–40 in.
Gauge — why it matters
- Make a 4 in × 4 in (10 cm × 10 cm) swatch in the main stitch pattern. Calculate stitches per inch (spi) and rows per inch (rpi). Use that to compute front/back panel stitch counts and sleeve shaping. Many cardigan patterns are written modularly (e.g., make back panel to a given width and join) so gauge ensures fit and drape.
Construction methods covered in these patterns
- Granny-square construction (joined squares or panels) — quick, graphic, and great for moderate drape.
- Top-down raglan — classic seamless shaping; easiest to try on as you go.
- Panel & seam — work front/back/ sleeves separately and seam for a polished finish.
- Modular pieces — combine motifs (flowers, tulips) and join-as-you-go.
Finishing essentials
- Block each piece to measurement before seaming to eliminate distortion.
- Use mattress stitch or whipstitch with crochet hook for flat joins.
- Add an edging round (sc, hdc, or picot) for stability at hems and plackets.
- If using light yarn that relaxes, consider a double-crochet or ribbed band (hdc in BLO or front-post rib) to lend structure.
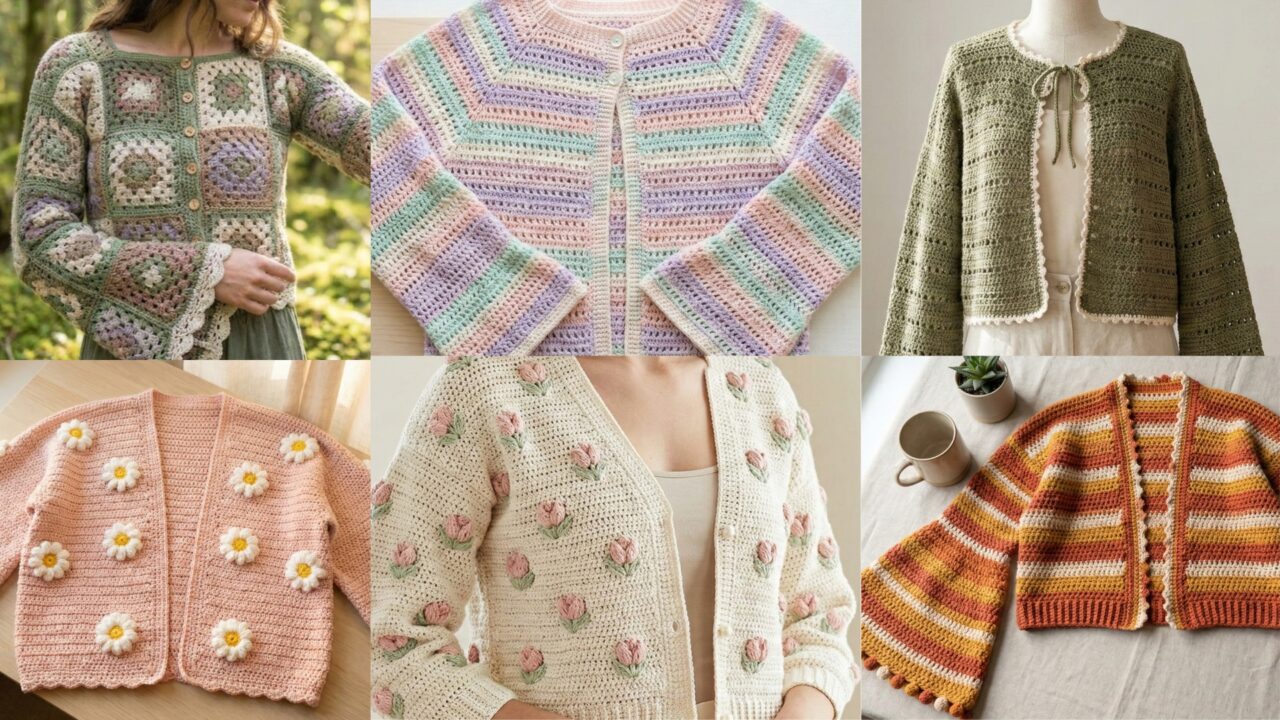
1. Crochet Forest Fairy Cropped Granny Square Cardigan Pattern

Vibe: Whimsical, cottagecore—cropped body composed of granny squares; dramatic flared long sleeves for a fairy-forest effect.
Skill level: Confident beginner → intermediate (motifs + joining + shaping for sleeve cap)
Finished style & measurements (sample M): cropped length ~16 in from shoulder, bust (after joining) ≈ 40 in with 2 in positive ease; sleeve length ~20 in with pronounced flare from elbow. Adjust by adding rows to squares or changing number of squares.
Materials
- Sport / light DK cotton blend, contrast colors for flower/leaf details if desired — total ~700–900 yd (medium sized set of 4-ply DK).
- Hook: 3.5–4.0 mm.
- 6 mm buttons (optional), tapestry needle, blocking pins.
Construction overview
Make granny squares (classic 3- or 4-round granny or floral granny) sized to ~4 in each. Arrange squares into two front panels, one back panel, and long rectangles for sleeves (or assemble sleeve panels from attached squares). Join with join-as-you-go or mattress stitch, add a yoke/shoulder seam if necessary, and work a flattering scalloped or lace edge at hem and cuffs.
Step-by-step
1. Square motif (classic granny with floral center option)
- Using MC (main color), make a magic ring. Round 1: ch3 (counts dc), (2 dc, ch2, 3 dc) in MR to create the first corner; ch1, repeat for 3 more corners (you can do 3 dc groups separated by ch2 corners). Pull ring tight. (Alternatively work flower center first: MR, 12 dc for a small flower center; then granny rounds.)
- Round 2: join a new color or continue MC. In each corner space work (3 dc, ch2, 3 dc); on sides work 3 dc groups separated by ch1 spaces to form square shape. Repeat 1–2 more rounds until square measures ~4 in. Make Back: 3 × 5 grid (15 squares) for a sample M back width; Fronts: 2 × 5 grid for each front (10 squares each); Sleeves: arrange 3×8 rectangular strip per sleeve or work long strips joined to create length.
2. Layout & joining
- Block all squares to measure precisely. Arrange them on a table into panels. Use join-as-you-go to connect subsequent squares (work final round of each new square and slip stitch into adjacent square’s final round) for a seamless look. Alternatively sew them with mattress stitch for a softer seam.
- Join front and back at shoulder seams by matching rows of granny squares (if your neckline is a simple open front, join only near shoulders, preserving front opening).
3. Sleeves
- Option A (seamed sleeves from squares): create long strips of squares to desired sleeve length plus flare extension; sew strip into tube and seam to armhole.
- Option B (worked as flared panel then shaped into tube): crochet rectangular panel in pattern stitch to sleeve length; then add flared ruffle at the cuff by increasing stitch clusters (e.g., shell rounds). Attach sleeve panels to armholes.
4. Neckline & front bands
- Work a clean band: pick up stitches along the front opening and neckline (preferably with the same color used for joining) and work 4–6 rounds of sc or hdc in BLO for a ribbed look. For a romantic finish, work a scalloped shell round: sc, skip 1, (5 dc) in next, skip 1, sc.
5. Buttons & closures
- Add one or two tiny buttons at top chest for closure (optional) or leave open. If adding buttons, sew on fabric reinforcement behind.
Fit & sizing tips
- To size up: increase the number of squares across the chest or increase square size by adding rounds. To lengthen: add rows of squares vertically.
- Flare degree is adjustable by how many extra squares/rows added at sleeve end.
Variations
- Make floral granny squares with embroidered leaves for a forest motif.
- Use variegated yarn for magical color play.
Finishing
- Weave ends; steam block assembled cardigan on form or flat; secure band with stitching to prevent stretching.
Care
- Machine wash gentle (follow yarn label), reshape and dry flat.
2. Crochet Tulip Stitch Cropped Cardigan Pattern
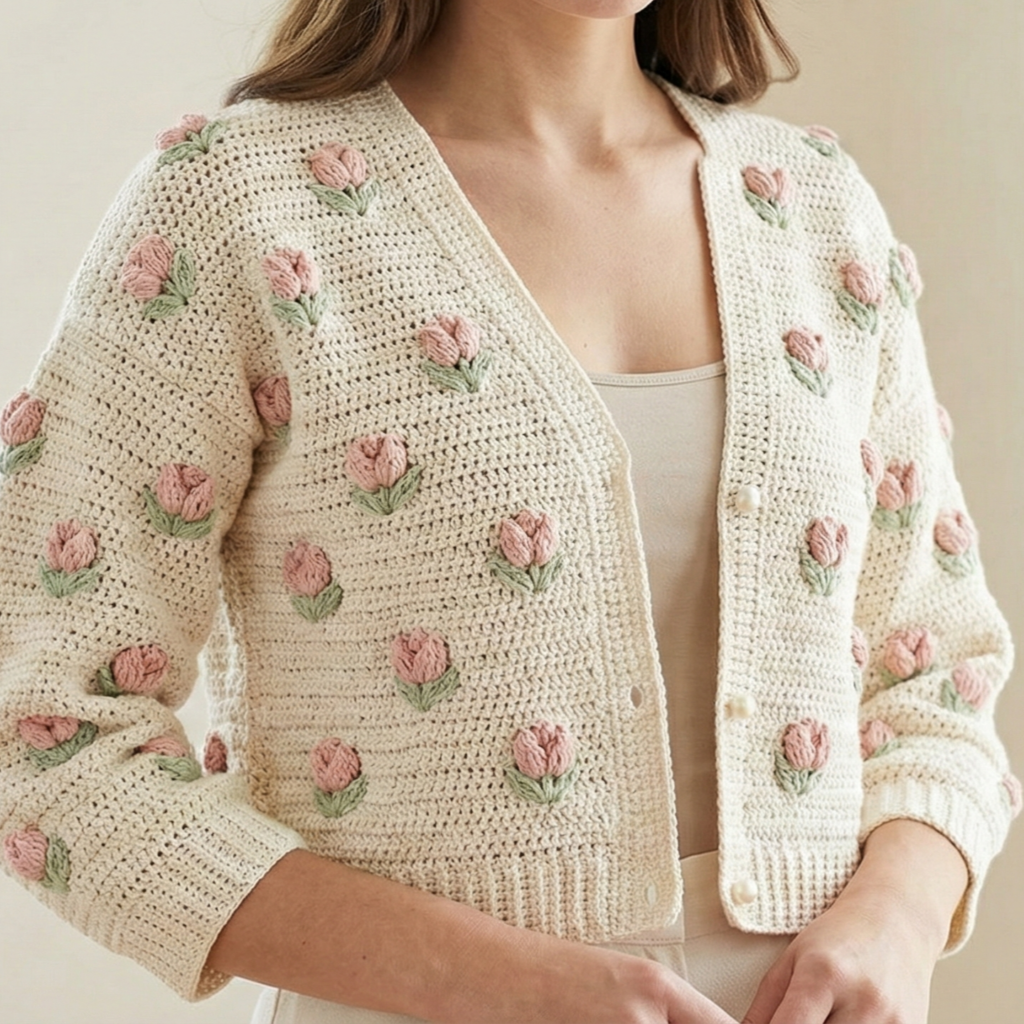
Vibe: Modern feminine — textured tulip stitch panels create an elegant cropped cardigan with neat, slightly boxy silhouette. Great for spring layering.
Skill level: Intermediate (tulip stitch familiarity and shaping)
Finished style (sample M): cropped 15–17 in from shoulder to hem, bust ~38–42 in depending on ease.
Materials
- Sport / light DK cotton or cotton-linen blend — ~700 yd for M.
- Hook: 3.5 mm.
- Tapestry needle, 2–3 buttons (20–25 mm) if adding closure.
Construction overview
Work two front panels and one back panel (rectangular) in tulip stitch (a textured shell/cluster pattern resembling tulips). Add set-in sleeves or worked-in strips for batwing options. Seam shoulders and sides, pick up for neckband and button band.
Tulip stitch reference (one common variation)
- The tulip stitch is typically made with small shells and tall stitches: Row repeat simplified: Row 1 (RS): sc, ch1, skip st, shell in next st; Row 2: anchors via sc in shell centers — there are many tulip stitch variations. Use a 6-row repeat for nice texture. Make a sample swatch and write down the multiple.
Step-by-step
1. Gauge & panel dimensions
- Make swatch: note stitches per inch. For example, tulip pattern might be 4 shells = 2 in. For a 40 in finished bust divided across front/back: back width = 20 in → compute stitches as 20 × spi.
2. Back panel
- Chain foundation for back width, work tulip stitch in rows until back length reaches desired length (e.g., 15 in) minus shoulders (optional). Keep ends straight via edge stitches.
3. Front panels
- Work two panels half the back width minus neckline shaping if adding a V or scoop. Work until same length as back.
4. Shoulders and seaming
- Join shoulder seams with mattress stitch leaving neck opening per desired style. Seam sides to within armhole length leaving opening for sleeves or add set-in sleeves.
5. Sleeves
- Option A (short cap or 3/4 sleeve): pick up around armhole and work in tulip stitch decreasing slightly for shoulder shaping. Option B (full length): work separate sleeve rectangles in pattern and seam in.
6. Bands & finishing
- Neckband: pick up stitches evenly around neckline with a 1–2 stitch border and work rows of hdc or sc to create a modest band. Add button band: single crochet band, attach small buttons and make buttonholes by leaving ch loops.
Fit & modifications
- For more drape, increase hook size or use a silk blend; reduce size or add ribbed band to tighten for more structure.
Variations
- Add eyelet rows between tulip repeats for a lacy look.
- Work the pattern as a longline cardigan by adding panel length.
Finishing & care
- Block to open the tulip texture. Handwash for natural fibers; machine gentle OK for blends.
3. Crochet Aesthetic Raglan Cardigan Pattern
Vibe: Modern minimalist — seamless top-down raglan construction with aesthetic openwork (lacy panels or simple V-stitch) and flattering drop shoulders. This is a great pattern if you like to try on as you go and avoid seaming.
Skill level: Intermediate (raglan shaping + stitch pattern)
Finished style (sample M): hip length ~22–24 in; bust ~40 in with 2–4 in ease.
Materials
- Sport / DK yarn or light worsted depending on drape — 900–1400 yd for a hip-length M (longer for larger sizes).
- Hook: 3.75–4.5 mm.
- Stitch markers, tapestry needle, optional buttons.
Construction overview (top-down seamless raglan)
Work yoke starting at neckline: increase at 4 raglan lines to shape shoulders. Once yoke reaches desired yoke depth, divide for body and sleeves and work body in rounds or rows to hem and sleeves in rounds to cuff.
Step-by-step
1. Neckline & yoke foundation
- Start with a small neck opening: ch foundation to fit around the back of the neck (or MR and work a ring). Example method: MR, ch3, 12 dc into ring; join — that’s your neckline base (modify to fit).
- Mark four points for raglan lines (every quarter of circumference).
2. Raglan increases (example schematic)
- Raglan increase row structure: work main stitch pattern across front panel; raglan increase (make a visible increase stitch or ch2 space), work sleeve stitches, raglan inc, work back stitches, raglan inc, work sleeve stitches, raglan inc.
- Repeat increases every other round until yoke depth (distance from neck to underarm) equals measured yoke depth (e.g., 9–10 in for medium).
3. Divide for body & sleeves
- Once yoke depth achieved, place sleeve stitches on holders, join body stitches and work body down in pattern (in the round or back and forth) to desired hem length.
- For cropped version, stop earlier; for longline, work to hip.
4. Sleeves
- Return sleeve stitches to hook and work in rounds down to cuff. For a lightweight airy sleeve finish, taper slightly and finish with a 2–3 in flared cuff (work increases at cuff) or a narrow trimmed rib.
5. Edging
- Add neat pick-up bands: single crochet or reverse sc around front edges and neck. Add a button or tie closure if desired (or leave open as a layering piece).
Tip: stitch patterns for “aesthetic” looks
- Use simple stitch repeats that read modern: V-stitch (dc, ch1, dc), linen stitch, or small chevron mesh. Keep gauge consistent with yoke increases.
Fit & adjustments
- Try on at yoke stage to adjust yoke depth and sleeve length. Top-down raglan is the easiest to customize on the fly.
Finishing & care
- Weave ends. Block gently; cotton/linen will soften and drape more after blocking. Handwash or machine gentle.
4. Crochet Daisy Cardigan Pattern

Vibe: Playful, romantic — daisy motif panels or daisy appliqués scattered over a simple cardigan base. Great for cottagecore aesthetics.
Skill level: Intermediate (motifs + joining + applied embellishments)
Finished style (sample M): hip-length cardigan with optional short or 3/4 sleeves.
Materials
- Sport-weight cotton in MC and contrast yellow/white for daisies — ~800–1100 yd.
- Hook: 3.5 mm.
- Tapestry needle, small buttons (optional).
Construction overview
Work a simple rectangular or raglan cardigan body in dc or shell stitches and add daisy appliqués either sewn on after, or integrated into panel using applique joins. You can also build the cardigan from daisy motifs arranged in rows.
Step-by-step (applique method for clarity)
1. Body panels
- Make back panel foundation: chain for half bust width + seam allowance; work rows of hdc or dc to desired length. Make two front panels halved for opening, ensuring symmetry.
2. Daisy applique (small 6-petal daisy)
- Center: MR, 6 sc (6).
- Petals (round): ch3, 3 dc in same st, sl st in next ×6 — this creates 6 petals. Fasten off and leave tail for sewing.
- Make 12–18 daisies depending on cardigan size and arrangement.
3. Placement & attachment
- After blocking body panels, arrange daisies and sew evenly—either edge-stitched (sew through center only) or fully sewn flat. For a subtle raised look, couch the centers only and tack the bases of petals lightly.
4. Assembly
- Seam shoulders and sides; attach sleeves (worked as separate tubes or picked up and worked). Add front band: pick up and work sc/hdc across front edge, finishing with picot edge (ch3, sl st) for dainty look.
5. Optional: daisy-yoke variation
- Create a circular yoke by joining daisies in a ring to form the yoke, then pick up and work the body downward for a motif yoke cardigan.
Variations
- Alternate motifs: mix daisies with tiny leaves.
- Contrast yarn colors for bold graphic daisies.
Finishing & care
- Sew on all appliqués securely to withstand washing. Machine wash gentle; reshape.
5. Crochet Cropped Frances Cardigan Pattern
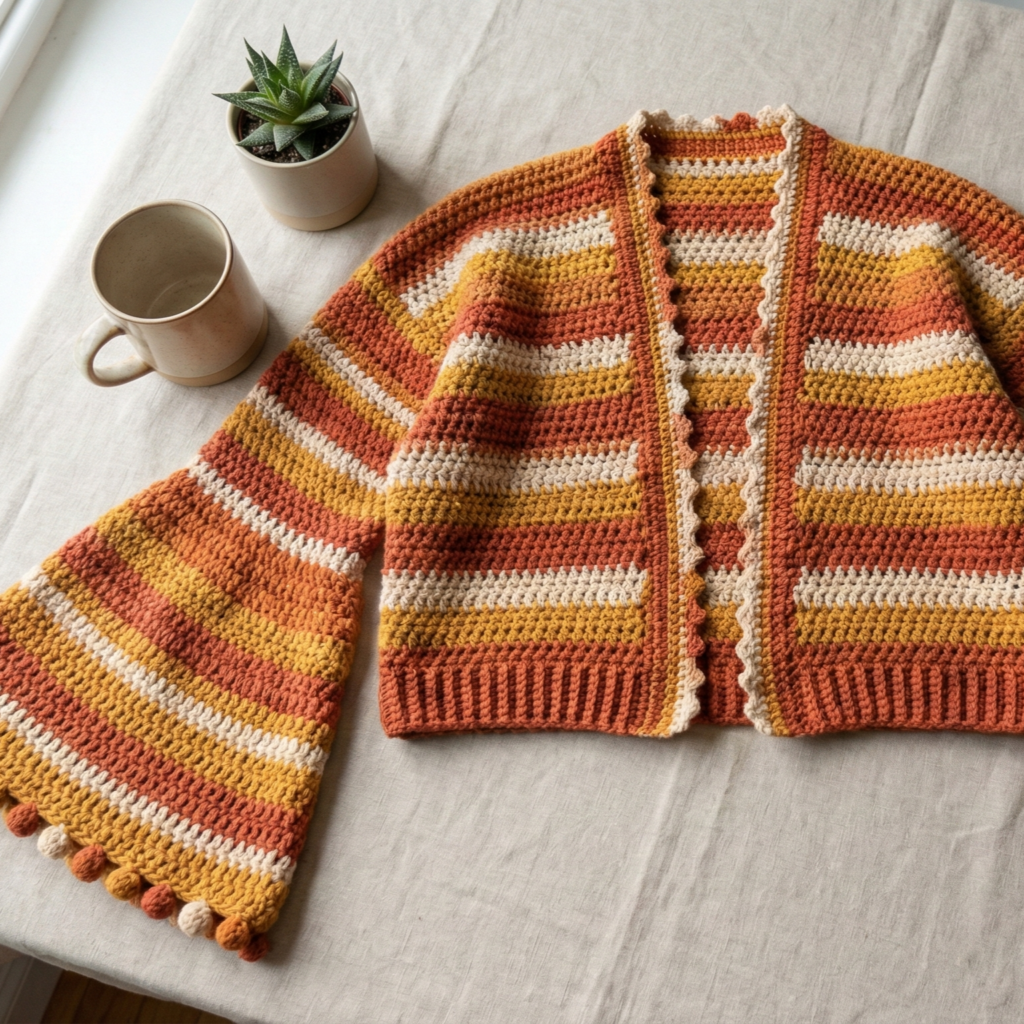
Vibe: Retro-modern — boxy cropped body, flared sleeves with playful pompom trim at cuff. Frances is cute and vintage-inspired, great with high-waisted skirts and jeans.
Skill level: Confident beginner → intermediate (flared sleeve shaping + pompom work)
Finished style (sample M): cropped length 15–17 in; flared bell sleeves ~18–22 in long finishing with 6–8 in flare.
Materials
- DK cotton or acrylic blend for spring warmth — ~700–900 yd.
- Hook: 3.75–4.25 mm.
- Small stash pompom maker or pre-made pompoms (10–12 small pompoms per sleeve), tapestry needle.
Construction overview
Work body panels in simple stitch (dc or extended dc) with a cropped silhouette. Sleeves are worked from underarm downward: flare achieved by periodic increases and final rounds of shell work to create broad bell shape. Attach pompoms by sewing to final round.
Step-by-step
1. Body panels
- Back: chain for back width, work rows of dc until cropped desired length; make two fronts each half the back less neckline width.
- Seam shoulders lightly leaving neckline open. Add front band by picking up and working sc rounds (2–3 repeat) with a small picot or decorative edge.
2. Sleeves
- Option A (set-in rectangle): measure armhole circumference then chain that and work rectangle in dc for sleeve length, adding increases every 4–6 rows near cuff to create flare then seam into tube.
- Option B (worked top-down): pick up sleeve stitches at the armhole and work rounds, increasing every so often (e.g., every 6 rounds increase evenly 6–8 sts) to widen into bell shape. Work final few rounds in shell stitch: skip 2, (5 dc) in next, skip 2, sc next for roomy flare.
3. Pompom trim
- Make or buy small pompoms. Attach each pompom on the last shell round evenly spaced — secure by sewing through each pompom core multiple times and knotting inside cuff.
4. Hem & band
- Add a tidy 1–2 in band at wrists and hem with hdc in BLO for subtle ribbing to balance bell silhouette.
Variations
- Swap pompoms for tiny tassels or embroidered eyelets.
- Make a matching pompom belt or tie.
Finishing & care
- Handwash or machine gentle; pompoms can be fragile—reinforce stitching and wash in laundry bag.
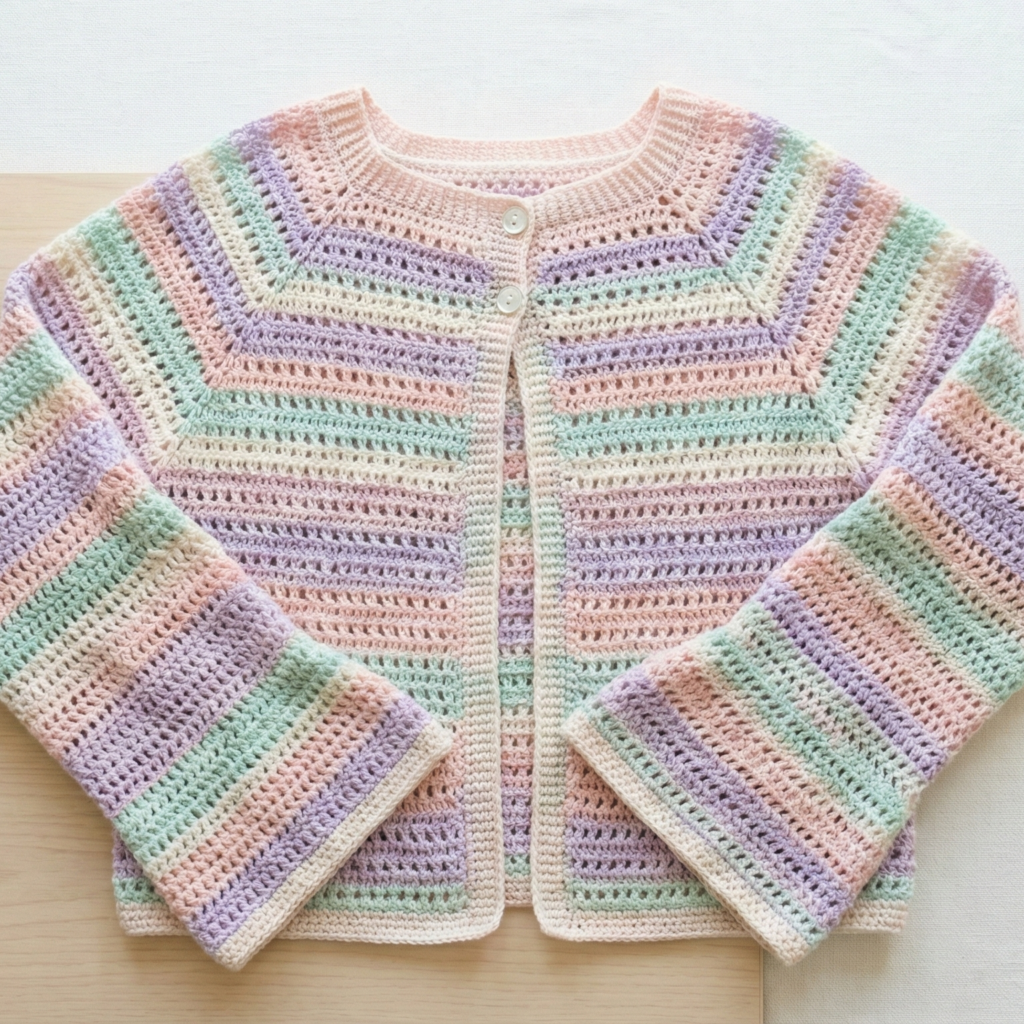
6. Crochet Aesthetic Spring Song Cardigan Pattern
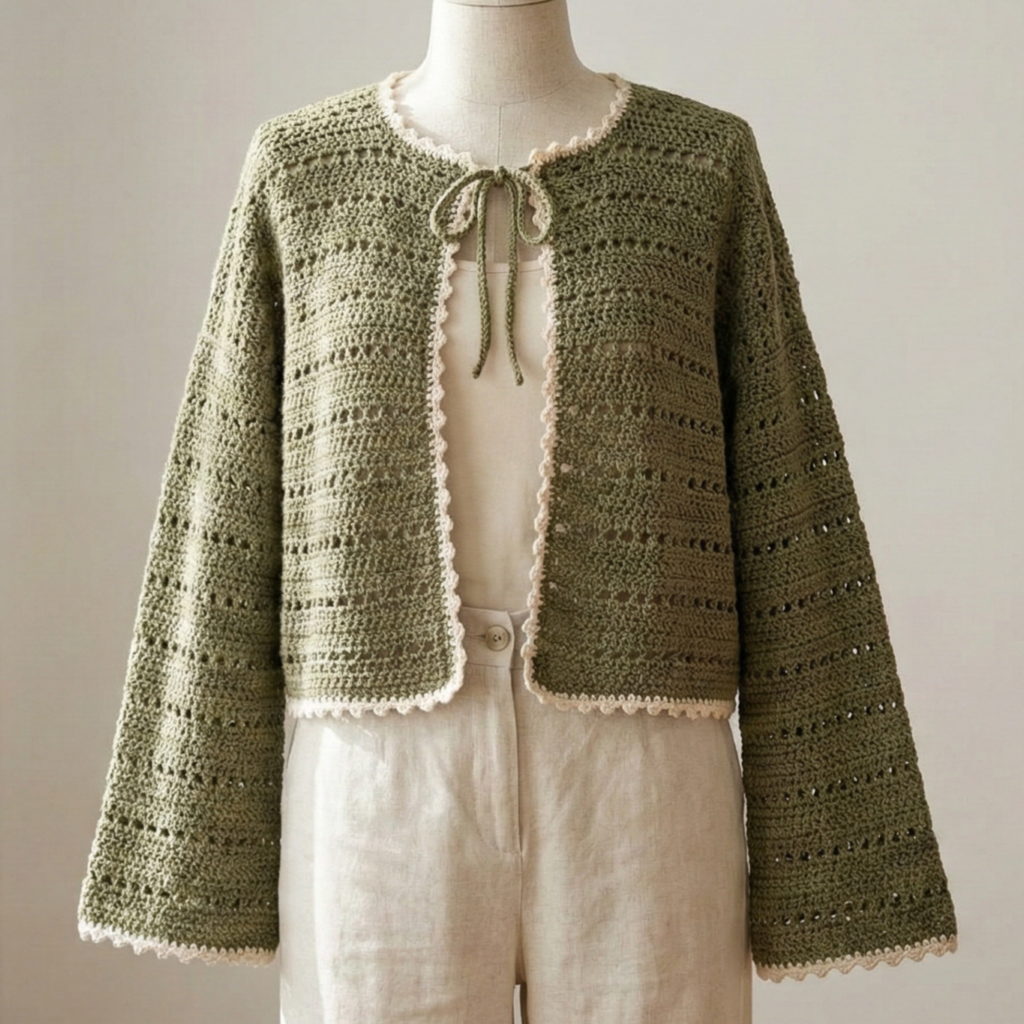
Vibe: Light, musical, and airy — a longerline cardigan featuring an eyelet-and-shell repeat that sings of spring breezes. Minimalist shape with romantic stitch texture.
Skill level: Intermediate (eyelet repeats and shaping)
Finished style (sample M): longerline, 26–30 in length; relaxed fit with 3/4 or long sleeve option.
Materials
- Sport or light DK cotton-bamboo blend for sheen & drape — 1000–1500 yd depending on length.
- Hook: 3.5–4.0 mm.
- Tapestry needle, stitch markers.
Construction overview
Work body flat in panels (or seamlessly in the round) using an eyelet + shell repeat: multiple-row repeat where every other row features clusters and chain spacers forming lacy columns. Shape shoulders and side slits for movement.
Step-by-step
1. Establish stitch repeat
- Example repeat (4-row):
- Row A (RS): dc, ch2, skip 2, dc across (creates mesh).
- Row B (WS): sc across.
- Row C (RS): shell (5 dc) in next ch2 space to create shell columns.
- Row D (WS): sc across.
- Make a 4–6 in swatch to determine spi.
2. Back panel
- Chain foundation for back width (half of desired bust circumference plus seams). Work pattern repeat until desired length. Optionally add side slits: stop pattern a few inches from hem and continue sides in smaller width.
3. Front panels
- Work two panels half the back width minus desired neckline shaping. Add button band or leave open.
4. Sleeves
- Work tube sleeves in the same repeat, adjusting for length. For a lingering spring vibe, choose 3/4 length sleeves.
5. Hem & edges
- A crisp band of sc or 1×1 rib (hdc in BLO) along front openings, neckline, and cuffs will provide structure. Consider a delicate picot at edge for finish.
Variation & styling
- Work side vents for extra flow.
- Add a tie belt in same stitch to cinch at the waist.
Finishing & care
- Block to open eyelets and shells. Machine wash on gentle if yarn allows; dry flat to preserve lace.
conclusion
You now have six complete concepts and workshop-ready builds for lightweight crochet cardigans that range from whimsical granny-square cropped styles to modern raglan and romantic lace panel pieces. A few final notes to make your project successful:
- Start with a swatch: every yarn behaves differently — cotton vs bamboo vs linen have distinct drape; swatch before you commit to the full garment.
- Try on early: I strongly recommend the top-down raglan approach for making frequent fit adjustments — you can try on as you go and stop when you like the length and sleeve fit.
- Blocking changes everything: blocking evens edges and opens stitch patterns. Always block panels or motifs before joining.
- Edge decisions matter: lightweight fabrics can sag if unstructured; a 2–3 round band in hdc or sc in a slightly smaller hook adds polish and prevents stretching.
- Make a style set: pair granny or daisy cardigans with coordinated hair accessories or a simple pouch made of the same yarn for a cohesive gift set.
- Care label: include washing instructions on patterns you sell or gift — e.g., “Handwash cold, lay flat to dry; reshape while damp.”