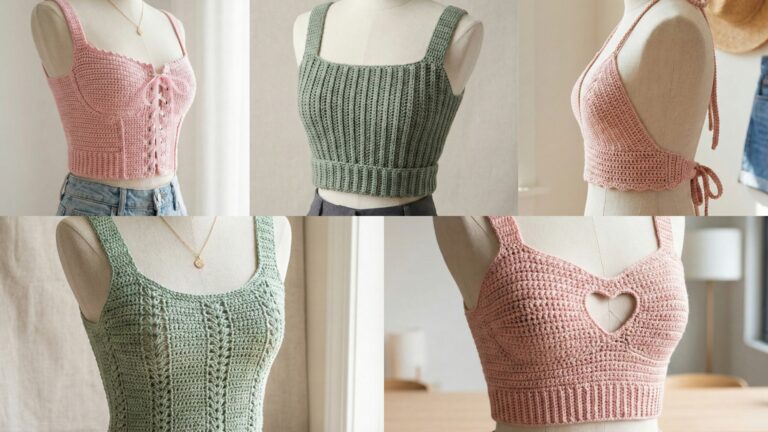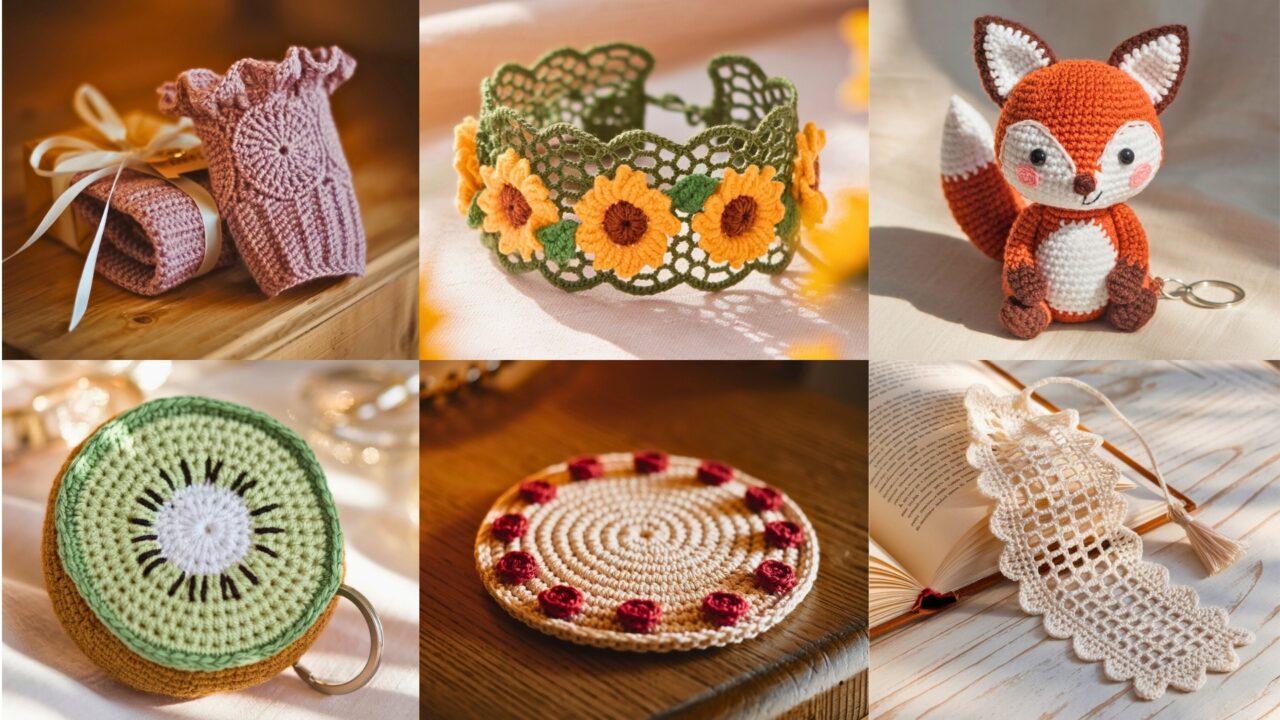
When time is short but your heart is full, crochet can save the day. These six last-minute gift ideas are small, quick, and packed with charm — perfect for pulling together a thoughtful present the same day you need it. Each pattern is written for speed and clarity, with a materials list, stitch abbreviations, an explicit step-by-step guide, finishing tips, and little presentation ideas so your handmade gift looks polished without extra fuss.
Quick notes before you begin
- Make it fast: use thicker yarn (worsted/bulky) and a slightly larger hook than the yarn recommends — that speeds up progress and gives a cozy look.
- Yarn choice: Cotton or cotton blend for washability (coasters, keychains, bookmarks); acrylic or wool-blends for warmth and softness (wrist warmers, fox). For amigurumi, use yarn with little fuzz and a smaller hook size than yarn band to get tight stitches.
- Tools: tapestry needle, small stitch marker or scrap yarn, scissors, stuffing (polyfill), small amounts of matching embroidery thread for facial details.
- Abbreviations used: ch (chain), sc (single crochet), hdc (half double crochet), dc (double crochet), inc (increase — 2 sc in same stitch), dec (decrease — invisible or sc2tog), sl st (slip stitch), BLO/FLO (back/front loop only), MR (magic ring), st(s) (stitch(es)).
- Timing: Each pattern is designed to be finished in roughly 15–45 minutes depending on your speed. Keep a small timer and allow 5–10 minutes for neat finishing (weaving ends, stuffing, assembly).
1. Crochet Sliced Kiwi Amigurumi Keychain Pattern
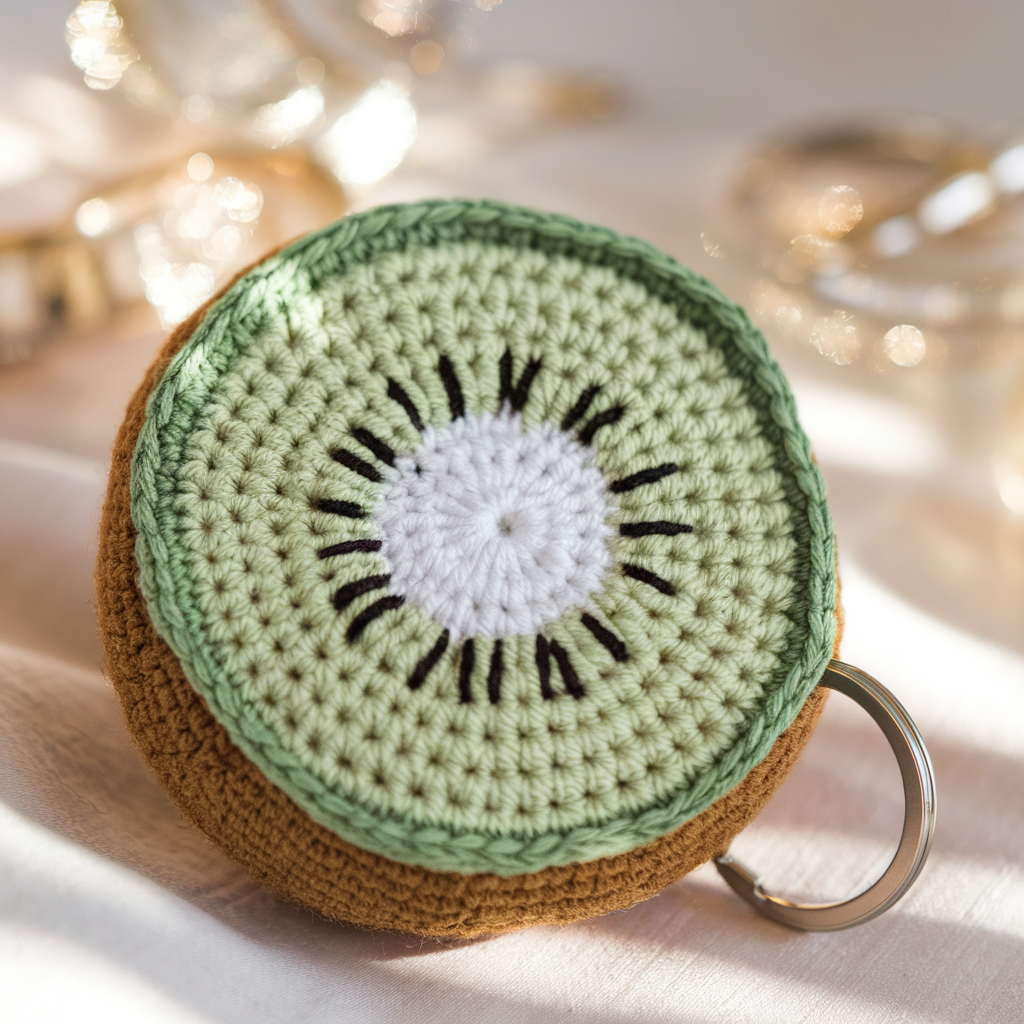
Finished size: ~2–2.5″ diameter
Time: 20–35 minutes
Skill level: Beginner-friendly (some color changes & surface embroidery)
Materials:
- Fingering or sport weight yarn in: light green (flesh), darker green (edge), white (inner ring), black (seeds) — tiny amounts (5–10 yards each). Alternatively use worsted with a smaller hook for tight fabric.
- Hook: 2.5–3.5 mm (smaller than yarn band to keep stuffing inside)
- Small amount of polyester stuffing
- Keyring or lobster clasp with small chain
- Tapestry needle, scissors
Stitches & techniques used: MR, sc, inc, dec, color change, surface embroidery (seed stitches), slip stitch join to create flat round.
Step-by-step pattern (slice worked flat)
- Center (MR). With light green, create a magic ring. Work 6 sc into ring. Pull tight. (6)
- Round 2. Inc in each st around. (12)
- Round 3. Sc, inc around. (18)
- Round 4. Sc in next 2, inc around. (24)
- Round 5. Sc in next 3, inc around. (30)
- Round 6. Switch to white for inner ring. Sc in each st around for one round to create the white inner ring. (30)
- Round 7. Switch to darker green for outer flesh. Sc in next 3, inc around. (36)
- Round 8. Sc in each st around. If you want a slightly more pronounced edge, do one more round of sc in dark green. (36)
- Flatten the slice. After final round, fasten off leaving a long tail to sew. Lightly stuff the center (very small amount) to give a slight dome or leave nearly flat — kiwi slices are normally a little bit curved.
- Create seeds (surface embroidery). Thread black yarn into tapestry needle and make small straight stitches from near the very center outward — leave them short (2–3 mm) to mimic seeds. Space evenly in a loose circle (10–14 seeds). Alternatively, use tiny French knots with embroidery thread.
- Edge finishing & attach keyring. Use the long tail to fold the edge and sew a few tight stitches creating a loop, then sew the loop securely to the keyring or attach a small chain and lobster clasp. Weave in ends.
Presentation & gift tips
- Attach the kiwi keychain to a small kraft tag with a handwritten note like “Picked fresh — just for you!”
- Add a tiny clear sticker to give a glossy fruit-slice look (optional).
Variations
- Make a whole fruit half (thicker) by increasing rounds and stuffing fully, then attach an eyelet to the rind for the keyring.
- Make lemon, orange, and lime slices with yellow/orange combinations.
2. Crochet Lace Wrist Warmer Pattern
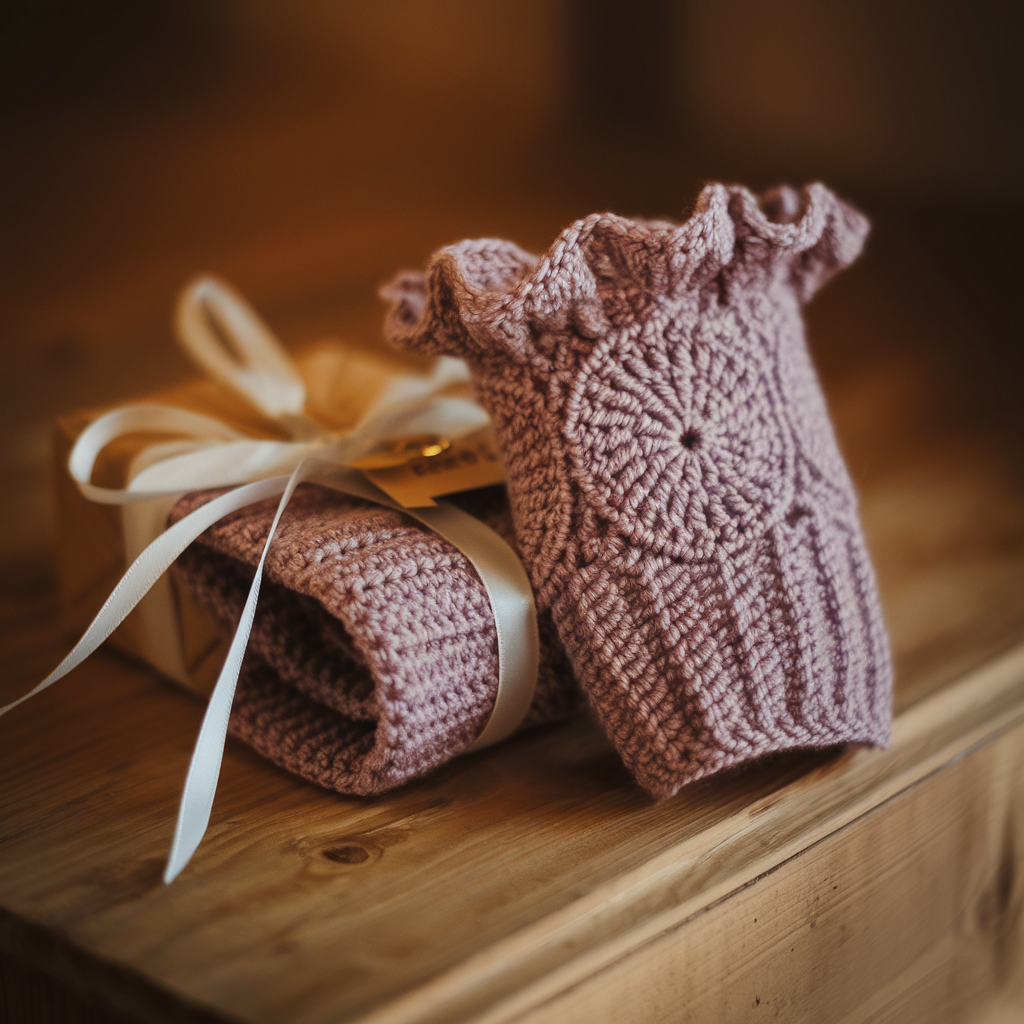
Finished size: Circumference ~7–9″ (elastic stretch), length ~7″ (covers wrist and lower forearm)
Time: 30–45 minutes (quick with worsted held double or bulky yarn)
Skill level: Beginner with a little lace knowledge
Materials:
- Fingering yarn for delicate lace or worsted weight (or hold two strands of fingering together for body/speed)
- Hook: 3.5 mm (for fingering) or 6–8 mm if using bulky/held double
- Tapestry needle, scissors
Stitches & techniques used: ch, sc, dc, shell stitch (group of dc in same st), picot (optional), sewing seam (invisible mattress stitch), working in rounds or flat and joining.
Why this for a last-minute gift?
A wrist warmer is quick because it’s a narrow tube; you can create an elegant lace look with a simple shell repeat and a couple of rows. Use a thicker yarn to speed it up.
Step-by-step pattern (worked flat then seamed)
Make one wrist warmer:
- Foundation chain (2 minutes). Chain 36 (adjust to fit wrist; chain fewer for smaller wrists). Join with sl st to form a loop if you prefer working in the round, but working flat makes a neater seam for lace.
- Row 1 (2–4 minutes). Ch 1, sc in each ch around (or across if working flat). Join or turn. This creates a firm base row.
- Row 2 (shell row — 5–8 minutes). Ch 3 (counts as dc), skip 2 sts, 5 dc in next st (shell), skip 2 sts, sl st in next st — repeat around. If working flat, repeat across and turn.
- Row 3 (spacer row — 3–5 minutes). Ch 1, sc in each st across or sl st to move; this gives a tidy line between shells.
- Row 4 (repeat shell row). Repeat row 2. Work until the piece measures ~7″ from starting edge (usually 4–6 shell rows depending on yarn).
- Top & bottom edging (3–5 minutes). Work one round of sc around the top and bottom (or a picot edge for a dainty finish: ch 3, sl st in 3rd ch back into same st every 3–4 sts).
- Seam (2–5 minutes). Fold the piece and seam the short edge using mattress stitch for an invisible join. Weave in ends.
Fit & adjustment notes
- Measure the wrist circumference; add 0.5–1″ for ease if using non-stretchy yarn.
- For a snugger fit, reduce starting chain by 2–4.
Styling & gift ideas
- Slip a tiny hand cream or a tea bag inside the wrist warmer as a surprise extra treat.
- Tie the warmer with a ribbon and attach a small tag with care instructions.
3. Crochet Roses Coaster Pattern
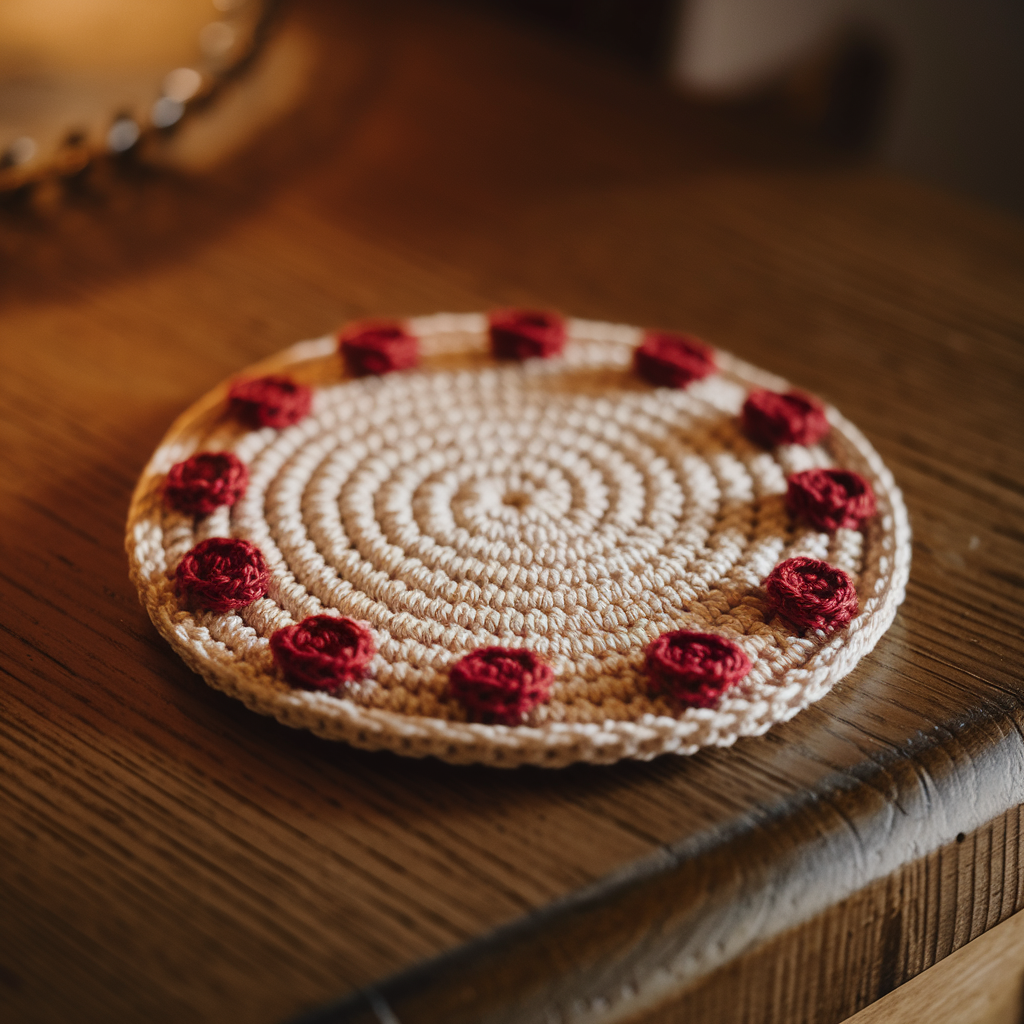
Finished size: ~4–4.5″ diameter
Time: 20–30 minutes for one rose coaster
Skill level: Beginner to intermediate
Materials:
- Cotton or cotton-blend worsted weight yarn (two colors optional: petal color + base color)
- 4.0–4.5 mm hook
- Tapestry needle, scissors
Stitches & techniques used: MR, ch, sc, hdc, dc, working in a spiral/flat spiral to make a rose spiral, single crochet base round, optional star-shaped backing.
Why this pattern?
A rolled rose made from a spiral works up super fast and looks fancy. Pair with a scalloped base for a neat coaster.
Step-by-step pattern — rolled rose + coaster base
Make the rose (spiral):
- Foundation chain (3 minutes). Ch 30–40 depending on how large/tall you want your rose. For a tight small rose, ch 30.
- Row 1 (spiral petals, 5–8 minutes). Dc in 3rd ch from hook and across (this creates taller petals). When you reach the end, do not turn — lay the strip flat with the right side facing up and start rolling from one end to create a spiral.
- Form the rose (5 minutes). Roll the strip tightly into a rose shape, adjusting tightness for the look you want (tighter = compact rose; looser = blooming rose). Tuck the tail and thread the yarn through the base with a tapestry needle, stitching through center of coil to hold layers securely.
Make the coaster base (10 minutes):
4. MR base (2–3 minutes). With base color, MR, ch 2. Work 8 dc into ring. Pull tight and join. (8)
5. Round 2 (3–4 minutes). 2 dc in each st — join (16).
6. Round 3 (3–4 minutes). Dc in next st, 2 dc in next — join (24). Stop at 24 for ~4″ diameter.
7. Round 4 (edge tidy, 2–3 minutes). Work one round sc around to flatten edge. Fasten off.
Attach rose to base (2–4 minutes). Sew the bottom of the rose onto the center of the coaster with a few secure stitches. Weave in ends.
Variation & presentation
- Make matching sets of two or four for an instant gift set. Place the set inside a small cellophane bag with a ribbon.
- Instead of a coaster base, glue (fabric glue) the rose to a felt circle for a sturdier coaster.
4. Crochet Bruges Lace Bookmark Pattern
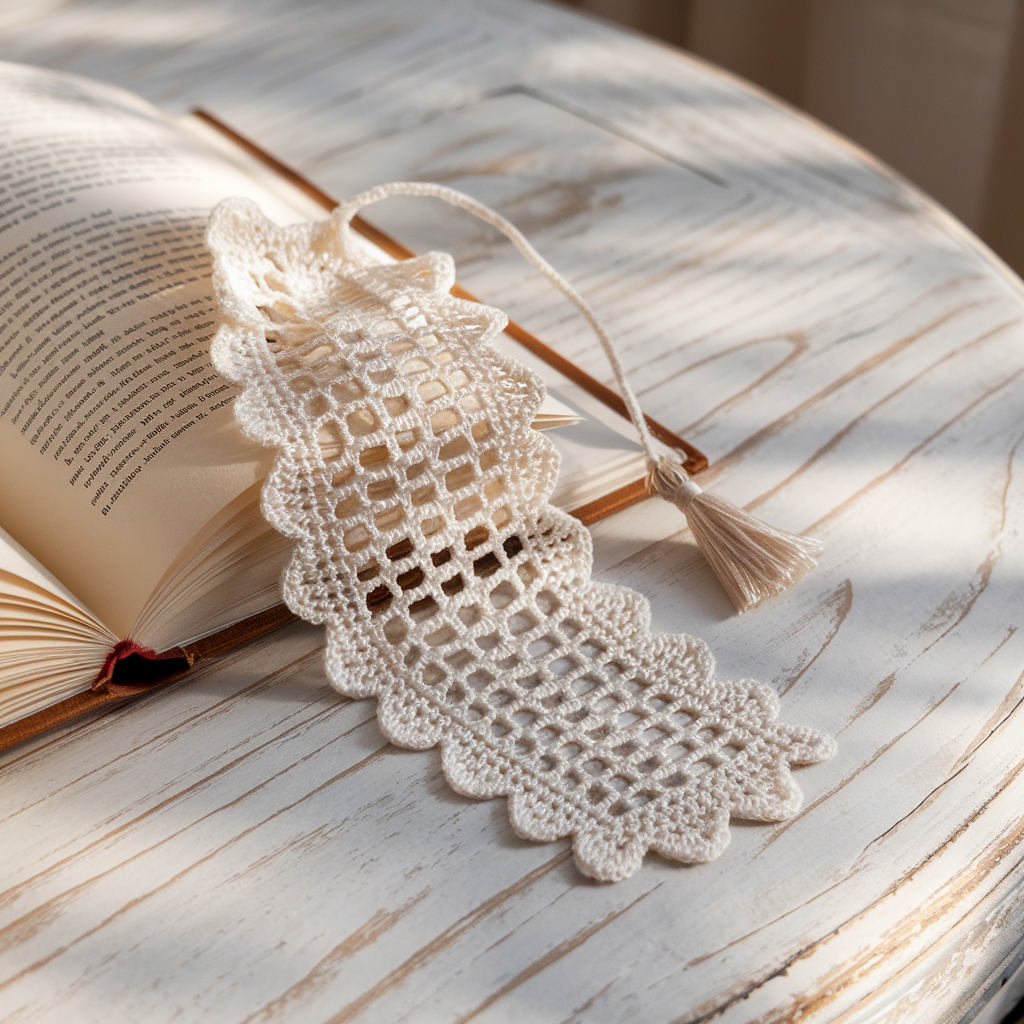
Finished size: ~1.2″ wide x 7–8″ long (plus tassel)
Time: 20–40 minutes (depending on thread size)
Skill level: Beginner with fine-gauge patience (or advanced beginner)
Materials:
- Crochet thread (size 10) or fingering-weight cotton yarn for a chunkier look
- Hook: 1.5–2.5 mm (for thread) or 2.5–3.5 mm for fingering yarn
- Tapestry needle, small tassel maker or scrap card for tassel
Stitches & techniques used: ch, sc, picot, shell, joining motifs (sl st), working narrow strips and lacing them together (Bruges technique simplified), turning chains.
About Bruges-style lace
Traditional Bruges lace is made of narrow motifs (tape-like strips) that are joined to form intricate patterns. For a last-minute gift we’ll simplify: make two or three pretty strips and join them into a lacy bookmark with a picot edging and tassel.
Step-by-step pattern (one strip + joining)
Make the central strip (repeat to make 2–3 strips):
- Foundation chain (1–2 minutes). Ch 30 (for a bookmark-length strip). Adjust length for desired bookmark size.
- Row 1 (3–5 minutes). Sc in 2nd ch from hook across. Turn.
- Row 2 (3–5 minutes). Ch 3, skip 2 sts, sc in next — repeat to create small eyelets row (this creates lacy holes). Turn.
- Row 3 (3–5 minutes). Ch 1, sc across making the small shell shapes where desired: in each ch-3 space work (sc, picot, sc) to create decorative accents.
- Repeat rows 2–3 until the strip reaches ~7″ length. Make 2 or 3 identical strips.
Join strips (5–8 minutes).
6. Lay strips side by side and join them along edges using sl st through both loops at regular intervals forming a delicate ladder pattern. Alternate joins to create tiny open windows.
7. Edge finishing. Work a round of picots or small scallops along both long edges to tidy and decorate.
8. Tassel (2–4 minutes). Make a small tassel and attach to one end. Add a bead for a luxe touch if you have one.
Presentation idea
- Slip the bookmark into a paperback book you know the recipient will love, and tie with baker’s twine and a tiny gift tag.
5. Crochet Cute Mini Amigurumi Fox Pattern
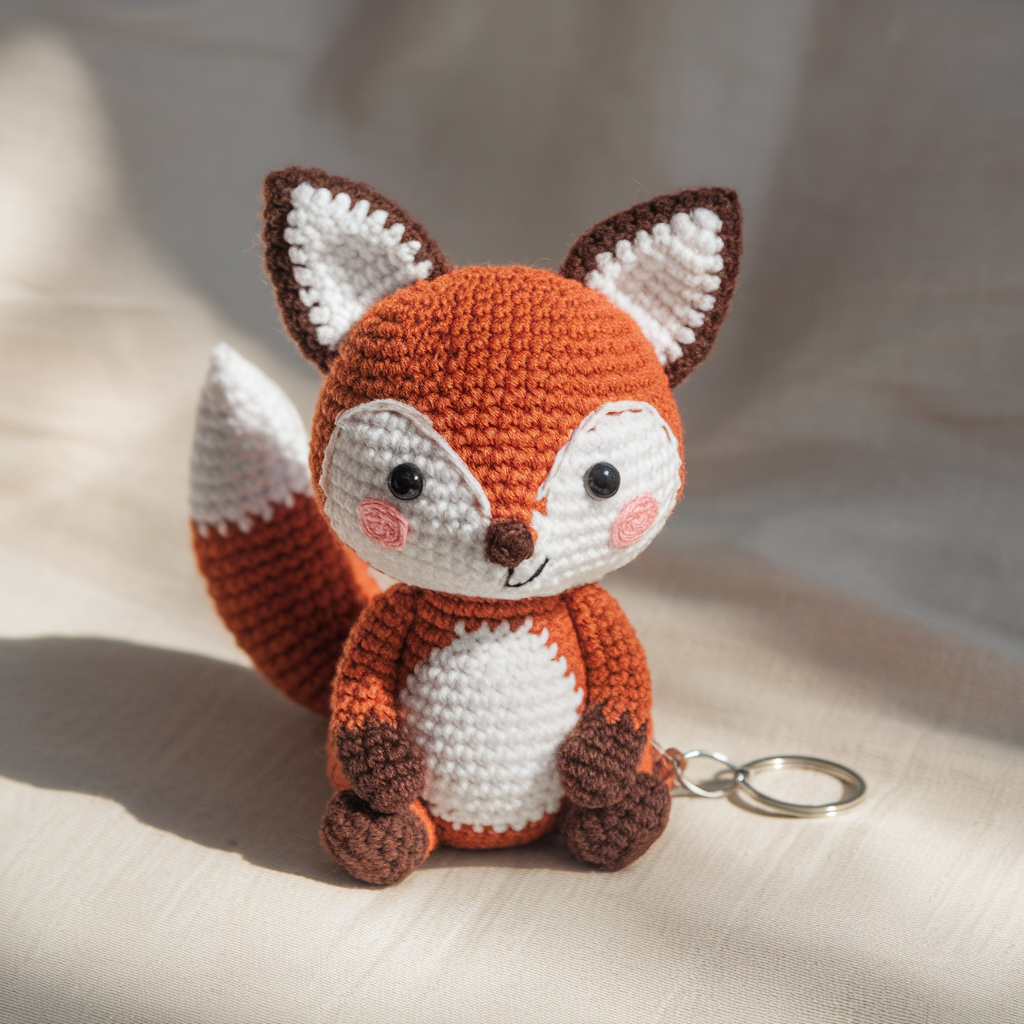
Finished size: ~3–4″ tall
Time: 30–45 minutes
Skill level: Beginner to intermediate (amigurumi basics)
Materials:
- Worsted or DK weight yarn in: rusty orange (main), white (face/belly/tip of tail), brown or dark orange (details) — small amounts.
- Hook: 2.5–3.5 mm (smaller than yarn band for tight stitches)
- Polyester stuffing, yarn needle, stitch marker, small safety eyes (6 mm) or embroidered eyes
- Small keyring if you want a keychain version
Stitches & techniques used: MR, sc, inc, dec, working in continuous rounds (no joins) for amigurumi, simple embroidery.
Step-by-step pattern (head, body, tail, ears)
Head:
- MR (2 minutes). MR, 6 sc into ring. (6)
- R2: Inc around. (12)
- R3: Sc, inc around. (18)
- R4: Sc in next 2, inc around. (24)
- R5–R8: Sc around (build height for face). Insert safety eyes between R6–R7 about 6 sts apart. Place blush or embroider cheeks later.
- R9: Sc in next 2, dec around to begin decrease if you want a slightly rounded head — otherwise keep sc around and leave hole for stuffing. Fasten off leaving a tail for sewing if using separate pieces.
Body:
7. Attach yarn at the base of head (or join separately): MR, 6 sc; inc rounds similar to head until you reach 20–24 sts for a plump body. Sc around for 4–6 rounds; stuff firmly.
8. Decrease by doing sc in next 2, dec around until the opening is small; close with tapestry needle.
Ears (make 2):
9. Ch 4, sc in 2nd ch from hook and across (3 sc), ch 1 turn; sc across for 2 more rows, fasten off leaving tail to sew. Fold base and sew to head in triangle shape. Add a small white inner detail if desired.
Tail:
10. Ch 8, sc back across, work a few inc rounds to make a tapered, slightly curved tail; change tip to white in final 2–3 rounds. Sew to the body.
Finishing touches:
11. Embroider nose and mouth with black/ dark brown yarn. Use a small amount of blush on cheeks (makeup blush lightly rubbed on a cotton swab works for photography; don’t apply if making for a child).
12. Weave in ends and attach a keyring if desired.
Safety note & gift ideas
- If gift is for a small child, avoid small parts like safety eyes — embroider the eyes.
- Present the fox in a small organza bag or attach to a tiny gift box with a ribbon.
6. Crochet Sunflowers Bracelet Pattern
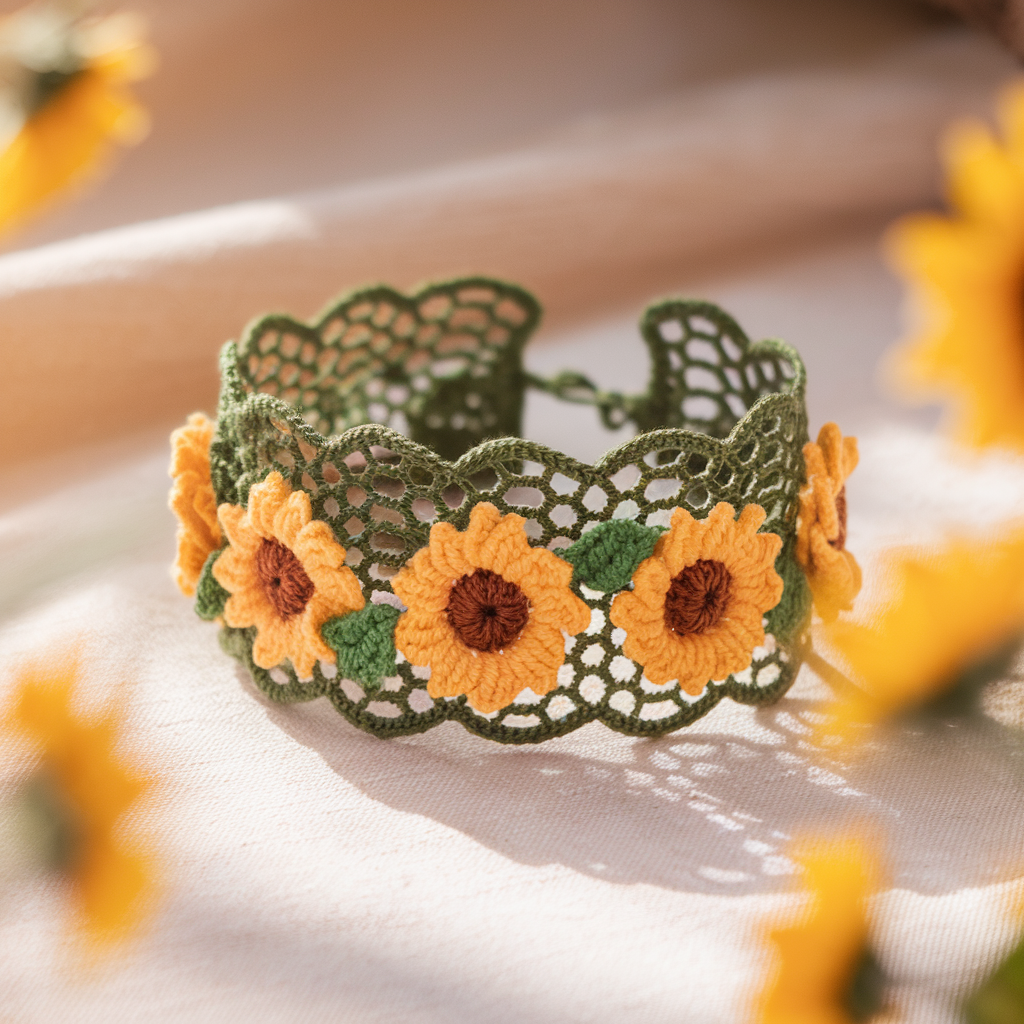
Finished size: Adjustable to wrist; sunflower motif ~1.25–1.5″ diameter
Time: 20–40 minutes (multiple motifs take longer)
Skill level: Beginner
Materials:
- Worsted weight cotton or acrylic yarn in yellow (petals), brown (center), and green (small leaves if you like)
- Hook: 3.5–4.5 mm
- Elastic jewelry cord or a simple chain/metal bracelet base to attach motifs
- Tapestry needle, scissors
Stitches & techniques used: MR, sc, hdc, dc, slip stitch, sewing motifs to band, making small leaves (optional)
Step-by-step pattern — single sunflower motif
- Center (MR). MR, work 6 sc into ring. Join. (6)
- Round 2. Inc in each st — join (12). Change to yellow.
- Round 3 — petal base. Ch 3, sl st in next st around to create 12 ch-3 loops spaced evenly (or make fewer wider petals by ch 4).
- Round 4 — petals. Into each loop: (sc, hdc, dc, hdc, sc) and sl st to the base to secure. Fasten off leaving a tail to sew.
- Optional leaves. Make two small leaves: ch 6; sc in 2nd ch from hook, hdc, dc, hdc, sc; fasten off and sew at base.
Assemble bracelet (5–10 minutes).
6. For a quick last-minute bracelet, string 1–3 motifs onto an elastic jewelry cord and tie securely with surgeon’s knot (add a dab of clear nail polish to the knot for security). Trim ends and hide by stretching the cord back into the beads/motifs.
7. For a chain bracelet base, sew motifs onto felt circles and use jump rings to attach to the chain at even intervals.
Styling & gift ideas
- Make a set of 2–3 mini motifs and attach them to an elastic for a summer-themed wrist stack.
- Present inside a small jewelry box with a note “Picked fresh for you.” Include care instructions: hand wash gently.
Conclusion
Last-minute gifts don’t have to feel rushed or sloppy — small, handmade items show care and personality. Here are quick finishing touches that elevate your crochet gift in minutes:
- Neat ends: Weave in ends tightly and hide tails along stitch paths. Trim close but not too close — leave a tiny bit in case of unravelling.
- Quick blocking: Light steam-block or pin flat (for cotton pieces) for a polished finish; this takes 5–10 minutes.
- Packaging: Place items in a small gift box, kraft bag, or organza bag. Add a sprig of dried lavender or a handwritten note for charm.
- Care card: Write one-line care instructions (e.g., “Hand wash cold, lay flat to dry”) and tuck it inside.
- Personalization: Add initials with embroidery, use the recipient’s favorite color, or attach a small charm that reflects their hobby.
Fast gift pairing ideas
- Kiwi keychain + mini fox on a keyring = adorable duo.
- Rose coaster + Bruges bookmark + wrist warmer = cozy reading bundle.
- Sunflower bracelet + small card = summer-ready jewelry gift.
If you’d like, I can: