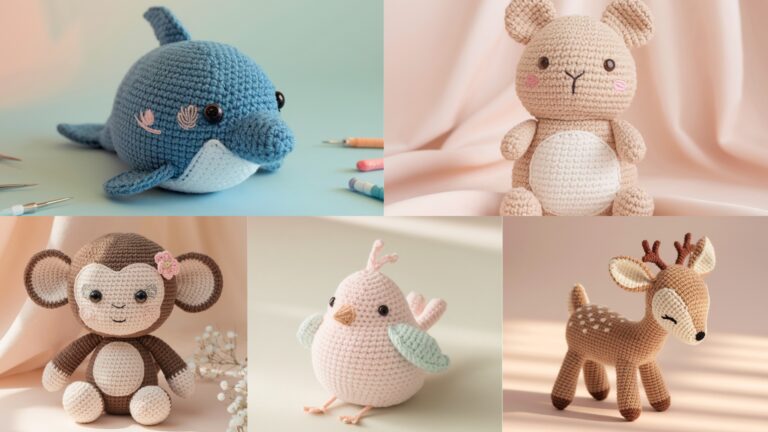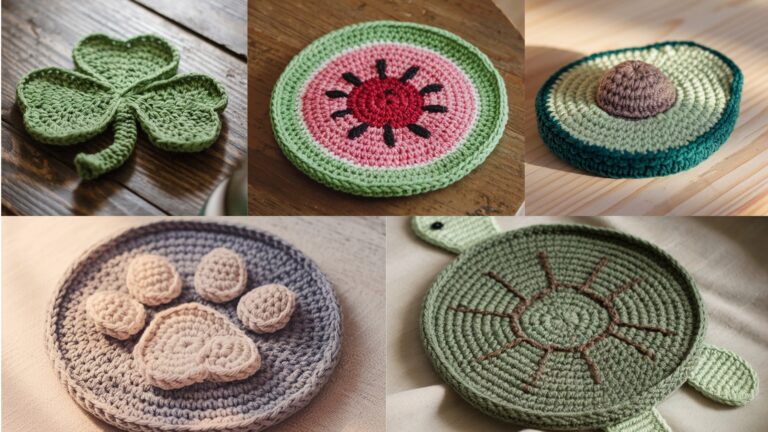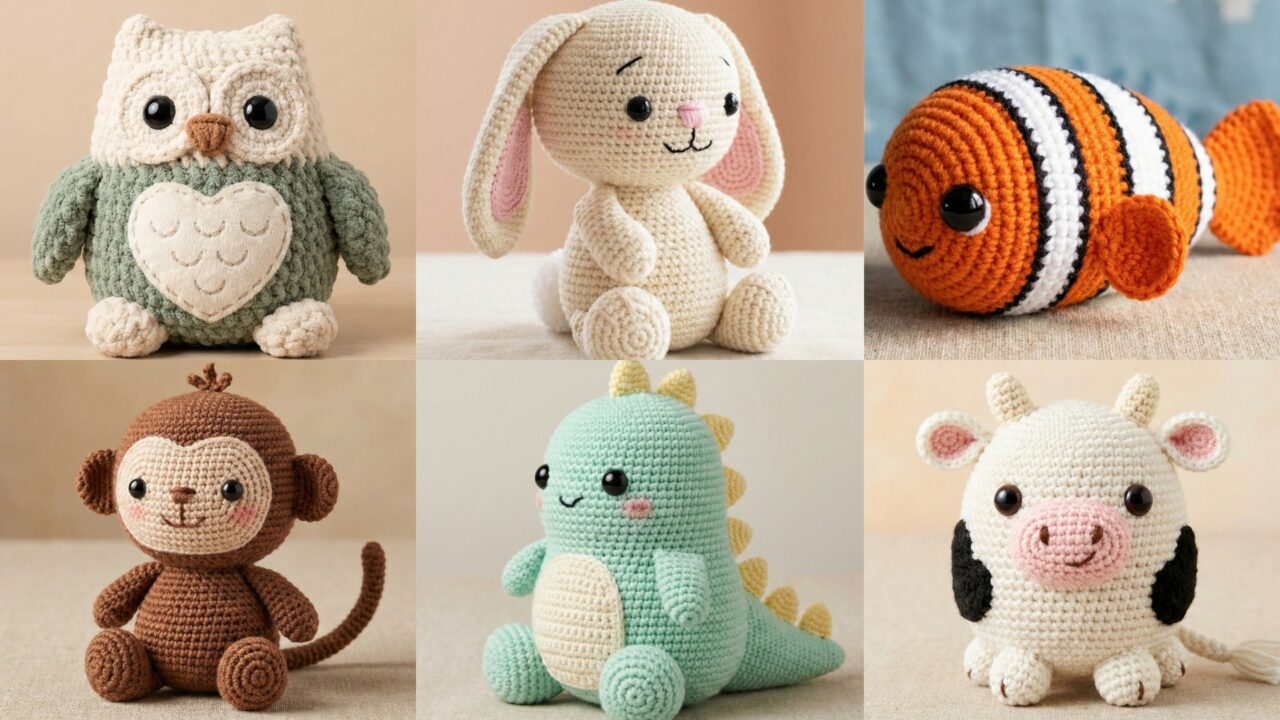
Amigurumi is the sweetest way to turn yarn into little friends. These six kawaii animal patterns — a roundish cow, Nemo-style fish, chubby dino, baby monkey, chunky owl plushie, and adorable bunny — are designed to be approachable, charming, and giftable. Each pattern is written in rounds (typical for amigurumi), uses common stitches, and includes step-by-step assembly notes so you don’t get lost halfway through. Use scrap yarn or coordinate colors for a cohesive set.
Before we dive in, a couple of friendly notes:
- Read the whole pattern before you start each piece. That helps you picture assembly order.
- Use safety eyes for finished toys for ages 3+. If making toys for babies, embroider eyes instead of using plastic safety eyes.
- Keep stitch counts consistent when stuffing — firm stuffing gives shape, but overstuffing stretches stitches.
- Abbreviations and a materials list are included for each pattern so you can swap yarn or hook size for your preferred finished size.
Abbreviations (used in every pattern)
- MR = Magic Ring
- ch = chain
- sc = single crochet
- hdc = half double crochet
- dc = double crochet
- inc = 2 sc in same stitch (increase)
- dec = single crochet decrease (invisible decrease where possible)
- sl st = slip stitch
- BLO = back loop only
- FLO = front loop only
- … = repeat instructions between asterisks x times
- (n) = stitch count at the end of the round
1. Crochet Roundish Cow Amigurumi Pattern
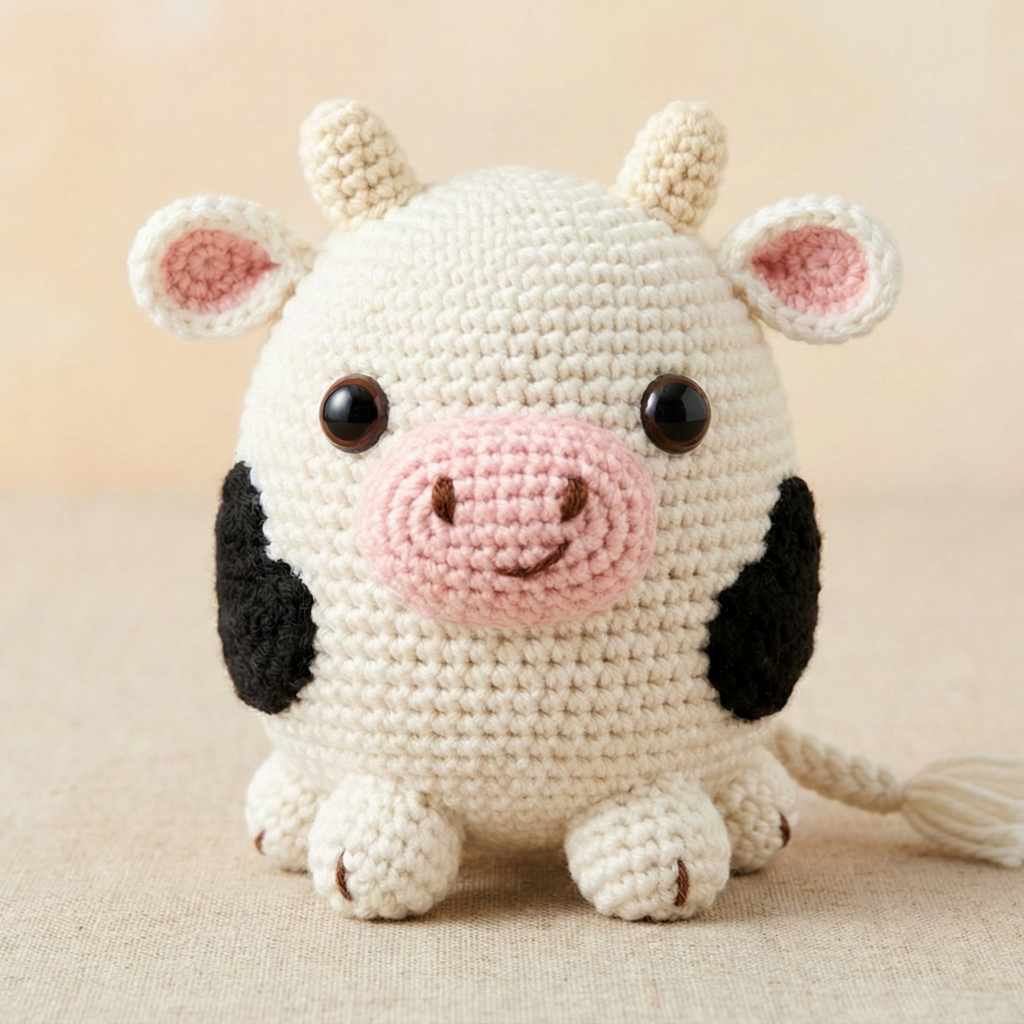
Finished size: ~6–7 in (15–18 cm) tall (depends on yarn/hook)
Yarn & hook: Worsted weight / aran (approx. 150–200 yards total); 4.0 mm (G) hook or size to obtain firm gauge
Materials: yarn in white (main), black (spots), soft pink (nose/inner ears), small amount of cream/tan (optional), polyfill, 9–12 mm safety eyes (or embroider), yarn needle, stitch marker.
Skill level: Beginner–intermediate
Body & Head (worked as one roundish shape)
Use white for body/head. Start with MR.
- MR, 6 sc in ring. (6)
- Inc in each stitch around. (12) — 6 increases → 12 total.
- Inc, sc 1 repeat around. (18)
- Inc, sc 2 repeat around. (24)
- Inc, sc 3 repeat around. (30)
- Inc, sc 4 repeat around. (36)
- Inc, sc 5 repeat around. (42) — now you have 42 stitches.
- Sc around for 6 rounds (Rounds 8–13): (42) × 6 rounds — this creates the body’s widest part.
- Dec, sc 5 repeat around. (36)
- Sc around twice. (36)
- Dec, sc 4 repeat around. (30)
- Sc 2 rounds. (30)
- Dec, sc 3 repeat around. (24)
- Dec, sc 2 repeat around. (18)
- Place safety eyes between rounds 11–12 about 6–8 stitches apart (adjust for cute expression). If using embroidered eyes, do this after stuffing partially.
- Dec, sc 1 repeat around. (12)
- Dec repeat around — close to 6, stuff firmly first. (6)
Finish off and weave in tail. Close remaining opening with tapestry needle, leaving hole for nose piece (below) if you prefer a separate muzzle.
Tip: If you want the head slightly more defined from the body, add 2–3 sc rounds after round 7 before decreasing.
Muzzle (pink)
- MR, 6 sc. (6)
- Inc in each st (12)
- Inc, sc 1 repeat (18)
- Sc 1–2 rounds for thickness. Fasten off leaving long tail for sewing.
Sew muzzle centered under eyes. Embroider nostrils with darker pink or black.
Ears (make 2)
- MR, 6 sc (6)
- Inc, sc 1 repeat (9)
- Sc around 1–2 rounds. Flatten and sew to top sides of head. Add small inner ear in pink if desired.
Horns (make 2)
- MR, 4 sc (4)
2–5. Sc 4 in each round for 4 rounds — or make a tapered horn by alternating sc rounds with dec to shape. Fasten off and stuff lightly. Sew between ears.
Legs/Feet (make 4)
- For teddy-like squat legs:
- MR, 6 sc (6)
- Inc, sc 1 repeat (9)
- Inc, sc 2 repeat (12)
- Sc around for 4–6 rounds depending on desired leg length. Fasten off leaving long tail to sew onto bottom of body. Slight stuffing gives a stable base.
Tail
Ch 8, sl st back along chain to create a short braided tail, add small pompom or tuft, and sew to back.
Spots
Crochet small oval patches (MR 6, sc around) in black, flatten and sew to body.
Assembly
- Sew legs evenly spaced so toy sits.
- Sew ears/horns to top of head.
- Attach tail centered on back.
- Add blush on cheeks with yarn or a tiny dab of fabric-safe pastel chalk.
- Embroider smile.
2. Crochet Nemo Fish Amigurumi Pattern
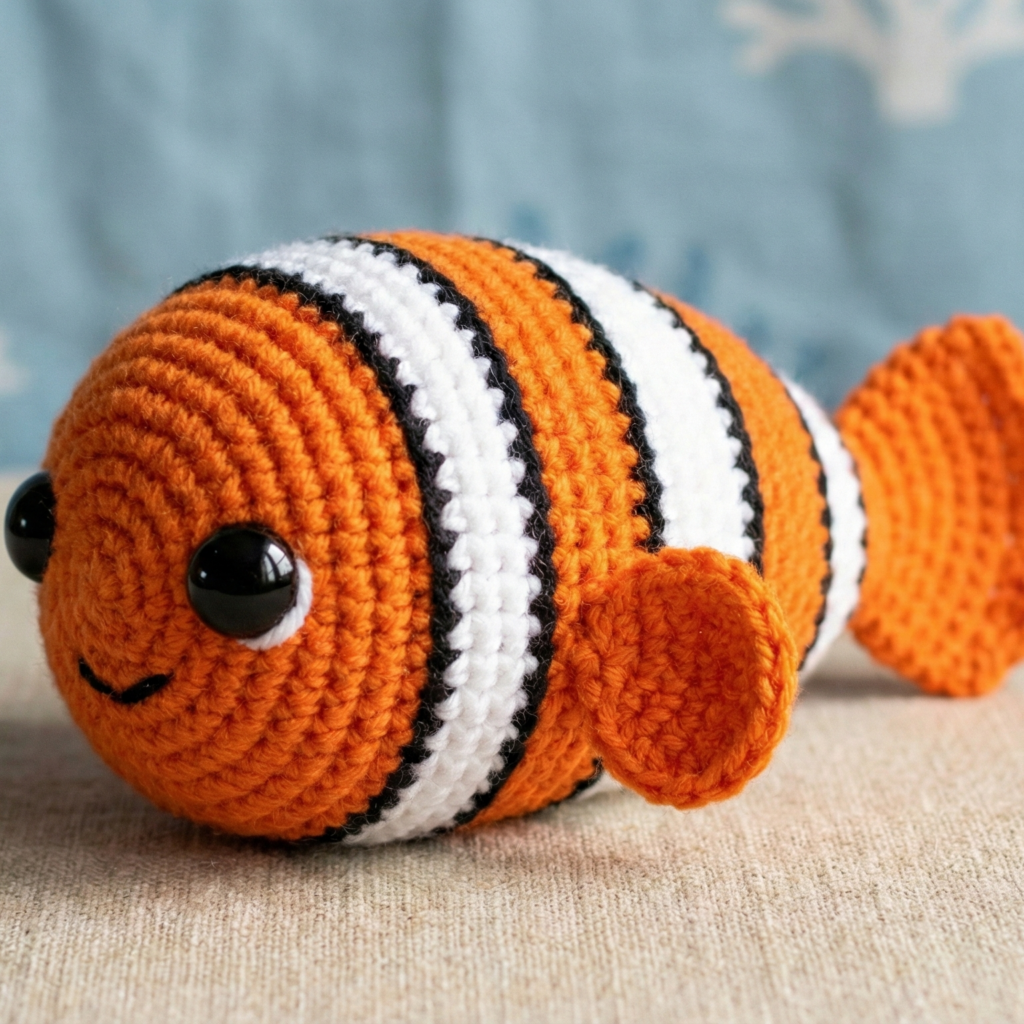
Finished size: ~4–5 in (10–13 cm) long
Yarn & hook: DK/light worsted recommended; 3.5–4.0 mm hook
Materials: orange main, white, black for stripes & details; polyfill; yarn needle; optional safety eyes or embroidered eyes.
Skill level: Beginner
Body (oval fish body)
- MR, 6 sc (6)
- Inc around (12)
- Inc, sc 1 (18)
- Inc, sc 2 (24)
- Sc around 2 rounds (24)
- Dec, sc 2 repeat (18)
- Dec, sc 1 repeat (12)
- Sc 1 round (12)
- Add stuffing, then dec rounds until closed (6). Fasten off.
This creates an oval/tapered fish body. If you want a more elongated fish, continue sc rounds at the 24 count for more length before decreasing.
Tail fin
Ch 9, sc back along chain to create a fan shape; make 2–3 fans joining into a triangle tail, or crochet a flat triangle: ch 3, 1 dc in 2nd ch, ch 1, turn, dc inc in center to create shape. Make two identical tails and sew onto back end.
Side fins (make 2)
- MR, 6 sc (6)
- Inc, sc 1 repeat (9)
- Flatten and sc across one edge to finish. Sew near center sides.
Stripes & Eyes
- Add white stripes by sewing narrow white bands around the body. For Nemo vibe, do two white rings with black outlines (use backstitch or black sc).
- Place eyes slightly forward — 6–7 stitches from front tip — and stitch or glue/insert safety eyes. Embroidery works well for babies.
Assembly & finishing touches
- Sew fins and tail firmly.
- Use black yarn to outline white stripes for that clownfish contrast.
- Add a tiny smile with black embroidery.
3. Crochet Chubbo Dino Amigurumi Pattern
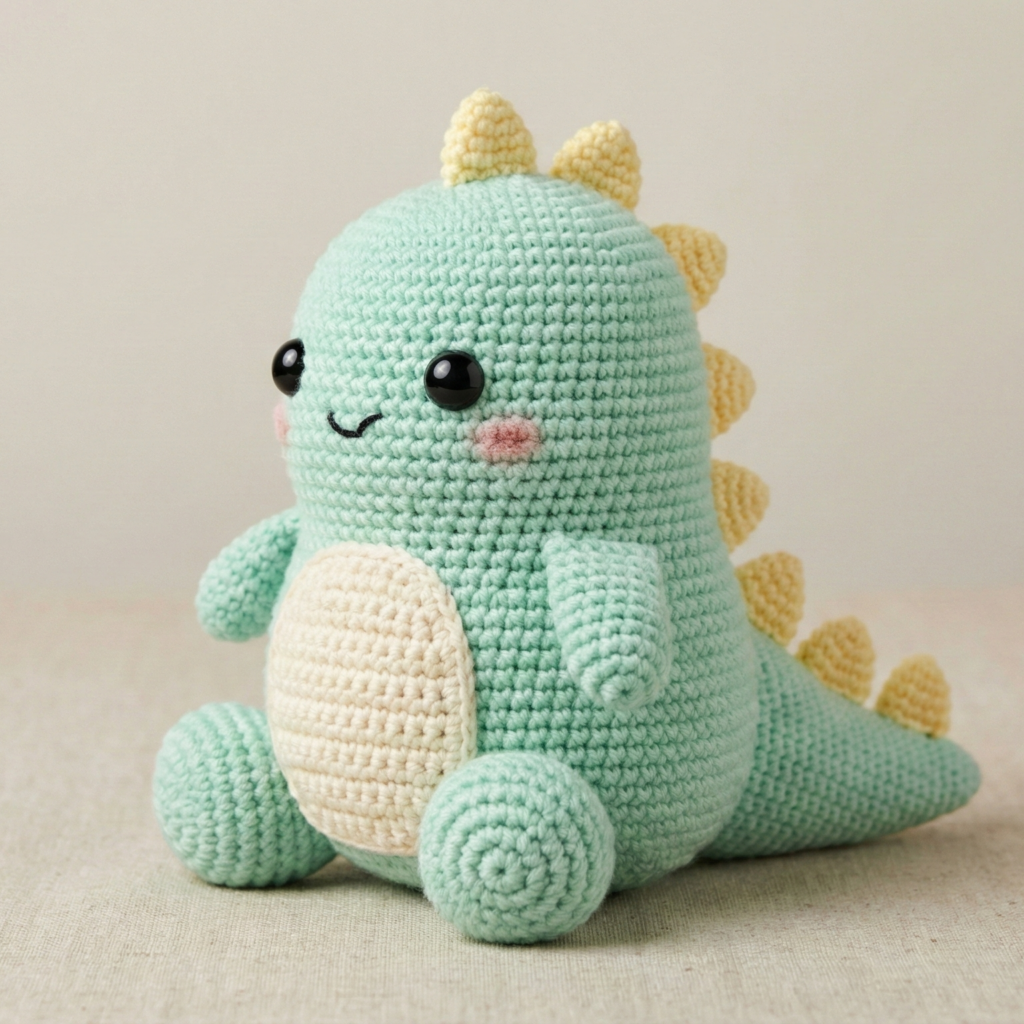
Finished size: ~7–9 in (18–23 cm) depending on yarn/hook
Yarn & hook: worsted weight; 4.0 mm hook
Materials: main color (green/mint), belly color cream, spikes color contrast, polyfill, safety eyes 9–12 mm or embroidered, yarn needle.
Skill level: Beginner–intermediate
Body / Head (one piece, roundish pear shape)
- MR, 6 sc (6)
- Inc around (12)
- Inc, sc 1 (18)
- Inc, sc 2 (24)
- Inc, sc 3 (30)
- Sc around 6–8 rounds at 30 for torso. (30)
- Dec, sc 3 (24)
- Sc 2 rounds (24)
- Dec, sc 2 (18)
- Sc 2–3 rounds (18)
- Dec, sc 1 (12)
- Sc 1 round (12) – attach stuffing, then dec to close (6) and finish. (6)
This creates a chunky pear body; adjust rounds at 30 for desired length.
Belly panel
Make an oval belly separately in contrasting color:
- Ch 8, sc across chain, rotate and work around chain to create small oval (sc about 16–20 total). Or make a flat oval with MR: MR 6, inc to 12, inc, sc 1 to 18, flatten and sc around for two rounds. Sew centered on front.
Arms (make 2)
- MR, 6 sc (6)
2–4. Sc around for 4–5 rounds to create a stubby arm. Attach to sides.
Legs (make 2)
- MR, 6 sc (6)
- Inc, sc 1 (9)
- Inc, sc 2 (12)
- Sc 3–4 rounds for length, stuff lightly, and sew to bottom-front so dino can sit.
Tail
- MR, 6 sc (6)
- Sc around 6–8 rounds decreasing gradually toward tip to create a tapered tail. Attach at center back.
Spikes (make 6–8)
Chain small triangles: ch 6, sl st in 3rd ch from hook to make a small triangular fan OR MR 3, hdc 3, dc 1, finish; create spikes in contrast yarn and sew along back from head to tail.
Face
- Place eyes near top of head: 8–10 stitches apart.
- Embroider nostrils and a tiny smile.
- Optional: little blush on cheeks.
4. Crochet Cute Baby Monkey Amigurumi Pattern
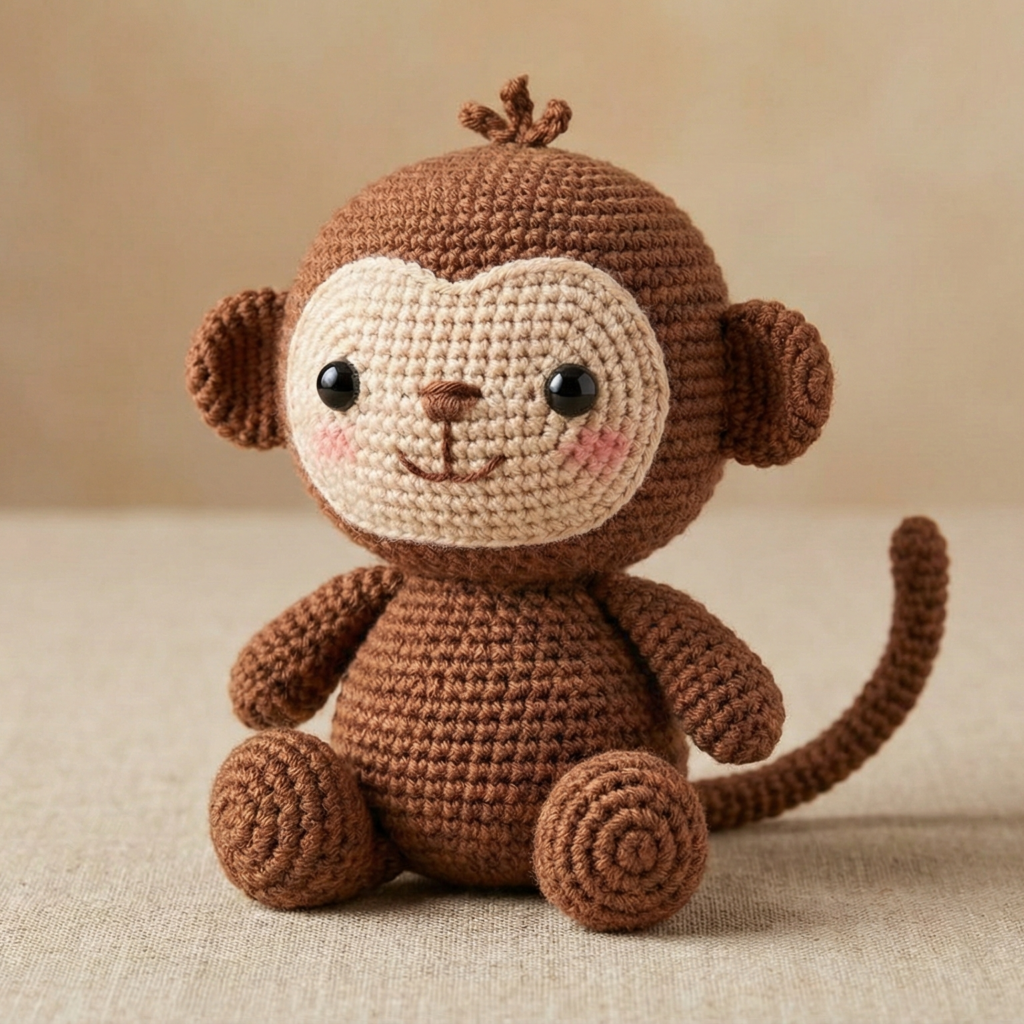
Finished size: ~6–8 in (15–20 cm)
Yarn & hook: DK to worsted, 3.5–4.0 mm hook
Materials: brown main, beige for face/belly, safety eyes 9 mm or embroidered, polyfill, yarn needle.
Skill level: Beginner
Head / Body (joined for chubby baby look)
- MR, 6 sc (6)
- Inc around (12)
- Inc, sc 1 (18)
- Inc, sc 2 (24)
- Inc, sc 3 (30)
6–10. Sc around 5 rounds at 30 for head/body top (30). - Dec, sc 3 (24)
- Sc 2 rounds (24) — place eyes between rounds 8–9.
- Dec, sc 2 (18)
- Sc 2 rounds (18) — stuff firmly.
- Dec, sc 1 (12)
- Dec around to close to 6, finish and weave in. (6)
Face disc (light beige)
- MR, 6 sc (6)
- Inc each st (12)
- Inc, sc 1 (18)
- Sc 1 round; flatten and sew under eyes as muzzle/face. Embroider nose and mouth on this disc.
Ears (2)
- MR, 6 sc (6)
- Inc, sc 1 (9)
- Sc 1 round; fold and sew edge to create cupped ear and attach to head sides.
Arms & Legs
Arms: MR 6, sc 6, sc 4–6 rounds (6) — lightly stuff and sew to sides.
Legs: MR 6, inc, sc 1 (9), sc 4–6 rounds, flatten and sew to bottom front for sitting.
Tail
Ch 20–30, sc back along chain for a rope tail, or crochet a thin tube (MR 6, sc rounds until length), stuff lightly, and sew to back.
Final touches
- Add a small tuft on top with a long loop stitch if you want baby hair.
- Embroider a tiny blush with pastel chalk or yarn.
5. Crochet Chunky Owl Plushie Amigurumi Pattern
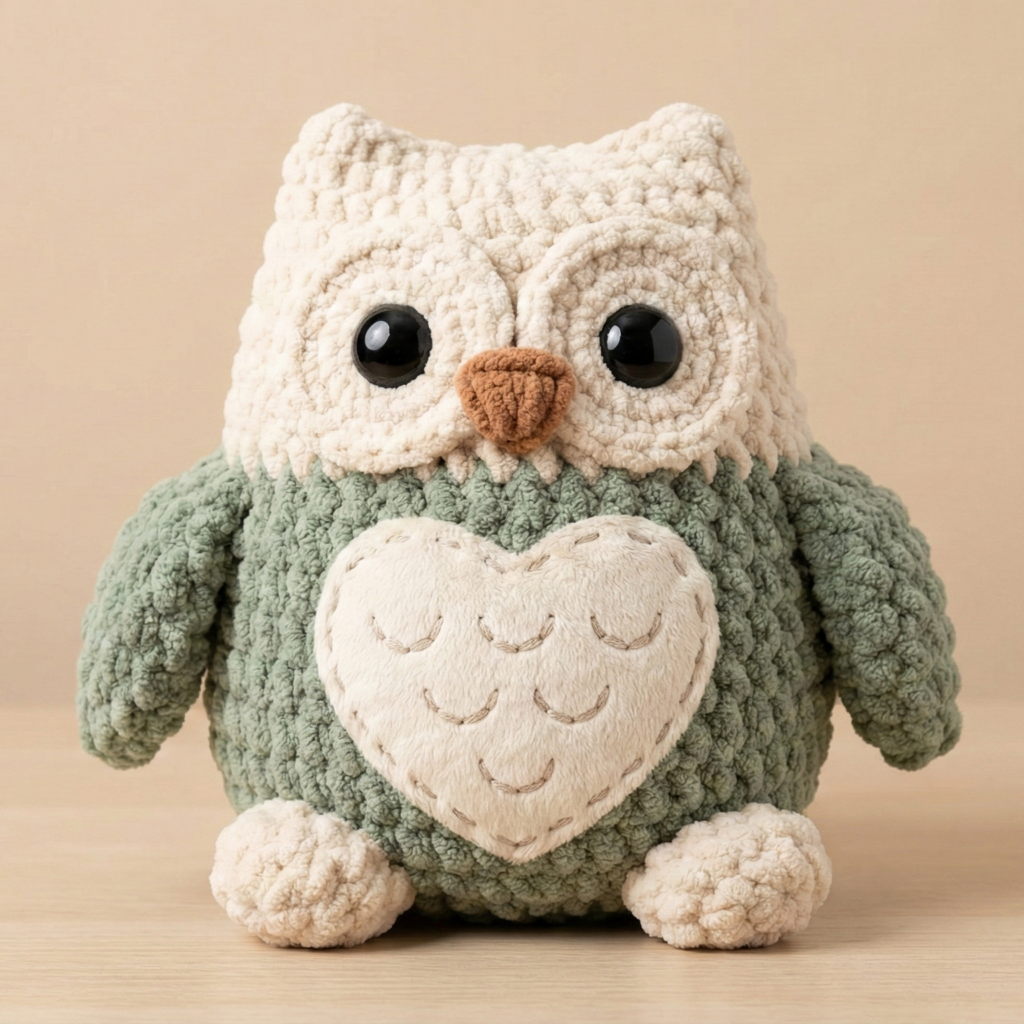
Finished size: ~8–10 in (20–25 cm) in chunky yarn; smaller with finer yarn
Yarn & hook: Bulky/chunky yarn recommended for the “chunky plushie” look; big hook like 6.0 mm (or adjust)
Materials: bulky yarn in main color, contrast for belly & eye cups, polyfill, stitch marker, yarn needle, 12–15 mm safety eyes (or embroider).
Skill level: Beginner–intermediate
Body (simple rounded cone)
- MR, 6 sc (6)
- Inc around (12)
- Inc, sc 1 (18)
- Inc, sc 2 (24)
- Inc, sc 3 (30)
- Sc around for 6–8 rounds at 30 (30) — this gives the stout owl body.
- Dec, sc 3 (24)
- Sc 2 rounds (24) — leave an opening for stuffing later.
- Dec, sc 2 (18)
- Sc 2 rounds (18)
- Dec, sc 1 (12)
- Stuff firmly, dec around to close to 6. (6) Fasten off.
Belly applique (contrast color)
- Make an oval or heart-shaped belly: MR 6, inc to 12, inc, sc 1 to 18, sc one additional round, then flatten and sew centered on front. Optionally stitch scalloped edges by slip-stitching small loops around.
Eye cups (make 2)
- MR, 6 sc (6)
- Inc around (12)
- Sc 1 round (12) — sew safety eyes to front of eye cups or place eyes on body and sew cups around them.
Beak
- MR, 4 sc (4)
- Sc 1–2 rounds; fold and sew to center between eye cups.
Wings (make 2)
- MR, 6 sc (6)
- Inc, sc 1 (9)
- Sc around 3–4 rounds, shape into wing and sew to sides slightly angled.
Feet (make 2)
Ch 6, then sc back and forth to create a 3-pronged foot or small oval that you sew under the body so the owl can sit.
Assembly & styling
- Sew belly first, then attach eyes/beak, and finally wings and feet.
- Use surface embroidery to add feather texture on belly (rows of scallops or chain-stitched arcs).
- If using chunky yarn, add pipe-cleaner for shaping (optional). Make sure to keep it safe if toy is for a child.
6. Crochet Adorable Bunny Amigurumi Pattern
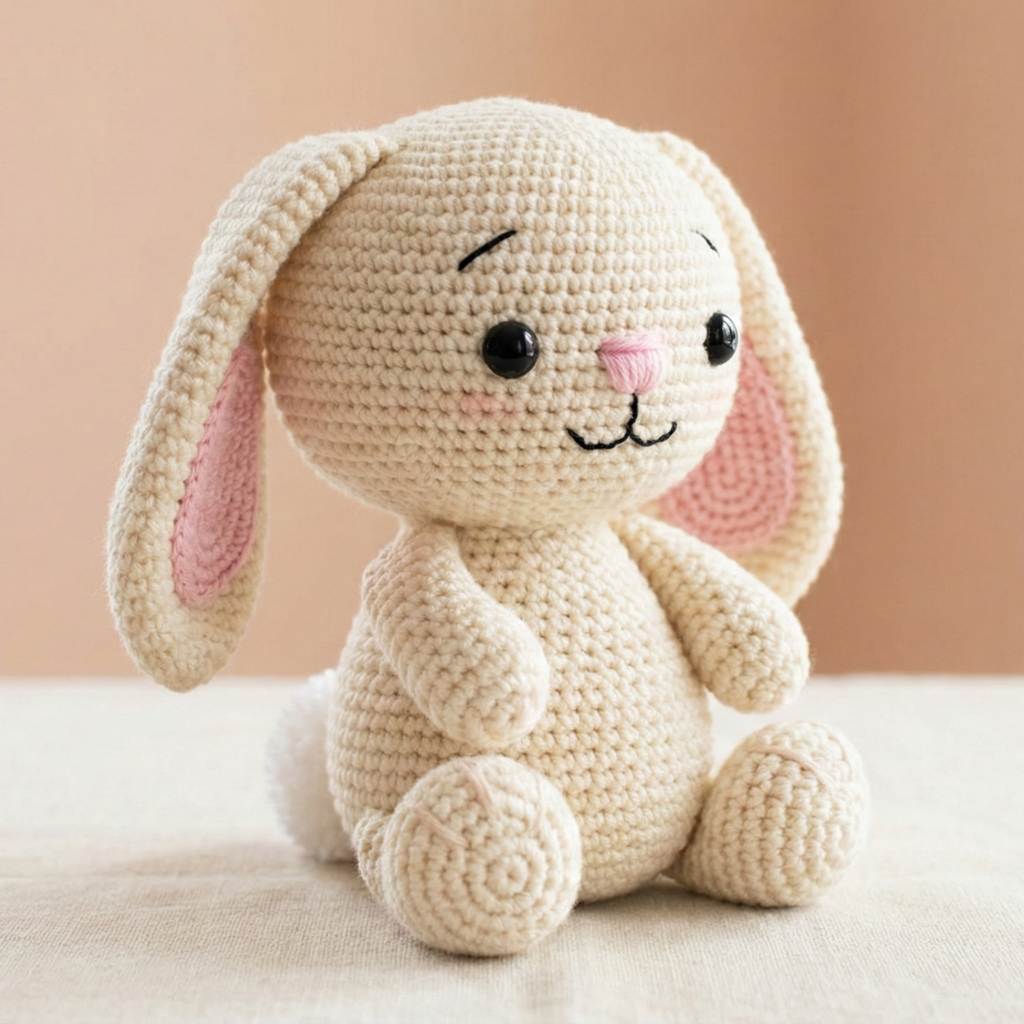
Finished size: ~7–9 in (18–23 cm) depending on yarn/hook
Yarn & hook: DK/worsted; 3.5–4.0 mm hook
Materials: main color for body, contrasting inner ear color, pink for nose, safety eyes 9–12 mm or embroidered, polyfill, yarn needle.
Skill level: Beginner
Body / Head (worked together for smooth shape)
- MR, 6 sc (6)
- Inc (12)
- Inc, sc 1 (18)
- Inc, sc 2 (24)
- Inc, sc 3 (30)
6–9. Sc around 4 rounds (30) — shape depends on how chubby you want bunny. - Dec, sc 3 (24)
- Sc 2 rounds (24) — place eyes here 8–10 stitches apart.
- Dec, sc 2 (18)
- Sc 1–2 rounds (18) — stuff head firmly.
- Dec, sc 1 (12)
- Dec around to close to 6 and finish (6)
Ears (make 2 elongated)
- Ch 20 (or length you prefer for long ears), sc in 2nd ch from hook and across (19 sc), turn and sc back along other side of chain to create long oval ear. Fasten off leaving long tail for sewing. For thicker ears, add a second round of sc around. Sew ears to top of head, shaping with a slight curve.
Shorter floppy ear version: MR 6, inc, sc 1 to 9, sc 6–10 rounds, fold slightly and sew.
Arms (2)
- MR 6, sc 6 (6)
2–5. Sc 4–6 rounds for length — stuff lightly and sew to sides a little forward so arms rest on belly.
Legs (2)
- MR 6, inc, sc 1 (9)
2–4. Sc around 3–4 rounds, flatten and sew to bottom front so bunny sits. Add small toes by stitching lines on foot with yarn.
Tail (pom-pom)
Make a small pom-pom (yarn) or a tiny MR filled and sewn as a bobble. Attach to back.
Face & finishing
- Sew a small oval muzzle if you’d like: MR 6, inc to 12, sc 1 round, sew to face and embroider nose and mouth.
- Add small inner ear patch in contrast color with a simple oval piece or with embroidery stitches.
- Add whiskers with embroidery thread or thin yarn if desired.
General finishing & assembly tips (applies to all patterns)
- Stuffing: Use polyester fiberfill. Start with small amounts and push into all extremities with a stuffing tool or blunt pencil. Stuff firmly but not so firm that stitches stretch.
- Joining parts: Use the whip stitch or ladder stitch with the long tails from parts to sew pieces on neatly. Always sew through both loops for a secure seam unless you want a visible ridge.
- Smoothing seams: When sewing on limbs, sew a few stitches, adjust placement, add final stitches, and knot; then weave in ends.
- Surface detail: You can use small embroidery stitches for eyebrows, mouths, patterns, or texture (feathers, fur lines).
- Blocking (if needed): For chunky yarn, gentle steam and shaping helps flatten ears or smooth panels (be careful with synthetic yarns).
- Safety: If making for a toddler or baby, do not use glued parts or un-sewn safety eyes; embroider instead. Avoid small accessories that could be pulled off.
Conclusion
There you have it: six kawaii crochet animal amigurumi patterns that are sweet, snuggly, and perfectly giftable. Start with the one that excites you most — maybe the roundish cow if you love cuddly shapes, or the Nemo fish if you want a quick, colorful make. Save the more detailed chunky owl or chubbo dino for a cozy evening.