Small pouches are addictively useful: they’re quick to make, use little yarn, and make perfect handmade gifts — from coin purses and makeup pouches to little tech holders and travel organizers. Below is a full, publish-ready blog post with a friendly introduction (materials, closures, sizing, lining and finishing tips), then six long, detailed pouch patterns you can follow start-to-finish: No-Sew Pouch, Strawberry Motif Pouch, Half-Double Pouch, Cute Coquette Bow Pouch, Gingham Heart Pouch, and Flower Design Pouch. Each pattern includes skill level, materials list, finished-size example, stitch notes, careful step-by-step construction, and variations.
Quick Introduction — tools, yarn, closures, lining, sizing & care
Why crochet pouches?
They’re fast (many take 1–3 hours), customizable, and practical. A well-made pouch is useful every day — coins, earbuds, cosmetics, knitting notions, masks, receipts, or as a small gift box for jewelry.
Tools & notions
- Yarn: For sturdy pouches use 100% cotton or cotton-blend (sport to worsted weight) — cotton holds shape and resists stretching. Bulky yarns are great for chunky pouches; fingering/sport creates delicate pouches.
- Hooks: Choose the hook recommended for your yarn; for denser fabric use a hook one size smaller than the yarn label suggests. Typical: 3.0–4.5 mm for sport-to-worsted cotton.
- Hardware & closures: zippers (invisible/nylon or metal), small snaps, magnetic snaps (encased only), buttons + loop, drawstrings, cord locks, keyring attachments. For earrings/metal finds use needle-nose pliers.
- Lining supplies: lightweight fabric, fusible interfacing for stiffness, sewing needle & thread or a sewing machine, small piece of felt or cork (optional bottom).
- Other: tapestry needle, scissors, stitch markers, measuring tape, pins for lining, optional fabric glue.
Construction choices (common methods)
- Flat rectangle → fold & seam: Most pouches are made by crocheting a rectangle, folding it in half, seaming the sides and adding a closure at the top. This is easy and works for zipper or button closures.
- Worked in the round tube: Make a tube and close bottom with a gathered base — great for cylindrical pouches and no-sew finishes.
- No-sew / single-piece: Crochet directly around a zipper or elastic band or work a single piece that folds into a pouch with an integrated flap — reduces sewing.
- Appliqué & surface work: Add pockets, motifs, or embroidery to the flat panel before seaming and lining.
Size guide (examples)
- Coin pouch: 3.5–4 in (9–10 cm) wide × 2.5–3 in tall
- Small zipper pouch / earbuds: 4.5–6 in wide × 3–4 in tall
- Makeup pouch / tech organizer: 7–9 in wide × 4–6 in tall
- Travel pouch / clutch: 9–11 in wide × 6–8 in tall
Scale patterns by adding/subtracting foundation chains or rounds and by changing yarn weight/hook size.
Gauge & stitch density
- Gauge isn’t strict for small pouches, but stitch density matters. If stitches are loose, small objects can poke through or the pouch will sag. If your fabric is airy, go down a hook size or use tighter stitches (sc, hdc, or front/back loop work).
- If you plan to skip lining, aim for a firm fabric (sc in a smaller hook, or hold two strands together).
Lining & finishing
- Lining adds structure, hides seams, and helps pouches last. Use cotton quilting fabric with light fusible interfacing for structure. Sew lining slightly smaller than the crocheted shell so it sits inside snugly.
- To install a zipper: either sew zipper to shell first then slip-stitch lining in place, or sew lining to zipper and then whipstitch assembled lining+zipper into crocheted shell for a neat interior.
- Felt or cork disk at the base makes the pouch sit flat and protects surfaces.
Care & safety
- Test wash the yarn you plan to use before committing. Cotton generally machine-washes well. Remove any glued metal elements before laundering if possible.
- Avoid small detachable beads or charms if making pouches for young children.
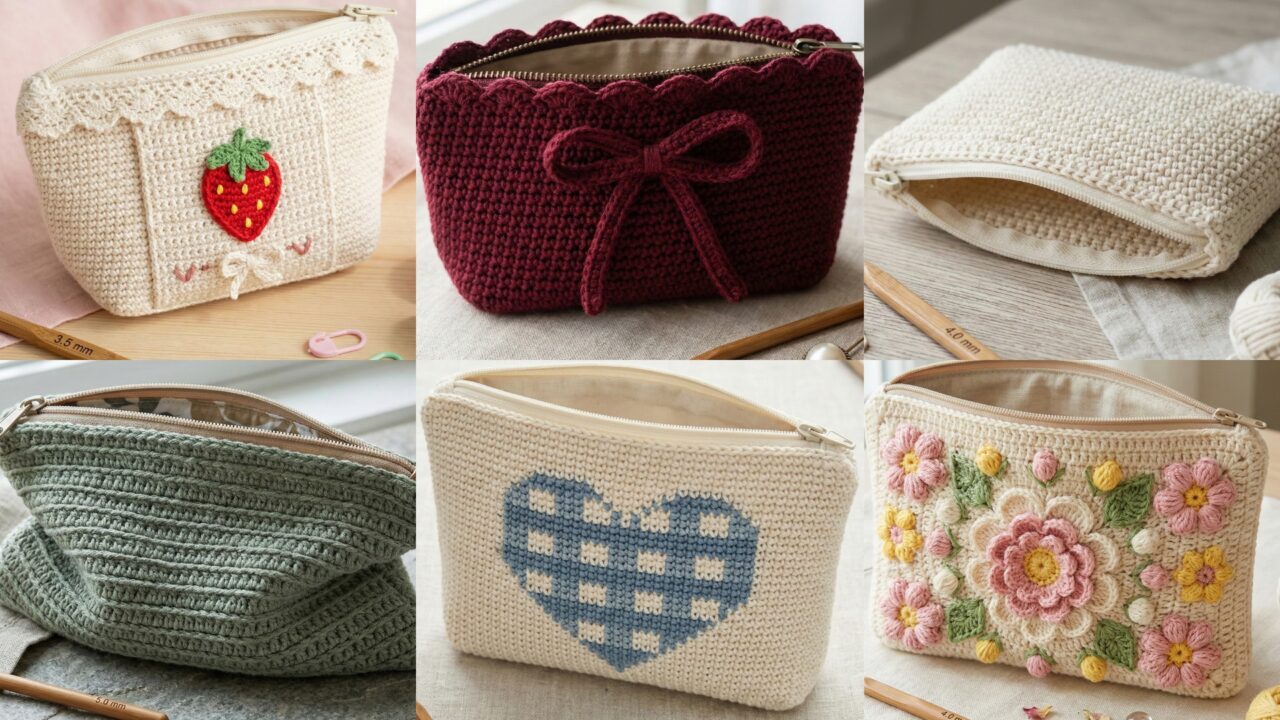
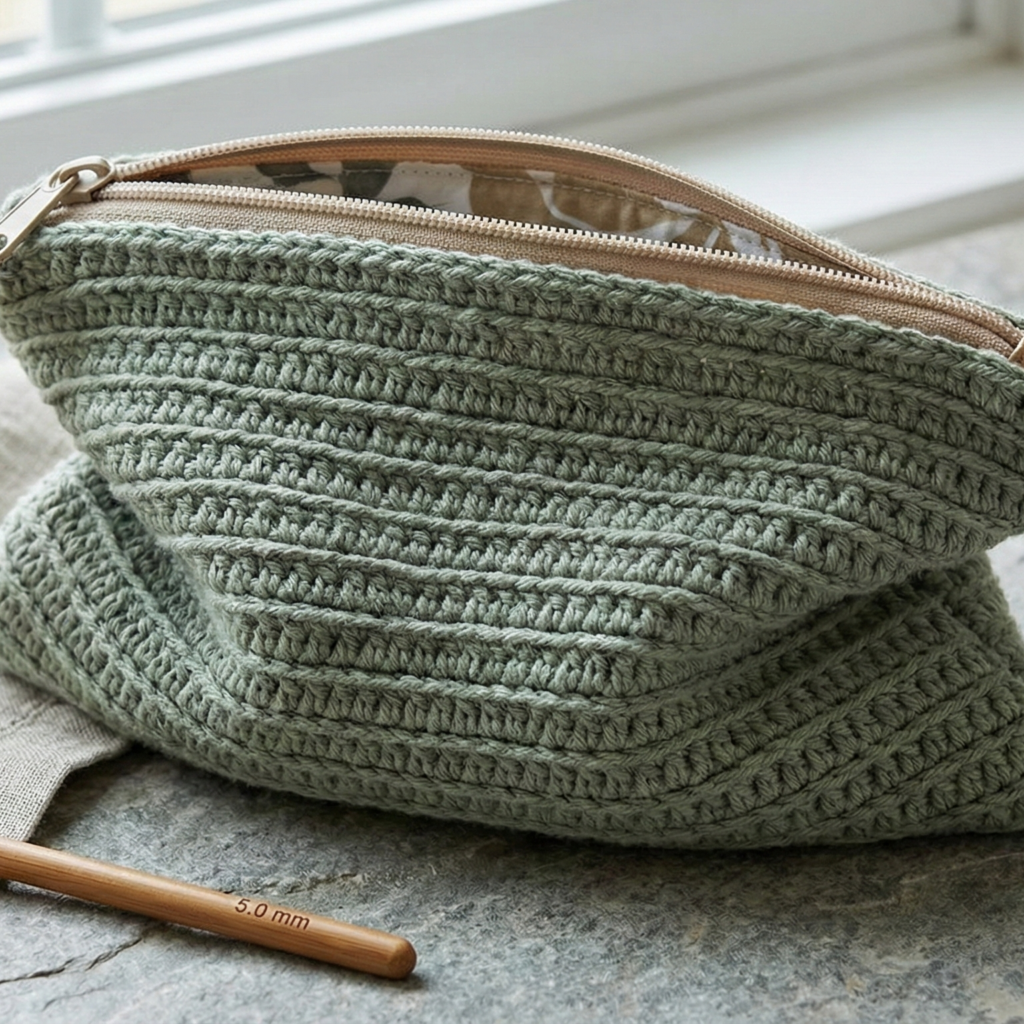
1. Crochet No-Sew Pouch Pattern
A quick single-piece pouch that requires no sewing — zipper is worked into the piece while crocheting. Ideal as a beginner-friendly, tidy gift.
Skill level: confident beginner
Finished size (example): 6 in wide × 4 in tall (zipper top).
Materials
- Worsted cotton ~80–100 yd.
- Hook: 4.0 mm.
- 6 in nylon zipper (matching color), stitch marker, tapestry needle.
Stitch notes
- Worked mostly in rows with a final folded/zipper-sewn technique that encases the zipper without hand-sewing the entire seam.
Step-by-step
- Swatch & compute: make a 4 in swatch in sc; count sts/in. Suppose 5 sc = 1 in and you want 6 in width → 5 × 6 = 30 foundation chains. Add 1 turning ch → ch 31.
- Foundation row: ch 31. Row 1: sc in 2nd ch from hook and across (30 sc). Turn.
- Body rows: Repeat Row 1 until piece measures approximately 8.5 in tall (this becomes 4 in pouch height + zipper overlap + seam allowance). For our yarn/hook that might be ~24 rows — measure as you go.
- Create zipper channel (no-sew):
- Fold the rectangle so the RS faces out and the bottom edges align — the zipper will sit across the top open edge. Place zipper face-down along the top raw edge, aligning zipper teeth with shell edge. Use stitch markers or safety pins to hold zipper in place.
- With RS side facing, work a row of sc through both zipper tape holes and the shell edge: insert hook under the zipper’s tape holes (or along zipper cloth), yarn over and sc through zipper and crochet edge simultaneously, working evenly across. This secures zipper edge to crochet without sewing. Flip and repeat on the other side of zipper (the interior will look tidy). Note: some zippers have tiny holes you can stitch through; if not, loop sc around zipper tape.
- Finish bottom seam: The bottom is still open. Fold pouch with zipper closed, aligning sides. Use sc through both layers along side edges (or use invisible mattress stitch) to join sides — again, no sewing is required if you slip-stitch through both layers. Work up both sides until you hit zipper ends. Tie off.
- Neaten & block: Weave in ends. Pull zipper to ensure smooth operation. Lightly block if needed.
Tips & variations
- Use a contrasting zipper for pop.
- For extra polish, on the inside add a manufactured fabric strip or thin fusible interfacing before attaching zipper for stiffness — this would add a little hand stitch but gives better durability.
2. Crochet Strawberry Motif Pouch Pattern
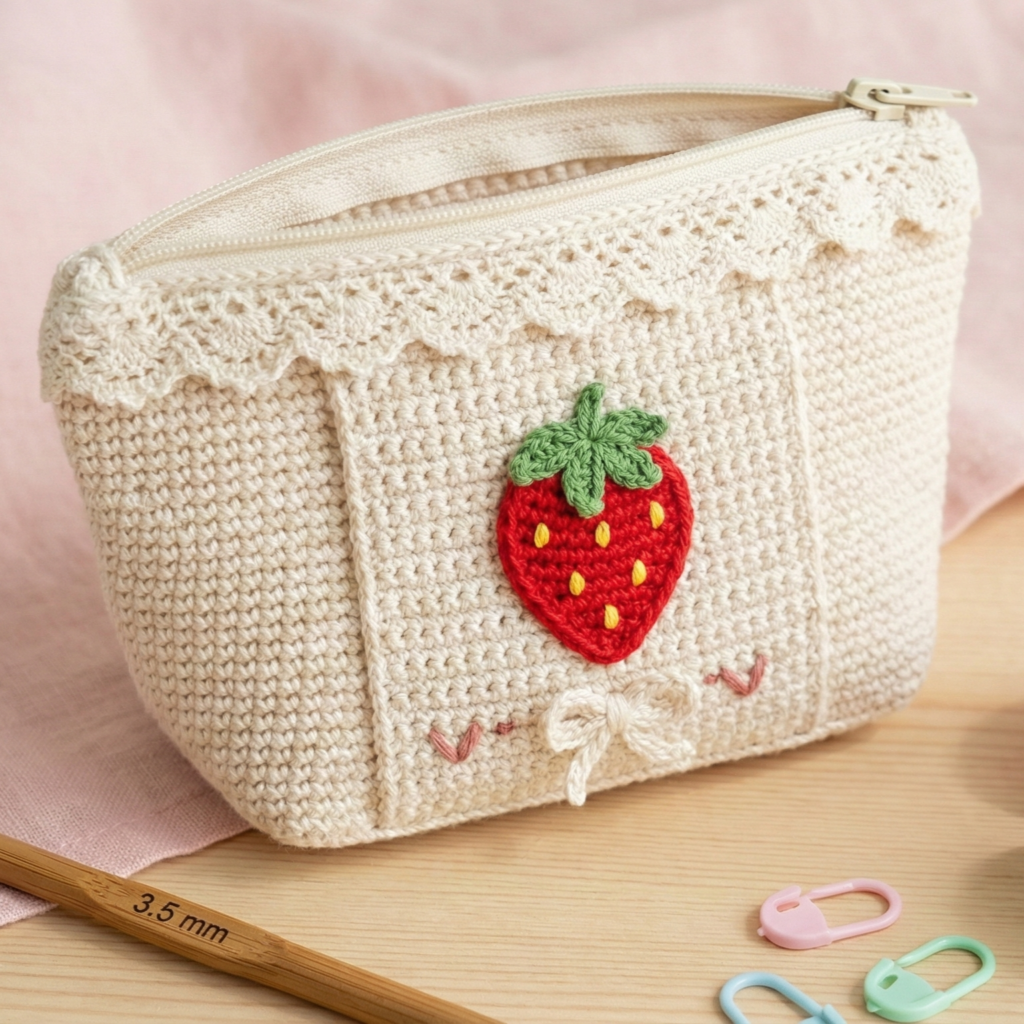
Adorable pouch with a flat strawberry appliqué on the front — perfect as a gift for kids or a cute coin purse.
Skill level: confident beginner → intermediate
Finished size (example): 4.5 in wide × 3.5 in tall (coin pouch).
Materials
- Sport/fingering cotton in red, green and a neutral for base ~60–80 yd total.
- Hook: 3.0–3.5 mm.
- 4 in zipper, small felt circle (optional for inside), tapestry needle.
Stitch notes
- Body = tight sc fabric; strawberry is crocheted separately and sewn on; add tiny seed beads or French knots.
Step-by-step
A — Crochet pouch body (rectangle)
- Compute foundation: Using a tight sc gauge; suppose 8 sc = 2 in → 4 sc/in. For 4.5 in width → 4 × 4.5 = 18 sc → chain 19.
- Row 1: ch 19; sc in 2nd ch and across (18 sc). Turn.
- Rows 2–14: ch1, sc across. Work until rectangle measures ~7 in tall (this becomes ~3.5 in height after seam allowances and zipper placement).
B — Strawberry appliqué
- Small strawberry body: MR, ch1, 6 sc in MR. R2: inc around → 12 sc. R3: sc1, inc → 18 sc. R4: sc around 18 for 2 rounds and fasten off, leaving long tail.
- Shape: Flatten the small round slightly and sew a small tail end to form a teardrop; you can also do a quick decrease round to taper into a point: sc 1, dec around then close.
- Leaves (make 2–3): Join green in top center of strawberry: ch 6; sc 1 in 2nd ch from hook, hdc, dc, hdc, sc. Fasten off and sew leaves to top.
- Seeds: Thread tiny seed beads on gold thread OR make French knots with yellow embroidery floss and sew evenly spaced across strawberry.
C — Join & zipper
- Place zipper along top edge and use approach from No-Sew pouch (step 4) to secure zipper to top edge by sc through zipper tape and shell.
- Fold piece and whipstitch/ sc the sides closed leaving zipper area as top opening.
- Sew strawberry appliqué centered on front panel. Optional: add tiny felt circle inside under strawberry for smoother interior.
D — Lining (optional)
- Cut a rectangle of cotton fabric 1/4 in less all around than crochet panel (so it sits inside). Fold and machine stitch sides and base into pouch shape. Slip lining into crocheted shell and hand stitch lining to zipper tape or top inner seam.
E — Finishing touches
- Weave ends and trim any stray floats. Block carefully so strawberry sits flat and neat.
Variations
- Make larger strawberry and adapt pouch to 6–8 in wide for phone or compact mirror.
- Use surface crocheting to create multiple small strawberries across the front for a polka-dot strawberry motif.
3. Crochet Half-Double Pouch Pattern
A simple, modern pouch that uses half-double crochet (hdc) for a soft, flexible fabric — great for makeup or as a clutch.
Skill level: confident beginner
Finished size (example): 8 in wide × 5 in tall (clutch).
Materials
- Worsted cotton ~150–220 yd depending on size.
- Hook: 5.0 mm.
- 7–8 in zipper, optional lining fabric, tapestry needle.
Stitch notes
- Hdc creates a thicker fabric than dc but more drape than sc — perfect for a soft, foldable clutch.
Step-by-step
- Swatch & compute: suppose hdc gauge is 4 hdc = 1 in. For 8 in width → 4 × 8 = 32 foundation sts. Chain 33.
- Row 1: ch 33, hdc in 3rd ch from hook and across (counts as hdc in top of ch2), turn.
- Rows 2–12: ch 2, hdc across. Continue until rectangle measures ~11 in tall (remember folds and seam allowances — 11 in becomes ~5 in finished plus seam). Adjust rows to get desired height.
- Edge: Work an optional decorative round: sc, ch 2, sc across top edges to create a small loop for closure option (if using button).
- Zipper install: You can sew zipper in on machine: fold piece to align top edges, pin zipper on RS and machine-baste zipper to one lip, then fold and seam sides. Or use no-sew method to crochet around zipper tape: sc through zipper tape and top edge across both sides (this is sturdier for cotton).
- Lining (recommended for makeup): cut fabric rectangle slightly smaller (1/4 in each side), sew sides and bottom, leave top open. Slip into crochet shell and hand stitch the top edge of lining to the zipper seam allowance. This protects yarn from makeup spills.
- Closure options: zipper + top flap (work an additional strip as flap and add snap), or a zipper + a decorative tassel on zipper pull.
Variations
- Work hdc in back loop only for a ribbed texture.
- Add a simple mosaic or stripe across the front by changing color every 4–6 rows.
4. Crochet Cute Coquette Bow Pouch Pattern
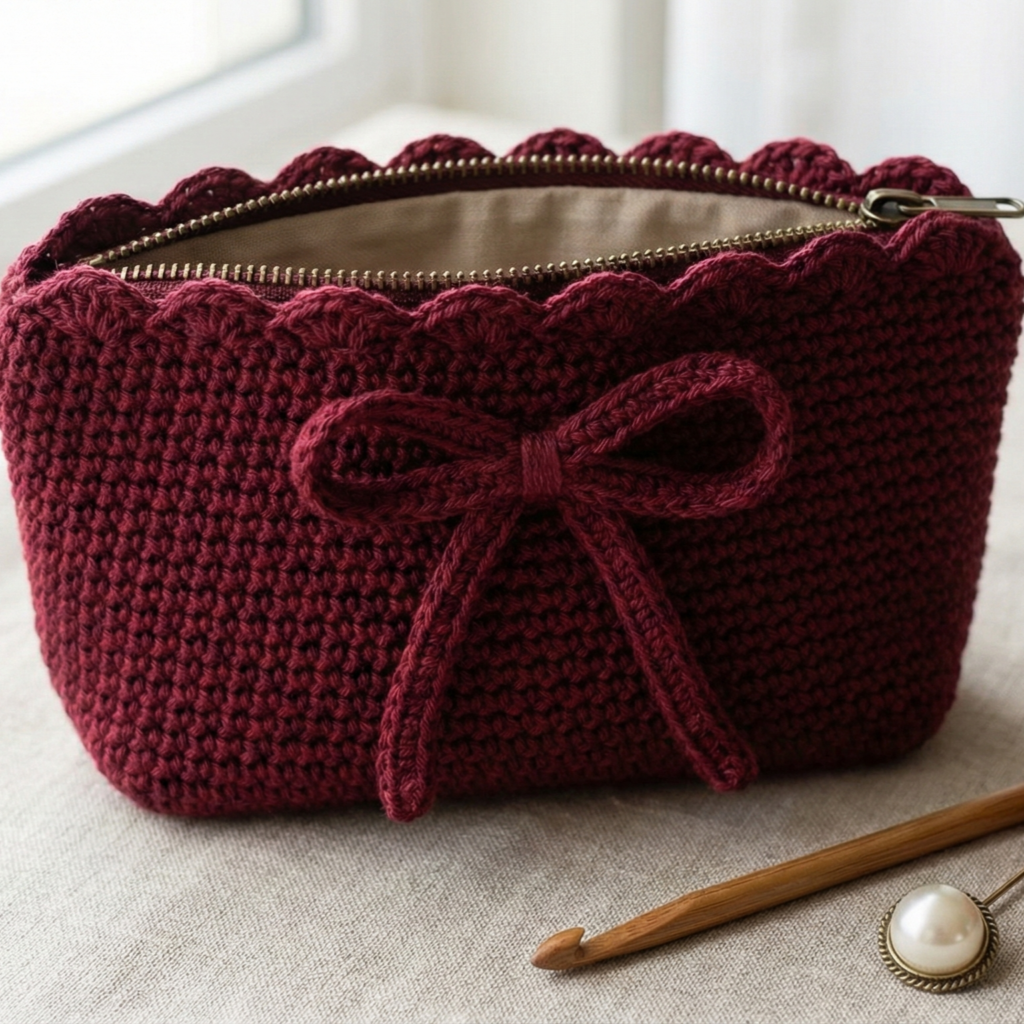
A feminine pouch with a sewn-on bow — ideal for jewelry gifts, hair ties, or lipstick.
Skill level: intermediate (bow shaping + assembly)
Finished size (example): 5.5 in × 4 in (small accessories pouch).
Materials
- Sport/DK cotton in main color and contrast for bow — ~80–100 yd.
- Hook: 3.5–4.0 mm.
- 5 in zipper or button closure, small snap optional.
Stitch notes
- Work a rectangle, fold to pouch, add a small crocheted bow finished with a wrapped center.
Step-by-step
A — Pouch body
- Compute foundation: e.g., gauge 5 sc = 1 in. For 5.5 in width → 5 × 5.5 = 27.5 → round to 28 sc, ch 29.
- Body: ch 29; Row1: sc across (28 sc). Rows 2–10: sc across until height ~8.5 in.
- Top finishing: For an elegant look, work a scalloped edge across top: sc, ch 3, sl st in next st to make small loops.
- Fold & seam sides: Fold in half RS together and sc or mattress stitch sides, leaving top open for the zipper.
- Add closure: either attach a 5 in zipper with the no-sew method, or sew a decorative button + loop (chain 6 as loop on front and sew button on opposite flap).
B — Bow
- Bow base: ch 22. Row 1: sc across (21 sc). Row 2–3: sc across. Fasten off leaving long tail for wrapping center.
- Shape bow: Fold strip in half lengthwise, then create bow shape by pinching center and wrapping with the long tail to cinch middle tightly. Wrap 10–12 times to create a tidy knot look, then sew tail to back to secure. Trim ends.
- Attach bow: Sew bow to front center of pouch. For extra security add small felt patch behind bow on interior and stitch through felt + yarn.
C — Lining & final touches
- If you used button closure, sew lining or facing to top to protect inside of pouch. Add a tiny bead or charm under bow for sparkle (sew on with strong thread).
Variations
- Make a double bow or layered bows with two colors.
- For a more structured bow, stiffen the bow piece lightly with a tiny bit of starch (test first).
5. Crochet Gingham Heart Pouch Pattern
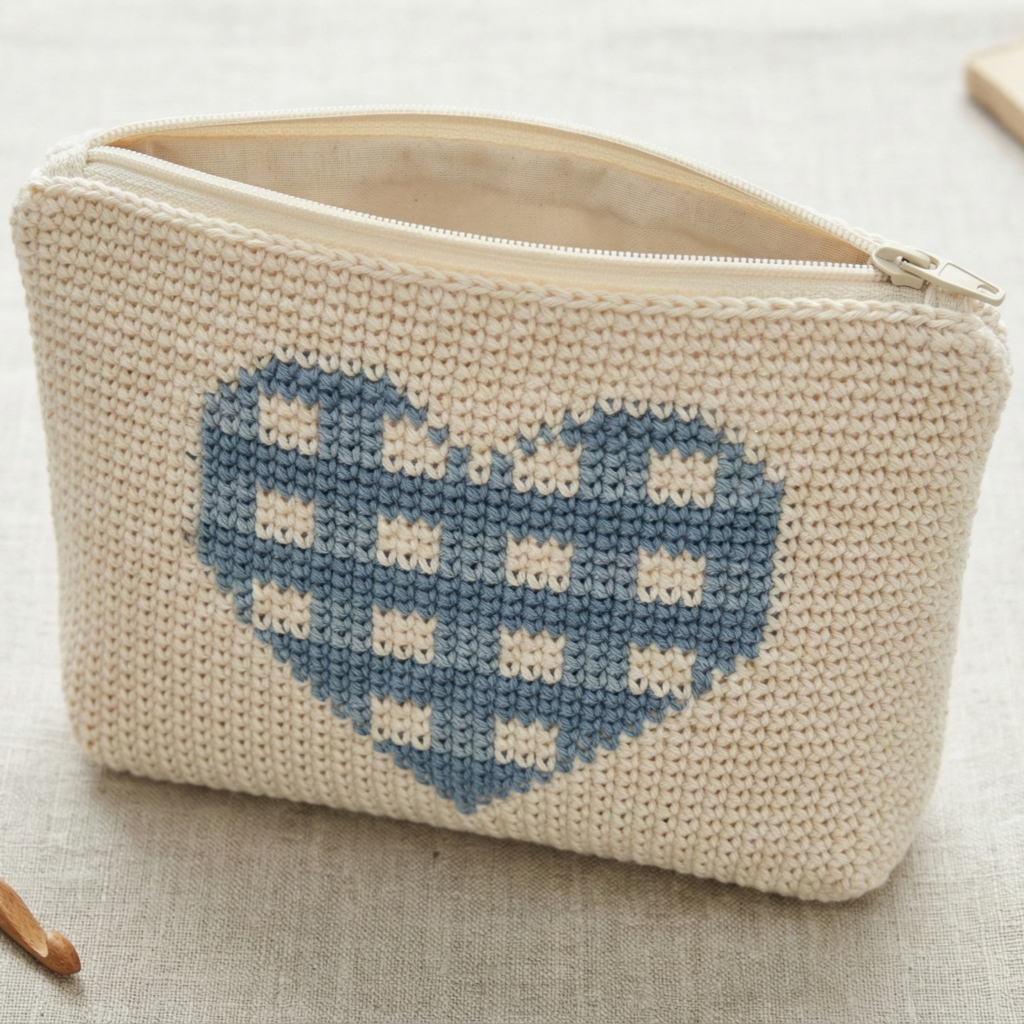
A textured colorwork pouch featuring a small gingham heart (tapestry crochet) — classy and nostalgic.
Skill level: intermediate → advanced (tapestry colorwork)
Finished size (example): 6 in × 4.5 in.
Materials
- Sport cotton in two colors (A = background, B = contrast) ~120 yd total.
- Hook: 3.0–3.5 mm.
- 6 in zipper, lining fabric optional.
Stitch notes
- Use tapestry crochet in sc to carry the unused color along the wrong side (or intermittently cut and weave if short floats). Pattern is worked flat with a knitted-looking gingham check heart worked into center.
Step-by-step
A — Design & chart
- Decide final width in stitches (e.g., 36 sc across for 6 in width at 6 sc/in). Create a small 36 × 25 stitch chart where the heart sits centrally: chart a 10×10 heart grid in the center area. You can draw this on graph paper or use a simple spreadsheet.
B — Work the rectangle with tapestry
- Ch 37. Row 1: sc across in color A. Turn.
- Row 2 onward: follow your chart row by row: sc in color indicated; when changing colors, carry yarn across by crocheting over the unused strand (tension should be even; avoid pulling too tight to prevent curling). Use stitch markers at chart center to remember position.
- Continue until rectangle height reaches planned measurement (e.g., 7.5–8 in).
C — Finishing
- Once finished, if you carried yarn throughout you’ll have floats at the wrong side; weave ends and trim. Press lightly with steam to set stitches flat.
- Fold rectangle and seam sides (in visible crochet or mattress stitch). Add zipper using the no-sew or sewn-in method. Add lining: cut lining 1/4 in smaller and sew inside, stitch lining to zipper seam for neat interior.
D — Variations & tips
- If tapestry is new to you, practice a small 10×10 swatch first.
- Use three colors for a multi-hued checkered heart (works well in faded pastels).
6. Crochet Flower Design Pouch Pattern
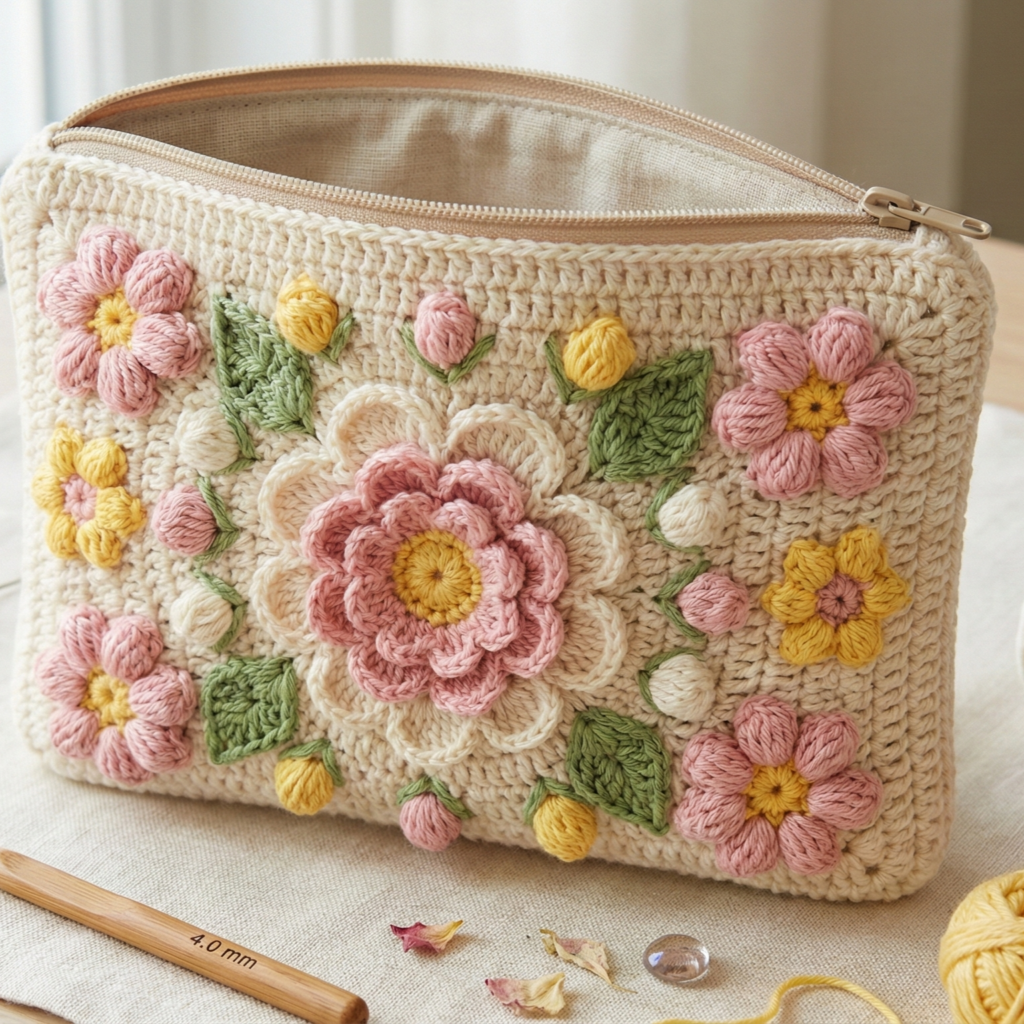
A bright pouch with a simple raised flower motif worked in relief — perfect for springtime gifts.
Skill level: intermediate (appliqué or raised stitch motifs)
Finished size (example): 7 in × 5 in (small cosmetics pouch).
Materials
- Worsted cotton in base + contrast colors ~150 yd total.
- Hook: 4.0 mm.
- 7 in zipper, optional felt for inside base.
Stitch notes
- Work a dense body (sc or hdc), then add a flower using short rows or sewn-on appliqué; alternatively work the flower in front-post/back-post stitches for a raised effect.
Step-by-step
A — Body
- Compute foundation: gauge 4 sc = 1 in; for 7 in width → 4 × 7 = 28 sc. Ch 29.
- Body rows: ch 29; Row1: sc across (28 sc). Work in sc for ~10–12 in height (makes ~5 in final height considering seam).
- Optional base reinforcement: before adding zipper, cut a small circle of cork or felt and attach inside bottom for stability.
B — Flower appliqué (make 1 large + 1 small)
- Large flower (center): MR, ch 1, 8 sc in MR. R2: (ch 3, 3 dc, ch 3, sl st in next st) around to make 8 petals. Fasten off leaving tail.
- Small flower (accent): MR, ch 1, 6 sc in MR; ch 2, 3 dc in next around to make petite petals.
- Raised option (worked directly on pouch): On the right side of body, identify center and work a short round of front-post dc shells in the desired petal positions: e.g., in the last row of body, fpdc 3 in next st, skip 2 around to pop petals.
C — Assembly
- Place large flower centrally and small flower offset; sew securely with yarn tails woven internally. If adding a bead center, stitch through to inside and secure with knot and extra thread to prevent pulling.
- Install zipper with chosen method. If you prefer a flap: crochet an extra narrow strip for a flap and sew a snap.
D — Finishing
- Lining recommended for cosmetics: cut and sew lining as before and attach to zipper seam for polish.
Variations
- Add leaves behind flower with simple moss stitch; or create a full bouquet across front by adding two-three flowers in different sizes.
Final finishing & gift presentation
- Weave ends thoroughly and hide them inside the lining or bottom seams so they don’t rub or pick.
- Label & care card: for gifts include a small card: fiber content, care instructions (machine wash warm gentle / lay flat to dry), and “Made with love” note.
- Packaging: tuck pouch into small organza bag or box with coordinating ribbon. For sets, make three pouches in complementary colors and nest them.
conclusion
These six pouch patterns cover a lot of ground — no-sew quick makes, adorable motif-driven coin pouches, everyday clutch-sized hdc pouches, feminine bow pouches, tapestry-style gingham hearts, and floral cosmetics pouches. Each pattern is adaptable: change yarn weight and hook to scale up or down, swap closures to suit the recipient, and add linings to elevate durability. Pouches are endlessly giftable — practical, beautiful, and personal.