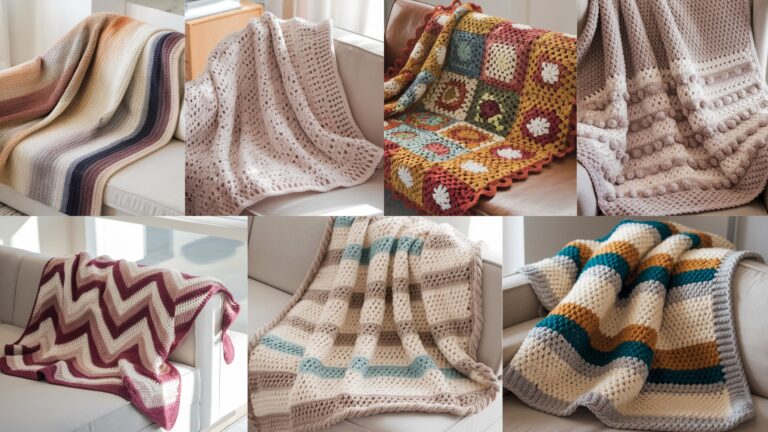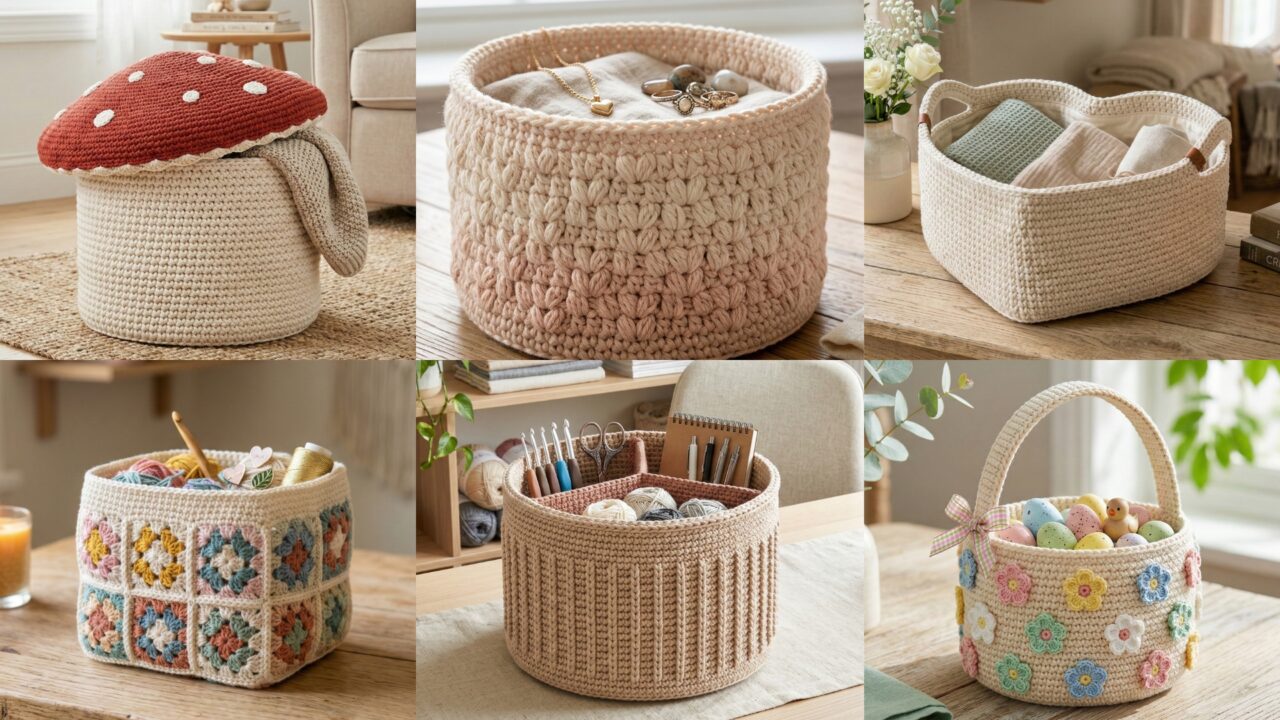
Baskets are the unsung heroes of home organization — practical, pretty, and instantly personal when made by hand. Whether you need a whimsical toadstool basket for a kid’s room, a sturdy spike-stitch basket with removable dividers for craft supplies, or a romantic puffy-heart basket for the entryway, these six patterns give you variety in shape, texture and function.
Below you’ll find a helpful introduction (materials, yarn choices, construction approaches and gauge math) and six complete basket patterns:
- Crochet Toadstool Mushroom Basket Pattern
- Crochet Spike Stitch Basket with Removable Dividers Pattern
- Crochet Puffy Heart Stitch Round Basket Pattern
- Crochet Heart Shaped Basket Pattern
- Crochet Mini Spring Flowers Easter Basket Pattern
- Crochet Granny Square Basket Pattern
Each pattern includes skill level, finished size, materials, suggested gauge, a clear step-by-step construction guide (base → walls → finishing → optional lining/dividers/handles), and ideas for variations. Let’s make storing things beautiful.
Quick primer — yarn, tools, structure & safety
Yarn & fiber choices
- 100% cotton (bulky or worsted held double) — favorite for baskets: strong, holds shape, machine-washable, tactile. Use single-strand worsted for small baskets, or hold two strands (or use t-shirt yarn) for chunky, stiff baskets.
- T-shirt yarn / fabric strips — excellent for very sturdy, sculptural baskets.
- Polyester cord / macramé cord — super-strong, great for heavy-use baskets, but less soft.
- Avoid novelty fluffy yarns (eyelash) for structural baskets — they hide stitches and weaken fabric.
Hooks & hardware
- Hooks sized to yarn: 6.0–12.0 mm depending on thickness (e.g., 8 mm for worsted doubled, 10–12 mm for t-shirt yarn).
- Tapestry needle, stitch markers, scissors, measuring tape.
- Optional: thin plastic canvas (for base reinforcement), removable fabric dividers, small wooden dowel or leather strap for handle reinforcement, hot glue or sewing kit for lining.
Construction approaches
- Worked in the round: most baskets are made as a single continuous piece — flat circular or oval base, then walls built up with increases or even stitches.
- Panels + join: granny or motif-based baskets made of squares joined then reinforced.
- Basket stiffness: increased by using thicker yarn, smaller hook for tighter stitches, post stitches, or by adding a sewn-in lining and interfacing.
Basic stitches useful for baskets
- sc (single crochet) — dense and strong
- hdc (half double crochet) — slightly taller, still sturdy
- dc (double crochet) — drapier, use for decorative parts
- bp/ fp (back/front post) for texture and ribs
- sl st for neat joins
Gauge math — short how-to
Always make a 2–3″ swatch in the stitch you plan to use. If your swatch shows 4 sts = 1″ and you want a base of 8″ diameter, target 4 × 8 = 32 stitches across the circle circumference (you’ll accomplish that via rounds/increases — this number guides your increases and when you stop increasing). For oval bases, measure length and width separately.
Safety & care
- If making baskets for food contact (fruit bowl), use food-safe washable cotton and avoid glues.
- If using plastic canvas or interfacing, sew the lining neatly and avoid exposed plastic edges.
- Washability: check yarn label. Cotton and many t-shirt yarns are machine-washable; let the basket dry reshaped.
1. Crochet Toadstool Mushroom Basket Pattern
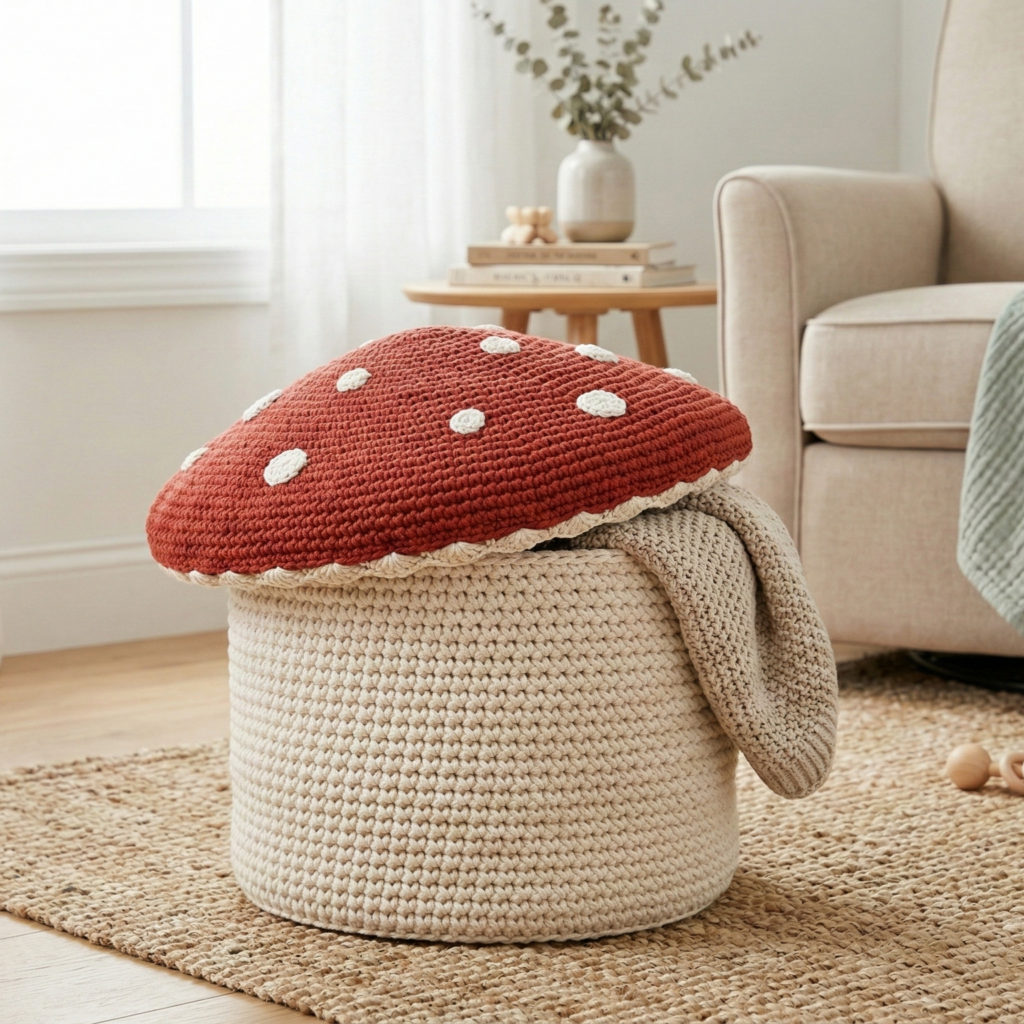
A whimsical mushroom-shaped basket — great for toys, small blankets, or seasonal decor.
Skill level: confident beginner → intermediate
Finished size (sample): diameter 10″, height 8″ (stem + cap)
Materials
- Worsted cotton held double (or chunky cotton) — about 300–500 yd depending on size
- Hook: 8 mm (adjust to yarn)
- Tapestry needle, stitch markers
- Optional: craft stuffing for a slightly rounded cap top (very light) or a stiffened lining
Construction overview
Two-part construction: a cylindrical stem (the “trunk”) that forms the base/inside storage and a flared cap (wide top with scalloped edge) that sits over the stump for the toadstool shape. You’ll either join cap to stem or make the cap removable.
Stitches used
sc worked tightly for walls; shells or 3-dc clusters for cap scallops.
Step-by-step
A — Make the base + stem
- Base circle (magic ring start)
- MR, ch1, 6 sc in MR — join. (6)
- R2: inc in each st → 12.
- R3: sc1, inc repeat → 18.
- R4: sc2, inc → 24.
- Continue increasing rounds until base diameter ≈ 6″ (for a 10″ cap). Stop when base measures desired size.
- Stem height
- Once base reached, stop increasing and work sc in rounds (no increases) to build up cylindrical stem height of 6–7″. Work tightly — consider using one size smaller hook for the stem rounds to keep fabric stiff.
- Optional lining or reinforcement
- For a very stable stem, cut a circle of plastic canvas for base and seat it under stitches, or attach a sewn cotton lining. If liner used, sew liner in before closing top edge or leave open for removable liner.
B — Make the cap (flared top)
- With cap color (e.g., red), MR, ch1, 6 sc in MR → increase rounds until you reach desired cap diameter ≈ 10–12″ (bigger than base to get the overhang). This will form the top dome.
- After reaching diameter, work 3–4 rounds in shell stitch to build the ruffled underside (shells facing downward): shell (5 dc) in one stitch, skip 2, sl st around. This creates the scalloped overhang.
- For the top of cap, attach white spots: embroider or crochet small white circles (MR, 6 sc) and sew them to cap.
C — Assembly
- Option 1 (fixed cap): Sew the cap to the top edge of the stem along one seam, leaving most of the cap free to form an overhang. Use strong yarn and small stitches.
- Option 2 (removable cap): Make the cap separate and create a small lip inside that tucks into the stem opening; the cap can sit loose.
D — Finishing
- Weave in ends, shape cap by blocking lightly, stuff a tiny bit in top if desired to round it.
- Optional: add a felt circle inside base to protect surfaces.
Variations & styling
- Make mini versions for Easter baskets, or make a set in different colors.
- Use tan/cream for a porcini mushroom look.
- Add a small loop handle under the cap for carrying.
2. Crochet Spike Stitch Basket with Removable Dividers Pattern
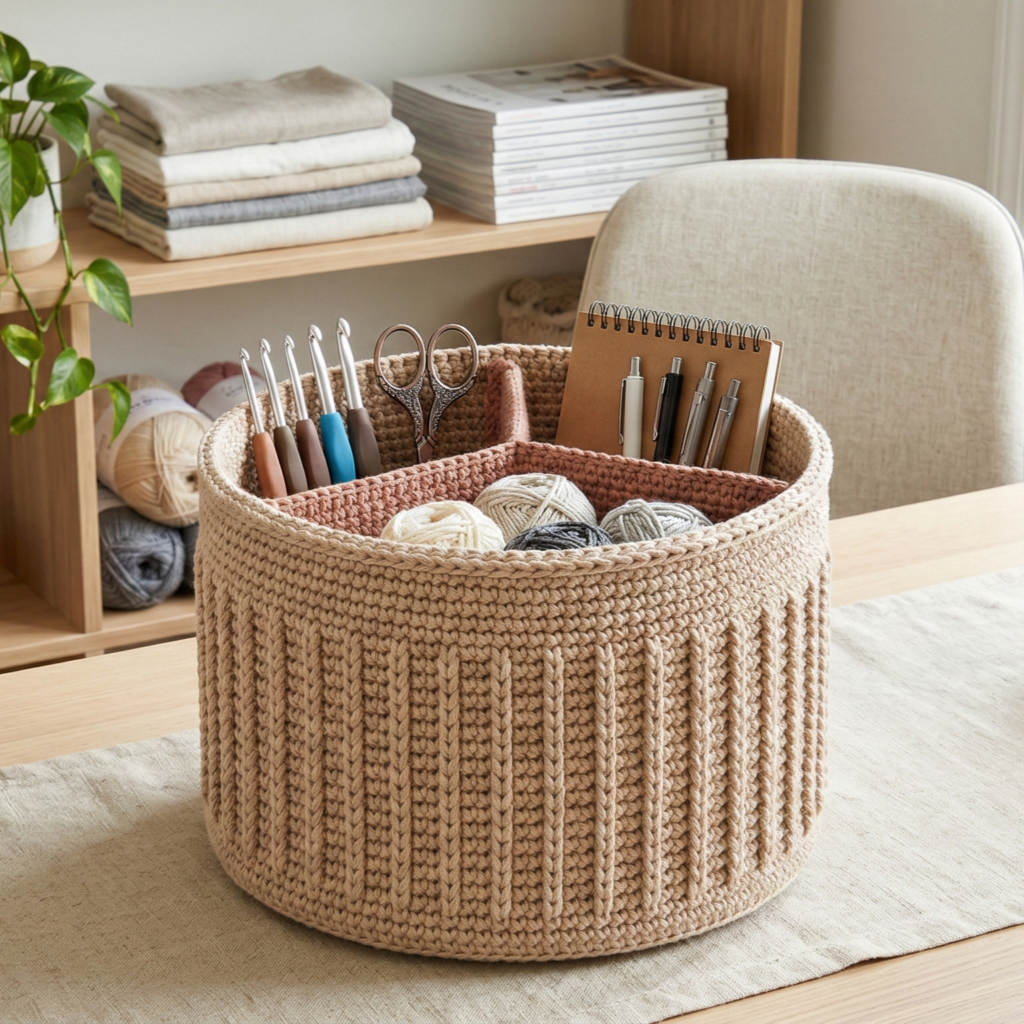
A practical, sculpted basket using spike (long) stitches for a firm ribbed texture and a removable divided insert for organizing craft tools, cosmetics, or office supplies.
Skill level: intermediate
Finished size (sample): diameter 12″, height 10″; dividers 3 compartments each ~3–4″ wide
Materials
- Bulky cotton yarn or worsted held double — ~400–700 yd
- Hook: 8–10 mm
- Plastic canvas or thin MDF disc for base (optional)
- Fabric for removable dividers (or crochet divider panels)
- Stitch markers, tapestry needle
Construction overview
Work a wide flat base, then rise into walls using spike stitches (you’ll work into lower rounds to create the elongated spike). The removable divider is a separate crochet panel or sewn fabric piece that fits inside and is anchored with snaps or Velcro.
Stitch definitions
- Spike stitch (long dc/spike dc): insert hook into a stitch several rounds below, pull up loop, complete dc — makes long vertical bars that look like spikes.
Step-by-step
A — Base (wide flat circle)
- MR → 8 sc. Increase in each st, then increase rounds as needed until base reaches 10–11″ diameter.
- Optionally support base with a plastic canvas disc cut to size and stitched into bottom by sewing through holes or stitching around the edge.
B — Wall with spike stitch
- After base reached, begin wall rounds:
- Round 1 (first wall round): ch2, hdc around in back loops for a tidy start.
- Round 2+: Working spike stitches: ch1, spike dc into the stitch 3 rounds below (or base round), ch1, sc next (experiment with the depth to get desired vertical rib). Continue around.
- Work 10–12 rounds of spike stitch to reach desired wall height. Spike stitches create a stiff ribbed wall; alternate with sc rounds to stabilize.
C — Top rim
- Work 2–3 rounds in sc in tighter tension for a firm, neat top rim.
- Optionally add a rope-style edge: sc around, then reverse single crochet (crab stitch) for a raised edge.
D — Removable divider insert (crochet or fabric)
- Option Fabric: cut fabric rectangles that match circumference / compartment sizes; sew them into a box shape that fits inside the basket. Add Velcro strips or small buttons on the lining to anchor the dividers.
- Option Crochet: make two panels sized to compartment width × height. Sew panels together to form T-shape dividers: one long panel across, one perpendicular to divide into three sections. Add small tabs that attach to snaps sewn to the basket interior (so you can remove for washing).
E — Handles (optional)
- Create sturdy handles by crocheting a thick band (ch to desired length, sc rows), fold and sew to both sides of basket. Reinforce with tiny wooden dowels or leather strips inside the handle for strength.
F — Finish
Weave ends, add liner if desired, attach dividers with snaps.
Variations
- Make multiple small inserts for different uses (yarn, office pens, makeup).
- Use color bands to visually separate compartments.
3. Crochet Puffy Heart Stitch Round Basket Pattern
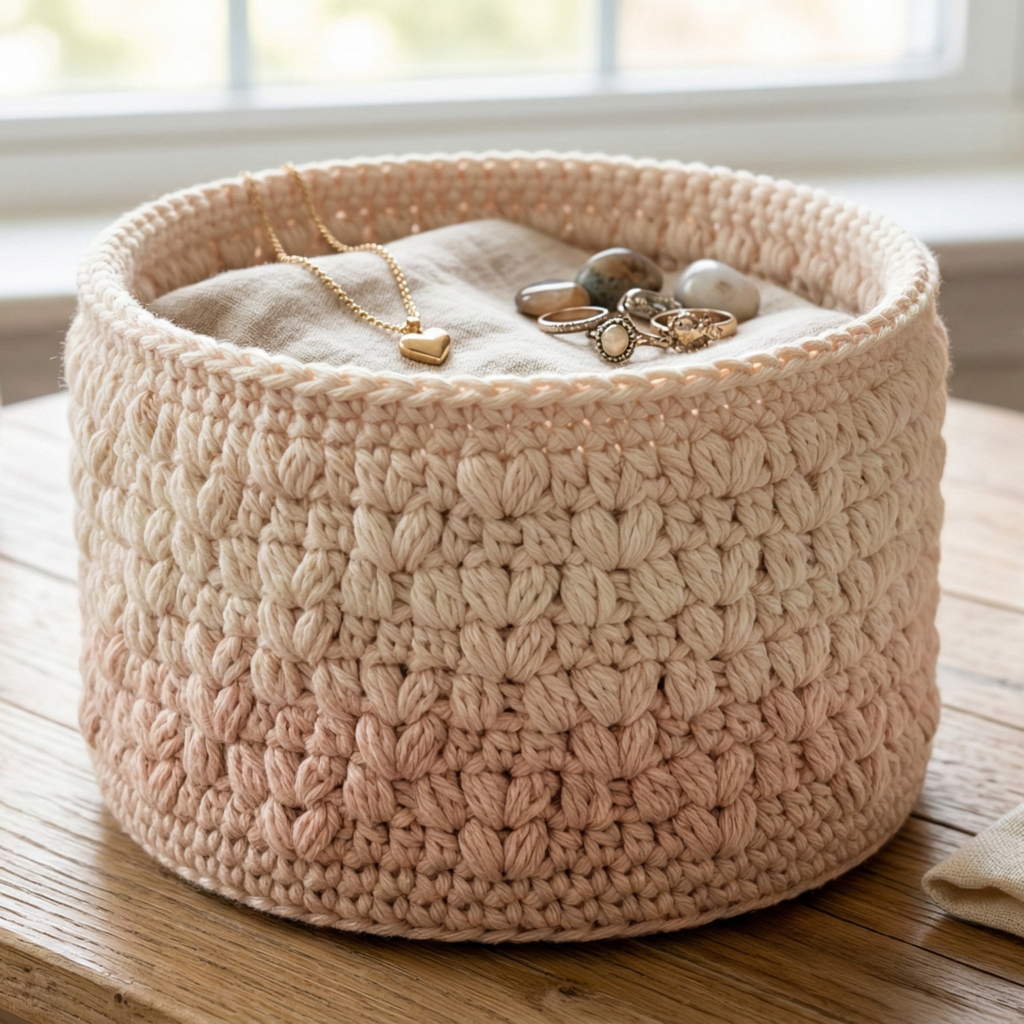
Romantic and textured: this round basket uses plush puff or bobble stitches arranged in heart motifs circling the basket.
Skill level: intermediate
Finished size (sample): diameter 9–10″, height 7–8″
Materials
- Chunky cotton or worsted held double for puffy stitches — 300–500 yd
- Hook: 8–10 mm (or size recommended for thickness)
- Tapestry needle, optional felt base
Construction overview
Start with a circular base; convert to wall with alternating rounds of sc and puff-stitch hearts arranged in a repeating pattern. Puff stitches give a very tactile, puffy texture that looks like rows of tiny hearts when arranged carefully.
Stitch notes
- Puff stitch: yarn over, insert hook, pull loop, repeat a number of times, yarn over and pull through all loops to make the puff. Secure with ch1 or sc.
Step-by-step
A — Flat base
Work base rounds to desired diameter (use same method as previous baskets).
B — Setup round
Once base size reached, sc around for 2–3 rounds to transition into wall.
C — Heart puff pattern (repeat around)
A heart motif row across the round: each mini-heart uses a cluster of puffs shaped into a heart top with a small decrease to form the point.
Example repeat (test on swatch first):
- sc, (puff x3) in next st (solid cluster), sc, sc decrease to form point, skip 1–2 stitches and repeat.
Spacing is key — mark positions with stitch markers so mini-hearts are evenly spaced. Work several rounds to build up the body height with alternating sc rounds to stabilize.
D — Top rim
Finish with a firm sc round and one decorative round of shells or picots for a pretty edge.
E — Optional internal felt base
Sew a felt circle to the inside bottom to keep the base flat and protect surfaces.
Variations and tips
- Use tonal yarns for a soft ombré effect.
- Make this pattern smaller as a jewelry or trinket basket.
4. Crochet Heart Shaped Basket Pattern

A full heart-shaped basket — adorable entryway catch-all or gift basket. The shape is worked from a specialized heart-shaped base.
Skill level: intermediate → advanced (shaping & joining)
Finished size (sample): width 12″ (across lobes), depth 8″
Materials
- Worsted cotton, 400–700 yd
- Hook: 6–8 mm depending on yarn
- Tapestry needle, stitch markers, optional stiffener or lining
Construction overview
Heart shape is easiest as a joined two-circle base or by following a heart-chart increase/decrease round layout. Walls are built up from the heart perimeter. You’ll finish with a neat rim and optional handles.
Two simple methods to construct base
Method A — Two-circle base joined at center (simpler)
- Make two identical circle bases (each about half the final width). For a 12″ width, make each circle ~6″ diameter.
- Align them side-by-side and join with sc or whipstitch along the touching edge, leaving the other perimeter free — this creates the top two lobes of the heart.
- Pick up stitches all around the joined outline and work upward in the round to create walls, adjusting stitch counts at the pointed bottom to shape the heart tip.
Method B — Heart chart base (neater)
- Work a heart-shaped crochet pattern by following a charted heart base (many heart base charts available; the idea is to increase asymmetrically to produce two lobes and a tapered bottom). Make sure base is smooth and flat.
Building walls
- Once the heart base complete, pick up stitches around edge evenly. Sc in rounds to build height. To maintain shape, add fewer increases at the tip and slightly more around lobes so walls sit vertical rather than bulging.
Rim & handles
- Create a firm top band (hdc in BLO for 2–3 rounds).
- For handles, crochet two sturdy bands and sew them to facing sides on the lobes, reinforce with leather or extra stitching.
Lining
- For a polished look, make a custom cloth lining in the same heart shape and sew it to the interior.
Variations
- Make small heart baskets for table favors or a large center-piece basket for blankets.
5. Crochet Mini Spring Flowers Easter Basket Pattern
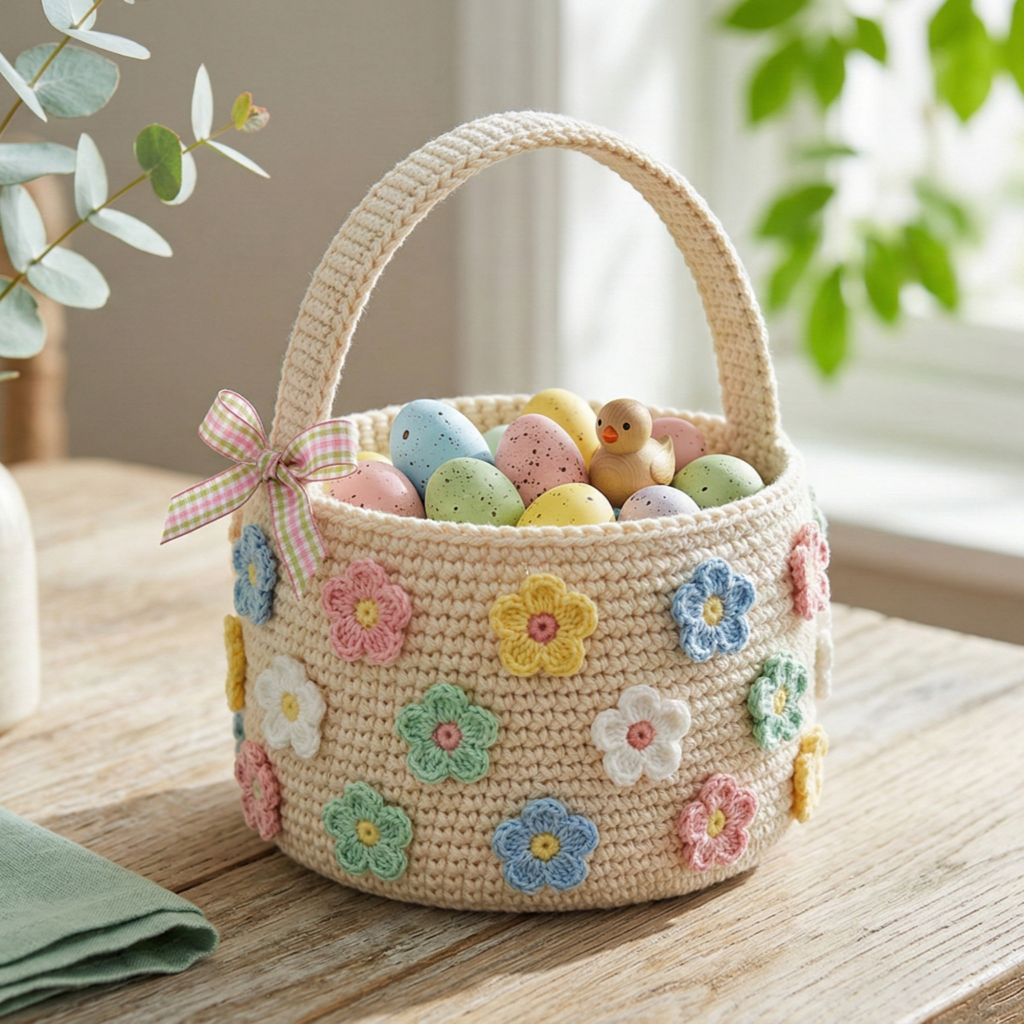
Tiny floral motifs build a fresh seasonal basket — perfect for Easter eggs or mantel decor. This basket emphasizes motif assembly and cheerful color.
Skill level: confident beginner → intermediate
Finished size (sample): diameter 8″, height 6″
Materials
- DK cotton in a few spring colors (pastel pink, yellow, green, white)
- Hook: 4.0–6.0 mm depending on yarn
- Tapestry needle, small ribbon for handle
Construction overview
Make a sturdy base circle, build walls of sc, and decorate exterior by sewing small 5-petal flower appliqués in rows. Add a simple crocheted handle or a ribbon-wrapped handle for a classic Easter look.
Steps
A — Base and walls
- Make circular base to 8″ diameter, then work sc in rounds for about 5–6″ height.
B — Flower appliqués (make 18–24)
- MR, ch1, 6 sc in MR, sl st to join.
- For each petal: ch4, sl st into next stitch around to form loops.
- On each loop: (sc, hdc, 3 dc, hdc, sc) to make the petal. Fasten off and leave tail for sewing.
C — Attach flowers
- Evenly space flower motifs around basket (count stitches and place markers). Sew each flower with matching thread, anchoring at the center.
D — Handle
- Crocheted handle: ch a length that spans across basket, sc back to make a 1–1.5″ wide band, fold and sew the ends to the basket sides. Reinforce with ribbon or leather tab.
E — Finishing
- Add a small bow or beeswax-wrapped button at base of handle. Weave all ends and lightly block.
Variations
- Cluster flowers densely on one side for a bouquet effect.
- Make matching egg cozies using the same flowers.
6. Crochet Granny Square Basket Pattern
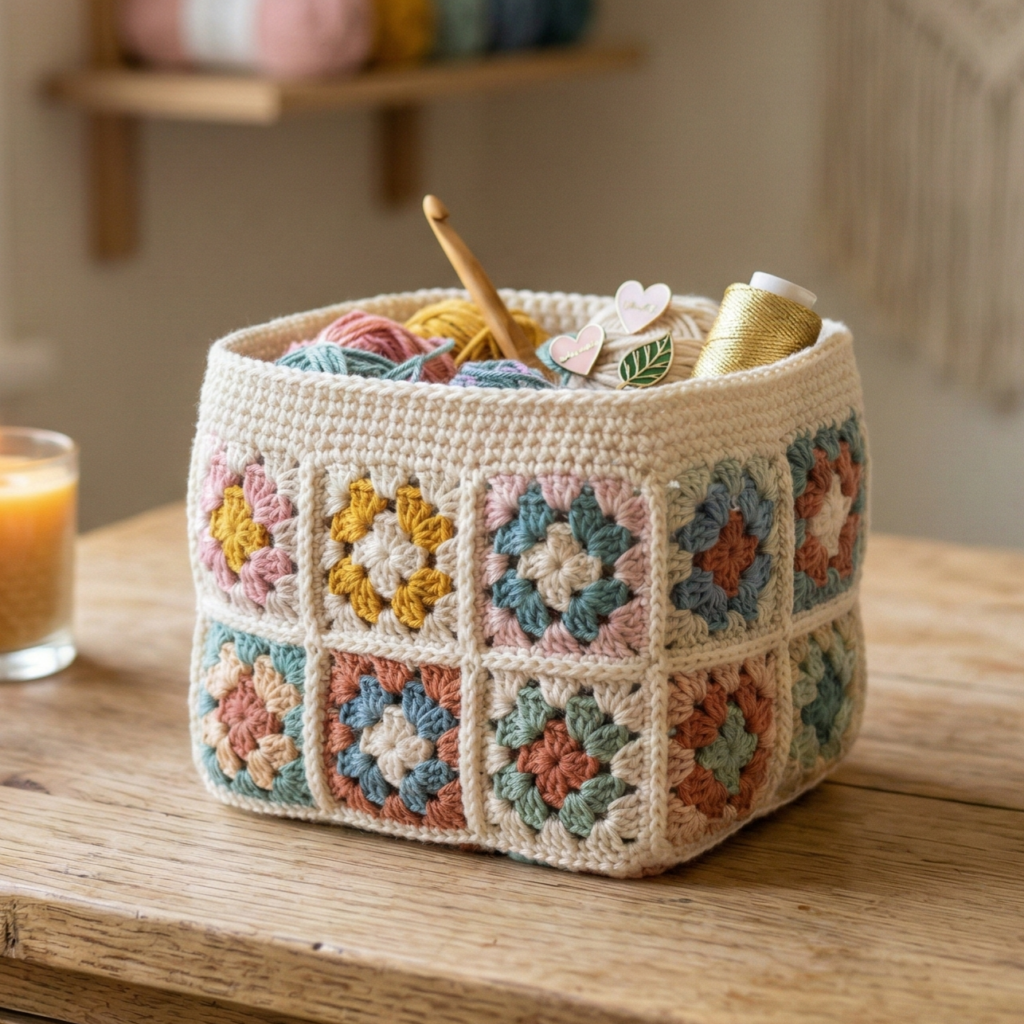
A versatile motif-based basket using granny squares (or hex granny squares) joined into a boxy or rounded basket. Great for scrap-busting and pretty for boho decor.
Skill level: confident beginner → intermediate (joining & finishing)
Finished size (sample): variable — e.g., 4 squares across → 12″ square basket approx.
Materials
- Assorted colors of DK/worsted cotton for squares, ~400–800 yd depending on size and number of squares
- Hook: 4.0–6.0 mm depending on yarn
- Sewing needle, optional interfacing for sides
Construction overview
Make multiple granny squares (all the same size), join them into two panels (front/back) and a base or into a wrap-around tube, then finish top edge and add handles. For stiffness, insert a sewn-in lining or interfacing.
Steps
A — Make granny squares
- Classic granny: MR, ch3, (3 dc, ch2) × 3 around for first round; join; Round 2: (3 dc in ch2 space, ch1) etc., until square reaches desired size (e.g., 4″–5″). Make enough squares to assemble your desired basket — for example, 3 × 3 grid for side height and width.
B — Joining
- Join squares as you go or whipstitch them together using a neat seam. Joining-as-you-go gives a cleaner look and fewer ends to weave.
C — Form base and walls
- Assemble into a tube: join squares into a rectangle that can be folded and seamed into a box. For a rounded basket, use granny hexagons or join-and-shape techniques.
D — Add bottom stability
- Insert a stiff base: cut a circle/square of plastic canvas or cardboard wrapped in fabric and place it in the bottom. Sew through lining to hold in place.
E — Top finishing & handles
- Add 2–3 rounds sc around the top edge to unify colors and provide a sturdy rim.
- Add handles: crocheted straps or leather strips stitched to sides. Reinforce with extra stitching.
Variations
- Make mismatched color granny squares for a cheerful boho basket.
- Add pom-pom trim around top for playfulness.
Finishing touches for every basket
- Weave in ends carefully — baskets are handled a lot. Double-weave tails for longevity.
- Blocking: for cotton baskets, you can wet-block to shape (pin to flat shapes or rim forms). Be careful with t-shirt yarn — stretch while damp to form desired shape.
- Lining: for fragile contents or if you want a polished interior, add a removable fabric liner. Sew it into shape using the basket interior as a template; attach with Velcro or small snaps for washing.
- Handles: for heavy loads, reinforce with leather strips or a sewn webbing inside the handle.
- Care: most cotton baskets are machine-washable on gentle, but if you used plastic canvas or glued bases, remove those parts first. Dry flat and reshape while damp.
Conclusion
Baskets are functional decor that let you flex creativity and craftsmanship. From the playful mushroom basket and ornamental puffy-heart piece to the workhorse spike-stitch organizer with removable dividers, these six patterns cover dozens of uses and stylistic directions for any room in your home.