


Wire jewelry brings an air of sophistication and artistry to any wardrobe. With just a spool of wire, a few basic tools, and your creativity, you can craft necklaces that range from delicate and subtle to bold statement pieces. In this post, you’ll find six wire necklace patterns—some incorporating beads and pearls, others built entirely from woven wire. Each tutorial includes a materials list, clear step‑by‑step instructions, and handy tips to ensure success. Ready to bend, wrap, and weave your way to beautiful handmade necklaces? Let’s begin!
1. Necklace Wire Wrap Pattern

Skill Level: Beginner
Materials:
- 20 gauge round craft wire (24–26 feet)
- Centerpiece charm or cabochon
- Chain‑nose pliers and round‑nose pliers
- Wire cutters
- 18″ chain and jump rings
Instructions:
- Cut Wire: Measure and cut two lengths of wire, each about 12 inches.
- Anchor the Cabochon: Hold your focal stone or charm between the two wires an inch from one end; fold wires in half over it.
- Basic Wrap: Using round‑nose pliers, wrap one wire tightly around both stems three times just below the cabochon; repeat on the other side.
- Create Bail: Bring the wire stems upward, cross them at top of stone, then coil each around itself to form mirror‑image loops—this becomes the pendant’s bail.
- Trim & Tuck Ends: Cut excess wire, press ends flat against the back so they don’t snag.
- Attach Chain: Open jump rings, connect bail to chain, and secure the clasp.
Tip: Keep your wraps snug but avoid kinking—smooth coils give a professional finish.
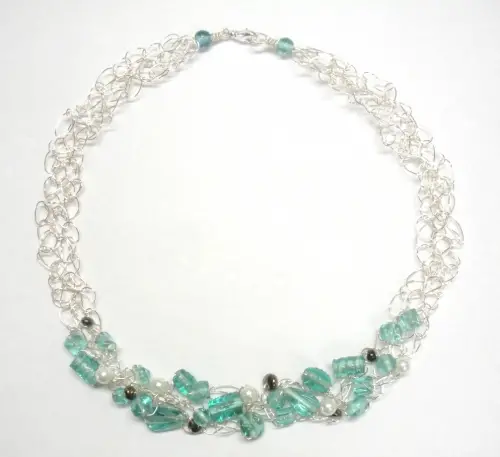
2. Wire Necklace with Freshwater Pearls Tutorial

Skill Level: Intermediate
Materials:
- 22 gauge silver‑plated or sterling wire
- 8–10 mm freshwater pearls (10–12 pieces)
- Crimp beads (matching finish)
- 18 – 20″ fine chain
- Crimping pliers, flat‑nose pliers, wire cutters
Instructions:
- Prepare Wire Length: Cut ~24 inches of wire. Slide on a crimp bead, then one half of your chain; loop wire back through the crimp bead and clamp firmly.
- String Pearls: Slide on one pearl, then one seed bead; repeat to your desired length (aim for 6–7 pearls).
- Securing Row: String a second crimp bead, pass wire back through that bead and the last seed bead, then flatten the crimp. Trim excess wire tail.
- Finish Other Side: Slide remaining chain half onto the free wire tail, loop, and crimp as before. Attach jump rings and clasp to chain ends.
- Optionally Add Dangles: Before finishing, slide a tiny pearl drop onto the waste wire, wrap a pin to create a dangling accent, and incorporate it among pearls.
Tip: Work slowly when tightening crimps to avoid crushing pearls; practice on scrap wire first.
3. Wire Crocheted Necklace Pattern
Skill Level: Advanced
Materials:
- 26 gauge artistic wire (18–20 feet)
- 2 mm steel crochet hook
- Small clasp and jump rings
- Flat‑nose pliers, cutter
Instructions:
- Start Chain: With wire on hook, make a slip‑knot and chain 50 (or desired length). Keep tension even for uniform stitches.
- Single Crochet Rows: Instead of yarn, use your wire chain as foundation—SC into each chain stitch to create a sturdy, flexible tube. Continue until you’ve built up a ½″‑wide band.
- Add Embellishment (Optional): To include beads, slide a 3 mm bead onto the wire before each SC, then crochet over it so beads sit on the necklace’s outer edge.
- Form Necklace Loop: Join ends of wire‑crochet tube by wrapping bare wire tails around the band several times and tucking ends neatly inside.
- Attach Clasp: Use jump rings to connect your clasp through the wrapped junctions.
Tip: Wire‑crochet takes practice—keep your hook motion smooth and tension consistent to avoid kinks.
4. Wire Crochet Necklace Tutorial

Skill Level: Intermediate
Materials:
- 24 gauge gold‑filled wire
- 3.0 mm steel crochet hook
- 2 mm Czech glass beads (optional, 40–50 beads)
- Lobster clasp and jump rings
Instructions:
- Foundation Chain with Beads (Optional): Thread beads onto wire. Chain 60 stitches, sliding a bead into place every 5 chains for a subtle sparkle.
- Second Round – Mesh: Join chain into a circle, chain 5 (counts as DC + chain‑2 space), DC in next chain, chain 2; repeat to form a mesh tube.
- Repeat Mesh: Continue for three rounds or until necklace width is about ½″.
- Edge Trim: Work a final round of SC around both edges to stabilize the tube.
- Finish: Wrap wire tails securely inside one mesh opening, then attach jump rings and clasp.
Tip: If beads are sliding too much, use a small dot of clear jewelry adhesive to lock them in position before crocheting over them.
5. DIY Wire Chain Necklace Pattern

Skill Level: Beginner
Materials:
- 18 gauge soft copper wire (3–4 feet)
- Round‑nose pliers, wire cutters
- Measuring tape
Instructions:
- Make Jump Rings: Cut wire into ¼‑inch lengths. Holding each piece in round‑nose pliers, wrap closely around the plier’s barrel to form a small ring; slide off and cut the spiral to free a jump ring. Make about 80 rings.
- Open & Link: Use flat‑nose pliers to gently twist open a ring, slip on a second ring, then close. Continue linking rings into a simple chain until the segment measures 18 – 20 inches.
- Finishing Clasp: Create two slightly larger rings from the same wire gauge, attach them as end loops, and slip on a clasp.
Tip: Use consistent ring size by marking your pliers where the wire end should meet; this ensures a uniform chain.
6. Crochet with Wire and Beads Necklace Tutorial

Skill Level: Advanced
Materials:
- 26 gauge silver plating wire
- 2 mm steel crochet hook
- 4 mm faceted crystal beads (30–40 pcs)
- Lobster clasp and jump rings
Instructions:
- Bead Prep: Pre‑string all crystal beads onto the wire, leaving a 12‑inch tail.
- Chain with Beads: Make a slip‑knot, then chain 1, slide on a bead, chain 1; repeat until all beads are strung—this forms a fine beaded chain.
- Crochet Stitching: Join chain ends into a circle, then work one round of mesh: chain 3, skip bead, SL ST in next bead wire segment; this creates an airy net around your crystals.
- Expand Net (Optional): For a wider net, add additional mesh rounds, spacing the slip‑stitches into the chain‑3 spaces.
- Finish & Clasp: Wrap remaining wire tails inside a mesh opening, secure by weaving around adjacent stitches, then add jump rings and clasp.
Tip: Keep your workspace well-lit—fine wire and small beads benefit from good visibility to avoid eye strain.
Conclusion
From effortless wire‑wrapped pendants to intricate wire‑crochet and mesh designs, these six necklace patterns prove that working with wire opens up a world of elegant, durable jewelry. Whether you’re a beginner keen to learn basic wraps and chains or an experienced maker ready to tackle wire‑crochet with beads, there’s a project here to spark your creativity. Gather your tools, pick your favorite pattern, and start crafting a one‑of‑a‑kind wire necklace today—your next cherished accessory awaits!


Hey there, You have done an excellent job. I will certainly digg it and personally recommend to my friends. I’m confident they will be benefited from this site.
telecharger melbet melbet apk
machines a sous 1win 1win apk
Нужен проектор? https://projector24.ru большой выбор моделей для дома, офиса и бизнеса. Проекторы для кино, презентаций и обучения, официальная гарантия, консультации специалистов, гарантия качества и удобные условия покупки.
химчистка покраска обуви химчистка обуви
Лучшее казино апх играйте в слоты и live-казино без лишних сложностей. Простой вход, удобный интерфейс, стабильная платформа и широкий выбор игр для отдыха и развлечения.
Лучшее казино up-x играйте в слоты и live-казино без лишних сложностей. Простой вход, удобный интерфейс, стабильная платформа и широкий выбор игр для отдыха и развлечения.
Лучше заходить на кракен маркет зеркало официальное чтобы избежать фишинга
дизайн спальни в доме дизайн ремонта коттеджа
дизайн туалета в квартире дизайн двухкомнатной квартиры 42 кв
скрытый полотенцесушитель полотенцесушители официальный сайт
Здарова народ!
Увидел любопытную инфу.
Может кому пригодится.
Вот ссылка:
tor blacksprut
Вроде норм.
медицинская косметология центр косметологии
Здарова народ!
Наткнулся на интересную инфу.
Думаю, многим будет полезно.
Смотрите тут:
блэкспрут
Мне зашло.
Доброго времени суток.
Нашел любопытную информацию.
Может кому пригодится.
Подробности здесь:
кракен даркнет
Мне зашло.
Здарова народ!
Нарыл интересную инфу.
Может кому пригодится.
Смотрите тут:
Mega onion
Пользуйтесь на здоровье.
globalconnectpro – Networking experience feels professional, platform is highly intuitive.
кв дизайн интерьеры сайт дизайн студий интерьера
Digital Buying Portal – Easy to use with a fresh feel, perfect for learning and generating ideas.
Velvet Vendor 2 Network – Discovered online, the layout is neat and content seems authentic.
Vendor Velvet Hub – Browsing feels effortless, products are visible, and content is genuinely helpful.
Venverra Network – Modern layout, selection is diverse, and scrolling feels easy and enjoyable.
Venvira Hub – Looked good immediately, site is easy to use and visually appealing.
Охраны труда для бизнеса охрана труда аудит системы безопасности, обучение персонала, разработка локальных актов и внедрение стандартов. Помогаем минимизировать риски и избежать штрафов.
Проблемы с зубами? стоматология профилактика, лечение, протезирование и эстетическая стоматология. Забота о здоровье зубов с применением передовых методик.
Professional сonstruction Moraira: architecture, engineering systems, and finishing. We work with local regulations and regional specifics in mind. We handle permitting and material procurement so you can enjoy the creative process without the stress of management.
Professional сonstruction Moraira: architecture, engineering systems, and finishing. We work with local regulations and regional specifics in mind. We handle permitting and material procurement so you can enjoy the creative process without the stress of management.
Охраны труда для бизнеса центр охраны труда аудит системы безопасности, обучение персонала, разработка локальных актов и внедрение стандартов. Помогаем минимизировать риски и избежать штрафов.
Нужен фулфилмент? фулфилмент для маркетплейсов — хранение, сборка заказов, возвраты и учет остатков. Работаем по стандартам площадок и соблюдаем сроки поставок.
Запчасти для сельхозтехники https://selkhozdom.ru и спецтехники МТЗ, МАЗ, Амкодор — оригинальные и аналоговые детали в наличии. Двигатели, трансмиссия, гидравлика, ходовая часть с быстрой доставкой и гарантией качества.
Оформления медицинских справок https://med-official2.info справки для трудоустройства, водительские, в бассейн и учебные заведения. Купить справку онлайн быстро
Медицинская справка https://086y-spr.info 086у в Москве по доступной цене — официальное оформление для поступления в вуз или колледж.
Медицинские справки https://norma-spravok2.info по доступной цене — официальное оформление. Быстрая запись, прозрачная стоимость и выдача документа установленного образца.
Оформление медицинских https://spr-goroda2.info справок в Москве недорого консультации специалистов и выдача официальных документов. Соблюдение стандартов и минимальные сроки получения.
Медицинские справки https://medit-norma1.info в Москве с прозрачной ценой — анализы и выдача официального документа без лишних ожиданий. Удобная запись, прозрачные цены и быстрое получение документа установленного образца.
Медицинская справка https://sp-dom1.ru с доставкой — официальное оформление. Удобная запись, прозрачные цены и получение документа курьером.
Получение медицинской https://gira-spravki2.ru справки с доставкой после официального оформления. Комфортная запись, минимальные сроки и законная выдача документа.
Справка 29н https://forma-029.ru в Москве с доставкой — без прохождение обязательного медосмотра в клинике. Отправка готового документа по указанному адресу.
Медицинские справки https://meduno.info и анализы в Москве — официально и удобно. Сеть из 10 клиник, оперативный прием специалистов и оформление документов по действующим стандартам.
click to browse – Everything feels sleek and browsing is effortless.
secure checkout link – The whole experience today was easygoing and efficient from cart to confirmation.
Орби казино orby-casino.com онлайн-платформа с широким выбором слотов, настольных игр и бонусных предложений. Узнайте об акциях, турнирах и возможностях для комфортного игрового досуга.
Купить квартиру недорого https://spb-novostroyki-gid.ru актуальные предложения на первичном и вторичном рынке. Подбор вариантов по бюджету, помощь в ипотеке и полное юридическое сопровождение сделки.
Онлайн казино Орби orby-casino большой выбор слотов, бонусы для новых и постоянных игроков, регулярные турниры с призами.
exclusive snack portal – Clear, useful descriptions and appealing products make shopping easy.
secure shopping page – I discovered the item I needed almost immediately tonight.
tagandtrade.shop – Discovered some exclusive deals that are hard to find elsewhere.
official buying hub – Everything feels logically placed and simple to access.
explore deals – Finding coupons is seamless and efficient.
routerreef.shop – Really impressed with the variety of products and how quickly pages load.
explore the collection – A tempting assortment paired with simple and organized navigation.
explore the shop – My question was answered quickly and the fix was simple.
official buying hub – Security is solid and the checkout process was smooth and quick.
Чудові бонусы казино — депозитні бонуси, бездепозитні бонуси та Турнір з призами. Обзори пропозицій і правила участі.
Найпопулярніша платформа казіно онлайн – популярні слоти, бонуси та турніри з призами. Огляди гри та правила участі в акціях.
Грайте в найкращі слоти — популярні ігрові автомати, джекпоти та спеціальні пропозиції. Огляди гри та можливості для комфортного харчування.
shopping destination – The rates feel reasonable and competitive in the current market.
Vivid Vantage – I love the bright layout and seamless browsing experience.
Найкращі ігри казино – безліч ігрових автоматів, правил, бонусів покерів і. Огляди, новинки спеціальні
Квартиры в новостройках https://domik-vspb.ru от застройщика — студии, однокомнатные и семейные варианты. Сопровождение сделки и прозрачные условия покупки.
official buying portal – The process was clear, fast, and secure from start to finish.
visit this store – The site’s tips and updates guided me through my purchase smoothly.
Un’accogliente pasticceria https://www.pasticceriabonati.it con fragranti prodotti da forno, classici dolci italiani e torte natalizie personalizzate. Ingredienti naturali e attenzione a ogni dettaglio.
direct access portal – Overall, the site feels lively and the browsing experience is pleasant.
check it out – The content is straightforward and the images add great value to the overview.
computecrescent.shop – The tech products are impressive and the site runs very smoothly.
browse products here – From checkout to delivery, everything was smooth and well-communicated.
official online store – The clean visuals and structure inspire confidence while shopping.
boutique home styling – Such tasteful pieces, I’m looking forward to another visit.
discover great finds – Found some fantastic pieces and the checkout flow worked perfectly.
reliable camping store – I got my essentials without delay and they were well-packaged.
luxury chocolate collection – The presentation style makes the whole shop feel premium.
seasonal scarf shop – Comfortable scarves with chic designs perfect for daily wear.
equine gear collection – I easily sourced what I needed, and the overall pricing looks reasonable.
Металлический кованый факел под старину с доставкой — прочная конструкция, эстетичный внешний вид и устойчивость к погодным условиям.
best deals marketplace – Quick ordering system and easy-to-follow checkout steps.
electric kettle hub – I found exactly what I wanted and it arrived much sooner than expected.
cookware boutique – Found creative tools that made meal prep faster and more fun.
visit Maker Marmot – There are truly distinctive products here you won’t easily find elsewhere.
Sandal Supply – The sandals look great and the support team was very responsive when I had questions.
Monitor Mesa – Wide selection of monitors with clear and detailed specifications for each model.
this cookware store – A solid range of items with explanations that really guide you.
Хочешь восстановить мрамор? https://conceptstone.ru устранение трещин, пятен и потертостей. Современные технологии шлифовки и кристаллизации для идеального результата.
tech tools outlet – I appreciated the variety of items and how well each product was described.
brand design marketplace – Each design is thoughtfully made with a sleek, modern edge.
eco-conscious marketplace – The natural theme and clear layout make shopping enjoyable.
Hello pals!
I came across a 158 useful resource that I think you should take a look at.
This resource is packed with a lot of useful information that you might find insightful.
It has everything you could possibly need, so be sure to give it a visit!
https://www.tmcnet.com/topics/articles/2023/07/07/456396-best-tech-webinars-2023.htm
Furthermore remember not to neglect, folks, which a person at all times are able to within this publication locate answers to the the absolute tangled questions. We tried to lay out the complete information using an extremely understandable manner.
finance knowledge vault – The step-by-step suggestions have already made a positive impact on my savings goals.
bloom & blossom shop – The floral assortment is delightful and ordering was easy and safe.
browse grooming favorites – My package arrived in great shape and matched the photos.
artisan wood collection – Such a tasteful look, and the durability is evident right away.
interior style outlet – Creative and modern designs that make my space feel inviting.
quality woodcraft market – The fresh layout pairs perfectly with the high-grade offerings.
premium tableware hub – Quick arrival and thoughtful packaging ensured no mishaps.
efficient DIY shop – Handy equipment makes projects much smoother and faster.
trusted outdoor retailer – I rely on this store for sturdy items suited for any terrain.
home luxury shop – Honestly speaking, the items are sturdy, well-made, and beyond what I imagined.
Carbon credits https://offset8capital.com and natural capital – climate projects, ESG analytics and transparent emission compensation mechanisms with long-term impact.
creative blossom shop – The floral variety is amazing and completing my order was fast and easy.
Plant Parlor – My plants arrived in perfect condition and are already thriving.
Свежие новости SEO https://seovestnik.ru и IT-индустрии — алгоритмы, ранжирование, веб-разработка, кибербезопасность и цифровые инструменты для бизнеса.
Бетонный бассейн под ключ https://atlapool.ru
the premium coffee outlet – I found everything I needed for brewing without overspending.
the corner shop online – A nicely curated catalog and a smooth transaction from start to finish.
this income growth store – Useful advice and tools for developing successful online revenue.
coffeecairn – Fresh coffee beans with rich aroma made my morning brew perfect.
clovercove shop – Lovely accents arrived quickly and enhanced my living space effortlessly.
amberworks – Arrived carefully packaged and every detail felt premium.
fitgearhub – Home workout equipment is durable and makes exercising easy and efficient.
this electronics corner – Browsing gadgets feels effortless and the selection is excellent.
connectcove – Cables arrived promptly and are high quality, working without any issues.
the online business corner – Resources here helped me improve my online revenue significantly.
Полная статья здесь: https://parfum-trade.ru/about_us/
cocoacove goods – Smooth, high-quality cocoa items that enhanced my beverages beautifully.
the painting hub shop – Found brushes and paints that fit all my project needs perfectly.
this premium clothing hub – Delivery was smooth and the quality exceeded my expectations.
screenprintstudio – Orders were delivered safely and prints looked fantastic with vivid colors.
chirpcollection – Adorable, nature-inspired pieces that brighten my rooms.
this elegant accessory shop – Pieces are highlighted nicely and descriptions are very clear.
RevenueRoost treasures – Tips and tools that simplify boosting online income streams.
sprucestudiohub – Tools came well packaged and immediately elevated my creative workflow.
rankaccelerator – Helped my pages reach higher positions quickly.
propantryprints – Supplies arrived on schedule and helped streamline my printing work.
espressoemporium gear – Coffee comes out smooth, flavorful, and perfectly balanced each time.
nestprotools – Helped manage multiple marketplace listings quickly and accurately.
my favorite digital earnings site – Insights and resources that truly help increase online profits.
Pattern Pulse Hub Store – Creative designs that matched my latest crafting ideas flawlessly.
Brew Brothers collection – I love how many options they carry at competitive rates.
exportmarketplace – Products shipped fast and arrived in perfect condition with clear labeling.
canvascorner pro – Smooth surfaces and quality materials make painting effortless.
mirrorsafeguard – Security tools were reliable and strengthened my system efficiently.
Revenue Roost selections – Products and strategies that helped me expand my online income.
quickcart – Fast shipping and quality items made this a pleasant shopping experience.
the luxury blanket shop – Plush blankets that wrap me in warmth during cold nights.
KnifeAndKnoll favorites – Each item feels robust and thoughtfully constructed.
Нужны казино бонусы? новые промокоды казино — бонусы за регистрацию и пополнение счета. Обзоры предложений и подробные правила использования кодов.
Онлайн покер сайт покерок — турниры с крупными гарантиями, кеш-игры и специальные предложения для игроков. Обзоры форматов и условий участия.
sketchnotehub – The perfect blend of sketching and writing for creative thinkers.
animalhealthshop – Products arrived safely and kept my pets healthy and happy.
Revenue Roost Hub – Helpful tips and tools to expand your digital income.
ivorystylehub – Elegant décor items came on time and brought sophistication to my living spaces.
the specialty finds hub – It’s packed with selections you rarely notice on other websites.
kitchenherbs – Products arrived safely and were fresh and fragrant.
this innovation marketplace – A reliable source of supplies and tips for creators.
CypressCart online – Easy browsing with super fast shipping made my experience great.
RevenueRoost treasures – Tips and tools that simplify boosting online income streams.
freightfable hub – Fast-arriving shipping boxes and materials helped streamline my work.
atelieralmond – Snacks were delivered safely and looked and tasted fantastic.
hazelnuthub – Nuts were delivered on time, crisp and tasty, making my recipes even better.
the Speed Springs collection – Products arrived on time and were high quality, very pleased.
gentlehome – Safe products that are convenient and allergy-conscious.
the pattern design marketplace – Perfectly matching patterns that enhanced my project.
Revenue Roost Hub – Helpful tips and tools to expand your digital income.
CinnamonCity picks – Fragrant sticks that added depth and aroma to my baked goods.
the Adventure Aisle marketplace – Browsing around always gets me excited about traveling somewhere new.
harborwellness – Essential health items were delivered promptly and made managing routines easier.
airpurearc devices – Quiet and effective purifiers make the room feel noticeably cleaner.
trendsetting boot boutique – It’s easy to appreciate the originality on display here.
SilverSpire selections – Elegant and stylish pieces combined with friendly service impressed me.
this online income shop – Valuable products that make growing online revenue much easier.
bloomingbargain – Good value and quality items that arrived quickly.
stickernook – Stickers shipped quickly and were perfect for adding personality to notebooks and planners.
the premium style store – Chic accessories that feel robust and long-lasting.
adaptermart – Quick delivery and tech gadgets work flawlessly right away.
exploremore – Essentials that make your travels smooth and carefree.
my favorite craft store – Handmade creations that feel special and enhance my home décor.
my favorite handmade boutique – Every item feels personal, special, and crafted with attention.
sole and style corner – Every product demonstrates careful curation and inspiring design.
this digital growth hub – Great strategies and products for expanding web-based earnings.
генерация генерация .
нейросеть генерации текстов для студентов нейросеть генерации текстов для студентов .
the imported goods corner – Ordering from abroad is now simple and worry-free.
clustercanyon store – The assortment is intriguing and I’ll definitely return to check out more.
нейросеть для учебы nejroset-dlya-ucheby-7.ru .
нейросеть пишет реферат нейросеть пишет реферат .
нейросеть для школьников и студентов nejroset-dlya-ucheby-5.ru .
mensfashionmint – Trendy men’s accessories arrived promptly and exactly as advertised.
ии реферат ии реферат .
this casual shopping hub – I love how relaxed and straightforward the whole experience feels.
согласование перепланировки под ключ согласование перепланировки под ключ .
Все о фундаменте https://rus-fundament.ru виды оснований, расчет нагрузки, выбор материалов и этапы строительства. Практичные советы по заливке ленточного, плитного и свайного фундамента.
Портал о жизни в ЖК https://pioneer-volgograd.ru инфраструктура, паркинг, детские площадки, охрана и сервисы. Информация для будущих и действующих жителей.
нейросеть для школьников и студентов нейросеть для школьников и студентов .
protein porch picks – Supplements and health products are well organized and easy to find.
aquahaven – Items were delivered on time and made organizing the tank a breeze.
tidyhub – Storage products are practical, sturdy, and keep my home neatly organized.
mediamosaic studio – Creative software and tools arrived ready to make project planning easier.
my favorite cozy corner – Home decor items that brought warmth and comfort immediately.
this organized workflow store – Great tech tools that help me stay on top of everything.
glove selection corner – Each piece is practical without sacrificing modern style.
vanilla charm boutique – Every product feels carefully chosen and pleasantly priced.
Зарубежная недвижимость https://realtyz.ru актуальные предложения в Европе, Азии и на побережье. Информация о ценах, налогах, ВНЖ и инвестиционных возможностях.
Все о ремонте квартир https://belstroyteh.ru и отделке помещений — практические инструкции, обзоры материалов и современные решения для интерьера.
pineandhome – Elegant pieces that arrived on time and add a cozy feel.
the luxury leather hub – Leather items are stylish, high-quality, and carefully packed.
нейросеть для учебы нейросеть для учебы .
phoenix music shop – Wide variety of merch and intuitive browsing experience.
hydratecentral – Water gear arrived promptly and has been very convenient daily.
нейросеть текст для учебы nejroset-dlya-ucheby-7.ru .
charcoalcharm grill fuel – The charcoal arrived quickly and improved my grilling results instantly.
нейросеть для учебы онлайн нейросеть для учебы онлайн .
нейросеть для учебы nejroset-dlya-ucheby-6.ru .
this air fryer hub – It always gives me practical ways to prepare quick meals.
dreamhomehub – Accessories arrived quickly and are well crafted, making my home feel special.
нейросеть реферат онлайн nejroset-dlya-ucheby-5.ru .
генерация генерация .
согласование перепланировки в москве согласование перепланировки в москве .
kids treasure shop – Browsing here is enjoyable with plenty of distinctive children’s products.
SafeSaffron selections – Aromatic spices that match the description perfectly.
the travel parlor – Every accessory feels premium and makes packing effortless.
нейросеть для рефератов нейросеть для рефератов .
mealprepmeridian corner – Pre-portioned kits and simple recipes streamline mealtime prep.
creativekit – Arrived on schedule and made crafting effortless and fun.
creative horizon finds – It’s wonderful to see such fine craftsmanship across the collection.
Всё про строительство https://hotimsvoydom.ru и ремонт — проекты домов, фундаменты, кровля, инженерные системы и отделка. Практичные советы, инструкции и современные технологии.
нейросеть для студентов онлайн нейросеть для студентов онлайн .
сделать реферат сделать реферат .
eclipse gadget corner – The shop feels organized and the selection is wide-ranging.
bbqmastershop – Grilling accessories came on time and made barbecuing fun and effortless.
this wellness supply store – High-quality products that support health and overall wellbeing.
SoleSaga Shoes – Their standout shoe designs quickly caught my eye.
нейросеть реферат онлайн нейросеть реферат онлайн .
ии реферат ии реферат .
smart sundial essentials – Time management gadgets are functional, stylish, and reliable.
ии для студентов ии для студентов .
Hosting Hollow favorites – The process is simple enough that even a novice can complete it quickly.
перепланировка москва pereplanirovka-kvartir9.ru .
нейросеть реферат онлайн nejroset-dlya-ucheby-5.ru .
Barbell Bayou Essentials – Strong workout products and costs that make sense this year.
ElmExchange Zone – Smooth design and neatly curated product range improve the user experience.
watercolor artist market – Access to quality supplies makes creating detailed projects simpler.
latte essentials hub – Comfortable vibes and a curated assortment make shopping a pleasure.
Wrap Wonderland Designs – Fun and lively gift wraps make the presentation as exciting as the gift itself.
Найкращі бонусы казино — депозитні акції, бездепозитні пропозиції та турніри із призами. Огляди та порівняння умов участі.
Wool Warehouse Marketplace – Plenty of yarn options and step-by-step knitting resources available.
Грати в найкраще кращі онлайн казино — широкий вибір автоматів та настільних ігор, вітальні бонуси та спеціальні пропозиції. Дізнайтеся про умови участі та актуальні акції.
ии реферат ии реферат .
my favorite gadget shop – Devices were simple to set up and worked exactly as expected.
реферат через нейросеть реферат через нейросеть .
pantryessentials – Pantry staples arrived on time and well packed, helping me stay efficient in the kitchen.
нейросеть текст для учебы nejroset-dlya-ucheby-7.ru .
Inspired by Art & Aisle – Innovative accents and décor themes make rooms feel alive.
DIYDepot Online – Tools and supplies here make weekend DIY tasks approachable for all skill levels.
DeviceDockyard Finds – Well-described tech accessories with helpful product details.
steelsonnet collection – Quality product visuals and well-written descriptions make browsing a pleasure.
harbor-side discount shop – Everything loaded fast and placing an order was incredibly easy.
нейросеть пишет реферат нейросеть пишет реферат .
перепланировка квартиры в москве pereplanirovka-kvartir9.ru .
Roti Roost Bakehouse – Well-explained recipes and breads make trying new bakes easy.
digital device outlet – Easy-to-read specifications and good deals made my selection faster.
my favorite art shop – The selection of pigments and supplies really impressed me today.
BeanieBazaar selections – Soft, warm hats with stylish colors for seasonal fashion.
нейросеть студент бот нейросеть студент бот .
реферат нейросеть реферат нейросеть .
Bungalow Combo Deals – Practical bundles keep everything you need in one place.
Visit SneakerStudio – Latest sneaker drops look great and the shopping experience is smooth.
Top Macro Mountain – Excellent assortment of inspiring arts and crafts items for new endeavors.
чат нейросеть для учебы nejroset-dlya-ucheby-7.ru .
Velvet Verge Lifestyle – Modern pieces offered at competitive prices across the collection.
rice ridge boutique – Navigation is simple, making it easy to browse the full selection.
реферат через нейросеть реферат через нейросеть .
Identity Isle Designs – Each custom item feels carefully crafted and original for every customer.
batteryborough – Ordered batteries and chargers came quickly and work perfectly.
warm and lovely picks – The range truly captures a soft and welcoming style.
нейросеть для рефератов нейросеть для рефератов .
перепланировка квартир перепланировка квартир .
Creative Mug Corner – Fun and artistic drinkware makes gifting effortless.
Sender Sanctuary Official Shop – Support answered immediately and provided a smooth solution.
нейросеть реферат нейросеть реферат .
Tea Time Trader Zone – Well-explained teas and reasonable pricing make it a great stop for tea enthusiasts.
StitchStarlight Picks – Eye-catching fabrics showcased clearly with excellent product images.
shore shakers hub – A fresh, cohesive style that makes the shop feel very professional.
this aromatic pantry store – Delivery was prompt and everything smelled wonderfully fresh.
Tech Pack Terra Gear – Practical gadgets and organizers are easy to browse and very functional.
this secure data hub – Tools are effective, convenient, and easy to use every day.
генерация генерация .
content creator corner – A go-to source for creative ideas and useful publishing insights.
Pearl Parade Gems – Detailed photos and clear descriptions made shopping a breeze.
Socks with Attitude – Playful artwork and cushy comfort make them hard to resist.
dawnanddapper corner – I love the modern aesthetic and effortless browsing interface.
Shop Berry Bazaar – Diverse products and the site loads effortlessly on mobile.
SnippetStudio Resources – Creative ideas and assets provided help jumpstart new projects.
перепланировка квартир перепланировка квартир .
нейросеть пишет реферат нейросеть пишет реферат .
нейросеть для школьников и студентов нейросеть для школьников и студентов .
Lamp Lattice Online – Product presentation is clean and helps make choosing lighting hassle-free.
Грати в ігри слоти – великий каталог автоматів, бонуси за реєстрацію та регулярні турніри. Інформація про умови та можливості для гравців.
Онлайн ігри онлайн казино – великий вибір автоматів, рулетки та покеру з бонусами та акціями. Огляди, новинки та спеціальні пропозиції.
проект перепланировки квартиры москва проект перепланировки квартиры москва .
согласование перепланировки цена согласование перепланировки цена .
нейросеть онлайн для учебы nejroset-dlya-ucheby-5.ru .
внедрение 1с решений 1s-vnedrenie.ru .
чат нейросеть для учебы nejroset-dlya-ucheby-6.ru .
ии для учебы студентов ии для учебы студентов .
Urban Unison Online – Curated selection with a modern presentation that’s easy to explore.
fitness gear hub – Offers a strong selection of equipment and accessories for all routines.
trendy chai styles – I’m really drawn to the fashionable energy in this collection.
Creative Mug Corner – Fun and artistic drinkware makes gifting effortless.
RemoteRanch Marketplace – Well-laid-out niche finds make exploration enjoyable.
Thread Thrive Hub – Impressive textile quality and vivid colors enhance every project.
Stretch Studio Zone – Easy-to-use website with a wide variety of exercise equipment and clothing.
lace lovers paradise – The parcel came earlier than expected and looked fantastic.
стоимость перепланировки квартиры стоимость перепланировки квартиры .
мелбет линия мелбет линия .
заказать проект перепланировки заказать проект перепланировки .
скачать бк мелбет скачать бк мелбет .
внедрение 1с на предприятии внедрение 1с на предприятии .
нейросеть для студентов онлайн нейросеть для студентов онлайн .
Shop Charger Charm – Everyday charging essentials featured on a well-structured site.
CreativeCrate Selects – Unique products and thoughtful gift ideas make the store enjoyable.
умная нейросеть для учебы nejroset-dlya-ucheby-5.ru .
Sticker Stadium Picks – Fun and quirky stickers arrive quickly and stick well.
сайт для рефератов сайт для рефератов .
CollarCorner Essentials – Everyday pet accessories look functional and durable.
golden spice market – The collection feels genuine, and each product has informative descriptions.
нейросеть генерации текстов для студентов нейросеть генерации текстов для студентов .
Spruce & Style Hub – The simple aesthetic allows for effortless product discovery.
сколько стоит оформить перепланировку квартиры skolko-stoit-uzakonit-pereplanirovku-8.ru .
VPNVeranda Solutions – Service details are structured in an easy-to-follow layout.
All About SnowySteps – Cozy winter collection offered at fair prices and easy to browse.
мелбет букмекерская контора официальный сайт скачать мелбет букмекерская контора официальный сайт скачать .
melbet com официальный сайт melbet com официальный сайт .
проект перепланировки и переустройства квартиры проект перепланировки и переустройства квартиры .
FitFuel Fjord Essentials – Protein snacks and supplement options are easy to browse and purchase.
Visit ProteinPort – Fitness enthusiasts will find the range of supplements both clear and dependable.
внедрение 1с услуги 1s-vnedrenie.ru .
Pavilion PC gear – Managed to complete my build efficiently thanks to the wide selection.
нейросеть реферат онлайн нейросеть реферат онлайн .
pearl gallery shop – Jewelry designs are elegant, and the photos make it easy to see details.
BerryBazaar Marketplace – Wide range of items and quick, mobile-friendly performance.
Domain Dahlia Finds – Eye-catching flowers and decorative accents perfect for any home.
The Mug Boutique – Stylish mugs here make gift-giving simple and fun.
нейросеть для учебы онлайн нейросеть для учебы онлайн .
online publishing center – I found valuable tools here and the pages are easy to navigate.
All About ZipperZone – Zippers come in different styles and sizes perfect for creative projects.
Trusted CyberShield – Cyber protection items are laid out clearly and appear credible.
согласование перепланировки стоимость согласование перепланировки стоимость .
melbet app download update version https://melbetmobi.ru .
online coral shop – Lots of options to explore and the checkout process feels easy.
проектная организация для перепланировки квартиры proekt-pereplanirovki-kvartiry22.ru .
мелбет рабочее зеркало сайта http://www.melbet-ru.it.com/ .
внедрение 1c внедрение 1c .
pearlpocket hub – Stunning jewelry designs with high-quality images that show every detail.
All About EmberAndOnyx – Well-laid-out items with stylish presentation and helpful details.
Shop CarryOn Corner – Useful travel products curated nicely with fast shipping service.
seamsecret – Sewing essentials are organized well and easy to find.
Spatula Station Finds Online – Well-priced and functional tools simplify everyday cooking.
скачать мелбет на айфон зеркало скачать мелбет на айфон зеркало .
узаконивание перепланировки квартиры стоимость skolko-stoit-uzakonit-pereplanirovku-8.ru .
скачать мелбет ставки на спорт скачать мелбет ставки на спорт .
raven reports online – Well-structured, informative content with trustworthy analysis.
trust temple marketplace online – Layout is simple and moving through pages is easy, enjoyed the visit.
мелбет зеркало официальный melbet-ru.it.com .
проект на перепланировку квартиры заказать proekt-pereplanirovki-kvartiry22.ru .
внедрение системы 1с внедрение системы 1с .
Pepper Parlor Collection – The aesthetic is enjoyable and navigation is straightforward.
tidalthimble boutique – Clean interface and navigating the catalog is easy.
мел бет скачать http://mobilemelbet.ru/ .
vaultvoyage online – Smooth browsing experience with a visually appealing layout.
analytics hub online – Navigation is effortless and the layout is clear for exploring tools.
скачать мел бет букмекерская скачать мел бет букмекерская .
согласование перепланировки квартиры цена согласование перепланировки квартиры цена .
shop Setup Summit – I love the clean interface and how easy it is to browse items.
проект перепланировки квартиры проект перепланировки квартиры .
рабочее зеркало melbet рабочее зеркало melbet .
explore catalogcorner collection – The interface is polished, and finding items is straightforward.
global taste marketplace – The variety feels authentic and gives confidence in its quality.
linen lantern essentials – The range looks curated with intention and displayed attractively.
внедрение 1с 8 3 внедрение 1с 8 3 .
скачать мелбет на андроид бесплатно скачать мелбет на андроид бесплатно .
check out warehousewhim – Navigation is smooth, and the browsing experience is very pleasant.
phonefixshop treasures – Services explained well and arranging appointments was effortless.
Онлайн покер Покер онлайн покерок — регулярные турниры, кеш-игры и специальные предложения для игроков. Обзоры возможностей платформы и условий участия.
discover mapandmarker – Navigation feels natural, and the overall shopping experience is pleasant.
official bandwidth barn site – The content is practical and presented in a simple, understandable way.
shop Iron Ivy – The layout is clean, and the ordering process feels effortless.
melbet скачать приложение melbet скачать приложение .
Winter Walk Hub – Clean design and product details are easy to access and understand.
Winter Walk Marketplace – Excellent assortment and navigation feels seamless.
wander warehouse boutique – Great assortment overall with a well-ordered presentation.
fiberforge – Really like the clean layout and smooth browsing experience overall.
мелбет ставки на спорт мелбет ставки на спорт .
VanillaView Finds Online – Stylish layout and easy browsing ensure a pleasant shopping journey.
visit warehousewhim – Products are clearly displayed, and exploring items feels natural.
sugarsummit delights – Tasty treats and confections that look irresistible.
wellness movement hub – The presentation feels bright and full of momentum.
Игровой автомат https://chickenroadgames.top — современный слот с интересной концепцией и бонусами. Подробности о механике и особенностях геймплея.
Cleair Cove Store – Layout is organized, and shopping feels simple and enjoyable.
my favorite Warehouse Whim – The website feels intuitive, and exploring items is effortless.
vpsvista corner store – Clear hosting information and competitive plans make choices simpler.
мелбет скачать на андроид мелбет скачать на андроид .
Olive Orchard Store – Everything is neatly arranged and the overall experience is very pleasant.
Parcel Paradise Store – Flexible delivery options and a fast, simple checkout made ordering easy.
explore Winter Walk Essentials – Attractive assortment and everything loads cleanly without problems.
Winter Walk Online – Items are clearly organized and browsing feels fast and simple.
Marker Market Picks – Smooth interface and shopping for items is straightforward.
brightbanyan – Really clean design and pages load quickly on mobile.
Willow Workroom Hub – Clear product descriptions and organized layout enhance the shopping process.
mariners corner store – Fresh produce combined with local specialties makes browsing enjoyable.
Citrus Canopy favorites – Layout is tidy, and browsing through the items is simple and enjoyable.
click for metricmeadow – Layout is tidy and finding items is simple and fast.
discover warehousewhim – Navigation is effortless, and products are well organized for browsing.
скачать мелбет на андроид последняя версия скачать мелбет на андроид последняя версия .
cardiocart – Excellent range of products and browsing the site is very simple.
check out winterwalkshop – Strong lineup of items and pages load quickly every time.
Sweater Station Essentials – Smooth browsing and organized layout makes shopping simple.
Winter Walk Gear – Navigation is smooth and product information is clear and helpful.
copper crown shop – Memorable products and a hassle-free checkout flow.
Hush Harvest Hub – Prompt delivery with well-protected, fresh products.
best mocha finds – Nice variety of products and the payment process was smooth.
premium pen pavilion – Artistic selections and well-presented items make the site engaging.
aurora insights shop – Helpful resources and tutorials simplify the learning process.
check out stablesupply – Website looks polished and navigating products is simple.
vpsvista hub – Plan options are clearly laid out and performance specs look solid.
explore Warehouse Whim – Items are easy to find, and the site feels clean and well structured.
discover labellilac – Variety is appealing, and product details make navigating the site easy.
discover Winter Walk Gear – Diverse products and everything functions smoothly.
sweet bake shop – Everything looks inviting, and the shopping process is easy.
check out trimtulip – Minimal design and exploring items is intuitive and fast.
скачать мелбет казино на айфон скачать мелбет казино на айфон .
Winter Walk Online Store – Navigation is simple and product info is clear for easy shopping.
quartz quiver hub online – Neat arrangement and descriptions that provide solid context.
premium ssdsanctuary – Everything is neatly displayed and navigation is fast and simple.
bayou muscle store – Helpful layouts and clear product info make choosing items straightforward.
скачать мел бет скачать мел бет .
online sample suite – Everything is neatly arranged and finding what I need is effortless.
handpicked Warehouse Whim – Browsing items is seamless, and the selection is excellent.
Discover a https://mineslot.club with an original theme and bonus features. Learn about the mechanics and gameplay features.
exclusive shoe shop – Stylish footwear is showcased and the rates feel reasonable.
shop Ruby Rail – The layout is neat, and exploring items feels natural and easy.
explore winterwalkshop – Wide selection and moving between pages is effortless.
Package Pioneer Hub – Clean layout and browsing products feels smooth and effortless.
Ergo Ember hub – The site feels polished, and browsing through the items is straightforward.
premium wordwarehouse – Everything is organized well and exploring pages is straightforward.
Winter Walk Finds Online – Smooth interface and shopping is effortless with clear product info.
anchor and aisle marketplace online – Navigation is clear and spending time on the site feels rewarding.
chairchampion treasures – Well-designed office seating that supports posture and productivity.
peach parlor corner – Lovely aesthetic and simple navigation make finding products easy.
промокоды на мелбет промокоды на мелбет .
discover warehousewhim – Navigation is effortless, and products are well organized for browsing.
premium fabric falcon – The selection looks appealing and descriptions provide helpful guidance.
slot oyunu minecraft slotu piksel grafikler, bonus ogeler ve ilgi cekici mekanikler. Oyunun kurallar? ve ozellikleri hakk?nda bilgi edinin.
Winter Walk Shop – Great range of items and pages open quickly without delays.
browse cablecorner items – The website is clean, and exploring products is effortless.
surfacespark – Clean interface and browsing through items feels intuitive very easy.
click for restrelay – Product pages are tidy, and browsing is easy and enjoyable.
see the Pine Path collection – Navigation is intuitive, and products are displayed nicely.
Winter Walk Online Store – Navigation is simple and product info is clear for easy shopping.
profit pavilion digital shop – The information provided is straightforward and well organized.
nocturnal finds hub – The style is eye-catching and the site looks professionally crafted.
click to explore Warehouse Whim – Selection is wide, and navigation feels smooth and simple.
roast and route shop corner – Sleek visuals and the mobile browsing experience is intuitive.
explore caffeinecorner collection – Items are clearly displayed and browsing feels natural.
Winter Walk Picks – Nice collection and browsing remains fast and stable.
Backpack Boutique Deals – Nice mix of items and navigation is fast and simple.
Winter Walk Hub – Clean design and product details are easy to access and understand.
explore tools at Search Smith – Everything is easy to navigate, and the content is helpful.
minimal treasures store – Items are displayed clearly and the simple style enhances browsing.
Stitch and Sell Store – Products are clearly listed, and the checkout experience is smooth.
Warehouse Whim picks – Everything is organized neatly, making browsing fast and enjoyable.
handpicked Jacket Junction – Navigation is seamless, and products look stylish and appealing.
Winter Walk Deals – Great choices and the site performs quickly and efficiently.
Ram Rapids Marketplace – Polished layout and browsing items is fast and user-friendly.
secure domain store – The design keeps things simple and makes navigation comfortable.
Wrap & Wonder Store – Charming displays and products feel perfectly curated for gift-giving.
Winter Walk Essentials – Easy to navigate and shopping experience is very smooth.
ойын автоматы Mine Drop бонус ойыны ?алай ж?мыс істейді – т?пн?с?а т?жырымдамасы мен жар?ын дизайны бар динамикалы? ойын автоматы. Механика, бонусты? м?мкіндіктер ж?не ойын процесіні? м?мкіндіктері туралы білі?із.
explore fiber options – The website is sleek and shopping flows smoothly.
apparel hub – The site feels polished, and browsing through items is very simple.
visit warehousewhim – Items are well organized, making browsing simple and enjoyable.
click for barbellblossom – Layout is tidy, and the site is very user-friendly for exploring products.
winterwalkshop – Nice variety and everything loads smoothly without any issues here.
Logo Lighthouse Collections – Everything loads quickly and finding products feels effortless.
online island ink – Stylish branding paired with a unique and artistic presentation.
скачать мелбет официальный сайт https://gamemelbet.ru .
checkoutcottage boutique – Clear product pages and an intuitive checkout make browsing a breeze.
explore winterwalkshop – Layout is clean and everything loads quickly without delays.
SuedeSalon Zone – Modern, elegant presentation and well-chosen items improve online browsing.
my favorite Warehouse Whim – The website feels intuitive, and exploring items is effortless.
reliable service marketplace – Service descriptions are simple and clear, giving a professional impression.
Print Parlor Deals – Navigation is intuitive and the layout is neat, making exploring products a breeze.
Winter Walk Gear – Plenty of choices and the site runs seamlessly.
check out patternparlor – Layout is clear, and finding what I need is fast and simple.
explore seashellstudio – Smooth interface and selecting items is fast and straightforward.
Topaz Trail Boutique Online – Clean setup and intuitive menu structure throughout.
this art supply hub – Large selection and intuitive checkout make shopping easy.
Winter Walk Selections – Clean design and browsing items is quick and user-friendly.
Der Online-Slot https://zeusvshades250.com/de/ bietet eine olympische Atmosphare, thematisch passende Symbole und ein dynamisches Spielformat. Erfahren Sie mehr uber die Spielregeln und -funktionen.
melbet скачать на пк melbet скачать на пк .
SeaBreezeSalon Zone – Relaxing vibe across pages creates a calm and enjoyable shopping experience.
Sparks Tow Official – Lovely shop with intuitive navigation, found items fast.
stock sculpt store – A solid collection of resources for tracking stocks and analyzing trends.
Ruby Rail picks – The pages are well structured, and browsing through products is very pleasant.
this premium textile store – Rich materials and elegant quality are evident throughout.
ChairAndChalk Essentials Hub – Fun, artistic products and quick, effortless checkout.
nutmeg specialty hub – The creative direction is appealing and the user experience is consistent.
Voltvessel Store – The site is clean and intuitive, perfect for quick exploration.
A catalog of cars https://www.auto.ae/catalog/ across all brands and generations—specs, engines, trim levels, and real market prices. Compare models and choose the best option.
мелбет бк мелбет бк .
SableAndSon Essentials – High-quality pieces accompanied by detailed and useful descriptions.
Vivid Vendor Official – Lively layout and striking visuals make exploring the site enjoyable.
sipandsupply shop online – Wide variety of products and the site design makes browsing enjoyable.
workbenchwonder marketplace – Items seem handy and descriptions are clear and well-written.
workspace tools corner – It’s easy to navigate and discover items designed for practical use.
Ruby Roost Store – Beautifully presented collection with high-quality product photos.
мелбет приложение мелбет приложение .
Art Attic Shop Hub – The creative products and smooth navigation make finding items effortless.
Wagon Wildflower Collections – Charming and playful design make browsing items feel delightful.
Basket Bliss Curated Store – Neatly arranged items and intuitive navigation create a seamless experience.
Yoga Yard Product Hub – Soothing items combined with a light, refreshing feel make browsing enjoyable.
Cove Crimson Finds Hub – Beautifully displayed items and site navigation is effortless.
tablettulip – Clean layout and pages load very smoothly without any lag.
Cypress Chic Studio – Layout feels modern and browsing the collection is seamless.
workbenchwonder boutique – Practical items and the product info is very informative.
Shop Cypress Circle – Organized layout and smooth navigation make exploring enjoyable.
Clarvesta Select – Clean presentation and products are easy to explore.
Actionable Insights Online Hub – Smooth navigation and clean pages make accessing content effortless.
trusted invoice marketplace – The sleek interface makes browsing both easy and visually pleasing.
VeroVista Deals – Pages load quickly, and product descriptions are clear and helpful for browsing.
Astrevio Curated Store – Well-organized pages make the product lineup easy to explore.
top ChairChase shop – Stylish furniture and effortless navigation make exploring items simple.
Bowl Boutique – Elegant layout and exploring products is simple and enjoyable.
briovista.shop – Very clean layout and everything loads fast without lag.
StrategicTrustSolutions Access – Organized pages and logical menus simplify exploring details.
Bath Breeze Selections – Nice assortment with a clear and user-friendly interface.
Cozy Carton Nook – Pleasant design with items clearly displayed.
Visit CourierCraft – The product selection is creative and ordering online is hassle-free.
journaljetty online shop – Extensive selection and descriptions are easy to read and informative.
layout lagoon corner – Clean design and it’s easy to browse everything.
Dalvanta Spot – Easy navigation and items are clearly organized for quick shopping.
explore TrustedCommercialNetwork – Clean layout and intuitive menus simplify accessing information.
Official Velvet Vendor 2 – Adding to bookmarks, the products are really one-of-a-kind.
PolyPerfect top picks – The layout is clean, and completing orders takes just a few clicks.
ChargeCharm Gadgets – Well-laid-out pages make discovering tech items fast and simple.
Rosemary Roost online – Everything looks well put together, creating a lovely shopping experience.
Attic Amber Shop Hub – The welcoming aesthetic and clear structure make browsing smooth.
official BrewBrooks site – I found plenty of options, and the pages open up without any delay.
briovista.shop – Very clean layout and everything loads fast without lag.
Cozy Copper Finds Hub – Navigation feels effortless and items look premium.
NauticalNarrative Marketplace – Lovely seaside-themed items and easy, stress-free browsing.
Bay Biscuit Essentials – Cute items paired with a smooth ordering experience.
Un sito web https://www.sopicks.it per trovare abbigliamento, accessori e prodotti alla moda con un motore di ricerca intelligente. Trova articoli per foto, marca, stile o tendenza, confronta le offerte dei negozi e crea look personalizzati in modo rapido e semplice.
sheetsierra shop – Good assortment and the process to buy was quick.
top ProfessionalCollaborationHub site – Well-organized pages and responsive design make browsing effortless.
Sketch Station Hub Online – Layout is clean and creative elements make the site enjoyable.
Dzisiejsze mecze http://www.mecze-dzis.pl/ aktualny harmonogram z dokladnymi godzinami rozpoczecia. Dowiedz sie, jakie mecze pilki noznej, hokeja i koszykowki odbeda sie dzisiaj, i sledz turnieje, ligi i druzyny w jednym wygodnym kalendarzu.
Clever Checkout Hub Online – Navigation is easy and checkout is quick for a hassle-free experience.
Vendor Velvet Hub – Clear layout and contemporary design make finding items simple.
Decordock Treasures – Assortment is appealing and descriptions help understand the products better.
explore Insights Hub – Easy navigation and clean pages make reading information straightforward.
Woolen picks outlet – The gentle color scheme and smooth navigation enhance the overall experience.
visit Long Term Business Partnerships – Clean interface and straightforward pages improve the browsing experience.
Aura Arcade Picks – Fascinating products with a checkout that runs without issues.
Wiadomosci tenisowe teniswiadomosci z Polski i ze swiata: najnowsze wyniki meczow, rankingi zawodniczek, analizy turniejow i wywiady z zawodniczkami. Sledz wydarzenia ATP i WTA, dowiedz sie o zwyciestwach, niespodziankach i najwazniejszych meczach sezonu.
CampCourier supplies – Products are easy to locate and the site responds quickly.
this Brondyra boutique – Intuitive navigation and contemporary style make exploring easy.
Color Cairn Hub – A collection of colorful products that immediately catch attention.
Craft Cabin Corner – Easy navigation and the item descriptions are very helpful.
Beard Barge Boutique Online – Well-curated products and informative descriptions make shopping smooth.
Wellness Wilds Essentials Online – Soothing layout and navigation works perfectly.
Yavex Showcase – Smooth performance and quick-loading pages make browsing enjoyable.
Venverra Central – The site gives a professional impression and feels reliable for online shopping.
sleepsanctuary digital – Browsing is pleasant and the design promotes relaxation.
your TrustedBusiness hub – Organized design and fast-loading sections make browsing simple.
Dorvani Studio – Quick-loading pages and a smooth overall experience.
explore Bond Solutions Portal – Professional layout and clear menus make navigation fast.
CorporateNetwork Online – Well-structured design makes browsing simple and efficient.
custom card corner – Everything feels organized, making it fun to discover new card ideas.
official Auracrest hub – Clear layout and helpful descriptions make shopping straightforward.
TabTower Selects – Neatly arranged pages and clear product descriptions enhance shopping.
Casa Cable Marketplace – Simple navigation and clear product information enhance the browsing experience.
BuildBay Curated Picks – Items seem well-crafted and checkout feels easy.
Craft Curio World – Easy to move through pages and the site feels well organized.
A convenient car catalog https://auto.ae/catalog/ brands, models, specifications, and current prices. Compare engines, fuel consumption, trim levels, and equipment to find the car that meets your needs.
дистанционное обучение по школьной программе дистанционное обучение по школьной программе .
Siatkowka w Polsce http://www.siatkowkanews.pl najnowsze wiadomosci, wyniki meczow, terminarze i transfery druzyn. Sledz PlusLige, wystepy reprezentacji narodowych i najwazniejsze wydarzenia sezonu w jednej wygodnej sekcji sportowej.
Birch Bounty Curated Picks – Smooth navigation and the collection is thoughtfully presented.
Koszykowka koszykowkanews.pl najnowsze wiadomosci, PLK, transfery i wyniki meczow. Sledz polska lige, turnieje miedzynarodowe i postepy zawodnikow, dowiedz sie o transferach, statystykach i najwazniejszych wydarzeniach sezonu.
Jan Blachowicz janblachowicz to polski zawodnik MMA i byly mistrz UFC w wadze polciezkiej. Pelna biografia, historia kariery, statystyki zwyciestw i porazek, najlepsze walki i aktualne wyniki.
samplesunrise digital shop – Neat layout and everything feels logically organized.
Clever Cove Hub Online – Simple browsing with well-organized items makes finding products hassle-free.
запоминаемость рекламы reklamnyj-kreativ9.ru .
ии анализ рекламы ии анализ рекламы .
Schema Salon Official – Clear content and navigation works smoothly throughout the site.
this business trust hub – Easy-to-follow design and structured layout improve browsing efficiency.
водопонижение котлована vodoponizhenie-msk.ru .
Ravion Online – Professional appearance and navigation is straightforward.
глубинное водопонижение глубинное водопонижение .
система водопонижения xn—77-eddkgagrc5cdhbap.xn--p1ai .
your Corporate Unity Solutions – Smooth navigation and clear page structure make finding services simple.
visit Strategic Growth Alliances – Intuitive pages and well-laid-out sections make browsing simple.
time saving dashboards – I can handle responsibilities faster thanks to the smart layout.
Aurora Atlas Shop Hub – Great product range with pages that load smoothly every time.
Caldoria Design Hub – Smooth browsing and neatly displayed products enhance the experience.
Calveria collection – Beautifully designed pages make scrolling through products enjoyable.
Xorya Top Picks – The modern aesthetic and clean interface create a smooth browsing experience.
Crate Cosmos Boutique Hub – Great range of items and browsing feels smooth.
run route marketplace online – Easy-to-navigate design and locating items is smooth.
Blanket Bay Online – Comfortable vibe and browsing is smooth without delays.
домашнее обучение best-schools-online.ru .
explore LongTermCommercialBonds – Fast-loading sections and organized content simplify finding information.
Qulavo HQ – Fast browsing experience with clear navigation throughout.
Sunset Stitch Studio – Items are thoughtfully curated and purchasing was quick.
машинное обучение креативы reklamnyj-kreativ9.ru .
a href=”https://findyournextdirection.shop/” />Find Your Next Direction Online Resources – Pages are responsive, and information is easy to access.
вакуумное водопонижение иглофильтрами вакуумное водопонижение иглофильтрами .
Aurora Avenue Curated Picks – Sleek design and well-chosen products make shopping simple and enjoyable.
chrome lifestyle outlet – The clean metallic theme and organized display feel professionally done.
CalmCrest Favorites – Gentle design and rapid page response enhance user experience.
shop Cardamom Cove today – Inviting design and useful product descriptions make browsing enjoyable.
Crisp Collective Picks Hub – Layout is clean and navigating the items feels easy.
Business Learning Center – Clean interface and structured content make accessing information simple.
система водопонижения система водопонижения .
upster pro upster pro .
скважинное водопонижение vodoponizhenie-moskva.ru .
tagtides treasures – Attractive visuals and navigation feels natural.
Click Courier Direct – Layout is tidy and service information is displayed clearly for users.
Blanket Bay Curated Picks – Pleasant products with a warm feel and smooth interface.
иглофильтровое водопонижение vodoponizhenie-iglofiltrami-moskva.ru .
Business Growth Partnerships Hub – Clear layout and organized content make finding resources fast.
система водопонижения xn—77-eddkgagrc5cdhbap.xn--p1ai .
Yavex Design Hub – Content loads quickly, and the site feels seamless to explore.
Qulavo World – Site runs efficiently and browsing feels natural.
цифровое обучение best-schools-online.ru .
Watch Wildwood Essentials Shop – Attractive presentation and browsing feels smooth overall.
your LongTermValue hub – Intuitive navigation and neat content presentation improve browsing.
the CardCraft gallery – Artistic selections displayed beautifully with a speedy checkout.
official Auroriv hub – Clean layout and smooth navigation make exploring enjoyable.
ChicChisel Online Marketplace – Modern visuals with helpful details make the site enjoyable.
Amber Arcade online – Between the buzzing environment and endless variety, I never get bored here.
Crisp Crate Boutique – Items are well presented and navigating the catalog is simple.
a/b тест баннеров reklamnyj-kreativ9.ru .
грунтовое водопонижение грунтовое водопонижение .
мостбет casino slots мостбет casino slots
Bloom Beacon Top Picks – User-friendly navigation and effortless browsing overall.
Click to Explore Innovations Online Hub – Logical layout and clear sections make finding information easy.
бурение скважин обратной промывкой бурение скважин обратной промывкой .
access GlobalEnterpriseBonds now – Fast-loading pages and intuitive design make exploring content effortless.
Spirit of the Aerodrome Stories – The website consistently delivers engaging and educational content.
бурение скважин для водопонижения бурение скважин для водопонижения .
Xelivo Base – Clear interface with intuitive browsing throughout the site.
The Front Room Chicago resources – Navigate a site filled with carefully presented details and visitor-friendly content.
водопонижение строительных котлованов водопонижение строительных котлованов .
анализ наружной рекламы анализ наружной рекламы .
explore ModernPurchasePlatform – Clean interface and well-laid-out products make purchasing easy.
CinnamonCorner Curated – Relaxed layout and user-friendly navigation feel seamless.
водопонижение котлована vodoponizhenie-iglofiltrami-moskva.ru .
Auto Aisle Store – Great selection of products and filtering makes browsing simple.
советы выбора школы best-schools-online.ru .
Crystal Corner Finds – Navigation is simple and exploring the items is effortless.
1вин Кыргызстан http://1win50742.help/
Everything about FC Qarabag https://qarabag.com.az in one place: match results and schedule, Premier League standings, squads and player stats, transfers, live streams, and home ticket sales.
IDMAN TV https://www.idman-tv.com.az live stream online: watch the channel in high quality, check today’s program guide, and find the latest TV schedule. Conveniently watch sporting events and your favorite shows live.
Watch Selcuksport TV selcuksports live online in high quality. Check the broadcast schedule, follow sporting events, and watch matches live on a convenient platform.
Free online games https://oyun-oyna.com.az with no installation required—play instantly in your browser. A wide selection of genres: arcade, racing, strategy, puzzle, and multiplayer games are available in one click.
a trendy fashion corner – Eye-catching streetwear designs that are exactly my vibe.
1win apk последняя версия http://www.1win50742.help
Storefront favorites shop – The clear presentation and simple navigation make the site feel welcoming.
Xorya Design Hub – Tidy interface and modern layout make navigating the site intuitive.
Julie Cash https://juliecash.online on OnlyFans features exclusive content, private posts, and regular updates for subscribers. Subscribe to gain access to original content and special offers.
Cloud Curio Spot – Interesting lineup and pages render rapidly.
Julie Cash juliecash online on OnlyFans features exclusive content, private posts, and regular updates for subscribers. Subscribe to gain access to original content and special offers.
проект водопонижения xn—77-eddkgagrc5cdhbap.xn--p1ai .
Bright Bento Essentials – Products are well-described and selection feels diverse.
улучшение hero карточки улучшение hero карточки .
34 Crooke Website – Benefit from a crisp appearance and easy-to-follow structure.
explore TrustedBusinessFramework – Fast-loading pages and clear headings make reading information simple.
Check Sleep Cinema Hotel here – Browse a one-of-a-kind concept with engaging visuals and easy navigation.
online SecureCommercialBonding resource – Organized sections and smooth design simplify accessing information.
Blue Quill Gems – Clean design and products are well organized for visitors.
водопонижение строительных котлованов водопонижение строительных котлованов .
водопонижение на строительной площадке водопонижение на строительной площадке .
Crystal Lust https://www.crystal-lust.online is the official website, featuring original publications, premium content, and special updates for subscribers. Stay up-to-date with new posts and gain access to exclusive content.
MiniTinah https://www.minitinah.es comparte contenido exclusivo y las ultimas noticias. Siguenos en Instagram y Twitter para enterarte antes que nadie de nuestras nuevas publicaciones y recibir actualizaciones emocionantes a diario.
Exclusivo de Candy Love https://www.candylove.es contenido original, publicaciones vibrantes. Suscribete para ser el primero en enterarte de las nuevas publicaciones y acceder a actualizaciones privadas.
Shilpa Sethi shilpasethi exclusive content, breaking news, and regular updates. Get access to new publications and stay up-to-date on the most interesting events.
Brooke Tilli brooketilli.online official website features unique, intimate content, exclusive publications, and revealing updates. Access original content and the latest news on the official platform.
CircuitCabin Central – Clear design and simple layout make finding electronics easy.
Bag Boulevard Curated Picks – Lovely bags and navigating the store feels effortless.
устройство водопонижения устройство водопонижения .
водопонижение строительных котлованов водопонижение строительных котлованов .
Workspace solutions online – The clear layout and functional products streamline daily routines.
топ проверенных образовательных платформ дистанционно топ проверенных образовательных платформ дистанционно .
this stylish berry-themed shop – Rich colors and crisp formatting enhance every page.
a/b тест баннеров reklamnyj-kreativ8.ru .
Lofts on Lex Homes – Browsing through the listings feels smooth and informative.
mostbet регистрация на сайте https://www.mostbet61527.help
Bright Bloomy Showcase – User-friendly layout and colorful design enhance the shopping experience.
Open Latanya Collins site – Access engaging content presented in a clear and reader-friendly manner.
lucky jet mostbet mostbet61527.help
Discover PressBros online – Browse structured pages featuring easy-to-find and helpful information.
Lily Phillips http://www.lily-phillips.com/ offers unique intimate content, exclusive publications, and revealing updates for subscribers. Stay up-to-date with new content, access to original photos, and special announcements on her official page.
Eva Elfie evaelfie ing shares unique intimate content and new publications. Her official page features original materials, updates, and exclusive offers for subscribers.
Sweetie Fox https://sweetiefox.ing/ offers exclusive content, original publications, and regular updates. Get access to new materials, private photos, and special announcements on the official page.
Unique content from Angela White http://www.angelawhite.ing/ new publications, exclusive materials, and personalized updates. Stay up-to-date with new posts and access exclusive content.
строительное водопонижение строительное водопонижение .
Souzan Halabi https://souzanhalabi.online shares exclusive content and new publications. Get access to private updates and original materials on the official platform.
Bold Basketry Studio Hub – Easy interface and shopping feels smooth for all visitors.
ии анализ рекламы ии анализ рекламы .
quirky product hub – Several items had a unique charm that kept me exploring.
your Click to Learn Strategically – Intuitive structure and well-laid-out pages simplify exploring details.
система водопонижения грунтовых вод система водопонижения грунтовых вод .
система водопонижения иглофильтрами xn—77-eddkgagrc5cdhbap.xn--p1ai .
See Olympics Brooklyn – The upbeat design pairs nicely with straightforward details.
осушение котлованов осушение котлованов .
Clove Crest Shop – Modern style with helpful product insights for all visitors.
The Call Sports resource – Explore detailed updates and highlight stories across different sports leagues.
active lifestyle shop – The upbeat tone and performance-driven items push me to do better.
Shilpa Sethi shilpasethi.in official page features unique, intimate content and premium publications. Private updates, fresh photos, and personal announcements are available to subscribers.
Riley Reid riley reid is a space for exclusive content, featuring candid original material and regular updates. Get access to new publications and stay up-to-date on the hottest announcements.
Exclusive Aeries Steele aeriessteele online intimate content, and original publications all in one place. New materials, special announcements, and regular updates for those who appreciate a premium format.
Luiza Marcato Official luiza marcato exclusive updates, personal publications, and the opportunity to connect. Get access to unique content and official announcements.
Brianna Beach’s exclusive https://briannabeach.online/ page features personal content, fresh posts, and the chance to stay up-to-date on new photos and videos.
the ultimate GPU shop – Excellent tech offerings displayed in a streamlined interface.
Check out Updating Parents – Access straightforward guidance and clear parenting suggestions.
онлайн обучение с официальным аттестатом онлайн обучение с официальным аттестатом .
вакуумное водопонижение иглофильтрами vodoponizhenie-msk.ru .
улучшение hero карточки улучшение hero карточки .
1win mBank пополнение https://1win50742.help
бурение водопонижение vodoponizhenie-iglofiltrami-moskva.ru .
анализ креативов анализ креативов .
Google salaries by position https://salarydatahub.uk comparison of income, base salary, and benefits. Analysis of compensation packages and career paths at the tech company.
Explore Brandon Lang Experts – The regular posts here offer meaningful insights worth reading.
Sabrina Cortez sabrinacortez offers unique content and fresh publications. Join us on social media to receive exclusive updates and participate in exciting activities.
Bunny Madison http://www.bunnymadison.online/ features exclusive, intimate content, and special announcements. Join us on social media to receive unique content and participate in exciting events.
Exclusive content Alexis Fawx https://alexisfawx.online/ original publications and special updates. Follow us on social media to stay up-to-date on new releases and participate in exciting events.
Любишь азарт? https://eva-vlg.ru онлайн-платформа с широким выбором слотов, настольных игр и живого казино. Бонусы для новых игроков, акции, турниры и удобные способы пополнения счета доступны круглосуточно.
explore Opportunities Portal – Fast-loading content and clear layout make reading simple.
понижение уровня грунтовых вод иглофильтрами понижение уровня грунтовых вод иглофильтрами .
Explore Winnipeg Temple updates – Find valuable guidance and content designed to educate and inspire.
ArcLoom online picks – The products are organized well, and the interface is visually appealing.
Check In The Saddle Philly online – Enjoy content that highlights togetherness and collective participation.
Ledger Lantern essentials – Clear layout and informative details make browsing hassle-free.
водопонижение иглофильтрами грунтовых вод водопонижение иглофильтрами грунтовых вод .
водопонижение иглофильтрами грунтовых вод vodoponizhenie-msk.ru .
PowerUpWNY Online – The dedication to strengthening the community really stands out.
Coffee Courtyard Select – Calm atmosphere and browsing feels seamless today.
Learn about energy updates – Find reliable coverage and meaningful commentary in one platform.
строительное водопонижение строительное водопонижение .
Al Forne Philly portal – Browse well-laid-out sections and concise explanations throughout the website.
access TrustedEnterpriseFramework now – Well-structured layout and clear headings simplify reading content quickly.
explore Audit Amber – Well-structured sections and user-friendly design keep things hassle-free.
Flour and Oak Showcase – The creative execution across the site is truly impressive.
Elmhurst local initiatives – Discover informative sections showcasing neighborhood collaboration efforts.
Arden Luxe essentials – Beautiful visuals combined with descriptive text make finding items simple.
майнс melbet майнс melbet
водопонижение котлована водопонижение котлована .
Discover 9E2 Seattle online – Read content presented clearly with a streamlined browsing experience.
1win мегапей Киргизия 1win мегапей Киргизия
бурение скважин обратной промывкой бурение скважин обратной промывкой .
RepublicW4 Online – The website showcases content that’s both interesting and accessible.
seogrowth site – Mobile version looks perfect; no glitches, fast scrolling, crisp text.
Scarlett Jones scarlettjones in shares exclusive content and the latest updates. Follow her on Twitter to stay up-to-date with new publications and participate in exciting media events.
Jill Kassidy Exclusives http://www.jillkassidy-official.online/ featuring original content, media updates, and special announcements.
Johnny Sins http://www.johnny-sins.com is the official channel for news, media updates, and exclusive content. Be the first to know about new releases and stay up-to-date on current events.
Discover Avi Love’s http://www.avilove.online world: exclusive videos, photos, and premium content on OnlyFans and other platforms.
Die Welt von Monalita monalita.de bietet exklusive Videos, ausdrucksstarke Fotos und Premium-Inhalte auf OnlyFans und anderen beliebten Plattformen. Abonniere den Kanal, um als Erster neue Inhalte und besondere Updates zu erhalten.
this inviting e-boutique – Beautifully crafted theme and a genuinely pleasant overall experience.
Collar Cove Select – Quality presentation and shopping is intuitive.
Energy Near online resource – Stay connected with well-presented articles and news items.
Все самое свежее здесь: оборудование для переговорных комнат
Dive into the world of Dolly Little dolly little original videos, exclusive photos, and unique content available on OnlyFans and other services. Regular updates and fresh publications for subscribers.
Discover the world of LexiLore lexi lore exclusive videos, original photos, and vibrant content. Regular updates, new publications, and special content for subscribers.
Serenity Cox serenitycox shares exclusive content and regular updates. Follow her on Instagram, Twitter, and Telegram to stay up-to-date on creative projects and inspiring events.
Discover Kionna West online – Find well-laid-out pages with carefully written and engaging information.
1win lucky jet играть 1win lucky jet играть
Pepplish Platform – I appreciate the clear structure paired with an original idea.
Купить квартиру https://sbpdomik.ru актуальные предложения на рынке недвижимости. Новостройки и вторичное жильё, удобный поиск по цене, району и площади. Подберите идеальную квартиру для жизни или инвестиций.
водопонижение скважинами водопонижение скважинами .
осушение котлованов осушение котлованов .
согласование перепланировки квартиры под ключ sostav.ru/blogs/286398/77663 .
1win новое зеркало 1win новое зеркало
melbet промокод при регистрации http://melbet09342.help
organized product hub – Each section is clear, making exploring the products simple.
Explore this Reinventing Gap page – Read well-structured content covering important issues effectively.
top sms activate alternatives top sms activate alternatives .
sms activate login sms activate login .
a practical creative shop – Wide range of products and a hassle-free buying process.
Karely Ruiz karelyruiz mx comparte contenido exclusivo y actualizaciones periodicas. Siguela en Instagram, Twitter y Telegram para estar al tanto de sus proyectos creativos y eventos inspiradores.
Get to know JakKnife http://www.jakknife.online and discover unique content. Regular updates, special publications, and timely announcements are available to subscribers.
Discover the world of Comatozze https://comatozze.in exclusive content on OnlyFans and active updates on social media. Subscribe to stay up-to-date on new publications and exciting projects.
The official website of MiniTina https://www.minitinah.com your virtual friend with exclusive publications, personal updates, and exciting content. Follow the news and stay connected in a cozy online space.
sms activate alternatives sms activate alternatives .
анализ наружной рекламы анализ наружной рекламы .
sms activate sms activate .
Нужна плитка? тротуарная плитка большой ассортимент, современные формы и долговечные материалы. Подходит для мощения тротуаров, площадок и придомовых территорий.
понижение уровня грунтовых вод vodoponizhenie-iglofiltrami-moskva.ru .
Explore 1911 PHL resources – Read engaging updates and navigate through well-structured pages.
Official ulayjasa website – Access organized content and convenient features in one place.
Public policy discussion site – Explore well-articulated viewpoints addressing governance concerns.
Copper Citrine Boutique – Items are displayed neatly and site is easy to use.
система водопонижения система водопонижения .
согласование перепланировки москва согласование перепланировки москва .
sms activate alternatives sms activate alternatives .
строительное водопонижение строительное водопонижение .
Natasha for Judge web portal – Navigate a professional, informative site with a confident voice throughout.
best sms activation services github.com/SMS-Activate-Service .
top sms activate services http://www.linkedin.com/pulse/top-5-sms-activate-services-ultimate-guide-virtual-phone-mike-davis-gnhre/ .
Simple Online Shopping Resources – Quick browsing and intuitive navigation make shopping effortless.
Visiting pin-up chile login gives you access to a legitimate gaming platform with clear terms and conditions regarding bonuses. The registration is fast, and the verification process didn’t take more than a few hours in my case.
At official spain mirror you can enjoy a very immersive atmosphere with localized themes that resonate well with the Spanish audience. The bonuses are transparent and easy to track within your personal account.
Строишь дом или забор? https://gazobeton-krasnodar.ru продажа газобетона и газоблоков в Краснодаре с доставкой по Краснодарскому краю и СКФО. В наличии автоклавные газобетонные блоки D400, D500, D600, опт и розница, расчет объема, цены от производителя, доставка на объект манипулятором
скважинное водопонижение vodoponizhenie-iglofiltrami-moskva.ru .
Нужен газоблок? газобетонные блоки купить каталог газоблоков и газобетона в Краснодаре: размеры, характеристики и цены на газобетонные блоки КСМК. Можно купить газоблоки с доставкой по Краснодару, краю и СКФО. Актуальная цена газоблоков, помощь в подборе, расчет объема и заказ с завода
Нужны ЖБИ? канализационные кольца широкий ассортимент ЖБИ, прочные конструкции и оперативная доставка на объект. Консультации специалистов и индивидуальные условия сотрудничества.
skilletstreet store – Loved the choices available and browsing works flawlessly.
best sms activation services github.com/SMS-Activate-Alternatives .
Rocket Electronics Hub – Easy-to-use site and purchasing steps are intuitive.
PMA Joe 4 Council information hub – Enjoy meaningful content arranged clearly with an emphasis on community initiatives.
согласование перепланировки в москве согласование перепланировки в москве .
мостбет live casino mostbet61527.help
sms activate sms activate .
Life Changing Magic Stories – I appreciate the uplifting tone and the warmth in each update.
explore Best Value Market – User-friendly layout and great deals make browsing a breeze.
Unique content from Gattouz0 – daily reviews, new materials, and the opportunity for personal interaction. Stay connected and get access to the latest publications.
Exclusive from SkyBri Officiall – daily reviews, new publications, and direct communication. Subscribe to stay up-to-date and in the know.
Contenido exclusivo de KarelyRuizOfficially: resenas diarias, nuevos materiales y la oportunidad de interactuar personalmente. Mantengase conectado y acceda a las ultimas publicaciones.
Discover the world of CandyLove Officiall: exclusive content, daily reviews, and direct communication. Subscribe to receive the latest updates and stay up-to-date with new publications.
Immerse yourself in the world of CrystalLustOfficiall: unique content, daily reviews, and direct interaction. Here you’ll find not only content but also live, informal communication.
Coral Crate Corner – Pleasant aesthetic and shopping flows naturally.
top sms activate services github.com/SMS-Activate-Service .
sms activate website sms activate website .
plannerport corner – Helpful tips and moving around the site is effortless.
sweet springs boutique – The products truly shine thanks to the lovely layout.
The official delux_girl channel features daily hot content, private selfies, and exclusive videos. Intriguing real-life moments and regular updates for those who want to get closer.
official page ElleLeeOfficiall features hot posts, private selfies, and real-life videos. Subscribe to receive daily updates and exclusive content.
Discover Play-Brary online – Browse engaging and clear content with a positive, approachable tone.
Discover the world of NaomiHughesOfficial: daily vibrant content, candid selfies, and dynamic videos. Real life moments and regular updates for those who appreciate a lively format.
The official LexisStarOfficial page features daily breaking news, personal selfies, and intriguing content. Subscribe to stay up-to-date with new updates.
Discover the world of MickLiterOfficial: behind-the-scenes stories, bold provocations, and personal footage. All the most interesting content gathered in one place with regular updates.
DiBruno Shop Updates – Great selection with engaging updates that make the site enjoyable.
PHL Market Portal – Love the variety of local goods and the frequent updates provided.
top sms activate alternatives top sms activate alternatives .
sms activate alternatives sms activate alternatives .
Basket Bliss Online Marketplace – Stylish collection and the interface is very easy to use.
перепланировка квартиры москва sostav.ru/blogs/286398/77663 .
Descubre el mundo de LiaLin Oficial: historias tras bambalinas, provocaciones audaces y videos personales. Todo el contenido mas interesante reunido en un solo lugar con actualizaciones periodicas.
The best of MilaSolanaOfficial – sharing all the most interesting content in one channel. Behind-the-scenes atmosphere, provocative mood, and personal snippets. Stay tuned and don’t miss any new releases.
Immerse yourself in the Mew Slut experience: candid behind-the-scenes moments, provocative vibes, and intriguing updates all in one place.
intriguing publications ReislinOfficiall and new materials appear regularly, creating a truly immersive experience. Personal moments, striking provocations, and unexpected materials are featured. Stay tuned for new publications.
Pearl Vendor Store – Layout feels organized and content is easy to follow.
skilletstreet essentials hub – Nice collection and browsing the website is very simple.
Philadelphia Resource Link – The helpful updates and community-minded style are much appreciated.
Canyon Market marketplace – Came across this shop and it looks very promising.
best virtual number service github.com/SMS-Activate-Service .
best sms activation services http://www.linkedin.com/pulse/top-5-sms-activate-services-ultimate-guide-virtual-phone-mike-davis-gnhre/ .
see Flake Vendor products – Browsing is fast and the interface is clean.
Toy Trader Online – I love the range of products and how smoothly the pages load.
check out Heather Market – Everything is well-structured and browsing is hassle-free.
Gary Masino News – Well-presented ideas and clear communication make the site very informative.
this Bath Breeze boutique – Elegant items and browsing through the pages is effortless.
ranklio site – Content reads clearly, helpful examples made concepts easy to grasp.
this Timber Aisle site – Browsing feels effortless and I can find everything I need.
this online vendor – Found my items fast and the checkout experience was simple.
best sms activation services github.com/SMS-Activate-Login .
visit Cobalt Vendor store – Browsing feels fast and the layout is very intuitive.
Bench Bazaar Store – Well-structured site with a smooth browsing flow.
Scarlet Crate Marketplace – Sleek layout and smooth browsing make for a very pleasant experience.
узаконить перепланировку москва sostav.ru/blogs/286398/77663 .
this online aisle vendor – Browsing here is simple and the interface is clean.
Clover Crate shopping hub – Browsing products is easy and the site feels very user-friendly.
shop the Topaz Aisle brand – A selection of unique items that fit my needs exactly.
tide shop online – Everything is easy to follow, and the layout makes browsing smooth.
ISWR Resource Center – It’s encouraging to see such reliable information shared so consistently.
sms activate sms activate .
browse Echo Aisle items – Intuitive design makes finding products effortless.
PrimeMarket – Everything is simple to browse, with easy-to-use menus and filters.
melbet статистика melbet09342.help
Bay Biscuit Essentials – Cute items paired with a smooth ordering experience.
Snow Vendor Store – The team answered promptly and resolved my issue without delay.
Elect Cateria McCabe Updates – Detailed information and open communication make the site very informative.
shop Lantern Market online – Layout is easy on the eyes and product categories are simple to explore.
top sms activate alternatives top sms activate alternatives .
discover Orchard Crate – The site flows well and checking items out is simple.
Quartz Vendor Items – The website is organized and easy to navigate from start to finish.
Chair Chic Studio – Attractive design and exploring products is fast and simple.
Firefly Crate Store – Product choices are smartly organized and appealing overall.
discover Zinc Vendor – Found some hidden gems at very fair prices here.
Dawn Vendor marketplace – Everything appears reliable and the pricing feels balanced.
Dyed & Dandy – Love the interactive feel and the website is very intuitive.
Beard Barge Design Hub – Solid selection with clear, useful product information.
O’Rourke Philly Resource Center – Efficient organization and useful content make visiting worthwhile.
North Crate Shop – Payment process was smooth and finished without any delays.
top sms activate services http://www.linkedin.com/pulse/top-5-sms-activate-services-ultimate-guide-virtual-phone-mike-davis-gnhre/ .
explore Terra Vendor shop – Costs are reasonable and the selection is quite solid.
Featured Poems and Essays – The expressive writing style and clean presentation stand out immediately.
visit Oak Vendor – Everything loads fast and the site layout makes shopping effortless.
headlinehub today’s news – Articles are insightful and pages respond immediately.
Cove Vendor collections – Quick-loading pages and intuitive navigation make shopping easy.
crownvendor.shop – Support replied quickly and handled everything with ease.
check out Meadow Aisle – The navigation is smooth and exploring products is enjoyable.
traffio site – Appreciate the typography choices; comfortable spacing improved my reading experience.
see Berry Aisle products – Support team was prompt and extremely helpful with my query.
HarborSelect – Product pages are easy to read and navigation is effortless.
exclusive revelations Monalita genuine passion and bold aesthetics. Private content you’ll find only here—directly from the author, without filters or unnecessary boundaries.
honest revelations Alina Rai vivid emotions and a sensual atmosphere. Unique private content, available only on this page—directly from me.
passionate atmosphere AmadaniOfficiall openness and a personal format of communication. Exclusive content, created without intermediaries—only for those who want more.
bold format BigTittyGothEggOfficiall sincere emotions and expressive images. Private materials and special publications that you’ll only see here.
Emery Essentials Store – Easy-to-navigate layout with a smooth and fast checkout.
Birch Bounty Curated Store – Browsing is simple and the selection feels curated with care.
Philly Beer Fest Finds – Looks like a fantastic festival with vibrant updates and atmosphere.
Garnet Aisle Shop – I quickly found exactly what I needed without hassle.
Meridian Vendor marketplace – This place offers some solid items worth browsing.
check out Silver Vendor – Buying items went smoothly and everything worked as expected.
personal revelations EvaElfieOfficially powerful energy and private publications. Unique content, available exclusively here—directly from me.
nicheninja site – Appreciate the typography choices; comfortable spacing improved my reading experience.
FitFuel Online – Loved the selection and completing my order was simple.
Lake Vendor website – The layout is simple and content is very easy to understand.
Pure emotion Reislin bold presentation, and a private format without boundaries. Exclusive content, personally created and available only here—for those who appreciate true energy.
Candid style DianaRiderOfficiall vibrant passion, and a unique atmosphere. Private publications and unique materials that you’ll find exclusively in this space.
Zena Aisle Shop – Smooth experience with quick loading and a clean mobile design.
Genuine emotions GirthmasterrOfficiall bold visual presentation, and personal communication. Exclusive content revealed only to its audience.
reachly site – Found practical insights today; sharing this article with colleagues later.
leadzo site – Loved the layout today; clean, simple, and genuinely user-friendly overall.
мелбет карта вывод мелбет карта вывод
Vivid revelations Sweetie fox sensual aesthetics, and a signature format. Private materials created without boundaries or templates—available only in one place.
PP4FDR Cause Details – The goals are shared passionately and explained with excellent clarity.
Blanket Bay Essentials Store – Inviting collection and pages load instantly.
shop Dew Vendor online – Everything works smoothly and finding products is stress-free.
Natalia Kerbabian Portal – The site provides thoughtful insights and content that captures attention.
cutandsewcove marketplace – Very easy to navigate and product descriptions are concise.
leadora site – Mobile version looks perfect; no glitches, fast scrolling, crisp text.
find Wild Crate products – Quick-loading pages combined with a modern interface make it enjoyable.
Dune Vendor Store – Clear design and straightforward sections make browsing enjoyable.
see Woodland Vendor products – The site responds fast and browsing is very straightforward.
trailvendor.shop – The site layout is clear and product descriptions are very informative.
Fit Fuel Essentials – Items are clearly displayed and buying felt very easy.
ClearGlassStore – Navigation is seamless and the payment process was very quick.
visit Harbor Aisle today – Categories are neat and product details are very useful.
мелбет турниры слоты мелбет турниры слоты
top sms activate services github.com/SMS-Activate-Service .
мелбет пополнение через карту https://melbet09342.help
top sms activate alternatives top sms activate alternatives .
Blanket Bay Boutique Online – Cozy atmosphere and smooth navigation everywhere.
Hearth Vendor Online – The site responds fast and moving between sections is smooth.
перепланировка квартиры москва sostav.ru/blogs/286398/77663 .
FernCrate Picks – Excellent variety and a user-friendly experience keep me coming back.
explore Robin Market shop – I appreciated the quick response and helpful feedback.
Denim Dusk Picks – Items are well-presented and exploring the site is effortless.
this online vendor – Site is simple to use and the checkout felt reliable.
Stone Vendor Items – Helpful and responsive support made the whole experience smooth.
Kids Creativity Workshop – Designed to motivate children to learn, build, and imagine freely.
shop Pine Crate online – Found exactly what I was looking for with a seamless browsing experience.
mostbet доступ сегодня mostbet доступ сегодня
Cup & Craft Corner – Professional design and browsing feels very intuitive.
Pure emotion Reislin Officiall bold presentation, and a private format without boundaries. Exclusive content, personally created and available only here—for those who appreciate true energy.
Candid style Diana Rider vibrant passion, and a unique atmosphere. Private publications and unique materials that you’ll find exclusively in this space.
Vivid revelations Sweetiefox Officiall sensual aesthetics, and a signature format. Private materials created without boundaries or templates—available only in one place.
Boldness and sincerity Luna Okko maximum intimacy. Personal content without intermediaries—only here and only directly from me.
visit this aisle shop – Loads instantly and works perfectly on any device.
Bloom Beacon Online – Simple navigation and enjoyable browsing throughout.
visit Chestnut Vendor store – Fast response and very helpful guidance from the support team.
Opal Aisle Marketplace Online – Lovely assortment and easy-to-navigate layout make shopping fun.
see Bright Aisle products – The layout keeps things simple and stress-free.
Maximum candor Princesslsi Officiall vibrant energy, and a private atmosphere. Exclusive content is personally created and available only here—for those ready for a truly unique experience.
A bold image LunaOkkoOfficiall strong charisma, and a personal communication format. Private publications and special materials revealed only to our audience.
visit Willow Vendor store – Clean layout and inviting design make the experience enjoyable.
An intimate atmosphere MiaMarinOficiall sensual presentation, and signature style. Exclusive materials available exclusively in this space.
Frank emotions RaeLilBlac Officiall captivating aesthetics, and a personalized format. Content without unnecessary filters—directly from the author.
sms activate login sms activate login .
sms activate website sms activate website .
find Plum Vendor X products – Easy-to-use interface and clearly labeled sections make shopping quick.
The energy of passion Romi Rain sincerity, and private access. Unique publications created for those who appreciate a personalized and bold format.
this lovely webshop – I’m impressed by how neat and inviting the setup is.
official Hollow Vendor page – The content breaks things down clearly for new users.
Woodland Crate products – Each product seems handpicked, creating a warm browsing experience.
Autumn Crate Items – Sleek layout with user-friendly navigation makes the experience seamless.
Wind Vendor shopping hub – Completing my purchase was seamless and efficient.
this online shop – Neatly organized sections make navigating the site effortless.
Illustration Inn Collection Hub – Great creative vibe and moving around the site is seamless.
Bold aesthetics SiriDahlOfficiall personal revelations, and an intimate atmosphere. Exclusive content is created without compromise—only for our audience, and only here.
Sensual style CocoLovelock Officiall vibrant energy, and an unfiltered format. Unique materials available exclusively in this space.
Лучшее казино онлайн пинап казино слоты, джекпоты, карточные игры и лайв-трансляции. Специальные предложения для новых и постоянных пользователей, акции и турниры каждый день.
Играешь в казино? https://eva-vlg.ru популярная онлайн-платформа с большим выбором слотов, настольных игр и лайв-казино. Бонусы для новых игроков, регулярные акции и удобные способы пополнения доступны круглосуточно.
Bright Bento Curated Picks – Wide selection of items with informative details for every product.
Seaside Fun at Moe’s – The upbeat environment and fresh updates are perfect for a quick visit.
find Hill Vendor products – Very clean interface and the overall experience feels inviting.
Нужен промокод казино? https://promocodenastavki.ru получите бесплатные вращения в популярных слотах. Актуальные бонус-коды, условия активации и пошаговая инструкция по использованию для новых и действующих игроков.
visit Iris Crate site – Layout is clean and product categories are very well arranged.
visit this market site – Design is clean and user experience is smooth.
Wheat Market Boutique – Browsing is fun thanks to the thoughtfully curated products.
browse Ruby Aisle – Clear sections and a tidy layout make finding items enjoyable.
shop Charm Vendor now – The unique selection adds a playful touch to the browsing experience.
discover Cedar Aisle – Ordering was simple and the whole site feels thoughtfully designed.
visit Apricot Market today – Contemporary design and quick filtering options make exploring items enjoyable.
Нужен компрессор? https://macunak.by для производства и мастерских. Надёжные системы сжатого воздуха, гарантия, монтаж и техническая поддержка на всех этапах эксплуатации.
Play unblocked games online without registration or downloading. A large catalog of games across various genres is available right in your browser at any time.
Работаешь с авито? магазин на авито профессиональное создание и оформление Авито-магазина, настройка бизнес-аккаунта и комплексное ведение. Поможем увеличить охват, повысить конверсию и масштабировать продажи.
Bench Breeze Picks Hub – Layout is neat and navigation throughout is very smooth.
Лучший выбор дня: Иглоукалывание от нервов: цена на терапию для вашего спокойствия
SkilletStreet Today – Products look appealing and browsing is quick and simple.
best sms activate service github.com/SMS-Activate-Alternatives .
CrystalAisle specials – A carefully arranged range of items with some nice surprises.
discover Reed Vendor – Simple site design and product categories make shopping effortless.
discover Moss Vendor – Bookmarking this to see new arrivals and make future purchases.
official Bright Bloomy hub – Friendly design and bright visuals make browsing effortless.
Satin Vendor Store – This one is going straight to my bookmarks for later.
Walnut Aisle Online Store – Browsing is fun thanks to clear layout and appealing product selection.
cannabis delivery in prague buy hashish in prague
cannabis in prague cali weed for sale in prague
buy weed in telegram cbd weed in prague
marijuana for sale in prague. weed in prague
hashish shop in prague buy thc joint in prague
Spring Crate Marketplace – I’ll revisit soon because shopping here is simple and quick.
LilacStore – The team resolved my problem swiftly and without complications.
IronVendor specials – Durable designs and solid materials make the store worth exploring.
check out Alpine Crate – Seems legitimate and worth navigating around a bit more.
Oktoberfest Party Updates – Ready for the fun and grateful for the clear breakdown of activities.
mostbet пополнение без комиссии http://mostbet61527.help/
Rocket Electronics Hub – Easy-to-use site and purchasing steps are intuitive.
Bronze Vendor Collections – Enjoyed the easy navigation and trustworthy layout here.
Rose Crate products – Smooth navigation and fun shopping, I’ll revisit soon.
shop Feather Market now – It’s clear this place focuses on unique and interesting goods.
Sage Vendor Online Store – Clean interface with smooth navigation makes shopping effortless.
City Party Guide – Love the originality and the interactive elements keep things exciting.
Uncommitted NJ Updates Hub – Straightforward explanations and transparency make the content easy to trust.
LoftMarket – Menus are easy to use and the filter options make shopping faster.
discover Coral Vendor – Clear descriptions and high-quality products make this shop dependable.
Glow Vendor products – The layout feels fresh and modern, making exploration enjoyable.
Modern Comfort Store – The ordering process was quick and surprisingly efficient.
Shop Violet Collection – The interface is smooth and browsing products is simple and enjoyable.
Nectar Trend Store – Seamless navigation and I quickly found exactly what I needed.
Best of Sea Vendor – Impressive assortment of items and checkout was simple and fast.
Amber Crate online – The site flows naturally, making it easy to look around.
Remi PHL Access – Smooth navigation and informative content make it easy to find everything.
Granite Online Market – Very smooth navigation with neatly arranged products.
NuPurple Plans & Costs – Helpful breakdowns and transparent details ensure everyone knows what to expect.
visit this store – Clear design and easy navigation make shopping effortless.
Ginger Crate Collection – Clean interface and effortless browsing experience.
Teal Vendor Finds – Pleasant shopping, items easy to locate, and checkout was smooth.
Ridge Vendor Store – Really impressed by the high-quality products and friendly support team.
Jovenix Boutique – Browsing is easy and the product arrangement feels logical.
check Ash Vendor – Navigation is intuitive and searching for items feels straightforward.
hemp for sale in prague hash in prague
cannabis store in prague cannafood delivery in prague
cannabis for sale in prague thc joint shop in prague
weed delivery in prague hash in prague
hashish for sale in prague hash delivery in prague
thc chocolate in prague hash in prague
Delta Marketplace – Products are solid and the checkout process went without any issues.
Aurora Picks Hub – The website is tidy and browsing through items is smooth.
visit this store – Discovered a few noteworthy items, I’ll be back again.
Bay Collection Hub – Great assortment of products and checkout went very smoothly.
Cumberland County NJ Vaccination Info – Clear guidance and helpful updates make this a valuable local resource.
Retail Glow Online – Browsing was pleasant, checkout was seamless and fast.
Wave Vendor Essentials – Great selection with a smooth and simple checkout experience.
buy thc vape in prague thc gummies for sale in prague
prague 420 prague 420
cannabis shop in prague kush
thc vape for sale in prague thc weed in prague
buy thc vape in prague buy marijuana in prague
shop Linen Vendor now – Clean interface and a smooth checkout make shopping effortless.
Ridge Online Store – Durable and high-quality items with customer care that truly listens.
EmberVendor Shop Hub – Found everything I wanted and checkout was seamless.
Lavender Marketplace – Unique selections and a trustworthy shopping experience.
Ash Market collections – Well-organized categories and a quick payment process make it pleasant to use.
Zen Marketplace – Very clear layout with helpful product information, making browsing easy.
Indigo Picks Hub – Layout is streamlined and the products are clearly selected with care.
Caramel Product Hub – Browsing was smooth and the overall site design is clean and simple.
Opal Wharf Online Hub – Very user-friendly with organized product listings and clear details.
Cycle for Sci Participation – Well-organized updates and inspiring content encourage involvement.
fairvendor.shop – Found exactly what I needed, site feels trustworthy overall today.
Field Favorites Shop – No confusion at all, just a quick find and easy order.
PlumVendor Corner – Smooth browsing experience, items are easy to find and well presented.
FreshCreek – Product pages are well-laid-out, and the speed is impressive.
EmberAisle specials – A few products really stood out, making me want to browse again.
cannafood shop in prague cannabis store in prague
buy thc chocolate in prague buy marijuana in prague
buy cali weed in prague marijuana in prague
thc gummies delivery in prague weed store in prague
Visit West Vendor – Smooth browsing experience with quick-loading pages and a tidy layout.
Sola Isle homepage – Clean presentation and a well-selected range of products enhance the browsing experience.
Jouez-vous au casino? https://sultan-willd-fr.eu.com une plateforme de jeux moderne proposant une variete de machines a sous, de jackpots et de jeux de table. Inscription et acces faciles depuis n’importe quel appareil.
Acorn Vendor Store – The site is very organized and easy to browse.
FrostTrack Online Store – Fast page loads and a tidy layout make it easy to find what you need.
Brass Online Shop – Detailed product info and smooth, fast-loading pages.
Pebble Vendor Boutique – The online selection was easy to explore and very pleasant overall.
Tide Vendor Marketplace – Layout is clean, and everything is easy to find.
O’Neill Legal Initiative – Easy-to-find information combined with a well-explained vision makes this site practical.
Jasper Home Finds – The amounts charged seem appropriate and the site feels authentic.
Visit here to find unique entertainment tips and detailed guides about the latest lifestyle trends. This platform is well-researched and provides a fresh perspective for anyone interested in high-quality content that isn’t covered by mainstream blogs. I especially like how they categorize their posts, making it easy to navigate through different themes without feeling overwhelmed.
WhimHarbor Online Store – Great overall design, pages are clear and browsing is hassle-free.
Check visit here for essential information regarding local community initiatives and the strategic goals set by leadership. The layout is very clear, which makes it easy to find specific data about upcoming public events and policy updates without much effort. It really helps bridge the gap by providing transparent and timely information that matters to every active citizen in the region.
Try Mr.Jackbet slots if you are looking for the official Mr.Jackbet platform with the most reliable slots and betting options. This destination is very professional and provides all the necessary details and service descriptions you might need before you start playing for real. It’s a great example of a secure environment that values transparency and makes it easy for users to find exactly what they need.
The official app download provides a highly optimized mobile experience for anyone looking to enjoy gambling and sports betting while on the move. The installation process is incredibly fast, and once you’re in, the interface feels much smoother and more responsive than the standard mobile browser version. I particularly appreciate the real-time notifications that keep you updated on your active bets and the latest promotional offers available.
At top online slots you will find an extensive library of licensed slots and live dealer tables that definitely cater to all types of players. The site has a reputation for offering very competitive bonuses with fair wagering requirements, making it a solid choice for both beginners and pros. I’ve personally found their withdrawal process to be quite efficient, which is always a top priority when choosing a new platform.
Flora Product Hub – I like the clean design and how easy it is to browse items.
visit this store – Pages load quickly, and the layout feels polished and professional.
this online boutique – Browsing here is smooth, and every item seems carefully picked.
Clear Trend Store – Navigation is intuitive and the products catch attention easily.
Wicker Lane Essentials – Quick browsing, easy navigation, and checkout went very smoothly.
Morning Crate Finds – Everything I wanted was easy to locate and checkout was simple.
Best of Grove Aisle – Products are organized well and browsing is fast.
Ocean Online Shop – Fast-loading pages and a good variety of products make browsing easy.
SunCrateStore – This site is easy to reference and perfect for future purchases.
EmberBasket Online Store – Easy navigation and clear product details make shopping enjoyable.
Juniper Product Hub – The delivery speed was great and the parcel was carefully sealed.
проект перепланировки квартиры проект перепланировки квартиры .
Santander down caiu.site .
N3rd Market Corner – The creative approach and lively updates make it hard not to return.
Казино лекс Казино лекс .
Казино лекс Казино лекс .
заказать кухню с установкой zakazat-kuhnyu-3.ru .
заказать кухню по индивидуальным размерам zakazat-kuhnyu-2.ru .
Thistle Picks Hub – The variety is impressive and product info is very clear and helpful.
JollyMart Store – Pages load fast and the selection of items is really convenient.
Hazel Shopping Spot – Everything worked perfectly and support responded very efficiently.
Shore Vendor Products – Browsing is quick and all sections are easy to access.
Oak Market Store – The site has a welcoming feel, making browsing a pleasant experience.
заказать кухню в интернете zakazat-kuhnyu-1.ru .
At Amunra bonus players in the Czech region can experience high-quality slots and live dealer games in a completely secure and localized environment. The site supports popular local payment methods and offers 24/7 customer support to resolve any technical or account issues as quickly as possible. It’s a very reliable destination for those looking for a smooth registration process and a diverse library of certified casino games.
Playing Plinko game link is a fantastic way to experience this classic arcade-style game with modern graphics and certified fair mechanics. The interface is very straightforward, allowing you to jump straight into the action without dealing with overly complicated settings or menus. It’s perfect for those who enjoy quick gaming sessions where the outcome is clear and the gameplay remains consistently engaging.
Inside secure India portal you will find a massive selection of games specifically tailored for the Indian market, including hits like Teen Patti and Andar Bahar. The platform utilizes high-level encryption to ensure all transactions and personal data remain secure at all times. I also found that they offer excellent local deposit options, which makes the whole experience much more convenient for users in the region.
Visit Sportuna login link if you are looking for a premium gaming experience in Greece with a heavy focus on sports-themed slots and live betting. The site is fully localized, making navigation easy for Greek speakers, and the bonus offers are quite generous for new registrations. They have a great mix of classic casino games and modern sportsbook features that keep the overall experience very diverse.
On Boomerang casino link you can enjoy a very engaging loyalty program that rewards active players with frequent cashback and exclusive tournament invitations. The platform is highly stable and performs well on both desktop and mobile browsers, ensuring you never miss a beat. It’s a great choice for those who value long-term rewards and a consistent gaming environment with plenty of variety.
joc mines 1win http://www.1win5805.help
Lunar Vendor Marketplace – Helpful and professional service made my experience smooth.
Best of Birch Vendor – Everything looks professional and the shopping experience is reassuring.
QuickCarton Spot – Very easy to browse, everything is displayed clearly and professionally.
Raven Vendor Online – The navigation flows naturally and the pages are clean and readable.
заказать проект перепланировки квартиры в москве teletype.in/@jorik11/proekt-dlya-pereplanirovki .
Icicle Crate Online – Fast shipping and products are exactly as described, very satisfied.
мостбет почта поддержки мостбет почта поддержки
Hagins Public Info – Well-defined priorities and dedicated service make this site very informative.
YouTube caiu caiu.site .
Walnut Vendor Picks – Checkout was effortless and the store feels very professional.
Рейтинг казино без верификации Рейтинг казино без верификации .
Казино лекс Казино лекс .
Reading casino review portal will give you a detailed overview of the platform’s features, from its unique space-themed design to its massive game library. This expert review breaks down the pros and cons, helping you decide if their current welcome package fits your playing style. It’s a very helpful resource for anyone who likes to do a bit of research before committing to a new online casino.
Visiting Spain digital portal is essential for those tracking the latest digital trends and platform launches in Spain for the upcoming year. The site provides technical details and roadmap updates that are quite valuable for anyone involved in the local tech or gaming sectors. It serves as an official hub for news and announcements regarding several key digital initiatives starting in early 2024.
Floral Vendor Store – Navigation is smooth and the product selection feels thoughtfully arranged.
On top Mexico news you will find a wide range of articles covering everything from local football to international sports tournaments. It’s a comprehensive portal for anyone who wants to stay updated on Mexican sports without having to visit multiple different news sites. The quality of the reporting is very high, and they cover a diverse range of athletic disciplines beyond just soccer.
Visiting Mexico player link gives you a detailed look into the career and professional achievements of one of Mexico’s top football stars. The site includes exclusive content, career milestones, and regular updates that are perfect for dedicated fans of the midfielder. It’s a well-organized tribute to his journey from local clubs to the international stage and his ongoing impact on the sport.
Explore betting tips link to find professional analysis and data-driven predictions for all major sporting events in the region. The site uses advanced statistical models to help users make more informed decisions when placing their bets on football, baseball, or other popular sports. It’s a great starting point for anyone looking to add a layer of expert insight to their wagering strategy.
Shop Shore Vendor – Browsing feels simple and the website is user-friendly.
1win apk ölçüsü 1win apk ölçüsü
1win suport live chat https://1win5805.help
заказать кухню стоимость zakazat-kuhnyu-3.ru .
shop Cart Catalyst now – The interface is clean, and exploring products feels natural and easy.
1win plinko 2026 http://www.1win5767.help
заказать кухню под размеры заказать кухню под размеры .
visit this store – Organized layout and intuitive design made finding items fast.
Mist Vendor Online Hub – Items are well presented and the layout makes shopping simple.
ZenMarket – Love the calm look and how easy it is to understand each item.
joc plinko 1win http://1win5805.help
Yornix Marketplace – Staff were attentive and responsive, made my purchase experience smooth.
Seasonal Blossom Finds – The write-ups are informative and the updates arrive on a regular basis.
At latest Mexico offers you can view all current promotional offers, including the welcome package for new users and weekly reload rewards. It’s a good idea to check this page regularly because they often update the terms and add exclusive seasonal bonuses for active players. I’ve managed to boost my bankroll significantly just by keeping an eye on their latest deposit matches.
Checking Chivas official link is a must for any fan looking for the latest news, match schedules, and official team updates. The portal provides in-depth coverage of the club’s performance and includes exclusive interviews with players and coaching staff throughout the season. It’s the most reliable source for verified information regarding upcoming fixtures and official club announcements.
This top Monterrey team portal provides comprehensive coverage of the club’s history, current roster, and community initiatives in the Monterrey region. I check it regularly for official injury reports and transfer news to stay updated on the team’s latest developments. It’s a great resource for dedicated supporters who want to follow every aspect of the club’s journey in the league.
See official stats link for the most accurate statistics and official statements directly from the club’s management this season. The site offers a detailed look at the team’s performance metrics and upcoming match analysis, which is perfect for fans who like to dive deep into the numbers. It’s a professional and well-maintained site that serves as the official voice of the team for its loyal fanbase.
Using official info site ensures that you are only accessing verified and licensed operators that fully comply with local Mexican laws. This guide is essential for players who prioritize financial security and want to avoid offshore sites with questionable reputations. It provides a clear list of legal platforms and explains the current regulations in a way that is very easy to understand.
Drift Shopping Spot – Browsing feels effortless and the product details are very clear and informative.
Quick Meadow Boutique – Fast site performance and clear product info made shopping easy.
online Item Cove boutique – Just visited and the bargains look attractive.
discover Velvet Vendor X – Clean and polished layout, moving through products is easy.
Maple Supply Online – Had a fun browsing session, lots of items to check out.
modern classic boutique – Stumbled upon it and the selection feels premium and polished.
глория мебель kuhni-spb-41.ru .
заказать кухню в интернете заказать кухню в интернете .
согласование переоборудования квартиры sites.google.com/view/dokument-dlya-pereplan/главная-страница .
заказать проект перепланировки квартиры teletype.in/@jorik11/proekt-dlya-pereplanirovki .
Best of Key Vendor – Very pleased with both product quality and speed of delivery.
Judge Hall Campaign Hub – Insightful details and well-structured information help voters understand the platform.
Mint Collection Hub – Very organized and the shopping process feels trustworthy.
Топ 10 казино онлайн Топ 10 казино онлайн .
заказать индивидуальную кухню zakazat-kuhnyu-1.ru .
WhatsApp caiu WhatsApp caiu .
Казино лекс Казино лекс .
Bouton Studio – Clear layout with products showcased beautifully for users.
Olive Vendor Marketplace – Layout is clean and shopping feels seamless throughout.
заказать кухню на заказ заказать кухню на заказ .
MarketPearl Corner – Site layout is clean and finding items is effortless.
Best of Finch Vendor – They responded almost immediately and sorted things out seamlessly.
Hovanta Online Shop – Very user-friendly design and smooth browsing throughout.
заказать кухню с замером zakazat-kuhnyu-2.ru .
trendy online marketplace – Items stand out and the shop layout is well done.
шлюхи без купить героин в шарье
Brook Online Shop – Made a strong first impression and I’m eager to return.
купить книгу героин или ты пристрастился порно ебут шлюху
газель с грузчиками московские грузчики
грузчики мебели услуги грузчиков день в день
check out Market Whim – Plenty of variety here, there’s something for every taste.
Pebble Supply Online – Easy to browse and the design is neat, making shopping enjoyable.
Медицинская мебель https://tenchat.ru/0614265/ это основа оснащения клиник, лабораторий и частных кабинетов. Мы предлагаем мебель медицинская для любых задач: шкафы, столы, тумбы, стеллажи и специализированные решения. В ассортименте можно купить медецинскую мебель, соответствующая санитарным требованиям и стандартам безопасности.
слоты mostbet http://www.mostbet52718.help
harborvendor.shop – Pleasant experience, everything loaded quickly and looked professional.
Ivory Collection Hub – Clean design and well-organized items make browsing enjoyable.
услуги по печати полиграфической продукции https://webyourself.eu/blogs/1813907/%D0%9D%D0%B0%D0%B2%D0%B8%D0%B3%D0%B0%D1%86%D0%B8%D1%8F-%D0%BD%D0%B0-%D1%84%D0%B5%D1%81%D1%82%D0%B8%D0%B2%D0%B0%D0%BB%D0%B5-%D1%83%D0%BA%D0%B0%D0%B7%D0%B0%D1%82%D0%B5%D0%BB%D0%B8-%D0%BF%D1%80%D0%BE%D0%B3%D1%80%D0%B0%D0%BC%D0%BC%D0%BA%D0%B8-%D1%84%D0%BB%D0%B0%D0%B5%D1%80%D1%8B .
Smyrna Fest Info Center – Excited to explore the performers and see the latest festival news.
проект перепланировки квартиры проект перепланировки квартиры .
this online store – Navigation is smooth and every item is easy to locate.
Рейтинг казино без верификации Рейтинг казино без верификации .
кухни под заказ в спб kuhni-spb-41.ru .
согласование перепланировки в москве согласование перепланировки в москве .
Explore Honey Market – Fast site and product visuals are very clear and appealing.
заказать кухню по своим размерам заказать кухню по своим размерам .
TIM caiu TIM caiu .
Казино Гизбо Казино Гизбо .
мостбет apk скачать Киргизия mostbet52718.help
knicknook.shop – Such charming small treasures, I’ll be saving this for later purchases.
пин ап казино вход в личный кабинет https://games-pinup.ru
Play online https://bloxd-io.com.az for free right in your browser. Build, compete, and explore the world in dynamic multiplayer mode with no downloads or installations required.
Football online https://qol.com.az goals, live match results, top scorers table, and detailed statistics. Follow the news and never miss the action.
El sitio web oficial de Kareli Ruiz https://karelyruiz.es/ ofrece contenido exclusivo, noticias de ultima hora y actualizaciones periodicas. Mantengase al dia con las nuevas publicaciones y anuncios.
Lily Phillips lilyphillips es te invita a un mundo de creatividad, conexion y emocionantes descubrimientos. Siguela en Instagram y Twitter para estar al tanto de nuevas publicaciones y proyectos inspiradores.
Lumvanta Hub – Enjoyed exploring the collection, everything feels well organized.
CelNova Shop Online – Browsing is effortless, pages load fast, and checkout was seamless.
Coastal Trend Shop – I’m marking this store to revisit when I need more items.
the Timber Vendor selection – Love the rustic touches, and site navigation is fluid.
discover Jewel Vendor – Photos are crisp, professional, and highlight the products well.
Leaf Vendor Store – Products feel premium and the prices are fair throughout.
North Vendor Hub – Smooth browsing experience, product information is very clear.
Frost Online Shop – Items were accurate and completing the order was hassle-free.
заказать кухню на заказ заказать кухню на заказ .
заказать индивидуальную кухню zakazat-kuhnyu-1.ru .
1win sign up 1win5805.help
chiccheckout.shop – Checkout is easy and the layout keeps shopping simple and fast.
печать полиграфии в Москве https://exchange.prx.org/series/60434 .
Best of Lemon Crate – Affordable and high-quality, I’ll visit this store again.
проект перепланировки москва проект перепланировки москва .
Онлайн казино в телеграм Онлайн казино в телеграм .
DepotGlow Finds – Browsing was easy and the items are top-notch for the price.
TIM caiu TIM caiu .
Рейтинг 10 лучших онлайн казино Рейтинг 10 лучших онлайн казино .
Mist Market store – Interesting products and payments go through quickly and securely.
кухни на заказ в спб цены kuhni-spb-41.ru .
узаконить перепланировку москва sites.google.com/view/dokument-dlya-pereplan/главная-страница .
заказать кухню с установкой zakazat-kuhnyu-4.ru .
favorite seaside shop – It has a distinctive charm and a well-balanced presentation.
curious shopper’s hub – Well-laid-out pages make browsing simple and efficient.
Luster Supply Online – The recent additions were fun to browse and explore.
заказать кухню по индивидуальному проекту заказать кухню по индивидуальному проекту .
cont 1win http://www.1win5805.help
мостбет KGS счет mostbet52718.help
заказать кухню цены zakazat-kuhnyu-2.ru .
услуги печати в Москве https://exchange.prx.org/series/60404 .
заказать проект перепланировки квартиры teletype.in/@jorik11/proekt-dlya-pereplanirovki .
Казино онлайн бесплатно Казино онлайн бесплатно .
xernita.shop – Images are sharp and the categories are well organized.
1win kazino slotlar 1win kazino slotlar
Dapper Aisle – A sleek and modern shopping space offering refined selections for everyday style.
Kovique Hub – A chic e-commerce space highlighting modern and unique offerings.
WhatsApp caiu WhatsApp caiu .
Казино волна Казино волна .
Gild Vendor – A polished online marketplace offering premium selections and curated deals.
Xerva Online – Clean and intuitive layout makes exploring items very straightforward.
заказать кухню с установкой zakazat-kuhnyu-1.ru .
Everyday Zen – Navigating through the store has been quick, smooth, and pleasant recently.
lorvana.shop – The items here look intriguing and worth a closer look.
1win aviator retragere http://1win5805.help/
Amber Essentials – Loved the selection and completing my purchase was very easy.
mostbet акции Кыргызстан 2026 http://www.mostbet52718.help
услуги по перепланировке квартир услуги по перепланировке квартир .
заказ кухни спб заказ кухни спб .
mostbet лайв казино https://mostbet52718.help
Go to OpalVendor – Great selection of products and browsing was straightforward.
заказать кухню в рассрочку zakazat-kuhnyu-4.ru .
visit XenialCart – Shopping is smooth and the selection appears reasonably priced.
Azərbaycanda 1win bonus Azərbaycanda 1win bonus
visit Cormira – Clean aesthetics and smooth navigation make shopping a pleasure.
полиграфическое производство https://www.esurveyspro.com/survey.aspx?id=503f7e44-3cc3-4c80-ad92-3dd7e38a54fe .
Visit Orbit Crate – The design is clean and page transitions are fast.
Pebble Vendor – A thoughtfully curated marketplace featuring compact yet impactful products.
Xolveta Shop – A fresh online destination focused on innovative products and smooth browsing.
Browse Xerva – Store design is intuitive, so navigating items today was smooth.
Smart Picks Night – Good selection and costs seem reasonable for current shoppers.
Smart Picks Cart – Amazing deals available and my order reached me very quickly.
browse Sernix – Fast-loading pages make checking out products quick and enjoyable.
QuickWharf Online – Smooth transaction and items reached me ahead of schedule.
1win bonus faollashtirish 1win5767.help
согласование перепланировок согласование перепланировок .
official Nook Harbor site – Warm vibe and I’d happily come back for another visit.
кухни на заказ в спб от производителя kuhni-spb-41.ru .
сколько стоит заказать кухню сколько стоит заказать кухню .
заказать кухню в интернете zakazat-kuhnyu-1.ru .
1win pul çıxarma 1win pul çıxarma
The Sorniq Spot – A creative destination combining functional products with stylish and original finds.
curated Yorventa collection – The variety is striking and grabbed my focus at first glance.
печатное производство https://teletype.in/@writes/6s1s5pxlws9 .
Zintera – The website loads fast and the design is fresh and modern.
Xerva Online – Clean and intuitive layout makes exploring items very straightforward.
Harbor Mint – A calm and curated marketplace inspired by coastal charm and clean design.
Joy Curated – Support responded quickly and resolved the issue smoothly.
stylish finds online – Great variety here that drew my attention quickly.
Melvora Marketplace – Modern feel and moving through categories is fast and simple.
curious shopper’s hub – Pricing feels right and product info is clear for easy decision-making.
Aisle Whisper Picks – Found a few standout products that made shopping fun and worthwhile.
1win xoş gəldin bonusu Azərbaycan http://www.1win5763.help
внедрение 1с ерп внедрение 1с ерп .
Cobalt Crate – A bold and reliable platform delivering standout selections with confidence.
Ravlora Treasures – Fast and efficient support resolved my problem easily.
Smart Picks Xerva – Browsing products today was simple thanks to the neat store layout.
кухни спб на заказ кухни спб на заказ .
Everyday Trend – Clear and structured categories make exploring products effortless.
полиграфическая компания https://scrapbox.io/toppost/Как_отличить_типографию_полного_цикла_от_посредника%3F .
Silk Vendor – A polished platform delivering quality finds with a touch of elegance.
official Value Whisper site – Products are priced well and descriptions are straightforward.
Check out CraftQuill Shop – Quality is outstanding and everything arrived as expected.
discover Order Quill – The clean format allows items to stand out clearly.
modern Quelnix shop – Layout feels clean and the small touches improve the overall experience.
заказать кухню с доставкой zakazat-kuhnyu-1.ru .
Quick Shop Worvix – Checkout was fast and payment methods worked perfectly.
Timber Cart – A warm and grounded online shop inspired by rustic charm and practical choices.
1с внедрение erp http://1s-erp-vnedrenie.ru/ .
Everyday Xerva – The interface is neat and makes exploring products quick and effortless.
Farniq Hub – Found some stylish items here that fit my taste flawlessly.
заказать кухню заказать кухню .
заказать кухню цены zakazat-kuhnyu-2.ru .
yarrowcrate.shop – Detailed product descriptions made selecting items very straightforward.
the Vault Basket selection – Everything is nicely categorized and easy to explore.
перепланировка квартиры в москве sites.google.com/view/dokument-dlya-pereplan/главная-страница .
Zest Vendor – A vibrant shop filled with energetic picks and exciting discoveries.
кухни от производителя спб kuhni-spb-43.ru .
ленинградские кухни ленинградские кухни .
Shop at Inqvera – Moving through categories is easy and payment is swift.
smart shopping spot – Wide selection and everything appears immediately with no lag.
1win ilova ochilmayapti 1win ilova ochilmayapti
кухни на заказ от производителя в спб кухни на заказ от производителя в спб .
1win verificación de identidad 1win verificación de identidad
1win aksiyalar https://www.1win5763.help
сколько стоит заказать кухню сколько стоит заказать кухню .
this online vendor – First impressions are positive, and the checkout steps look straightforward.
Irnora Essentials – Found items here that are unique and not easy to get on other websites.
Gild Vendor – A polished online marketplace offering premium selections and curated deals.
Frost Aisle – A cool and refreshing store presenting crisp deals and clean design.
Xerva Finds – Easy-to-navigate store layout made finding products today very simple.
внедрение 1с ерп внедрение 1с ерп .
Browse Ripple Aisle – Attractive offers paired with clear images make product selection easy.
quality online boutique – Easy navigation and comfortable shopping make it a nice visit.
aviator juego 1win aviator juego 1win
retargetroom deals page – Some worthwhile products here, saving it for my next purchase.
Silk Hub – Quality looks impressive and costs are reasonable for most products.
serverstash utility hub – Smooth navigation and a well-laid-out collection of practical tools.
купить кухню в спб от производителя купить кухню в спб от производителя .
кухня глория kuhni-spb-44.ru .
1win app no abre 1win app no abre
изготовление кухни на заказ в спб kuhni-spb-42.ru .
Holvex shop online – Minimalist design with intuitive flow created a smooth browsing experience.
Fintera Treasures – Intuitive navigation and neat category structure make for smooth shopping.
Zarnita – A modern and distinctive platform showcasing unique items for curious shoppers.
Orqanta Online – A forward-looking store offering smooth browsing and unique product choices.
Xerva Essentials – Browsing items is hassle-free with the clean and organized layout.
the zenvorax website – Crisp, clean interface makes product discovery seamless.
Official ItemTrail Site – Customer support responded quickly and made the solution simple.
GoodsQuarry Online – I like the mix of products and the pricing appears sensible.
Nook Marketplace – Intuitive, modern layout makes exploring the store a pleasure.
modern Yovrisa store – Browsed for the first time and the variety is surprisingly good.
внедрение erp стоимость 1с внедрение erp стоимость 1с .
this showcase hub – Loved browsing the selections, can’t wait to return later.
1win login səhifəsi 1win login səhifəsi
revenueharbor profit hub – An appealing platform for anyone aiming to grow steady web income streams.
lucky jet o‘yin 1win lucky jet o‘yin 1win
kelnix product hub – Interesting selections that appear intentionally picked and well thought-out.
изготовление кухни на заказ в спб изготовление кухни на заказ в спб .
кухни на заказ петербург kuhni-spb-43.ru .
Acorn Treasures – Very neat and professional design, browsing items is quick and simple.
Effortless Cerlix – A smooth marketplace offering an enjoyable and efficient shopping experience.
кухни в спб от производителя кухни в спб от производителя .
Explore Xerva – Store design is clean and navigating products feels effortless.
Aerlune Curated – A sophisticated shopping destination focused on elegant and effortless selections.
Browse Liltharbor – Clean layout helps me find exactly what I need.
Velvet Finds – Easy and reassuring checkout experience, especially for first-time users.
keepcrate product page – Well-arranged items, browsing is simple and enjoyable.
Shaker Station Store – Wide range of products, easy to browse and find what you need.
внедрение 1с erp внедрение 1с erp .
official prenvia site – Smooth browsing with clear product displays, everything loads without delay.
check this resource – Packed with opportunities to strengthen your digital earning potential.
Нужны столбики? мобильный столбик столбики для складов, парковок и общественных пространств. Прочные материалы, устойчивое основание и удобство перемещения обеспечивают безопасность и порядок.
Amber Hub – Honest pricing and well-written descriptions make browsing products simple.
trusted shopping spot – The product highlights are informative and well laid out.
кухня по индивидуальному заказу спб кухня по индивидуальному заказу спб .
кухни на заказ в спб цены kuhni-spb-43.ru .
Looking for a yacht? affordable yacht charter Cyprus for unforgettable sea adventures. Charter luxury yachts, catamarans, or motorboats with or without crew. Explore crystal-clear waters, secluded bays, and iconic coastal locations in first-class comfort onboard.
купить кабель 6 кабель минск
The Xerva Spot – Store feels well-arranged, making product browsing today a smooth experience.
заказать кухню спб заказать кухню спб .
Icicle Mart – A sharp and efficient marketplace focused on clarity and convenience.
1win bitcoin https://www.1win5771.help
Wavlix Picks – Excellent range of products and a hassle-free shopping process overall.
SheetStudio shop online – Attractive layouts with modern designs make exploring the templates easy.
JollyVendor Storefront – Fair costs and the process from cart to payment was seamless.
Check out GarnetDock – The interface is tidy and straightforward to use.
official cometcrate site – Unique concept with items that feel intentionally chosen and enjoyable.
1win live kazino 1win live kazino
MeridianBasket Store – Wide selection with competitive pricing that seems fair.
внедрение erp на предприятии внедрение erp на предприятии .
Dapper Marketplace – Very smooth and enjoyable, navigating products was simple.
мелбет crash game https://melbet41263.help/
ryzenrealm storefront – I liked the crisp look and the straightforward navigation today.
Explore Xerva – Store design is clean and navigating products feels effortless.
кухни в спб на заказ кухни в спб на заказ .
кухни на заказ в спб от производителя кухни на заказ в спб от производителя .
Yield Mart – A practical and value-driven store offering rewarding choices every day.
check these safe deals – Layout and navigation create a sense of security while exploring products.
Go to WhimVendor – Trustworthy website, I’ll be back for future orders.
кухня глория kuhni-spb-42.ru .
mines 1win como jugar https://1win5771.help/
NimbusCart specials – The entire purchase process felt polished and checkout was flawless.
JewelAisle products – Navigation is intuitive and the product selection is great.
Grenvia collections – Shopping felt easy with smooth navigation and a fast checkout process today.
their shopping portal – Solid selection with fair prices, definitely worth checking out.
Umbramart products – Shopping today was smooth, and the website loaded very quickly.
briskparcel collection – Smooth purchase process, everything feels secure and fast.
1win sitio alternativo https://1win5771.help
shopnshine fashion corner – Bright and stylish selection that’s easy on the wallet.
safesavings storefront – Solid range of cost-cutting options that make a real difference.
adster – Appreciate the typography choices; comfortable spacing improved my reading experience.
Visit the TerVox Shop – Support staff were responsive and very helpful.
reacho – Content reads clearly, helpful examples made concepts easy to grasp.
заказать кухню в спб от производителя заказать кухню в спб от производителя .
заказать кухню в спб от производителя заказать кухню в спб от производителя .
кухни под заказ кухни под заказ .
FlintCove Store – Discovered some excellent products and the pricing feels fair today.
MaplePick online store – The lineup is diverse and the prices appear sensible.
Wenvix Store – Completing my purchase was fast, easy, and hassle-free today.
quirkcove.shop – Unique vibe throughout the store, really stands apart visually.
promova – Mobile version looks perfect; no glitches, fast scrolling, crisp text.
discover Plumparcel – Navigation was easy thanks to the clean design and neatly organized product sections.
rankora – Bookmarked this immediately, planning to revisit for updates and inspiration.
signalstation knowledge hub – Actionable strategies and clear insights for anyone in marketing.
trendfunnel – Pages loaded fast, images appeared sharp, and formatting stayed consistent.
this shopping hub – Modern feel with thoughtful product displays, visually appealing experience.
seamstory official store – A refined collection showcased in a way that’s easy to appreciate.
scaleify – Loved the layout today; clean, simple, and genuinely user-friendly overall.
ParcelMint offers – The search was fast and I grabbed exactly what I needed.
GlenVox online – Fast and secure checkout paired with a user-friendly interface.
discover Zestycrate – Some cool finds and checkout was easy and secure.
RavenAisle online store – Spotted a few unusual items that feel exclusive to this shop.
sitefixstation repair corner – Troubleshooting instructions are clear and simple to apply.
NightCrate online – Appealing range of products, seems worth revisiting soon.
searchsignal storefront – Useful concepts presented in a way that feels both clear and practical.
browse latchbasket – Plenty of interesting products, I’ll definitely return here.
Jaspercart Store – The prices seemed reasonable and placing my order was simple.
official QuillMarket site – Everything is organized well and browsing feels smooth.
sitemapstudio official store – Tools are neatly organized, making sitemap creation smooth and simple.
HollowCart deals – Browsing was effortless and intuitive, despite using an older mobile phone.
ZephyrMart online – Seamless interface, finding what I needed was fast and easy.
Dollyn deals – Support team responded fast and fixed my issue without delays.
this shopping hub – Clear product layouts and informative descriptions make browsing simple.
SeaSpray boutique – The sea-inspired presentation pairs nicely with fair value offerings.
the socialsignal website – Modern, fresh approach to social branding that feels practical.
shop at Harlune – Their customer care got back to me quickly and solved everything with ease.
melbet киргизия вход melbet киргизия вход
trusted BasketBerry shop – My queries were answered fast and politely by the support team yesterday evening.
pin-up mirror https://pinup37056.help/
lucky jet game мелбет lucky jet game мелбет
elvorax.shop – Modern layout and smooth navigation make browsing effortless.
нарколог на дом срочно ростов-на-дону narkolog-na-dom-v-rostove.ru .
discover Lemon Lane – The selection stands out and everything is sorted nicely.
срочный вызов нарколога на дом ростов narkolog-na-dom-v-rostove-1.ru .
1win скачать приложение https://1win19643.help
velvetpick product hub – Well-designed layout with sharp product photos, browsing feels premium.
securestack info page – Professional aesthetics combined with a noticeable security-first focus.
official DahliaNest site – Product info is precise, well explained, and genuinely helpful for buyers.
melbet казино вход http://melbet41263.help
pin-up Visa ilə depozit http://pinup09715.help/
pin-up depositar pin-up depositar
частный нарколог на дом в ростове narkolog-na-dom-v-rostove.ru .
pinup aviator juego http://pinup37056.help/
Gildcrate online store – Delivery was faster than expected and the quality surpassed what I imagined.
частный нарколог на дом в ростове частный нарколог на дом в ростове .
WovenCart Store – My order arrived quickly and the packaging was flawless today.
their optimization portal – Beginner-focused SEO lessons are presented in a clear and engaging way.
LoftLark shop online – Effortless browsing thanks to a smooth and clear interface.
мелбет скачать кыргызстан мелбет скачать кыргызстан
врач нарколог на дом в ростове narkolog-na-dom-v-rostove.ru .
вызов нарколога на дом в ростове вызов нарколога на дом в ростове .
KettleCart catalog – The structure is clean and the product explanations are easy to read.
1win http://www.1win19643.help
YoungCrate catalog – Items are priced fairly and compare well to similar online stores.
наркологическая служба на дом ростов-на-дону narkolog-na-dom-v-rostove-1.ru .
Scarlet Crate Shop – Navigation is intuitive and the pages load quickly without issues.
мелбет киргизия вход https://melbet41263.help
1win на компьютер http://www.1win19643.help
xarnova.shop – Modern branding and carefully curated products make this store feel trustworthy.
наркологическая помощь на дому ростов narkolog-na-dom-v-rostove.ru .
official Werniq site – The checkout process went flawlessly and I liked the variety of payment methods.
нарколог на дом ростов круглосуточно нарколог на дом ростов круглосуточно .
Dorlix offers – Polished design, intuitive layout, and a very professional feel overall.
pin-up пинап https://www.pinup37056.help
Quartz Vendor Online Shop – Navigation is quick and the product selection is easy to browse.
нарколог на дом ростов круглосуточно нарколог на дом ростов круглосуточно .
врач нарколог на дом в ростове narkolog-na-dom-v-rostove.ru .
discover Indigo Aisle – The site was engaging and I’ll happily return in the near future.
shop at JetStreamMart – I had a seamless and enjoyable browsing experience today.
Oak Vendor Online – Navigation is simple and I was able to find products without any hassle.
нарколог на дом стоимость ростов-на-дону narkolog-na-dom-v-rostove-2.ru .
pin-up atención al cliente Chile https://pinup37056.help
выезд нарколога на дом ростов-на-дону narkolog-na-dom-v-rostove.ru .
1win подтвердить аккаунт 1win19643.help
вызвать нарколога на дом ростов-на-дону вызвать нарколога на дом ростов-на-дону .
pin-up qeydiyyat necə https://pinup09715.help
Rackora Home – Loved the assortment and shopping flows smoothly.
вызов нарколога на дом в ростове вызов нарколога на дом в ростове .
нарколог на дом цена в ростове нарколог на дом цена в ростове .
вывод из запоя в клинике в ростове vyvod-iz-zapoya-v-rostove-1.ru .
вывод из запоя в ростове-на-дону на дому vyvod-iz-zapoya-v-rostove-3.ru .
For those seeking an exceptional online gaming experience, us.com](https://maxispin.us.com/) stands out as a premier destination. At Maxispin Casino, players can enjoy a vast array of pokies, table games, and other thrilling options, all accessible in both demo and real-money modes. The casino offers attractive bonuses, including free spins and a generous welcome offer, along with cashback promotions and engaging tournaments. To ensure a seamless experience, Maxispin provides various payment methods, efficient withdrawal processes, and reliable customer support through live chat. Security is a top priority, with robust safety measures and a strong focus on responsible gambling tools. Players can easily navigate the site, with detailed guides on account creation, verification, and payment methods. Whether you’re interested in high RTP slots, hold and win pokies, or the latest slot releases, Maxispin Casino delivers a user-friendly and secure platform. Explore their terms and conditions, read reviews, and discover why many consider Maxispin a legitimate and trustworthy choice in Australia.
It features advanced tools to produce distinctive and engaging textual content.
**Features of MaxiSpin.us.com**
The interface of MaxiSpin.us.com is intuitive and easy to navigate.
**Benefits of Using MaxiSpin.us.com**
MaxiSpin.us.com is cost-effective, delivering high-quality content at a much lower cost than traditional approaches.
Zen Treasures – Browsing feels seamless, with no difficulties in navigation recently.
вывод из запоя цена в ростове вывод из запоя цена в ростове .
Shop Brisk Harbor – Shipping was fast, and every step of ordering felt seamless.
Urbanparcel Home – Smooth browsing and the items feel genuinely appealing.
вывод из запоя клиника в ростове вывод из запоя клиника в ростове .
установка модулей газового пожаротушения установка модулей газового пожаротушения .
Willowvend Store – Very impressed with the clean design and easy navigation.
вывод из запоя в стационаре в ростове-на-дону vyvod-iz-zapoya-v-rostove-2.ru .
cupón pin-up cupón pin-up
browse Silver Vendor items – Checkout process is user-friendly and completed quickly.
нарколог на дом в ростове на дону нарколог на дом в ростове на дону .
1win_kg http://1win19643.help
1win бонус код 1win бонус код
Acornmuse Deals – Really liked checking out the selection, all products seem premium.
выезд нарколога на дом ростов-на-дону narkolog-na-dom-v-rostove-1.ru .
TrendNook Collection – Fast browsing and products are shown in a very clear way.
TinyHarbor Collection – Excellent deals, bookmarking this for later browsing.
Fioriq Collection – Picked out distinctive products and the purchase process was straightforward.
mostbet mines mərci necə qoyulur mostbet mines mərci necə qoyulur
Listaro Products – Items are neatly displayed and navigation feels natural.
Night Essentials – Great assortment and reasonable costs make browsing enjoyable.
Xerva Hub Online – Overall, the store is organized well and exploring items today felt effortless.
Official Torviq Site – Came across a variety of interesting items while browsing.
вывод из запоя в стационаре в ростове-на-дону вывод из запоя в стационаре в ростове-на-дону .
нарколог на дом ростов круглосуточно нарколог на дом ростов круглосуточно .
наркологическая помощь на дому ростов наркологическая помощь на дому ростов .
Isveta Store – Found this store recently and the selection really impressed me.
Evoraa Webstore – Everything feels streamlined and product pages are clean.
вывод из запоя в стационаре в ростове на дону вывод из запоя в стационаре в ростове на дону .
анонимный вывод из запоя в ростове vyvod-iz-zapoya-v-rostove-1.ru .
Wild Crate Items – The site design is crisp and performance is excellent on phones.
Explore LiltStore – Smooth product browsing and everything works perfectly.
круглосуточный вывод из запоя в ростове круглосуточный вывод из запоя в ростове .
стоимость монтажа газового пожаротушения montazh-gazovogo-pozharotusheniya.ru .
pin-up rəsmi ünvan https://pinup09715.help
shop the Slate Vendor brand – Moving around the site is simple and enjoyable.
inqora.shop – Smooth browsing, everything loads quickly and products look great.
вывод из запоя в стационаре в ростове вывод из запоя в стационаре в ростове .
срочный вызов нарколога на дом ростов срочный вызов нарколога на дом ростов .
Yovique Shopping – Pages load fast and the product selection is very appealing.
Upcarton Webstore – The site runs smoothly and is simple to explore.
Artisanza Specials – Eye-catching selections and an optimized experience for mobile users.
Shop at RoseOutlet – Products caught my eye and checkout was very straightforward.
Zintera – The website loads fast and the design is fresh and modern.
Yolkmarket Boutique – Checkout felt easy and everything processed without any issues.
Xerva Hub – Simple, neat layout makes it easy to browse products quickly.
VioletVend Products – Easy browsing and items have an appealing design.
срочный вывод из запоя на дому в ростове vyvod-iz-zapoya-v-rostove-3.ru .
visit Stone Vendor – Got fast and helpful responses from customer service, very satisfied.
нарколог на дом недорого ростов нарколог на дом недорого ростов .
tillora.shop – Found some nice items and checkout felt quick.
нарколог выезд на дом ростов narkolog-na-dom-v-rostove-3.ru .
Parcelbay Marketplace – Navigation is easy and checkout was efficient.
нарколог в ростове цена вывод из запоя нарколог в ростове цена вывод из запоя .
вывод из запоя в клинике в ростове vyvod-iz-zapoya-v-rostove-1.ru .
shop Grain Vendor online – Costs are fair and items appear high quality.
вывод из запоя с выездом в ростове вывод из запоя с выездом в ростове .
газовое пожаротушение монтаж с гарантией montazh-gazovogo-pozharotusheniya.ru .
Ulveta Specials – Everything is neatly presented and moving around the site is easy.
OrderWharf Products – Well-written descriptions made it simple to know what to pick.
Visit Easy Carta – Products are well organized and checkout completed quickly.
QuartzCart Store – It didn’t take long to track down what I wanted here.
нарколог на дом цена в ростове narkolog-na-dom-v-rostove-2.ru .
Official BasketMint Site – Site is responsive and browsing through product sections is simple.
Ivory Aisle Online Shop – I got a prompt response and each of my queries was handled carefully.
Ravlora Hub Online – Support team responded rapidly and solved my problem smoothly.
Dervina Collection – Great variety and site navigation is very fast.
вывод из запоя в стационаре в ростове на дону вывод из запоя в стационаре в ростове на дону .
Xerva Store – Really like the layout, browsing products today was simple and smooth.
Plum Vendor X Online Shop – Smooth navigation and a clean layout make browsing hassle-free.
Harniq Direct – Got what I needed right away and checkout was quick and easy.
BloomTill Products – Easy navigation with pages loading almost instantly.
вывод из запоя в стационаре в ростове вывод из запоя в стационаре в ростове .
Official Frentiq Site – High-quality products and a flawless checkout experience.
круглосуточный нарколог на дом в ростове круглосуточный нарколог на дом в ростове .
Marketlume Marketplace – Plenty of products to explore and pages load without any delay.
нарколог на дом без постановки на учет ростов narkolog-na-dom-v-rostove-3.ru .
вывод из запоя в стационаре в ростове на дону вывод из запоя в стационаре в ростове на дону .
shop the Summit Vendor brand – Definitely coming back for more items shortly.
Shop at Wistro – Clear information and a smooth checkout experience overall.
газовое пожаротушение монтаж с гарантией montazh-gazovogo-pozharotusheniya.ru .
вывод из запоя дома в ростове вывод из запоя дома в ростове .
нарколог вывод из запоя на дому в ростове vyvod-iz-zapoya-v-rostove-1.ru .
ZenCartel Webstore – Layout is structured and modern, products are easy to browse.
Quvera Online – Pages load quickly and browsing is simple and smooth.
Discover Worvix – Payments were simple and checkout felt effortless.
Thistletrade Home – Categories are easy to browse and finding items is quick.
Quickaisle Outlet – The site posts bargains regularly and browsing feels fast and convenient.
Xerva Essentials – Browsing items is hassle-free with the clean and organized layout.
check out Ruby Aisle – Smooth interface and well-structured layout improve usability.
KindleMart Website – Solid range of products and everything loads very fast.
Explore Quistly – Lots to choose from and the site is very straightforward to use.
Walnutware Hub – Product pages are clear and simple to understand.
анонимный вывод из запоя в ростове vyvod-iz-zapoya-v-rostove-2.ru .
pin-up lucky jet uduş pin-up lucky jet uduş
вывод из запоя в ростове-на-дону на дому vyvod-iz-zapoya-v-rostove-3.ru .
Ebon Lane Essentials – Pages load quickly and the interface is simple yet elegant.
Official Mistcrate Site – Came across some fascinating products that I think are worth seeing.
психиатр нарколог на дом в ростове психиатр нарколог на дом в ростове .
вывод из запоя на дому в ростове вывод из запоя на дому в ростове .
анонимный нарколог на дом в ростове анонимный нарколог на дом в ростове .
PureValue Finds – A fresh and interactive experience that sparks new ideas.
Varnelo Specials – Well-described items and a very user-friendly browsing experience.
Irnora Essentials – Found items here that are unique and not easy to get on other websites.
Irvanta Finds – Good-quality items and pricing seems appropriate.
Xerva Hub Online – Overall, the store is organized well and exploring items today felt effortless.
монтаж системы газового пожаротушения спб montazh-gazovogo-pozharotusheniya.ru .
вывод из запоя с выездом в ростове вывод из запоя с выездом в ростове .
Knickbay Finds – Each item comes with useful background and clear specifications.
срочный вывод из запоя на дому в ростове vyvod-iz-zapoya-v-rostove-1.ru .
GiftMora Store – Pages load fast and items are easy to locate.
stackhq – Mobile version looks perfect; no glitches, fast scrolling, crisp text.
Jarvico Specials – The website runs smoothly with no noticeable delays.
Spring Crate Collections – Planning to return often because the interface is smooth and reliable.
AisleGlow Direct – User-friendly navigation and thoughtfully arranged categories.
bytehq – Found practical insights today; sharing this article with colleagues later.
cloudhq – Navigation felt smooth, found everything quickly without any confusing steps.
Shop at Cindora – Categories are clearly labeled and navigation is effortless.
mostbet cod promoțional Moldova mostbet cod promoțional Moldova
анонимный вывод из запоя в ростове vyvod-iz-zapoya-v-rostove-3.ru .
Kiostra Deals – Navigating the site feels very smooth and responsive.
Shop at Mavdrix – User-friendly design, fast page loads, and easy buying experience.
Borvique Collection – The interface is sharp and exploring items is very straightforward.
нарколог на дом ростов отзывы нарколог на дом ростов отзывы .
Smart Picks Fintera – Navigation is simple, and categories are logically arranged for quick browsing.
вывод из запоя в ростове цена вывод из запоя в ростове цена .
Zinniazone Specials – Enjoyed navigating through the catalog and finding new items.
вывод из запоя в стационаре в ростове на дону вывод из запоя в стационаре в ростове на дону .
devopsly – Found practical insights today; sharing this article with colleagues later.
нарколог на дом цена в ростове нарколог на дом цена в ростове .
Xerva Store – Really like the layout, browsing products today was simple and smooth.
stackops – Appreciate the typography choices; comfortable spacing improved my reading experience.
Shop Hivelane Online – The streamlined layout and structured menus help shoppers find items fast.
Volveta Products – Easy to navigate pages and I found my items quickly.
монтаж газового пожаротушения для склада montazh-gazovogo-pozharotusheniya.ru .
вывод из запоя в ростове на дону на дому вывод из запоя в ростове на дону на дому .
Sage Vendor Hub – Well-structured menus and a tidy layout make shopping stress-free.
Find Lark Store – Items are well organized and checkout was simple.
вывод из запоя в стационаре в ростове вывод из запоя в стационаре в ростове .
Ulvika Direct – Product details are clear and the website feels simple to use.
mostbet retragere bani https://www.mostbet96150.help
Explore Lemon Vendor – Browsing and completing the order was genuinely enjoyable.
mostbet sms təsdiq mostbet sms təsdiq
sovique.shop – Enjoyed browsing, prices seem fair and reasonable today.
pin-up android google play http://pinup09715.help
kubeops – Content reads clearly, helpful examples made concepts easy to grasp.
mostbet crash multiplicator mostbet crash multiplicator
Discover XoBasket – The categories are well organized and the site is easy to use.
Shop at Wardivo – Clean layout with a nice variety of items and smooth navigation.
Shop Acorn Aisle – Professional look and simple navigation make browsing enjoyable.
Xyloshop Home – Layout is modern and browsing on mobile is very easy.
The Xerva Spot – Store feels well-arranged, making product browsing today a smooth experience.
Uplora Store – Really enjoyed checking out the items and pricing seems fair.
EchoStall Online – Layout is minimalistic and product descriptions are very informative.
Prolfa Outlet – Placing an order was hassle-free and payment methods worked perfectly.
вывод из запоя в ростове-на-дону на дому vyvod-iz-zapoya-v-rostove-2.ru .
IrisVendor Specials – Fast site performance and the products look premium grade.
печать стикеров цена печать стикеров цена .
Flarion Specials – Items are well categorized and site feels organized.
Clovent Deals – Quick loading and the site design is visually appealing.
mostbet rəsmi ünvan https://www.mostbet13670.help
cloudopsly – Overall, professional vibe here; trustworthy, polished, and pleasantly minimal throughout.
FernBasket Marketplace – Items look excellent and pages appear instantly.
KindBasket Collection – Items seem excellent and descriptions provide all the important details.
Amber Treasures – Clear descriptions and sensible prices make it simple to choose items.
Visit Glentra – Browsing is seamless and the item explanations are easy to understand.
Xerva Store – Really like the layout, browsing products today was simple and smooth.
Browse FlairDock – Everything is visually pleasing and ordering is quick.
For those seeking an exceptional online gaming experience, us.com](https://maxispin.us.com/) stands out as a premier destination. At Maxispin Casino, players can enjoy a vast array of pokies, table games, and other thrilling options, all accessible in both demo and real-money modes. The casino offers attractive bonuses, including free spins and a generous welcome offer, along with cashback promotions and engaging tournaments. To ensure a seamless experience, Maxispin provides various payment methods, efficient withdrawal processes, and reliable customer support through live chat. Security is a top priority, with robust safety measures and a strong focus on responsible gambling tools. Players can easily navigate the site, with detailed guides on account creation, verification, and payment methods. Whether you’re interested in high RTP slots, hold and win pokies, or the latest slot releases, Maxispin Casino delivers a user-friendly and secure platform. Explore their terms and conditions, read reviews, and discover why many consider Maxispin a legitimate and trustworthy choice in Australia.
MaxiSpin.us.com is a cutting-edge platform designed for content creators and marketers.
**Features of MaxiSpin.us.com**
One of the standout features of MaxiSpin.us.com is its ability to generate content in multiple languages.
**Benefits of Using MaxiSpin.us.com**
Businesses benefit greatly from MaxiSpin.us.com as it streamlines the process of creating content.
Caldexo Outlet – Each listing includes concise, easy-to-follow product information.
Softstall Boutique – Strong collection and the costs seem quite reasonable right now.
1win_kg 1win_kg
OliveOrder Direct – Clear layout and a smooth, enjoyable browsing experience overall.
pin-up çıxarış rədd edilib pin-up çıxarış rədd edilib
mostbet açılmır http://mostbet13670.help/
JunoPick Collection – Items look great and checkout went without a hitch.
XenoDeals Deals – The site design is tidy and finding items is quick and simple.
наклейки на заказ наклейки на заказ .
Explore Iventra – Clean design and checkout worked without issues.
Pentrio Collection – Completing my order took no time and worked flawlessly.
Dapper Online – The process was simple and surprisingly pleasant for such a large selection.
Xerva Picks – The store is well organized, making product browsing a breeze.
Serviq Products – Looking forward to returning to explore more items soon.
NobleVend Shopping – Will come back here soon for more online purchases.
mostbet jocuri pe bani real mostbet jocuri pe bani real
yovinta.shop – The layout is clean and moving around the site feels effortless.
Merchio Styles – The contemporary layout makes the solid-looking products stand out.
Grivor Collection – Everything worked perfectly and navigating products is effortless.
digital shop – I found the layout tidy and very simple to browse.
Official Elnesta Site – The whole experience was smooth, especially the fast checkout.
Нужны столбики? столбики ограждения с вытяжной лентой столбики для складов, парковок и общественных пространств. Прочные материалы, устойчивое основание и удобство перемещения обеспечивают безопасность и порядок.
кабели провода купить купить проводку для дома цена в минске
Quinora Official – Easy to navigate and I could find everything without any hassle.
Click for VelvetHub – I’ll be revisiting this store for future orders.
Olvesta Deals – Definitely worth checking out again later.
Xerva Store – Really like the layout, browsing products today was simple and smooth.
Browse Auricly – Attractive items and intuitive navigation make browsing simple.
производство наклеек pechat-nakleek-v-moskve.ru .
official storefront – The interface is simple yet functional, making navigation easy.
mines mostbet http://mostbet96150.help/
shopping site – Overall, it felt easy to explore without any confusion.
1win Бишкек катталуу http://1win91276.help/
mostbet futbol mərc http://mostbet13670.help/
Everaisle Collection – I’ll bookmark this to check out more items later.
Lormiq Specials – Saving this site to shop again very soon.
1win сколько идет вывод 1win сколько идет вывод
mostbet aviator mostbet aviator
web resource – After looking around, I found the material genuinely informative.
Larnix shopping hub – The website feels contemporary, neat, and very easy to use.
Wavento Online – Smooth browsing experience with quick-loading pages.
workwhim info portal – Very user-friendly layout, content appears quickly.
мостбет казино Кыргызстан https://mostbet39081.help/
online retail site – The details shared seem authentic and relevant today.
наклейки на заказ в москве pechat-nakleek-v-moskve.ru .
Up Vendor – A forward-thinking store built to elevate your everyday shopping experience.
Funnels & Marketing – The navigation feels intuitive and content is neatly presented.
Stylish boutique shop – Pages are organized clearly and easy to read.
Wardrobe Hub – Everything is arranged logically, making navigation smooth.
Click for Spice Craft – Logical layout ensures a smooth and efficient user experience.
Trail Trek Essentials – Fast pages with well-defined sections make exploring easy.
ravnio.shop – The site seems well-made and browsing feels smooth.
Yelnix online store – Navigation is user-friendly, helping me find items quickly and efficiently.
resource link – Well-written content and consistent updates keep it informative.
digital storefront – The content is informative and neatly arranged.
mostbet idman mərc yüklə mostbet idman mərc yüklə
ecommerce site – The platform performs flawlessly and responds immediately.
Browse Hyvora – Simple navigation and shopping is effortless.
Kind Vendor – A friendly and thoughtful marketplace offering reliable and pleasant service.
inboxinstitute.shop – The layout is simple and navigating feels effortless.
Gardening store online – Content is easy to follow and pages respond quickly.
1вин вывод средств https://1win91276.help/
Online Emporium Portal – Layout is clear and content is easy to read.
Pot & Petal Store – Logical layout and clear sections make browsing effortless.
печать стикеров на заказ печать стикеров на заказ .
Online Luggage Hub – Clear organization allows me to find information easily.
DuneParcel deals – Really appreciated the fast and clear responses from customer service.
check this website – Pages are structured logically and easy to follow.
ecommerce page – Straightforward design keeps the experience hassle free.
keywordcraft – Pages loaded fast, images appeared sharp, and formatting stayed consistent.
online catalog – It’s easy to navigate, and the information is laid out clearly.
Quality leather hub – Clean structure with information that’s easy to digest.
Visit Gym Gear Junction – Pages are straightforward and browsing is effortless.
Heritage Online Hub – Clear layout and smooth navigation make exploring easy.
1win войти в аккаунт https://1win91276.help
Modern Finds Hub – A stylish online space focused on distinctive and up-to-date selections.
Online fashion hub – Navigation feels natural and content is simple to access.
1вин бонус Киргизия https://1win91276.help/
Online Decor Portal – Content is neatly structured and visually pleasing.
featured website – The layout is smooth, and finding content is effortless.
Relvaa marketplace – Checkout was quick and the payment choices made the process easy.
shopping portal – Nicely arranged sections make browsing simple and pleasant.
education portal – Simple design and easy-to-follow sections make it highly accessible.
their shop page – Everything is organized clearly and browsing is comfortable.
Interior & Mason Shop – Clear interface and fast access to all sections.
Logo Ledger Hub – The interface feels intuitive and content is easy to scan.
Shop Ginger wellness – Pages are well-structured and visually appealing.
Revenue Ridge Marketplace – Well-laid-out sections and effortless browsing experience.
Silk Style Hub – Elegant design and well-arranged content enhance the user experience.
Shop Meadow – A peaceful shopping hub featuring handpicked items with natural appeal.
discover Zarniq – Delivery was prompt, and the package looked secure and well-presented.
типография москва наклейки pechat-nakleek-v-moskve.ru .
retail website – Everything is structured well and easy to navigate quickly.
melbet aviator стратегия https://melbet76815.help/
platform homepage – The speed and responsiveness make it pleasant to use.
Salt & Satin Official – Well-organized pages with intuitive navigation throughout.
мостбет ставки приложение https://mostbet39081.help/
Content streaming portal – Pleasant browsing with clear sections and quick loading.
Macro Merchant Hub – The interface feels intuitive and the content is easy to digest.
featured shop – The site responds rapidly and keeps things simple.
расчет газового пожаротушения расчет газового пожаротушения .
монтаж газового пожаротушения под ключ монтаж газового пожаротушения под ключ .
promoseeder – Found practical insights today; sharing this article with colleagues later.
Revenue Ridge Resources – Smooth navigation and professional presentation throughout.
продвижение сайтов prodvizhenie-sajtov-v-moskve9.ru .
clickrevamp – Content reads clearly, helpful examples made concepts easy to grasp.
this web store – Clear structure makes it easy to browse through pages.
Visit Lotus Loft – Smooth interface and clear sections make exploring effortless.
монтаж газового пожаротушения монтаж газового пожаротушения .
Zolveta catalog – Clean and straightforward design with clear categories made navigation very easy.
Item Whisper – A smart and intuitive platform helping you discover hidden gems with ease.
melbet кыргызстан https://melbet54187.help
melbet как поставить экспресс http://melbet76815.help
shop link here – Clean design, simple menus, and easy-to-read content.
serpstudio – Pages loaded fast, images appeared sharp, and formatting stayed consistent.
Whisk Warehouse Products – Pages are neatly structured, making navigation smooth.
simonscider.co.uk – The atmosphere feels genuine and the presentation is beautifully done.
leadspike – Bookmarked this immediately, planning to revisit for updates and inspiration.
melbet демо режим слоты melbet демо режим слоты
Thyme lifestyle store – Organized interface and smooth navigation throughout.
retail destination – The layout is sharp and user-friendly, giving a smooth browsing experience.
Finance Fjord Boutique – Navigation is simple and the site feels well-organized.
Sublime Summit Portal – Interface is polished and browsing is quick without any confusion.
trafficcrafter – Content reads clearly, helpful examples made concepts easy to grasp.
стоимость монтажа газового пожаротушения montazh-gazovogo-pozharotusheniya-2.ru .
DepotLark offers – Product information is well-written, precise, and helps buyers make informed choices.
установка модулей газового пожаротушения установка модулей газового пожаротушения .
продвинуть сайт в москве prodvizhenie-sajtov-v-moskve9.ru .
Visit Honey & Hustle – Interface is neat and all sections are easy to find.
mostbet зарегистрироваться http://mostbet39081.help
official store page – The site feels intuitive and content is easy to access.
монтаж газового пожаротушения под ключ монтаж газового пожаротушения под ключ .
Shop Monarch Mosaic – Pages are simple, attractive, and easy to move through.
browse the festival – Event information is direct, clear, and easy to follow.
official storefront – The interface is tidy and moving between pages feels natural.
shopping platform – The site currently appears organized and very user-friendly.
Visit Embroidery Eden – Clean design with clear sections makes browsing smooth.
SEO Analysis Hub – Clean interface and organized sections allow effortless browsing.
HazelAisle picks – I’ve had a positive experience navigating the site and finding products easily.
газобетонные блоки купить стоимость газоблока
Online Tech Portal – Structured pages and tidy interface make navigation effortless.
интернет агентство продвижение сайтов сео интернет агентство продвижение сайтов сео .
лицензия на монтаж газового пожаротушения montazh-gazovogo-pozharotusheniya-2.ru .
electrolyteemporium.shop – Unique products featured, browsing feels straightforward and pleasant.
Filter Fable Store – Well-structured pages and effortless navigation throughout.
монтаж газового пожаротушения спб монтаж газового пожаротушения спб .
game resource page – The layout makes browsing feel dynamic and entertaining.
продвижение по трафику продвижение по трафику .
Kitchenware portal – Simple design and smooth page transitions enhance usability.
this web store – I noticed how it reflects current trends quite naturally.
Looking for a yacht? yacht charter cyprus for unforgettable sea adventures. Charter luxury yachts, catamarans, or motorboats with or without crew. Explore crystal-clear waters, secluded bays, and iconic coastal locations in first-class comfort onboard.
Kitchen Kite Storefront – Layout is straightforward, and exploring the site feels natural.
шаровой кран под приварку шаровые краны под приварку
расчет газового пожаротушения расчет газового пожаротушения .
мелбет вывод средств https://melbet76815.help/
Clean Cabin Resources – Pages are structured logically with fast navigation.
internet seo prodvizhenie-sajtov-v-moskve10.ru .
official email resource – Everything loads quickly and the layout is easy to follow.
Relaxation sound hub – Pages are clean and information is easy to absorb.
online catalog – The pages are organized logically, making exploration simple.
проект и монтаж газового пожаротушения проект и монтаж газового пожаротушения .
movie portal – The site stands out with unique ideas and interesting content.
Fig & Fashion Official – Clean design with intuitive navigation throughout.
online catalog – The structure is clear, and loading times are impressively fast.
Design Driftwood Online – Simple structure and intuitive flow between sections make it easy to use.
монтаж газового пожаротушения для склада montazh-gazovogo-pozharotusheniya-1.ru .
аудит продвижения сайта prodvizhenie-sajtov-v-moskve9.ru .
supplysymphony marketplace online – Lots of options and the interface is very smooth.
Explore fabric collections – Tidy pages with intuitive navigation and easy reading.
melbet киберспорт cs2 ставки http://melbet76815.help/
bloomvendor.shop – Such a pleasant browsing experience with lovely selections available.
authoritylab – Mobile version looks perfect; no glitches, fast scrolling, crisp text.
trustedcore.bond – Modern look, messaging highlights reliability and smooth user experience.
engine info guide – Organized and user-friendly design makes finding info straightforward.
Sweet shop online – Layout feels refined and content is easy to find.
сделать аудит сайта цена prodvizhenie-sajtov-v-moskve10.ru .
Captain’s Closet Website – The layout makes shopping convenient, and the designs never disappoint.
Daisy Crate Website – Each time I shop, the selection is solid and checkout is hassle-free.
mostbet безопасность аккаунта http://mostbet39081.help
Basket Wharf Online Shop – Browsing is intuitive and pages load quickly in a clean layout.
Stock Stack Resources – Pages are well-arranged and easy to follow.
tobiasinthepark.co.uk – A creative concept with a layout that feels carefully arranged.
Alpine Vendor Finds – I appreciate the clean design and intuitive navigation throughout the site.
Shop Aurora Bend Online – The site feels polished and moving between sections is simple.
Online Meal Prep Hub – Easy-to-follow sections make exploring the site enjoyable.
Explore Popular Products – Browsing is intuitive, convenient, and the shopping process feels seamless.
halvyn.shop – The site is simple to use and browsing feels intuitive.
монтаж газовой системы пожаротушения под ключ монтаж газовой системы пожаротушения под ключ .
мелбет верификация http://melbet76815.help/
Tidal Thimble Boutique Online – Simple layout and exploring products is effortless.
melbet поддержка http://melbet30926.help/
Visit Cherry Checkout – Easy navigation and a fast, hassle-free checkout process today.
purepath.bond – Simple design, site communicates reliability and approachable guidance.
сделать аудит сайта цена prodvizhenie-sajtov-v-moskve10.ru .
visit this platform – Browsing is seamless, with easy-to-understand menus.
Visit Prairie Vendor – Browsing is effortless thanks to the clean design and quick loading.
Merniva Direct – The items are unique and pricing looks fair for what’s offered.
Explore Saucier Studio – Love the mix of unique items and artistic touches throughout the site.
Discover Hot Offers – The site feels responsive and the deals caught my attention.
Official Calm Cart Store – Browsing is straightforward and the site feels dependable and user-friendly.
workbenchwonder marketplace online – Products feel practical and all details are easy to understand.
магазин кабель каталог проводка купить
Amber Bazaar Online – Came across some rare finds and the cost is reasonable.
this web store – The interface is sleek and the overall vibe is engaging.
мелбет официальный сайт вход мелбет официальный сайт вход
установка газового пожаротушения цена установка газового пожаротушения цена .
teamroute.bond – Polished layout, content inspires alignment and collaborative thinking.
Shop Cherry Crate Online – Great selection with high-quality images that make browsing simple.
сделать аудит сайта цена prodvizhenie-sajtov-v-moskve10.ru .
Shop Lark Vendor – The listings include unique products and detailed, helpful info.
мостбет вход на сайт мостбет вход на сайт
Zipp Aisle Specials – Completing my purchase was fast and easy.
Shop Autumn Bay Online – The menus are straightforward and each item has clear details.
Workbench Wonder Store – Practical products and descriptions are easy to understand.
Top Picks Online – Smooth navigation and a reliable shopping experience make browsing enjoyable.
Shop Formula Forest – I appreciate the premium options and the swift payment experience.
melbet игровые автоматы скачать https://melbet30926.help/
brisklet.shop – Navigation works perfectly and content is clear to read.
Amber Outpost Hub – Fast, smooth checkout and responsive pages make shopping easy.
crestpoint.bond – Polished visuals, content projects stability and a sense of high-quality standards.
мелбет купон бонус http://melbet54187.help/
melbet официальный сайт вход http://melbet30926.help/
online retail site – Browsing feels smooth, with clear and well-arranged sections.
заказать продвижение сайта в москве заказать продвижение сайта в москве .
Winter Vendor Online Shop – Browsing the site is effortless with intuitive navigation.
Your Go-To Shop – Browsing is easy, pages respond fast, and navigating the site feels intuitive.
layout lagoon boutique – Clear organization and it’s easy to find what you need.
Start Shopping Here – Variety is excellent and the process to complete orders is smooth.
Official Varnika – Navigation is simple thanks to clearly defined categories.
calmcart.shop – Shopping is simple, convenient, and navigating the site feels effortless.
datadev – Appreciate the typography choices; comfortable spacing improved my reading experience.
Silver Stride Deals – Clean visuals and clear navigation make finding products a breeze.
мелбет вывод киргизия https://www.melbet54187.help
applabs – Overall, professional vibe here; trustworthy, polished, and pleasantly minimal throughout.
featured website – The design is simple, clean, and easy to move around.
dataops – Color palette felt calming, nothing distracting, just focused, thoughtful design.
trycloudy – Loved the layout today; clean, simple, and genuinely user-friendly overall.
bondline.bond – Contemporary style, messaging encourages trust and clarity in every section.
Amber Wharf Specials – Appreciate the clear interface and logically grouped product categories.
mines игра мостбет mostbet39081.help
Sheet Sierra Essentials Online – Nice collection and ordering worked perfectly today.
Elm Vendor Outlet – The items are solid and the rates are fair across the board.
Official Bay Basket Store – Navigation is fast and the site feels very trustworthy.
Official Calm Cart Store – Browsing is straightforward and the site feels dependable and user-friendly.
getbyte – Overall, professional vibe here; trustworthy, polished, and pleasantly minimal throughout.
Xenonest Hub – Great overall atmosphere with clear, easy-to-read product info.
Your Go-To Shop – Regularly added products and updates keep the site interesting to explore.
Inventory Ivy Website – The platform shares concise information that helps with purchasing choices.
solidtrackline.bond – Polished design, pages inspire trust and present information in a grounded, professional manner.
product hub – The site layout is logical, helping me find useful information quickly.
store link here – The interface is straightforward and moving around the site is simple.
мелбет о! деньги мелбет о! деньги
Apricot Aisle Shop Now – Easy to navigate with clear and helpful product info.
wellnesswilds hub online – Calm layout and moving through pages is effortless.
продвижение по трафику продвижение по трафику .
melbet зарегистрироваться http://melbet51923.help/
газовое пожаротушение монтаж с гарантией montazh-gazovogo-pozharotusheniya-1.ru .
usebyte – Content reads clearly, helpful examples made concepts easy to grasp.
Rooftop Vendor Experience – Fast and helpful responses made getting answers simple and professional.
Find Exclusive Items – Products are impressive and categories are logically arranged.
Visit Calm Cart – Overall experience is smooth, reliable, and easy to move through.
цена монтажа системы газового пожаротушения цена монтажа системы газового пожаротушения .
getkube – Found practical insights today; sharing this article with colleagues later.
Soft Parcel Specials – Fast page loads and simple navigation make browsing enjoyable.
мелбет ошибка вывода https://www.melbet54187.help
Find Exclusive Items – Easy browsing combined with a dependable, user-friendly interface.
groundline.bond – Modern layout, pages feel structured and clearly communicate reliability.
trystack – Color palette felt calming, nothing distracting, just focused, thoughtful design.
как скачать мостбет на android https://www.mostbet85961.help
usekube – Appreciate the typography choices; comfortable spacing improved my reading experience.
retail destination – Browsing is smooth and the layout has a fresh, clean feel.
мелбет p2p пополнение melbet30926.help
official samplesunrise site – Creative concept with a clean and thoughtful arrangement.
Network Nectar Experience – The website is easy to use and pages pop up almost instantly.
как пополнить melbet melbet51923.help
melbet-kg melbet30926.help
Apricot Crate Hub – Products feel premium and ordering online is straightforward.
Your Online Crate – It’s simple to move around and all the items were easy to access.
мелбет как использовать бонус мелбет как использовать бонус
Find Top Products – The site is user-friendly, convenient, and browsing feels natural.
Cherry Vendor Store – Fresh arrivals appear often, keeping the selection interesting.
поисковое seo в москве prodvizhenie-sajtov-v-moskve9.ru .
fetchbay.shop – The website has a clean layout and placing orders is very easy.
монтаж газового пожаротушения для серверной montazh-gazovogo-pozharotusheniya-1.ru .
jolvix.shop – Simple design but it definitely gets the job done.
solidtrack.bond – Clean design, content conveys dependability and smooth user experience.
run route treasures – Simple design and locating products is hassle-free.
official storefront – The interface is easy to navigate and visually organized.
networknectar.shop – The site is easy to move around and pages open almost instantly.
Official Calm Cart Store – Browsing is straightforward and the site feels dependable and user-friendly.
Premium Online Store – Customer service is approachable and responds fast.
Top Picks Online – The menu works perfectly and loads without hesitation.
Tally Cove Online Shop – Smooth and easy-to-use layout makes every visit enjoyable.
Order Grove Boutique – Wide range of products and finding what I want is simple and fast.
заказать продвижение сайта в москве prodvizhenie-sajtov-v-moskve9.ru .
tagtides marketplace – The style is attractive and the experience feels smooth.
tobiasinthepark – Really enjoy the atmosphere, every detail feels well considered.
мелбет вывести на карту киргизия мелбет вывести на карту киргизия
монтаж газового пожаротушения под ключ монтаж газового пожаротушения под ключ .
anchorcore.bond – Polished design, content flows well and reinforces a dependable user experience.
dewdock deals page – Clean and organized pages made checking out items simple.
feathercrate essentials – Clear interface and tidy layout make exploring simple.
shopping platform – Simple design and easy navigation make browsing this site very enjoyable.
Official Calm Crate Store – Layout is neat and locating products is quick and easy.
fireflymarket featured – Pages are tidy and moving through products is simple.
frostdock featured – Simple browsing flow with organized products makes shopping enjoyable.
Your Go-To Shop – Easy to move around, reliable site, and overall shopping is stress-free.
Your Online Basket – Professional design with a friendly feel encourages exploration.
Jade Aisle Collection – Nice assortment of products with fair value overall.
Maple Vendor Shop Now – I enjoy the variety and the crisp, detailed visuals for products.
Acorn Crate Boutique – Smooth performance and clear navigation make using the site enjoyable.
supplysymphony hub online – The selection is impressive and navigating is effortless.
Online game registration super mario games online
Official Ash Wharf Store – The catalog is diverse and the overall tone is pleasant.
мелбет написать в поддержку http://melbet51923.help
gladegoods online – Straightforward design and intuitive navigation make exploring stress-free.
visit this platform – A short browse shows the site has valuable information.
harborwharf hub – Easy-to-use layout with accessible products enhances shopping.
furkidsboutique deals page – I loved scrolling through the collections, everything looks so sweet.
stonebridgegroupcapital.bond – Clean visuals, messaging is professional and encourages engagement effectively.
лицензия на монтаж газового пожаротушения лицензия на монтаж газового пожаротушения .
продвижение сайта в топ по трафику prodvizhenie-sajtov-po-trafiku6.ru .
featherfind curated shop – Navigation is easy and everything is organized neatly across the site.
закупка ссылок в гугл заказать услугу агентство закупка ссылок в гугл заказать услугу агентство .
Drift Aisle Store – Simple structure and accessible pages made exploring smooth.
fireflyvendor picks – Well-laid-out sections and clean visuals make browsing simple.
Publicaciones unicas amouranth noticias de vanguardia y contenido original. Mantengase al dia y no se pierda ninguna novedad.
Visit Calm Cart – Overall experience is smooth, reliable, and easy to move through.
Discover Best Deals – I enjoy browsing the newest products and seeing updates posted frequently.
frostgalleria marketplace – Clean design and intuitive navigation make it easy to find products.
Harbor Lark Collection – Everything works without issues and loads quickly on mobile devices.
Alpine Aisle Hub – Browsing is simple, convenient, and dependable every time.
Bloom Vendor Marketplace – Their representatives give the impression of being patient and eager to resolve concerns.
glimmercrate picks – Everything is easy to browse with a tidy presentation.
seo продвижение по трафику clover seo продвижение по трафику clover .
melbet скачать без блокировки http://melbet51923.help/
harborwharf treasures – Simple and neat design enhances the ease of finding products.
Find Something New – Looking through the products revealed many interesting choices.
mostbet android Киргизия http://www.mostbet85961.help
coralmarket web store – Easy to browse catalog and the order confirmation was instant.
La pagina oficial de evaelfie es ofrece contenido exclusivo, noticias de ultima hora y actualizaciones periodicas. Mantengase al dia con las nuevas publicaciones y anuncios.
getstackr – Content reads clearly, helpful examples made concepts easy to grasp.
feathervendor essentials – Navigation feels natural and the design is neat throughout.
flakecrate selections – Simple design and intuitive layout make exploring items enjoyable.
поисковое продвижение москва профессиональное продвижение сайтов prodvizhenie-sajtov-v-moskve9.ru .
usestackr – Pages loaded fast, images appeared sharp, and formatting stayed consistent.
cloudster – Content reads clearly, helpful examples made concepts easy to grasp.
deployly – Navigation felt smooth, found everything quickly without any confusing steps.
driftcrate curated shop – Everything is orderly and clean, making browsing effortless.
melbet мобильная версия http://melbet51923.help/
official garnetcrate – Browsing is effortless, and products are clearly presented.
глубокий комлексный аудит сайта глубокий комлексный аудит сайта .
заказать сео анализ сайта пушка заказать сео анализ сайта пушка .
glowgalleria hub – Everything feels logically arranged and easy to navigate.
установка газового пожаротушения цена установка газового пожаротушения цена .
Premium Online Store – Large selection and easy-to-navigate layout make shopping smooth.
продвижение сайта трафиком продвижение сайта трафиком .
harborwharf online finds – Organized layout with fast navigation makes browsing easy.
ремонт 2 квартири вартість скільки коштує ремонт квартири
Gold Vendor Outlet – It conveys professionalism while keeping the experience pleasant.
mostbet не приходит код mostbet не приходит код
<Top Picks Online – Browsing feels secure and pleasantly simple.
cottoncounter web store – Simple design choices made it easy to locate what I wanted.
блог о маркетинге блог о маркетинге .
seo блог seo блог .
flakefind curated shop – Organized pages and easy navigation improve the overall experience.
fernaisle official shop – Navigation feels natural and the layout is clearly organized.
материалы по seo seo-blog14.ru .
garnetgoods picks – Items are easy to locate, and the design is tidy.
byteworks – Navigation felt smooth, found everything quickly without any confusing steps.
goldenvendor showcase – Well-organized pages with smooth flow enhance the shopping experience.
мостбет скачать apk Кыргызстан https://mostbet85961.help/
iciclemarket – Just discovered this store today, products look interesting and worth checking.
official driftwharf site – The display feels intentional and descriptions make everything easy to understand.
online jasper vendor hub – Noticed this website, seems like a neat place to browse.
мелстрой казино официальный мелстрой казино официальный .
harborwharf treasures – Simple and neat design enhances the ease of finding products.
Official Clover Vendor Store – Support staff answered all inquiries efficiently and clearly.
seo аудит веб сайта seo аудит веб сайта .
lemonloft online – Layout feels minimal and convenient for checking products.
interesting platform – Ran into this page today, it looks minimal, tidy, and straightforward.
quick visit here – I discovered this website earlier, everything is easy to find and navigate.
official cottoncrate site – It took no time to find what matched my needs.
best of flintcrate – Organized pages and simple navigation improve the shopping flow.
browse here – Came across this page today, finding products is simple and intuitive.
fernfinds product range – Smooth page transitions and organized sections make exploring enjoyable.
graingalleria essentials – Clean interface and smooth flow make exploring products easy.
garnetmarket outlet – Simple layout makes finding items a smooth process.
jewel junction corner – The site seems tidy and easy to scroll through.
best price stop – Seems like a reasonable place online to look for lower prices.
локальное seo блог seo-blog16.ru .
harborwharf store – Clean interface and easy navigation make browsing enjoyable.
seo и реклама блог seo-blog15.ru .
duneaisle homepage – Layout is tidy and navigating through the site is easy.
ремонт квартир під ключ м2 ремонт квартир Львів
take a look here – Found this website today, layout is organized and browsing feels intuitive.
helpful site – I bumped into this earlier and it looks like a straightforward option.
visit here – Ran into this site recently, the layout is tidy and easy to move around.
this website – I stumbled upon this page, finding items feels straightforward and convenient.
маркетинговый блог маркетинговый блог .
Start Shopping Here – Easy navigation combined with smooth browsing makes shopping fun.
cottonvendor style hub – Items appear well-produced and the explanations leave no confusion.
оптимизация сайта франция prodvizhenie-sajtov-v-moskve11.ru .
flintfolio essentials – Products are easy to find and clearly explained.
site I found – Just noticed this page, finding products is clear and convenient.
grainmarket marketplace – Pages load fast and layout makes shopping straightforward.
fernvendor curated shop – Clean design and clear organization make exploring products smooth.
devnex – Bookmarked this immediately, planning to revisit for updates and inspiration.
juniper crate hub – Found this page today, looks like a tidy platform to explore items.
gildaisle picks – Fast-loading pages with a clean, easy-to-use layout.
recommended shop – Came across this website earlier and the pages are well structured.
bytevia – Bookmarked this immediately, planning to revisit for updates and inspiration.
harborwharf online shop – Smooth interface with organized content makes browsing enjoyable.
indigo store page – It appears to be an uncomplicated website to explore quickly.
quick visit – Just checked out this website today and everything seems easy to move around.
visit here – Noticed this site earlier and it seems clean and dependable.
cool find online – Discovered this while browsing and it looks simple enough to check out.
see this website – Stumbled on this page, finding items feels easy and practical.
florafinds collection – Navigation is smooth and the design is visually appealing.
блог про seo блог про seo .
best of covecrate – The setup is impressive and the offerings seem intentionally chosen.
granitecrate hub shop – Simple interface with well-organized items makes finding products easy.
Your Go-To Shop – Easy-to-navigate sections with clear product descriptions make the overall experience pleasant.
best of fernvendor – Layout is simple, and product information is clearly visible.
check this site – Found this link today, exploring items seems smooth and straightforward.
juniper hub store – Navigation feels simple and the layout is clean for visitors.
профессиональное продвижение сайтов профессиональное продвижение сайтов .
explore gildcorner – Smooth experience overall, everything feels thoughtfully arranged.
harborwharf finds – Clean presentation with intuitive navigation improves the experience.
vendor shopping page – Came across this earlier and it seems like a practical site.
mostbet бездепозитный бонус http://mostbet85961.help/
check this site – Just found this website, navigation seems smooth and exploring products is simple.
take a look – Ran into this page and the browsing experience seems user-friendly.
dataworks – Bookmarked this immediately, planning to revisit for updates and inspiration.
see this website – Stumbled on this page, browsing through items feels smooth.
seo агентство seo агентство .
useful link – Saw this mentioned somewhere and the page looks tidy and smooth.
floravendor showcase – Simple navigation and clean design make browsing effortless.
granitegoods features – Easy navigation and organized design make browsing stress-free.
Creek Cart Store – The site runs smoothly and content appears almost instantly.
explore junocrate – The site seems straightforward, making shopping smooth.
сео продвижение по трафику clover сео продвижение по трафику clover .
fieldfind shopping hub – Easy-to-follow design and tidy pages make exploring pleasant.
this platform – I noticed this page while searching, the design feels clear and organized.
gingergoods hub – Fast-loading content and tidy layout improve the shopping experience.
mellstroy game casino mellstroy game casino .
ivorycrate deals page – The site seems well arranged and pleasant to browse.
руководства по seo seo-blog15.ru .
harborwharf choices – Everything is clearly displayed, making it easy to shop.
локальное seo блог seo-blog14.ru .
melbet промокод при регистрации https://melbet93640.help
mossaisle – Came across this site today, the layout feels tidy and easy to browse.
AWS caiu caiu.site .
продвижение в google продвижение в google .
мелбет приложение для ставок melbet28175.help
recommended page – Found this link today, moving through products is effortless and intuitive.
seo кейсы seo-kejsy13.ru .
harborbundle store – Clean presentation and well-structured pages make shopping easy.
link worth seeing – Came across this website and the clean layout stands out.
forestaisle – Enjoyed checking out the items, everything feels thoughtfully arranged.
монтаж газового пожаротушения москва монтаж газового пожаротушения москва .
visit junohub – Found this website, seems like a solid platform for browsing.
seo partner program prodvizhenie-sajtov-v-moskve9.ru .
создать сайт прогнозов на спорт в москве создать сайт прогнозов на спорт в москве .
creekcrate featured picks – Simple and clean design makes moving through the site effortless.
melbet промокод http://melbet93640.help
finchmarket homepage – Layout is clean and exploring products feels straightforward.
easy market page – Browsing the site feels smooth thanks to its clean setup.
gingervendor store – Organized sections and intuitive browsing create a great first impression.
mossmarketplace – Came across this site today, products are simple to locate and browse.
harborwharf essentials – Clear structure and tidy presentation simplify exploring products.
quick browse – I discovered this page earlier, navigation feels clear and practical.
как пройти верификацию melbet как пройти верификацию melbet
this resource – Came across this website, layout looks neat and browsing items is straightforward.
мостбет как вывести на Visa https://mostbet76914.help/
мостбет хоккей ставки https://www.mostbet85961.help
блог о маркетинге блог о маркетинге .
сео продвижение за процент кловер prodvizhenie-sajtov-po-trafiku6.ru .
продвижение портала увеличить трафик специалисты prodvizhenie-sajtov-po-trafiku7.ru .
check them out – Came across this page recently, moving through items is effortless.
harborwharf – Clean layout and smooth navigation make finding items effortless.
official forestvendor – The site feels well organized with a smooth flow.
juno market stop – The website layout feels organized and convenient for visitors.
have a look – Discovered this while browsing and the layout looks simple and clear.
оптимизация сайта блог seo-blog15.ru .
закупка ссылок в гугл заказать услугу агентство закупка ссылок в гугл заказать услугу агентство .
mostbet бонус Кыргызстан http://mostbet96810.help
mostbet кэшбэк казино http://mostbet15247.help/
mellstroy casino официальный mellstroy casino официальный .
jade crate deals – Seems like a shop where you might discover something cool.
интернет маркетинг статьи seo-blog14.ru .
visit creekvendor – Strong first impression with clear organization and trustworthiness.
fireflyfind homepage – Layout feels organized and browsing through items is effortless.
explore gladecrate – Items are displayed clearly, and moving through pages is smooth.
harborwharf online – Smooth browsing experience with clearly presented items.
browse this page – Stumbled on this platform, finding products seems quick and simple.
WhatsApp down WhatsApp down .
лицензия на монтаж газового пожаротушения лицензия на монтаж газового пожаротушения .
закупка ссылок в гугл заказать услугу агентство закупка ссылок в гугл заказать услугу агентство .
кухню заказать кухню заказать .
melbet ставка на спорт киргизия http://melbet28175.help/
visit here – Ran into this page recently, exploring items seems simple and effortless.
crash mostbet http://mostbet76914.help
kettle crate shop – The website looks clean and easy to navigate.
this platform – Found this during a quick search and the structure feels very relaxed.
check this jade shop – The layout looks clean and makes browsing simple.
useful link – Stumbled on this site and the layout looks well-organized and easy.
melbet киргизия официальный сайт melbet киргизия официальный сайт
how internet partner prodvizhenie-sajtov-po-trafiku7.ru .
материалы по seo материалы по seo .
online shop – Found this website, browsing feels smooth and straightforward.
современные seo кейсы seo-kejsy13.ru .
https://mobilityspecialists.net
mostbet бонус Кыргызстан https://mostbet85961.help
продвижение по трафику продвижение по трафику .
заказать кухню заказать кухню .
site I found – Just discovered this page, interface feels clear and easy to explore.
Gaming portal Unblocked Games with free online games. A huge collection of browser games without restrictions: arcades, strategy, racing, logic games, and entertainment for relaxation right in your browser.
MMORPG игра сайт Скрайда — онлайн-мир приключений, сражений и развития персонажа. Выбирайте класс героя, исследуйте локации, участвуйте в PvP и PvE боях, вступайте в гильдии и проходите квесты в захватывающей многопользовательской игре.
Компания “Маркет Климата” https://market-climata.ru/services/obsluzhivanie-konditsionerov/ предоставляет полный спектр услуг по Техническому обслуживанию кондиционеров в Москве всех марок и моделей.
Мучает варикоз? удаление варикоза информационный сайт о здоровье вен и лечении варикоза ног: УЗДС диагностика, лечение варикоза, ЭВЛО (лазерное лечение), склеротерапия, восстановление и компрессионный трикотаж. Рекомендации врача, ответы на частые вопросы и профилактика варикоза.
мостбет мобильная версия https://mostbet76914.help
The best is in one place: luxury sleepovers, glampouts & backyard parties
веб-аналитика блог seo-blog15.ru .
как скачать мелбет на android http://melbet93640.help/
check this site – Found this link today, the layout seems tidy and user-friendly.
keystone crate corner – The site appears tidy, making it simple to check out items.
seo и реклама блог seo-blog14.ru .
мелстрой казино мелстрой казино .
nightnook – Just visited this site, the layout is clear and easy to navigate.
check this marketplace – Came across this site today, looks like a tidy spot for shopping.
монтаж газового пожаротушения в офис montazh-gazovogo-pozharotusheniya-3.ru .
browse here – Came across this site earlier and it seems like a good shop to explore.
TinyTill Deals – I’ll return soon for another round of shopping.
продвижение сайта клиники наркологии продвижение сайта клиники наркологии .
заказать кухню под заказ заказать кухню под заказ .
stackora – Found practical insights today; sharing this article with colleagues later.
helpful website – Landed on this platform today and moving around the catalog feels smooth.
сео центр seo-kejsy13.ru .
orchardvendor – Just visited this site, everything seems tidy and easy to navigate.
devonic – Bookmarked this immediately, planning to revisit for updates and inspiration.
мелбет приложение на русском http://melbet93640.help
wickercrate – Just came across this shop earlier and the items seem quite interesting.
see this website – Stumbled on this site, the structure feels clear and easy to browse.
jasper market hub – Seems like a good spot to discover a variety of products online.
продвижение по трафику без абонентской платы продвижение по трафику без абонентской платы .
apponic – Pages loaded fast, images appeared sharp, and formatting stayed consistent.
заказать кухню по индивидуальному проекту zakazat-kuhnyu-3.ru .
melbet ставки на теннис http://www.melbet28175.help
where internet partner prodvizhenie-sajtov-po-trafiku6.ru .
check this site – I stumbled on this while surfing and the interface looks neat and simple.
Explore Evoraa – Smooth interface and well-structured product pages.
recommended store – Found this platform today, navigation is smooth and overall experience is simple.
quick visit – I noticed this website today and exploring sections feels smooth.
мелбет как пополнить мбанк https://melbet93640.help
в atom casino реально платят, 8 выплата уже
https://matchup.id/employer/kat-rb/
online spot – Just found this site, exploring products is smooth and clear.
чӣ гуна пул гузоштан ба 1win https://1win83254.help/
мостбет ios приложение скачать http://mostbet76914.help/
look at this hub – I landed on this page today and browsing through it felt pretty smooth.
seo top 1 seo-kejsy13.ru .
заказать кухню онлайн заказать кухню онлайн .
melbet купон https://www.melbet28175.help
this online basket shop – Randomly landed here and the design looks clean and uncluttered.
Found a bride? after dinner proposal ideas romantic scenarios, beautiful locations, photo shoots, decor, and surprises for the perfect declaration of love. Make your engagement in Barcelona an unforgettable moment in your story.
мелбет рулетка онлайн http://melbet28175.help/
Проблемы с застройщиком? неустойка дду юрист помощь юриста по долевому строительству, расчет неустойки, подготовка претензии и подача иска в суд. Защитим права дольщиков и поможем получить компенсацию.
mostbet регистрация 2026 mostbet96810.help
мостбет скачать apk бесплатно http://mostbet15247.help/
marblevendor – Came across this site and the layout is clean and simple to navigate.
Official VioletVend Site – Easy-to-browse pages with appealing merchandise.
quick visit – I noticed this platform today and the layout makes navigation easy.
Honey Treasure Online – Pages are organized and navigation works naturally.
Meadow Marketplace – Pages are tidy and organized, browsing feels natural.
Rain Bazaar Hubspot – Organized layout, moving around the site is easy.
заказать кухню через интернет заказать кухню через интернет .
see the apricot shop – Took a look at this site and the design feels tidy and responsive.