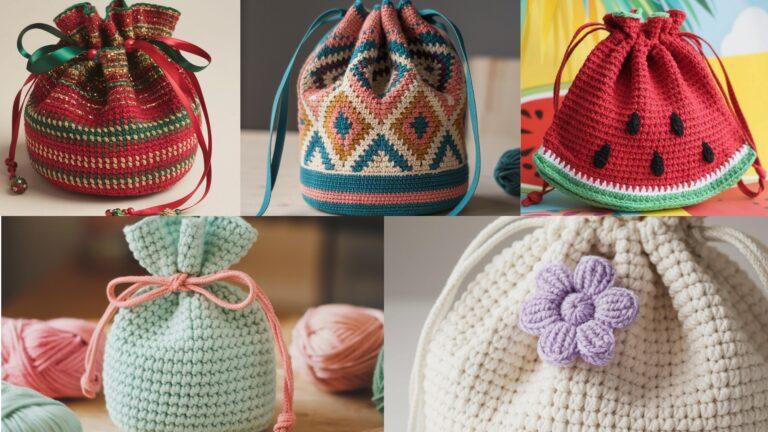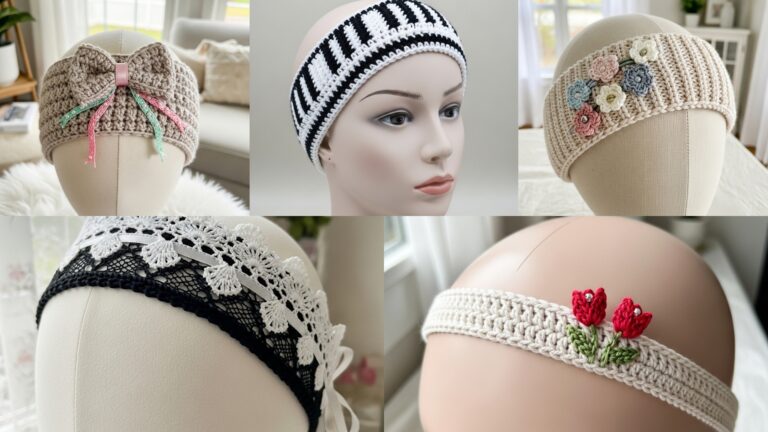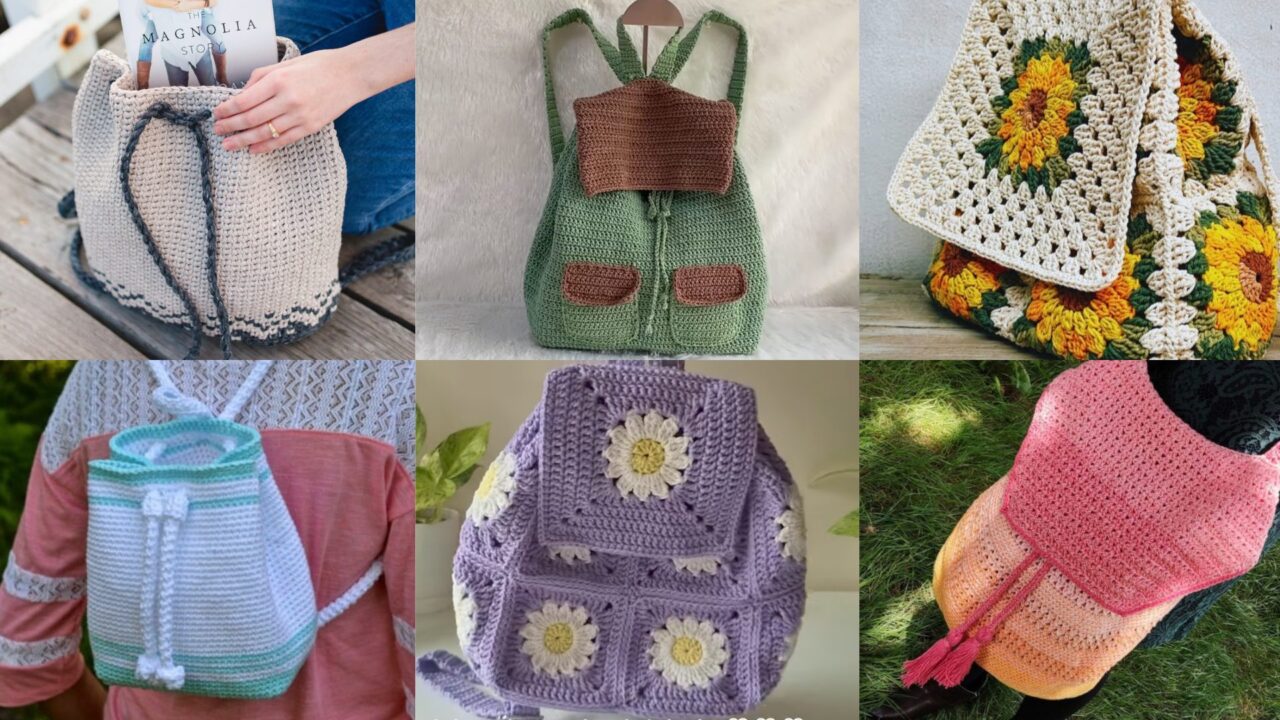
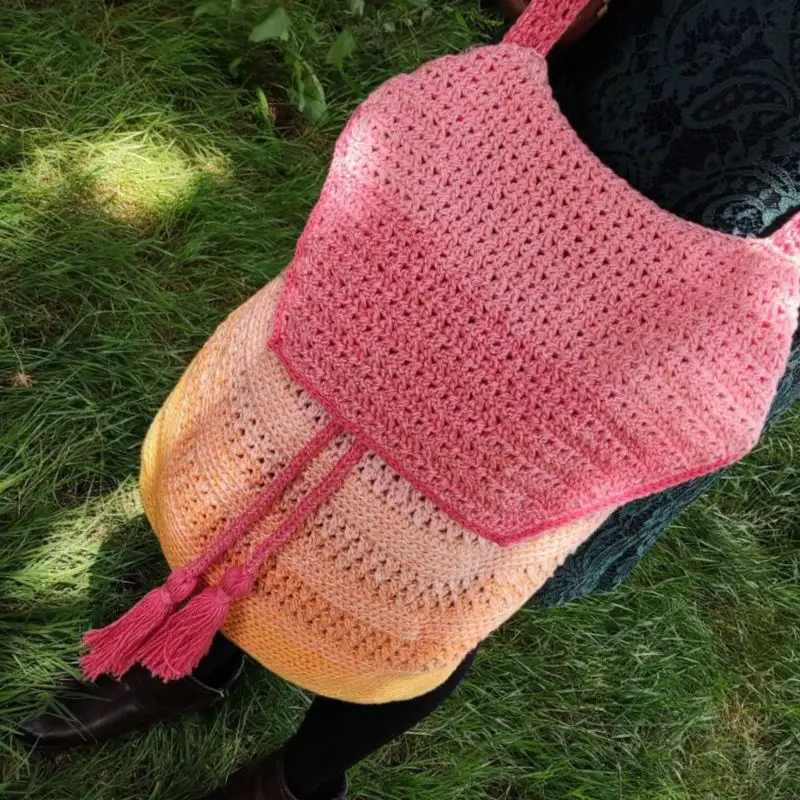
A handmade crochet backpack is one of the most satisfying projects: useful, wearable, and surprisingly quick when you work with the right yarn and simple shapes. This collection of six beginner-friendly backpack patterns gives you a range of looks — from tiny drawstring minis and floral granny-square bags to structured backpacks with pockets — plus full materials lists, step-by-step instructions, finishing guidance, and tips for durability and style. Each pattern is written so you can follow it even if you’re new to making bags.
Quick stitch legend (US terms)
ch = chain, sl st = slip stitch, sc = single crochet, hdc = half double crochet, dc = double crochet, tr = treble, st(s) = stitch(es), inc = increase (2 sts in same st), dec = decrease (sc2tog unless otherwise noted), BLO = back loop only, FLO = front loop only. Work a gauge swatch if you want precise sizing.
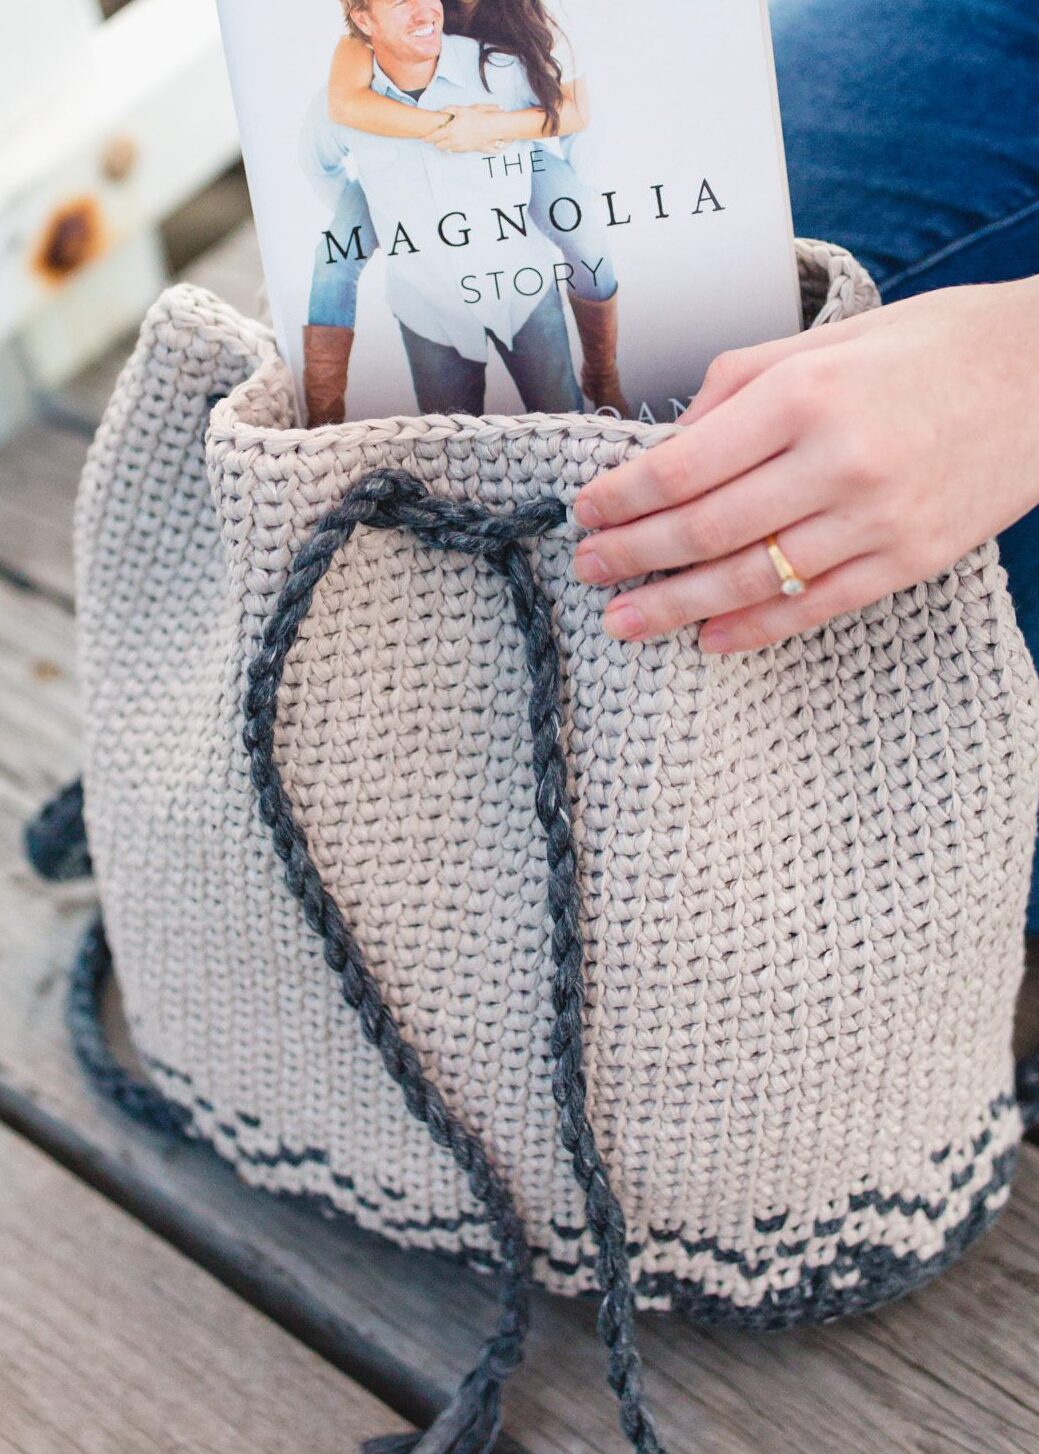
1. Drawstring Mini Backpack Crochet Pattern
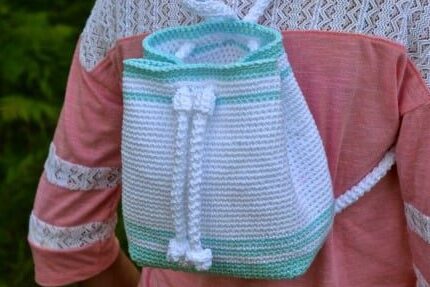
Skill level: Beginner
Finished size (approx): 9″ tall × 7″ wide (small daypack/mini)
Materials
- Worsted weight (4) cotton or cotton-blend yarn — 150–200 g
- Crochet hook 5.0 mm (or hook that gives a firm fabric)
- Tapestry needle, stitch marker, scissors
- 3/8″ cord or matching crocheted cord for drawstring (36″ / 90 cm)
- Optional: fabric lining (cotton), sewing needle/thread
What you’ll make
A small, easy-to-wear drawstring backpack with a rounded base and a single drawstring that doubles as shoulder straps.
Gauge (informal)
Approx. 14 sc × 16 rows = 4″ in sc (adjust hook if needed).
Base (flat circle)
- Ch 2. Rnd 1: 6 sc in 2nd ch from hook. (6)
- Rnd 2: inc around. (12)
- Rnd 3: sc in next st, inc around. (18)
- Rnd 4: sc in next 2 sts, inc around. (24)
- Continue increasing in this manner until your base measures about 6″ across (for the listed size). Keep increases evenly spaced — every round increase interval increases by one. Fasten off.
Body (worked in rounds)
- Join yarn at edge, ch 1, work sc evenly around in BLO for one round (this gives a slight ridge). Mark start.
- Continue working sc in each st around until piece measures 6″ tall from base to last st. Try the bag on to check height: you want the top to hit around mid-torso for a mini.
- For a firmer top and to form the drawstring channel: work 2 rounds of hdc; then 1 round of ch 2, sk 2 sc to make eyelet spaces for drawstring channel (or do one round of BLO sc to create a neat ridge plus a second round of ch 1 eyelets depending on aesthetic). Work one final round of sc for finish. Fasten off leaving long tail.
Drawstring & straps
- If using cord: fold top edge over and weave cord through eyelets around the bag. If crocheting a cord: make a 36″ chain, slip it through eyelets. Pull ends together and knot; separate cord ends to make two straps and adjust length.
- Optionally sew a small loop and knot at bottom corners and anchor cord there for secure straps (or just tie cord ends together).
Lining & finishing
- For longevity, cut a fabric lining to match interior circumference and height; sew side and bottom seams, insert into bag and whipstitch lining to top edge before adding drawstring.
- Weave in ends, block gently if needed.
Tips
- For a sturdier bag, work the body in sc tightly or use a smaller hook than yarn recommends.
- Add a small exterior pocket by crocheting a rectangle and sewing it to the front before lining.
2. Daisy Granny Square Crochet Backpack Tutorial
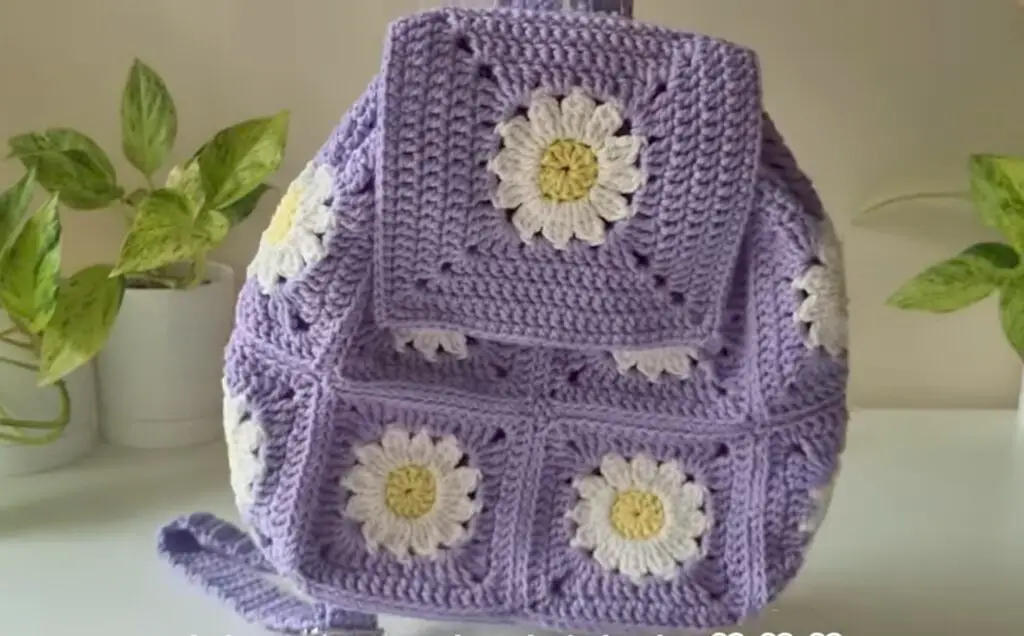
Skill level: Beginner → Intermediate (joining squares + assembly)
Finished size (approx): 12″ tall × 10″ wide (medium backpack)
Materials
- DK or worsted weight yarn in background and contrast colors (250–350 g total)
- Crochet hook 4.0 mm (adjust to gauge)
- 12–16 granny square motifs (approx. 4″ squares) — number varies by layout
- Tapestry needle, scissors, sewing needle & thread for lining
- 1 zipper or drawstring closure, strap material (crocheted or webbing)
What you’ll make
A charming backpack made from daisy-centred granny squares joined into a front, back, and side panels — perfect for colorwork.
Daisy granny square (one square)
- Center: With color C (center), ch 4, sl st to form ring. Rnd 1: ch 3, 11 dc into ring; join. (12 dc)
- Petal round: Join petal color, ch 3, sl st into next dc repeat to create 12 loops; join. Into each loop: (sc, hdc, 2 dc, hdc, sc) — create petals. Fasten off petals.
- Granny rounds: Join background color into a space between petals. Round 1 (square start): ch 3 (counts as dc), work 2 dc, ch 2, 3 dc in same space for corner; 3 dc in next side space, ch 2, 3 dc in next corner space — form 4 corners. Continue with standard granny rounds: in side spaces work 3 dc clusters, corners as (3 dc, ch 2, 3 dc) until square measures about 4″. Fasten off.
Make panels
- Create the number of squares needed for front (e.g., 3 × 3 grid = 9 squares for front), back, and side/bottom strips depending on size. A typical 12″×10″ bag could use 9 squares front, 9 back, and 4 for sides/bottom if you prefer a patchwork box shape.
- Block squares flat for even joining.
Join squares
- Arrange squares into panels. Join with whipstitch or join-as-you-go (sl st method) to make front and back rectangles. Use sturdy seam: single crochet join on the right side creates a decorative ridge.
- Add a bottom panel by joining squares edge-to-edge to form a rectangle, then sew front, back and bottom together to form a bag shell.
Add lining & straps
- Sew a cotton lining sized to the bag interior. Insert lining and hand-stitch or machine-stitch to top edge.
- Add zipper at top (sew into lining then attach lining to crochet top) OR make a flap with a button closure. For straps, crochet two long straps in hdc or sc (approx. 40–45″ length before attaching) and sew securely to upper back inside the lining, reinforced with extra stitches.
Tips
- Use slightly tighter tension for granny squares to prevent holes between motifs.
- Reinforce strap attachment with a small leather patch or extra stitches inside the lining.
3. Lily-Roo Crochet Backpack Pattern
Skill level: Beginner (simple shaping)
Finished size (approx): 11″ tall × 9″ wide (everyday pack)
Materials
- Bulky-worsted blend yarn for faster build (300–350 g) or worsted if you prefer denser fabric
- Crochet hook 6.0 mm (bulky) or 5.0 mm (worsted)
- Tapestry needle, stitch marker, small zipper (9″–10″) or flap closure
- Optional: magnetic snap, lining fabric
What you’ll make
A rounded-top backpack with a clean, modern silhouette and optional front pocket. Bulky yarn gives softness and quick progress.
Base (rectangle-to-rounded-bottom)
- Ch 30 (or width desired for bag base ~9″). Row 1: sc in 2nd ch and across (29 sc). Turn.
- Rows 2–10: sc across (make rectangle height about 3″ to form base/depth). This rectangle will be folded and sewn to create bottom.
Body (worked in rounds from base)
- Rejoin yarn to one end of rectangle and work sc evenly around the perimeter of your rectangle to begin the sides — this transforms rectangle into a tube; place stitch marker at start. Work sc in rounds until tube measures ~8″ tall from base (adjust for personal fit).
- To create a rounded top: decrease evenly on one side only to shape an arch: work sc across first 2/3 of rounds normally, then decrease 1–2 sts at the top edge per round on the shaping side until you have a smooth arch for the opening. Alternatively, create a separate rectangular flap and sew onto top for a flap closure.
Front pocket (optional)
- Crochet a pocket rectangle 7″ × 5″: ch 22, sc rows to height. Attach to front panel by whipstitch bottom/side edges and leave top open. Add a little flap or zipper to secure pocket.
Closure & straps
- Add zipper to top opening by sewing to lining or whipstitching into crochet edge. For flap closure, make flap piece and sew along top back edge; add a magnetic snap to front flap and bag front.
- Straps: make two adjustable straps: ch to desired starting length (approx. 40″), work sc rows or hdc strips for width and stuff lightly if you want a padded feel. Attach securely to lower back with extra stitching.
Lining & reinforcement
- Line the bag with cotton canvas for shape. Add interfacing to lining if using floppy yarn. Sew lining to zipper and top edge.
Tips
- Bulky yarn makes a soft structured look, while worsted + interfacing gives more formality.
- Consider adding a key loop inside the pocket.
4. Olive Green Crochet Backpack with Pockets Tutorial
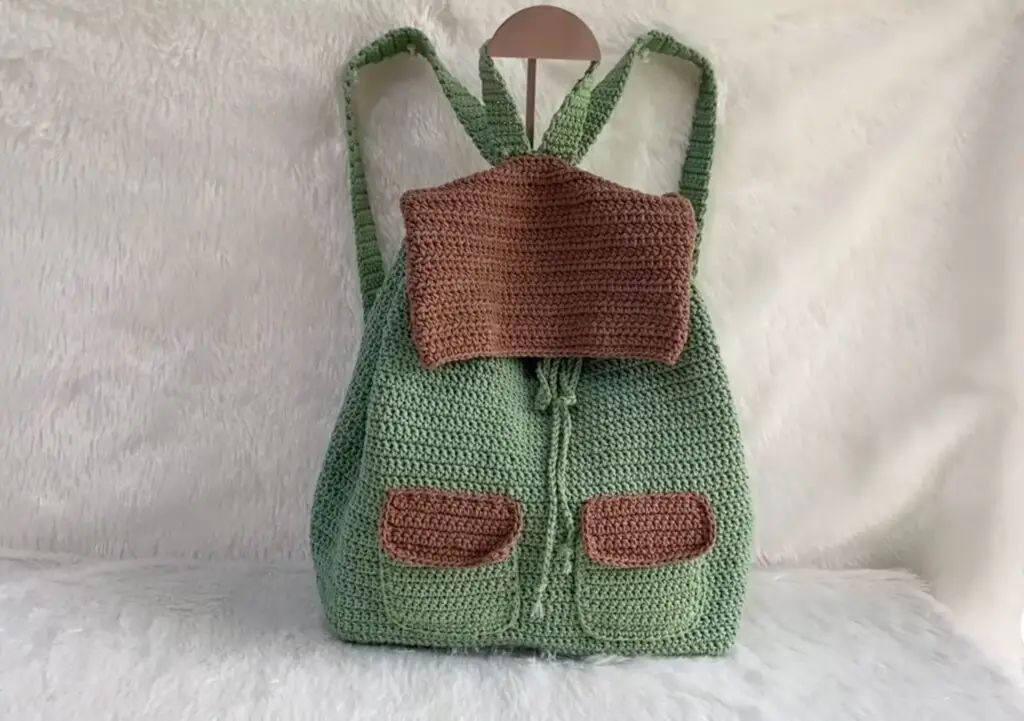
Skill level: Beginner → Intermediate (pockets + structure)
Finished size (approx): 13″ tall × 11″ wide (classic daypack)
Materials
- Worsted weight (4) cotton-acrylic blend in olive green — 350–450 g
- Hook 5.0 mm
- Two 8″ zippers (one for main, one for pocket) or button closures for pockets
- Lining fabric (cotton canvas) and fusible interfacing
- Straps (crocheted or ready-made), D-rings for adjustment (optional)
What you’ll make
A practical medium-sized backpack with two exterior pockets, a roomy main compartment, and reinforced lining for everyday use.
Back panel & front panel (worked as rectangles)
- Ch 33 (or width ~11″). Row 1: sc in 2nd ch from hook and across. Turn. Repeat rows until panel measures 13″ tall. Make two identical panels (front and back).
- Work one additional rectangle for the base: ch 33, sc rows for 4″ height.
Pockets
- Front pocket (large): Ch 25, sc rows until pocket measures 6″ tall. Attach zipper at top of pocket by sewing into lining or hand-stitching to crochet edge. Sew pocket to front panel, leaving top with zipper functional.
- Side pockets (optional): Work small rectangle 6″ × 5″ for bottle or small items, seam to side edges.
Join pieces
- With panels right sides together, seam sides and bottom using a sturdy slip-stitch or whipstitch. Leave top open. Attach base piece by seaming around base edge for a boxy bottom.
- Create top edge with 2–3 rounds of sc for a tidy finish.
Lining & reinforcement
- Cut lining pieces corresponding to main panel sizes + seam allowance. Fuse interfacing to the lining for added structure (especially on front pocket and base). Sew lining pockets and zipper into lining then insert and stitch lining to top edge of crochet shell.
Straps & hardware
- Use D-rings and webbing to make adjustable straps, or crochet strap bands and add D-ring adjusters. Attach straps with extra stitches and, if possible, reinforce with a small leather patch on the inside lining where the strap meets the bag for durability.
Tips
- Use cotton-blend yarn for durability and machine washability.
- For a polished finish, topstitch the lining to the shell around the zipper.
5. Florence Backpack Crochet Pattern
Skill level: Beginner → Intermediate (classic silhouette + flap)
Finished size (approx): 14″ tall × 12″ wide (roomy daypack)
Materials
- Worsted weight yarn (bulky cotton or acrylic blend) — 400–500 g
- Hook 5.5 mm
- Large flap button or buckle, drawstring cord (optional), lining fabric
- Magnetic snap for flap closure (optional)
What you’ll make
A roomy, slightly structured backpack with a top flap and drawstring closure — classic and versatile.
Bottom & body
- Base: Ch 36. Row 1: sc in 2nd ch and across (35 sc). Work rows to make a rectangle 12″ wide × 4″ tall.
- Body: Join and work in sc around the rectangle edge to make a tube; continue sc in rounds until tube measures 10″ tall from base. This forms main body.
Top shaping & flap
- Top eyelet row: Work one round of sc, ch 2, sk 2 to make eyelet row for drawstring. Work 1–2 rounds sc after eyelets.
- Flap: Make a flap by turning the top edge and working rows in sc or hdc to form a rectangular flap that folds over the front about 6–7″ long. Taper flap edges by decreasing 1–2 sts per row near sides to create a curved look if preferred. Add buttonhole or sew magnetic snap. Fasten off.
Pocket & accents
- Crochet a front pocket 8″ × 6″ and attach to front under flap. Add a decorative panel or stitch rows of texture (front post dc) for interest.
Lining & straps
- Line as usual with canvas. For straps, crochet two wide strips in hdc and sew on with strong stitching across back panel and reinforcement patch. Add buckles for adjustability or make fixed length straps.
Tips
- Try a textured stitch (waffle or basketweave) for the body for sweater-like look.
- For weather resistance, use a yarn with a cotton/acrylic mix and consider a water-repellent spray for the finished bag.
6. Crochet Sunflower Backpack Tutorial
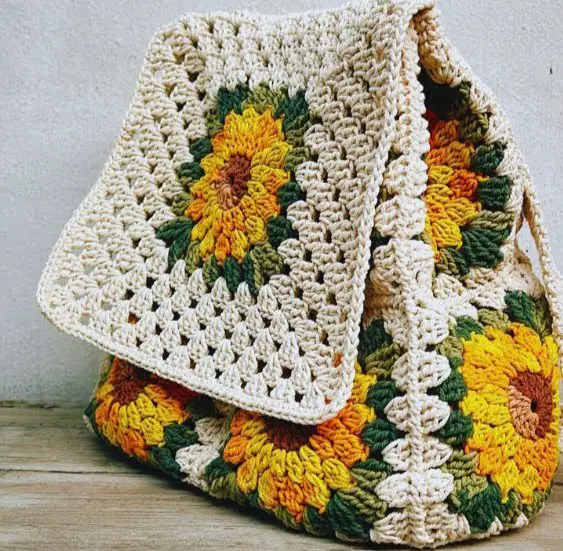
Skill level: Beginner → Intermediate (appliqué + structured assembly)
Finished size (approx): 12″ tall × 10″ wide (cheerful medium bag)
Materials
- Worsted weight yarn: yellow (petals), brown (center), green (leaves) and neutral body color (250–350 g total)
- Crochet hook 4.5–5.0 mm
- Tapestry needle, lining fabric, zipper or flap closure
- Small buttons for center (optional)
What you’ll make
A backpack with a bold sunflower appliqué on the front — fun, bright, and perfect for gifting.
Sunflower appliqué
- Center (brown): ch 2, work 8 sc in magic ring; join. Rnd 2: inc around (16 sc). Rnd 3: sc in next, inc around (24 sc). Fasten off.
- Petals (yellow): Join yellow to round 2 spaces. Round: ch 6, sl st back into same st to form loops for each petal across (make 12–14 loops). Round 2 (petal shaping): Into each loop: (sc, hdc, 3 dc, hdc, sc); fasten off and weave in tails.
- Sew the sunflower onto a square panel or directly onto the front panel.
Body & assembly
- Make front and back panels as rectangles: ch to width 10″, sc rows to 12″ height. Attach sunflower to front before joining panels.
- Make side and bottom panels for depth (4″ height). Assemble front, back and base as described in previous patterns.
- Add pockets and lining. Top with zipper or flap closure.
Leaves & extra decoration
- Crochet a couple of leaves and stitch near the flower for a 3D effect. Add a small leather patch or tag to elevate look.
Tips
- Use a contrasting yarn for the bag body so sunflower pops.
- Sew the appliqué securely at many points so it withstands use.
General Construction & Durability Notes (applies to all backpacks)
- Lining — strongly recommended for backpacks. Use cotton canvas and add fusible interfacing for structure. Sew lining to zipper first, then attach to crochet shell for a polished finish.
- Reinforcement — wherever straps meet the bag, reinforce with extra stitches, a leather patch or bar tack stitching on lining to prevent tearing.
- Zippers vs. drawstrings — zippers give security and clean opening; drawstrings are simpler and part of a casual aesthetic. For heavy use, use a quality zipper and sew into the lining for strength.
- Straps — crocheted straps are comfortable but may stretch; consider lining them with webbing or using adjustable webbing straps for durability.
- Yarn choice — cotton and cotton blends are recommended for strength and machine-washability. Acrylic is lighter and forgiving but can pill. Bulky yarn works when you want fast results; worsted gives more refined shape.
- Care — check yarn label. Most cotton and acrylic blends can be gentle-machine washed inside a pillowcase; remove any metal hardware before washing and reshape while damp.
Conclusion
These six easy crochet backpack patterns give you a range of styles — from tiny drawstring minis to roomy daypacks with pockets and a cheerful sunflower appliqué. Each project teaches a useful bag-making skill: circular bases, join-as-you-go granny motifs, structured lining, zipper insertion, and sturdy strap attachment. Pick a yarn and pattern that match your lifestyle (fast bulky for an evening build, cotton for everyday durability), follow the step-by-step guide, add a lining for longevity, and customize with pockets and appliqués. Enjoy making a backpack that’s truly yours — and perfect for carrying small adventures. Happy crocheting!