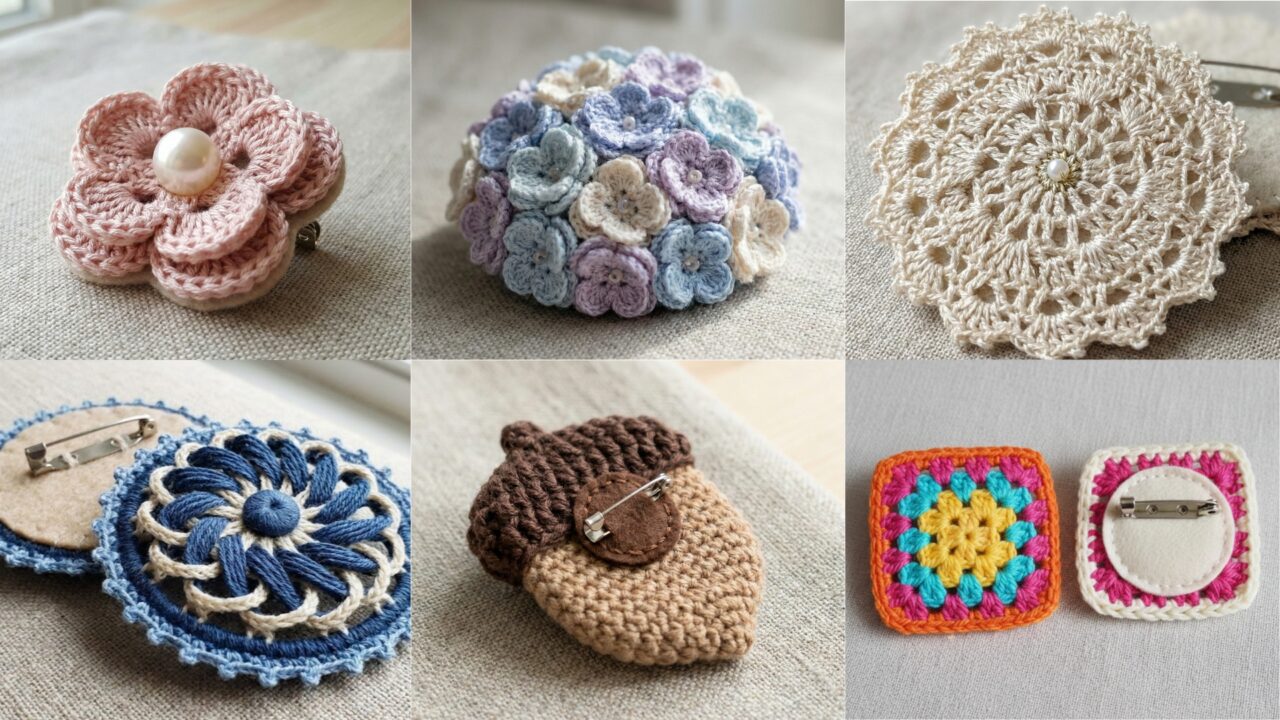
Crochet brooches are tiny wearable artworks — fast to make, brilliant for using scrap yarn, and perfect for gifting or selling. In this post you’ll find six fully detailed brooch patterns with clear, step-by-step instructions, materials, skill levels, finishing & care, plus helpful variations and troubleshooting tips. All patterns use US crochet terms. If you prefer UK terms, tell me and I’ll convert them.
Quick notes (applies to every pattern)
- Tools & abbreviations (US terms): ch = chain, sc = single crochet, hdc = half double crochet, dc = double crochet, tr = treble (rarely used here), sl st = slip stitch, sk = skip, st(s) = stitch(es), sp = space, BLO = back loop only, FLO = front loop only, RS = right side.
- Finishing: I recommend adding a small felt backing and sewing on a brooch pin for a neat, durable finish — instructions included in each pattern.
- Blocking: For lacey/flat brooches, gently block to shape using a spray of water and pins or a light iron through a damp cloth.
- Safety: If making for children, attach pins so they won’t come loose or consider using brooch alternatives like magnetic backs.
1. Crochet Doily Brooch Pattern
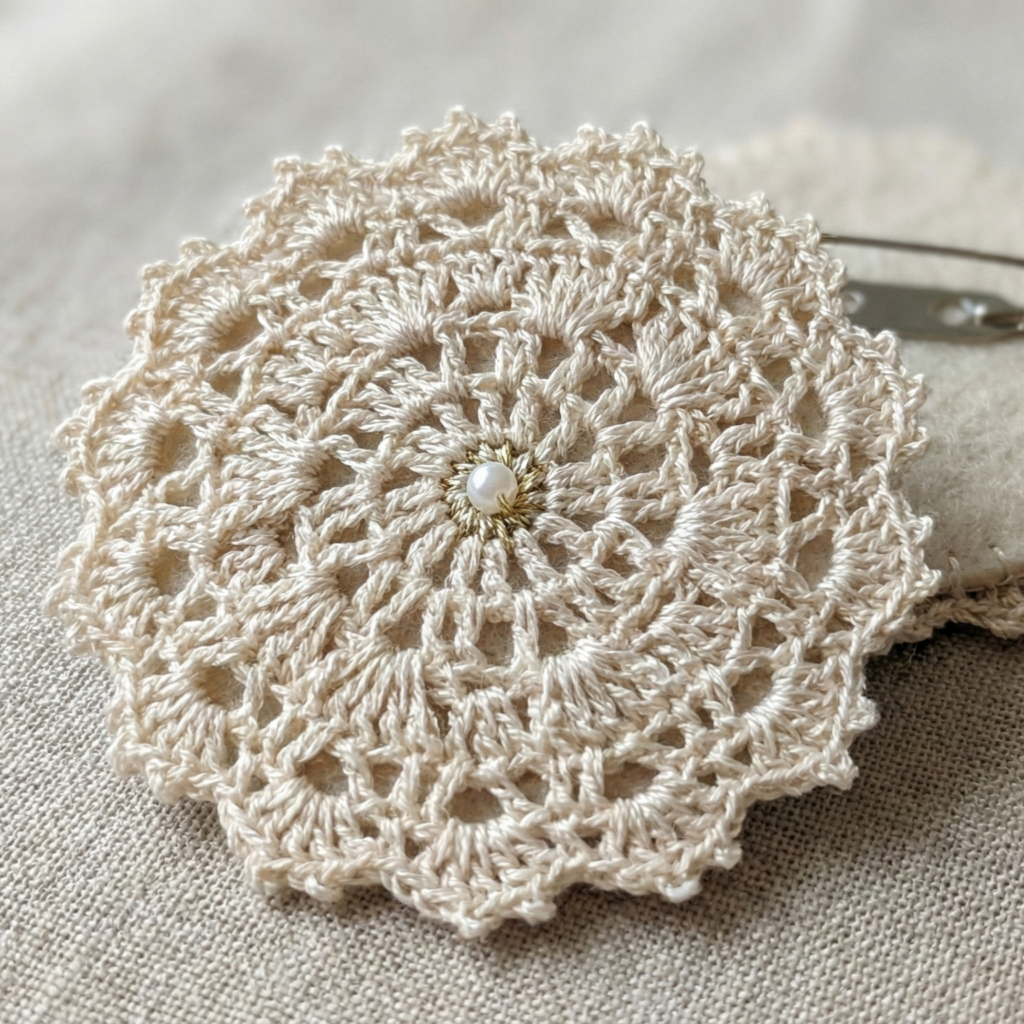
Skill level: Intermediate (beginners who know dc clusters, picots, and working in rounds can try)
Approx. time: 45–75 minutes
Finished size: ~2.5–3.5 in (depends on yarn/hook)
Materials
- Fine cotton thread or lace-weight yarn (e.g., size 10 cotton)
- Hook: 1.75–2.5 mm (match yarn)
- Tapestry needle, small brooch pin (bar pin), scissors
- Optional: starch for stiffening, small embroidery hoop for blocking
Notes before you start
This design uses concentric rounds of fans and picots to create a delicate lace look. Work loosely for airy lace; tighten for compact texture.
Pattern (US terms)
- Round 0 — Magic ring: Make a magic ring. Ch 1, work 10 sc into ring. Join with sl st to first sc. (10 sc)
- Round 1 — Base round: Ch 3 (counts as dc), dc in next st around (10 dc total). Join with sl st to top of ch-3.
- Round 2 — Chain arches: (Ch 4, sk 1 st, sc in next st) repeat around. Aim for 10 chain arches. Join.
- Round 3 — Fan lace: In each chain arch: (2 dc, ch 2, 2 dc). Join. You’ll have 10 fans.
- Round 4 — Add height: Ch 1, sc in each dc across the fan shells and sc into the ch-2 spaces when available — this evens the round. Join.
- Round 5 — Picot edging: (Ch 3, sl st into same st) to make a picot, sk 1, sc in next st — repeat around to form delicate picot edge. Join.
- Fasten off leaving a tail for weaving. Weave in ends.
Finishing
- Lightly block to round shape. For firmness, mix a bit of starch/water and shape over a small plate until dry.
- Cut a small felt circle (slightly smaller than the brooch). Sew or glue it to the back, then hand-stitch the pin onto the felt. Use strong thread and reinforce with several passes.
Care
- Hand wash only in cool water, reshape while damp. Avoid machine washing. If starched, hand press lightly — do not iron directly on thread.
Variations & tips
- Use a laceweight metallic thread for a subtle sparkle.
- Scale up by using fingering yarn + larger hook for a bigger brooch.
- Add a cluster of tiny beads in the center for vintage glam.
2. Crochet Elegant Flower Pearl Brooch Pattern
Skill level: Beginner–Intermediate
Approx. time: 25–45 minutes
Finished size: 1.75–2.5 in
Materials
- DK (light/worsted for stronger petals) or cotton yarn
- Hook: 3.0–3.75 mm
- Faux pearl bead (8–12 mm) or cluster of seed beads
- Tapestry needle, small brooch pin, matching thread for sewing bead, scissors
Pattern (US terms)
Center (optional — bead sewn on):
- Make a small yo (magic ring) and sc 6 into ring; join, fasten off. (This creates a tiny base to sew the bead to.)
Petals (make 5–7 petals depending on fullness):
Work petals directly around the center or make separate petals and sew:
- Petal foundation: Ch 2, in next st (or in center ring) sc, hdc, dc, hdc, sc. Sl st back into base to anchor petal. Fasten off or continue without fastening if working in continuous round.
- Repeat to create desired number of petals, spacing evenly around center.
Assembly:
- Place the faux pearl bead over center and sew it securely through the center ring or the small center disc.
- Weave in ends.
Finishing
- Use a small felt backing and sew the brooch pin. For extra reinforcement, stitch a few stitches through the bead to secure it to the felt/petals.
Care
- Spot clean around bead. Avoid soaking if bead has a glued finish.
Variations & tips
- Use silk or shiny mercerized cotton for a bridal look.
- Make two smaller flowers and stack for more dimension.
3. Crochet Hydrangea Flower Brooch Pattern

Skill level: Intermediate (working with lots of small motifs)
Approx. time: 40–90 minutes (depending on number of florets)
Finished size: 2–3 in (can be doubled up)
Materials
- Lightweight yarn in 2–3 close shades (pastels for realistic hydrangea)
- Hook: 2.5–3.25 mm
- Tapestry needle, brooch pin, small amount of stuffing (optional for dimension)
Pattern overview
Hydrangea = cluster of many small 4–5 petal florets. Make several tiny florets and stitch them together into a dome cluster.
Single Floret (make 8–12 for a small brooch; 15–25 for a full dome):
- Magic ring. Ch 1, make 6 sc into ring; join. (6 sc)
- Petal round: ch 2, in next st work (hdc, dc, hdc), sl st to next st — Repeat around to make 6 small petals (or make slightly larger: ch3, (dc, tr, dc) for fuller petals).
- Fasten off leaving long tail for sewing.
Assembly:
- Lay out your color plan. Start sewing florets together at edges to form a rounded cluster. Overlap slightly for a dense look.
- If you want a bit of 3D shape, add a tiny pinch of fiberfill under some florets before stitching them closed.
Finishing
- Back with felt and attach brooch pin. Sew a small felt circle inside the cluster if you want to hide seams.
Care
- Spot clean. Hydrangea clusters can crush; steam gently to revive shape.
Variations & tips
- Combine two color gradients for realistic blooms.
- Use very small seed beads in the center of a few florets for sparkle.
4. Crochet Granny Square Brooch Pattern

Skill level: Beginner (great first zipper project)
Approx. time: 15–35 minutes
Finished size: 1.5–2.5 in square (depending on rounds)
Materials
- Scrap yarn (worsted weight for sturdier brooches)
- Hook: 3.5–4.0 mm
- Tapestry needle, brooch pin, small felt backing
Pattern (simple mini granny square)
- Center: Ch 4, join into a ring with sl st.
- Round 1: Ch 3 (counts as dc), (2 dc, ch 2, 3 dc) into ring for first corner, ch 1, (3 dc, ch 2, 3 dc) repeat to make four corners. Join to top of ch 3.
- Round 2: Sl st into ch-2 corner, ch 3, (2 dc, ch 2, 3 dc) into same corner, ch 1, 3 dc into next ch-1 sp across until you reach next corner, (3 dc, ch 2, 3 dc) in corner. Join.
- Fasten off and weave ends.
Assembly & finish
- Add a tidy single-crochet or sc border if desired. Press lightly to square. Attach to felt backing and sew on the pin.
Care
- Machine wash gentle (if using washable yarn) inside a mesh bag, or hand wash. Press back into shape.
Variations & tips
- Make mini granny squares in busy colorways for a playful brooch.
- Add a little bead at the center for interest.
5. Crochet Acorn Brooch Pattern
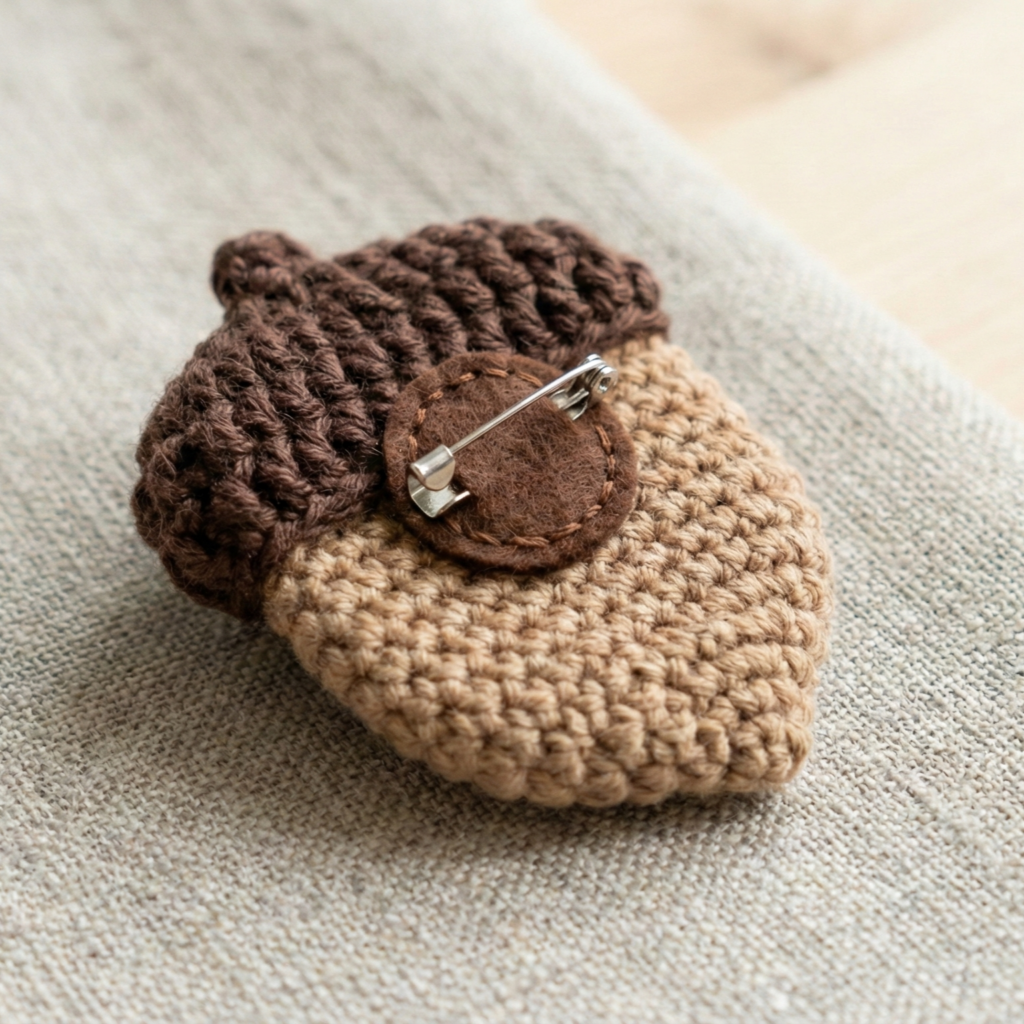
Skill level: Beginner–Intermediate
Approx. time: 30–60 minutes
Finished size: ~1.5–2 in
Materials
- Worsted weight yarn in two colors: light brown (body) + dark brown (cap), or tan + brown
- Hook: 3.5–4.0 mm
- Fiberfill (tiny amount)
- Tapestry needle, brooch pin, scissors
Pattern (US terms) — Acorn Body (worked in continuous rounds)
- Using light brown, Magic ring: 6 sc into ring. (6)
- R2: inc in each st around — 12 sc.
- R3: (sc, inc) around — 18 sc.
- R4–R6: sc around for 3 rounds (18 sc) — builds height.
- R7: (sc, dec) around — 12 sc.
- R8: dec around — 6 sc. Fasten off leaving a tail. Lightly stuff just enough to give shape.
Cap (in darker color) — work flat circle or textured cap
- Ch 2, in 2nd ch from hook work 6 sc — join to form small circle (6).
- R2: inc around — 12 sc.
- R3: * (sc, inc) around* — 18 sc.
- R4: Switch to a textured stitch: sc in BLO around or fpdc/bpdc cluster to mimic cup texture; work 1–2 rounds. Fasten off leaving long tail to sew.
Assembly
- Place cap over top of acorn body and stitch around edge to secure.
- Add a small crochet stem: ch4, sl st back to base; sew to top center if desired.
- Attach brooch pin to felt backing and sew the acorn onto the felt or stitch the pin directly into the cap base.
Care
- Spot clean, gentle hand wash if necessary. Reshape while damp.
Variations & tips
- Use variegated yarn for the cap to mimic natural color variation.
- Make a set of acorn and leaf brooches.
6. Crochet Dorset Button Flower Brooch Pattern
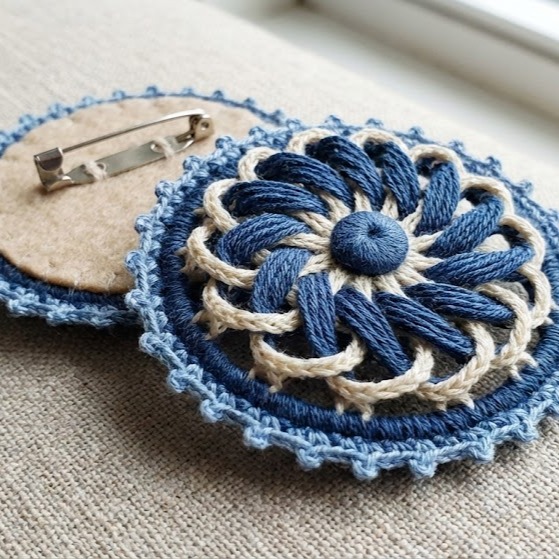
Skill level: Intermediate (requires wrapping and weaving techniques)
Approx. time: 30–60 minutes
Finished size: 2–3 in diameter (depends on ring size)
Materials
- Dorset button ring (metal or plastic ring 1–2 in diameter) OR make a faux ring by wrapping a washer
- Fine yarn or embroidery floss
- Small crochet hook (or large blunt needle)
- Tapestry needle, brooch pin, scissors
Quick intro
Dorset buttons are made by wrapping thread around a ring, then creating spokes and weaving to make petals. The result is heirloom-quality.
Method
- Wrap the ring: Secure yarn to ring and wrap evenly until the ring is completely covered — this forms the base. Secure and cut leaving a tail.
- Make spokes: Using a darning needle or crochet hook, make 8–12 evenly spaced spokes by looping yarn across the ring and anchoring at equal intervals. Tighten so spokes are taut.
- Weave the web (petals): With yarn, weave over/under the spokes in a circular spiral, gently pulling each round toward the center to form petals. To make petal loops, after a few rounds, at each spoke make a small loop (ch 3 or ch 4) and anchor — this creates distinct petals.
- Continue until the center is filled and secure the end by weaving under spokes and trimming.
Finishing
- Optionally crochet a small picot or scallop edge around the outer ring.
- Sew felt backing and attach brooch pin.
Care
- Dust with a soft brush. Avoid heavy washing — hand wash gently if needed.
Variations & tips
- Use thicker thread and fewer spokes for bold, modern buttons.
- Add an embroidered center or bead cluster for contrast.
Conclusion
Crochet brooches are wonderfully satisfying — fast to make, customizable, and endlessly giftable. You now have six distinct patterns that cover vintage lace (Doily), classic elegance (Pearl Flower), romantic florals (Hydrangea), playful colorwork (Granny Square), seasonal charm (Acorn), and traditional craft (Dorset Button). Each pattern includes practical finishing and care instructions to ensure your brooches look polished and last.