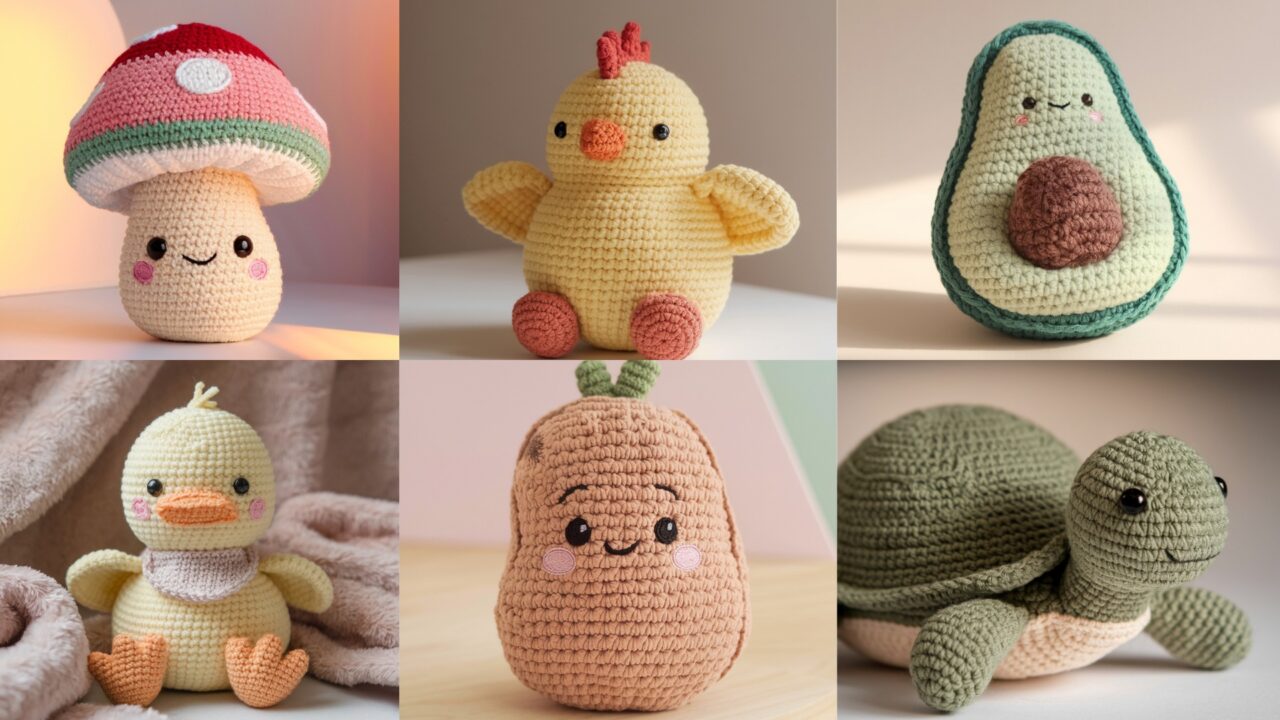
Small, tactile objects can be surprisingly comforting. Crochet plushies are portable, washable, and can be made to feel soft, heavy, squishy, or fidget-friendly — perfect as pocket companions, on-desk pals, or heartfelt gifts. Below are six approachable plushie patterns written so you — whether brand-new to amigurumi or an experienced maker — can make cozy emotional-support friends: Potato, Chunky Chicken, Mushroom, Duck, Turtle, and Avocado.
Each pattern includes: Skill level • Finished size • Materials • Abbreviations • Step-by-step instructions (rounds) • Finishing & assembly • Tips & variations • Care & safety. All patterns use US crochet terms and assume you’re comfortable working in continuous rounds for amigurumi.
Safety note: for toys intended for babies or children under 3, do not use safety eyes, beads, or loose small parts — embroider features instead. For weighted plushies, keep all weight securely inside an inner pouch and never leave a weighted toy with an unsupervised infant.
Common materials + tips (used across patterns)
- Yarn: worsted weight (#4) cotton or cotton/acrylic blend for durability and washability. Acrylic is squishier; cotton is less fuzzy.
- Hook: 3.0–3.5 mm (for tight fabric) or 3.5–4.0 mm depending on yarn and personal tension. Smaller hook = tighter fabric = less stuffing show-through.
- Stuffing: polyester fiberfill. For weighted plushies, use plastic pellet beads inside a small zip pouch or tiny poly pellets & seal them inside before placing in the toy (see safety below).
- Tools: tapestry needle, stitch marker, small scissors, safety eyes (6–10 mm) or embroidery thread for eyes, optional pipe cleaner for poseable limbs.
- Gauge: not critical — amigurumi relies on tight stitches. Aim for firm fabric (no visible stuffing).
- Work in continuous rounds unless specified. Use a stitch marker to mark round start.
1. Crochet Potato Pattern

Skill level
Beginner — great first amigurumi.
Finished size
About 4–5 in (10–13 cm) tall (with worsted yarn and 3.5 mm hook).
Materials
- Worsted weight yarn (tan/light brown) — ~40–60 yd
- Small amount of darker brown for “spots” (optional)
- 3.5 mm hook, stuffing, tapestry needle, stitch marker
- Safety eyes 6–8 mm or black embroidery thread
Abbreviations
MR = magic ring, sc = single crochet, inc = 2 sc in same st, dec = sc2tog, sl st = slip stitch
Body (worked in continuous rounds)
- MR, R1: 6 sc in MR (6)
- R2: inc around (12)
- R3: sc1, inc (18)
- R4: sc2, inc (24)
- R5: sc3, inc (30)
- R6–R10: sc around (30) — lengthen to get a plump potato (add or remove rounds to desired height)
- R11: sc3, dec (24)
- R12: sc2, dec (18)
- R13: sc1, dec (12) — insert safety eyes between R6–R8 about 6–8 sts apart (or embroider eyes later)
- R14: dec around (6), fasten off, weave tail and close hole. Stuff firmly but not overstuffed — you want a soft squeezable potato.
Spots (optional)
- Work tiny flat ovals: ch 5, sc in 2nd ch and across (4), fasten off. Sew a few irregular spots on the body with darker yarn.
Face & expression
- Embroider a small smile under the eyes with black or dark brown floss. A tiny blush (pink yarn or pastel chalk) on cheeks makes it sweeter.
Finishing & assembly
- Weave in ends. If making as a weighted comfort plush, place a sealed plastic-pellet pouch at the base inside before final closing (secure and double-sew).
Tips & variations
- Make “sleepy” potatoes with closed-eye embroidery.
- Make a keychain version with thinner yarn and a 2.5–3 mm hook.
Care & safety
- Machine wash gentle in mesh bag; reshape while damp. If weighted, hand wash only and avoid soaking the weight pouch.
2. Crochet Chunky Chicken Pattern

Skill level
Beginner → Easy (simple shaped body + tiny wings/comb)
Finished size
About 5–6 in (12–15 cm) tall when made with bulky/worsted yarn.
Materials
- Worsted or bulky yarn in yellow ~80 yd, orange for beak/feet ~10 yd, red for comb ~5 yd
- 4.0 mm hook (or 4.5–5.0 mm for chunkier look), stuffing, tapestry needle
- Safety eyes 8 mm or embroidered eyes
Body (bottom-up)
- MR, R1: 6 sc in MR (6)
- R2: inc around (12)
- R3: sc1, inc (18)
- R4: sc2, inc (24)
- R5–R8: sc around (24) — add rounds for chunkier body
- R9: sc2, dec (18)
- R10: sc1, dec (12) — stuff firmly
- R11: dec around (6), close and fasten.
Wings (make 2)
- Ch 6, sc in 2nd ch from hook and across (5). Row 2: ch1, sc across. Row 3: ch1, sc2tog, sc1 (2). Fasten off leaving tail; fold and sew to side.
Beak
- With orange: ch4, sc in 2nd ch and across (3); turn and sc 2 rows; fold and sew to front center.
Comb (make 1)
- Ch 6, sl st into 2nd ch, ch3, sl st in next ch to make tiny scallops; sew on top of head.
Feet (make 2)
- With orange: ch 10, sl st back along chain to make a short i-cord or ch 5 and make three small toe loops; sew to bottom.
Face & finishing
- Embroider eyes, or attach safety eyes between rounds 6–7. Add tiny wings on sides. You can sew on a small weighted pouch near bottom for grounding weight.
Tips & variations
- Chunky yarn makes a squishy, huggable bird perfect for laps or desks.
- Add a small loop for hanging or a ribbon collar.
Care & safety
- Machine wash gentle; for bulky yarn, low temperatures and air dry. Remove any metal for machine washing (clasp, keychain).
3. Crochet Mushroom Pattern

Skill level
Beginner → Easy
Finished size
About 4–5 in (10–13 cm) tall.
Materials
- Worsted yarn: cap color (red/green/pink) ~40 yd, stalk color (cream) ~25 yd, white for dots ~ small amount
- 3.5 mm hook, small stuffing, tapestry needle
Stalk (worked first)
- MR, R1: 6 sc in MR (6)
- R2: inc around (12)
- R3–R8: sc around (12) — lengthen for taller stalk
- R9: sc1, dec (8) — start stuffing
- Continue dec to close the base or leave slight flat bottom and sew to felt disc to sit upright.
Cap (worked separately, flat dome)
- With cap color, MR, R1: 6 sc (6)
- R2: inc each st (12)
- R3: sc1, inc (18)
- R4: sc2, inc (24)
- R5: sc3, inc (30) — continue until cap diameter ~3–4 in depending on desired size
- R6–R7: sc around without increasing to form dome height. Fasten off leaving tail for sewing.
Dots & face
- Make small dots: MR, 4 sc — flatten and sew to cap as spots. Add a tiny embroidered smile on the stalk for sweet expression.
Assembly
- Sew cap to top of stalk with whipstitch, ensuring it’s centered. Add a few scattered embroidered spots. Optionally add a small weighted insert in stalk base for grounding.
Tips & variations
- Make a toadstool with polka dots and pale stalk.
- Make a set with different cap colors and sizes for a calming desktop/group.
Care & safety
- Machine wash gentle; reshape cap while damp.
4. Crochet Duck Pattern

Skill level
Beginner → Easy
Finished size
About 5–6 in (12–15 cm) long.
Materials
- Worsted yarn: body (soft yellow) ~60 yd, beak/feet (orange) ~10 yd, optional accent color for bib ~small amount
- 3.5–4.0 mm hook, stuffing, tapestry needle, safety eyes 6–8 mm or embroidered
Body (oval)
- MR, R1: 6 sc (6)
- R2: inc (12)
- R3: sc1, inc (18)
- R4: sc2, inc (24)
- R5–R10: sc around (24) — lengthen for elongated duck body
- R11: sc2, dec (18) — stuff firmly
- R12: sc1, dec (12)
- R13: dec around (6), close.
Wings (make 2)
- Ch 8, sc in 2nd ch and across (7). Row 2: ch1 sc across. Row 3: ch1, sc2tog, sc across 3, sc2tog (5). Fasten and sew to sides.
Beak
- With orange: ch 5, sc across (4), ch 1 turn, sc across 3 rows to create small flattened beak; sew to front.
Feet
- Make two small flat feet: ch 7 then sc back and forth for 2 rows then shape a three-toe foot by making small loops or embroidery at bottom of body.
Face & finish
- Embroider cheeks maybe with pale pink; add bib or tiny scarf for extra comfort. You can add a little pocket on the belly (sewn felt) to hide a tiny note or calming scent sachet.
Tips & variations
- Add a ring to the top of the head to make it a bag charm.
- Use fuzzy yarn for a plush chick look (avoid safety eyes for baby versions).
Care & safety
- Machine wash gentle; remove any glued beads before washing.
5. Crochet Turtle Pattern

Skill level
Intermediate — multiple parts (shell, head, limbs) but still beginner-friendly if you follow steps.
Finished size
About 6–7 in (15–18 cm) long.
Materials
- Worsted yarn: shell color (green/olive) ~80 yd, underside (cream) ~20 yd, accent for shell pattern ~small amount
- 3.5 mm hook, stuffing, tapestry needle, safety eyes 6–8 mm or embroidered
Underside (plastron) — worked flat
- Ch 12. Row1: sc in 2nd ch from hook across (11). Turn.
- Row2–6: ch1, sc across — build a rectangle approx 3–4 in long and 2 in wide depending on gauge. This will be the belly plate.
Shell (worked in rounds, dome)
- MR, R1: 6 sc (6)
- R2: inc (12)
- R3: sc1, inc (18)
- R4: sc2, inc (24)
- R5–R8: sc around (24–30) making a dome large enough to cover the plastron and overhang edges slightly. Fasten off leaving long tail to sew to belly.
Head & limbs
Head: MR 6 sc; R2 inc = 12; R3–R6 sc (12) – stuff lightly, close leaving tail for sewing.
Legs (make 4): MR 6 sc; R2 sc1, inc to 9-12; R3–R5 sc around; leave tail to sew; shape into paddle-like feet by folding and sewing 1–2 small decreases at tip.
Assembly
- Sew legs to underside sides so turtle can sit stable. Sew head at one narrow end. Place the shell over the plastron and stitch around perimeter, catching both pieces with small even stitches. Add decorative surface embroidery to the shell to suggest scutes (small hexagon shapes) or attach small crocheted hexagon motifs before sewing shell on.
Weighted option
- Tuck a sealed microbead pouch inside the belly before final stitching for a grounding weight (securely double-sew).
Tips & variations
- Make a “hug” turtle with a soft, flat shell (less pronounced dome) to be extra huggable.
- Use variegated yarn for an organic shell look.
Care & safety
- Machine wash gentle (if using sturdy acrylic/cotton). Weighted versions: hand wash and avoid soaking the weight pouch.
6. Crochet Avocado Pattern

Skill level
Beginner → Easy
Finished size
About 6–7 in (15–18 cm) long for the half with removable pit.
Materials
- Worsted yarn: outer green ~40 yd, inner pale green/cream ~20 yd, brown for pit ~15 yd
- 3.5 mm hook, stuffing, tapestry needle
Avocado half (body)
- Chain 18–22 for length; work oval base as in earlier patterns and increase rounds to shape a broad half-oval approx 6–7 in long. You will make a shallow bowl shape (do not completely close top) so the pit fits inside.
- Change to flesh color for inner rounds: work 2–3 inner rounds in cream so the avocado has a visible “flesh” border.
- Work sides up a couple of rounds in green to form a rim that keeps the pit in place.
Pit (removable small bowl)
- Brown MR, R1: 6 sc (6)
- R2: inc around (12)
- R3: sc1, inc (18)
- R4–R6: sc around to make a small bowl that fits into the avocado cavity or make it slightly dome-shaped if you prefer a little knob to hold.
- Fasten off and stuff lightly if you want a soft pit; for more tactile weighted feel, add a small sealed pellet pouch inside the pit (double bag) — seal and test fit.
Assembly & finishing
- Sew or tack a few stitches into the avocado base to keep the pit from flipping out too easily — or leave it fully removable to use as a sorting / fidget piece (good for calming hands). Embroider a tiny smile or add a blush with yarn.
Tips & variations
- Make a “hugger” avocado with two halves that zip together (use an applique zipper or sew buttons).
- Make avocado keychain miniatures using fingering yarn.
Care & safety
- Machine wash cotton/acrylic items on gentle. Removable weighted inserts: remove before machine washing if possible.
Conclusion — finish, feelings & next steps
These six plushies are designed to be quick to crochet, tactile to hold, and easy to personalize — perfect as small emotional-support companions, pocket pals, or mindful gifts. A few closing practical suggestions:
- Choose the right fiber for the function: acrylic/worsted for squish and washability; cotton for less fuzz and better machine care; chunky yarn for bedtime huggables.
- Tight tension is key to keep stuffing (and pellets) from showing or leaking out. If you see gaps, frog and use a smaller hook or add a round of surface stitches to tighten.
- Weighted options can be grounding for anxious hands — always enclose pellets in a sealed pouch and sew that pouch inside the plushie to prevent leaks. Do not use beads or fillers that present choking hazards for small children. Label toys with care and age guidance.
- Finishing touches matter: tiny embroidered faces, blush, matching scarves, or a small tag with a calming affirmation (“Breathe”, “You’re OK”) make the plushie emotionally resonant. Consider adding a little pocket with a lavender sachet for calming scent — but include care and allergy warnings.
- Gift idea: pair a plushie with a small note describing how to use it for grounding (5 deep breaths while holding it, tracing stitches as a fidget, placing it under your hand during calm-down).
If you’d like, I can:
- convert any one of these into a printable one-page pattern card (ready for blog download),
- produce a step-by-step photo tutorial (stitch-by-stitch) for one plushie (popular choices: Potato or Avocado), or
- generate a yardage & hook chart so you can offer small, medium, and large versions of each design.