A handmade Kindle sleeve is the perfect small project: useful, fast, and lovely to gift. These six patterns give you options for every style — from textured and sturdy to cute and whimsical. Below you’ll find a friendly introduction (materials, sizing, safety, and construction approaches), then six complete sleeve patterns with materials, suggested finished sizes, detailed step-by-step instructions, finishing and lining tips, variations, and care instructions. I wrote every pattern so you can make a polished sleeve that protects a device and looks great on your shelf.
Quick note: when I say “Kindle sleeve” I mean a padded, sleeve-style cover sized to fit a typical e-reader. Adjust the measurements in each pattern to match the exact model you’re making the sleeve for (e.g., Kindle Paperwhite, Kindle Oasis), or choose a slightly bigger finished size to allow room for a case or cover.
Quick primer — materials, tools, sizing, and construction approaches
Yarn choices
- Worsted / aran cotton or cotton-blend (recommended): sturdy, low-stretch, good stitch definition, easy to wash.
- Acrylic: soft and affordable, takes color beautifully, but slightly more stretch.
- Wool / wool blends: warm and squishy (good for padding) but may need a lining for smooth device insertion.
- For extra protection, you can crochet around a thin foam or add quilt batting as lining.
Hook & notions
- Typical hooks: 4.0–6.5 mm depending on yarn weight; smaller hook than label gives denser fabric (better protection).
- Tapestry needle, scissors, stitch markers, measuring tape.
- Lining fabric (cotton canvas, flannel, fleece), fusible interfacing or thin foam, sewing needle or sewing machine, Velcro / snap / button / zipper for closure.
Device sizing & ease
Measure your Kindle (height × width × depth). Subtract ~0.25–0.5″ in width and height for a snug fit (less ease gives a snug sleeve; more ease makes it easier to slide in). Example: Kindle size 6.9″ × 4.9″ → finished sleeve inner dimensions ~7.1″ × 5.1″ including seam allowance and lining. I include sample measurements per pattern but always swatch and measure your device.
Construction approaches
- Worked flat and seamed (easy): two rectangles or a rectangle folded and seamed on sides.
- Worked in the round (seamless tube): quickest, no side seams; fold open top to make flap.
- Motif assembly (grannies, squares): decorative, then lined.
- Padded sandwich: crochet outer + batting + inner fabric sewn together for extra protection.
Basic abbreviations (US)
- ch = chain
- sc = single crochet
- hdc = half double crochet
- dc = double crochet
- tr = treble crochet
- sl st = slip stitch
- st(s) = stitch(es)
- rep = repeat
- BLO / FLO = back/front loop only
1. Crochet Granny Stitch Kindle Sleeve Pattern
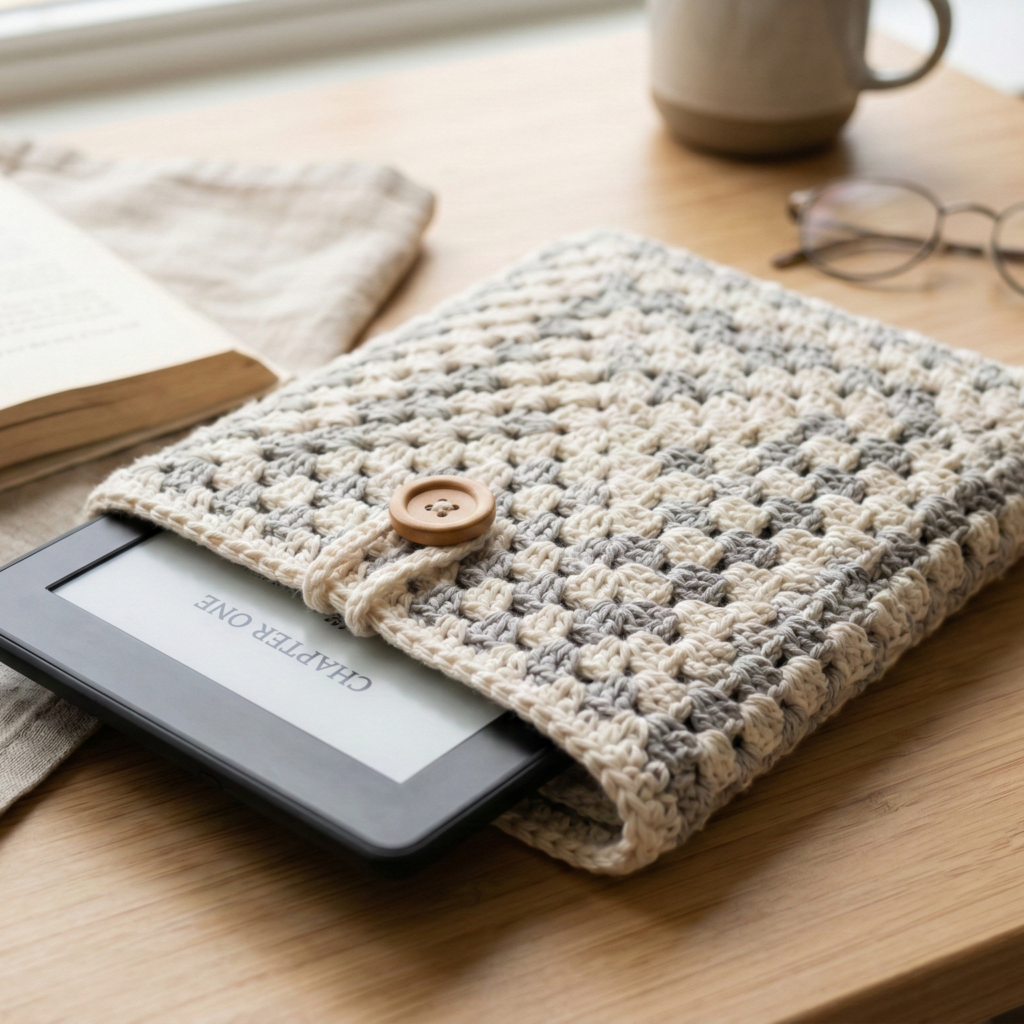
A classic, sturdy sleeve using the granny stitch motif — quick to make and totally customizable in color.
Skill level: confident beginner
Suggested yarn: worsted/DK cotton or cotton-blend (sturdy), ~250–400 yd depending on size and strap/flap options
Hook: 4.0–5.5 mm (use smaller for firmer fabric)
Sample finished size (inner pocket): 7.0″ × 5.0″ (fits a standard Kindle with a little ease) — adjust for your device
Why this works
Granny stitch (cluster of 3 dc) makes a quick, textured, and forgiving fabric. Joined as a flat rectangle or as squares folded into a sleeve, it’s ideal for a cozy yet breathable cover.
Materials & notions
- Yarn, hook, tapestry needle, scissors.
- Lining: cotton or fleece piece slightly larger than finished sleeve.
- Closure: small snap, button + loop, or a short strip of Velcro.
Construction options (pick one)
Option A — One rectangle folded (fastest)
- Make a rectangle in granny stitch worked in rows until piece measures (finished height × half circumference). For a simple fold sleeve with flap, make rectangle approx. 10″ wide × 10.5″ tall (including flap height). Pattern below shows math for a 7″ × 5″ pocket.
Option B — Two panels (front/back) and seam
2. Crochet two smaller panels, seam on two sides leaving top open, optionally add a flap.
Option C — Granny squares joined
3. Make granny squares (approx. 4″ each), join into a rectangle then fold and seam.
Step-by-step (Option A: rectangle, folded sleeve)
- Swatch & gauge
- Make a small granny stitch swatch (4″ square) in the chosen yarn and hook. Measure dc clusters per inch. Example: 4 granny clusters across = 4″ → 1 cluster/inch. For a 7″ wide sleeve, you need ~7 clusters across. Each cluster typically uses 3 dc in one ch-space; account for turning chains and spacing.
- Foundation row
- Chain a multiple that gives desired width. If your granny cluster uses chains and spaces, a common foundation is chain a multiple of 3 + 2. For a sample calculate needed chains to reach ~7″ width. Example: if 1 cluster ≈ 3 ch + 1 sc space, chain 3 × 7 + 2 = 23 ch.
- Granny stitch rows
- Row 1 (setup): sc in 2nd ch from hook, ch2, skip 2 ch, (3 dc in next ch) repeat across; end with sc. Turn.
- Row 2+: ch3 (counts as dc), (3 dc in each ch2 space), ch2 between clusters; continue until rectangle measures ~10.5″ height (this includes body + flap height — see step 5).
- Fold & seam
- Fold rectangle so bottom aligns to form the pocket depth (e.g., fold at 7″ from bottom to create a 7″ tall pocket and 3.5″ flap). Seam sides using whipstitch or mattress stitch through both layers. Leave top open.
- Optional flap
- From the back top edge, pick up stitches and work a small flap: sc rows or granny shell rows for 3–4″. Add a button to the front panel and a loop on the flap, or sew a snap on the flap and counterpart on the front.
- Lining & padding
- Cut lining fabric to match inner dimensions + seam allowance. If adding batting, sandwich between outer and lining and stitch along top edge, then slipstitch lining to inner edge by hand or machine sew before final top stitch. This gives extra protection.
- Finishing
- Weave in ends, block lightly to even granny clusters. Attach closure.
Variations & styling
- Make colorful stripes by changing colors every few rows.
- Add a crochet strap or wrist loop for carrying.
- Add a small pocket on front for charging cable.
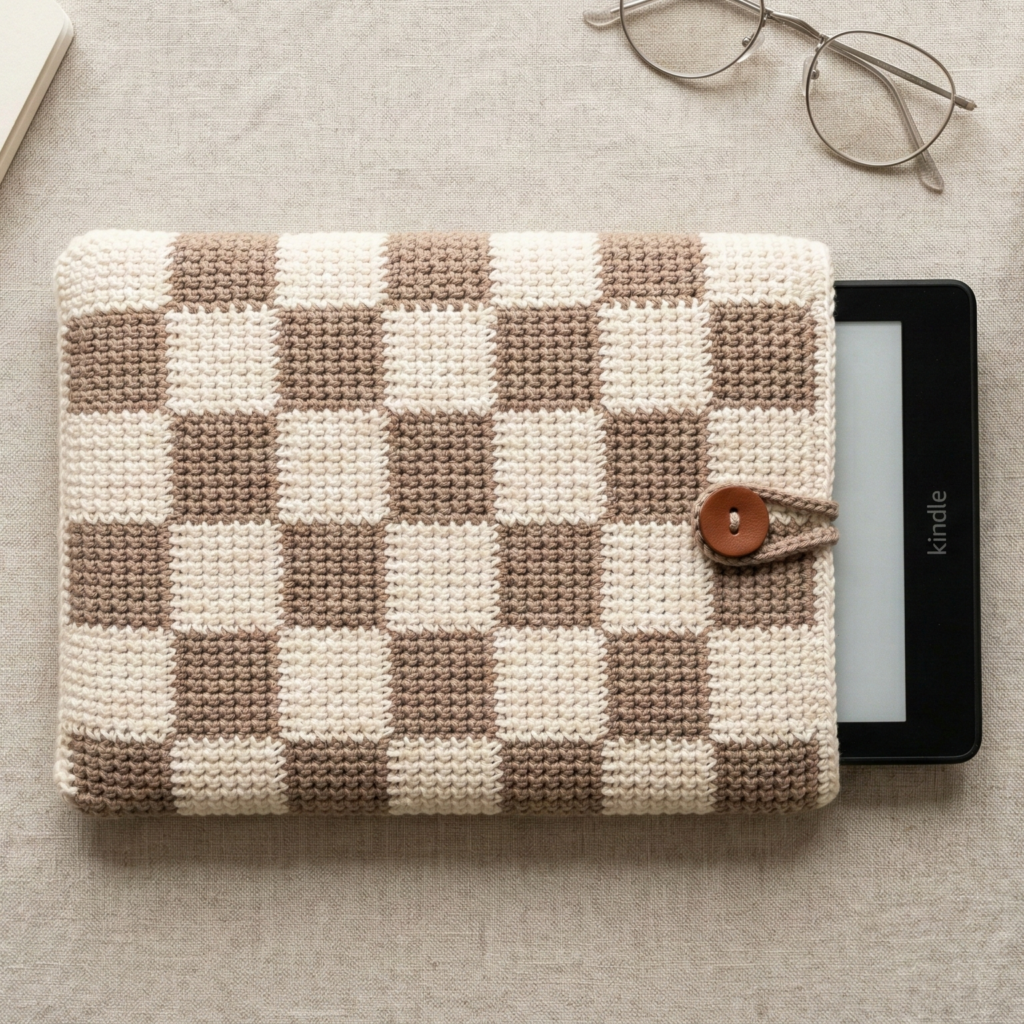
2. Crochet Checkered KIndle Sleeve Pattern
(Heading preserved exactly: “Crochet Checkered KIndle Sleeve Pattern”)
A modern, graphic checkered sleeve using two colors — crisp and stylish.
Skill level: intermediate (colorwork + tapestry technique)
Suggested yarn: DK cotton in two contrasting colors, ~250–350 yd total
Hook: 4.0 mm
Sample finished inner size: 7.0″ × 5.0″
Why this works
Checkerboard in crochet is striking and very forgiving. The dense single-crochet fabric (or hdc) gives protection and a neat look perfect for gifting.
Materials & notions
- Two colors of DK cotton (A and B), tapestry needle, scissors, lining fabric, optional zipper or flap closure.
Stitch choices
- For the most solid fabric use sc in BLO or just sc; a tighter fabric handles sliding devices well. Hdc gives a bit more drape.
Step-by-step (single-piece folded sleeve, seamless in the round variation included)
- Decide check size & swatch
- Decide how big each square in the checkerboard should be (e.g., 6 stitches × 6 rows). Make a swatch to measure stitches/inch. Compute foundation chain or starting rounds accordingly.
- Foundation & pattern grid
- Chain a number of stitches equal to desired width (in sts), adding 1 for turning. For a 7″ width at 5 sc/in → 35 sc. If your square is 5 sts wide, 35 ÷ 5 = 7 squares across.
- Work in rows (flat) — color block method
- Row 1: sc across in Color A. Row 2: sc in Color A for first block width, then change to Color B for next block width, alternate. To avoid long floats on the back, carry the unused color along the edge or drop and pick up each time (weave in ends later).
- Continue working rows, switching colors every block height (e.g., every 6 rows) to form the grid. Ensure your color changes are consistent — carry yarn neatly or use intarsia technique (bobbin lumps) for very clean backs.
- Seam & finish
- Once rectangle reaches desired height, fold and seam sides as in granny pattern. Add lining using machine or hand sewing. For a zipper closure, sew zipper to lining and then assemble lining to outer using the zipper as the top edge.
- Seamless round option (tube)
- For a seamless look, crochet in the round as stripes, then on the right side surface-crochet squares (surface slip stitch) to create check pattern. This avoids color floats inside but requires surface embroidery.
- Edge & finishing
- Work a firm sc round around top opening and flap (if present). Block and press.
Variations & tips
- Use muted two-tone check for a minimalist aesthetic or bright contrasting for playful look.
- Add a small leather tab to insert a magnetic snap for clean closure.
2. Crochet Tulip Stitches Kindle Sleeve Pattern
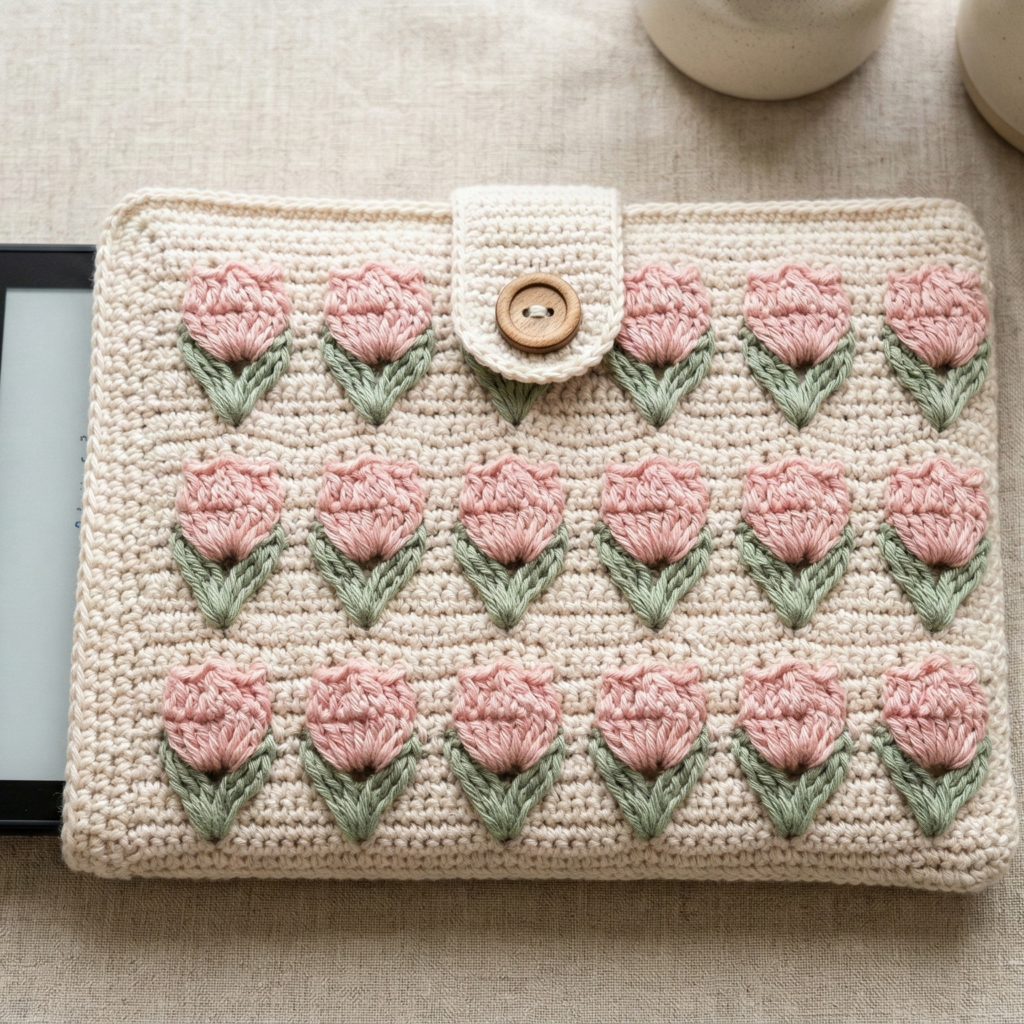
A feminine textural sleeve using tulip stitch motifs — pretty petals and a cushioned feel.
Skill level: intermediate (stitch repetition and shaping)
Suggested yarn: soft DK/bamboo or cotton blend for drape, ~300–450 yd
Hook: 4.0 mm
Sample finished inner size: 7.0″ × 5.0″; padded with batting or fleece
Why this works
Tulip stitches (clustered stitches forming petal shapes) create a squishy, tactile surface that looks hand-crafted and luxurious.
Materials & notions
- Yarn, hook, tapestry needle, inner foam or fleece lining (optional but recommended), closure (button or snap).
Stitch basics (one tulip motif)
A common tulip cluster uses 3–5 dc grouped into one stitch or worked into a small loop to create a petal cluster. We’ll use a repeat of (sc, tulip cluster, sc) across rows.
Step-by-step (worked flat, seamed)
- Swatch the tulip cluster
- Make a 4″ swatch using planned tulip repeat to measure clusters per inch. Decide how many repeats across you need (e.g., 7 clusters = ~7″ width).
- Foundation chain
- Chain enough multiples for the stitch repeat plus edge sts. Example chain = (multiple of 3) + 2.
- Row pattern (sample)
- Row1 (setup): sc across. Turn.
- Row2 (tulip row): sc1, (yarn over twice, insert hook in next st, pull up loop, yarn over and pull through 2 loops) repeat 3 times to make tall cluster, finish cluster by pulling through remaining loops (create a big elongated cluster), sc in next st — this is a possible form; there are many tulip cluster variants. Alternatively use puff stitch clusters: sc, (puff stitch in next st), sc.
- Row3: sc across and anchor clusters by working sc between them. Repeat rows 2–3 until height reaches pocket + flap length.
- Fold & seam
- Fold along planned position and seam sides. Add padding: cut a fleece/ batting piece to inner dimensions and stitch into lining before final top edge join.
- Flap & finishing
- Make a small flap in plain sc or replicate tulip rows for continuity. Add a button or snap. Weave in ends and block lightly.
Variations
- Make the tulip motifs all over or create a Tulip band across center with plain sc at top/bottom.
- Contrast tulip color for a pop.
3. Crochet Adorable Kitty Kindle Sleeve Pattern
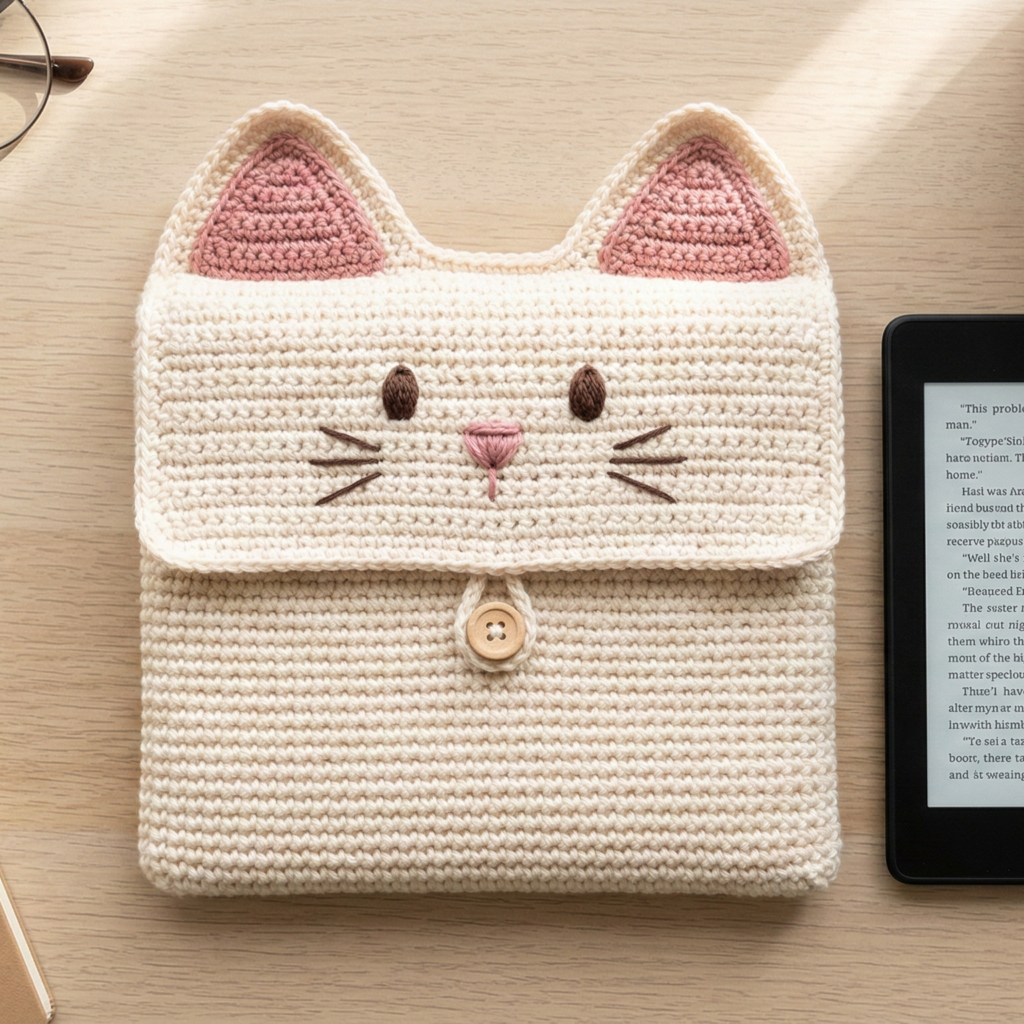
A playful sleeve shaped with a subtle cat-ear flap and optional embroidered face — perfect as a gift for kids or cat lovers.
Skill level: confident beginner → intermediate
Suggested yarn: worsted/DK cotton (soft), ~300–500 yd
Hook: 4.0–5.0 mm
Sample finished inner size: 7.0″ × 5.0″
Why this works
A split flap with two top ear points makes a charming cat silhouette. Embroidered eyes and nose keep it child-safe.
Materials & notions
- Yarn (main color + small contrast for inner ear), felt for backing, lining fabric, tapestry needle, small snap or button for closure.
Construction overview
Work a tube or rectangle that forms pocket; on the flap row shape two ear points by decreasing at the center, then seam and add embroidered face.
Step-by-step
- Make the pocket (rectangle)
- Chain foundation as needed for width (e.g., 36 ch for 7″ width, based on gauge). Row 1: sc across; Rows 2–n: sc across until piece measures approx. pocket height + flap base (e.g., 7″ pocket + 2.5″ for flap base).
- Shape ear flap
- Decide flap width (centered). To form ears, you can either:
- Work flap as a triangle: decrease at both edges to form two peaks; or
- Work flap as a rectangle and afterwards cut and shape two ears and sew them slightly tapered.
- Method: mark the center and leave two triangular openings by decreasing toward two peaks separated by a valley. Example: on flap rows, decrease every other row on either side of the ear peaks to taper.
- Decide flap width (centered). To form ears, you can either:
- Seam & line
- Fold pocket and seam sides. Add lining and sew inside. If adding batting, sandwich it before sewing the lining in.
- Embroider face
- Using black embroidery floss or yarn, stitch two small oval eyes (or French knots) and a triangular nose. Keep details small and securely anchored. For toddler-safe version, use stitched features only — no glued beads.
- Attach ears inner color
- Crochet small triangles in contrast color and sew into ear pockets to give inner ear color.
- Closure
- Add snap or small button and yarn loop on flap. For a secure child-safe closure, use a Velcro dot sewn into lining (avoid loose ends).
- Finishing
- Weave ends, block lightly (cotton) and enjoy the cute result.
Variations & tips
- Add a small pocket on the back for a charging cable or lightweight pen.
- Make matching cat bookmark as a tiny amigurumi to stick in pocket for gifting.
5. Crochet Waffle Inspired Kindle Sleeve Pattern
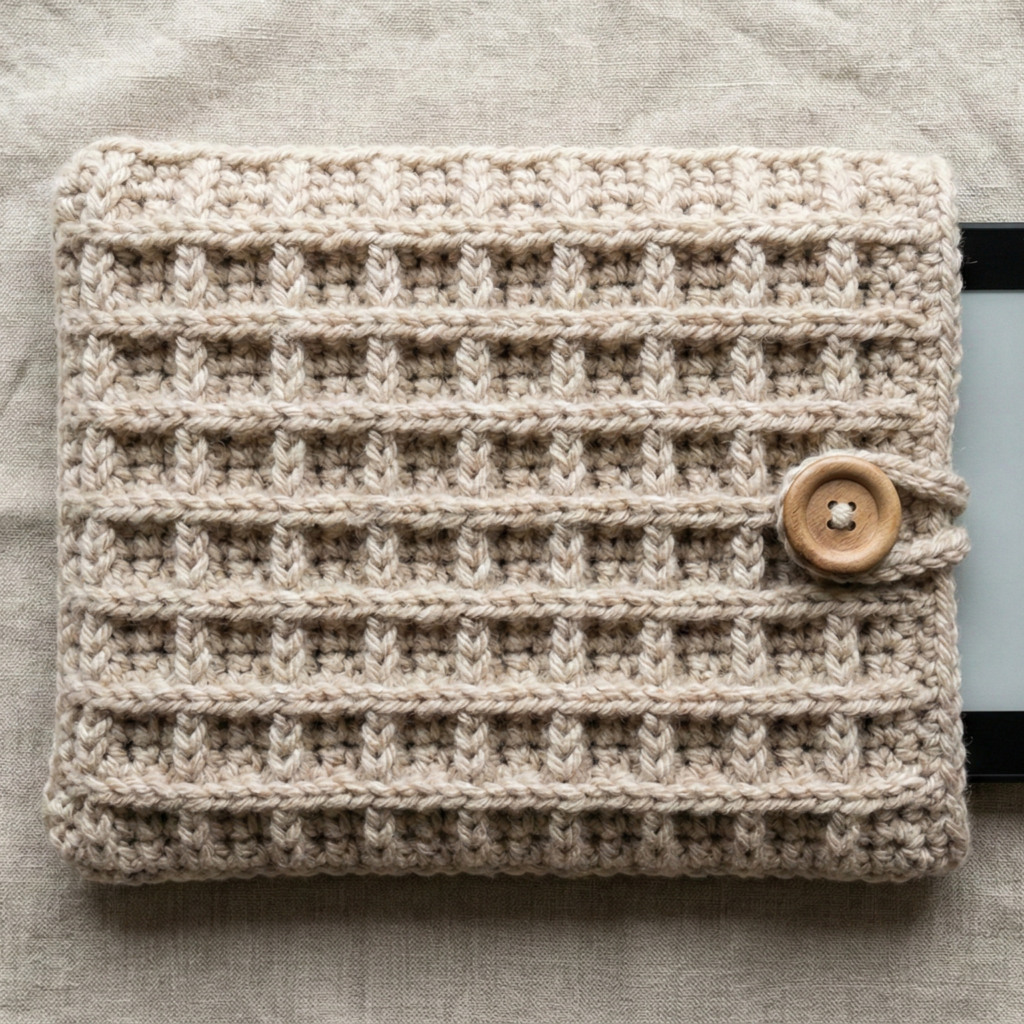
Textured and cozy, waffle stitch (alternating post stitches) gives a thick, cushy fabric that’s ideal when you want extra protection without lining.
Skill level: intermediate (post stitches)
Suggested yarn: worsted weight (for maximal squish), ~300–500 yd
Hook: 5.0–6.0 mm for deep waffle texture
Sample finished inner size: 7.0″ × 5.0″
Why this works
Waffle stitch builds thickness through front-post and back-post clusters — it’s insulating and looks great in solid colors.
Materials & notions
- Worsted yarn, large hook, tapestry needle, optional thin foam or fleece for inner padding, closure (button or zip).
Waffle stitch basics
A common waffle repeat (US terms): worked in multiple of 3 + 2. Typical pattern uses DC and Front Post Double Crochet (fpdc) and Back Post Double Crochet (bpdc).
Sample waffle repeat (rows)
- Row 1: foundation sc row.
- Row 2: dc across.
- Row 3: dc, fpdc around next dc, bpdc around next dc repeat.
- Row 4: dc across. Repeat rows 3–4 to build depth.
Step-by-step
- Swatch & chain
- Make swatch to see waffle depth. For a squishy sleeve, choose worsted yarn and 5.5–6 mm hook. Chain foundation for desired width (e.g., 36 ch + 2).
- Work waffle panel
- Row 1: sc across. Row 2: dc across. Row 3: dc1, fpdc around dc1 of previous row, dc1, bpdc around next dc repeat across (this creates the ridged waffle). Row 4: dc across to lock. Repeat rows 3–4 until panel height reaches pocket + flap.
- Seam & optional padding
- Fold and seam sides. Optionally, sandwich a thin foam or fleece layer inside for extra protection — stitch around edges to keep layers from shifting.
- Top edge & closure
- Add sturdy sc or hdc round around opening. Add a flap or zipper depending on preference. For pocket-style, fold a small flap and add button or magnetic snap.
- Finishing
- Weave ends and block lightly (be cautious with bulky wool; block per yarn requirements).
Variations
- Work waffle stitch in stripes for modern texture.
- For very padded sleeve, work two waffle panels and quilt-stitch them together with batting inside.
6. Crochet Mushroom Motif Kindle Sleeve Pattern

A whimsical sleeve featuring little mushroom appliqués on a neutral background — charming for nature-lovers and kids alike.
Skill level: confident beginner → intermediate (appliqué + assembly)
Suggested yarn: DK cotton (neutral background + colored caps), ~350–500 yd total
Hook: 4.0 mm
Sample finished inner size: 7.0″ × 5.0″
Why this works
Appliqués let you add personality while keeping construction simple: make a plain sleeve and sew mushrooms on top.
Materials & notions
- Yarn in background neutral + red, cream, brown, green for mushrooms; hook; tapestry needle; felt for backing; lining and optional padding.
Mushroom appliqué (small)
Cap
- MR, ch1, 6 sc in ring. (6)
- R2: inc around → 12
- R3: sc1, inc ×6 → 18 — forms a small dome. Fasten off and leave tail for sewing.
Stem
4. With cream/tan: ch6, sc in 2nd ch and across (5 sc), turn and sc back across 2–3 rows to make a small stem rectangle. Fold & stitch to make a rounded stem and sew to cap’s underside.
Decoration
5. Stitch small white spots onto cap with tiny French knots or small sc stitches (cream/white). Make several mushrooms in varied sizes and colors.
Sleeve base (simple rectangle or round)
- Make a rectangle in sc or hdc to the desired inner dimensions: width and height as previous patterns. Fold and seam sides (or work in the round as tube then close one end).
- Block and attach appliqués by sewing through both mushroom base and sleeve fabric with small, neat stitches. Anchor strongly to prevent peeling.
- Lining and closure: add lining and finish edges with a neat sc round. Add flap or zipper if desired.
Variations & tips
- Cluster mushrooms in one corner for cute asymmetry or scatter them all over for a fairy-tale look.
- Add tiny embroidered grass or a felt tree to accent the scene.
Lining & padding — a short how-to (works for all sleeves)
- Cut lining: measure inner pocket dimensions (width × height) and add ½″ seam allowance on each side. If you’ve added a flap, cut lining to include flap dimension.
- Add padding (optional): cut a piece of thin quilt batting or foam to same size as lining (no need to add seam allowance). Sandwich batting between outer crochet fabric and lining or quilt the batting to the lining first.
- Sew zipper: if using a zipper, sew zipper to the top edge of the lining first. Machine-sew gives strongest results. For snap/button closures, sew snaps to lining and mirror on outer piece.
- Insert lining: place lining inside sleeve (wrong side out), fold over top edge and hand-stitch or machine stitch to secure. Hand stitched slip-stitch yields clean finish on the outside.
- Reinforce corners & strap anchors: stitch through outer + lining several times at stress points.
Care & finishing tips
- Blocking: cotton and blends benefit from light wet blocking to even shapes. Avoid heavy stretching for padded sleeves.
- Washing: choose machine-washable yarns for sleeves that will see regular use; line dry to preserve shape, or tumble dry low if yarn label allows. Remove any leather tabs before washing when possible.
- Stitch density: for better protection, use a tighter stitch (smaller hook) and consider a thin padded lining.
- Personalization: add initials via surface crochet or embroidered letters for gifts.
conclusion
These six Kindle sleeve patterns — Crochet Granny Stitch, Crochet Checkered KIndle Sleeve, Crochet Tulip Stitches, Crochet Adorable Kitty, Crochet Waffle Inspired, and Crochet Mushroom Motif — offer a range of looks and protective styles: classic motifs, graphic colorwork, plush texture, adorable character flaps, and cute appliqués. Each pattern includes clear building blocks (swatch → size → stitch → assembly → lining) so you can make a sleeve to fit any e-reader and any aesthetic.