

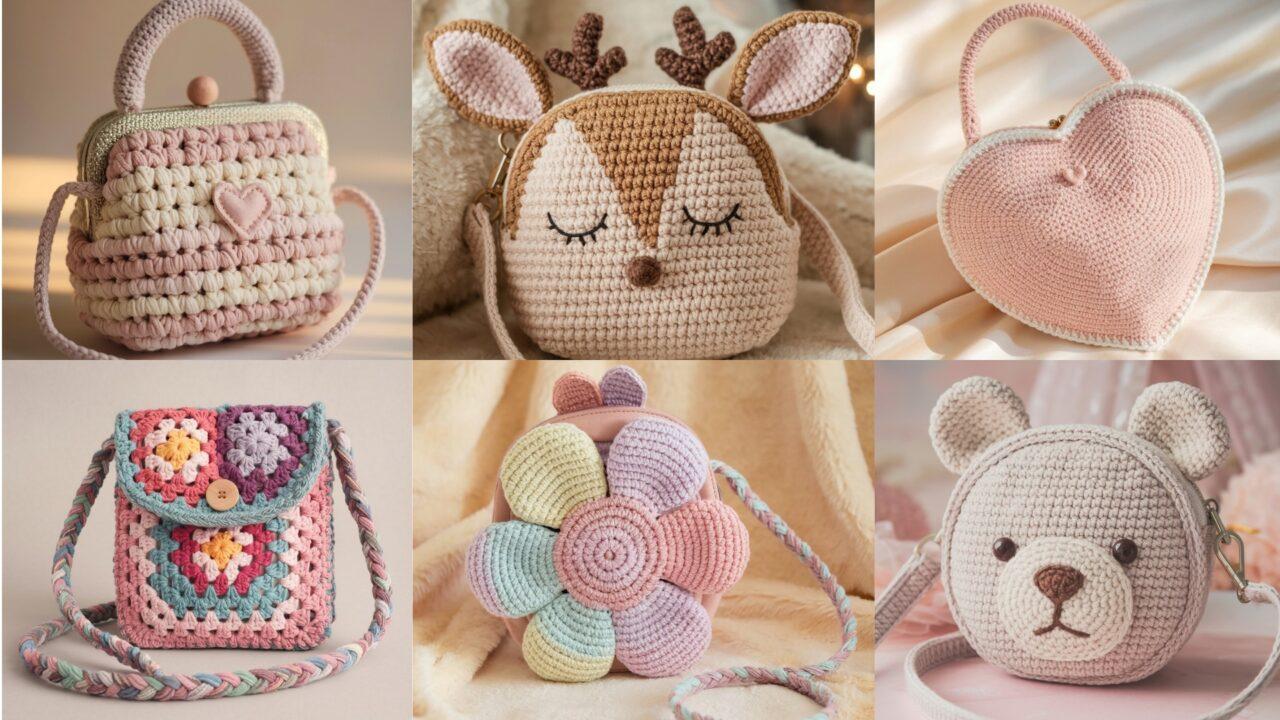
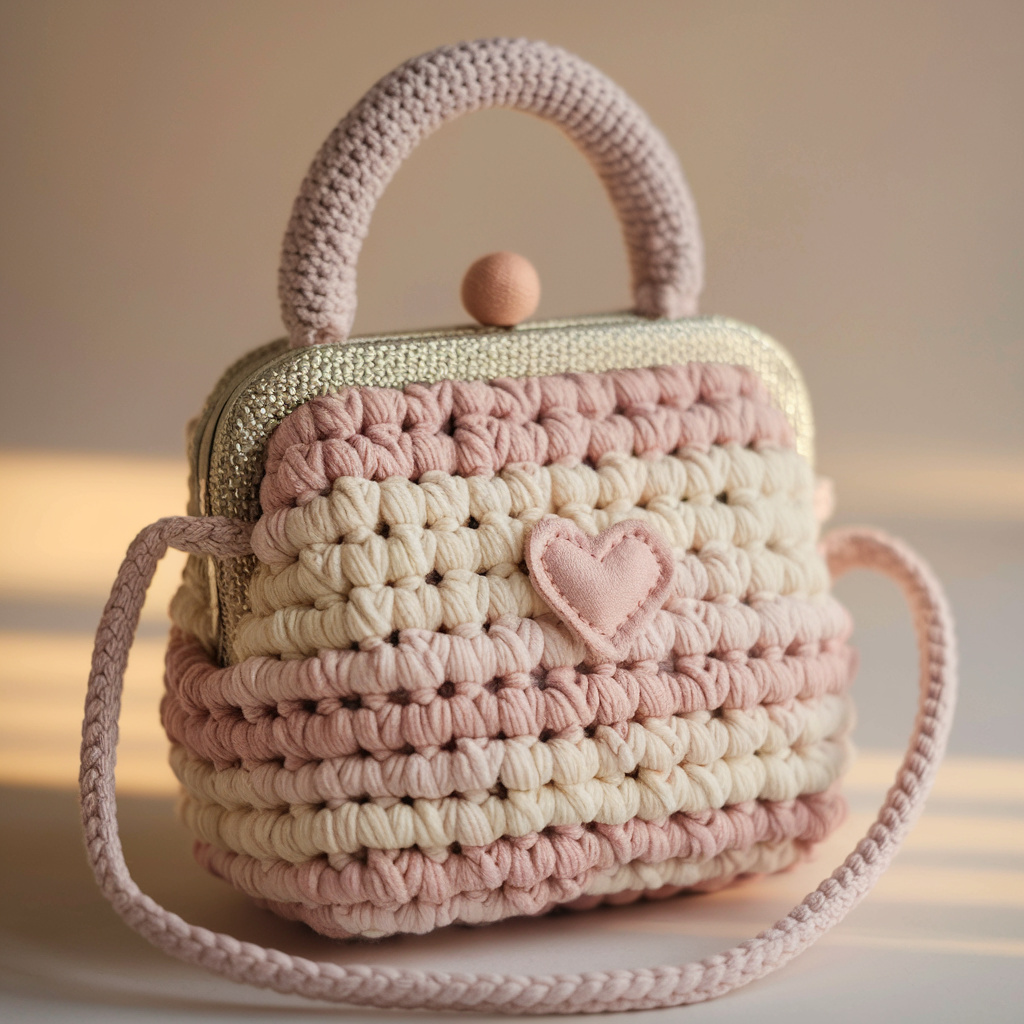
Little hands love little bags — they’re perfect for secret treasures, snacks on the go, or dress-up play. These six kid-friendly crochet purse patterns cover whimsical motifs (deer, bear, flowers, hearts), tactile texture for toddlers, and a classic granny-square crossbody. Each pattern includes materials, skill level, finished size, stitch glossary, clear step-by-step construction, assembly, safe finishing tips for children, and simple variations so you can make each purse in an afternoon (or over a weekend). I wrote them to be practical: sturdy cotton yarn, secure linings, and kid-safe closures.
Before you start: read the common notes and safety section — they’re short but important for making durable, child-safe purses.
Quick notes & safety (read first)
- Yarn choice: Use 100% cotton or cotton blends for durability, easy washing, and low stretch. Avoid novelty yarns that shed. For toddlers, choose hypoallergenic cotton.
- Hook sizes: Most patterns use 3.5–5.0 mm depending on desired density. Use a slightly smaller hook for tighter fabric.
- Lining & interfacing: Always line kid’s bags with cotton fabric and optional fusible interfacing or thin felt for structure. Lining keeps little fingers from snagging and secures inner seams and closures.
- Closures & safety: Avoid small plastic buttons or beads that can be choking hazards for toddlers — use embroidered features, large sewn-on felt shapes, Velcro, or covered snaps. If using toggles or rivets, ensure they’re firmly attached and well-covered on the inside.
- Finishing: Weave in ends thoroughly, double-check seams, and stitch down any applique firmly. For anything removable (pom-poms, tassels), avoid for under-3 age group or ensure supervisor use.
- Sizing: Finished sizes in patterns are approximate — measure as you go for the child’s age. For small children, keep strap length short so bag sits at chest level; for older kids, make it a crossbody length.
Abbreviations (used throughout)
- ch = chain
- sl st = slip stitch
- sc = single crochet
- hdc = half double crochet
- dc = double crochet
- tr = treble crochet
- st(s) = stitch(es)
- inc = increase (2 sc in same st)
- dec = decrease (sc2tog)
- MR = magic ring
- RS/WS = right side / wrong side
- BLO/FLO = back/front loop only
1. Crochet Deer Purse Pattern
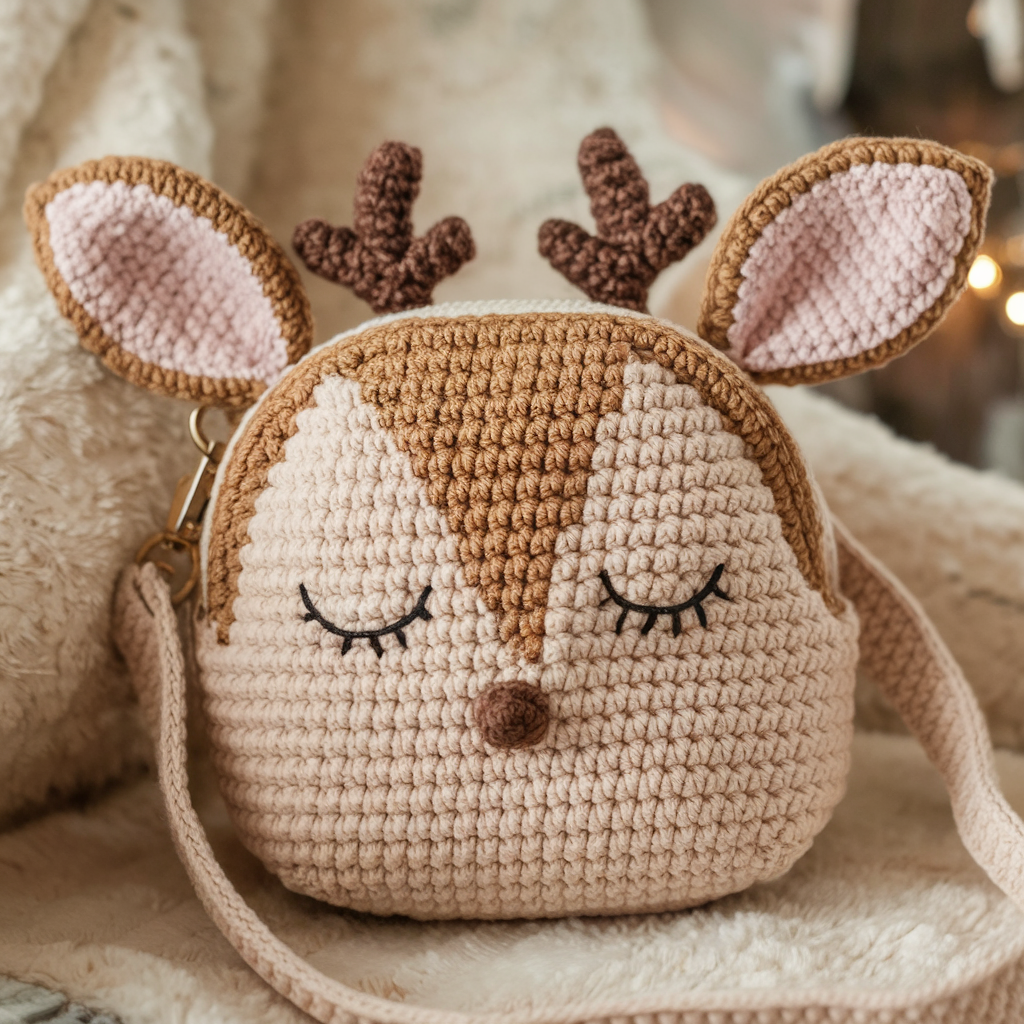
A sweet little deer face on a compact purse — perfect for animal-loving kids.
Skill level: Beginner → Intermediate
Finished size: ~7″ W × 6″ H (body), strap length ~36″ (adjustable for toddler)
Materials:
- 100% cotton worsted (Main: tan/beige; Contrast: cream, dark brown, pink for inner ear) ~150 yds total
- 4.0 mm hook (adjust for gauge)
- Tapestry needle, fabric for lining (~9″ × 10″ cotton), Velcro or small sewn snap, small felt for eyes/nose (embroider preferred for toddlers)
Stitches used: sc, inc, dec, MR, surface embroidery for eyelashes/nostrils
Pattern — step-by-step
A. Deer face body (worked flat)
- Foundation chain: ch 34 (or adjust to width desired; 34 gives ~7″ width with 4.0 mm). Row 1: sc in 2nd ch from hook and across — 33 sc. Turn.
- Body rows: Row 2–18: ch 1, sc across. (Make 18 rows to reach ~6″ tall; adjust for size.) Fasten off leaving long tail for seaming.
B. Ears (make 2)
- With main color: ch 6. Row 1: sc in 2nd ch and across (5 sc). Turn. Row 2: ch 1, sc2tog, sc in next st, sc2tog (3 sts). Turn. Row 3: ch 1, sc3tog (1 st). Fasten off leaving tail.
- Make inner ear with contrast pale color: smaller 2-row insert — ch 4, sc in 2nd ch and across; fold and sew inside ear.
C. Antlers (optional small)
- Ch 6, join to form small antler branch: work 6 sc in loop for a small rosette; shape into twig and sew to top.
D. Appliqué nose & eyes
- Eyes: embroider closed eyes with satin stitch or backstitch using dark brown yarn — two small curved lines. DO NOT use buttons for young children.
- Nose: small oval: MR, 6 sc, join, flatten and sew at lower center.
E. Assembly
- Fold body RS together (short edges meet) and whipstitch or mattress-stitch sides leaving top open. Insert lining: cut lining to ¼″ smaller all around (to hide seam) and sew a simple rectangle bag then slip into crochet shell; ladder-stitch top to inside of crochet to secure.
- Sew ears at top front (about 3–4 sc in from the side each). Thread antler appliqués behind ears if used.
- Add a Velcro strip inside top for safe closure (sewn to lining). Sew strap: crochet a sturdy strap — ch 6, sc in 2nd ch and across, repeat rows to 1″ width and desired length. Fold and slip-stitch ends into side seams inside lining and reinforce.
F. Safety & finishing
- Double-stitch ears and any embellishments. Tuck and weave in ends. Trim excess lining inside so it sits flat.
Variations
- Add a small pom-pom tail on lower back as a playful detail.
- Make a woodland set by matching a hat or mittens.
2. Crochet Textured Toddler Purse Pattern
Chunky texture, soft colors, and tactile bean/cluster stitches make this perfect for toddlers who love to feel things.
Skill level: Beginner (pattern uses simple repeats)
Finished size: ~6.5″ W × 5.5″ H; strap ~28″ (short for toddlers)
Materials:
- Cotton DK or worsted held single for softer hand ~150 yds
- 4.0 mm or 3.5 mm hook for denser fabric
- Insul-Bright or thin felt (optional) for structure, lining cotton, Velcro
Stitches used: sc, bean stitch (5-loop puff), sc rounds
Pattern — step-by-step
A. Base rectangle (worked flat)
- Ch 30. Row 1: sc in 2nd ch from hook and across — 29 sc. Turn.
- Row 2: ch 1, bean stitch in next st, sc in next st repeat across (if bean stitch is new, see note). Turn.
- Row 3: ch 1, sc across to stabilize. Turn.
- Repeat Rows 2–3 until piece measures ~5.5″ tall (about 14–16 rows depending on tension). Fasten off.
Bean stitch refresher: yarn over, insert hook into st, pull up loop; repeat 4–5 times (you’ll have 5 partial loops), yarn over and pull through all loops, ch 1 to close. Practice on scrap.
B. Seaming & lining
- Fold rectangle RS together and mattress-stitch sides leaving top open. For toddlers, add Insul-Bright between crochet and lining to add slight structure (not necessary to be heat-proof; used for shape).
- Cut lining ¼″ smaller all around; sew three seams (base & sides), turn wrong side out, insert into crochet and ladder stitch top edge to crochet to hide seam.
C. Strap & closure
- Strap: chain to desired length (e.g., 28″), sc back for 1″ width, fasten off. Fold strap ends into side seams and stitch securely from inside lining — reinforce with extra stitches.
- Closure: sew a small Velcro square inside — toddler safe and easy.
D. Finishing
- Add a small sewn-on felt applique (star, heart) — avoid glued items. Sew very firmly.
Variations
- Use two or three colors in stripes; alternate texture rows for more sensory interest.
- For older kids, make strap longer and add a cute wooden toggle (secure with strong stitching).
3. Crochet Flower Shaped Purse Pattern
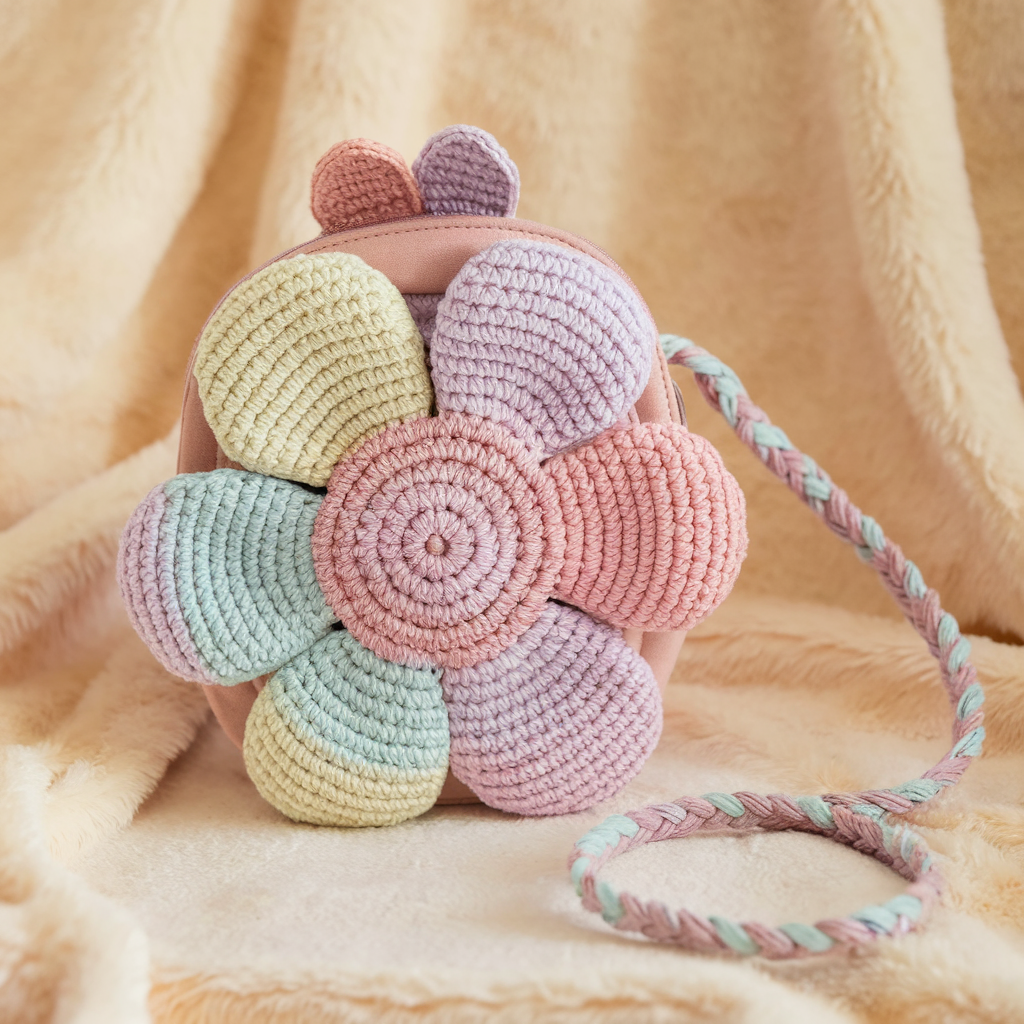
A playful flower-shaped purse — petals form the body and flap. This one’s pure whimsy and great as a gift.
Skill level: Intermediate (shaping & joining petals)
Finished size: ~8″ diameter (across petals)
Materials:
- Cotton worsted in two colors (petal color + center) ~200 yds
- 4.0 mm hook, lining fabric circle, Velcro or snap (sewn through lining), small D-ring if you want removable strap
Stitches used: MR, sc, dc clusters, shell stitch for petals
Pattern — step-by-step
A. Make 7 petals (work as identical leaf-like pieces)
- Petal foundation: Ch 9. Row 1: sc in 2nd ch and across (8 sc). Turn. Row 2: ch 2 (counts as hdc), hdc across. Row 3: ch 2, 2 dc in first st, dc across next 4, 2 dc in last st — this creates a rounded top. Fasten off leaving tail for joining. Make 7 petals total.
B. Join petals into circle (flower front & back)
- Arrange 7 petals in a circle with slightly overlapping bases. Using yarn tail and tapestry needle, whipstitch through the petal bases to attach them together forming a flower disk (this is the front). Repeat for back. Make sure the petals tilt outward slightly to create bloom shape.
- Optional center: crochet a small circle (MR, 8 sc, join) in contrast color and sew over center to cover join.
C. Sew front and back together to form bag
- Align RS together and whipstitch around the base of petals leaving a 1″–1.5″ gap at top for lining insertion. Insert lining — use circular lining cut slightly smaller. Ladder stitch top edges to hide raw edges and close gap. Alternatively, join at side edges and leave a small opening for items.
D. Flap & closure
- Make a small petal-shaped flap by crocheting a single larger petal with additional rows. Sew the flap at top back center; attach a Velcro piece or big sewn-on button (button sewn through lining) and a sturdy yarn loop for closure. For toddler safety, prefer Velcro.
E. Strap
- Make a braided cord strap by chaining long length and making 3 equal ropes then braid and knot ends. Alternatively crochet a strap tube and insert webbing for strength. Stitch ends to side petal seams and reinforce.
Safety note: ensure center circle and any embellishments are sewn, not glued.
Variations
- Make petals in ombré yarn for gradient.
- Convert to coin purse by making smaller petals and adding zipper around edge.
4. Crochet Sweetheart Small Purse Pattern
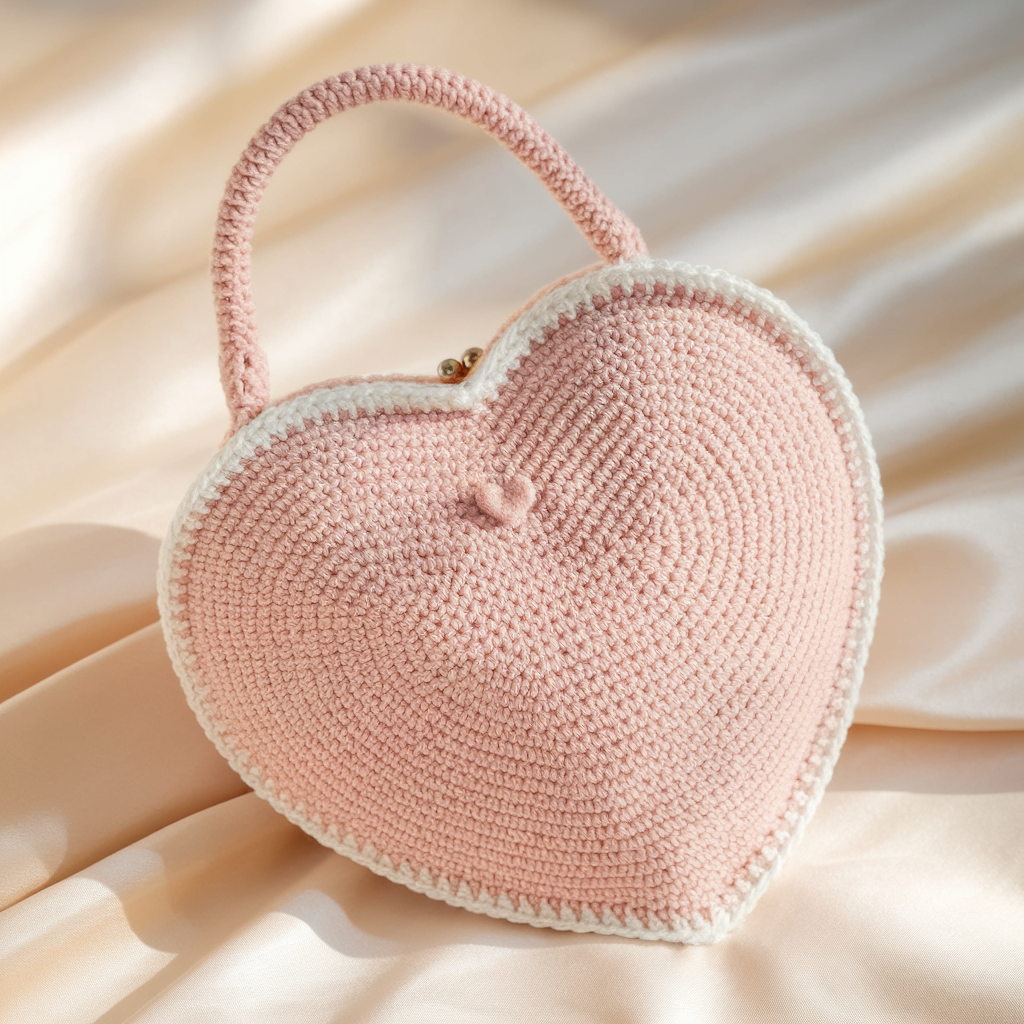
A small heart-shaped purse — romantic and adorable for little ones who love hearts.
Skill level: Beginner → Intermediate
Finished size: ~6.5″ wide × 6″ high (heart shape)
Materials:
- Cotton DK or worsted ~120–150 yds in main color and small contrast for edging
- 4.0 mm hook, lining, Velcro
Stitches used: MR, sc, inc, dec, sc rounds
Pattern — step-by-step
A. Heart half (make 2)
- MR, ch 2, work 3 dc into ring, ch 2, 3 dc into ring (this is one bump of the heart) then continue forming a half-heart shape by chaining and sc across to shape the bottom point — simpler route below uses a worked flat heart half:
Simpler worked flat half-heart (symmetrical halves):
- Ch 13. Row 1: sc in 2nd ch from hook and across (12 sc). Turn. Row 2: ch 2, hdc across. Row 3: ch 2, 2 dc in next st, dc in next 2, (dc3 in next) as build until center, finish to shape bump. Work 6–8 rows increasing at bump area until half-heart size appropriate. Make identical second half.
- Join halves with slip-stitch seam along the curved top edges to form the heart front. Repeat to make back.
B. Join front and back for bag
- With RS together, whipstitch around side edges leaving top open. Insert lining (cut to heart shape slightly smaller) and ladder-stitch lining to top edge to hide seams.
C. Strap & closure
- Make short handle: ch 40 (or desired length), sc across to make ¾″ strap. Attach ends to top sides, sew inside lining and reinforce.
- Sew small Velcro closure to inside of top center. Optionally add a felt heart applique on front sewn on for reinforcement.
Variations
- Add bead embroidery (sewn on) or a tiny crocheted bow stitched above the heart — for toddlers, sew all bits securely.
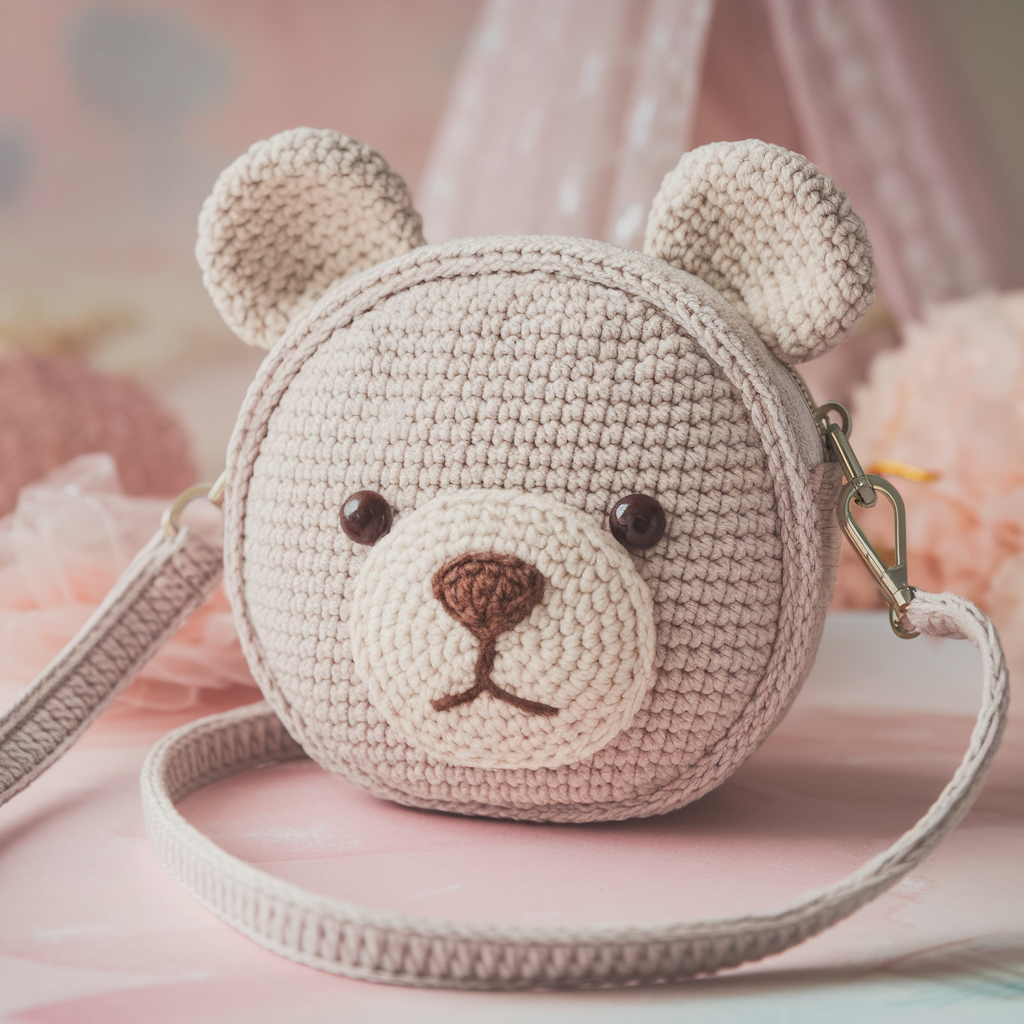
5. Crochet Sweet Bear Crossbody Purse Pattern
A lovable bear face purse with crossbody strap — cuddly and practical.
Skill level: Intermediate (applique & shaping)
Finished size: Bear face diameter ~8″; strap long for crossbody ~42–48″ (adjust)
Materials:
- Cotton worsted: main (beige), contrast (brown/cream) ~200 yds
- 4.0 mm hook, lining, small plastic snap (sewn through lining) or Velcro, safety-approved materials for eyes if for older kids, otherwise embroidered for toddlers
Stitches used: MR, sc, inc/dec, surface embroidery
Pattern — step-by-step
A. Bear face circle (worked in rounds)
- MR; ch 1, 8 sc in MR. Pull closed and join. (8)
- R2: ch 1, inc around (16). R3: sc 1, inc repeat (24). R4: sc2, inc repeat (32). Continue rounds until diameter ~8″ (stop with 6–8 rounds beyond 32 depending on yarn). Finish with one or two rounds of sc to firm up. Fasten off.
B. Ears (2)
- MR; ch 1, 6 sc in MR; join. R2: sc, inc repeat to 9–12 sts. Make inner ear smaller with contrast and sew centered.
C. Snout / muzzle applique
- MR; 6 sc, R2: sc, inc to ~9–12 sts to form oval. Embroider nose and mouth with satin stitch in dark brown.
D. Eyes & features
- Embroider closed or open eyes with brown/black yarn. For toddlers, do not use plastic eyes. Embroider small circles or simple arcs.
E. Assembly & bag creation
- To make bag, create a back circle same size as front. Join RS together leaving a top opening of ~4″. Insert lining circle and stitch top to hide seam. Alternatively make a side strip: chain seamed around for a boxy depth — ch to desired depth in stitches (e.g., 14–16 sc around perimeter) then join to front/back for a 2D flat bag. A side strip gives 3D depth.
F. Strap & closure
- Strap: crochet a tube 1.5″ wide and 40–48″ long for crossbody, slip in cotton webbing for reinforcement. Sew ends to side seams inside lining and reinforce.
- Add Velcro or snap under chin area for closure (snap through lining so no metal on outside) or tiny flap with button – ensure safety and that button form is large and secured.
Safety note: For very young children, keep strap length appropriate and avoid long straps that could be a hazard; supervise use.
Variations
- Turn into a bunny by elongating ears.
- Make a matching sibling set in different colors.
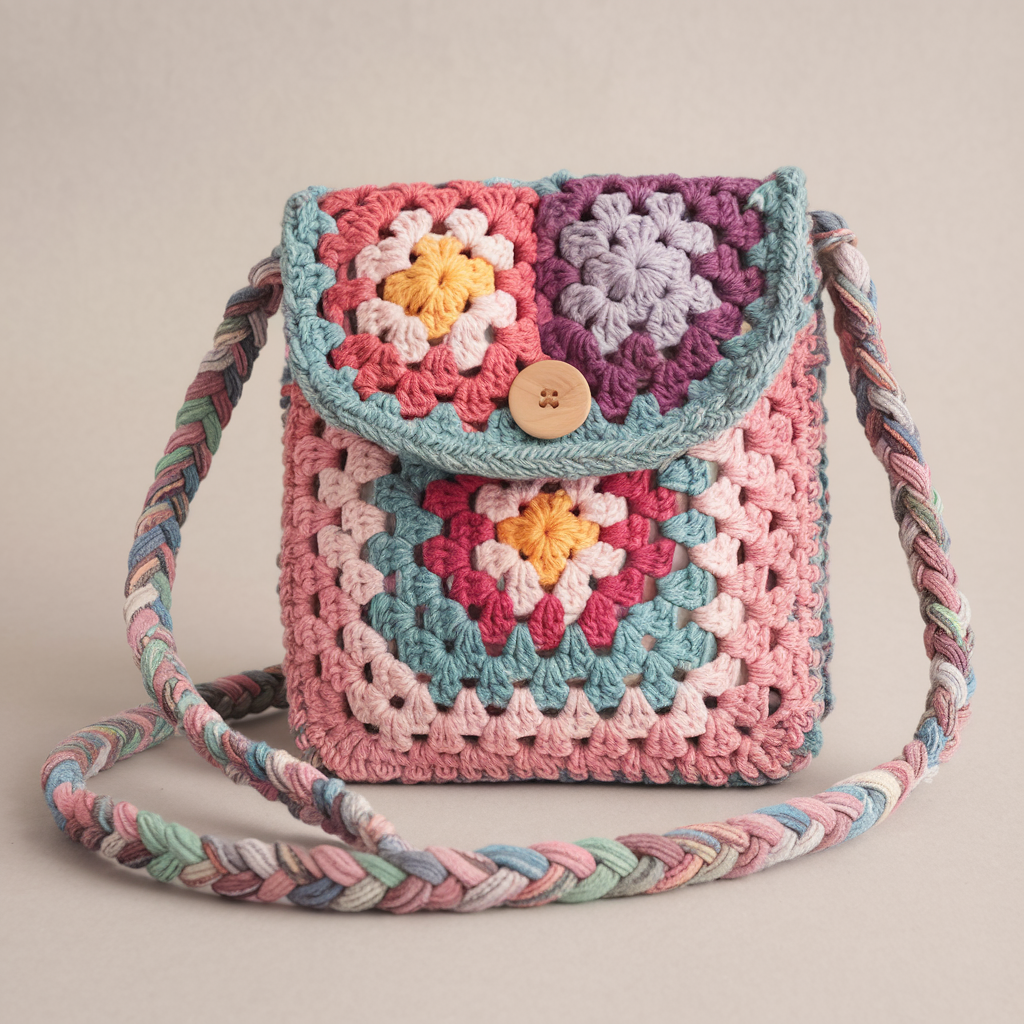
6. Crochet Granny Square Crossbody Purse Pattern
Classic granny square crossbody — a great scrap-busting pattern with retro charm.
Skill level: Beginner (if comfortable with granny squares)
Finished size: ~8″ W × 6.5″ H (2×3 squares) with strap ~42–45″
Materials:
- Cotton worsted scraps in 4–6 colors ~200–300 yds total
- 4.0 mm hook, lining fabric, strap hardware optional
Stitches used: classic granny square (dc clusters), join-as-you-go or whipstitch joining
Pattern — step-by-step
A. Make granny squares (6)
- Mini granny square (finished ~3.5″)
- MR; ch 3 (counts as dc), work 2 dc into ring, ch 2, 3 dc in ring, ch 2 repeat 3 more times = 4 clusters; join.
- R2: join contrasting color in any corner space, work (3 dc, ch 2, 3 dc) in corner space, ch 1, 3 dc in next space, ch 1 repeat; join. Add a third round for larger square if needed.
Make 6 squares in coordinating colors (3 for front/back or 2×3 layout).
B. Arrange & join
- Arrange 2 × 3 layout for front and back or do front panel 2×2 and back 1×2 depending on design choice. Join squares with whipstitch or join-as-you-go (JAYG) for seamless look. Make two panels (front/back) equal in size.
C. Side & base
- Make a long strip of sc rounds equal to the perimeter to create side panel or use single row of granny squares to make the depth. If short on time, sew panels around edges leaving top open to create a flat bag (less depth). For depth: measure width of side and crochet a strip (sc rounds) to desired depth (~3–4″).
D. Lining & strap
- Make a cotton lining rectangle with bottom seam and top hem; sew optional inside pocket and attach to bag by ladder-stitch around top edge.
- Strap: a braided crochet strap or long tube with webbing inside for stability. Attach with D-rings sewn onto side seams or sewn firmly through lining.
E. Finishing touches
- Add a small flap (one granny square folded) with a large wooden button (sewn through lining) or Velcro closure for child safety.
- Hand-embroider initials or a small motif on one square for personalization.
Variations
- Make a rainbow square variation with bright colors.
- Use jumbo yarn and larger hook to make a statement oversized kid’s tote.
Care, Washing & Final Tips
- Washing: Machine wash cotton purses on gentle cycle inside a laundry bag, air dry flat. Remove leather parts or hardware if possible.
- Inspect & reinforce: Before gifting, tug gently on straps and appliqués — double-stitch weak points.
- Age-appropriate choices: For toddlers and under-3 children: avoid small detachable parts, use Velcro, and keep strap short to prevent tripping or hazard. For older kids, you can use buckles and decorative buttons but stitch them on securely.
- Make it personal: Add initials, favorite colors, or small sewn-in label with care instructions for a professional polish.
Conclusion
These six cute kid’s purse patterns give you a full range of styles: the woodland charm of the Deer Purse, the tactile Textured Toddler Purse, the whimsical Flower Purse, the classic Sweetheart, the cuddly Sweet Bear Crossbody, and the retro-chic Granny Square Crossbody. Each pattern was written to be kid-safe, durable, and easy to customize — change colors, add lining, shorten straps for toddlers, or add pockets for stickers and crayons.

Your enticle helped me a lot, is there any more related content? Thanks! https://www.binance.com/vi/register?ref=MFN0EVO1
Can you be more specific about the content of your article? After reading it, I still have some doubts. Hope you can help me.
Thanks for sharing. I read many of your blog posts, cool, your blog is very good.
I don’t think the title of your article matches the content lol. Just kidding, mainly because I had some doubts after reading the article.
Thank you for your sharing. I am worried that I lack creative ideas. It is your article that makes me full of hope. Thank you. But, I have a question, can you help me?
Can you be more specific about the content of your article? After reading it, I still have some doubts. Hope you can help me.
Your article helped me a lot, is there any more related content? Thanks!
Thanks for sharing. I read many of your blog posts, cool, your blog is very good.
Your article helped me a lot, is there any more related content? Thanks!
I don’t think the title of your article matches the content lol. Just kidding, mainly because I had some doubts after reading the article.
Your point of view caught my eye and was very interesting. Thanks. I have a question for you.
Your point of view caught my eye and was very interesting. Thanks. I have a question for you. https://accounts.binance.com/hu/register?ref=IQY5TET4
Thanks for sharing. I read many of your blog posts, cool, your blog is very good.
Your point of view caught my eye and was very interesting. Thanks. I have a question for you.
Your article helped me a lot, is there any more related content? Thanks! https://www.binance.com/pt-PT/register?ref=KDN7HDOR
Thanks for sharing. I read many of your blog posts, cool, your blog is very good.
Can you be more specific about the content of your article? After reading it, I still have some doubts. Hope you can help me. https://accounts.binance.info/register-person?ref=IXBIAFVY