Anklets are playful, lightweight accessories that instantly upgrade a summer outfit or beach look. They’re small projects that work up quickly, use little yarn or thread, and are perfect for using scraps, beads, or small charms. This post walks you through six cute anklet patterns — from boho blooms and shells to beaded and lacy designs — each with full, copy-ready instructions: Skill level → Finished size & fit tips → Materials → Step-by-step guide → Finishing / closures → Tips & variations → Care. I’ve written every pattern so you can make one tonight and have a handmade gift in the morning.
Abbreviations (US): ch = chain, sl st = slip stitch, sc = single crochet, hdc = half double crochet, dc = double crochet, tr = treble, sp = space, BLO / FLO = back/front loop only, RS = right side, RS = wrong side.
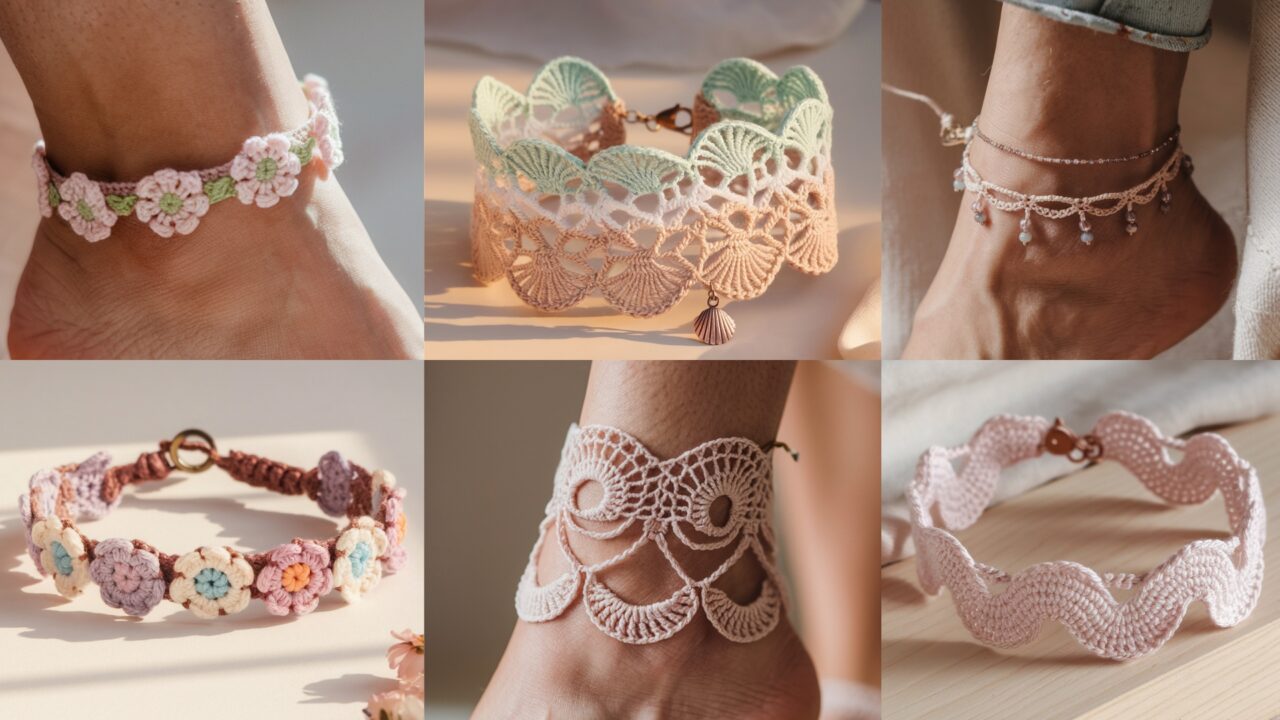
1. Crochet Boho Bloom Anklet Pattern

Skill level: Beginner → Easy (basic stitches + small flower appliqués)
Finished size: Typical adult ankle circumference ≈ 9 in (23 cm); final anklet length should be ankle measurement + 1/2–1 in for comfort/closure. Width (with flowers) ≈ 0.6–1 in depending on flower size.
(Measure the wearer’s ankle at the narrowest point above the ankle bone.)
Materials
- Fingering or sport weight cotton thread (or two strands sport for more presence) — ~15–25 yards
- 2.5–3.5 mm hook (match yarn)
- Small jump ring + lobster clasp OR button & loop for closure
- Tapestry needle, scissors, optional small beads for flower centers
What you’ll make
A narrow band with tiny crocheted flowers spaced evenly around the anklet — boho, delicate, and great with summer sandals.
Step-by-step guide
1) Measure & foundation
- Measure ankle circumference and decide final length (e.g., 9″). Subtract ½–1″ if using a non-stretch closure (button), or add ½″ if you want a looser fit.
- Make a small gauge test: ch 20 and work 2 rows of sc to measure stitches-per-inch. Use that to calculate how many foundation chains you need to reach the desired circumference. Example: if your gauge is 8 sc = 1″, and you need 9″, you need 72 sc. For a chain foundation, ch 73 and join to form ring — do not twist.
2) Band base (simple decorative band)
- Join with sl st to form ring (ch count computed above). Round 1: ch 1, sc in each ch around; join with sl st. (This creates a neat base row.)
- Round 2: ch 2 (counts as hdc), hdc in each st around for a slightly taller band; join. Repeat 1–2 rounds of hdc until band height ≈ 0.3–0.5 in (1–2 rounds typically) — you want a narrow band so flowers sit nicely.
3) Make tiny boho flowers (make 8–12 depending on anklet length)
Each flower ≈ 0.5–0.9 in across.
- Magic ring. Ch 1. Round 1: 6 sc into ring. Pull tight, join with sl st. (6 sc)
- Round 2 (petals): ch 3, sl st into next st — repeat around to make 6 little loop petals. Optional: into each ch-3 loop work (sc, hdc, 3 dc, hdc, sc) and sl st to base for fuller petals. Fasten off leaving tail to sew.
4) Attach flowers evenly
- Count band stitches and divide by number of flowers to get spacing e.g., 72 sts / 9 flowers = place a flower every 8th stitch. Use stitch markers to mark positions.
- Sew each flower to the band with tail and whipstitch through the band base; weave in ends. Add a small bead in center if desired.
5) Closure
- Button & loop: At row start (seam area) leave a small loop: ch 5 and sl st to band to form loop; secure with a sc round. Sew a small button opposite the loop.
- Lobster clasp: Attach a tiny jump ring sewn into a sturdy bar of sc at the end; solder or crimp a small metal loop and attach lobster clasp. This is best if you plan to clip onto sandals or bag rings.
Finishing & styling
- Block lightly to set shape. Trim ends. For a more authentic boho vibe, add a short tassel or tiny charm near the clasp.
Tips & variations
- Use linen or cotton-linen blend for an earthy look.
- Make metallic bead centers or use tiny shell beads for beachy boho.
- Make flowers in two sizes and alternate for texture.
Care
- Hand wash or gentle machine wash in mesh bag; reshape and dry flat.
2. Crochet Seaside Shell Anklet Pattern

Skill level: Beginner — uses simple shell stitches and openwork
Finished size: Adult: 9–10 in (23–25 cm) circumference; width ≈ 0.5–0.8 in depending on shell size.
Materials
- Fingering weight cotton or crochet thread (size 10) for crisp shells — ~20–30 yd
- 2.25–3.0 mm hook
- Small extender chain & lobster clasp or button closure
- Tapestry needle, scissors, optional tiny shell charms
Concept
An airy band composed of repeated shell stitch motifs that resemble little scallop shells — perfect for seaside vibes.
Step-by-step guide
1) Foundation chain
- Make a chain that is a multiple of 6 + 1 to complete shell repeats. For example, chain 61 for a 9″ band if your swatch indicates this length. Join into a ring carefully.
2) Shell round (Base row)
- Round 1: ch 1, sc in each ch around; join. (This stabilizes the chain.)
- Round 2 (shell pattern): [skip 2 sts, 5 dc in next st, skip 2 sts, sc in next st] repeat around — join. You’ll get regular shells across the band. If the shells aren’t evenly spaced at the end, adjust starting offset by a few sts.
3) Lace anchoring row
- Round 3: ch 1, sc in each dc and sc around to anchor shells. Join. Optionally repeat a second shell round offset (work shells into the spaces between first-round shells) to create a staggered double-shell look.
4) Optional decorative picot edging
- Round 4: ch 1, sc across and at each shell peak work (ch 3, sl st into base of chain) to make picot points that accent shells.
5) Closure
- Add an extender chain (a few inches) with lobster clasp so wearers can adjust fit — attach chain sewn securely to band end.
Styling & finishing
- Sew small seashell charm (real shell or metal) facing down near clasp.
- For beach-ready, hold two strands together (one white, one aqua) for an ombré sea effect.
Tips & variations
- Use a slightly larger hook for looser fabric that drapes.
- For a sturdier everyday anklet, add a row of sc as a foundation under shells.
Care
- Hand wash; lay flat to dry to preserve shell shape.
3. Crochet Lacy Twist Anklet Pattern

Skill level: Intermediate — uses chain arches, trebles, and twisted loop joins for a braided look
Finished size: Adult: 9 in (23 cm) circumference (plus hook gauge allowance); width ≈ 0.5–1 in.
Materials
- Light-weight cotton or bamboo yarn (sport/fingering) — ~20–30 yd
- 2.75–3.5 mm hook (choose based on yarn)
- Small closure (button + loop or lobster clasp + chain)
- Tapestry needle, optional small metal twist charm
What’s special
The lace twist anklet has a delicate spiral/rope effect created by offset arches and chain loops, giving a braided/lacy twist without actual braiding.
Step-by-step guide
1) Foundation & base
- Chain to measured circumference in stitches (use your stitches-per-inch gauge). Join carefully. Example: ch 68 join.
2) Round 1 — groundwork
- ch 1, sc in each ch around; join. (This stabilizes the band.)
3) Round 2 — lacy twist repeat
- Ch 5, skip 2 sts, sc in next st, ch 5, sl st in same st — this makes a pair of opposed chain arches anchored on the same stitch creating a petal. Continue around creating these loop-pairs. Join.
4) Round 3 — create twist appearance
- Into the center of each ch-5 arch work: sl st into arch, ch 3, tr, ch 3, sl st into center — this builds a little fan. Work the fans staggered from previous row (work into alternate arches) so the fans offset and create a twisted, rope-like visual. Join.
- Repeat Round 3 for 2 rows to build texture.
5) Optional tiny picot row
- Work one round of sc and place a tiny picot (ch 3, sl st in base) every 4th sc to give a beaded edge.
6) Finishing & closure
- For a neat finish, sew a small loop at the start end and a decorative button at the opposite end. Optionally add a three-link extender chain with lobster clasp.
Tips & variations
- Use metallic thread for a subtle shimmer on the fans.
- Make two narrow lace twists and join them as a double-strand anklet for more presence.
Care
- Hand wash recommended for bamboo blends; lay flat.
4. Crochet Beaded Anklet Pattern

Skill level: Beginner → Intermediate (pre-string beads or add as you go)
Finished size: Adult anklet length 9 in (23 cm); width is narrow (single row) or double-row if you stack beads.
Materials
- Beads: seed beads (size 6/0–8/0) or small glass beads — ~40–60 beads depending on design
- Crochet cotton thread or fine fingering yarn — ~20 yd
- 1.5–2.5 mm crochet hook (small for thread)
- Beading needle (to pre-string beads), lobster clasp & jump rings or button closure
- Tapestry needle, scissors
Two methods: Pre-string beads (recommended) or bead-on-the-fly.
Method A — Pre-string beads (faster & neater)
- Pre-string beads onto yarn in the order you want them to appear. For a single-row beaded anklet with bead every 3rd stitch for 9″, string ~30–40 beads.
- Chain desired number of base chains: example ch 75 (adjust per gauge). Join.
- Round 1: ch 1, sc across BUT when you reach a stitch where a bead should sit, slide one bead up to the hook and work the sc so the bead will sit on the working loop (common method: push bead close to the hook, insert hook into stitch, catch bead with yarn loop and pull through so bead rests on the outside). Continue around. Join.
Method B — Bead-on-the-fly
- Use a beading needle to pre-thread a small selection or work bead by bead by sliding bead on before completing each bead stitch. This is slower and fiddly but works when you’ve not pre-measured.
Decorative band options
- After the first beaded sc row, add one round of chain-loop picots between beads: (ch 4, sl st into bead base) to create small lacy loops between bead positions. This makes the beads look suspended on tiny arches.
Finishing
- Sew on a jump ring at one end; at the other end either attach a lobster clasp or make a small crochet loop closure. For adjustability, add a short extender chain and bead at the end.
Tips & variations
- Use alternating bead colors for stripes or a single focal bead in front and tiny beads around.
- For a chunkier bracelet look, use larger crystal beads with a wider thread and bigger hook.
Care
- Beaded anklets should be hand washed carefully; avoid tumble drying. Store flat to protect thread and beads.
5. Crochet Delicate Daisy Anklet Pattern

Skill level: Easy — simple daisy motifs on a narrow chain band
Finished size: Adult length ~9 in (23 cm) or adjustable; daisy diameter ~0.5–0.75 in.
Materials
- Crochet cotton thread or fingering yarn — main band color ~15 yd, small amount of contrast for daisy centers ~5 yd
- 2.25–3.0 mm hook
- Tiny jump ring & clasp or button loop closure
- Tapestry needle, scissors
Design idea
Tiny daisies (classic 5-petal) spaced around a slim strap — light and feminine.
Step-by-step guide
1) Band foundation
- Calculate ch count to get desired circumference and join into ring. Work 1–2 rounds of sc (or hdc for slightly taller band) for a sturdy base.
2) Daisy motif (make 8–12)
- Center: Magic ring. Round 1: ch 1, 6 sc into ring. Pull tight, join. (6 sc)
- Petals: ch 3, (3 dc, ch 3), sl st into same st —repeat 5 times around to create 5 petals; fasten off leaving tail.
3) Attach daisies
- Pin daisies evenly around the band (mark spacing with stitch markers). Sew each daisy to the band by stitching through center and base of petals. Add a tiny knot or bead in the center for extra highlight.
4) Optional leaf accents
- Crochet tiny leaves (ch 6; sl st back into chain with sc, hdc, dc, hdc, sc) and tack in between daisies.
5) Closure
- Add a small chain extender and lobster clasp or button loop.
Tips & variations
- Use variegated thread for pastel daisies.
- Make a stack: three slim daisy anklets worn together look great.
Care
- Machine wash delicate cycle in mesh bag or hand wash to preserve petals.
6. Crochet Delicate Wave Anklet Pattern

Skill level: Intermediate — small wave shell repeats that create a flowing wave border
Finished size: Adult: ~9 in circumference; width ≈ 0.4–0.9 in depending on shell size.
Materials
- Sport or fingering weight yarn for drape — ~20–30 yd
- 2.75–3.5 mm hook
- Small lobster clasp + extender or button & loop
- Tapestry needle, scissors
Visual concept
A narrow band with repeating tiny wave/shell motifs that produce an elegant undulating line — looks great with casual or dressier outfits.
Step-by-step guide
1) Foundation chain & base
- Chain to circumference (use gauge); join into a ring and sc around to set the band (1 round).
2) Wave repeat row
Choose a small shell motif: each repeat uses 6 sts.
- Round 2: skip 2 sts, 5 dc in next st (shell), skip 2 sts, sc in next st — repeat around. The shell peaks will form the waves. Join.
3) Anchor round
- Round 3: ch1, sc in each st and in the tops of shells to anchor them and produce a flat band. Join.
4) Optional second wave row
- For a double-wave, work a second row of shells offset between the first row shells: into the gap between shells work sc, ch 2, 5 dc, ch 2, sc — this nests waves and adds depth.
5) Finishing
- Work a tiny picot or sc round on the top and bottom edges for a neat finish. Add closure hardware.
Tips & variations
- For a daintier wave, reduce shell dc count to 3 dc.
- For a bolder look, hold two strands together or use thicker yarn.
Care
- Hand wash recommended; reshape shells while damp.
Conclusion
Anklets are one of the most satisfying quick-make accessories — small, seasonal, and ideal for gifts, craft markets, or personal style. These six patterns give you a range of styles:
- Boho Bloom — floral and laid-back.
- Seaside Shell — beach-ready scallops.
- Lacy Twist — delicate spiral lace.
- Beaded — shimmer and sparkle with tiny glass beads.
- Delicate Daisy — sweet, floral minimalism.
- Delicate Wave — elegant undulating shells.
Quick practical tips before you publish or make batches
- Measure twice: anklet fit requires exacting length — measure the actual ankle and add allowance for closure style and stretch.
- Finish securely: reinforce attachment points for charms, claps, or button loops with extra stitches or a small felt patch.
- Use appropriate fiber: cotton and linen are great for summer; silk/metallic thread for special-occasion anklets; avoid fuzzy novelty yarns that trap sand or debris.
- Provide care instructions: include fiber content and washing instructions with each piece if selling.