

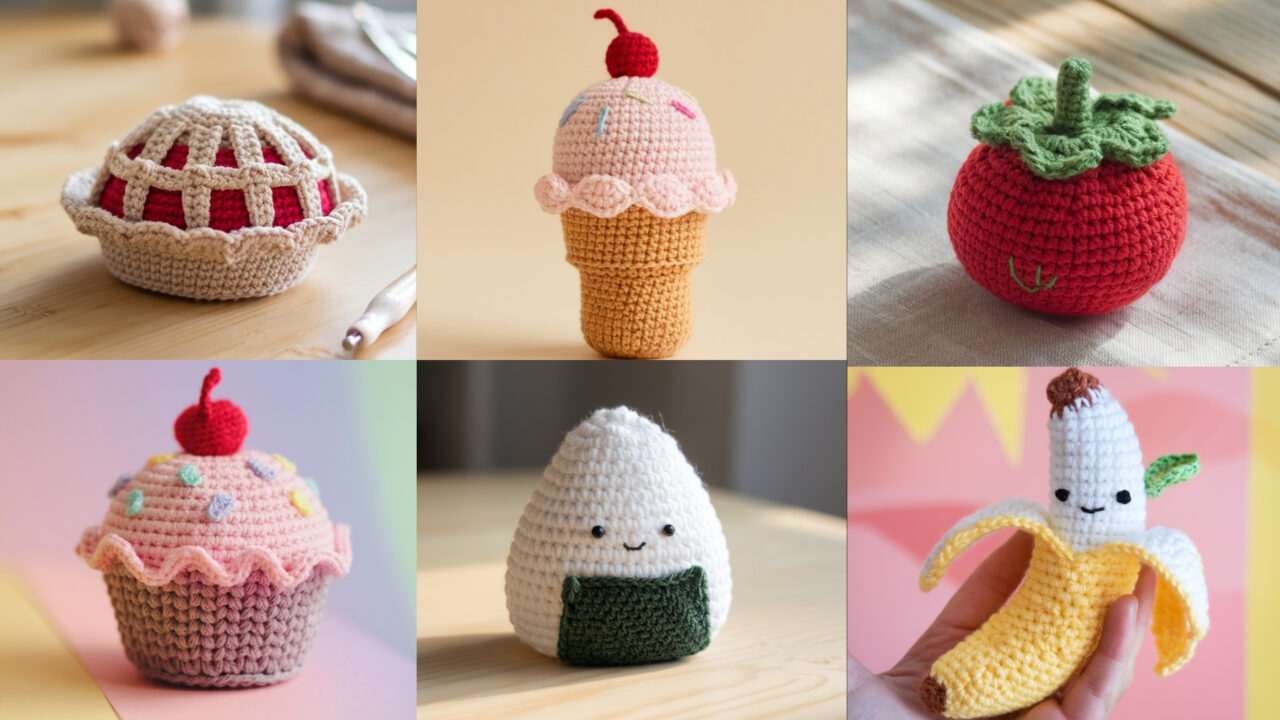
A set of crochet play food is one of the nicest handmade gifts you can give a child: bright, tactile, washable, and endlessly imaginative. Below are six complete amigurumi play-food patterns — each with a clear materials list, finished size, step-by-step rounds (US terms), assembly notes, child-safety guidance, variations, and care instructions. These are written so a crocheter with basic amigurumi experience (magic ring, single crochet in continuous rounds, increases and decreases) can follow them and get reliable results.
Before we begin I list common abbreviations and a short technique note so you don’t have to hunt for them inside each pattern.
Quick notes (abbreviations & technique)
- US terms used throughout.
- MR = magic ring
- ch = chain
- sc = single crochet
- inc = increase (2 sc in same stitch)
- dec = decrease (sc2tog)
- sl st = slip stitch
- st(s) = stitch(es)
- FLO / BLO = front / back loop only
- Work in continuous rounds (do not join between rounds) unless I say “join.” Use a stitch marker to mark round start and slide it up each round.
- Safety note: For toys for children under ~3 years, do not use small detachable parts (buttons, beads, safety eyes). Instead embroider faces and details with yarn or embroidery floss. Always secure seams and weave in ends very thoroughly.
1. Crochet Ice Cream Amigurumi Pattern
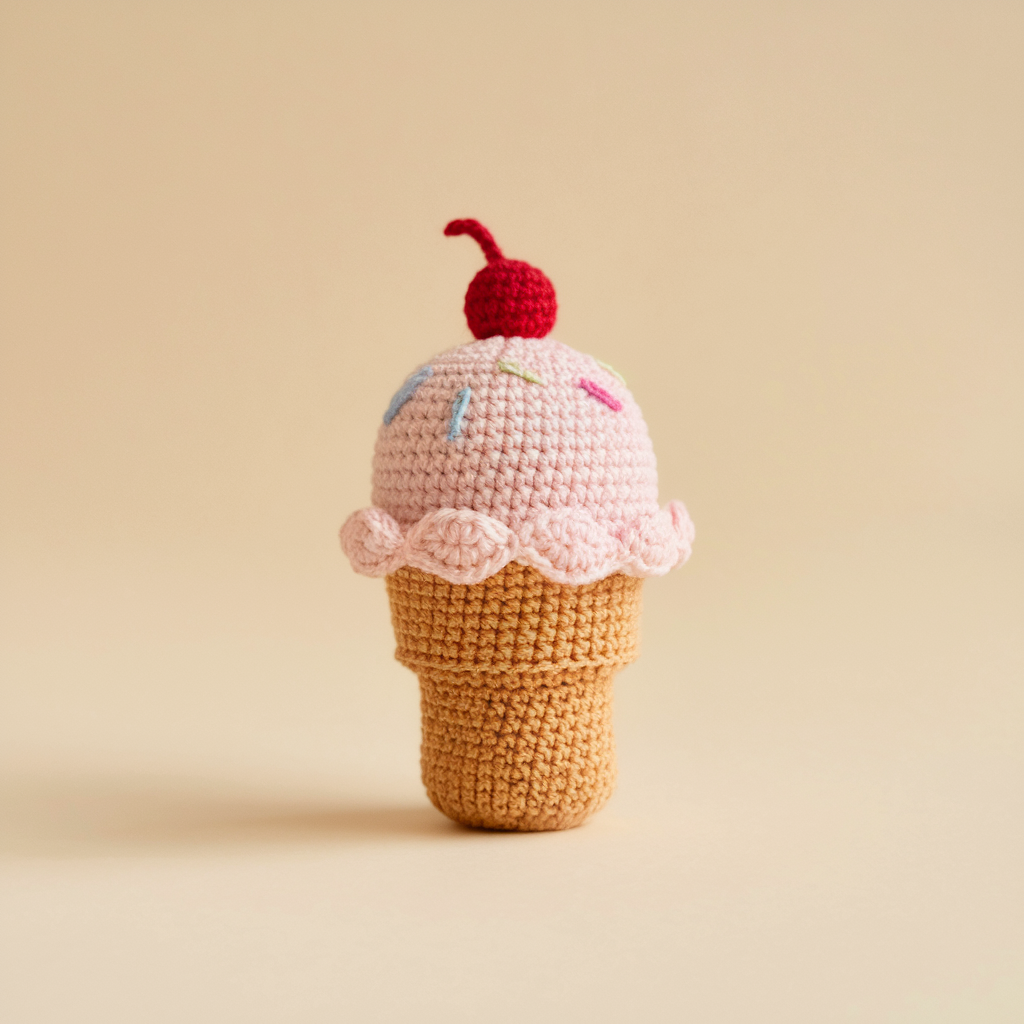
Skill level: Confident beginner
Finished size: cone + scoop assembled ≈ 3.5–4.0 in tall (scoop ~2.25–2.5 in diameter) when made with worsted weight yarn and 3.5 mm hook
Materials
- Worsted-weight yarn (Category 4): cone color (tan), scoop color (pink / any), cherry color (red), small amount brown/black for sprinkles (optional)
- 3.5 mm (E) crochet hook (or hook that gives firm fabric)
- Polyester fiberfill
- Tapestry needle, stitch marker
- For child-safe toy: embroider eyes & smile with embroidery floss
Cone (worked in continuous rounds)
A tapered cone built from a circular base that is decreased to a point.
Rounds (cone):
R1 MR: 6 sc in ring — (6)
R2: inc in each st around — (12)
R3: sc, inc around — (18)
R4: sc 2, inc around — (24)
R5: sc 3, inc around — (30)
R6: sc 4, inc around — (36)
R7–R9: sc around (36) — (36 each) — (these build height; adjust to taste)
R10: sc 4, dec around — (30)
R11: sc 3, dec around — (24)
R12: sc 2, dec around — (18)
R13: sc 1, dec around — (12)
R14: dec around — (6)
Fasten off leaving a long tail for sewing. Stuff the cone lightly before final decreases finish; leave the small opening so the scoop can be sewn on top. If you prefer a flat open top for sewing scoop, stop decreases at round 11 and fold top edge inward, or shape as you like.
Texture option (waffle lines): After finishing cone, use surface slip-stitch or embroidery to stitch diagonal waffle lines across the cone in contrasting yarn.
Scoop (rounded hemisphere)
Make a slightly flattened sphere (so it sits nicely on the cone).
Rounds (scoop):
R1 MR: 6 sc — (6)
R2: inc each st — (12)
R3: sc, inc — (18)
R4: sc 2, inc — (24)
R5: sc 3, inc — (30)
R6: sc 4, inc — (36)
R7–R9: sc around — (36 each) — (these create bulk; add more for a taller scoop)
R10: sc 4, dec — (30)
R11: sc 3, dec — (24)
R12: sc 2, dec — (18)
Stop here and leave the opening for sewing to the cone: do not close completely. Lightly stuff the scoop so it keeps a dome shape but remains a little soft. Position scoop on top of cone and sew through the base of the scoop to the top edge of the cone with whipstitch to attach so it looks like a scoop sitting in a cone. Weave in ends.
Drip option: Work a few elongated “drips” by chaining 6–10 and slip-stitching back into adjacent stitches; stuff lightly and sew to the scoop edge.
Cherry (tiny sphere)
R1 MR: 6 sc — (6)
R2: inc each — (12)
R3–R4: sc around — (12 each)
R5: sc, dec around — (8)
R6: dec around — (4) — Fasten off, stuff lightly, close, and leave tail to sew on top of scoop. For child-safe detail, embroider tiny freckles with contrasting yarn instead of attaching beads.
Assembly & decoration
- Sew scoop onto cone securely with yarn tail. Sew cherry on top with extra reinforcement.
- For sprinkles, embroider small straight stitches in different colors.
- Embroider face (eyes & smile) on the scoop for kawaii look. Keep embroidery knots inside and ends woven deeply.
Variations & tips
- Make a double-scoop by stitching a second hemisphere on top of the first (smaller rounds).
- Use variegated yarn for “swirled” ice cream.
- To make a soft, chunky scoop, use a larger hook and fluffier yarn; reduce stuffing so shape is soft.
Care
- Machine wash gentle in a laundry bag if yarn label allows; otherwise hand wash and air dry. Avoid the dryer for shaped toys.
2. Crochet Mini Amigurumi Cute Banana Pattern
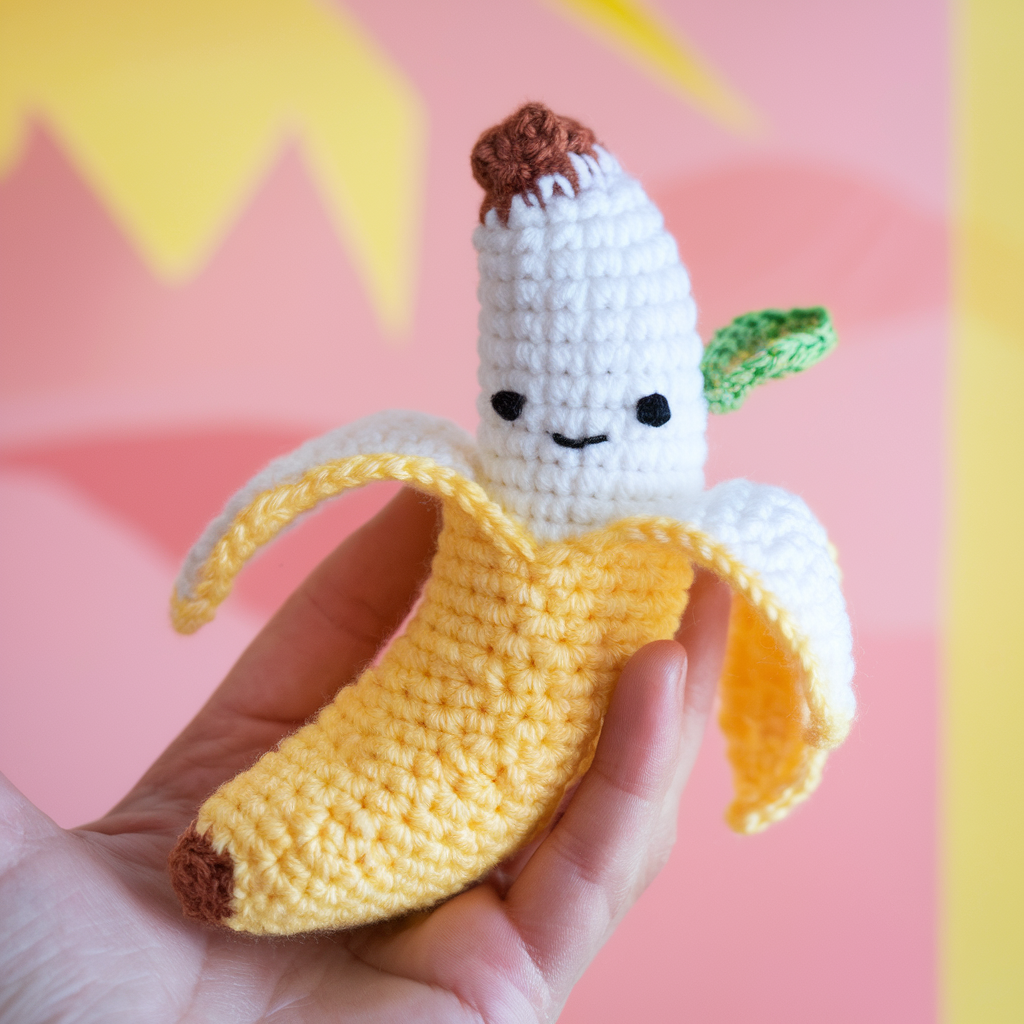
Skill level: Beginner–Confident beginner
Finished size: about 3.5–4.5 in long (depending on yarn/hook)
Materials
- Worsted-weight yarn: banana yellow, brown for tips, small bit of green for stem if desired
- 3.5 mm hook, fiberfill, tapestry needle
- Embroidery floss for face (optional) — embroider to be child-safe
Instructions — Banana (worked in rows to create curve)
This easy banana is worked flat (a curved, tapered oblong) and seamed lengthwise to make the banana shape and curve.
Panel (flat curved strip):
Chain 21 (this is the panel width; adjust for longer banana). Work in rows:
Row 1: sc in 2nd ch from hook and each across (20 sc). Turn.
Row 2–3: sc across in each row (20 sc). Turn.
Row 4: sc 1, inc across — (approx 26 sc). Turn.
Row 5–6: sc across (26 sc). Turn.
Row 7: sc 2, inc across — (approx 34 sc). Turn.
Row 8–9: sc across (34 sc). Turn.
Row 10: sc 2, dec across — reduce slightly toward tip (work until row end).
Row 11–12: sc across (back to about 26 sc). Turn.
Row 13: sc, dec across to about 20 sc. Turn.
Row 14–15: sc across. Fasten off leaving a long tail for seaming.
Shaping & seaming:
- Fold panel in half lengthwise with RS out (so the outer curve is on the outside). Begin to whipstitch from one narrow end toward the other end, stuffing lightly as you go. When about two-thirds closed, add fiberfill to create gentle curve. Continue sewing to the tip; before finishing the second tip, use a few brown stitches to make the tip darker (embroider a small brown patch or use a slip-stitch round in brown yarn). Close and weave ends.
Stem: Make a short tube: MR 6 sc; R2–R3 sc around (6 sts) — fasten off and sew to top end. Add tiny leaf with green yarn (ch 5, sc in 2nd ch, hdc, dc, sc) and sew near stem.
Face option: Embroider eyes and smile on the banana side if desired.
Variations & tips
- For a peeled banana, make 3 narrow peel panels (worked similarly but smaller), seam them to the body and leave peel edges open to look peeled back.
- Use DK yarn and a 3.0 mm hook for a smaller banana.
Care
- Machine wash gentle if yarn is machine-safe; reshape and air dry.
3. Crochet Cupcake Amigurumi pattern

Skill level: Confident beginner → Intermediate (several parts)
Finished size: ~3–3.5 in tall (cup + frosting) with worsted yarn, 3.5 mm hook
Materials
- Worsted yarn: cupcake liner color (brown/neutral), frosting color (pink/white), sprinkles color small bits, cherry red for top
- 3.5 mm hook, stuffing, tapestry needle
Cup (liner) — color A
R1 MR: 6 sc — (6)
R2 inc each — (12)
R3 sc, inc — (18)
R4 sc 2, inc — (24)
R5 sc 3, inc — (30) — (this is the base)
R6: BLO sc around for a ridged liner look — (30)
R7–R9: sc around in BLO to make height (30 each). Fasten off and leave long tail to sew frosting on top later.
(BLO rounds create vertical ridges akin to cupcake liners. Use contrasting yarn for stripes if desired.)
Frosting — swirl (worked from bottom of swirl up)
Make a small dome and then a spiral ruffle on top.
Dome base:
R1 MR: 6 sc — (6)
R2 inc each — (12)
R3 sc, inc — (18)
R4 sc 2, inc — (24)
R5–R6 sc around (24) — Fasten off and lightly stuff the dome.
Swirl edge (ruffle): Reattach frosting yarn at R6 edge and work in spirals: ch 2, 3 dc in next st, sl st in next st and continue around to create little petals. Or work 2 dc in each st around to make a fuller ruffle; after one spiral, work another row of ruffles offset to create layers. Fasten off and leave tail.
Assembly: Put the cupcake dome into the liner opening and sew around the rim with whipstitch to secure. Add cherry (see ice cream cherry pattern) or small puff-sphere on top. Embroider sprinkles as short straight stitches in various colors. For child-safe sprinkles, use embroidered knots rather than beads.
Variations & tips
- Make a “frosted open-top” by leaving the dome slightly exposed and stitching only at a few anchor points so frosting is plush and removable.
- Use fluffy yarn for frosting for a squishier look.
Care
- Hand wash or machine wash on gentle; reshape while damp.
4. Crochet Rice Ball (Onigiri) Amigurumi Pattern
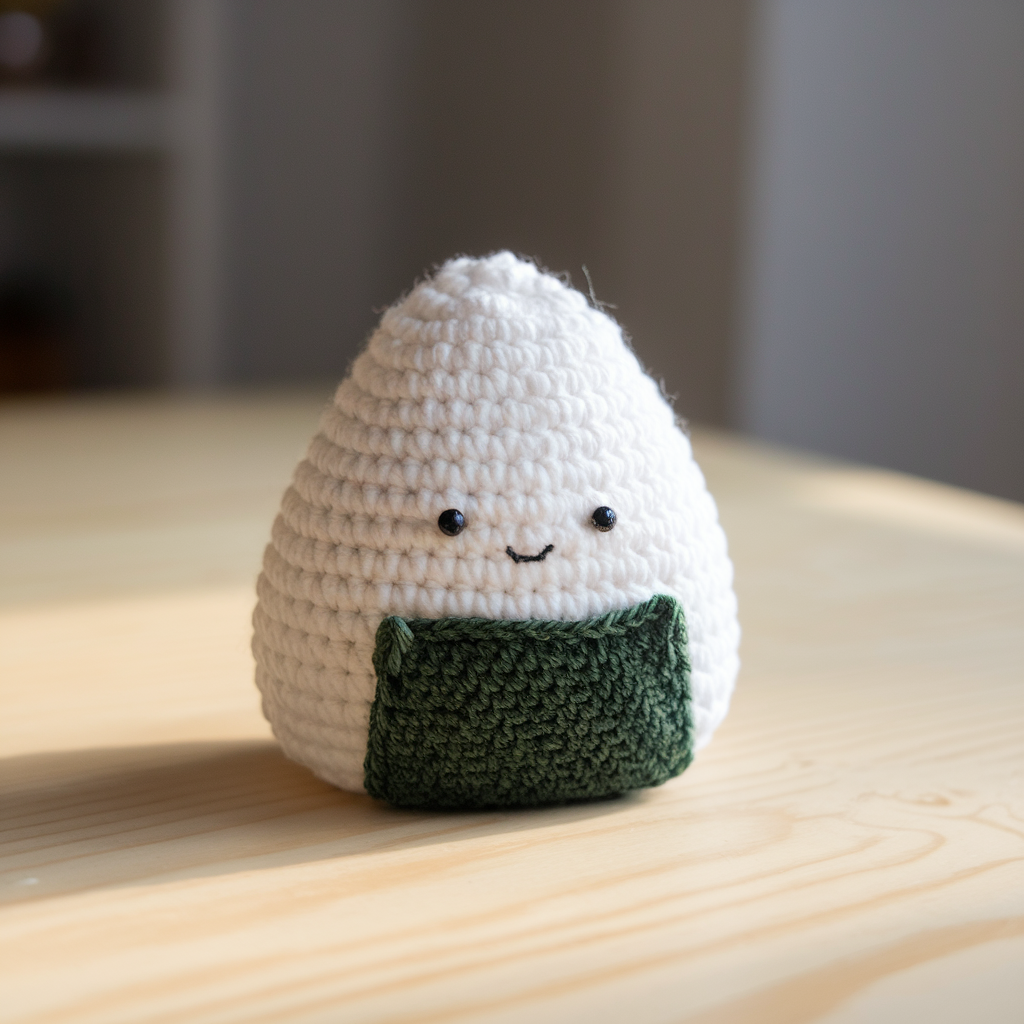
Skill level: Confident beginner
Finished size: ~2.5–3.0 in tall (small wedge/triangular onigiri)
Materials
- Worsted cotton yarn: white for rice, dark green or black for nori (seaweed) strip, small bit of black for face/eyes
- 3.5 mm hook, polyester fill, tapestry needle
Onigiri body (rounded triangle)
Make a slightly flattened triangular rice ball by working a dome and then shaping into a triangle with short rows.
Simple, reliable method: make a small sphere then flatten and shape into a triangle by sewing and slight stuffing — this yields child-safe and easy-to-make onigiri that reads triangular.
Sphere rounds (compact dome):
R1 MR: 6 sc — (6)
R2 inc — (12)
R3 sc, inc — (18)
R4 sc 2, inc — (24)
R5 sc 3, inc — (30)
R6–R8 sc around — (30 each)
R9 sc 3, dec — (24)
R10 sc 2, dec — (18)
Stop with opening for stuffing; stuff firmly and close leaving a bit of flatness.
Triangle shaping: To make the rice ball triangular look, fold the finished sphere into a triangle and sew a few lines from top center to base edges to create the three sides (like a kite). Use yarn to stitch faint seam lines that shape it into a triangle when tightened. Alternatively, after step R6 you can lightly flatten one side to form the base and then whipstitch edges to form three flat faces.
Nori strip: Using black/dark green, ch enough to cover the back width (e.g., ch 12), sc back along chain to make a small rectangle, fasten off and sew the rectangle around the back bottom portion of the onigiri.
Face option: Embroider face (eyes & smile). Keep features stitched rather than attached.
Variations & tips
- Add a tiny embroidered filling dot (salmon/pickled plum) visible at the top.
- Make a set of three onigiri in different flavor markings (lines, seeds, tiny embroidery).
Care
- Cotton is ideal; machine wash gentle and air dry.
5. Crochet Mini Amigurumi Pie Pattern
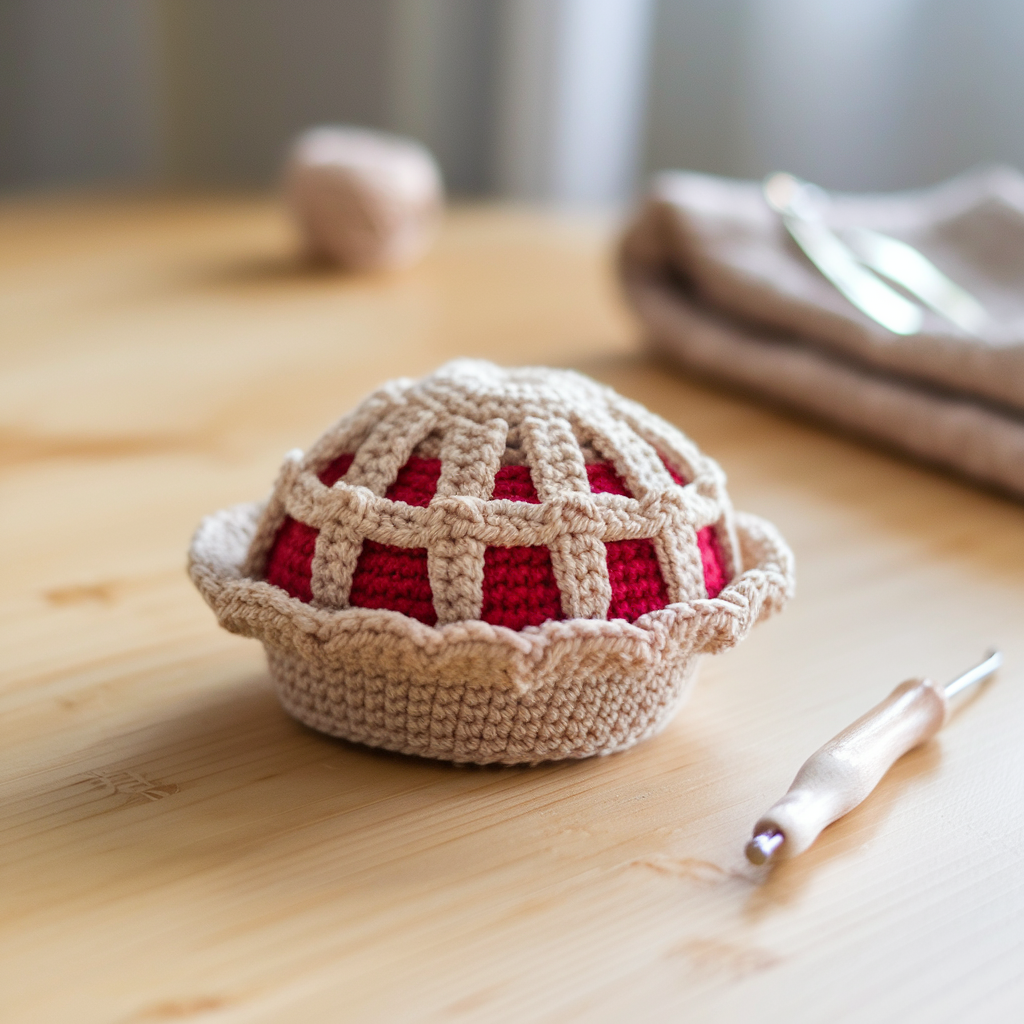
Skill level: Intermediate (several components)
Finished size: whole mini pie ≈ 3–3.5 in diameter; slice ~2.5 in along crust
Materials
- Worsted yarn: crust color (beige/brown), filling color (apple = tan/amber, cherry = red), whipped topping color (cream)
- 3.5 mm hook, stuffing, tapestry needle
Mini Whole Pie (simple dome pie with crust top)
Base crust (pie plate):
R1 MR: 6 sc — (6)
R2 inc each — (12)
R3 sc, inc — (18)
R4 sc 2, inc — (24)
R5 sc 3, inc — (30) — (this is the outer rim)
R6–R7 sc around (30) — This becomes the pie plate rim; if you want a wider plate, increase further.
Filling dome (fruit filling):
Make a shallow dome the size of the inner ring: MR 6, inc 12, sc 18, sc 18, fasten off and sew into the pie plate base leaving the rim exposed.
Top crust lattice (optional):
Make small strips for lattice: ch 12, sc back to create band, fasten off. Weave 3–4 strips across the top in a lattice pattern and sew endpoints into the rim. Alternatively crochet a single circular crust: attach crust color to the rim and work ch 2, skip 1, sl st around to create a decorative edge.
Slice version (optional):
Work a wedge by making a spherical wedge (a partial sector): Start with a smaller circle and increase only in 3 corner points to form triangular wedge shape. (If you prefer a simpler approach, make a whole mini pie and cut it: sew a seam and insert stuffing to create a wedge shape.)
Whipped topping / dollop: make small spiral: ch 8, SC back across and then roll strip and sew to top as dollop; or make a small puff stitch for whipped look.
Assembly & decoration
- Sew filling inside pie plate; attach lattice strips. Add small embroidered seeds or tiny felt highlights.
- For child-safe play food, avoid glued decorations; sew everything securely.
Variations & tips
- Change filling color for blueberries, pumpkin, cherry.
- Make mini pies as ornaments or pretend dessert set.
Care
- Surface wash and air dry; do not use glue elements that can fail in washing.
6. Crochet Tomato Amigurumi Pattern
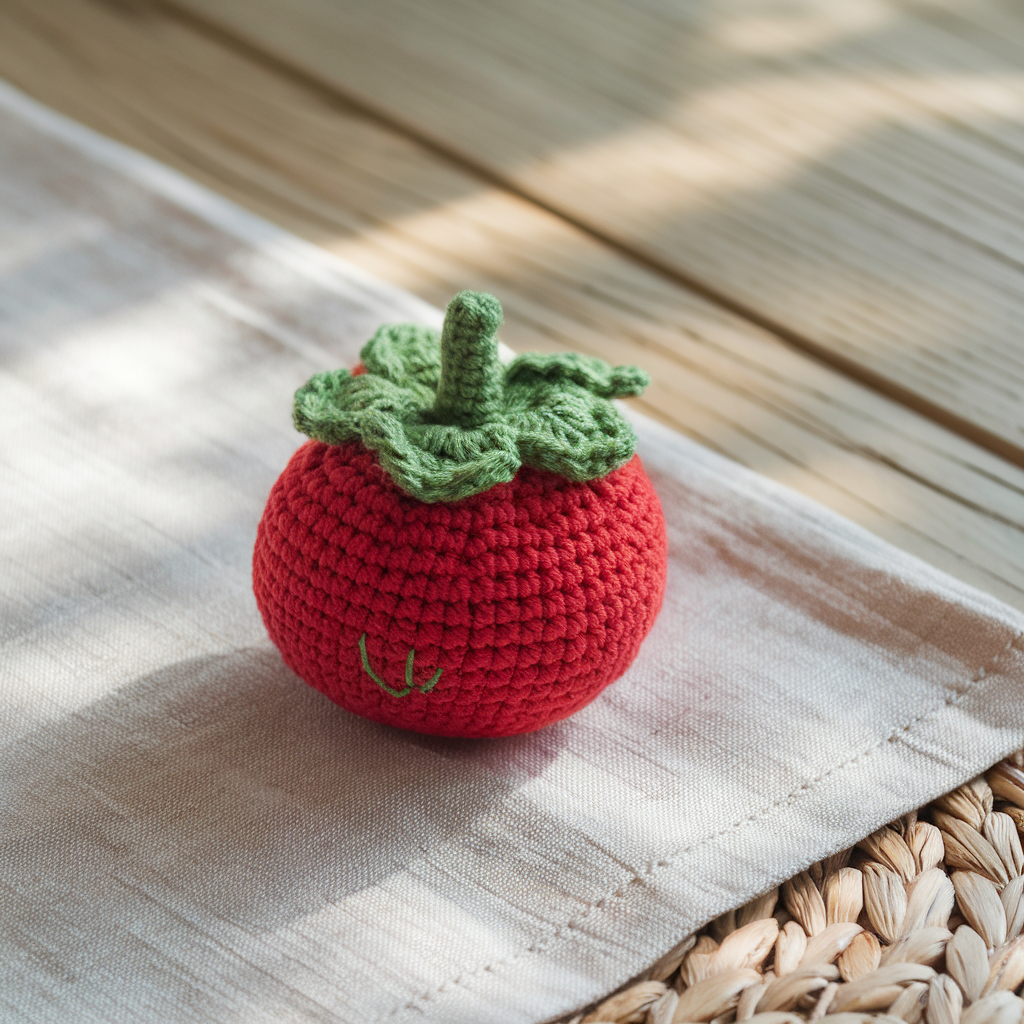
Skill level: Beginner → Confident beginner
Finished size: ≈ 2.5–3.0 in diameter
Materials
- Worsted-weight yarn red (tomato), green for calyx & stem, brown for optional tiny seed embroidery
- 3.5 mm hook, stuffing, tapestry needle
Tomato body (sphere)
R1 MR: 6 sc — (6)
R2 inc each — (12)
R3 sc, inc — (18)
R4 sc 2, inc — (24)
R5 sc 3, inc — (30)
R6–R8 sc around — (30 each) — add rounds for larger tomato
R9 sc 3, dec — (24)
R10 sc 2, dec — (18)
Stuff firmly here.
R11 sc 1, dec — (12)
R12 dec around — (6) — close and weave in.
Calyx (green leaf crown) — make 5 leaves
Make 5 small leaves and sew them together in circular arrangement before attaching to tomato.
Leaf (one): ch 4. R1 sc in 2nd ch from hook, hdc next, dc next, sl st to base — fasten off leaving tail. Repeat 5 times, arrange in a circle and sew to the top of tomato covering the closure. Add a short green stem: ch 5, sc back across and sew to center.
Segment lines option: embroider 4–6 faint vertical lines from near top to bottom with a slightly darker red or green to imply tomato segments (use long satin stitch or surface slip stitch).
Variations & tips
- Make a smiling face with embroidered eyes and mouth. Keep single small stitches for kawaii expression.
- Create a tomato set by making different sizes for play cooking.
Care
- Machine wash gentle if yarn permits; reshape and air dry.
Final assembly & safety checklist (all toys)
- Secure seams: Double-stitch all sewn joins (especially where small pieces join a larger piece).
- Hide tails: Weave tails deeply into the stuffed body and trim flush—no loose tails that a child could pull.
- Child-safe: For children under 3, avoid beads and safety eyes. Use tight embroidery instead.
- Stuffing: Use polyester fill and do not overstuff — firm but slightly squishy. For very young children, use a double layer of fabric lining with the stuffing inside and the crochet outside sewn together for extra insurance.
- Wash & care: Use yarns that are washable for toys. Provide care notes: machine wash gentle in a mesh bag and air dry.
Conclusion
These six play-food amigurumi patterns — ice cream, banana, cupcake, rice ball (onigiri), mini pie, and tomato — are compact, fast-to-make, and great for building a child’s imaginary kitchen or a small market stall. Each project teaches slightly different shaping and finishing skills: spheres and domes, tapering cones, flat panels and seaming, surface embroidery, and small appliqués.


Dưới đây là những sản phẩm mà slot365 là gì đã và đang cung cấp tại trang chủ chính thức mà bạn có thể lựa chọn trong mỗi lần truy cập.
Can you be more specific about the content of your article? After reading it, I still have some doubts. Hope you can help me. https://www.binance.info/pl/register?ref=UM6SMJM3
Thank you for your sharing. I am worried that I lack creative ideas. It is your article that makes me full of hope. Thank you. But, I have a question, can you help me? https://www.binance.info/vi/register?ref=MFN0EVO1
Thanks for sharing. I read many of your blog posts, cool, your blog is very good. https://www.binance.com/register?ref=IXBIAFVY
Your point of view caught my eye and was very interesting. Thanks. I have a question for you. https://www.binance.com/register?ref=IXBIAFVY
Your point of view caught my eye and was very interesting. Thanks. I have a question for you.
Your point of view caught my eye and was very interesting. Thanks. I have a question for you.
Your point of view caught my eye and was very interesting. Thanks. I have a question for you. https://www.binance.info/tr/register?ref=MST5ZREF
I don’t think the title of your article matches the content lol. Just kidding, mainly because I had some doubts after reading the article.
I don’t think the title of your article matches the content lol. Just kidding, mainly because I had some doubts after reading the article.
Your point of view caught my eye and was very interesting. Thanks. I have a question for you.
Your article helped me a lot, is there any more related content? Thanks! https://www.binance.info/register?ref=JW3W4Y3A
Your article helped me a lot, is there any more related content? Thanks!