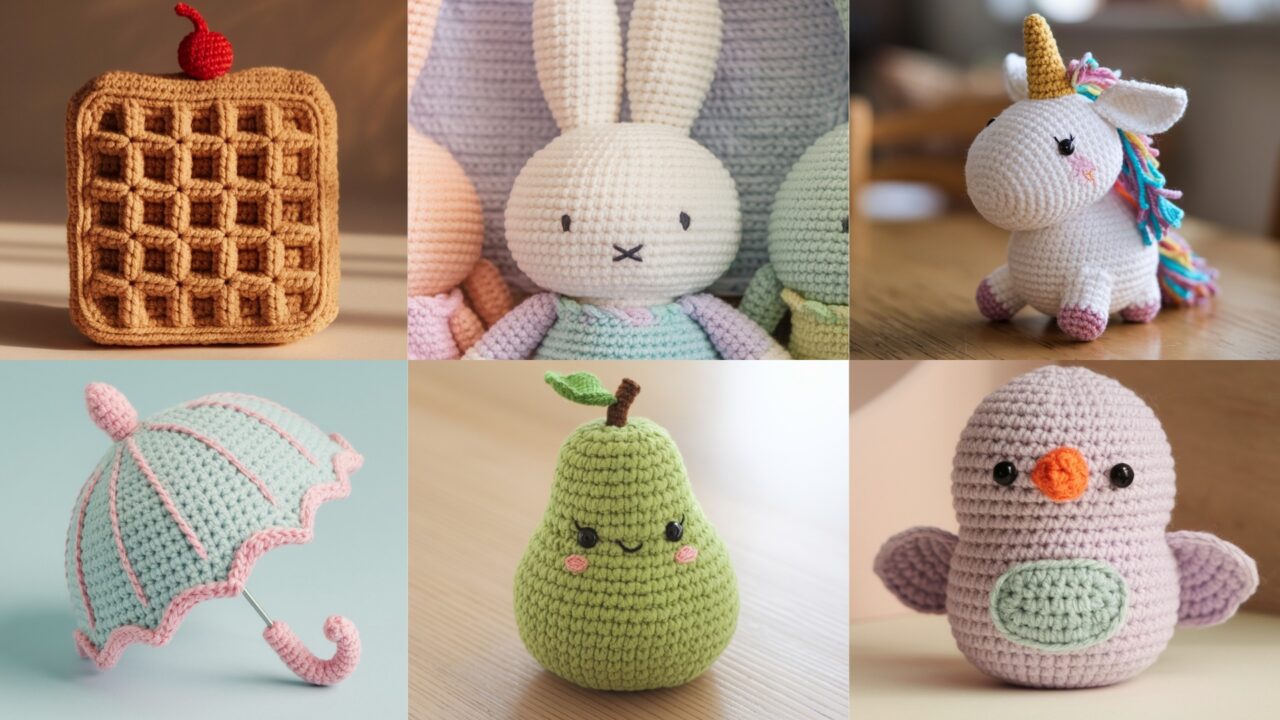
Tiny, soft, and impossible to resist — amigurumi are the smallest victories in crafting. These six beginner-friendly patterns (little bird, pear, Miffy bunny, umbrella, mini unicorn, waffle) are designed to be fast, forgiving, and endlessly customizable. Each pattern includes exact round counts and stitch math so you don’t have to guess, plus assembly tips so your finished pals look neat and durable.
I’ve focused on manageable shapes and minimal sewing: spheres, cones, simple applique. Use yarn you like, but check the recommended hook and safety rules — especially if the toy will land in a small human’s hands. Make them as gifts, keychains, or shelf companions. No judgement either way.
Quick common notes (read this — it saves time)
Skill levels used
- Beginner: basic single crochet, inc, dec, invisible decrease, magic ring.
- Confident Beginner: simple shaping, small appliqués, simple embroidery.
- Intermediate: color changes in the round, more seams.
Yarn & hooks (baseline used across patterns unless otherwise noted)
- Yarn: worsted weight (#4) acrylic or cotton (acrylic is inexpensive; cotton gives cleaner stitches).
- Hook: 3.0 mm — 3.5 mm depending on yarn and how tight you crochet. For amigurumi we recommend a tighter tension than garment work.
- Filling: polyester toy stuffing (fibrefill).
- Tools: tapestry needle, stitch markers, small scissors, safety eyes (6–10 mm) or embroidery thread for eyes, small amount of felt for accents (optional), hot glue for felt if desired.
Safety note
- For toys intended for babies/toddlers, do not use safety eyes—embroider eyes instead. Sew on any attachments securely and double-check seams. Small parts = choking risk.
Abbreviations (US terms)
- MR = Magic ring
- ch = chain
- sc = single crochet
- inc = 2 sc in same stitch
- dec = single crochet decrease (sc2tog) or invisible decrease (preferred)
- sl st = slip stitch
- st(s) = stitch(es)
- BLO/FLO = back/front loop only
Stuffing & finishing tip
- Stuff firmly but not overstuffed. Use small amounts at a time and push stuffing into small crevices with the blunt end of a pencil or stuffing tool. Weave tails through multiple stitches and lock with a small knot inside the toy.
1. Crochet Little Bird Amigurumi Pattern
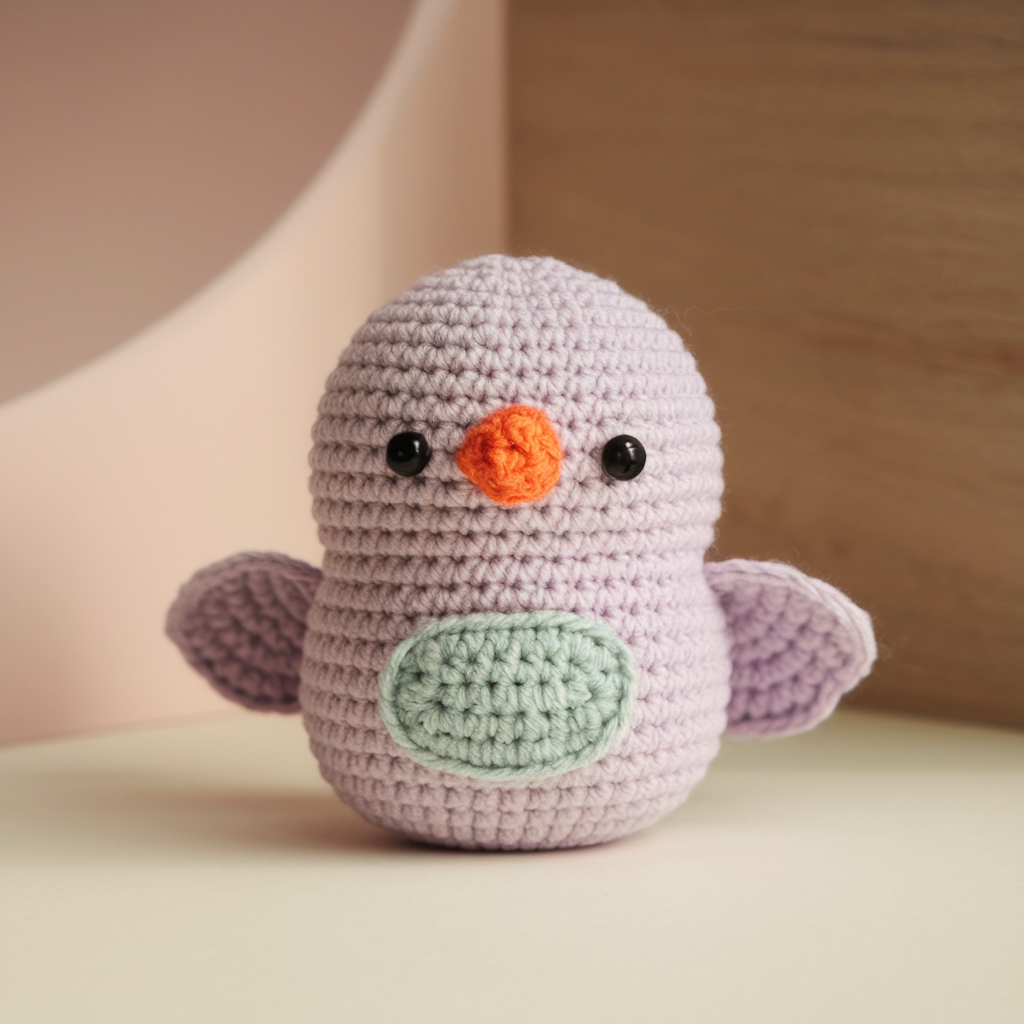
Skill level: Beginner
Finished size: ~3–4″ tall (with worsted yarn and 3.5 mm hook)
Materials: 20–30 yds main color (body), 5–10 yds contrast (belly/beak/wings), 6 mm safety eyes or embroidery thread, 3.5 mm hook, stuffing.
Shape logic
A simple sphere body with a flattened base, small beak and wings sewn to sides, tiny felt feet optional. Stitch math below uses a 6-starter magic ring.
Body (worked in continuous rounds — counts shown)
Use a stitch marker to mark start of round.
- MR, R1: 6 sc in MR — 6.
- R2: inc around — inc 6 = 12. (6 + 6 = 12)
- R3: (sc, inc) × 6 → (1 + 1) × 6 = 12 more → previous 12 +12 = 24.
- R4: (2 sc, inc) × 6 → adds 6 → 24 + 6 = 30.
- R5: (3 sc, inc) × 6 → adds 6 → 36.
- R6–R8: sc around (3 rounds) → stays 36 each round.
- R9: (3 sc, dec) × 6 → reduces 6 → 36 − 6 = 30.
- R10: (2 sc, dec) × 6 → reduces 6 → 24.
- R11: (sc, dec) × 6 → reduces 6 → 18.
- R12: dec around → 9. Fasten off leaving tail for closing. Stuff firmly, finish decrease to close hole and weave tail inside.
Belly (optional small oval applique)
- Ch 6, sc in 2nd ch from hook and across (5 sc). Turn and work 3 rows sc (5 sc each). Fasten off leaving long tail. Sew to front of bird; stuff slightly beneath to make a small tummy pucker.
Beak (make 1)
- MR, R1: 4 sc in MR — 4. R2: (sc, inc) ×2 = 6. R3: sc around 6. Fasten off leaving tail; flatten and sew to front center; reinforce with a few stitches.
Wings (make 2)
- Ch 7, Row1: sc in 2nd ch and across (6 sc). Row2: ch1, dec, sc to last 2 stitches, dec → approx 4 sc. Fasten off, fold and sew long edge to body slightly angled.
Eyes & assembly
- Insert safety eyes between R6–R7 spaced ~6–8 sts apart. If embroidering, use long running stitches and secure back carefully.
- Sew wings and beak to body with hidden stitches. Add tiny felt feet or embroider legs with yarn.
Finishing & variations
- Add a small crest by chaining short loops and sewing to top of head.
- Make it pastel for nursery or loud colors for keychains. Add a keyring through top with a sewn loop.
2. Crochet Adorable Pear Amigurumi Pattern
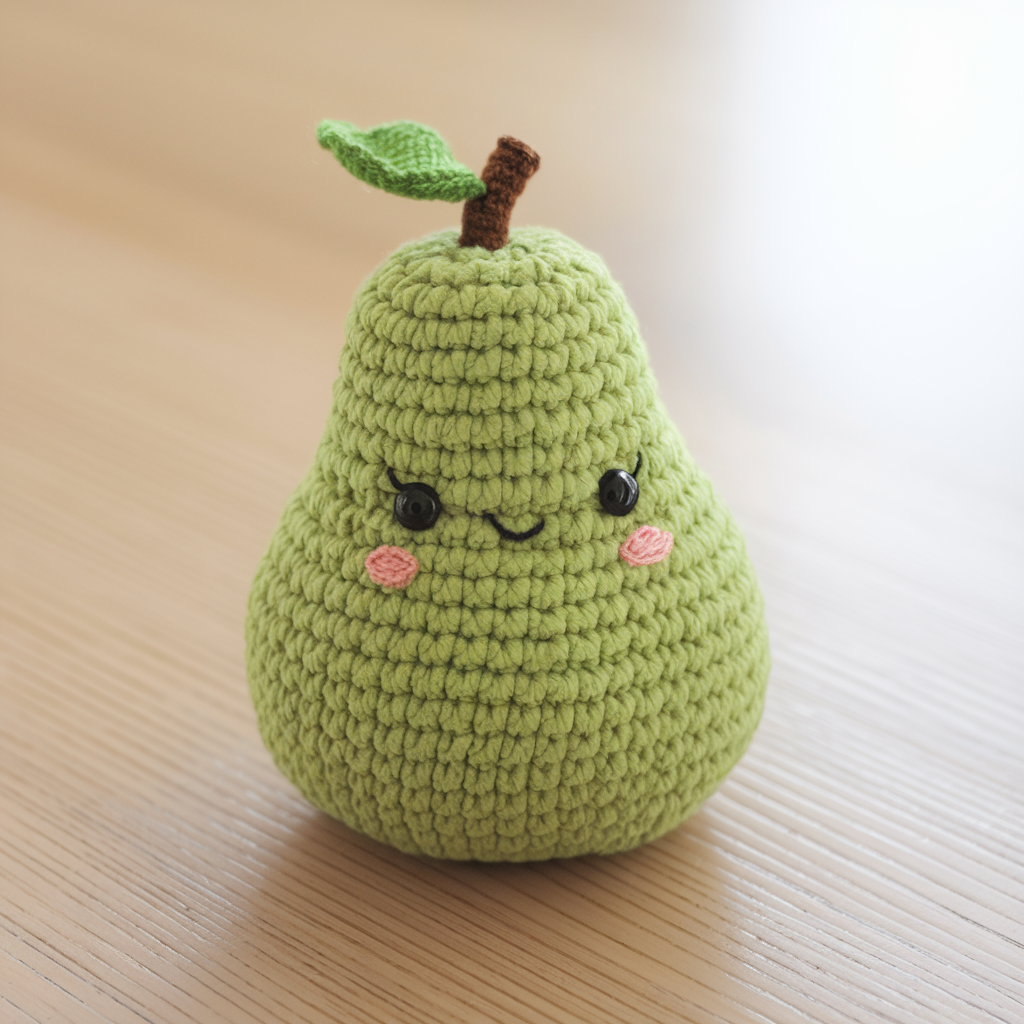
Skill level: Beginner → Confident Beginner
Finished size: ~4–5″ tall (pear shape)
Materials: 30–40 yds green or yellow main color, small brown for stem, 3.5 mm hook, 6 mm eyes (optional), stuffing.
Shape logic
A tapered sphere: increases to widest point, then decreases while shifting stitch counts to create pear neck.
Body (worked in continuous rounds)
- MR, R1: 6 sc — 6.
- R2: inc around → 12.
- R3: (sc, inc) ×6 → +6 → 18.
- R4: (2 sc, inc) ×6 → +6 → 24.
- R5: (3 sc, inc) ×6 → +6 → 30.
- R6–R8: sc around (3 rounds) → stays 30. (Gives belly width.)
- R9: (3 sc, dec) ×6 → −6 → 24.
- R10: (2 sc, dec) ×6 → −6 → 18.
- R11: (sc, dec) ×6 → −6 → 12. At this point you have a tapered top; stuff firmly but leave room for stem.
- R12: dec around → 6. Fasten off leaving long tail for closing; do not close completely (we’ll attach stem).
Neck shaping alternative (for more pear neck)
- Instead of continuing to dec to 6, stop decreasing a round earlier and work a short cylinder of sc for a defined neck: e.g., after R10 you can do R11–R12: sc in around for two rounds then dec and close.
Stem & leaf
Stem: with brown, ch 5, sc back (4–5 sc), make a short tube and sew into top opening. Hide tail inside toy.
Leaf (optional): ch 6, sc 1, hdc, dc, hdc, sc; sl st to join into a small leaf shape. Sew next to stem.
Eyes & blush
- Add small safety eyes at the widest part or embroidered eyes with black and white highlight. Add cheek blush with a tiny dab of pink yarn or fabric-safe blush.
Finishing & variations
- Make pear in two colors and embroider small seeds/texture stitches for charm.
- Make a loop before closing to turn into an ornament.
3. Crochet Miffy Bunny Amigurumi Pattern
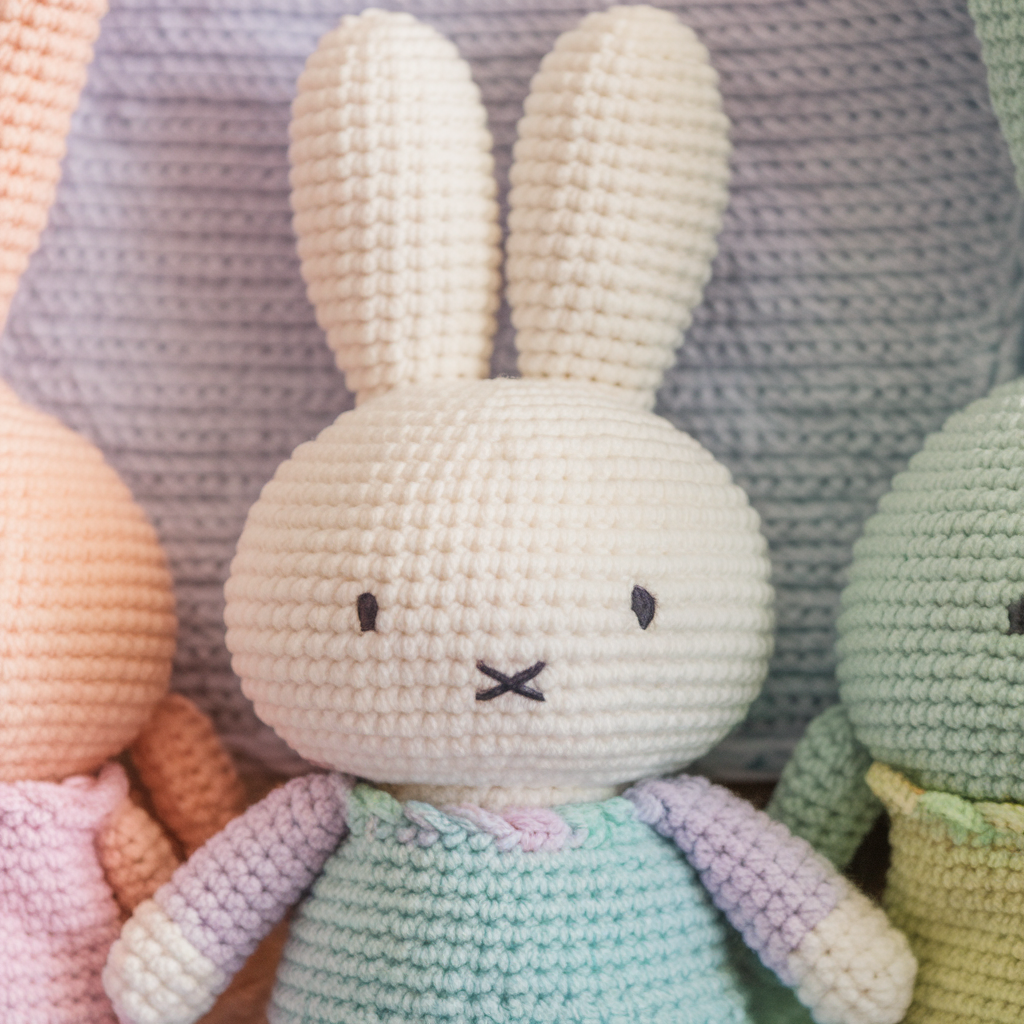
Skill level: Confident Beginner
Finished size: ~6–7″ tall (taller due to ears)
Materials: 80–120 yds worsted white yarn, small amount of contrasting color for dress/overalls, 3.5 mm hook, black embroidery thread for face (no safety eyes to keep Miffy-safe), stuffing.
Notes on style & licensing
Miffy is a classic minimal bunny character. This pattern is inspired by that simple look (minimal face, long ears, blocky body). If you sell, design your own bunny variations — keep it cute.
Body & head (worked as one piece, joined at neck)
We’ll make a slightly egg-shaped body then a long head to preserve proportions.
Body base (worked in continuous rounds)
- MR, R1: 6 sc — 6.
- R2: inc around → 12.
- R3: (sc, inc) ×6 → 18.
- R4: (2 sc, inc) ×6 → 24.
- R5–R7: sc around (3 rounds) → 24.
- R8: (2 sc, dec) ×6 → reduces 6 → 18.
- R9–R10: sc around (2 rounds) → 18. Stuff base lightly.
Upper body / torso transition
8. R11: (sc, inc) ×6 → +6 → 24 (to create a gentle neck flare).
9. R12–R14: sc around (3 rounds) → 24.
Head
10. R15: (3 sc, inc) ×6 → +6 → 30.
11. R16–R20: sc around 5 rounds → 30 (head height).
12. R21: (3 sc, dec) ×6 → −6 → 24.
13. R22: (2 sc, dec) ×6 → −6 → 18.
14. R23: (sc, dec) ×6 → −6 → 12. Stuff head firmly.
15. R24: dec around → 6. Fasten off leaving tail, close hole.
Ears (make 2)
- Ch 10, sc in 2nd ch from hook across (9 sc). Turn.
- Row2: ch1, sc across (9). Row3: ch1, dec, sc, sc, sc, dec → 7 sc. Row4: ch1, dec, sc, sc, dec → 5 sc. Row5: ch1, sc across 5. Fasten leaving long tail to sew. Fold ear slightly and sew to top of head. Alternatively crochet a longer tube and flatten for a cleaner look.
Face (minimal)
- Use black embroidery thread to stitch two small crosses for the mouth (Miffy-style) and two small dots for eyes. Simple: place dots on row 17–18 horizontally spaced ~8–10 stitches apart.
Outfit (dress / overalls)
- Pick a contrasting yarn color. Pick up stitches around torso (~24 sts) and work 4–6 rounds of sc to create a short dress base. Add sleeves by picking up stitches around armhole and working a few rounds. Or crochet a little removable dress.
Assembly & finishing
- Sew ears securely through head several times. Add blush with a tiny bit of pink yarn or fabric blush. Add a loop at back if you want to hang it.
Variations
- Make baby Miffy by using smaller yarn and hook (sport weight + 2.5 mm hook) or make giant Miffy with bulky yarn.
4. Crochet Little Umbrella Amigurumi Pattern
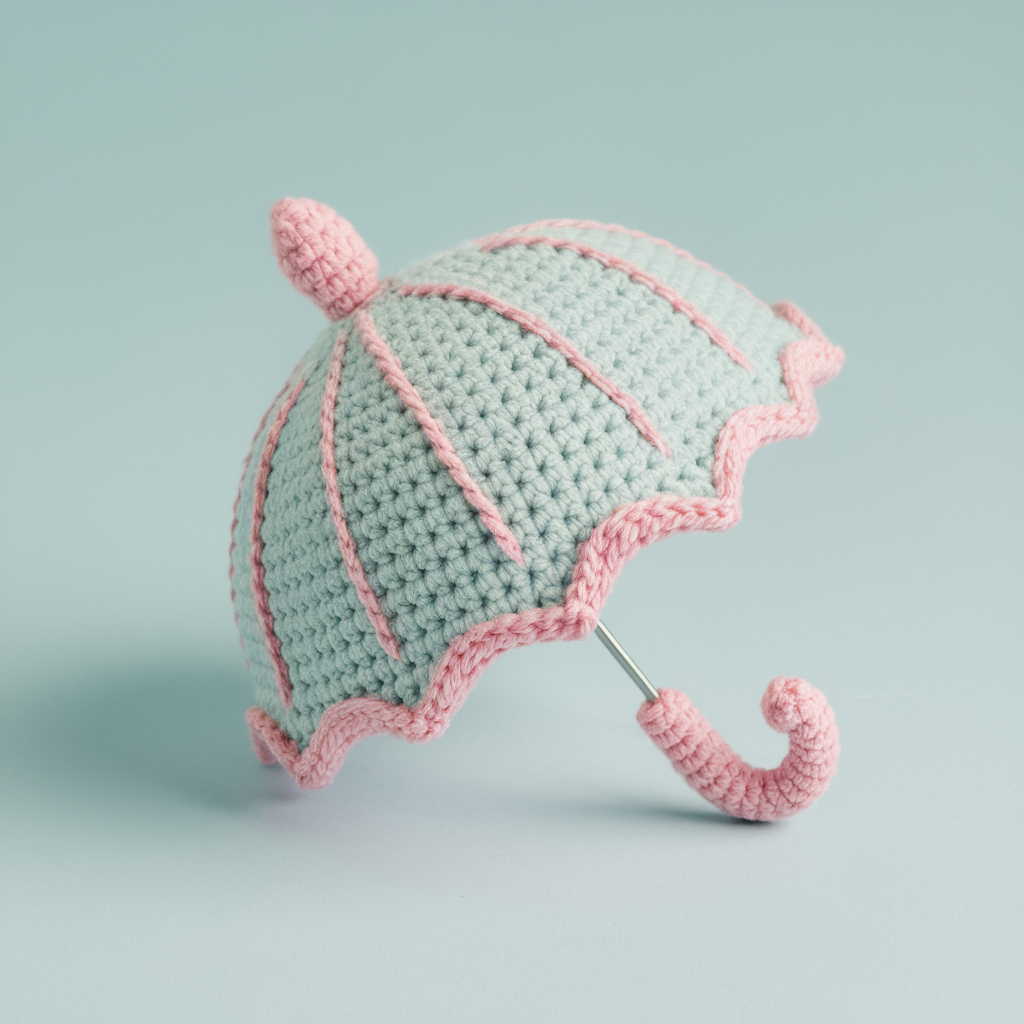
Skill level: Beginner
Finished size: ~4″ diameter canopy, 5–6″ tall with handle depending on handle length
Materials: small amounts of colored yarn for canopy and handle (approx. 20–40 yds), 3.5 mm hook, small dowel or pipe cleaner for handle (optional but makes it sturdier), stuffing for tiny top knob.
Shape logic
A shallow dome canopy worked in rounds plus a short handle. This pattern makes a cute miniature umbrella charm/keychain.
Canopy (worked in continuous rounds)
- MR, R1: 6 sc — 6.
- R2: inc around → 12.
- R3: (sc, inc) ×6 → +6 → 18.
- R4: (2 sc, inc) ×6 → +6 → 24.
- R5: (3 sc, inc) ×6 → +6 → 30.
- R6: (4 sc, inc) ×6 → +6 → 36. (This gives a shallow dome diameter ~4″.)
- R7: sc around (one round) → 36. If you want a slightly flared rim, R8: sc, ch1, sk1 in pattern to create scallops or (3 dc, ch1, 3 dc) every 6–8 sts for scalloped edge. Fasten off and leave long tail for sewing.
Handle
Option A — soft yarn handle
- Ch 20 (or desired length), sl st back across chain to create a cord. Fold and sew chain end to center of canopy underside, anchor strongly.
Option B — rigid handle
- Use a thin wooden dowel or wire pipe cleaner cut to length. Insert through a small crocheted tube: ch 4, join, sc rounds to make a small tube covering the dowel, sew tube to canopy center and secure.
Top knob
- Make a tiny ball: MR, 6 sc, inc → 12, sc 1 round, dec rounds to close. Stuff and sew to top center of canopy; also use it to anchor handle.
Decorative ribs (optional)
- Embroider ribs with contrasting yarn: start at top knob and embroider straight lines to rim using running stitches. This simulates umbrella ribs.
Assembly & finishing
- Attach small keyring by making a sewn loop on top or by attaching to handle end. For a keychain, use a metal split ring and small chain.
5. Crochet Mini Unicorn Amigurumi Pattern

Skill level: Intermediate (small details like horn, mane)
Finished size: ~4–5″ tall sitting (bigger if standing)
Materials: worsted yarn in white (body), colors for mane/tail (leftover scraps), gold or yellow for horn, 3.5 mm hook, safety eyes (6 mm) or embroidered eyes, stuffing.
Shape logic
Basic chubby horse body (similar to sphere with stubby legs), a cone horn, floppy ears, and colorful mane/tail.
Body (worked in continuous rounds)
Use the bird/pear body math but a bit larger.
- MR, R1: 6 sc — 6.
- R2: inc around → 12.
- R3: (sc, inc) ×6 → 18.
- R4: (2 sc, inc) ×6 → 24.
- R5: (3 sc, inc) ×6 → 30.
- R6–R8: sc around (3 rounds) → 30.
- R9: (3 sc, dec) ×6 → −6 → 24.
- R10: (2 sc, dec) ×6 → −6 → 18.
- R11: sc around (1 round) → 18. Stuff lightly for belly.
- R12: (sc, inc) ×6 → +6 → 24 (neck).
- R13–R16: sc around (4 rounds) → 24 (head).
- R17: (3 sc, dec) ×6 → −6 → 18.
- R18: (2 sc, dec) ×6 → −6 → 12. Stuff head firmly.
- R19: dec around → 6, close and weave in.
Legs (make 4)
- Ch 6, sc in 2nd ch and across (5 sc). Work 6 rounds sc to form short tube. Flatten and sew base closed, stuff lightly. Sew legs to underside evenly spaced.
Horn
- With gold: MR, 4 sc in MR → 4. R2: (sc, inc) ×2 → +2 = 6. R3: sc around 6. R4: (sc, dec) ×2 → −2 = 4. Fasten off, stuff lightly, and sew to forehead.
Ears (make 2)
- Ch 4, sc in 2nd ch and across (3 sc), sc 2 rows, fasten off and sew to head sides near base of horn.
Mane & tail
- Use loops of yarn (several colors). Fold short lengths (6–8 cm) in half, pull fold through a stitch along top/back and pull tails through loop to knot (latch-hook style) — makes thick mane quickly. For tail, do longer loops and sew into back seam.
Eyes & face
- Insert safety eyes between head rounds ~R14–15, or embroider simple eyes. Add tiny nostrils with small french knots or embroidered dots.
Finishing & variations
- Add sparkly embroidery, a saddle, or tiny felt wings to make a pegasus. Size scales well: sport yarn + 2.75 mm hook yields mini keychain unicorns.
6. Crochet Waffle Amigurumi Pattern
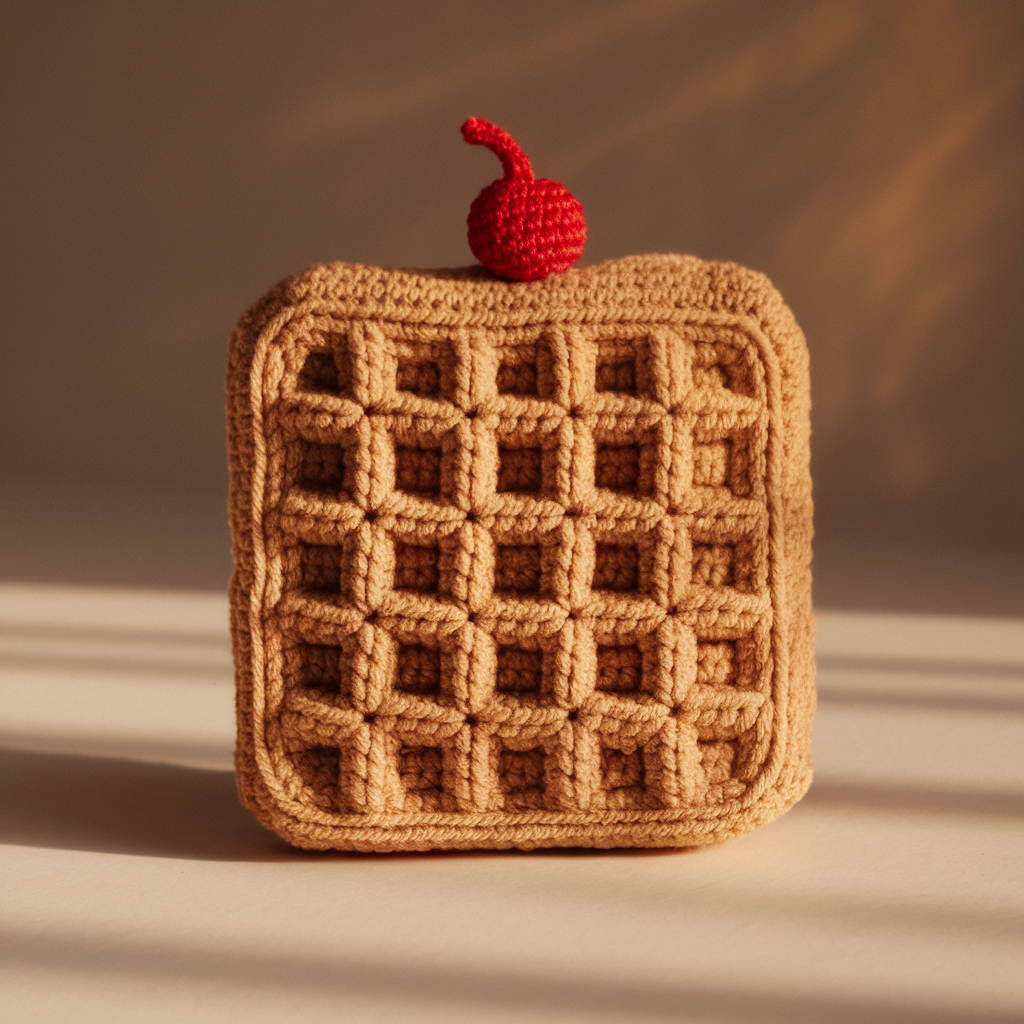
Skill level: Confident Beginner → Intermediate (texture)
Finished size: ~3–4″ (square-ish)
Materials: worsted weight in “waffle” color (golden brown), small amount for syrup/berry accents, 3.5 mm hook, stuffing, tapestry needle.
Shape logic
A flat-ish square with waffle-texture stitch and tiny appliqué (syrup blob and cherry). The toy is a cute squishy coaster-style plush.
Waffle square (worked flat, magic chain or ch foundation)
Make a 10×10 waffle grid (adjust size as you like).
Waffle stitch reminder (one easy version)
- Waffle uses front post double crochet (fpdc) and regular dc rows.
Foundation & grid
- Ch 21 (or any multiple +1 for width). Row1: dc in 4th ch from hook and across (counts as dc + dc). Turn.
- Row2: ch3, dc in each st across. Turn.
- Row3: ch3, fpdc around next dc, dc in next dc repeat across. Turn.
- Row4: ch3, dc across. Repeat Rows 3–4 until square is desired height (approx 10 rows for a small waffle). Fasten off leaving long tail for sewing edges.
Stuffing & shaping
- Fold square in half and stitch around 3 sides, leave 1 side open to stuff lightly, then stitch closed — makes a thick, crunchy waffle block. Alternatively, sandwich a thin piece of felt inside before stitching for extra firmness.
Syrup & cherry applique
- Syrup: Use darker brown yarn to embroider a tear-drop shape on top; fill with satin stitch.
- Cherry: Small round — MR, 6 sc, sc 1 round; fasten off, sew on top.
Finishing & variations
- Add tiny square indentations by embroidery to simulate waffle grid. Use variegated yarn for a toasted look. Make a set of breakfast food amigurumi for a cute gift set.
Final assembly & photography tips (practical)
- Use stitch markers and count every 4–6 rounds. If your counts drift, fix immediately instead of continuing.
- Neat sewing makes all the difference: use ladder stitch/mattress stitch for seams when possible to hide joins.
- For product photos: use a plain background, natural light from a window, and include a hand or coin for scale in one shot.
Care & washing
- Acrylic amigurumi: machine wash gentle in laundry bag, reshape and air-dry.
- Cotton: machine wash gentle or hand wash; air dry flat to keep shape.
- Embroidered features are more durable than glued felt; if you use felt, hand-wash only.
conclusion
There you go: six friendly amigurumi patterns that actually finish. Each design is compact — a quick win you can finish in a few hours, with sensible assembly steps so your toys don’t look slapped together. Swatch your tension, use the given round counts, and sew parts on firmly. If you’re making toys for kids, swap safety eyes for embroidery and double-stitch all attachments.