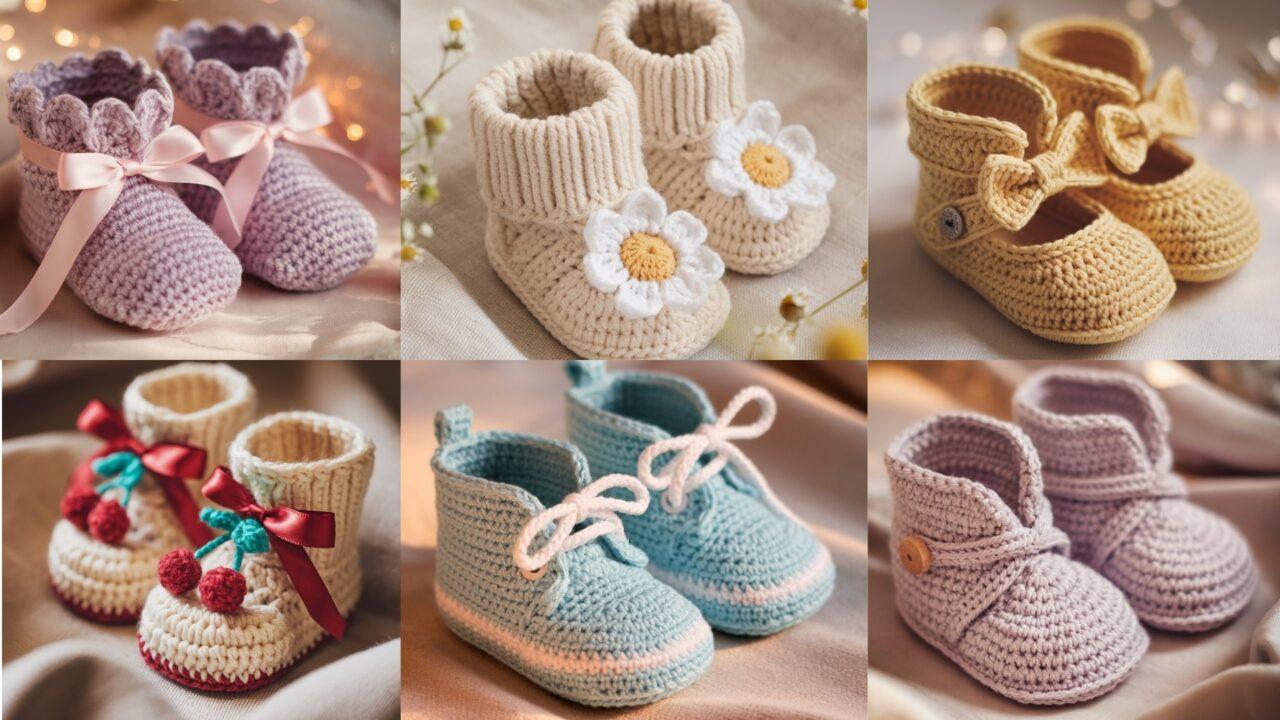
Tiny shoes, big charm — baby booties are some of the most satisfying baby crochet projects. Below you’ll find six fully worked bootie patterns that use buttons, ribbons, and pretty trims to make sweet, wearable gifts. Each pattern includes skill level, materials, measurements for three common baby sizes (Newborn / 3–6 months / 6–12 months), a clear step-by-step construction (sole, upper, strap/ribbon detail), assembly, finishing, and safety notes.
Before we begin: a few universal tips that apply to every baby bootie pattern below.
Important safety note: Buttons and small beads are choking hazards. If the booties are for infants who mouth things, consider using sewn-on fabric tabs, embroidered “buttons,” snaps with secure backing, or stitched ribbon bows instead of loose buttons. Sew buttons very securely (use a shank or button back) and consider reinforcing with a dab of fabric glue on the knot. Always supervise infants wearing decorative items.
Universal materials & sizes
- Yarn: Soft baby yarn or light worsted (DK/Light Worsted). Cotton blends are breathable; acrylic is easy-care. For structured booties use medium-weight yarn; for soft booties use DK.
- Hook suggestions: 3.0–4.5 mm depending on yarn and desired density. The patterns below list a recommended hook — but always check your gauge if fit matters.
- Notions: tapestry needle, stitch marker, scissors, small buttons (10–12 mm), narrow ribbon (1/4″–3/8″), optional elastic (for ankle stability), small amount of stuffing only if making decorative pom-poms.
- Sizes (approximate inner sole length):
- Newborn (0–3 months): 3.25″ (8.5 cm)
- 3–6 months: 3.75″ (9.5 cm)
- 6–12 months: 4.25″ (10.8 cm)
Want precise measurements for a custom size? Measure the baby’s foot from heel to toe and make the sole length match that measurement minus about 0.25″ for slight snugness.
Abbreviations (US terms)
ch = chain
sc = single crochet
hdc = half double crochet
dc = double crochet
sl st = slip stitch
st(s) = stitch(es)
inc = 2 sc in same st
dec = sc2tog (single crochet two together)
sp = space
BLO / FLO = back / front loop only
1. Crochet Yellow Bow Baby Booties Pattern

A sweet Mary-Jane style with a little bow across the vamp — classic and gift-worthy.
Skill: Beginner → Intermediate
Sizes: Newborn / 3–6m / 6–12m
Materials
- DK or light worsted yarn — about 75 (90 / 110) yds total, sunny yellow for body, contrast for bow if desired.
- Hook: 3.5 mm (E) for a snuggly fabric.
- Small button (10 mm) and narrow ribbon if you want extra bow detail.
- Tapestry needle.
Step-by-step
Sole (common for all sizes, stop when sole measures desired length)
- MR, ch 1; 6 sc in MR. (6) — join with sl st to first sc.
- R2: inc around (12).
- R3: sc 1, inc around (18).
- R4: sc 2, inc around (24).
- R5: sc 3, inc around (30).
- R6: sc 4, inc around (36). (If you’re using a smaller yarn or want a smaller sole stop at R5.)
- R7 (optional for larger sizes): sc 5, inc around (42).
Check length: stop increasing when the sole reaches approximately the target (3.25″ / 3.75″ / 4.25″). If you used more or fewer rounds, that’s okay — base your stop on length.
Heel & vamp
- After you have the desired oval base, work one round of sc around to tidy the base and fill ch-1 spaces (sc in each stitch). Place a marker at the center of one long side — this will be the front (toe) center.
- Work Row 1 (turning rows now): ch 1, sc in next 18 (21 / 24) stitches — this forms the sole’s center that becomes the vamp. Leave remaining sts unworked and turn — these unworked sts will be for the heel. (Exact stitch counts vary by how many increases you did; aim to work approx. 60–65% of the total stitches for vamp on newborn, 65–70% for larger sizes. If in doubt, align to foot measurements as you go.)
- Rows 2–6 (vamp shaping): ch 1, sc across the same number of stitches. Work until vamp height is ~1.1″ (Newborn) / 1.25″ (3–6m) / 1.5″ (6–12m). Turn.
Build the heel
- Join yarn at the heel edge (remaining unworked stitches). Work sc in rounds around the heel edge and across the heel area: sc across remaining sts, sc across back of sole bridging to first vamp stitch, sc the same number of rounds to build heel height. Usually 4–6 rounds of sc will create a short booty heel. For a higher ankle bootie add more rounds. After heel rounds, work one round of sc across entire top to join vamp and heel into one loop (work through both layers where needed).
Top shaping & edging
- Work 2–3 rounds sc around the whole shoe to even the fabric. Work one round in BLO for a subtle folding ridge if desired.
- For cuff: work 6–8 rounds of hdc or sc in BLO to create a stretchy ankle cuff.
Bow
- Make bow separately: ch 12, hdc in 2nd ch and across (11 hdc). Work 3 rows of hdc. Fasten off leaving long tail. Wrap center tightly with yarn to make a bow shape and sew onto vamp center or side using long tail. Add a tiny button center if desired.
Strap (Mary-Jane)
- Attach yarn at inner side of ankle, ch enough to span foot (ch 5–7 depending on size), sl st back to opposite side to create strap loop. Or ch 6, sc back across to make thicker strap. Fold strap over and sew securely. Attach button to the outer side aligning with strap loop.
Finishing
- Weave in ends and secure button firmly. Consider sewing a tiny bit of elastic into strap for stretch. Block lightly to even stitches.
Variations
- Replace bow with a crocheted flower. Make cuff higher for boot-style look.
2. Crochet Little Daisy Baby Booties Pattern

Adorable daisy motif on the toe with a soft ribbed cuff — fresh and springlike.
Skill: Beginner
Sizes: Newborn / 3–6m / 6–12m
Materials
- DK yarn: main color (cream/pastel) ~80 (95 / 115) yds, yellow small amount for daisy center, green for leaf if desired.
- Hook: 3.5 mm.
- Small button (optional) for heel tab.
Step-by-step
Sole
- Start as in pattern 1: MR, 6 sc; R2 inc to 12; R3 sc1 inc → 18; R4 sc2 inc → 24; R5 sc3 inc → 30; R6 sc4 inc → 36 (stop when sole length matches size target).
Upper & sides
- Round 1: sc around to tidy (36 sc).
- Round 2: sc in next 12 (13 / 15) stitches (this is vamp top). Leave remaining unworked — turn and work back-and-forth rows across your vamp stitches: ch 1, sc across, repeat for 4–6 rows until vamp height ~1–1.5″ depending on size.
- Rejoin yarn to heel area; work sc rounds around the heel area 6–8 rounds to build ankle.
Cuff
- Switch to hdc BLO for 6 rounds for stretchy cuff, or work sc in BLO as rib. For an extra decorative edge, finish with one round of picot (ch 3, sl st in 3rd ch) spaced every 4 sts.
Daisy motif (small applique)
- Ch 2, 6 sc in 2nd ch from hook — join (6). (Center)
- Round 2 (petals): ch 3, sl st in next st repeat 6 times around (six little loops). Fasten off and block petals open.
- Sew a small yellow French-knot-like center using yarn or a tiny felt circle. Position daisy on vamp or toe and sew firmly.
Optional heel tab / button
- Crochet a small tab: ch 6, sl st back across; sew to heel and add button to opposite side to help with pull-on (decorative more than functional).
Finishing
- Weave in ends; sew appliqué firmly. If booties will be used with socks, you can insert a small piece of elastic into the cuff to keep on.
3. Crochet Wrap Around Button Infant Baby Booties Pattern
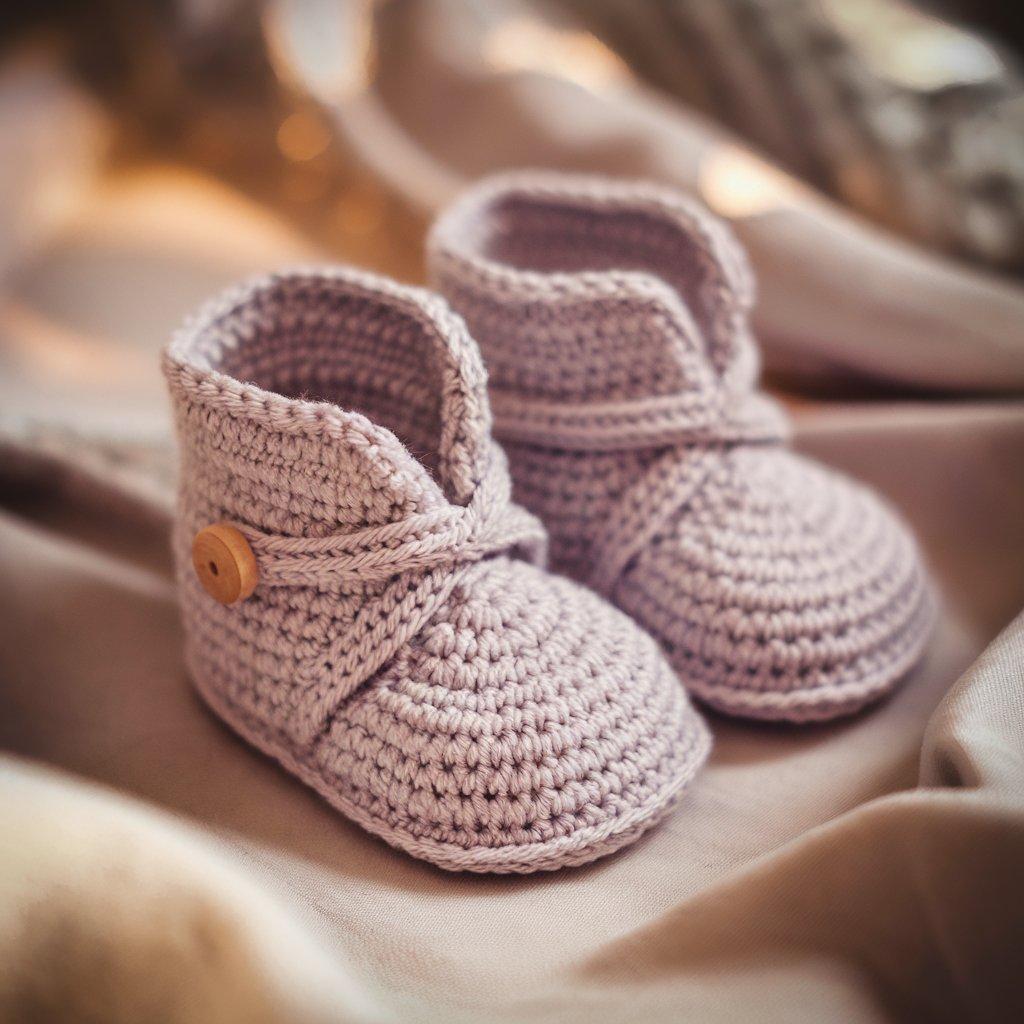
A practical wrap-around strap that buttons on the outer ankle — easy to adjust and secure.
Skill: Beginner → Intermediate
Sizes: Newborn / 3–6m / 6–12m
Materials
- Worsted or DK yarn ~90 (110 / 130) yds.
- Hook: 3.75–4.0 mm for slightly denser fabric.
- 1 medium button per bootie (or pair; 10–12 mm).
- Tapestry needle.
Step-by-step
Sole
- MR 6 sc; R2 inc →12; R3 sc1 inc →18; R4 sc2 inc →24; R5 sc3 inc →30; R6 sc4 inc →36 — adjust for length stop.
Upper
- Sc around one round to tidy.
- Row construction: determine vamp width (work across roughly 60–70% of stitches). Work back-and-forth sc rows until vamp height ~1–1.5″ (size dependent). Leave heel stitches unworked; rejoin to heel and work heel rounds 5–7 for height.
Wrap strap
- From the side of vamp, attach yarn and ch 28 (Newborn) / 32 (3–6m) / 36 (6–12m) — this length is approximate for wrapping across the instep and fastening to opposite ankle; crop if needed.
- Row 1: sc in 2nd ch and across. Row 2–3: sc across to make strap 2–3 rows thick. Fasten off leaving tail for sewing. Sew one end to inner ankle side; on the outer ankle sew on a button aligned so the strap wraps comfortably and fastens without tension. For a clean finish, create a small buttonhole in the strap by making ch 2 space in the second row of strap, closing securely around edge.
Ankle reinforcement
- To prevent stretching where the strap attaches, work a reinforcement round of sc across the top edge and sew strap through multiple rows.
Finishing
- Weave in ends; sew button securely. If you’re worried about buttons, substitute with a snap or embroidered patch.
4. Crochet Cherry Baby Booties Pattern
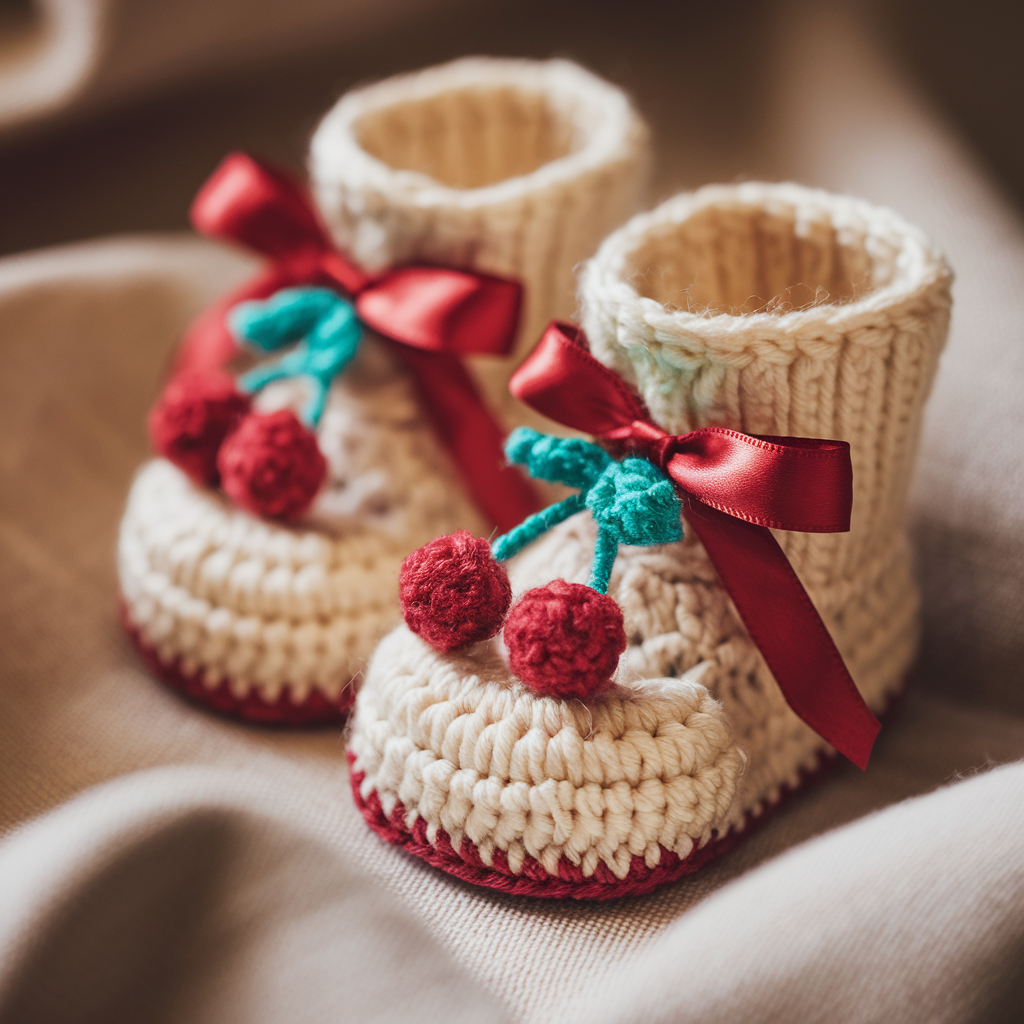
Playful cherry applique and ribbon tie give these booties a vintage nursery vibe.
Skill: Beginner
Sizes: Newborn / 3–6m / 6–12m
Materials
- DK yarn main color ~80 (95 / 110) yds. Red for cherries small amount, green for leaves, narrow red ribbon (3/8″) for tie.
- Hook: 3.5 mm.
- Two tiny red pom-poms or crocheted cherries per bootie.
Step-by-step
Sole
- Follow standard sole rounds: MR 6 sc; inc; inc pattern until length target reached (see earlier patterns).
Upper
- Round 1: sc around to tidy base.
- Rows: work vamp in back-and-forth sc rows across approx. 60–70% of sts until height ~1.25–1.5″. Rejoin at heel and build heel rounds.
Cherry appliqué (make 2–4 small cherries to sew as a cluster)
- MR, 6 sc in MR, pull closed — fasten off leaving tail and stuff lightly if making plush cherry. Make two for a twin cherry look. Sew cherries together at tops.
- Make leaf: ch 5, sc in 2nd ch, hdc next, dc next, sl st to base — tiny leaf. Add a short embroidered stem using green floss.
Ribbon tie
- Make two small eyelets on either side of upper: at top round of bootie, ch 2, skip 2 sts, sl st in next st to create a small opening. Repeat opposite side.
- Weave a 24–30″ ribbon through eyelets and tie into bow on front. Knot ribbon ends to prevent fraying, or heat-seal synthetic ribbon slightly.
Assembly
- Sew cherry cluster on the toe or side of each bootie. Secure well.
Finishing
- Weave ends and trim ribbon. Add small bead in center of cherry if desired (observe safety note).
5. Crochet Lace-Up Crochet Baby Booties Pattern

Cute lace-up mode — looks like classic sneakers — complete with eyelets and laces (ribbon or cord).
Skill: Intermediate (eyelets and shaping)
Sizes: Newborn / 3–6m / 6–12m
Materials
- Sport/DK yarn ~100 (120 / 140) yds.
- Hook: 3.5–4.0 mm.
- Narrow cord or ribbon for laces.
- Optional non-slip sole patch material for toddler versions.
Step-by-step
Sole
- MR 6 sc; R2 inc to 12; R3 sc1 inc →18; R4 sc2 inc →24; R5 sc3 inc →30; R6 sc4 inc →36 (stop by length). For sneaker look commonly use an oval slightly longer — you might go one additional increase round for older sizes.
Tongue & eyelet placement
- After base is set, sc around one round. Determine where the tongue will sit — center front across approx. 8–10 sts (varies by size). Work rows back and forth across that center section to form tongue: ch 1, sc across 6–8 sts for 3–4 rows. Leave edges unjoined.
- To make eyelets on each side of tongue, after joining rounds work the top round and create ch-1 or ch-2 eyelets spaced evenly: sc 3, ch 2, skip 2 (eyelet), sc next* etc at the position where laces will pass.
Form vamp & heel
- Build up sides and heel by continuing sc rounds; shape the toe by decreasing across the top near the toe (dec every 3–4 sts one round). This creates a sneaker toe box. Work heel taller (6–8 rounds) for an ankle shoe.
Sole edging
- To get the “sneaker sole” look, work two rounds of hdc or dc around the bottom edge for a thicker sole rim. Work final round in white contrast (if desired) for classic sneaker stripe.
Laces
- Weave narrow cord or ribbon through eyelets and tie in bow. You can also run a 3–strand i-cord for cute tubed laces.
Finishing
- Weave in ends and trim. For extra grip add a small non-slip patch under sole (fabric glue) for toddlers who walk.
6. Crochet Little Pixies Baby Booties Pattern
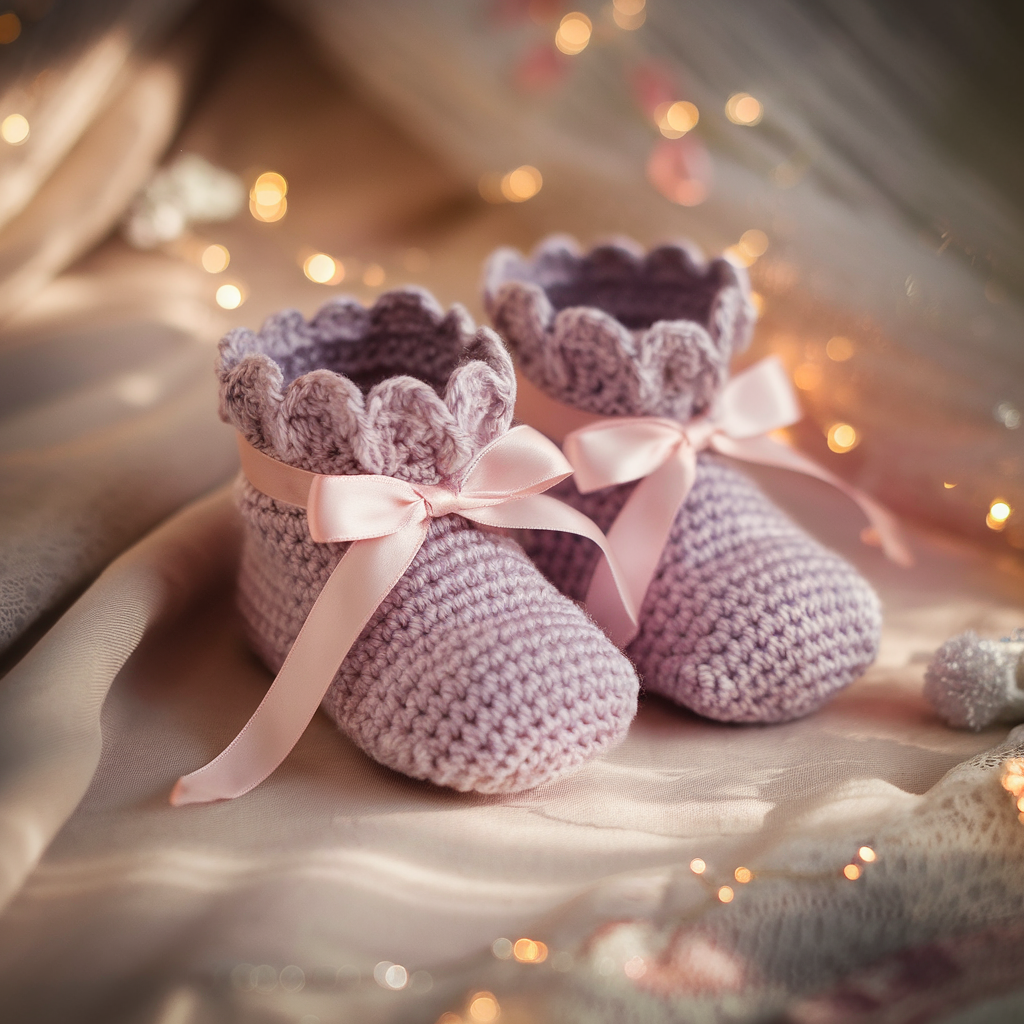
A whimsical, ankle-high pixie style with ribbon ties and a scalloped cuff — darling on tiny feet.
Skill: Intermediate (shaping & scalloped edge)
Sizes: Newborn / 3–6m / 6–12m
Materials
- DK or light worsted yarn ~90 (110 / 130) yds.
- Hook: 3.5 mm.
- 1/4″ ribbon for tie, small optional pom-pom.
Step-by-step
Sole
- Start as usual: MR 6 sc; inc to 12; sc1 inc → 18; sc2 inc → 24; sc3 inc → 30 — stop by length.
Upper & ankle shaping
- Round 1: sc around.
- Round 2: sc in next 10 (12 / 14) sts — these are vamp top rows worked back and forth for 5–7 rows to build a tall vamp that becomes the pixie ankle. (Exact sts depends on your base count — make sure vamp centers over shell of toe area.)
- After creating vamp height, rejoin to heel and work sc rounds around heel to form ankle height of ~2–3″ (size dependent).
- For pointed pixie tip: on one side of the top front work decreases in a small wedge to shape a lyrical point (optional).
Scalloped cuff
- On top of final round work: skip 1 st, 5 dc in next st, skip 1 st, sl st next around (scallop shells). Adjust spacing until cuff lays nicely. For a tighter scallop, use 3 dc shells.
Ribbon tie & finishing
- Make small eyelets near ankle (ch 2, skip 2 sts) spaced evenly. Thread ribbon through eyelets and tie into bow at front. Add small pom-pom at toe tip for pixie charm (sew on securely) or a tied tassel.
Finishing
- Weave ends and cut ribbon ends at angle or use fray-stop.
Conclusion
You now have six detailed baby-bootie patterns — from the Mary-Jane Yellow Bow to cherry-topped cuties, lace-up sneakers, and the whimsical little pixies. A few final tips to make them wearable and gift-ready:
- Measure before finishing. If possible, compare your sole to the baby’s foot or a ruler to check length before finishing and adding trims. Adjust by adding or removing increase rounds on the sole.
- Comfort & safety. Use soft yarn, avoid sharp trims, and replace small buttons with embroidered/stitched alternatives for younger babies. Consider lining the soles with a small fabric circle to make cleaning easier.
- Care instructions. Choose machine-washable yarns for ease (e.g., washable acrylic or cotton blends). If delicate trims (ribbon/pom-poms) are used, hand wash or use a lingerie bag.
- Gift presentation: Attach a little care tag and size note — handmade booties make a lovely, personal gift.