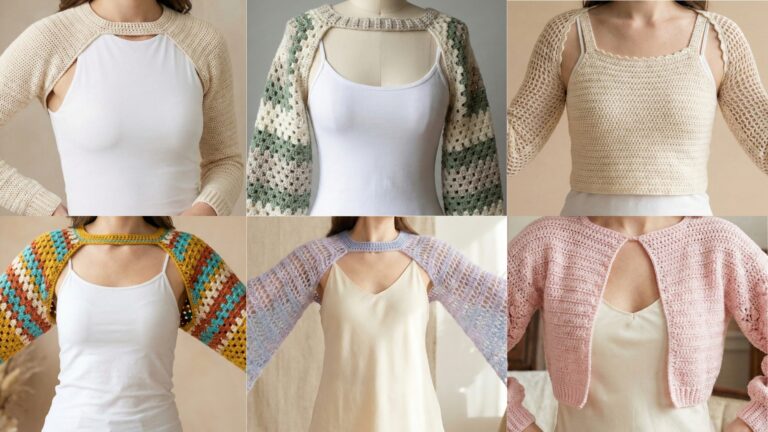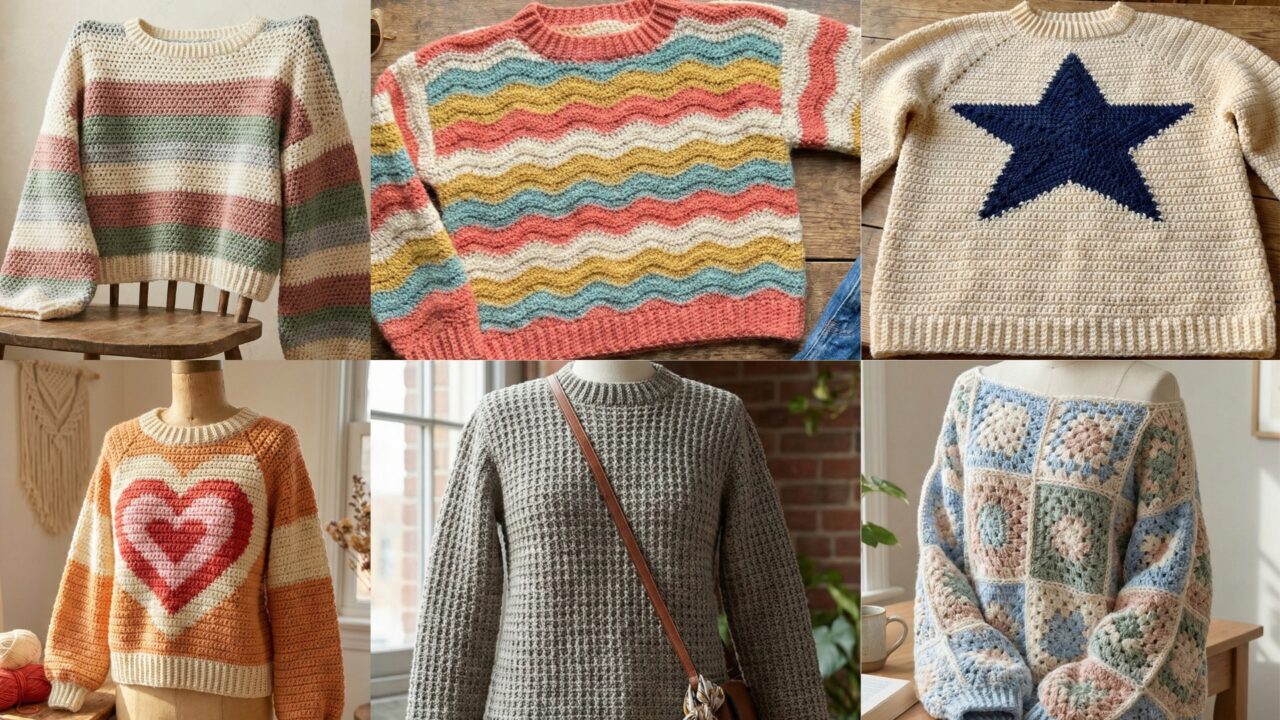
Crochet sweaters are one of the most satisfying garments to make: they’re wearable, quick to finish (with the right yarn), and they give you so much room to express style — from feminine heart details to bold retro stripes and breezy off-shoulder charm. Whether you prefer a seamless top-down yoke or a modular square-by-square construction, each sweater below is written with real-world construction notes and step-by-step guidance so you can make a garment that fits, flatters, and lasts.
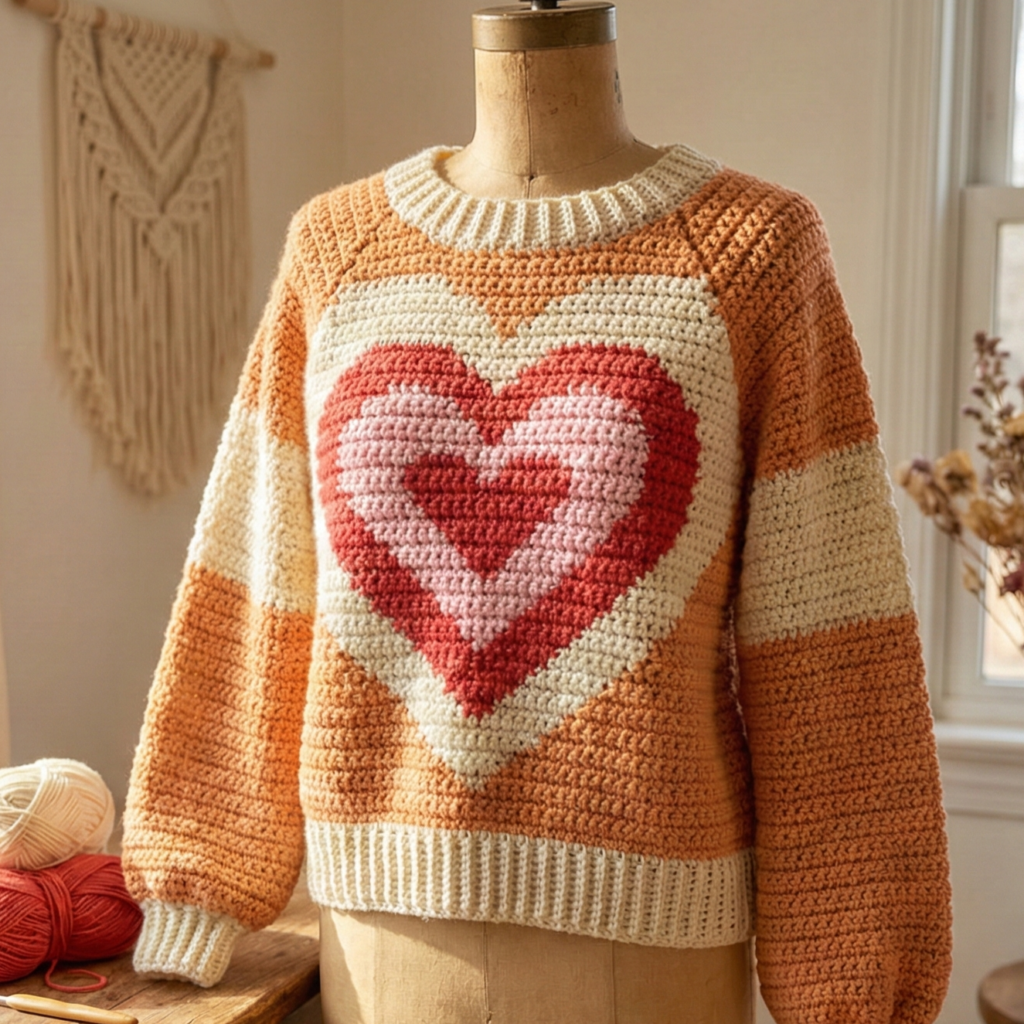
1. Crochet Chantel Heart Sweater Pattern
Skill Level
Intermediate — comfortable with shaping, working a small chart, and simple garment math.
Materials Needed (estimates)
- Yarn: Worsted weight (#4) — 100% acrylic/wool blend recommended for drape and warmth.
- Size S: ~1000–1200 yards (900–1100 m)
- Size M: ~1150–1400 yards (1050–1280 m)
- Size L: ~1350–1600 yards (1230–1460 m)
- Size XL: ~1550–1850 yards (1420–1690 m)
- Hook: 5.0 mm (H/8) for body; optional 4.5 mm for cuff/ribbing.
- Tapestry needle, stitch markers, measuring tape, waste yarn for lifeline (optional).
- Small printed heart chart (or create with graph paper).
Gauge & Finished Measurements (example)
- Gauge: 16 sc = 10 cm (4″) across in single crochet (unblocked).
- Example finished bust ease (approx): S 36″ (91 cm), M 40″ (102 cm), L 44″ (112 cm), XL 48″ (122 cm).
- Adjust hook size to match gauge.
Stitch Pattern Overview
- Structure: Top-down raglan yoke with a centered heart motif across the chest (charted colorwork). Body worked in half double crochet (HDC) for a soft drape. Ribbing worked in back loop only single crochet (BLO SC) for stability.
Step-by-Step Construction
1. Swatch & Planning
- Make a 10 × 10 cm swatch in HDC (or the stitch you plan to use) and measure gauge after blocking (if using natural fiber). Decide which finished bust measurement you want (target finished bust = your bust + desired ease). Use the gauge to calculate required number of stitches around bust.
2. Yoke Start (Top-down raglan)
- Chain a small neck opening: for a relaxed crewneck, chain enough to reach comfortable neck circumference divided by stitch gauge (e.g., for 36 cm neck circumference and 16 sts/10cm: 16 × 3.6 = 58 sts; chain 58 + 1).
- Work a round of HDC in the round (join or work in spiral — I recommend working in the round to avoid join bumps). Place 4 raglan markers to mark front, back, and two sleeve divisions. Alternatively, use a magic loop start if you know it.
- Increase rounds: On each raglan increase round, increase at the 4 raglan markers by working (HDC, ch1, HDC) or (HDC inc) depending on desired seam look. A typical raglan increase method in crochet is: at marker, (HDC, ch1, HDC) into the same stitch to create a visible raglan line. Continue increasing every 2 rounds until yoke depth reaches underarm measurement (usually 17–22 cm depending on style and size — check against body).
3. Working the Heart Motif
- After establishing the yoke increases and once you have reached the row where chest motifs should start (typically after 4–6 increase rounds), begin the heart chart: read the chart left-to-right on forward rounds if working in rows, or plan your color changes if in the round (you may want to work the front back and forth while keeping sides in the round then seam, or work the yoke in the round and do intarsia-style patches — top-down intarsia is easiest when you plan motif placement before setting sleeve separation).
- Option A (simpler): Work the entire yoke in main color, then embroider the heart onto the chest after finishing the sweater (easier for beginners).
- Option B (colorwork): Use a small motif chart and change colors during yoke rounds. Use the stranded method, catching floats at the back and keeping floats no more than 4–5 stitches wide. Carry contrast color for small hearts or implement duplicate stitch after assembly for cleaner back.
4. Separate Body & Sleeves
- Once yoke depth is achieved and you have the required stitch count, place sleeve stitches on hold (transfer stitches to waste yarn or stitch holders) for sleeve openings. For example, work up to raglan marker, slip the sleeve sts to holder, chain 2 (or chain 1 then join), skip sleeve stitches, continue across to next sleeve, repeat for the second sleeve. Join and continue working body in the round.
5. Body Construction
- Work the body in HDC rounds until desired length (e.g., hip length 55–65 cm from shoulder depending on style). For a slightly tapered waist, decrease 2–4 stitches evenly every 6–8 rounds.
6. Sleeve Construction
- Transfer held sleeve stitches back to hook and pick up 2–4 stitches underarm for a solid join (pick up along underarm edge evenly). Work sleeves in the round in HDC, decreasing 2–4 stitches every 4–6 rounds to shape the sleeve toward cuff if desired. For a fitted cuff, switch to BLO SC for last 6–8 rounds or work 2–3 rounds of SC in smaller hook.
7. Hem & Neck Ribbing
- Neck: If you made a simple chain neck start, you may want to work 4–6 rounds of BLO SC around the neckline for a neat finish. If you left a looser neck, add a folded rib worked flat and sewn on.
- Hem: Work 3–4 rounds of BLO SC or SC for a defined hem. Optionally block the finished hem.
8. Finishing
- Weave in all ends securely. If you did colorwork, weave floats and carry ends on the inside. Lightly block to shape the yoke and heart motif. If embroidered, use duplicate stitch to tidy the heart.
Variations
- Make the heart motif larger/smaller by scaling the chart or using duplicate stitch.
- Try a cropped length (stop body 10–20 cm higher) or tunic length (add 10–20 cm).
- Swap HDC for DC for a more open drape or for warmer fabric use SC.
Care Instructions
- Hand wash or machine wash gentle cycle in a mesh bag. Lay flat to dry to avoid stretching. Use detergent appropriate for fiber.
Final Tips
- If colorwork feels tricky, finish the yoke in main color then add the heart with embroidery.
- Keep a lifeline (contrasting scrap) on the yoke after every 6–8 rounds while shaping—this saves ripping if you miscount increases.
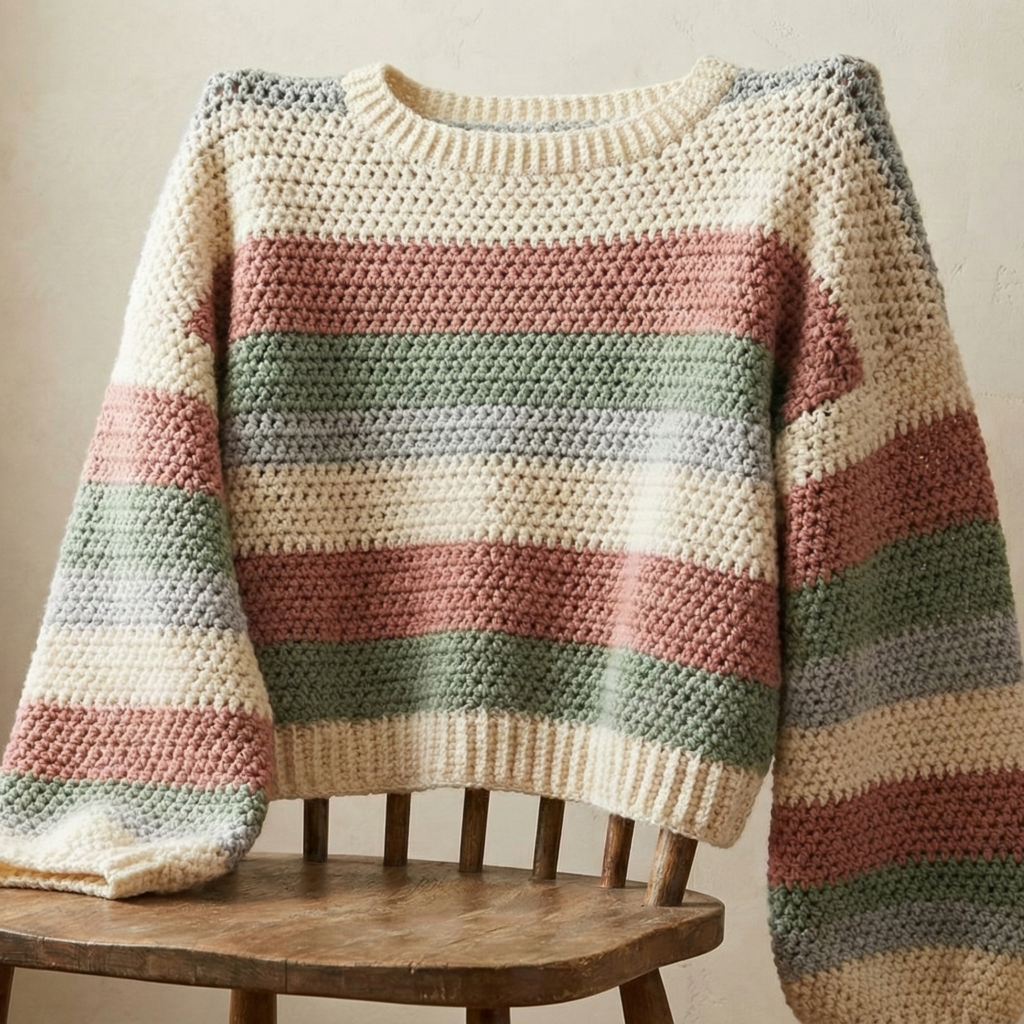
2. Crochet Oversized Cheshire Dreams Striped Sweater Pattern
Skill Level
Advanced Beginner — minimal shaping, easy stripes, boxy fit.
Materials Needed (estimates)
- Bulky or aran weight yarn (for cozy oversized drape).
- S: ~900–1100 yds (820–1000 m)
- M: ~1100–1400 yds (1000–1280 m)
- L: ~1400–1700 yds (1280–1560 m)
- XL: ~1600–2000 yds (1460–1830 m)
- Hook: 6.5 mm (K) or size to meet gauge.
- Stitch markers, tapestry needle.
Gauge & Fit
- Gauge: 12 hdc = 10 cm (4″) approx with bulky yarn (adjust to yarn).
- Fit: Boxy, drop shoulder. Choose finished chest measurement 10–20 cm (4–8″) larger than your body measurement for an oversized look.
Stitch Pattern Overview
- Worked bottom-up in two panels (back and front) with simple HDC rows; set-in or drop shoulder: for drop shoulder, sleeves are worked separately and sewn into wide armholes. Stripes are frequent — change color every 4–6 rows for a classic striped pattern.
Step-by-Step Construction
1. Swatch & Stripe Planning
- Swatch HDC and measure rows per 10 cm. Plan stripe sequence (e.g., 4 rows color A, 4 rows color B, repeat). Calculate number of stitches for desired panel width.
2. Back Panel
- Foundation chain = number of stitches for half the chest (finished measurement ÷ gauge). Example: if finished chest is 120 cm and gauge is 12 hdc/10 cm → stitches = 12*12 = 144 sts wide. For back panel do half minus seam allowance; simpler: split evenly: back = 72 sts.
- Work HDC rows across in stripes: join new color at the end of a row, carry or break yarn. Continue until desired back length (e.g., 60 cm from hem to shoulder).
3. Front Panel
- Repeat back panel stitch count or add neckline shaping to create scoop or boat neck: for neckline, when you reach shoulder shaping point, divide front into three parts (left shoulder, neck, right shoulder) and work middle portion fewer rows to lower the neckline by skipping center stitches or working short rows to create curved neckline. For simple: work entire front as back then create a shallow neckline by working fewer rows in the center section and finishing shoulders separately.
4. Shoulder Seams
- Block both panels. Seam shoulders using mattress stitch or slip stitch join across desired shoulder width (for oversized look, leave minimal seam and consider drop shoulder where shoulders extend).
5. Sleeves
- For drop shoulder sleeves: measure armhole height on assembled body; make a rectangular sleeve: chain number of stitches equal armhole width + ease, work in HDC rows to desired sleeve length, then seam down. Optionally taper sleeve by decreasing 2 sts every 6–8 rows. For fitted cuff switch to SC or ribbed BLO SC.
6. Finishing
- Attach sleeves to body by sewing into the armhole. Weave ends, block lightly to even stripes.
Variations
- Color blocking with wide stripes for retro style.
- Add textured stitch band (waffle or bobble) on upper chest for interest.
Care Instructions
- Bulky yarns often are machine wash gentle but check label. Lay flat to dry.
Final Tips
- Because this sweater is oversized, precise gauge is less critical — focus on drape and personal fit.
- If you prefer more structure at shoulders, do small shoulder seams rather than leaving broad drop shoulders.
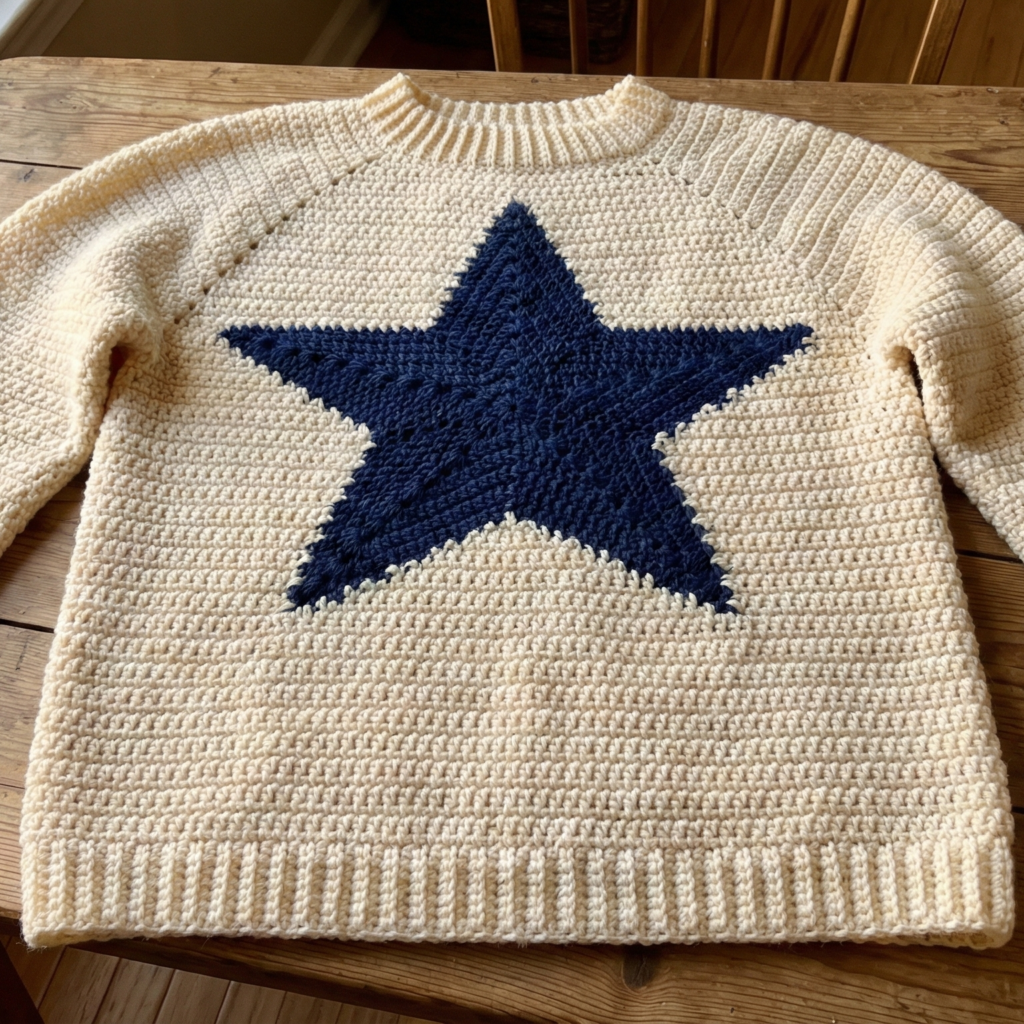
3. Crochet Cozy Star Sweater Pattern
Skill Level
Intermediate (involves circular yoke and stranded colorwork)
Materials Needed (estimates)
- DK/worsted weight yarn in 2–3 colors (main + contrasting star color(s)).
- S: ~1000–1200 yds (900–1100 m)
- M: ~1200–1450 yds (1100–1325 m)
- L: ~1400–1650 yds (1280–1500 m)
- Hook: 4.5–5.0 mm for yoke and body.
- Stitch markers, tapestry needle.
Gauge & Fit
- Gauge: 16 dc = 10 cm (4″) (example using double crochet/gauge will vary by stitch).
- Fit: standard fitted yoke with slight positive ease.
Stitch Pattern Overview
- Circular stranded colorwork yoke (star motifs) worked top-down; body in double crochet (DC) or half-double for warmth. Sleeves set-in or raglan depending on yoke construction (we’ll use circular yoke with minimal seaming).
Step-by-Step Construction
1. Swatch & Chart Setup
- Work a 10 cm swatch in DC and in sample stranded chart to check float tension. Create or print a star chart sized to the yoke width and repeats.
2. Start Yoke (top-down in the round)
- Make a neck ring: ch enough to match neck circumference divided by gauge (example earlier). Work a few rounds of DC in the round to establish the neck and add a marker for beginning of the round.
- Begin raglan increases or yoke shaping: For circular yoke, you can increase evenly across the round to shape the yoke, placing markers for sleeve openings (4 markers as raglan points). Use the stranded chart across the chest front rows—transfer your chart to align with front/back and sleeve positions.
3. Colorwork Technique
- Use stranded knitting-style colorwork: carry contrast color behind, catch floats every few stitches if long to avoid catching on fingers. Keep floats loose.
- If floats get long, do a stranded catch (twist yarns every N stitches) or break and rejoin to avoid long floats.
4. Yoke Depth & Sleeve Separation
- Continue yoke increases until you reach the desired underarm depth (measure from the base of the neck to underarm on yourself). At that point, place the sleeve stitches on holders and join body in the round.
5. Body
- Work body in DC or HDC in the round until desired length. For an oversized cozy look, stop at hip or slightly above and add a hem in BLO SC to stabilize.
6. Sleeves
- Transfer sleeve stitches to hook and work in the round. Many stranded yoke sweaters look best with slightly tapered sleeves: decrease 2 sts every 6–10 rounds until desired cuff width, then switch to SC for 6–8 rounds or work ribbing in back loop only.
7. Neck Finish
- For a neat neck finish, pick up stitches around neckline and work 4–6 rounds of BLO SC or ribbing pattern (Fp/ Bp for crochet if desired) to create a soft collar.
8. Finishing
- Weave in ends, paying attention to stranded colorwork ends — weave them on the inside horizontally. Block flat to even the yoke.
Variations
- Use metallic or slubby contrast yarn for star points to add shimmer.
- Make the yoke taller for a mock turtleneck.
Care Instructions
- Hand wash recommended for stranded colorwork to maintain float integrity. Lay flat to dry.
Final Tips
- If stranded floats make the yoke stiff, use thinner yarn for contrast or duplicate stitch after finishing for a softer back.
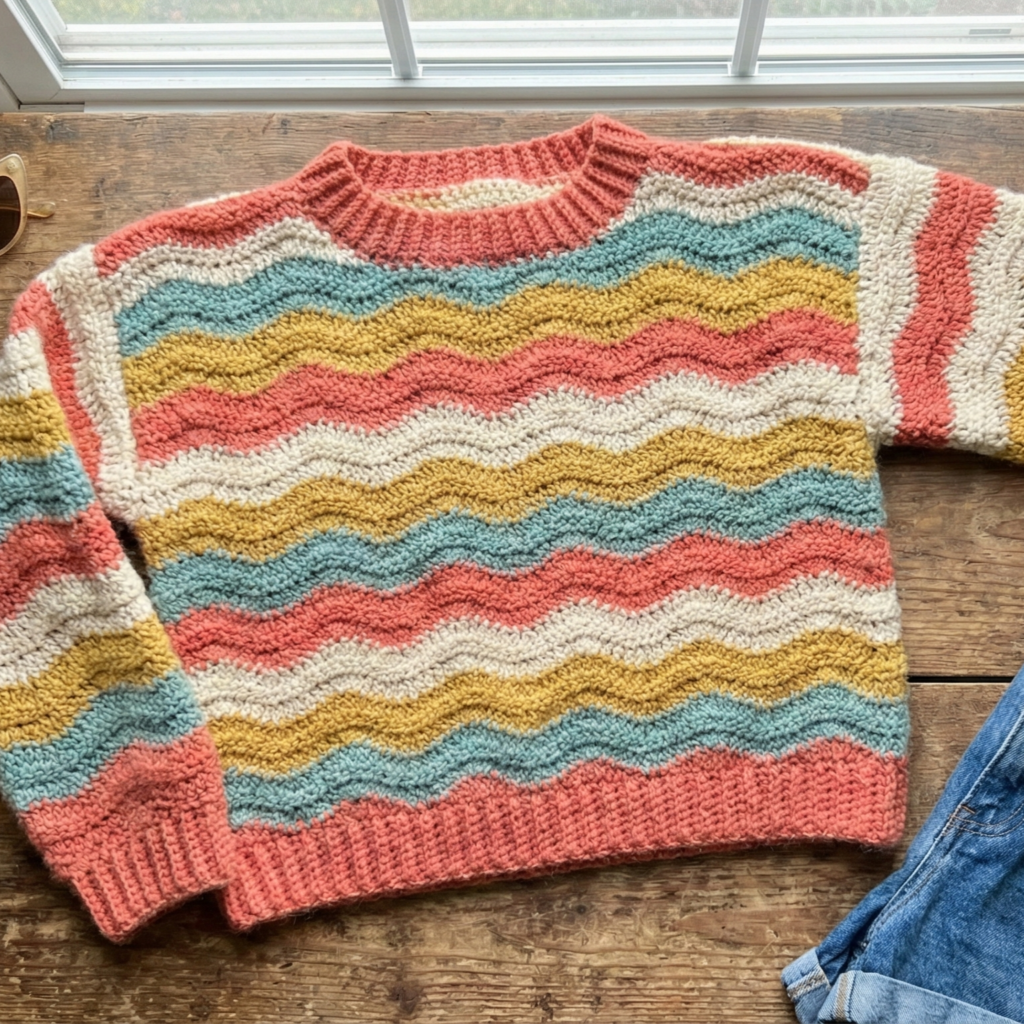
4. Crochet Retro Inspired Malibu Sweater Pattern
Skill Level
Advanced Beginner → Intermediate (clean shaping and striping, optional puff sleeves)
Materials Needed (estimates)
- Sport to DK weight yarn for lighter retro vibe, or worsted for warmer sweater.
- S: ~900–1100 yds (820–1000 m)
- M: ~1100–1400 yds (1000–1280 m)
- L: ~1400–1700 yds (1280–1560 m)
- XL: ~1600–1900 yds (1460–1740 m)
- Hook: 4.0–5.5 mm depending on yarn.
- Stitch markers, tapestry needle.
Gauge & Fit
- Gauge variable by yarn; aim for a fabric that is not too stiff so retro drop and sleeve shaping sit well. Finished length often cropped to high waist or slightly below.
Stitch Pattern Overview
- Boxy cropped body with retro horizontal stripes and optional puff sleeves (achieved by increasing sleeve volume early then decreasing to fitted cuff).
Step-by-Step Construction
1. Swatch & Stripe Planning
- Swatch in chosen stitch (DC or HDC). Plan stripe sequence with chosen colors; retro style often uses 3–4 repeat colors in differing widths (e.g., 2 rows pale, 6 rows bold, 2 rows pale).
2. Bottom-Up Body
- Work back and front as separate pieces or as one piece in the round and split for armholes. For cleaner shaping, work pieces flat.
- Back: chain foundation for back width. Work rows in DC until reaching armhole height (measure from hem up — for cropped 35–40 cm, for regular 50–60 cm depending on size).
- For cropped: stop earlier; for classic: continue longer.
- Front: follow back, adding neckline shaping: when front reaches desired depth before shoulders, work center neck decrease — bind off or skip central stitches and work each shoulder separately for several rows.
3. Sleeves (Puff option)
- Puff sleeves: cast on for sleeve width at cuff (or start with a small cuff and increase quickly):
- Start with cuff: 6–8 rounds of BLO SC to create cuff.
- Then increase 6–12 sts evenly over first 4–6 rounds to create extra volume. Work wide rounds for 6–10 cm, then decrease gradually back to sleeve width for underarm or for set-in seam, seam sleeve to body.
4. Assembly
- Block pieces flat and seam shoulders using mattress stitch. Attach sleeves into armholes and sew side seams. For less seaming, you can work yoke top-down (but stripe alignment will need planning).
5. Neck & Hem
- Add simple SC or ribbing to neck and hem. For cropped look, work 4–6 rows of BLO SC at hem to give sturdy edge.
6. Finishing
- Weave ends, steam block lightly. If stripes show tension changes, block longer and press.
Variations
- Make it long or cropped. Change stripe widths for a subtler retro look. Add small button placket at neckline for a cardigan-style retro piece.
Care Instructions
- Follow yarn label; block to even stripes.
Final Tips
- When working stripes, carry yarn up the side or break yarn at color changes if you don’t want floats showing.
- Puff sleeves look best with lighter yarn to avoid too much bulk.
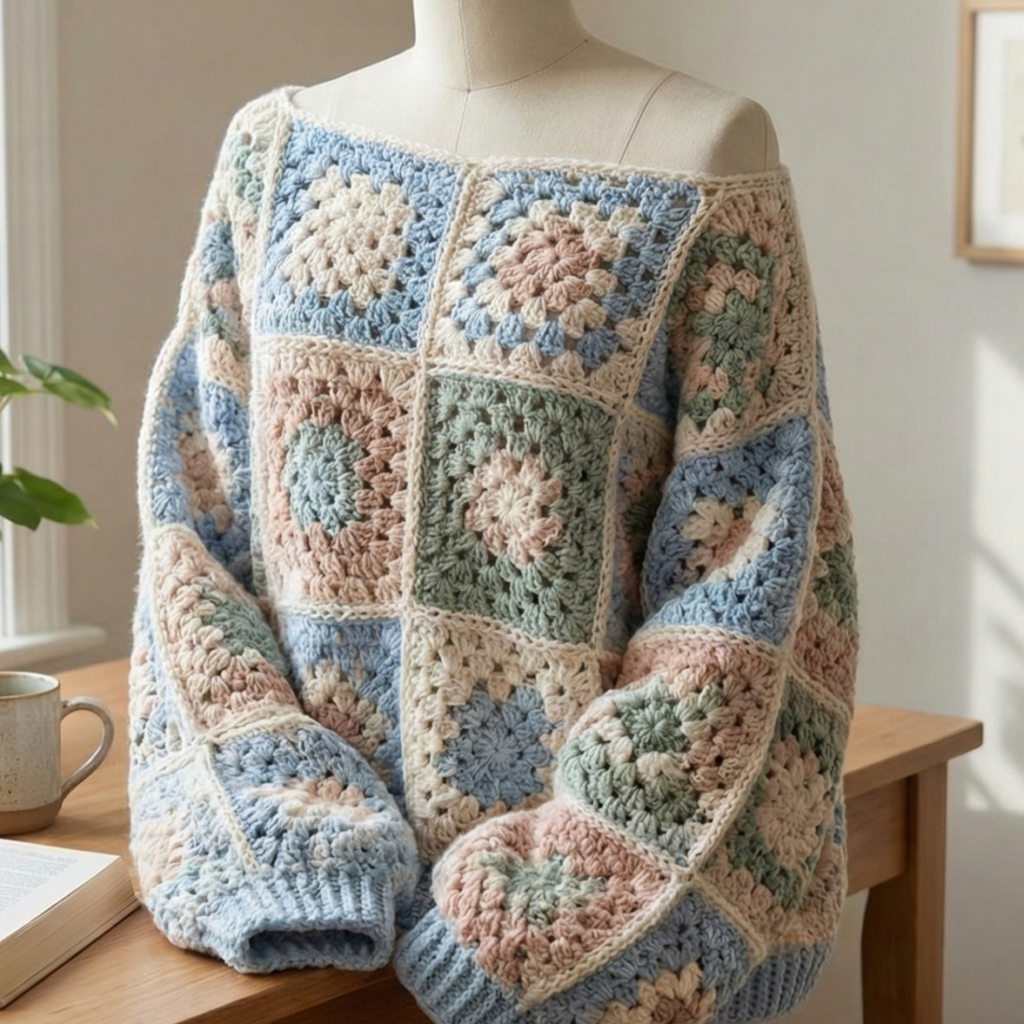
5. Crochet Granny Square Off Shoulder Sweater Pattern
Skill Level
Beginner → Intermediate (modular construction, minimal shaping)
Materials Needed (estimates)
- DK or worsted yarn depending on desired weight.
- S: ~900–1100 yds (820–1000 m)
- M: ~1100–1400 yds (1000–1280 m)
- L: ~1400–1700 yds (1280–1560 m)
- XL: ~1600–2000 yds (1460–1830 m)
- Hook: 4.0–5.5 mm.
- Tapestry needle, stitch markers.
Gauge & Fit
- A granny square construction can be very forgiving — finished size depends on number of squares across and down. Off-shoulder design means neckline is wider—allow comfortable stretch.
Stitch Pattern Overview
- Construction: Make a grid of granny squares (classic 4-round granny or layered square), join together in a tube for torso and make sleeve strips or attach full square sleeves.
Step-by-Step Construction
1. Square Swatch & Planning
- Make a sample granny square and measure its finished size after blocking. Decide how many squares across (width) and down (length) you want. Example: if square is 10 cm and you want 100 cm bust finished → 10 squares across.
2. Making Squares
- Make all identical granny squares (or color-shifted ones for a patchwork look). Keep consistent tension. For neat joins, ensure round count is the same across squares.
3. Joining for Body
- Layout squares in rows of desired width. Join squares in each row using whipstitch, slip stitch join, or join-as-you-go (JAYG) for cleaner joins. For off-shoulder, construct a wide tube: seam the short ends together to make a circular tube that you will slide on over shoulders.
- To create armholes, plan rows where you stop and leave gaps (or add extra square rows to form sleeves).
4. Sleeve Construction
- Option A: Short off-shoulder sleeve — leave last 1–2 rows or attach 2–3 squares for short sleeves.
- Option B: Make separate sleeve tubes from squares or rows of granny motifs and sew them in.
5. Neckline & Off-Shoulder Fit
- For off-shoulder stability, add an elasticized casing or worked chain with elastic inside along the top row of squares to keep the neckline from slipping too much. Alternatively, stitch a shallow folded band worked in BLO SC with a bit of negative ease so it snugly grips shoulders.
6. Hem & Finishing
- Add a border around bottom and sleeve openings using SC or a decorative shell to unify the look. Weave in ends and block square grid to even edges.
Variations
- Make maxi dress length by adding rows of squares.
- Use solid color squares with a contrasting border for a modern look.
Care Instructions
- Depending on fiber; for mixed fibers avoid hot water as seams may shrink differently.
Final Tips
- Keep a consistent method for joining (same tension) — it dramatically affects the final look.
- If you want less bulk across the shoulders, use smaller squares or fewer rounds per square.
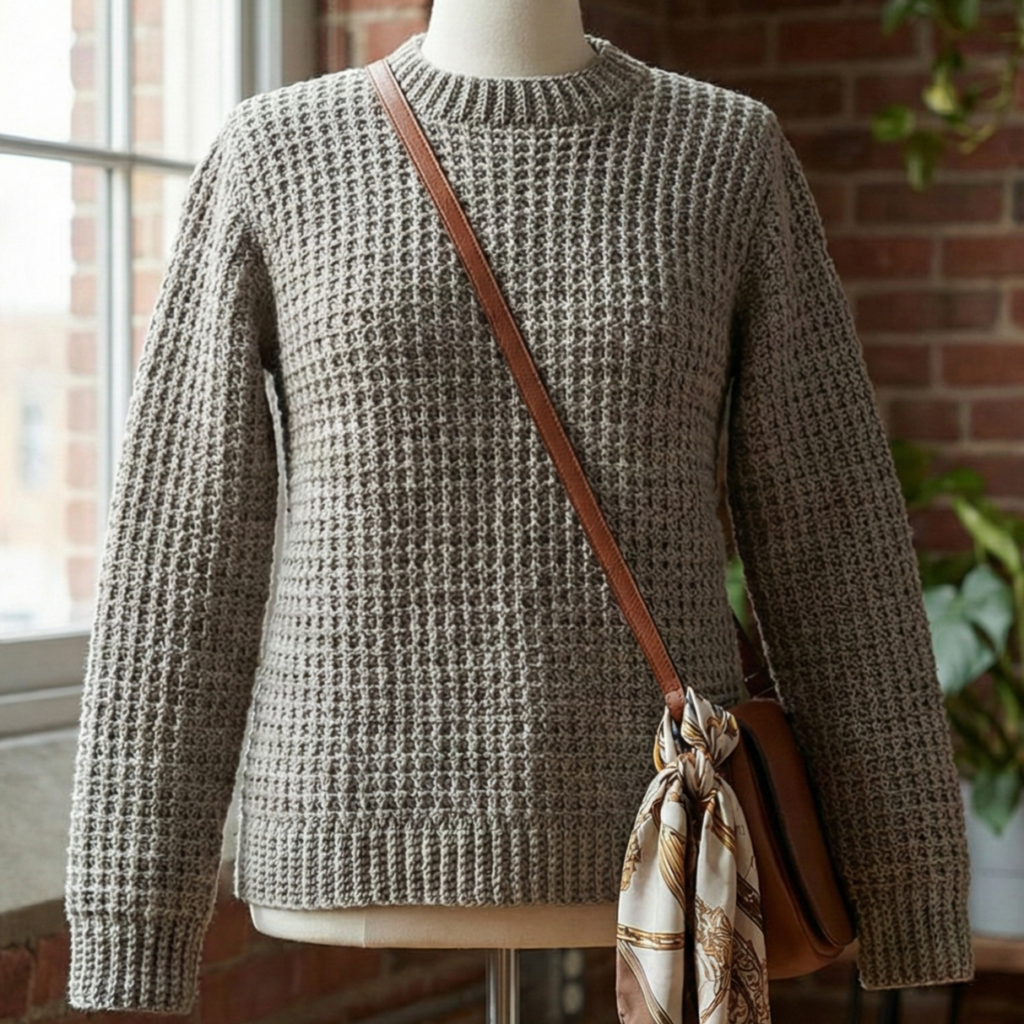
6. Crochet City Stroll Sweater Pattern
Skill Level
Intermediate (textured stitches and set-in sleeve shaping)
Materials Needed (estimates)
- Sport to worsted weight yarn depending on texture (basket/waffle texture looks great in worsted).
- S: ~1000–1200 yds (900–1100 m)
- M: ~1200–1450 yds (1100–1325 m)
- L: ~1450–1700 yds (1325–1550 m)
- XL: ~1700–2000 yds (1550–1830 m)
- Hook: 4.0–5.5 mm.
- Stitch markers, tapestry needle.
Gauge & Fit
- Gauge depends on textured stitch — do a swatch. Typical example: 16 sts × 20 rows = 10 cm in chosen texture. Fit can be relaxed or fitted.
Stitch Pattern Overview
- Pullover with textured body (e.g., broken waffle or basketweave stitch) and set-in sleeves for a polished silhouette. Worked bottom-up in pieces, seamed at shoulders and sides.
Step-by-Step Construction
1. Swatch Texture
- Work a 10 cm swatch in the textured stitch and block it. Measure stitches and rows and practice V-stitch transitions if present.
2. Back Panel
- Chain foundation for back width. Work textured stitch in rows until reaching armhole depth (measure against body). For set-in sleeve, keep precise armhole depth (often 20–22 cm for adult sizes; adjust for size).
3. Front Panel
- Work same as back until neckline shaping point. To shape neckline: work center decrease rows — bind off center sts and work each shoulder separately until shoulder height matches back. Or use short-row shaping for rounded neck.
4. Shoulder Seams
- Seam shoulders using mattress stitch for flat joins. Ensure texture lines align.
5. Sleeves
- For set-in sleeves: pick up stitches around armhole or make flat sleeve pieces: chain for cuff circumference and work textured stitch increasing gradually to cap width. Shape sleeve cap by decreasing at both ends of rows symmetrically until cap height fits armhole curve. Sew sleeve in matching the armhole.
6. Side Seams & Finishing
- Seam sides and underside of sleeves. Pick up around neck and work 4–6 rounds of BLO SC for a neat collar. Add cuff details as desired (ribbing in BLO SC or slip stitch rounds).
7. Blocking & Final Touches
- Block to final dimensions to relax texture and align pattern. Weave in ends.
Variations
- Make it longer (tunic) or shorter (cropped).
- Add pockets at front waist for a city-ready look.
Care Instructions
- Most yarns will be machine-washable on gentle — check label. Lay flat to dry to preserve shape.
Final Tips
- Because textured stitches can bias, always block panels before seaming to make seams match more easily.
- Keep notes for stitch counts and decreases for sleeve cap shaping for future repeatability.
Conclusion
Crochet sweaters are a wonderful way to build both practical wardrobe pieces and creative statements. The six sweaters above — from the romantic Chantel Heart yoke to the playful Granny Square off-shoulder — offer a range of techniques and fits so you can make garments for every season and mood. The keys to success are swatching, consistent tension, and measuring as you go.