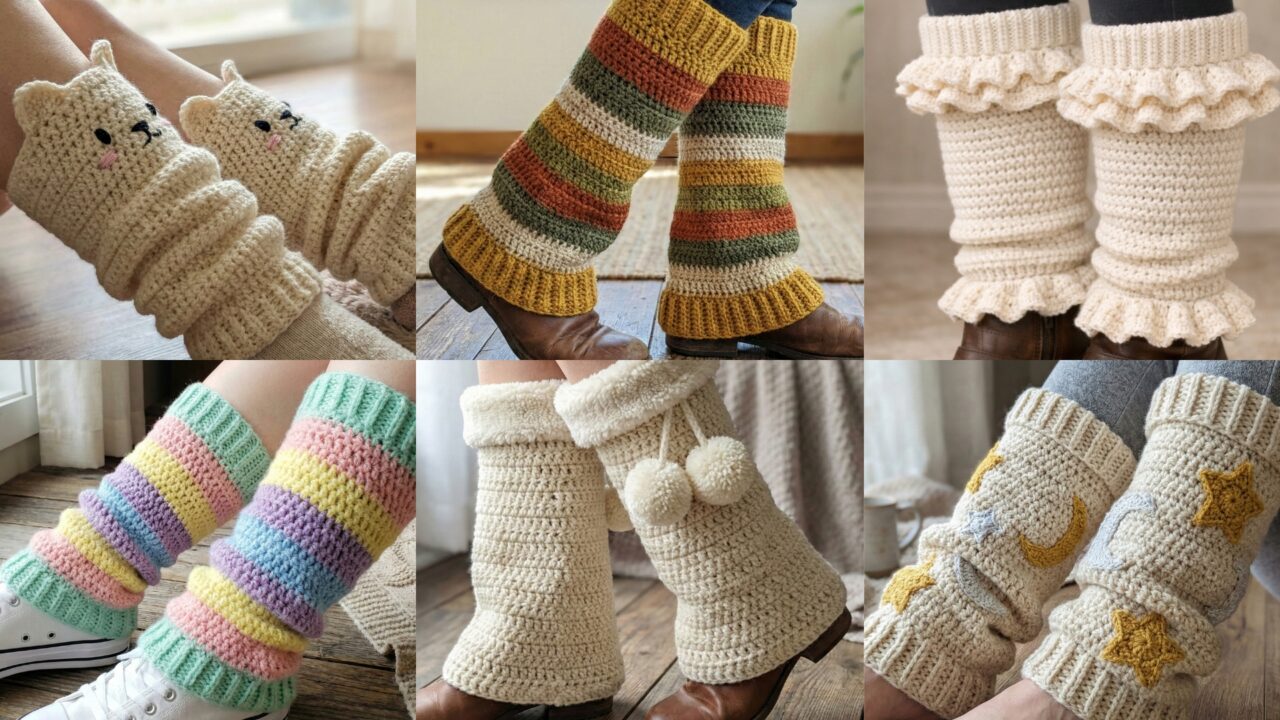
Leg warmers are one of the most satisfying quick accessories to crochet: they’re cozy, wearable, quick to alter for size, and endlessly customizable. Below you’ll find a full blog-ready post with a single clear introduction, tools & sizing essentials you can use for every pattern, and six long, detailed patterns — Cute Ruffled, Star & Moon, Pastel Rainbow, Striped Flared, Fleece-Trim Flared with Pom-Pom, and Meowtastic Kitty. Each pattern includes a materials list, skill level, a worked example (with step-by-step instructions for one size), guidance for resizing, finishing tips, and variation ideas.
Read the intro and sizing notes once, then jump to the pattern you want to make. All patterns are written in US terms.
Quick essentials (tools, yarn, abbreviations, sizing & gauge)
Yarn & hooks (general guidance)
- For warm, structured leg warmers: worsted/aran weight (Category 4) or bulky (Category 5) yarn works nicely. Use worsted for a more fitted look and bulky if you want thick, cushioned warmth.
- Recommended hooks: 4.5–6.5 mm depending on yarn and stitch choice. Many sample instructions use a 5.0 mm (H) or 5.5 mm (I) hook—use whatever hook gives the gauge you want.
- Notions: tapestry needle, stitch markers, measuring tape, optional small elastic or ribbon for drawstring, small pom-pom maker if you plan pom-poms.
Abbreviations (US)
- ch — chain
- sc — single crochet
- hdc — half double crochet
- dc — double crochet
- tr — treble crochet
- sl st — slip stitch
- st(s) — stitch(es)
- beg — beginning
- rep — repeat
- inc — increase (2 sts in one st)
- dec — decrease (sc2tog, hdc2tog, etc.)
- BLO / FLO — back loop only / front loop only
- RS / WS — right side / wrong side
Sizing basics — how to measure & fit
Leg warmers are basically tubes that fit around the lower leg. Measure these two numbers for a good fit:
- Calf circumference: Measure the widest part of the lower leg (calf) while standing relaxed. Typical adult medium calf is about 15 inches (38 cm), but calves vary widely — common ranges: small 13–14 in (33–36 cm), medium 15–16 in (38–41 cm), large 17–19 in (43–48 cm).
- Length: How tall you want the leg warmer to be (from below knee to ankle, or from ankle upward). Typical lengths: short boot cuff 6–8 in (15–20 cm), classic leg warmer 12–16 in (30–41 cm). Decide whether you want the top to sit under the knee (longer) or mid-calf.
Gauge & stitch math (worked example — read carefully and follow for every pattern)
Always swatch in the stitch pattern you plan to use because the stitch type greatly affects stitches-per-inch (spi).
Example swatch and math (digit-by-digit):
- Make a 4-inch wide swatch in the stitch you’ll use (blocked if necessary). Suppose the swatch shows 12 hdc = 4.00 inches. That means your gauge is 12 hdc per 4.00 in.
- Convert to stitches per inch: 12 ÷ 4.00 = 3.0 hdc per inch (spi = 3.0).
- If your target calf circumference is 15.00 inches, multiply spi × circumference: 3.0 × 15.00 = 45.00 stitches. That means you’ll want about 45 hdc stitches around the tube to achieve a 15-inch circumference with this gauge.
- If the stitch pattern requires a multiple (for example a cable repeat needs a multiple of 6 sts), round to the nearest multiple that gives a comfortable fit. If pattern multiple is 6, divide 45 ÷ 6 = 7 remainder 3. Nearest multiples are 6 × 7 = 42 or 6 × 8 = 48. Choose 42 for slightly firmer fit (less ease) or 48 for a slightly roomier fit. For a snug leg warmer pick 42; for comfortable or layered (over pant) pick 48.
When calculating for length, simply decide how many rows = 1 inch in your stitch pattern (rows-per-inch) and multiply by desired length.
1. Crochet Cute Ruffled Leg Warmers Pattern
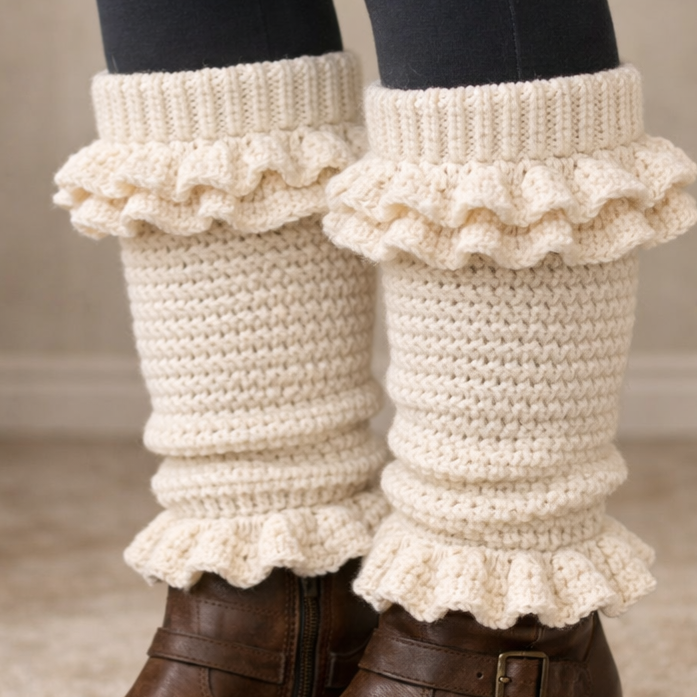
Vibe: soft, feminine ruffles at top (and optionally bottom) over a fitted textured tube. Great with leggings, boots, or as cozy home wear.
Skill level: confident beginner — basic stitches and working in the round; adding ruffles is easy.
Materials (one pair, adult M example)
- Worst ed weight yarn (Category 4) — ~300–400 yd total (varies by length).
- Hook: 5.0 mm (or to obtain gauge).
- Tapestry needle, stitch marker, scissors.
Finished example (Medium)
- Calf circumference target: 15.00 in
- Length: 14.00 in (from just under knee to ankle)
- Gauge example (use your own): 12 hdc = 4.00 in → 3.0 hdc per inch (spi).
Worked example math for the pair (Medium)
- Using spi = 3.0 and circumference = 15.00 in → stitches needed = 3.0 × 15.00 = 45.00.
- Ruffle pattern multiple: body uses hdc in the round so no strict repeat; pick 45 hdc for a snug medium fit. If you want a little looseness pick 48 hdc instead. For this example we’ll use 48 hdc (rounded up) as it’s comfortable and easy to divide into pattern repeats when needed.
Construction overview
- Make a tube of hdc in the round from top down (or bottom up) to target length.
- Add a ruffled edge by working increases/ruffle rows at top (and optionally bottom).
- Optionally add an elastic or drawstring in the top row to keep snug below the knee.
Step-by-step (one leg — repeat for second leg)
Top rib (optional folded cuff for secure hold)
- Ch 49 and join to work in the round carefully avoiding a twist (if using foundation sc you can fsc 48). (We chained 49 because ch 49 includes one turning ch; you’ll have 48 foundation loops to work into — adjust if you use foundation stitches.)
- Rounds 1–6: hdc BLO (half double crochet in the back loop only) in each st around — 48 hdc per round. This creates a ribb ed cuff you can fold down if you like. For a shorter cuff do 3 rounds.
Body
3. Round 7 (switch to regular hdc): hdc in each st around — 48 hdc. Mark start with stitch marker.
4. Rounds 8–X: repeat Round 7 until piece measures 12.00 in from the top edge (or length minus ruffle height). Example: if your rows per inch in hdc is 3.0 rows/in (derived from your swatch), and you want 12.00 in of body, multiply rows per inch × desired inches: say rows per inch = 3.0 → 3.0 × 12.00 = 36.0 rows. So work 36 rounds of hdc (Rounds 8–43). Your exact rows per inch may differ; measure as you go.
Optional ankle cuff
5. If you want a cuff at ankle to keep leg warmers from slipping: work 6 rounds hdc BLO at the ankle end (or 3 folded rounds).
Ruffle (top edge; can be worked at the start instead if you crocheted from bottom up)
6. After completing the body but before finishing, add the ruffle: switch to desired ruffle color or stay monochrome. Rnd A: sc in next st, 2 sc in next st repeat around — this doubles stitches and forms a flared base (if you started with 48 sc, you’ll now have 96 sc).
7. Rnd B: ch 3, 5 dc in next st, sl st in next st repeat around into the 96 sts — this makes scalloped high ruffle loops. Alternatively do two rounds of shell (sc, ch2, 5 dc, ch2, sc) for a fuller ruffle. Fasten off and weave ends.
Finishing
8. If top is a bit loose, thread a 1/4 in elastic (cut to slightly less than calf measurement) into the rib casing (fold the rib inward and stitch seam to form a casing) or stitch a drawstring chain through one round beneath the ruffle. Knot ends and hide inside the casing.
9. Block lightly if needed to shape ruffles. Repeat for second leg.
Variations & styling
- Make ruffles at both top and bottom for a Victorian look.
- Try multiple narrow ruffles stacked for tiered effect.
- Use variegated yarn for soft, blended ruffles.
2. Crochet Star and Moon Leg Warmers Pattern
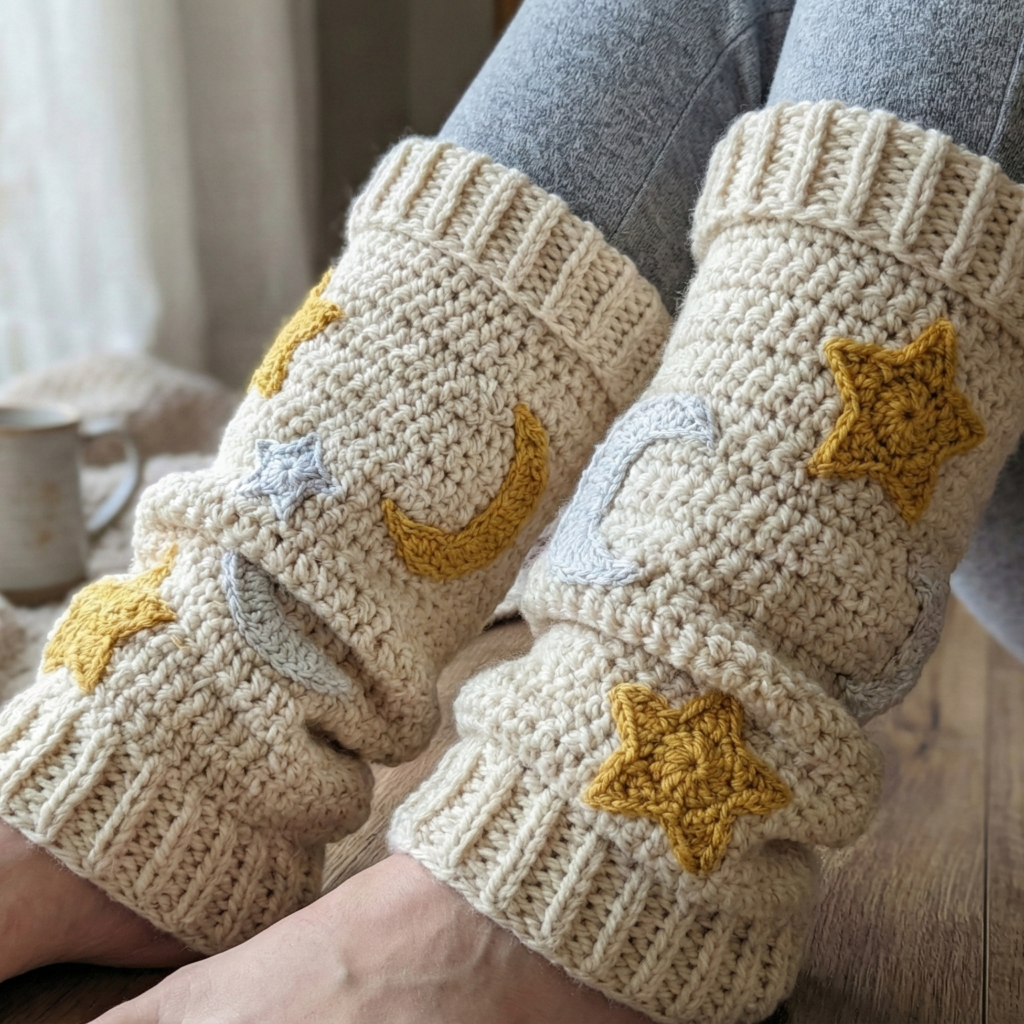
Vibe: celestial colorwork or appliqué — stars and moons placed on a solid textured tube. Great for nightwear, kids, or magical outfits.
Skill level: intermediate — involves simple colorwork (tapestry crochet) or appliqués sewn on.
Materials (one pair)
- Worsted weight yarn MC (solid color) ~300–350 yd and small amounts of CC for stars and moons (or contrast yarn for appliqués).
- Hook: 5.0 mm (or to match gauge).
- Tapestry needle, stitch markers.
Finished example (Medium)
- Calf circumference target: 15.00 in.
- Length: 14.00 in.
- Gauge sample: 12 hdc = 4.00 in → spi = 3.0 hdc/in → 45–48 sts needed (we’ll use 48 hdc again).
Construction choices: two techniques
A. Tapestry (stranded) single-crochet colorwork tube — you work stars/moons into the side during the round.
B. Make appliqués (stars & moons) separately and sew them onto a simple hdc tube — easier and ideal if you don’t want floats or long carried strands.
Below is the appliqué method (most approachable), followed by notes for tapestry colorwork.
Step-by-step (appliqué method)
Tube (body)
- Ch 49, join to make ring (48 ch loop) or fsc 48. Rounds 1–6: hdc BLO for cuff rib. Rounds 7–R: hdc even until tube measures desired length minus room for cuff/edging (12.00 in measured down from top). Keep marker on first st.
Create star appliqués (make 4–6 depending on length)
Small star (approx 1.5 in diameter):
2. MR, ch 1, 8 sc in MR, sl st to join (8 sc). Round 2: ch 3, sl st in same st around — make 8 loops. Round 3: in each loop work: (sl st, sc, hdc, dc, hdc, sc, sl st). Fasten off leaving tail to sew.
Create moon appliqués (make 2–4)
Little crescent moon:
3. Ch 6, sl st to form small ring, Rnd 1: 8 sc around ring (8 sc). Rnd 2: sc in next 3 sts, hdc in next 2, dc in next 2, sl st in last — this makes a crescent shape. Fasten off and shape gently; or make two nested circles with offset stitching and sew slightly overlapping to make a crescent.
Placement & assembly
4. Block reusable appliqués flat and arrange around the tube: alternate star and moon spaced evenly (e.g., repeat pattern every 8 sts). Sew appliqués on securely by stitching through several base stitches and the tube, using long tails to anchor inside.
Edging
5. Add a round of sc at the top and bottom for a neat edge: sc in each st around; for a decorative top do sc, ch 2, skip 1 st to create small picots.
Optional colorwork (tapestry)
- If you prefer to knit the motifs into the tube: chart your stars and moons in a small grid (each square representing one sc/hdc). Work single crochet in the round for colorwork (sc gives tight fabric) and carry unused colors behind stitches, crocheting over floats; avoid floats longer than 3–4 stitches or trap them at the back.
Variations & styling
- Make larger star & moon panels for a bold, graphic look.
- Use metallic yarn for stars to catch light.
3. Crochet Pastel Rainbow Leg Warmers Pattern
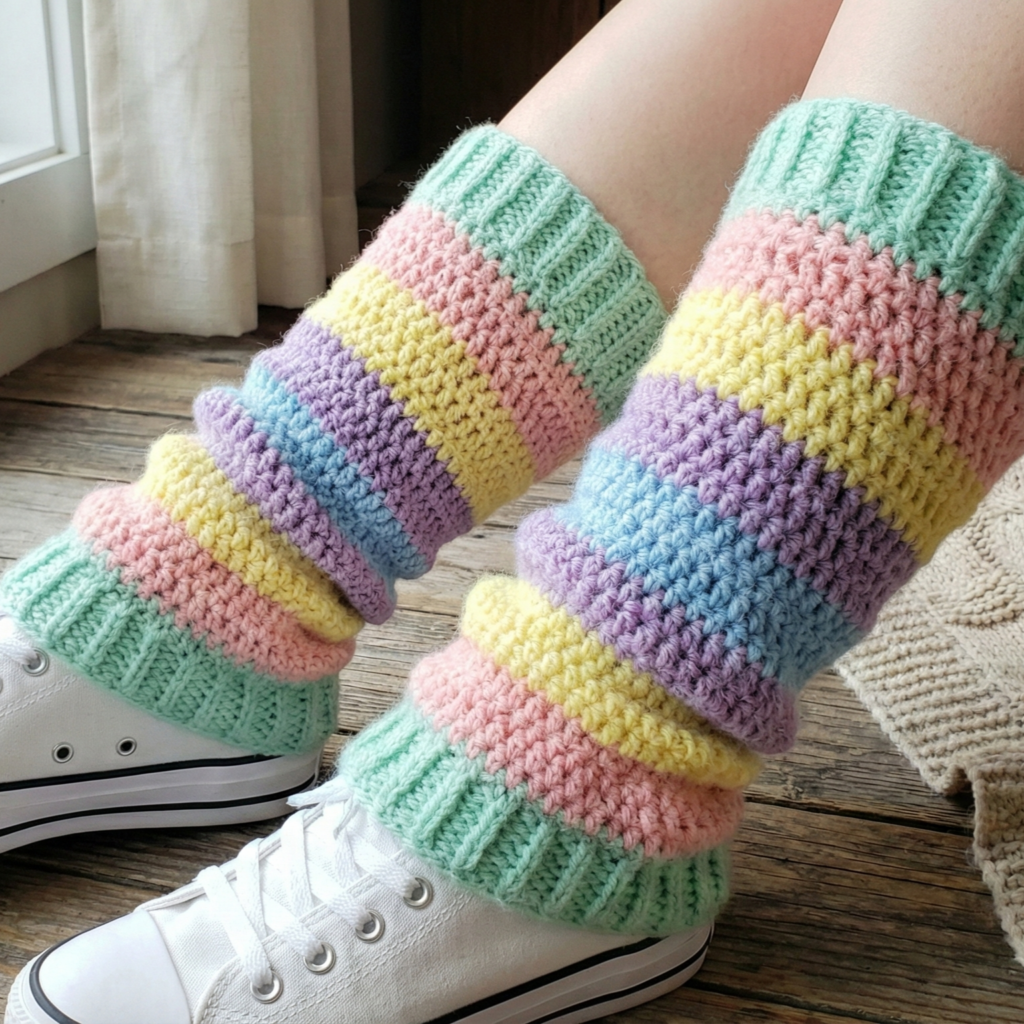
Vibe: cheerful layered pastel stripes in a simple textured stitch. Looks great with boots or sneakers.
Skill level: confident beginner — color changes and striping.
Materials (one pair)
- Sport/DK weight yarn in several pastel shades (5–6 colors) ~350 yd total.
- Hook: 4.5–5.0 mm depending on yarn.
- Tapestry needle.
Finished example
- Calf circumference target: 15.00 in (Medium)
- Length: 14.00 in
Gauge & stitch choice
- Use hdc or moss stitch for a slightly dense but flexible fabric. Example gauge: 13 hdc = 4.00 in → spi = 13 ÷ 4.00 = 3.25 hdc/in. Multiply for circumference 15.00 × 3.25 = 48.75 → round to 48 hdc or 52 hdc depending on desired ease. We’ll use 52 hdc (a bit roomier for stripes).
Step-by-step (one leg)
Foundation
- Ch 53 join to form ring (52 st count). Rounds 1–6: hdc BLO to make a ribb ed cuff. Mark first st.
Stripe sequence
2. Decide stripe height: for five colors over 14.00 in, consider 2.5 in per color: 14.00 ÷ 5 = 2.80 in per color — that’s long stripes. For shorter stripes choose 1.4 in per color. Determine rows per inch from your gauge; suppose rows/inch = 3.0 (for hdc rounds); then rows per color = 3.0 × 2.80 = 8.4 → round to 8 or 9 rows per color. For this example use 8 rounds per color.
Body
3. With Color A, work 8 rounds hdc in each st around. Change to Color B and work 8 rounds hdc. Continue through chosen colors (pastel sequence: mint, blush, lemon, lavender, sky). Carry ends up or weave in after each color change (weave in tails later or carry very short floats on inside for neatness).
Finish
4. Optional ankle cuff: 6 rounds hdc BLO in final color to mirror top. Add one round sc around both edges for tidy finish. Fasten off and weave ends. Repeat for second leg.
Variations & tips
- Try thinner stripe set (4–5 rounds per color) for candy-cane look.
- Add simple bead embellishments by sewing small pearl beads at stripe junctions for a delicate look.
4. Crochet Striped Flared Leg Warmers Pattern
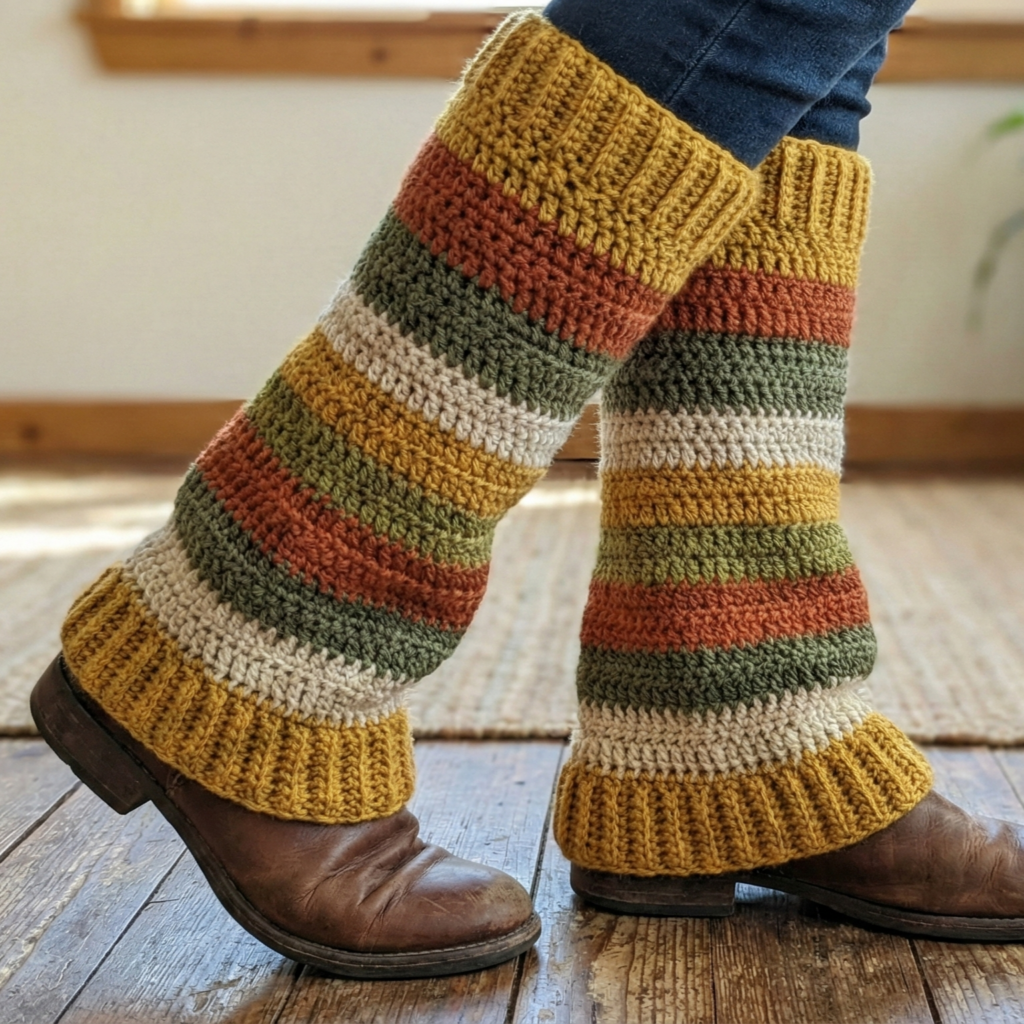
Vibe: fitted at ankle, flared at calf (or fitted at calf and flared at knee) — retro 70s vibe. Stripes and flare create a flattering silhouette over boots or skirts.
Skill level: intermediate — requires shaping increases to flare.
Materials (one pair)
- Worsted or aran weight yarn ~400–500 yd.
- Hook: 5.5 mm (or to match gauge).
- Tapestry needle.
Sample finished example
- Ankle circumference: 9.00 in
- Calf circumference (flare): 16.00 in
- Length: 16.00 in (full flare from ankle to below knee)
Gauge & shaping math (example)
- Suppose gauge in hdc is 12 hdc = 4.00 in → spi = 3.0 hdc/in. For ankle 9.00 in → 3.0 × 9.00 = 27.00 sts (choose 27 hdc). For calf 16.00 in → 3.0 × 16.00 = 48.00 sts (choose 48 hdc). That means between ankle and calf you need to increase from 27 sts to 48 sts — 21 increases across the height you choose for flare.
Step-by-step (one leg — bottom-up method for flare)
Ankle cuff (fit)
- Ch 28 join (for 27 st loop). Rounds 1–6: hdc BLO for cuff. This forms a foldable cuff.
Shaping increase for flare
2. Switch to regular hdc and plan increases across the height: target increases = 21 sts. Decide on how many increase rounds you want — gentle flare looks best when increases distributed gradually. For example, do increases every 3rd round for 12 total increases rounds. Each increase round you might perform 21 increases (one per chosen spacing) or fewer per round. Practical method:
- Option A (even distribution): Over 12 rounds, add 2 increases per increase round for the first 9 rounds and 3 increases in last 3 rounds, etc. But simpler is to increase by hdc, inc spacing.
- Example increase plan (simplest): Work rounds of hdc but every 5th stitch do (hdc, inc) or hdc 4, inc repeat. With 27 base sts, hdc 4, inc repeated around yields approx (27 ÷ 5 = 5.4 repeats) — to get exact 48 you can increase calculatedly: we want +21 increases. If we increase on 21 existing stitches once (i.e., pick 21 equally spaced positions in first increase round and do inc there — e.g., hdc across pattern where inc occurs every 27/21 ≈ 1.28 sts — not practical), instead we will increase by 2 or 3 increases every 4–6 rounds until desired stitch count. The exact distribution is best done by measuring: every few rounds, try the leg on and adjust increases. For a concrete sequence, use a repeating increase round formula quickly:
- Round A (increase): hdc in next 1 st, inc in next st repeat across → this increases count by ~50% if repeated across all sts (not desired).
- More practical method: increase by a small percent each increase round: do increase rounds where you do hdc 3, inc repeat. Each such round increases total stitches by roughly 1/4 of current stitches. Starting at 27: inc round with hdc 3, inc adds about 27 ÷ 4 ≈ 6–7 increases → new total ~33–34. Repeat another increase round later to reach ~40–45, and finally one more to reach ~48. This method requires trying on and measuring.
Simpler worked example (precise)
To keep this pattern reproducible, I will give an exact worked plan that uses arithmetic:
- Start 27 sts. We want 48 sts. Do three evenly spaced increase rounds that increase the stitch count by roughly √(48/27) per increase round. But that’s complicated.
Instead use this concrete step plan:
A. Round 1 (after cuff): hdc in each st — 27.
B. Round 2–6: hdc even (5 rounds).
C. Round 7 (Increase round 1): hdc in next 2 sts, inc in next st repeat around. Calculation: increases per round = total sts ÷ 3 (because pattern repeats every 3 sts) ≈ 27 ÷ 3 = 9 increases → new total = 27 + 9 = 36 sts.
D. Round 8–12: hdc even for 5 rounds.
E. Round 13 (Increase round 2): hdc in next 3 sts, inc in next st repeat around. Increases per round ≈ 36 ÷ 4 = 9 → new total = 36 + 9 = 45 sts.
F. Round 14–16: hdc even for 3 rounds.
G. Round 17 (final increase if needed): hdc in next 2 sts, inc in next st repeat around — increases ≈ 45 ÷ 3 = 15 → new total = 45 + 15 = 60 sts (too big). So instead for milder final increase do hdc in next 5 sts, inc in next st repeat: increases ≈ 45 ÷ 6 = 7.5 → round to 8 → new total = 45 + 8 = 53 sts. That’s slightly wider than target 48 but can be adjusted by making earlier increase rounds smaller.
This example shows why flare shaping benefits from trying on as you go. For a precise pattern with less fitting need, pick a target final stitch count and perform a single evenly spaced increase round: calculate required increases = target − start (48 − 27 = 21 increases). To distribute 21 increases in one round across 27 sts, increase on every k-th stitch where k ≈ 27 ÷ 21 = 1.285 — meaning you need to increase nearly every stitch; that’s not gentle. So break into multiple increase rounds as shown.
Recommendation for readers
- Use the stepwise method above but measure the leg warmers on the leg as you go. Add small increase rounds every 4–6 rounds until the required circumference is reached. This gives the best fit and smooth flare.
Finish
4. Once desired stitch count (approx 48–52) is reached, work even hdc rounds until the piece measures your desired final length (e.g., 16.00 in). Work a neat top cuff using hdc BLO for 6 rounds or sc for a firmer finish. Add one round sc at both top and ankle edges for tidy finish.
Variations & tips
- Make stronger flare by increasing more frequently or by using shell stitches in the flare zone.
- Add decorative vertical cables (post stitches) before flare for visual lengthening.
5. Crochet Fleece Trim Flared Leg Warmers with Pom-Pom
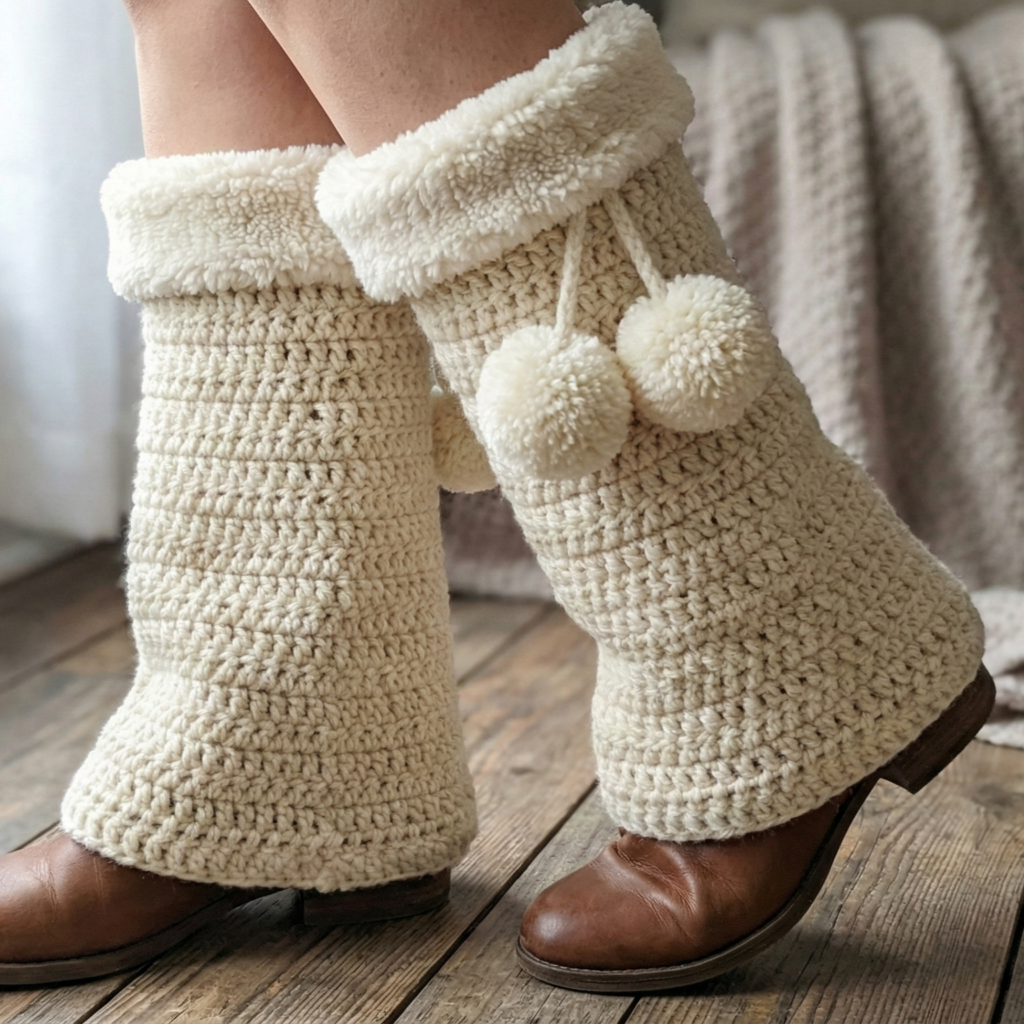
Vibe: luxe fleece-lined trim and playful pom-poms at the top or bottom. These are warm, soft, and perfect for cold climates or gift making.
Skill level: intermediate — requires sewing lining and making pompoms.
Materials (one pair)
- Bulky yarn for outer shell ~400–500 yd.
- Faux-fleece trim (pre-cut 1 in wide strip or a small yard) or polar fleece yardage for lining.
- Hook: 6.5 mm (or to obtain squishy gauge).
- Pom-pom topper yarn (same or accent color).
- Sewing needle and thread, fabric glue (optional), tapestry needle.
Finished example
- Calf circumference target: 16.00 in (bulky yarn expands)
- Length: 16.00 in
Construction overview
- Crochet an outer flared tube in a dense stitch (hdc or dc) with a deliberate flare shaping as in Pattern 4.
- Line the top edge with a fleece strip or sew a fleece cuff inside the top rim.
- Make two large pom-poms and attach them to the top edge.
Step-by-step (one leg)
Outer shell
- Chain foundation to match desired final bulky fit; example gauge bulky: 9 hdc = 4.00 in → spi = 2.25 hdc/in. For circumference 16.00 in → 2.25 × 16.00 = 36.00 sts → use 36 hdc as starting point if you want a roomier leg warmer because bulky has less give. Ch 37 join and work in rounds: Rounds 1–4 hdc BLO for cuff. Rounds 5 onward hdc even and plan increases for flare (if you want flared design). For the fleece version, a simple straight tube with slight ease is equally cozy.
Lining the top cuff
2. Before finishing top edge add fleece: cut a fleece strip approx length = inner circumference + 0.5 in seam allowance (e.g., cut 16.5 in long) and width = desired cuff height + seam room (e.g., 2.5–3.0 in). Fold fleece into a loop and blind stitch it to the inside of your crocheted top cuff. Optionally create a casing by folding top hdc rounds inward and sewing fleece inside that fold.
Pom-poms
3. Make two large pom-poms (4–5 in diameter) from matching yarn. Attach to top cuff by sewing the pom base securely through both pom and fleece/crochet layers. Reinforce knots with additional stitches and tie on inside.
Finishing
4. Work a neat bottom cuff (hdc BLO or sc) and optionally sew a fleece lining for ankle comfort if you plan to wear barefoot indoors.
Variations & styling
- Make smaller pompoms or tassels for a subtler look.
- Use contrasting fleece color for a pop when folded down.
6. Crochet Meowtastic Kitty Leg Warmers Pattern
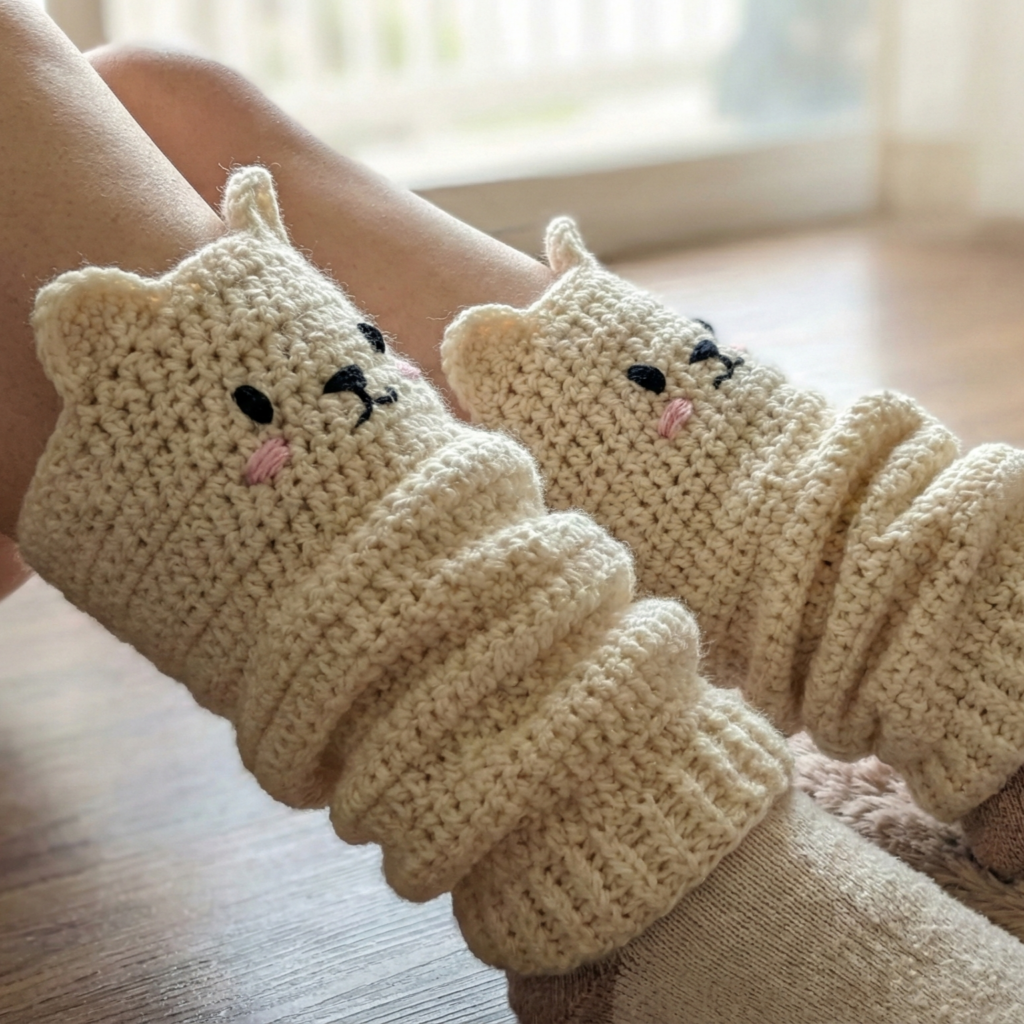
Vibe: whimsical cat-face appliqués with paw pads near ankle — perfect for kids, teens, or cat lovers.
Skill level: intermediate — applique & embroidery for face details.
Materials (one pair)
- Worsted yarn for body ~300 yd (MC) and small amounts of cream, pink, black for appliqués.
- Hook: 5.0 mm.
- Tapestry needle.
Finished example
- Calf circumference target: 15.00 in
- Length: 14.00 in
Step-by-step (one leg)
Tube
- Use the standard tube method: ch 49 join (48 st loop) or fsc 48. Rounds 1–6: hdc BLO. Rounds 7–R: hdc even until desired length minus space for ankle appliqués (e.g., stop at 12.00 in).
Cat face appliqué (front)
Head base
2. MR, ch 1, 8 sc in MR; sl st to join (8 sc). Rnd 2: ch 1, sc, inc around → 12 sc. Rnd 3: sc in next 2, inc around → 16 sc. Rnd 4: sc in next 3, inc around → 20 sc. Continue rounds until head disc measures ~3.00–3.5 in.
Ears (make 2)
3. Ch 4; Row 1: sc in 2nd ch from hook and next two (3 sc). Row 2: ch 1, sc2tog to make a triangle tip. Fasten off leaving long tail to sew.
Face features
4. Use black yarn to embroider closed eyes (small curved lines), black nose (tiny triangle), and whiskers. Use pink for inner ear stitch and small blush circles. Sew ears to head top.
Paw pad appliqués (optional, near ankle)
5. Small oval paw pad: MR, ch 1, 6 sc in MR; sl st to join — flatten and stitch to ankle area. Make 4 small toe pads by making tiny circles: MR, 4 sc, sl st. Arrange and sew into paw formation.
Attachment
6. Center and sew cat head onto front center of leg warmer with tight stitches. Sew paw pads at ankle.
Finish
7. One round sc around top and bottom edges for neatness. Add a small inner felt backing behind cat head to hide knots and increase durability.
Variations & styling
- Sew button eyes for adult-only gifts (avoid buttons on children’s items; embroider eyes instead).
- Make different animal faces (fox, bunny) using the same method.
Finishing techniques common to all patterns
Weaving in ends
- Weave ends into inside of tube running them along the direction of stitches for at least 2 in to secure. Avoid leaving tails that can snag.
Blocking & shaping
- For non-wool blends: block lightly on a flat surface to even rounds and shape ruffles. For bulky yarn, steaming helps relax stitches.
Lining & cuff casing
- If you want an internal fleece lining for cold-weather wear, sew the lining securely to the inside top edge before finishing. For drawstring or elastic casing, fold top rib inward and stitch to create 1/2 in casing, thread elastic or cord, then secure ends.
Sizing adjustments (quick summary)
- Swatch in chosen stitch, measure spi (stitches-per-inch).
- Multiply spi × desired circumference → initial stitch count.
- Round to nearest pattern multiple. Make a short test tube, try on and adjust increases/decreases as you crochet.
Care & gifting notes
- Check yarn label for washing instructions. Many acrylic/worsted blends are machine washable on gentle cycles; wool should be hand washed and air-dried.
- For fleece-trimmed warmers, hand wash recommended to maintain fleece integrity.
- For gifts, present leg warmers folded with a small ribbon and a card indicating fiber content and care instructions.
conclusion
These six leg warmer patterns give you a full toolbox for cozy accessories — from the flouncy and feminine ruffled style to playful cats and celestial motifs, from lightweight pastel stripes for spring to fleece-trimmed winter warmers. The patterns are modular: once you master the basic tube construction and the gauge math shown at the start, you can mix and match cuff types, ruffle styles, applique sets, and lining choices to make leg warmers that match wardrobes and seasons