

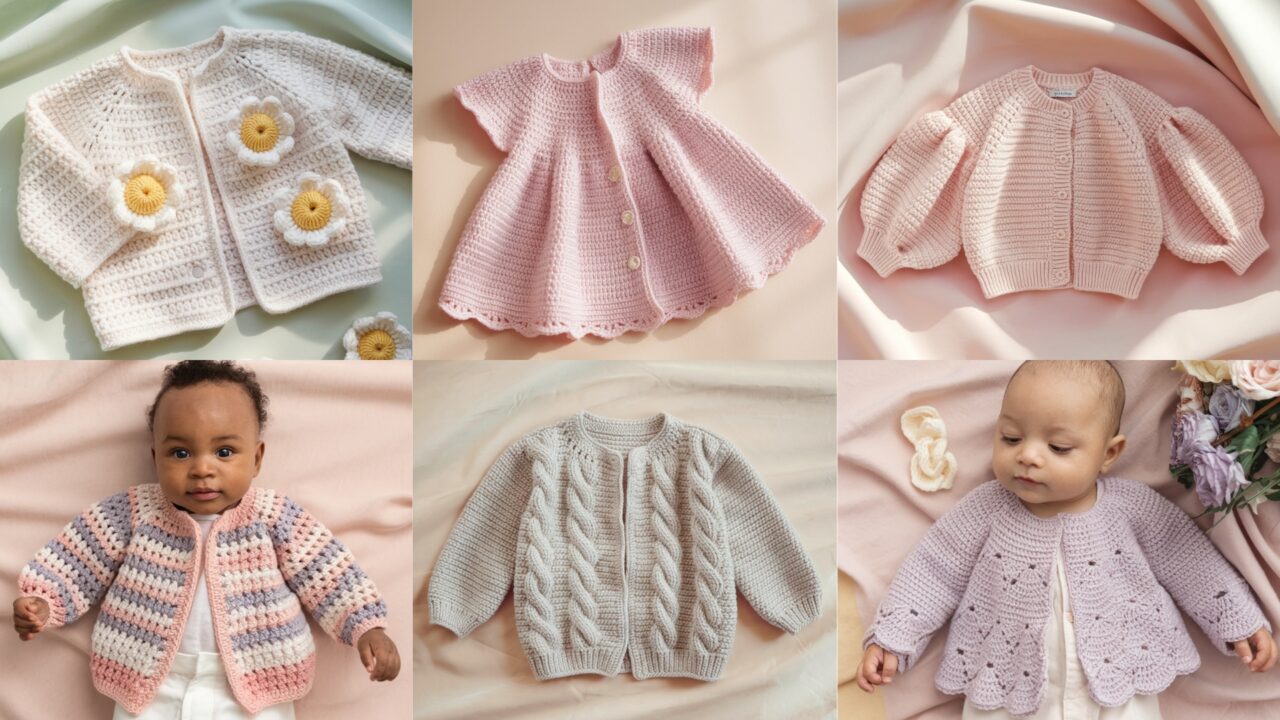
A handmade baby cardigan is one of the sweetest, most useful items you can crochet: practical, soft, and fast to make. A good baby cardigan fits comfortably, is easy to take on and off, and washes well — and because baby garments are small, they’re ideal projects for trying new stitches or making heirloom-quality gifts. This post contains six distinct cardigan designs (dressy, textured, seamless, scalloped, appliqué-adorned, and cabled). Every pattern includes: skill level, recommended yarn and hook, suggested sizes and gauge, clear step-by-step construction, finishing and blocking guidance, safety notes, and variations so you can customize each piece.
Before the patterns, read the general notes — they’ll save you time when adapting sizes or yarns.
General notes (read before you begin)
US terms used throughout.
Common abbreviations you’ll see: ch (chain), sc (single crochet), hdc (half double crochet), dc (double crochet), tr (treble), sl st (slip stitch), st(s) (stitches), inc (increase), dec (decrease), BLO/FLO (back/front loop only), RS/WS (right/wrong side), rep (repeat).
Sizing guide (approx finished chest circumference):
- Newborn: 16 in (41 cm)
- 0–3 months: 18 in (46 cm)
- 3–6 months: 19 in (48 cm)
- 6–12 months: 20.5 in (52 cm)
Decide desired positive ease (how roomy the cardigan should be). For a snug fit use +0.5–1 in; for a layering cardigan use +2–3 in.
Gauge & swatching: Always make a 4 in × 4 in (10 × 10 cm) blocked swatch in the main stitch called for by the pattern. If your gauge differs, change hook size rather than changing stitch counts.
Construction choices: I give two common approaches where helpful:
- Top-down seamless (raglan/yoke) — great for customizing length as you go and fewer seams.
- Seamed panels (back/front/sleeves) — easier for exact pattern repeats and beginner-friendly assembly.
Safety: For babies use securely sewn (or embroidered) buttons/closures. Avoid small beads/safety eyes for infants. Reinforce button attachments with an interior felt patch. Weave in ends thoroughly.
1. Crochet Baby Dress Cardigan Pattern
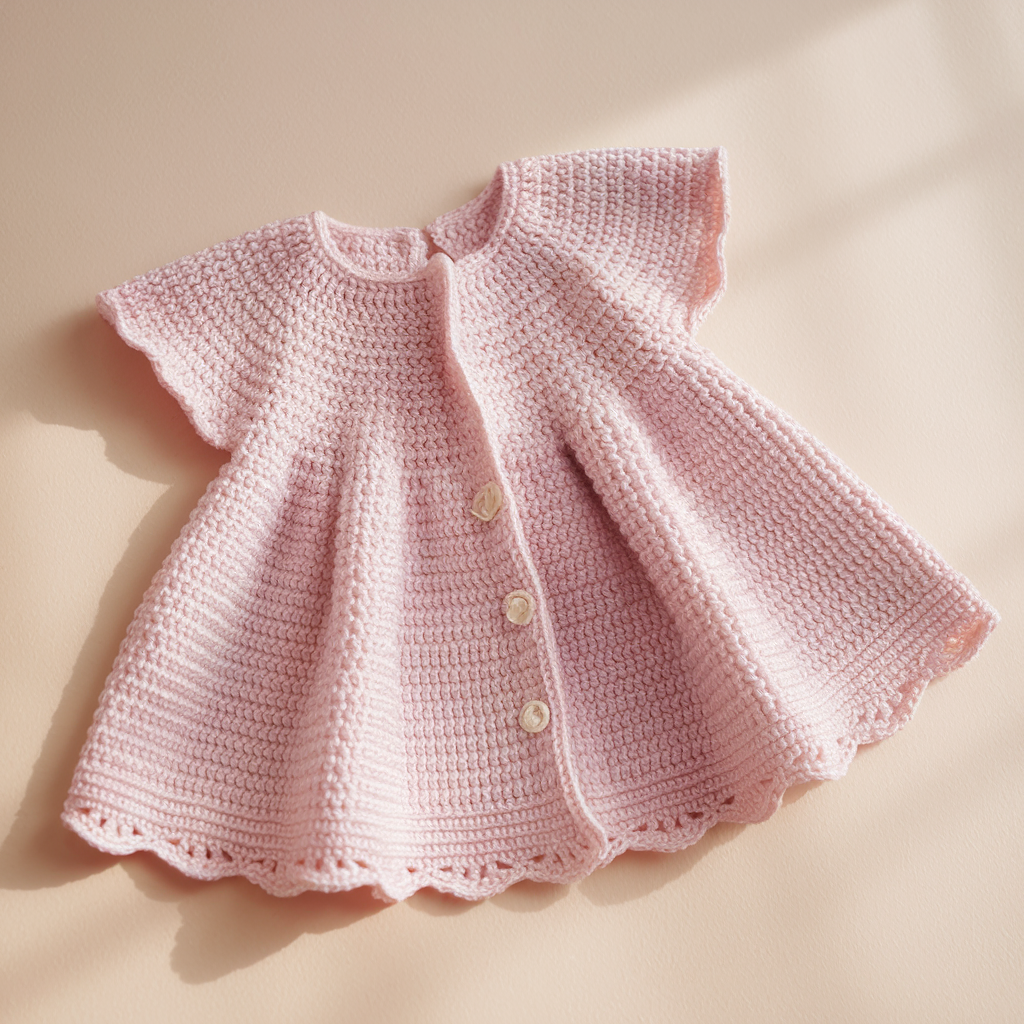
Overview
A lightly flared, dress-style cardigan with a graceful scalloped hem and small button closures. Feminine and photo-ready, but also easy to make with simple increases.
Skill level
Confident beginner — comfortable with working in rows, increasing, and simple edgings.
Materials (3–6 months sample)
- DK weight baby yarn (superwash merino or acrylic blend) — ~350–400 yds total
- Hook: 3.5 mm (E) — adjust to your gauge
- Small flat buttons (¾ in / 18–20 mm) — 3–4
- Tapestry needle, stitch markers
Suggested gauge (example)
- 20 hdc × 24 rows = 4 in in hdc (blocked). Match your swatch, then use formulas below.
Sizes and stitch math (how to scale)
- Choose finished chest: Baby chest + ease. For 3–6 months: 19 in finished.
- Using your swatch, calculate stitches per inch (SPI). E.g., if swatch = 5 hdc per inch, total body stitches round = finished chest × SPI = 19 × 5 = 95 stitches. If you’re working flat panels divide by number of panels (see construction). For dress flare we’ll work top-down and add increases.
Construction (top-down yoke → body flare → shells)
Step 1 — Neck and yoke (top-down raglan method)
- Chain a neck foundation length that comfortably fits over baby’s head (example: chain 72 for approx 16–17 in un-stretched neck band; check by gently wrapping chain around head). Join to work in the round, being careful not to twist. Work 3 rounds of hdc for a stable neckband.
- Place four markers evenly for raglan seams (mark positions where front→sleeve→back→sleeve→front meet).
- Begin raglan increases: on each increase round work (hdc to 1 st before marker, 2 hdc in st before marker, hdc at marker) — or a consistent raglan increase you prefer. Increase rounds every other round until yoke depth (center back neck to underarm) is about: Newborn 4½ in; 0–3m 5 in; 3–6m 5¾ in; 6–12m 6½ in.
Step 2 — Separate sleeves & work body
- When yoke depth is reached, place sleeve stitches on hold (slip them to scrap yarn) — the stitches between two raglan markers form each sleeve. Join and work the body in rounds from the remaining stitches.
- For a dress-style flare: work rounds where you increase evenly every 3–4 rounds — e.g., work 2 rounds even, next round increase 8–12 stitches spaced evenly — repeat until you reach the desired hem width (a few extra inches create a sweet flare).
Step 3 — Shell hem
- After reaching the length for the hem (e.g., 7–9 in from underarm for a dressy length), stop increasing and work 2–3 rounds of hdc to stabilize.
- Work a shell edge: skip 2 sts, 5 dc in next st, skip 2 sts, sl st around — adjust spacing to make shells even. Work 1–2 rounds across the bottom for a fuller scallop.
Step 4 — Sleeves
- Return sleeve stitches to hook and join. For a short dress sleeve work 6–8 rounds even in hdc or dc, then 2 rounds of BLO hdc for a tidy cuff. For a puff sleeve work more rounds and decrease slightly at cuff to gather.
Step 5 — Button band
- Pick up stitches evenly along one front edge and around neckline and down the other front. Work 3 rounds of sc. On the right band create buttonholes by chaining 3 and skipping 3 sts in the sc round at even intervals (top only or 3 buttons spaced down chest).
- Sew buttons securely on the opposite band and reinforce with felt backstage.
Finishing
- Block lightly to settle shells. Weave ends and trim.
- Reinforce button placement with a small felt disc on the interior for durability.
Variations & notes
- Use a lacy shell stitch for body instead of hdc for a more delicate dress.
- Omit buttonholes and use a single top-tie loop for newborn safety.
2. Crochet Puffy Sleeves Baby Cardigan Pattern
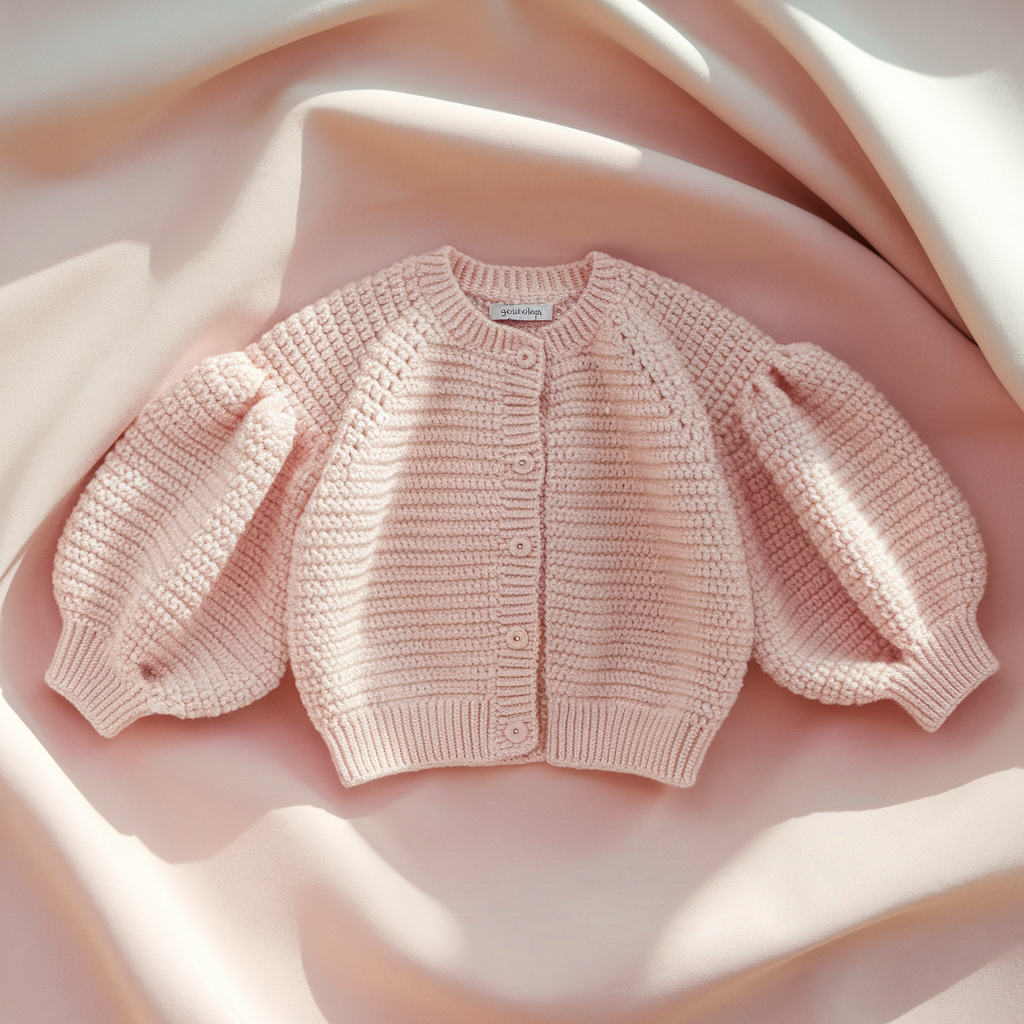
Overview
A contemporary cardigan featuring softly gathered puff sleeves and a simple clean body — cozy, stylish, and comfortable.
Skill level
Intermediate — requires top-down shaping and sleeve gathering skills.
Materials
- Worsted or DK weight baby yarn — ~350–450 yds depending on size
- Hook: 4.0 mm (G) for worsted, 3.5 mm for DK
- Buttons (optional), tapestry needle, stitch markers
Suggested gauge
- 16–18 dc × 22 rows = 4 in (example). Swatch to check.
Construction (top-down raglan with sleeve puff)
Step 1 — Neck and raglan yoke
- Start top-down as in Pattern 1: make neck ring, 3 rounds of hdc, place 4 raglan markers.
- Work raglan increases every 2 rounds until yoke depth equals underarm measurement.
Step 2 — Separate sleeves & body
- Place sleeve stitches on holders. Join and work body in rounds until desired torso length. Add a wide ribbed band (2–3 rounds BLO hdc) if you want a cuffed look.
Step 3 — Puff sleeve shaping
- For each sleeve, pick up sleeve stitches and join. To make the puff gather the sleeve cap:
- Option A (cap gathers): In the first round after joining, increase 20–30% of stitches evenly (for example, if sleeve is 40 sts, increase to 48 sts by doing sc inc every 5th st). Work 2–3 rounds even — these extra stitches at the top create puff. Then taper sleeve by working 1–2 rounds with small decreases near lower arm for a slight bell shape.
- Option B (mid-sleeve puff): Work even sleeve rounds and make one round with increases at mid-sleeve, then work even and finish with a narrow cuff to create a blouson effect.
- Finish cuff with 4–6 rounds BLO hdc or sc in smaller hook for a snug fit.
Step 4 — Edging & closures
- Add a neat sc band around fronts and neck. Add 3 small buttons or a single tie.
Finishing
- Use blocking to balance sleeve puff; pin sleeve cap gently while drying to shape.
- Reinforce buttonholes and sew buttons firmly.
Variations
- For a softer puff use a fluffy yarn; for more structure use a tighter gauge or smaller hook at cuff.
- Add a picot edge along neckline for a delicate finish.
3. Crochet Seamless Granny Stitch Baby Cardigan Pattern
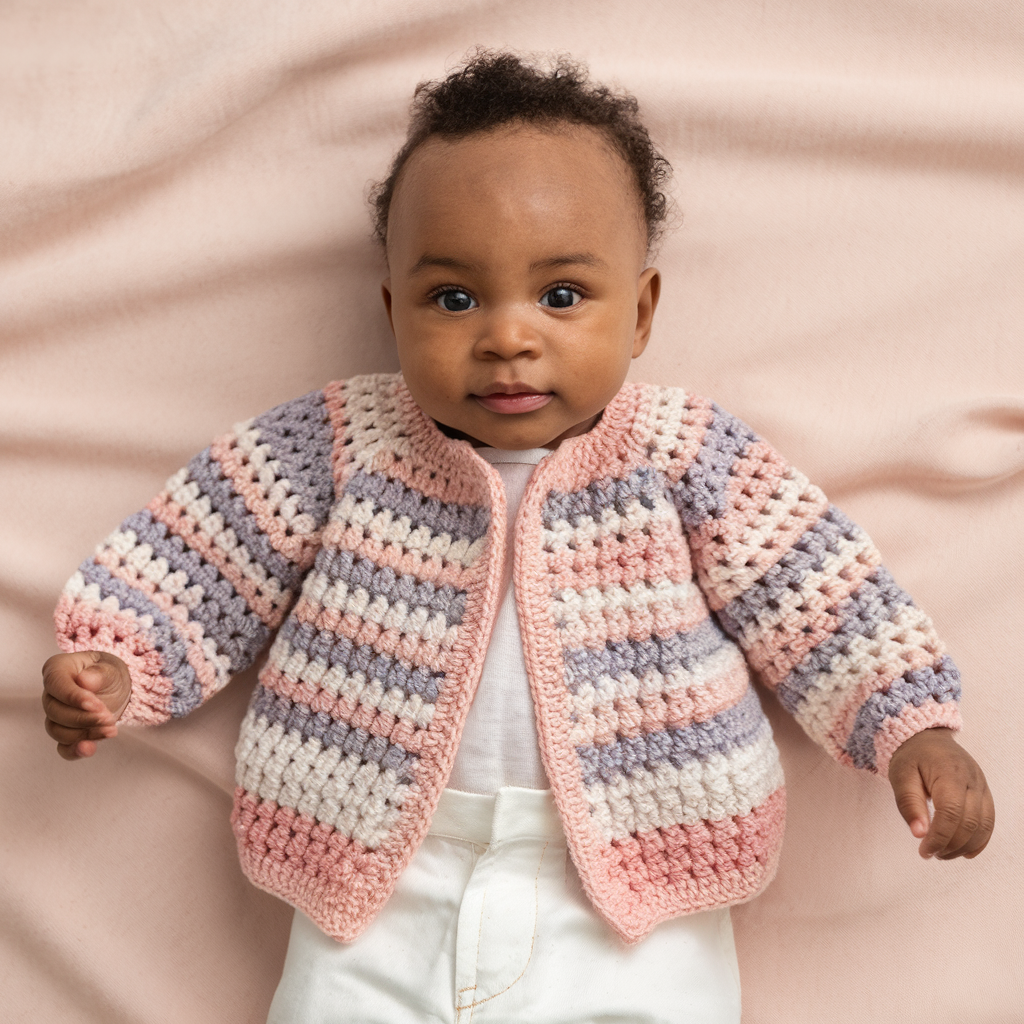
Overview
A quick, scrap-friendly cardigan using granny clusters in a top-down or seamed granny-square construction — charming, colorful, and warm.
Skill level
Confident beginner — granny clusters are easy, and join-as-you-go reduces seaming.
Materials
- Worsted weight yarn or multiple scraps — ~400–600 yds depending on size and color changes
- Hook: 4.0–5.0 mm depending on yarn
- Buttons (optional), tapestry needle
Suggested gauge
- 12 granny clusters ≈ 4 in (example — measure your cluster!). Granny cluster size varies with cluster stitch and hook.
Construction options (I outline top-down seamless granny yoke and seamed square methods)
Option A — Top-down seamless granny yoke
- Start with a center MR and create a 4-corner granny ring: (3 dc, ch 2) × 4 around; join.
- Continue rounds of granny clusters: at each ch-2 corner work (3 dc, ch 2, 3 dc); between corners work (ch 1, 3 dc) into previous round spaces. Change colors each round if desired.
- Increase naturally at corners; keep working until yoke depth = underarm. Place sleeve clusters on holders (the clusters between corner increases define sleeve openings).
- Work the body in granny rounds until desired length. For sleeves rejoin held clusters and work granny rounds to sleeve length, or convert to sc rounds for snug sleeves.
- Add sc button band; create buttonholes on one side.
Option B — Seamed granny squares
- Make a set of granny squares (size approx 3.5–4 in blocked) and layout into a cardigan configuration (back, two fronts, two sleeves).
- Join-as-you-go or seam the squares together, adding border rounds to even edges.
- Add button band and shell edging as desired.
Finishing
- Block thoroughly — granny stitch relaxes and evens beautifully.
- Weave ends carefully when using many colors.
Variations
- Use a 2-color palette for modern look or scrappy multi-color for whimsical baby wear.
- For colder climates, add a thin lining or sew in a cotton interlining for extra warmth.
4. Crochet Shell Edge Baby Cardigan Pattern
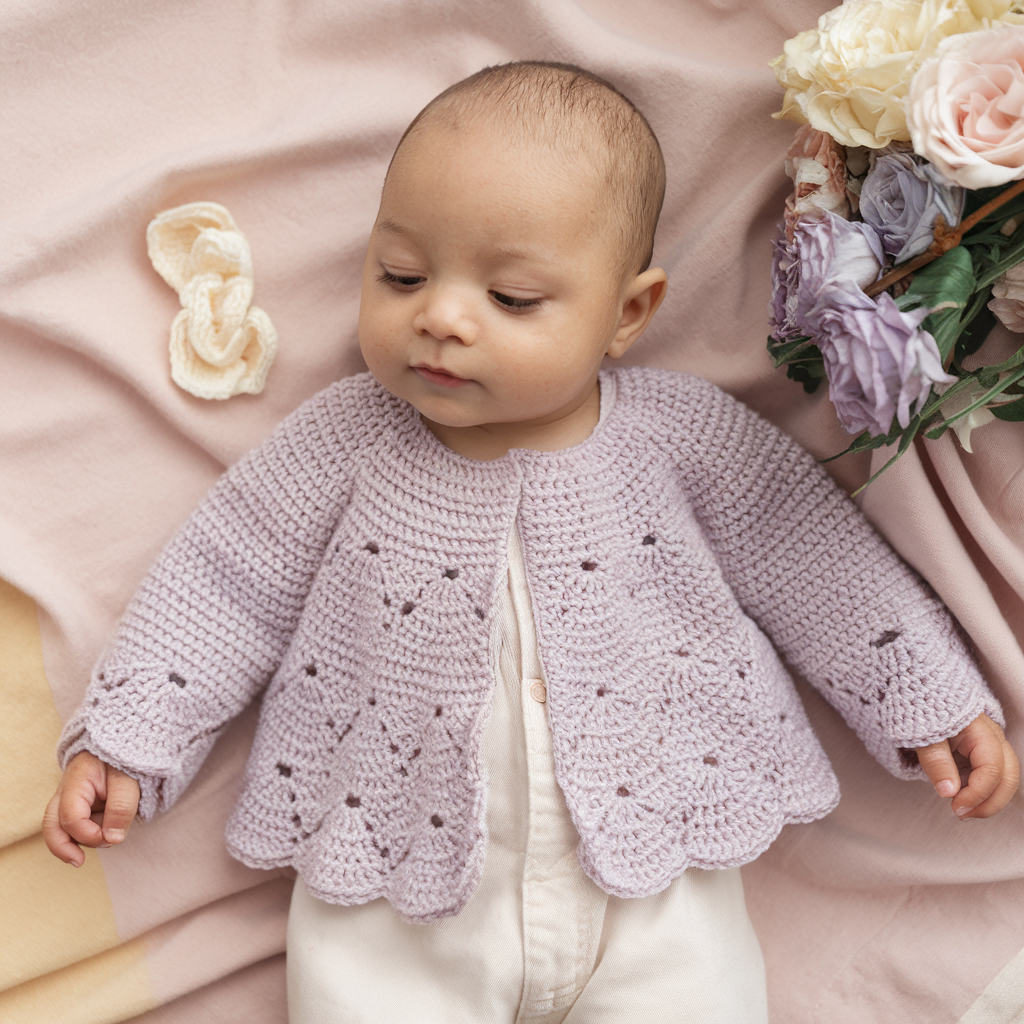
Overview
Classic, vintage-inspired cardigan with a feminine shell (fan) edging around hem, cuffs, and neckline.
Skill level
Confident beginner — mainly straight rows and a decorative shell border.
Materials
- DK weight baby yarn — ~300–400 yds
- Hook: 3.5–4.0 mm
- Small buttons, tapestry needle
Suggested gauge
- 20 hdc × 24 rows = 4 in (example). Swatch in base stitch.
Construction (panel or top-down)
Panel method (seamed panels)
- Work back panel to desired height in hdc or DC.
- Work two front panels, shaping neckline if desired (short V-shape or shallow round).
- Crochet sleeves as tubes or shaped caps.
- Seam shoulders and sides.
Shell edging
- With RS facing and after sewing, attach contrast yarn at bottom front left and work sc around bottom edge to even counts.
- Work shell row: skip 2 sts, 5 dc in next st, skip 2, sl st across bottom and repeat around cuffs and neckline (adjust spacing so shells sit evenly; use shell size 3–5 dc depending on gauge).
- If shells pull, work 1 round of sc in BLO first to stabilize edge.
Button band
- Add a sc band before shell rounds; make buttonholes by chaining 3 and skipping 3 sts at desired points on right band; sew buttons on other band.
Finishing
- Block shells to set their shape and open the scallop.
- For baby safety, use a single top button or embroidered closure if you prefer.
Variations
- Use smaller 3-dc shells for subtle scallops or larger 7-dc shells for dramatic vintage look.
- Work a tiny picot in the center of each shell for a lacey highlight.
5. Crochet Daisy Applique Baby Cardigan Pattern
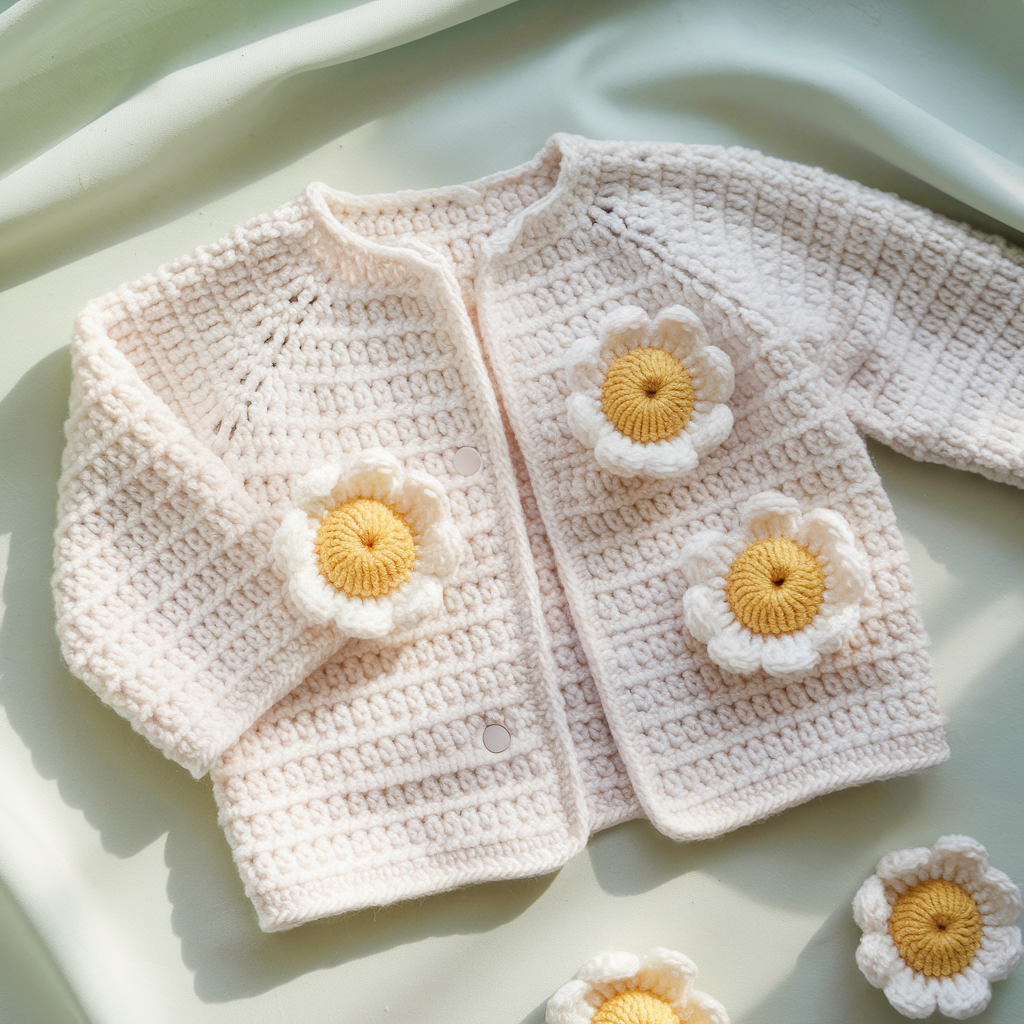
Overview
A playful cardigan with daisy appliqués sewn across the yoke or hem — cheerful and perfect for spring gifts.
Skill level
Confident beginner — base cardigan is simple; daisy appliqués are quick motifs.
Materials
- Sport/DK yarn for base — ~350 yds
- Small amounts white & yellow (or accent colors) for daisies
- Hook: 3.5–4.0 mm (base) and 2.5–3.0 mm for tiny daisies
- Buttons or embroidered loop closure
Construction (base + appliqués)
Base cardigan
- Work a simple top-down or panel cardigan in hdc or DC using instructions from Pattern 1 (simplify: straight body with minimal shaping).
- Decide where daisies will sit (across yoke, cuffs, hem, pockets).
Daisy appliqué (small daisy ~1 in)
- MR; ch 1; work 6 sc into ring; join — yellow center.
- Join white in any st; ch 2, sl st in same st 6 times to make loops.
- Into each loop work (sc, hdc, dc, hdc, sc) — petal formed. Fasten off, weave tail.
Assembly
- Pin daisies in place symmetrically (mirror placement on both sides if desired).
- Sew by stitching through the core of the daisy into the cardigan fabric with multiple passes; reinforce inside with a small felt circle (hidden) to prevent stress on loops.
Finishing
- Add a neat sc band along fronts and make buttonholes. Use large, soft buttons and reinforce them.
Variations
- Make daisies in different sizes for a cottagecore look.
- Instead of sewing many daisies, make a single large daisy on the back as a statement.
6. Crochet Cabled Baby Cardigan Pattern

Overview
A classic heirloom cardigan with braided cable panels. Crochet cables are formed with post stitches — results are thick, warm, and textured.
Skill level
Intermediate to advanced — comfortable with FPdc/BPdc and crossing post stitches.
Materials
- Worsted weight merino or soft wool-blend yarn — 400–600 yds
- Hook: 5.0 mm (or adjust for your cable tension)
- Buttons, tapestry needle
Suggested gauge
- 16 st × 20 rows = 4 in in cable panel swatch (measure and adjust).
Basic cable technique
- Crochet cable: use FPdc/BPdc rib base and perform a cable-cross row every 6–8 rows by working FPdc around the posts of stitches that will lie in front or behind — effectively crossing columns to form braid.
Construction (panel approach)
Step 1 — Plan panel widths
- Decide how many cable columns you want: e.g., center cable 6 sts wide, flanked by 8 sts plain panel each side.
- Chain foundation for back or front width accommodating cable and plain panels.
Step 2 — Work panels
- Back: work pattern across (hdc or SC base with cable columns in center). Follow cable chart for cross rows. Repeat until back length completed.
- Fronts: mirror cable columns onto fronts placed near center fronts if desired.
- Sleeves: add small cable or keep plain.
Step 3 — Assembly
- Seam shoulders and sides; set sleeves.
- Pick up stitches around neckline and work a folded rib collar (e.g., BLO hdc rounds and fold down) for a polished heirloom finish.
Step 4 — Button band
- Create a sturdy button band, incorporate a horizontal bar for button shank comfort due to cable thickness.
Finishing
- Steam block carefully — cables will settle but do not overstretch. Use blocking pins to keep braid pattern even.
- Reinforce buttons with a felt patch inside.
Variations
- Use twin cables (two narrow braids) or alternate cables and seed-stitch panels for a textured look.
- Work with lighter yarn and smaller hook for a subtler braided effect.
Final finishing & care (applies to all patterns)
- Weave in ends: Tuck tails into fabric over several inches and double-back for secure anchoring. Babies tug on loose threads; a tidy finish matters.
- Blocking: Wet-block gently — soak, press between towels, pin to shape on a blocking mat, let dry. For wool follow yarn label (steam or gentle soak).
- Buttons & safety: Use large, sewn-on buttons and reinforce with interior felt discs. For infants consider a single top button or embroidered loop instead of multiple small buttons.
- Care: Choose washable yarns for practicality (superwash wool or acrylic). Recommend gentle wash cycles and reshape flat to dry.
- Labeling: If gifting, include washing instructions and fiber content.
Conclusion
These six crochet baby cardigan designs cover a wide range of styles and techniques — from the delicate dress cardigan to a sturdy cabled heirloom. Each pattern is written for practicality as well as beauty: choose soft, washable yarns for everyday use; pick heirloom fibers for keepsakes. Use the construction options (top-down or panel seamed) to match your confidence and time. Customize color, trim, and appliqués to suit the baby and occasion.


I don’t think the title of your article matches the content lol. Just kidding, mainly because I had some doubts after reading the article. https://www.binance.com/sk/register?ref=WKAGBF7Y
tải 66b xuất hiện trên thị trường cá cược từ nhiều năm trước, ban đầu chỉ là một nền tảng nhỏ với số lượng trò chơi giới hạn. Nhưng với tầm nhìn chiến lược nỗ lực không ngừng, nhà cái đã phát triển vượt bậc, trở thành một trong những nhà cái nổi tiếng tại khu vực châu Á.
Can you be more specific about the content of your article? After reading it, I still have some doubts. Hope you can help me. https://accounts.binance.info/en-ZA/register-person?ref=B4EPR6J0
Chính thức “chào sân” vào năm 2012, tài xỉu 66b là một nhánh nhỏ trực thuộc sự quản lý của CURACAO Gaming, cơ quan giám sát cờ bạc hàng đầu Châu Á. Ngay từ thời điểm ra mắt, nhà cái chúng tôi đã có trụ sở chính thức tại hai trung tâm cờ bạc lớn nhất Philippines là Manila và Costa Rica.
I don’t think the title of your article matches the content lol. Just kidding, mainly because I had some doubts after reading the article.
I don’t think the title of your article matches the content lol. Just kidding, mainly because I had some doubts after reading the article. https://accounts.binance.com/ar/register-person?ref=PORL8W0Z
Thanks for sharing. I read many of your blog posts, cool, your blog is very good.
I don’t think the title of your article matches the content lol. Just kidding, mainly because I had some doubts after reading the article.
Your article helped me a lot, is there any more related content? Thanks!
Can you be more specific about the content of your article? After reading it, I still have some doubts. Hope you can help me.
Thank you for your sharing. I am worried that I lack creative ideas. It is your article that makes me full of hope. Thank you. But, I have a question, can you help me?
I don’t think the title of your article matches the content lol. Just kidding, mainly because I had some doubts after reading the article.
Your point of view caught my eye and was very interesting. Thanks. I have a question for you.
Your article helped me a lot, is there any more related content? Thanks! https://accounts.binance.com/fr/register?ref=T7KCZASX
Can you be more specific about the content of your article? After reading it, I still have some doubts. Hope you can help me.
Your article helped me a lot, is there any more related content? Thanks!
I don’t think the title of your article matches the content lol. Just kidding, mainly because I had some doubts after reading the article. https://www.binance.info/lv/register?ref=SMUBFN5I
Your point of view caught my eye and was very interesting. Thanks. I have a question for you.
Your article helped me a lot, is there any more related content? Thanks!
Thanks for sharing. I read many of your blog posts, cool, your blog is very good.