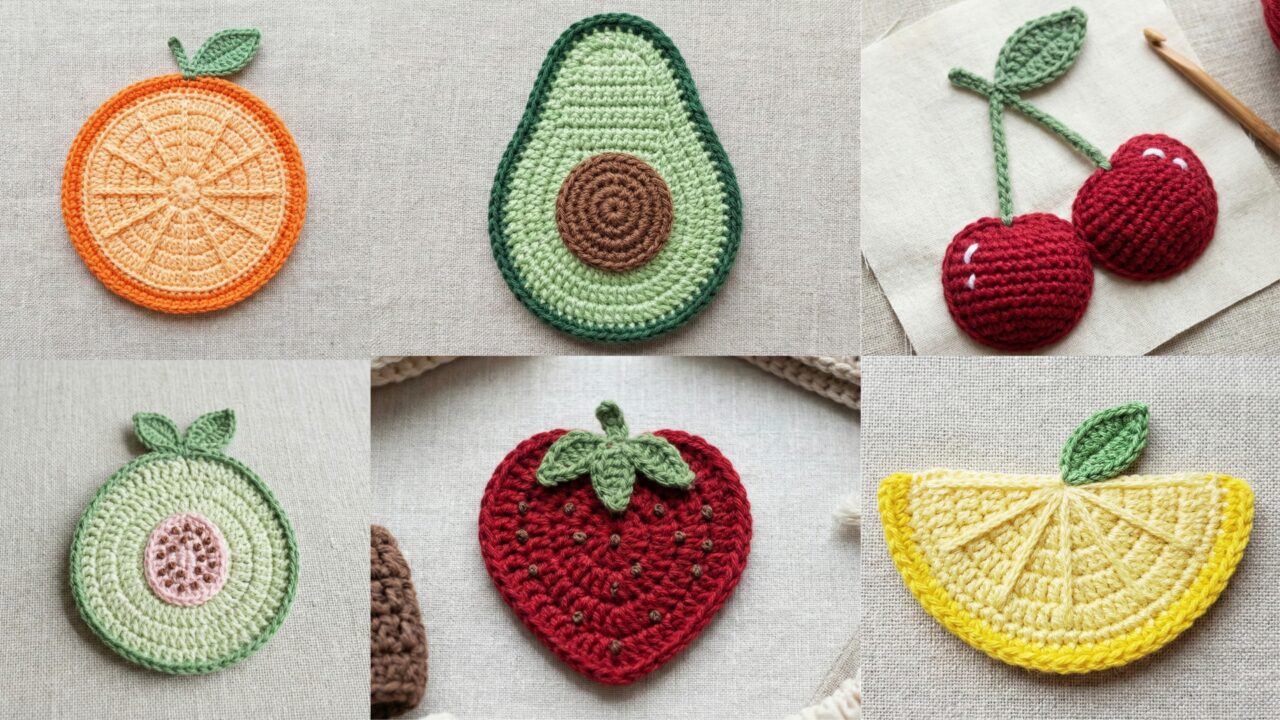
Small crochet fruit appliqués are one of the quickest ways to add color and charm to kids’ clothes, toy food, hair clips, bags, and home crafts. They’re fast to make, use tiny amounts of yarn, and look delightfully handmade. Below you’ll find one helpful introduction (materials, sizing, general tips), followed by six detailed, step-by-step applique patterns: Strawberry, Avocado, Cherry, Guava, Lemon, and Orange. Each pattern includes skill level, materials, finished size, a clear stitch-by-stitch build, finishing, variations, and care notes so you — and your readers — can make finished pieces that look polished and last.
All instructions use US crochet terms.
Quick primer — yarn, hooks, sizing, safety & finishing
Yarn & hook
- Use sport / DK / worsted cotton or cotton-blend for crisp stitches that hold shape well on appliqués. For tiny appliqués use lighter yarn (sport or DK) and a 2.5–3.5 mm hook. For larger appliqués (3–4 in), use worsted and a 3.5–4.5 mm hook.
- Cotton is preferred because it blocks well and won’t fuzz like acrylic. Mercerized cotton gives a pretty slight sheen.
Notions
- Tapestry needle, small scissors, stitch marker (optional), small amounts of stuffing only if you want slightly 3D appliqués, small safety eyes only if making toys for adults (avoid small parts for baby items), fabric glue (optional) for no-sew attachment, tiny buttons or embroidery floss for seeds or highlights.
Finished sizes (guideline)
- Small appliqué (1–1.5 in) — use fingering/sport and 2.5–3.0 mm hook.
- Medium appliqué (2–2.5 in) — use DK and 3.0–3.5 mm hook.
- Large appliqué (3–4 in) — use worsted and 3.75–4.5 mm hook.
Safety note
- For items for children under 3, do not attach beads, buttons, or safety eyes. Embroider seeds, pips, or eyes instead.
Blocking & adhesion
- Lightly wet-block cotton appliqués to shape scallops or smooth edges.
- To attach: sew appliqués on with matching thread for permanence; use fabric glue for quick craft projects (but sew for washable items). For hair clips, glue then stitch for security.
Abbreviations (US)
- ch = chain
- sc = single crochet
- hdc = half double crochet
- dc = double crochet
- tr = treble (tr)
- sl st = slip stitch
- st(s) = stitch(es)
- inc = increase (2 sc in same st)
- dec = decrease (sc2tog)
- MR = magic ring
1. Crochet Strawberry Applique Pattern
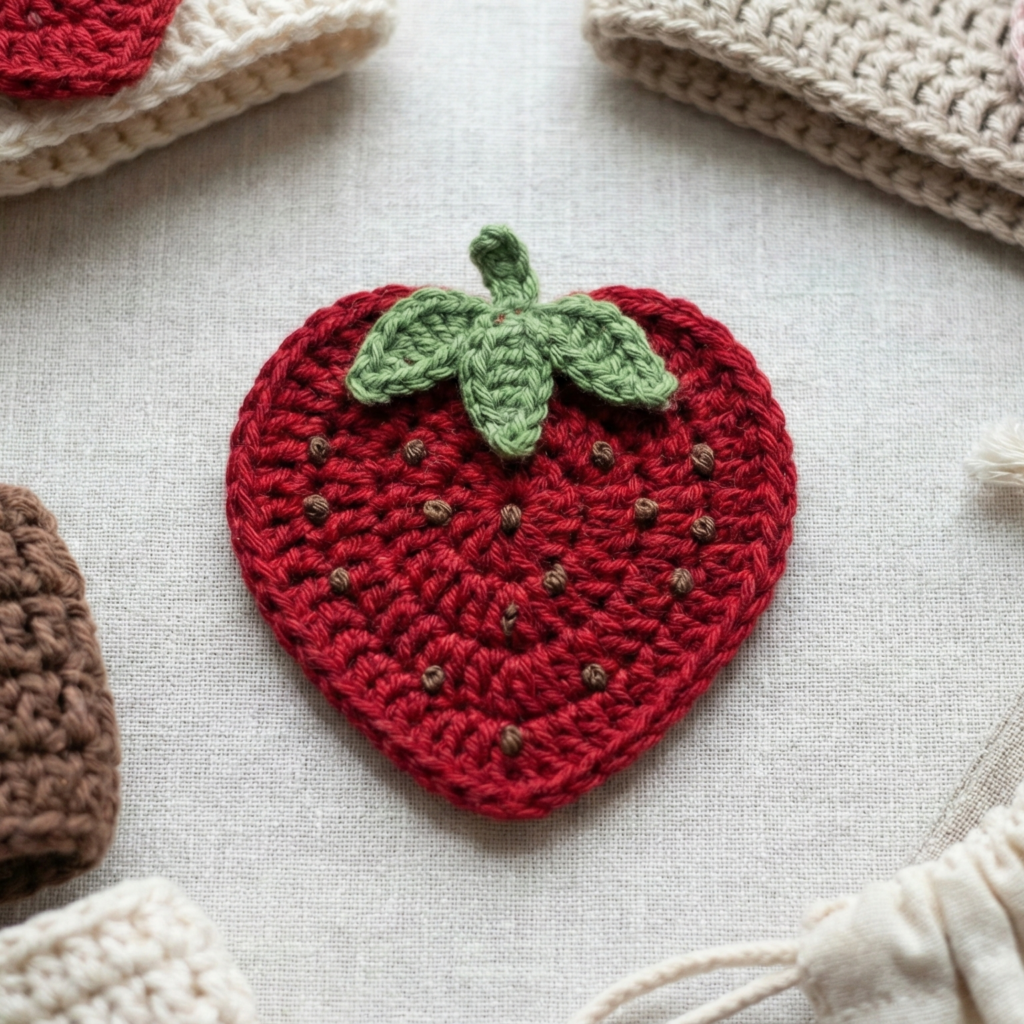
Style & use: classic heart-shaped strawberry with tiny seed embroidery — perfect for headbands, pockets, or toy food.
Skill level: Beginner–Confident beginner
Finished size: ~2.25 in tall (DK yarn + 3.5 mm hook). Scale by changing hook/yarn.
Materials
- DK cotton: red (main), green (leaf), brown or black for seeds (or embroidery floss).
- 3.5 mm hook, tapestry needle, small scissors.
Step-by-step (worked flat; shape like a rounded heart)
- MR; Round 1: MR, ch1, 6 sc into MR — (6). Tighten ring; place marker.
- R2: inc in each st around — (12).
- R3: sc, inc around — (18).
- R4: sc x2, inc around — (24).
- R5: work even sc around (24). This builds a round that will be the middle of the berry.
- Form the heart/teardrop shape: Now we will make two lobes by working along half of the round for one lobe, then the other side.
- Lobe A (left): Work 6 sc (continue in rounds but stop after 6 sts), then turn work (or continue without joining, see options). Work back along those stitches with dec shaping: sc2tog, sc, sc2tog — this sculpts a small lobe. Fasten off and weave end if working separate lobes technique.
- Lobe B (right): Reattach at the opposite point of the ring and repeat symmetric lobe shaping.
- Alternative simpler method (flat increases/decreases): After R5, continue R6: sc x3, dec around to start narrowing, then R7: sc x2, dec around, then shape two small increases on either side to form gentle heart dip at the top — this approach is forgiving and easier for beginners.
- Top taper: After forming lobes, work 1 round of hdc across the upper edge to give thickness; then do two rounds of sc decreasing evenly to come to a small point at the bottom of the strawberry if needed (e.g., sc x3, dec around then sc x2, dec). Stop when shape is pleasing.
- Leaf & calyx (make 3 leaves): With green, join at top center. Option A simple leaf: ch5, 1 sc in 2nd ch from hook, hdc in next, dc in next, sl st to base, repeat two more times to make three small leaves around the top. Option B fuller leaf: ch6, sc, hdc, dc, hdc, sc across, sl st to base.
- Seeds: Using brown or black embroidery floss, embroider tiny French knots or simple straight stitches across the red body to mimic seeds. Space evenly. For washable projects, use colored yarn and tiny sewn French knots.
Finishing & variations
- Add a tiny chain-loop at top to hang as an ornament.
- For a raised strawberry, make two identical strawberry pieces and sew them together leaving a small opening; stuff lightly and close. Useful for toy food.
- Pair with tiny blossoms crocheted in cream to make a whole strawberry sprig.
Care
- Machine wash on gentle inside a mesh bag (cotton). Reshape while damp.
2. Crochet Avocado Applique Pattern
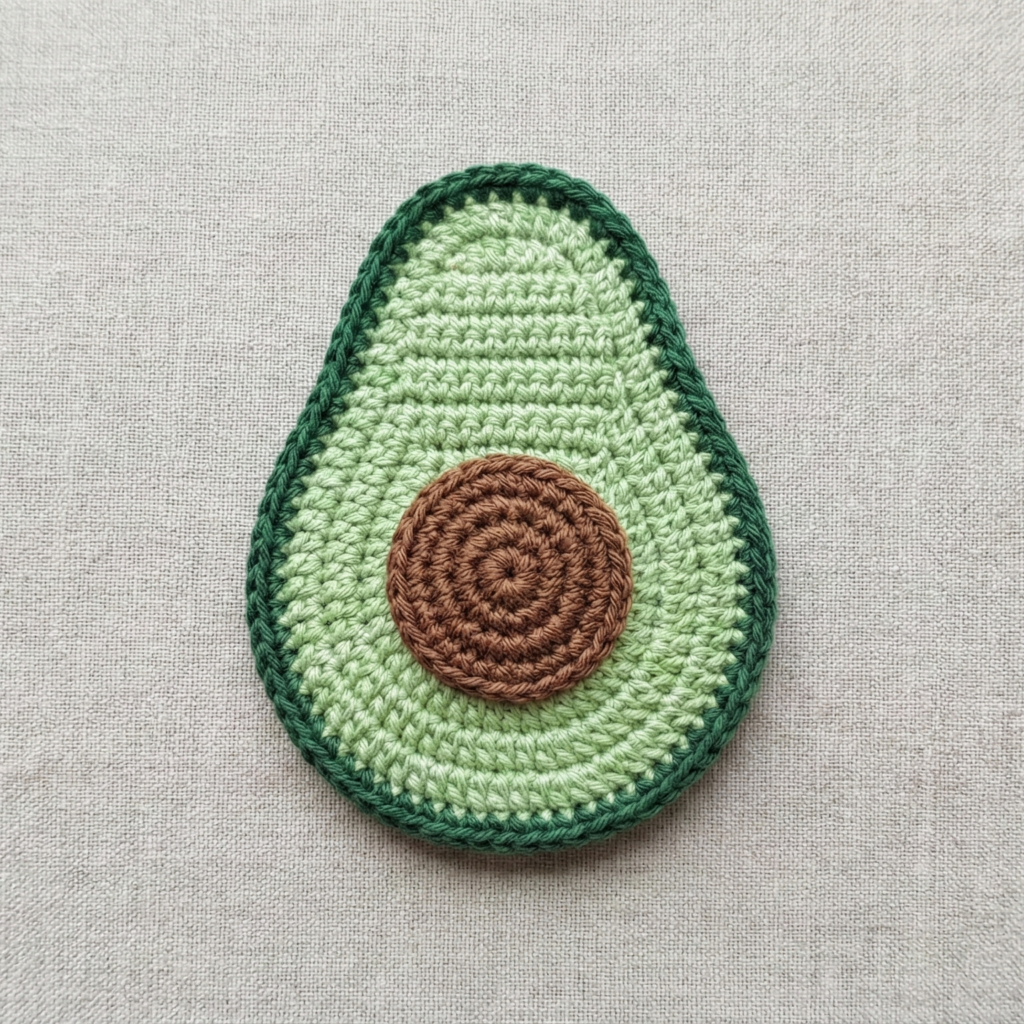
Style & use: cute avocado half with pit — adorable on shirts, totes, or play food.
Skill level: Beginner–Confident beginner
Finished size: ~2–3 in across (DK + 3.5 mm hook).
Materials
- DK cotton: light green (flesh), dark green (skin), brown (pit), 3.5 mm hook.
Step-by-step (worked flat in rounds, then cut in half concept)
- Make whole oval base (work a flat oval):
- Chain 8. R1: sc in 2nd ch from hook and across (7 sc). Turn, work on the opposite side of chain: 3 sc in end ch, sc across other side (7), 3 sc in last ch — join with sl st — you have an oval base.
- R2: sc around, placing 2 sc in corner sts (where you made the 3 sc) to maintain oval. Work even rounds for 4–6 rounds until base measures about 2.5–3 in long.
- Alternatively use MR and increase rounds to a circle then use shaped rounds to elongate to an oval.
- Color the skin vs flesh: Join dark green on outermost round and work 1–2 rounds sc around edge as “skin” rim. Then switch to lighter green and continue inner rounds (if using MR-method, you can tapestry crochet color change to create rim). If oval already made in a single color, surface-crochet a skin rim: join dark green, sl st along outer edge to form skin.
- Cut in half or make half only: If you prefer to make half avocado directly: work MR and shape a half-oval by doing a flat semicircle: MR, ch1, 6 sc in MR — (6); R2: inc around — (12); R3: sc, inc across half circle then dec on flat side to shape. For clarity, making a full oval then folding is simpler.
- Pit: MR with brown: 6 sc in MR (6). R2: inc around (12). R3: sc around (12) — adjust rounds to get a circle that sits nicely in the avocado cavity. Sew pit on center of flesh area, or make pit removable by making pit in two layers with tiny button inside to attach.
- Optional face: Embroider tiny eyes and smile for kawaii applique.
Finishing & variations
- Sew felt backing to avocado for added stiffness.
- Make a “smashed avocado” pair by adding tiny white embroidered dots (salt) and a chive sprig.
Care
- Machine wash gentle; reshape.
3. Crochet Cherry Applique Pattern
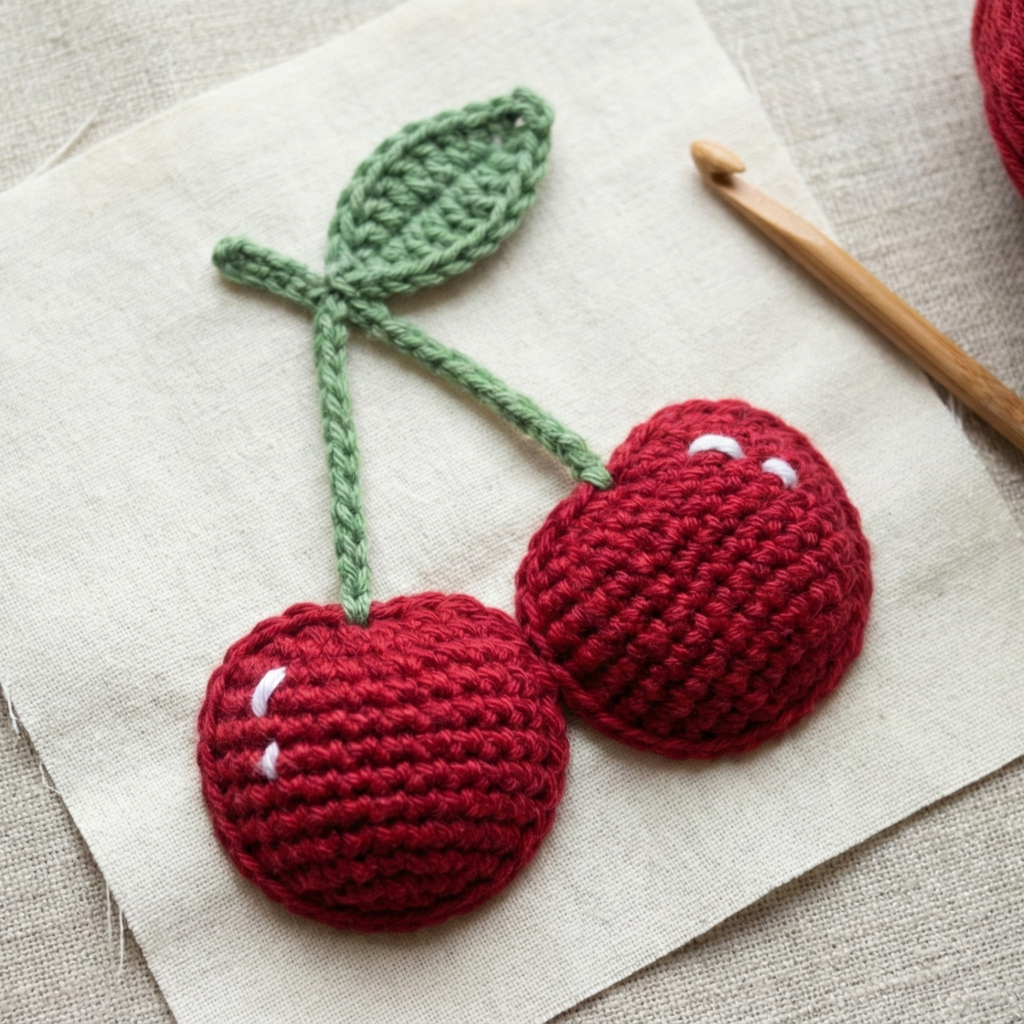
Style & use: twin cherries on a stem — classic and quick, ideal for hair clips and pocket accents.
Skill level: Beginner
Finished size: ~1.5–2 in per cherry pair (DK + 3.5 mm).
Materials
- DK cotton: cherry red, leaf green, 3.5 mm hook, optional tiny embroidery thread for shine.
Step-by-step (two round cherries + connecting stem)
- Cherry (make 2 identical): MR; R1: 6 sc in MR (6). R2: inc around (12). R3: sc around (12). Optional R4: sc around (12) for slightly larger cherry. Fasten off leaving long tail for sewing.
- Flatten & secure: Pull center slightly to form a round cherry, or make a second circle and sew both together leaving tiny stuffing for 3D charm. For flat appliqué, do single circle and press.
- Stem & leaf: With green, join at top center between the two cherries: ch8 (stem), sc back toward base to give a short tube or chain, then attach small leaf: ch5; sc in 2nd ch from hook, hdc, dc, hdc, sc; sl st to base.
- Join cherries: Arrange cherries close together and sew stems so they meet; couch the stem chain across top edge and secure with hidden stitches.
- Tiny highlights: With white embroidery floss, add a tiny straight stitch on each cherry to imply shine.
Finishing & variations
- Attach the cherries to a metal hair clip with glue + a few stitches for durability.
- Use lighter pink for strawberry-cherry hybrids.
Care
- Machine wash gentle; hair-clip versions—spot clean the applique only and avoid wetting clip hardware.
4. Crochet Guava Applique Pattern
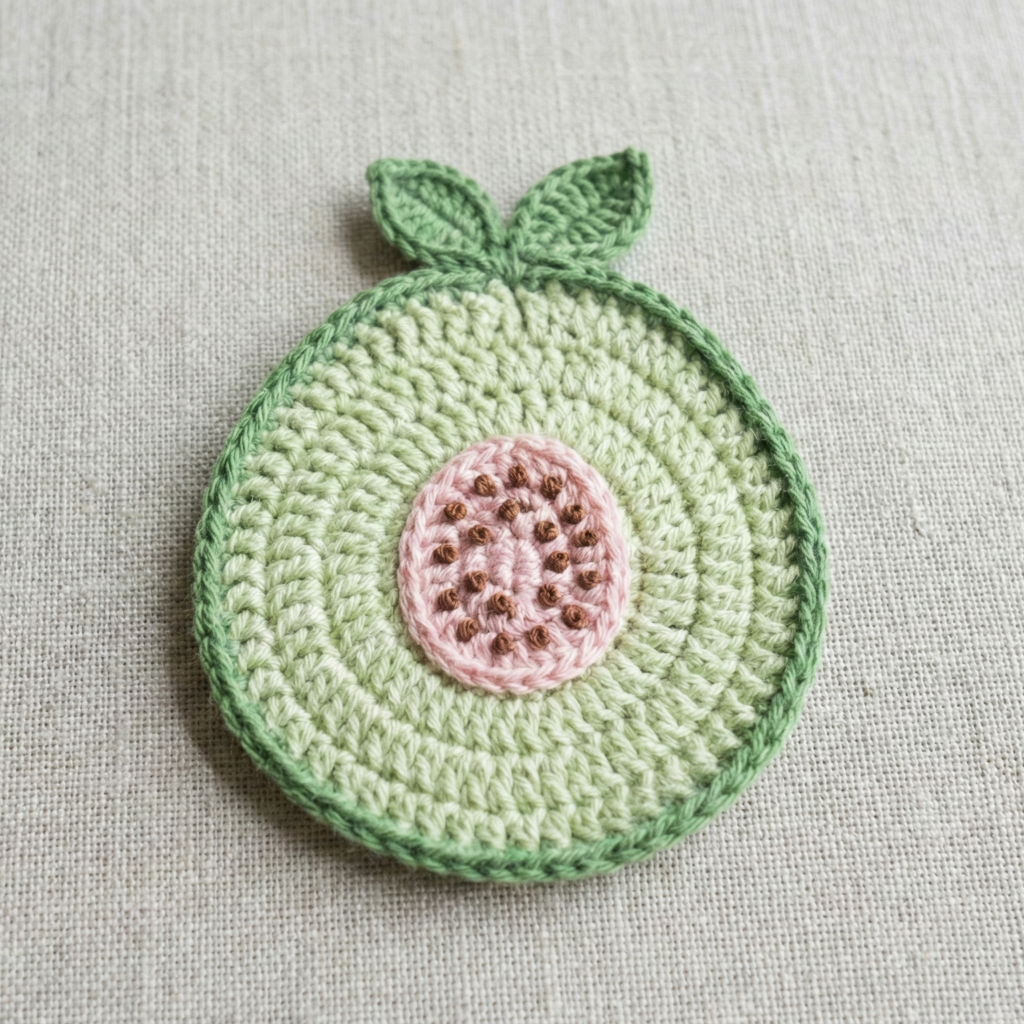
Style & use: rounded guava with small central seed cluster — slightly exotic and playful on bags or dolls.
Skill level: Intermediate (oval shaping + seed embroidery)
Finished size: ~2.5–3.25 in (DK+3.5 mm).
Materials
- DK cotton: pale green (flesh), darker green (skin), tiny amount of cream/pink for seed area, embroidery floss for details. Hook 3.5 mm.
Step-by-step
- Flat oval base (similar to avocado method): Chain 9. R1: sc in 2nd ch and across (8). Work around the chain to produce oval: 3 sc in end chain, sc across opposite side, 3 sc in last chain. Join. R2–R4: sc around, increasing at the 3-sc end corners as needed until oval measures ~2.5–3 in.
- Skin edge: Join darker green on outer round and work 1 round sc for skin rim.
- Seed cavity: Using cream or light pink, embroider a tiny elongated oval near the center (or make a small appliqué circle, sew on and add embroidered red/brown tiny seed dots). For a more realistic guava, you can create a tiny seeded cluster by making 3–5 French knots of brown/black floss grouped near the center.
- Leaf: Add 1–2 tiny leaves at top: ch6, sc, hdc, dc, hdc, sc, sl st to base.
Finishing & variations
- For 3D guava, make two ovals, sew together leaving gap, stuff lightly and close. Sew seed cluster into one side before closing.
- Use pink interior for ripe guava look.
Care
- Machine wash gentle; reshape.
5. Crochet Lemon Applique Pattern
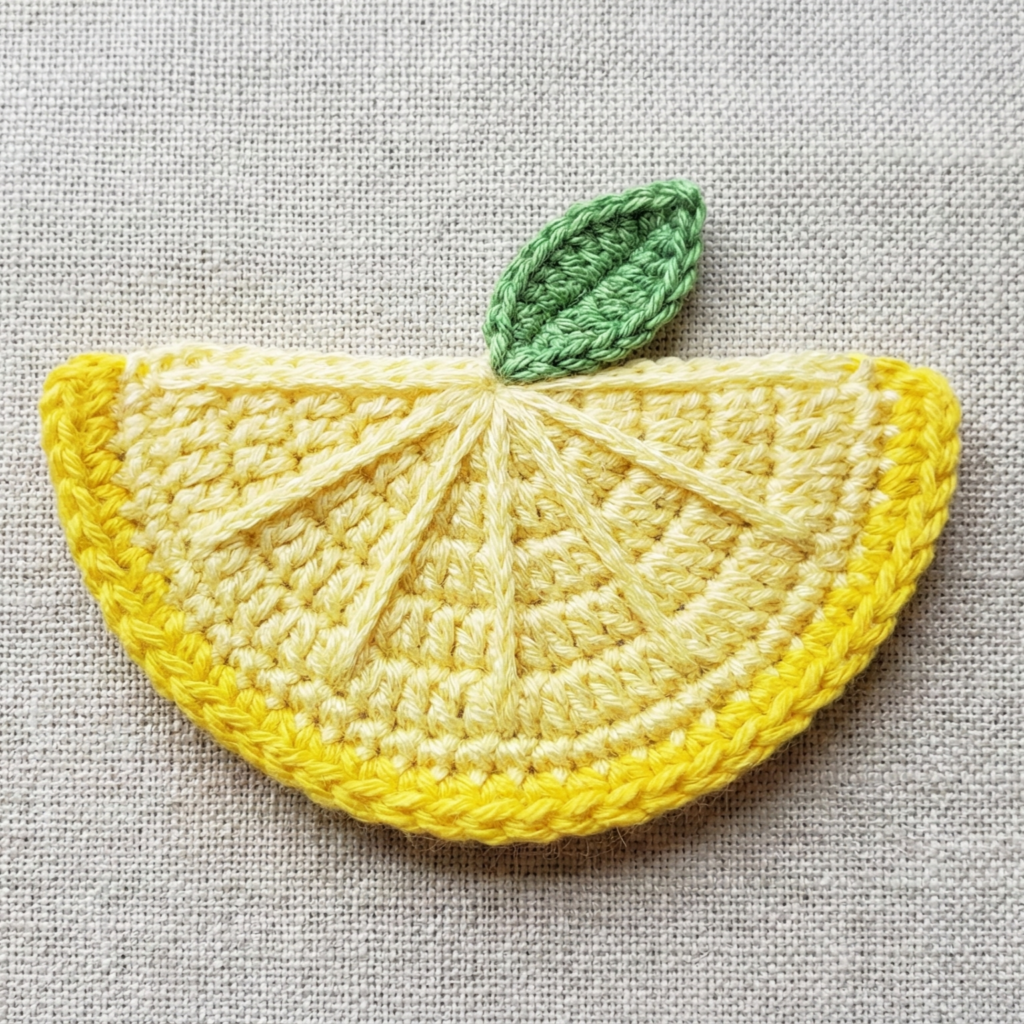
Style & use: lemon wedge or whole lemon round — bright and zesty on kitchen textiles, napkins, or kids’ clothing.
Skill level: Beginner–Intermediate
Finished size: wedge ~2–3 in; whole lemon ~2.5–3.5 in (DK + 3.5 mm).
Materials
- DK cotton: bright yellow (lemon), pale yellow or cream for inner wedge, green for leaf. Hook 3.5 mm.
Step-by-step — Wedge version (fast and graphic)
- Center wedge (worked flat): MR; R1: 6 sc in MR — (6). R2: inc around — (12). R3: sc, inc around — (18). Flatten to form a circle, then shape wedge by working decreases along one side:
- R4: sc x2, dec around to narrow slightly, then finish with an angled edge: positioned decreases across 4–6 sts to form a wedge tip. Another approach: make a circle then cut a wedge by crocheting a semi-circle and finishing inner edge with sc.
- Inner segment lines: Use pale yellow to surface-crochet thin radiating lines from center towards outer curve to mimic citrus sections (6–8 lines across wedge).
- Rind: Join bright yellow along outer edge and work a round of sc in bright yellow to accent rind; optionally follow by a round of crab stitch (reverse sc) for a raised edge.
- Leaf: small leaf: ch5, sc in 2nd ch, hdc, dc, sl st to base. Sew at top.
Whole lemon alternative (oval):
Make a flat oval as in avocado, join bright yellow for rind, and embroider faint lines for segments on the flat face.
Finishing & variations
- Make a set of lemon wedges in varying sizes for a playful garland.
- Add tiny French-knot “pulp” along the segment interior for texture.
Care
- Cotton lemon appliqués: machine wash gentle.
6. Crochet Orange Applique Pattern
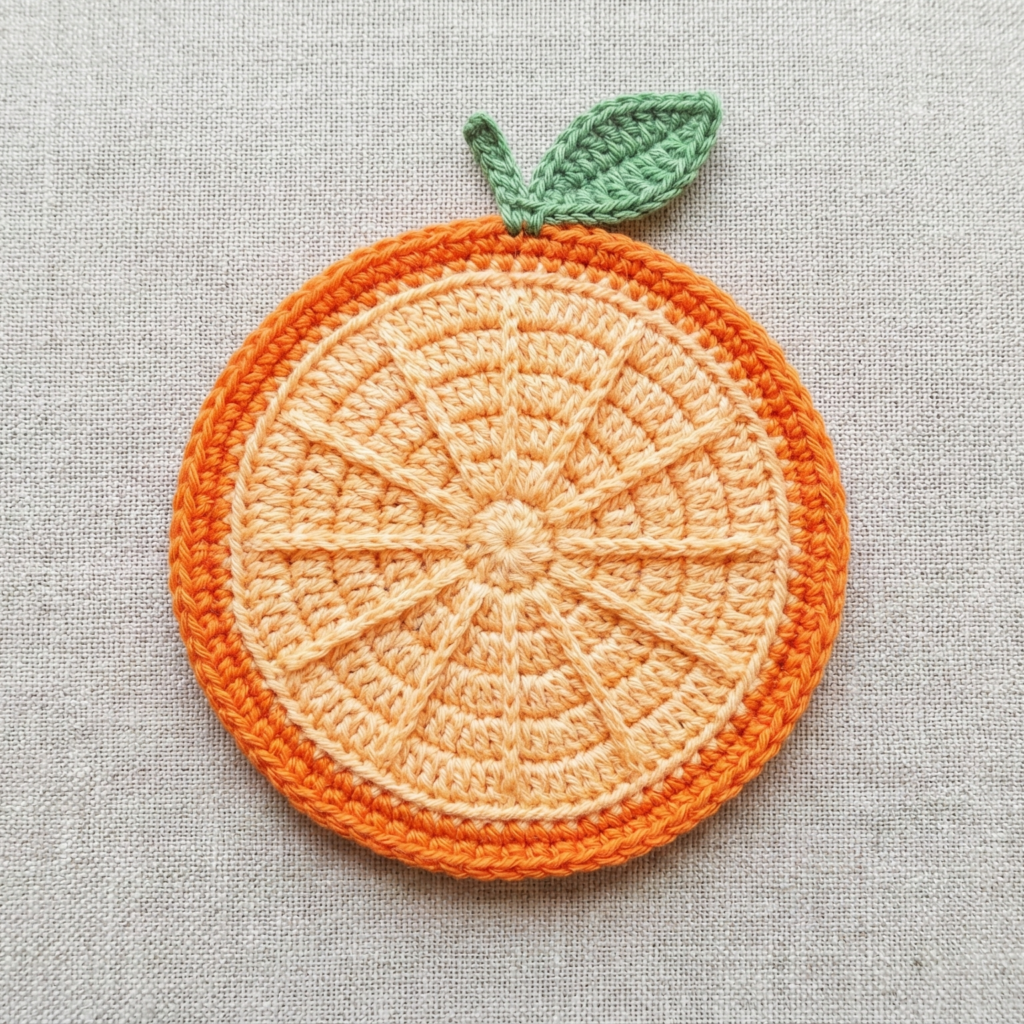
Style & use: classic segmented orange slice — cheerful for kids’ shirts, tea towels, or placemats when scaled up.
Skill level: Intermediate (segment sculpting + surface embroidery)
Finished size: ~2.5–3.5 in for slice (DK + 3.5 mm).
Materials
- DK cotton orange, pale orange/cream for pith/segments, green for leaf, 3.5 mm hook.
Step-by-step — Half-slice (most versatile)
- Start with flat semicircle: MR, ch1, 6 sc in MR (6). R2: inc around (12). R3: sc, inc around (18). Continue expanding a half circle by working increases on the curved side only — an easier way is to work a full circle then fold it in half and seam to create a half-slice (see below).
- Full circle then cut method (easiest neat segments): Work a circle to the desired diameter (e.g., R1 6sc, R2 inc=12, R3 sc, inc=18, R4 sc x2, inc=24… up to ~36 sts for 3.5 in). Block flat. Fold in half and seam along diameter with contrasting cream yarn to mimic the rind separation; or simply cut in half (if used as a decorative piece) and finish edge with sc.
- Segment lines (surface): Using pale cream, surface sl st or backstitch along radii from center to rind, making 8–10 segments. Then, within each segment, work small dc chains or short surface slipstitches to mimic the tiny juice vesicles.
- Rind: Work a round of sc in orange around outer edge; work one more round in a slightly darker orange or in crab stitch for lift.
- Leaf & stem: Add a tiny leaf and short stem at edge: ch6 leaf shape as before, attach near rind.
Finishing & variations
- Make an entire set of citrus slices (lemon, lime, orange, grapefruit) for a colorful kitchen display.
- For toy food, make two slices, sew together and stuff lightly.
Care
- Machine wash gentle for cotton.
Conclusion
You now have six fully worked fruit applique patterns with clear step-by-step instructions and practical finishing options. A few ideas and tips to help you turn these into charming craft projects and sellable gift sets:
Ideas & uses
- Sew several fruit appliqués onto a plain denim tote or a kid’s backpack for an instant style upgrade.
- Attach to hair clips, bibs, patchwork quilts, or make a matching set for play food in a pretend market stall.
- Make a fruit garland by stitching small loops to the top of each applique and stringing them on twine for nursery decor.
- Create small magnets by sewing appliqués to pre-cut felt circles and adding a strong magnet on the back (adhesive + sewing recommended for washability).
Gift set ideas
- Snack set: three different fruit appliqués sewn onto a small canvas pouch and tied with ribbon — simple, affordable, and quick to make.
- Play food kit: fruit appliqués plus a small mini basket and doll-scale napkin — great for children’s imaginative play.
Production tips
- Make templates for repeatability: print simple oval/heart shapes to keep all appliqués consistent in size.
- Block every piece and photograph multiples as a set to help sell or present on your blog.
- Stitch securely and finish back edges neatly to ensure durability — always sew rather than glue for items that will be laundered or handed to kids.
Care & labeling for gifts
- Recommend: “Machine wash gentle, cold. Reshape and lay flat to dry. Avoid high heat.” For items with glued or non-washable attachments (clips, wooden beads), note “spot clean only.”