Crochet stitch patterns are the language of texture, movement, and mood in every handmade project. A single stitch choice can turn the same yarn into an airy shawl, a structured cushion, or a cozy blanket. In this post you’ll find six beautiful, versatile stitch patterns — each with a clear explanation of how the stitch works, a step-by-step construction (with repeat counts and a sample swatch size), gauge and materials guidance, design notes, troubleshooting tips, and project ideas where the stitch shines. All patterns use US terms.
Use these stitches as building blocks: learn them on small swatches, then scale them into scarves, blankets, garments, bags, or home decor. Where helpful I include suggestions for adjusting stitch density, color, and finishing so the stitch does exactly what you want it to do.
Quick notes before you start
- Abbreviations used: ch = chain, sc = single crochet, hdc = half double crochet, dc = double crochet, tr = treble (tr), sk = skip, st(s) = stitch(es), BLO = back loop only, FLO = front loop only, sl st = slip stitch, rep = repeat, RS = right side, WS = wrong side.
- Yarn & hook: I give sample yarn weights and hooks for each stitch; always make a swatch to check gauge before committing to a project.
- Gauge examples are approximate — because stitch height and openness vary by maker, treat them as starting points.
- Notes on blocking: many textured stitches open up and look best after light blocking (wet or steam, depending on fiber).
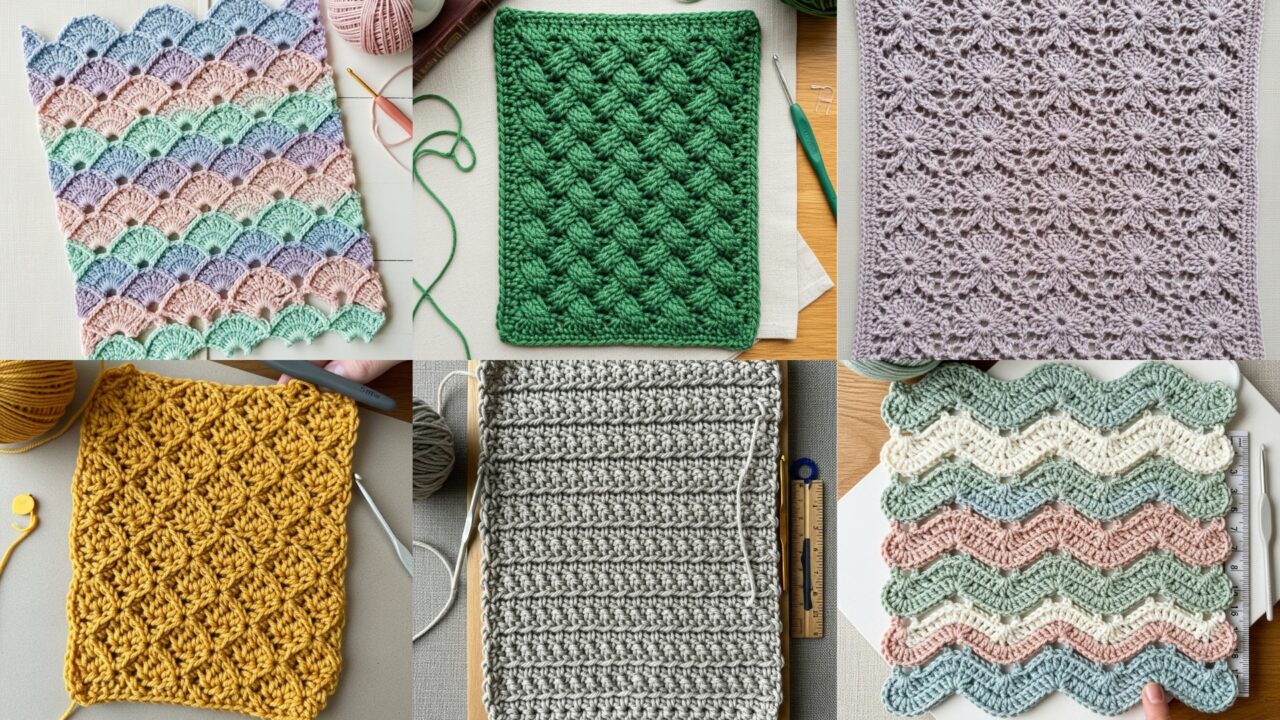
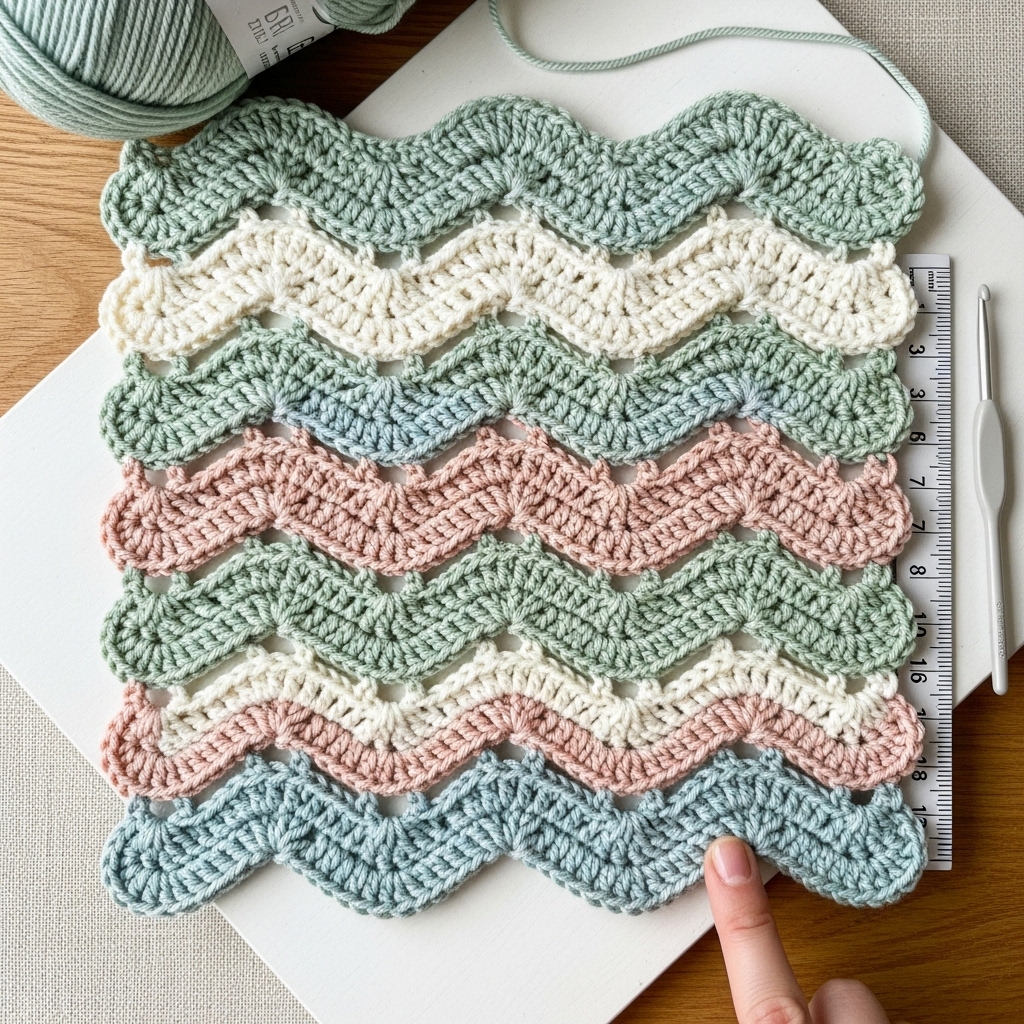
1. Crochet Open Wave Stitch Pattern
Overview & character:
The Open Wave stitch creates rhythmic wavy bands separated by openwork rows. It’s an airy, flowing stitch ideal for shawls, scarves, lightweight blankets, and feminine cardigans. Wave bands formed by taller stitches give visual movement; the open rows add breathability.
Skill level: Confident beginner
Materials & gauge (sample swatch):
- Yarn: Fingering to DK (sample uses DK).
- Hook: 4.0 mm.
- Gauge (approx): 16 sts × 12 rows = 4 in × 4 in in pattern (DK). Make a 4″ swatch to confirm.
Multiple / repeat: multiple of 12 + 1 (for turning chain)
Stitch explanation (short):
The stitch alternates a textured “wave” band worked in clusters of tall stitches (dc/tr combinations) with an open mesh row (chains and skipped stitches). The wave rows are worked with increases/decreases or shell clusters that create a scalloped top and bottom.
Step-by-step (sample, DK yarn)
- Foundation: Ch 73 (multiple of 12 + 1) — this sample gives a ~18–20 in wide scarf in DK (adjust chains for desired width).
- Row 1 (Base): Dc in 3rd ch from hook and across. Turn. (72 dc)
- Row 2 (Wave setup): Ch 3 (counts as dc), skip next 2 sts, (3 dc, ch2, 3 dc) in next st (shell made in center), skip next 2 sts, dc in next 3 sts — repeat across ending with dc; turn.
- Row 3 (Open row): Ch 1, sc in first st, ch 3, sk 3 (over shell base), sc in next 3 dc — repeat to end; turn.
- Row 4 (Wave fill): Ch 3, dc in each sc and ch3 space to re-form shells where ch-spaces occur: in ch-3 space work (3 dc, ch2, 3 dc), sc into tops of shell peaks; repeat. Turn.
- Row 5: Repeat Row 3.
- Repeat Rows 4–5 for the desired length. End with a dc row (Row 1 style) for a neat edge. Finish with a round of sc for stability if the piece will be used as a garment/bag.
Variations & ideas:
- Make shells taller (use tr instead of dc) for deeper waves.
- Work shells in contrasting color every other wave for bold stripes.
- Use this stitch for airy cardigans and beach wraps by scaling width and length.
Finishing & blocking:
Block gently to open the shells and align waves. Pin each crest if you want crisp scallops.
Troubleshooting:
If waves look lopsided, check that you’re landing your shells consistently into the same reference place (often a center stitch or ch-space). Counting across several repeats helps when starting a new row.
Best uses: shawls, scarves, lightweight blankets, summer tops.
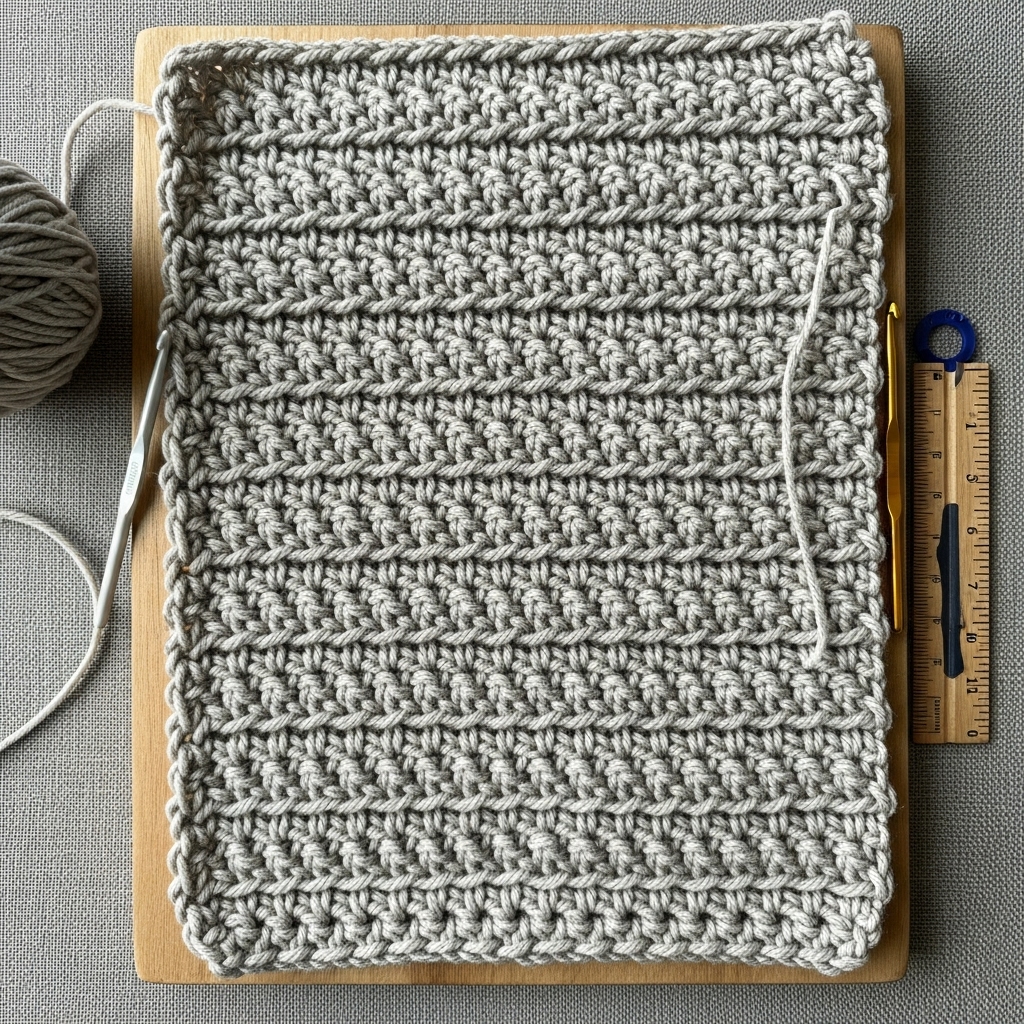
2. Crochet Crumpled Griddle (Gridle) Stitch Pattern
Overview & character:
The Crumpled Griddle stitch (sometimes called “griddle” or “gridle”) is a textured, slightly bumpy fabric that resembles a folded or crumpled waffle. It’s dense, warm, and squishy — excellent for bath mats, heavy blankets, winter scarves, and structured bags.
Skill level: Confident beginner → intermediate
Materials & gauge (sample swatch):
- Yarn: Worsted/Aran weight.
- Hook: 5.0 mm.
- Gauge (approx): 13 sts × 18 rows = 4 in × 4 in (in pattern).
Multiple / repeat: multiple of 2 + 1 (for turning)
Stitch explanation (short):
This stitch uses alternating rows worked into the back loop only and into both loops to create tiny ridges and small vertical columns, producing the crumpled visual.
Step-by-step (sample, worsted)
- Foundation: Ch 41 (multiple of 2 + 1).
- Row 1: Sc in 2nd ch from hook and across. Turn. (40 sc)
- Row 2 (BLO Row): Ch 1, sc in BLO across. Turn.
- Row 3 (Full row): Ch 1, sc in each st across working through both loops. Turn.
- Row 4 (Pattern repeat): Repeat Row 2 then Row 3 alternately. Over several repeats the fabric forms small horizontal ridges and a crumpled profile.
Variation (enhanced waffle):
To emphasize texture, substitute hdc for sc on the full rows and sc for the BLO rows — tall stitches accentuate depth.
Finishing & blocking:
Minimal blocking; stretch lightly to square. The stitch is stable and mostly unchanging after washing.
Troubleshooting:
If the fabric looks too flat, tighten the hook (drop one size) or use thicker yarn; if too stiff, try a larger hook. For bags, keep tension tight; for scarves or blankets allow slightly looser tension.
Best uses: winter scarves, structured cardigans, potholders (use cotton), textured blankets, bags.
3. Crochet Honeycomb Stitch Pattern
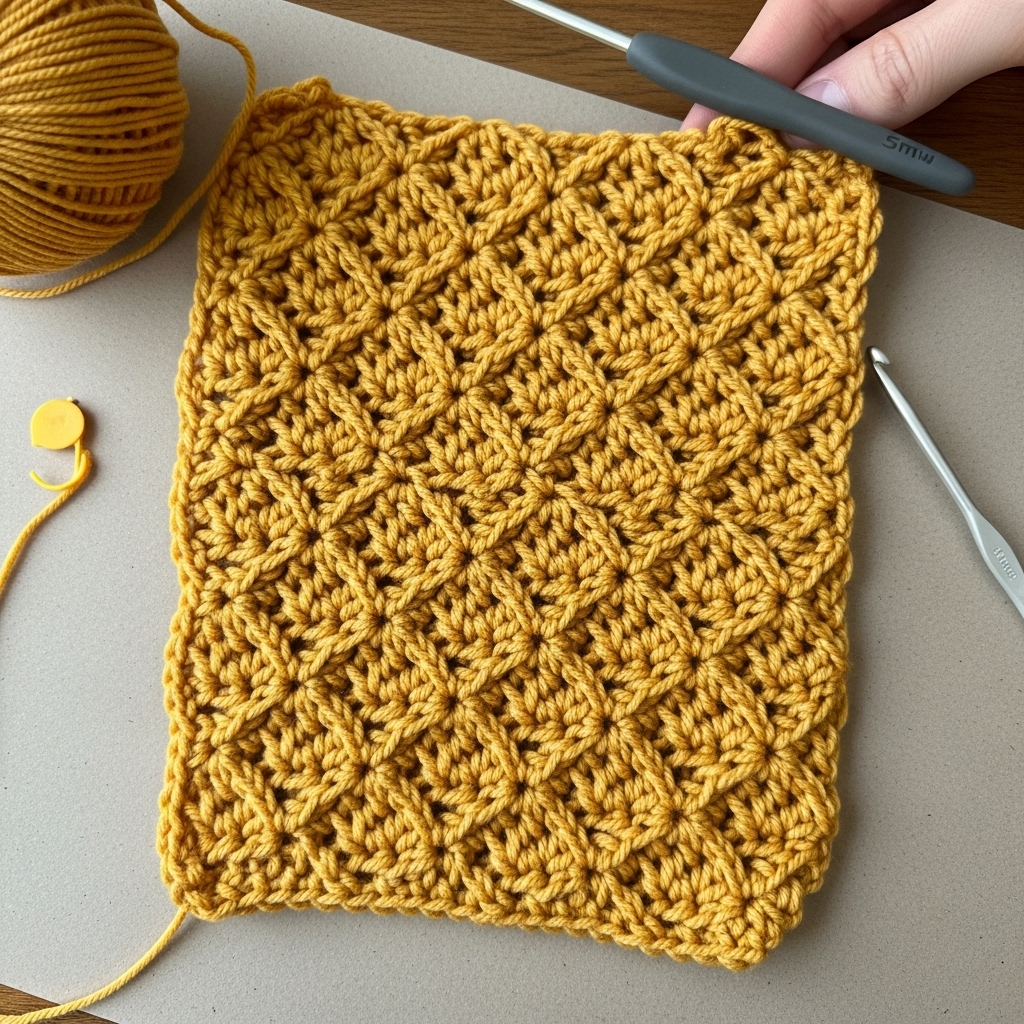
Overview & character:
Honeycomb stitch produces a dense, interlocking hexagonal texture reminiscent of a bee’s honeycomb. It’s a great decorative and insulating stitch — warm, durable, and elegant for blankets, cozy cardigans, and cushions.
Skill level: Intermediate (uses post stitches or crossed stitches)
Materials & gauge (sample swatch):
- Yarn: Worsted weight.
- Hook: 5.0 mm.
- Gauge (approx): 14 sts × 16 rows = 4 in × 4 in in pattern
Multiple / repeat: multiple of 3 + 2 (this depends on version; below is a common post-stitch honeycomb)
Stitch explanation (short):
Common honeycomb uses front-post and back-post stitches (FPdc/BPdc) arranged so that columns of post stitches bracket sections that look like honeycomb cells.
Step-by-step (post-stitch honeycomb, sample)
- Foundation: Ch 32 (multiple of 3 + 2).
- Row 1: Dc in 3rd ch from hook and across. Turn.
- Row 2: Ch 2 (counts as hdc), hdc across. Turn.
- Row 3 (begin honeycomb): Ch 2, FPdc around next st, BPdc around next st, FPdc around next st; hdc in next st; repeat across to end. Turn.
- Row 4: Ch 2, hdc across working into tops of post stitches. Turn.
- Row 5: Repeat Row 3 but offset post positions by one stitch to begin forming honeycomb pockets. Alternate Row 3 and Row 4 for the pattern.
Variations & tips:
- Use FPdc/BPdc pairs of different heights to exaggerate cell depth.
- Use a sport weight for an even more delicate honeycomb lace.
Finishing & blocking:
Block to set hexagon shapes — pin lightly to square edges and flatten the cells.
Troubleshooting:
Posts can pull fabric horizontally—keep tension consistent when working post stitches so the fabric doesn’t cinch. If wavy edges occur, check increases/decreases across the row count.
Best uses: blankets, cushion covers, warm jackets, textured cowls.
4. Crochet Celtic Weave Stitch Pattern
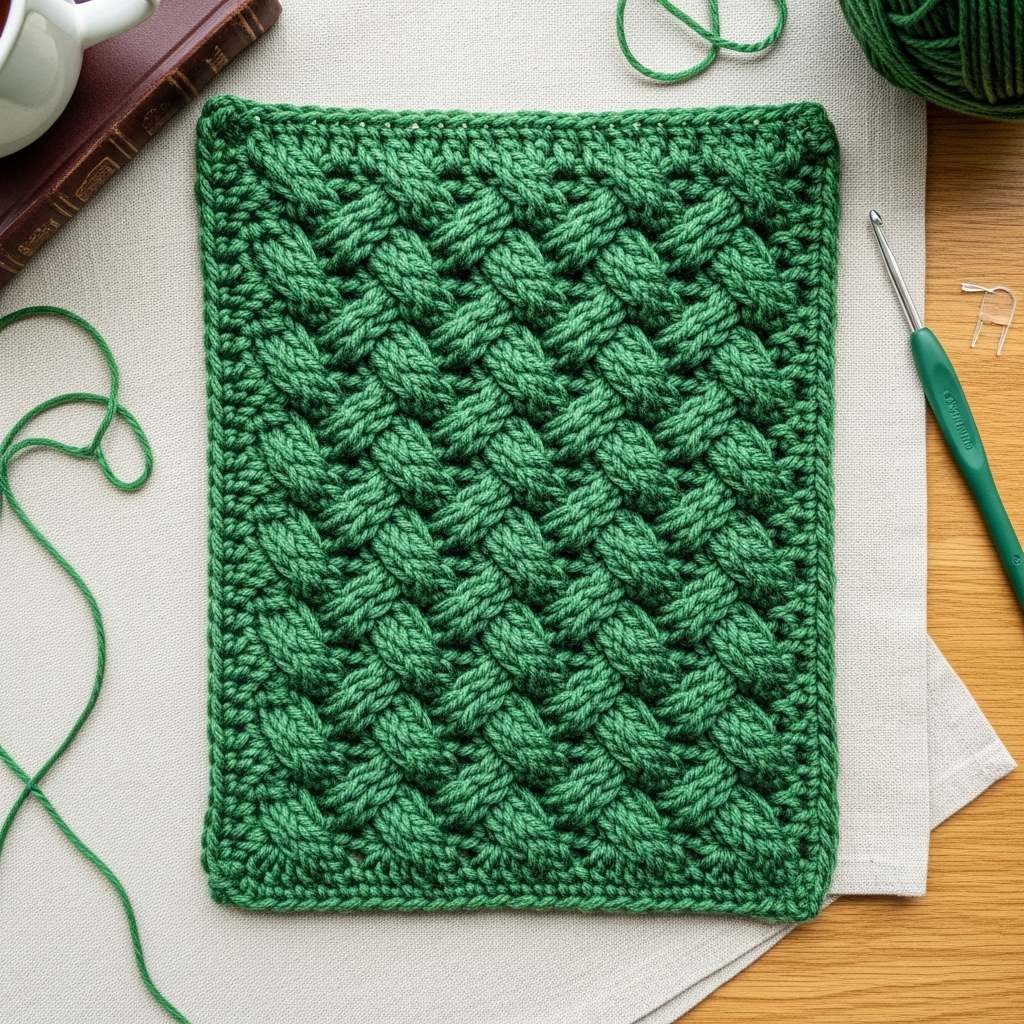
Overview & character:
Celtic Weave stitch evokes interlaced ropes and braids (not true stranded Celtic knots, but a visual weave). It creates strong vertical columns and a woven appearance by using a combination of post stitches and crossed stitches. It looks fantastic on scarves, hats, and sweater panels.
Skill level: Intermediate → advanced (crosses, cables via front/post stitches)
Materials & gauge (sample swatch):
- Yarn: Aran/worsted weight.
- Hook: 5.0 mm.
- Gauge (approx): 12 sts × 14 rows = 4 in × 4 in in pattern
Multiple / repeat: multiple of 12 + edge sts (common charted repeat)
Stitch explanation (short):
This stitch uses front/post stitches plus crossed front-post groups to simulate cable crossings. By skipping stitches and crossing over, a woven cable effect appears.
Step-by-step (simplified Celtic weave panel)
- Foundation: Ch 50 (or a multiple accommodating the pattern + edges).
- Row 1: Dc across to establish base. Turn.
- Row 2 (setup): Hdc across or sc across as a base row.
- Row 3 (weave row): Ch 2, FPdc around next 3 sts, BPdc around previous 3 sts (crossing effect) — practical implementation requires holding loops on hook or using stitch markers to keep track of which posts cross over which. Repeat pattern across, ending with hdc edge.
- Row 4: Hdc across.
- Repeat Rows 3–4. On subsequent passes, reverse the order of FP/BP groupings to create left and right crosses mimicking Celtic weaving.
Worked example (cable crossing technique):
- To make a left-cross: work FPdc around the 2nd set of 3 sts first, then work FPdc around the earlier set so the later group appears in front. For right-cross, reverse order.
Variations & tips:
- Narrow the cable motif and run it down a sweater front for a Celtic-inspired panel.
- Use two-color combinations with the weave in a contrasting color via surface slip stitch to outline cables.
Finishing & blocking:
Block to open the weave; cable stitches will relax slightly after blocking.
Troubleshooting:
Crossed post stitches require planning and counting — use stitch markers to mark cable groups before you start the row. If the cable looks twisted or bunched, check the order of post stitches.
Best uses: scarves, sweater panels, hat bands, statement cushion fronts.
5. Crochet Interlocking Shell Stitch Pattern
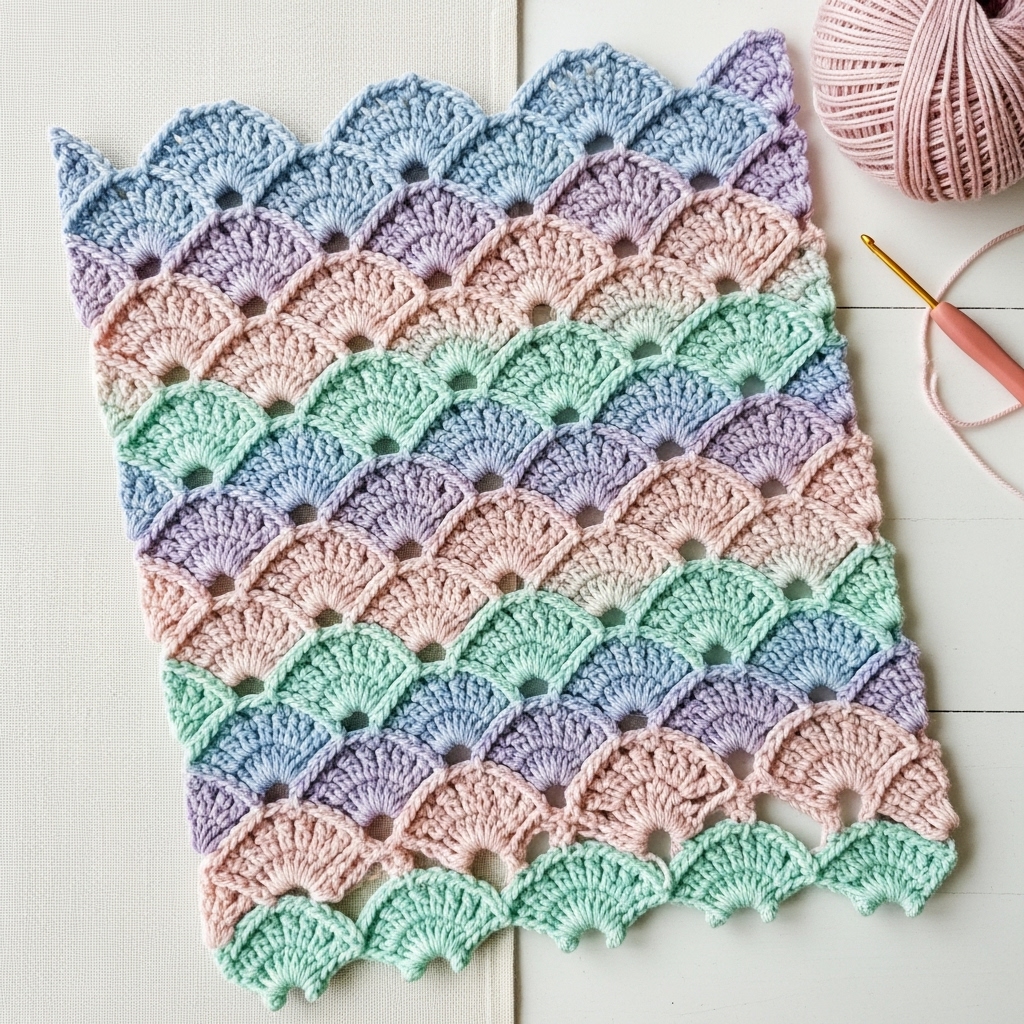
Overview & character:
Interlocking Shells create an undulating, richly textured fabric where shell motifs appear to link into one another — decorative and versatile. This stitch is wonderful for stoles, decorative throws, baby blankets, and feminine cardigans.
Skill level: Confident beginner → intermediate
Materials & gauge (sample swatch):
- Yarn: DK or worsted (sample uses DK).
- Hook: 4.0 mm.
- Gauge (approx): 16 sts × 18 rows = 4 in × 4 in in pattern
Multiple / repeat: multiple of 6 + 1 (shell placement)
Stitch explanation (short):
You create rows of shells (usually 5-dc clusters) offset every other row so the shells interlock into chain-like rows. Chains and single crochets between shells help lock them together.
Step-by-step (sample)
- Foundation: Ch 73 (multiple of 6 + 1).
- Row 1 (base): Dc in 3rd ch from hook and across. Turn.
- Row 2 (shell row): Ch 1, sc in first st, skip 2, (5 dc) in next st, skip 2, sc in next st — repeat across to create shells spaced by sc. Turn.
- Row 3 (interlock row): Ch 3, dc in top of first sc, dc in center of next shell (work into 3rd dc of shell), dc in top of next sc — this stitches shells into the next row, creating the interlock. Turn.
- Repeat Rows 2–3 to grow fabric. The result is linked shells forming a flowing surface.
Variations & tips:
- Make shells taller (7 dc) for a more dramatic effect or shorter (3 dc) for a compact pattern.
- Use variegated yarn to emphasize shell arcs.
Finishing & blocking:
Block to spread shells evenly; pin shell points gently for crisp curves.
Troubleshooting:
If shells stacking look off, ensure you are working into correct center dc of previous shells. It helps to place a stitch marker in the center dc while you learn.
Best uses: feminine shawls, baby blankets, decorative throws, textured tops.
6.Crochet Iris Stitch Pattern
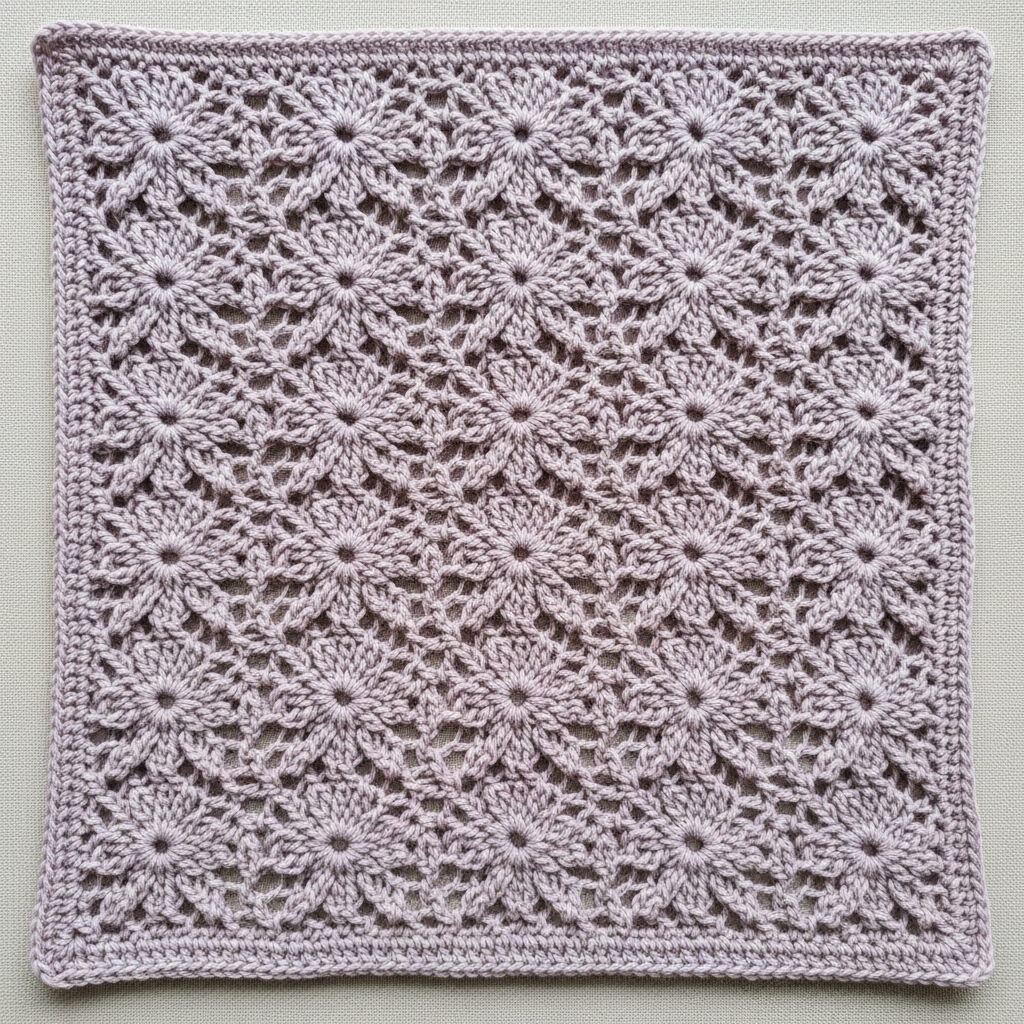
Overview & character:
The Iris stitch is delicate, floral-inspired, and produces a subtle eyelet texture often compared to the petals of an iris. It’s breathable and refined — perfect for summer garments, lightweight scarves, and elegant shawls.
Skill level: Intermediate
Materials & gauge (sample swatch):
- Yarn: Fingering or sport weight for delicate drape.
- Hook: 3.25–3.75 mm.
- Gauge (approx): 20–24 sts × 28 rows = 4 in × 4 in (depends on yarn)
Multiple / repeat: multiple of 4 + 2 (varies by chart)
Stitch explanation (short):
The Iris stitch typically combines chains, clusters, and single or double crochets to make small petal-like motifs arranged in offsets. The resulting fabric has little petal clusters separated by mesh columns.
Step-by-step (one common Iris repeat)
- Foundation: Ch 66 (multiple of 4 + 2).
- Row 1: Dc in 4th ch from hook and across. Turn.
- Row 2 (Iris pattern start): Ch 1, sc in first st, ch 3, sk 3, sc in next dc; repeat across to create mesh reference. Turn.
- Row 3 (petal clusters): Ch 2 (counts as hdc), (3 dc cluster) into ch-3 space, ch 1, sl st back into center of cluster — the cluster + sl st makes a petal. Repeat across. Turn.
- Row 4: Ch 1, sc across through dc tops and sl st centers, aligning petals in offset rows to produce Iris texture.
- Repeat Rows 2–4 to build the pattern.
Variations & tips:
- Use larger clusters for bolder petals.
- Work in silk blends to emphasize drape and sheen.
Finishing & blocking:
Block to open petal shapes and set pattern; delicate threads respond well to steam blocking.
Troubleshooting:
When clusters don’t line up, mark the ch-3 spaces on the previous row so you place clusters consistently. Keep tension even when making clusters to avoid lopsided petals.
Best uses: summer tops, airy shawls, delicate scarves, elegant trims.
Putting it into practice — project ideas & pairing tips
- Blanket: Combine Honeycomb for a center panel, Interlocking Shells for borders, and Open Wave for edge flounce.
- Sweater: Use Celtic Weave as a central cable panel, with Griddle stitch for body sides for warmth.
- Shawl/Wrap: Open Wave or Iris stitch in fingering/silk blends creates gorgeous drape.
- Home decor: Honeycomb cushions, Griddle bath mat (cotton), Interlocking Shell throw for texture.
- Accessories: Celtic Weave scarf, Iris lace headband, Shell-stitch market bag panels.
When combining stitches in one project, swatch each stitch in the intended yarn to compare gauge. Adjust stitch counts or hook sizes so panels line up neatly before seaming.
Troubleshooting common issues & practical tips
- Waves or panels flaring at edges: Check that your foundation chain is true and that you are not accidentally increasing/decreasing due to missed stitches. For lopsided repeats, count across a few repeats and adjust before continuing.
- Post stitches pulling fabric inwards: Keep post stitch tension slightly looser and work a plain row of hdc or sc every few rows to stabilize.
- Uneven selvedge edges: Work a chain-1 (or chain-2) non-stitch at beginning of row and an extra sc at end as a tidy border, or add a uniform sc round after finishing.
- Stitch definitions muddy on textured yarns: Use smoother plied yarns for highly textured stitches (Celtic Weave, Honeycomb) so post stitches and shells read clearly.
Finishing: blocking, seaming, and edges
- Light blocking opens lace and evens textured stitches. Use wet blocking for natural fibers and steam/cloth for acrylic blends (check yarn instructions).
- Seaming: For visible seams (garments, cushions), mattress stitch on wrong side gives an invisible join. For decorative edges, try picot, crab stitch (reverse sc), or a small sc round for a neat framed edge.
- Edging tips: A single round of sc in a contrast color can make complex stitches pop and stabilize edges for garments and bags.
Conclusion
These six crochet stitch patterns — Open Wave, Crumpled Griddle, Honeycomb, Celtic Weave, Interlocking Shells, and Iris — offer a toolbox of texture, rhythm, and style. Learn them on swatches, then mix and match to design your own projects: a honeycomb cushion beside a shell-edged throw, a Celtic-weave scarf paired with a griddle-stitch hat, or an iris-stitched summer top with an open wave hem.