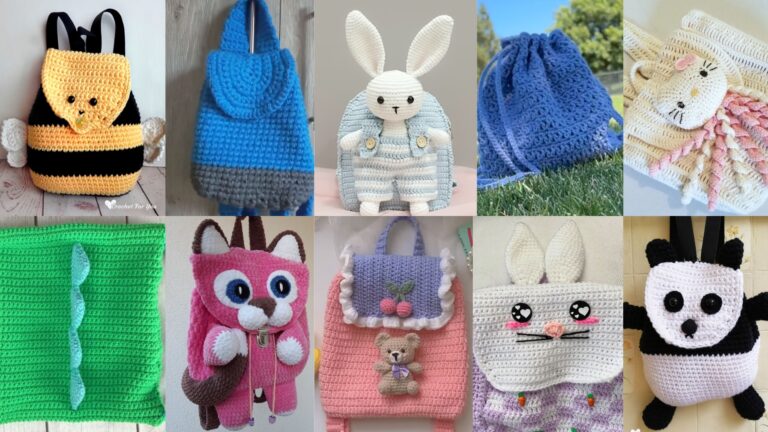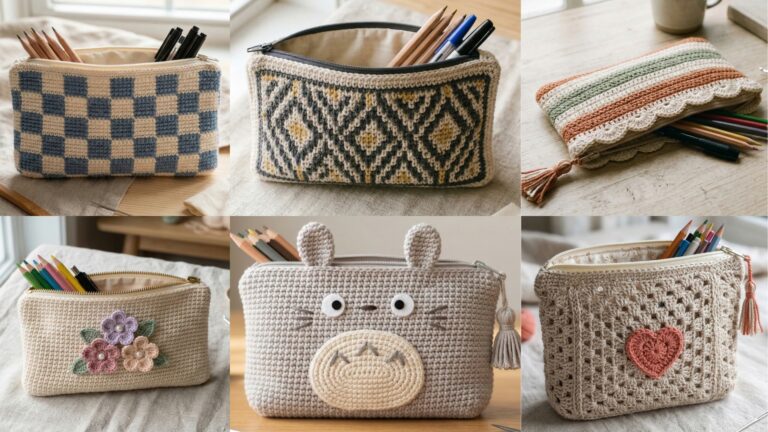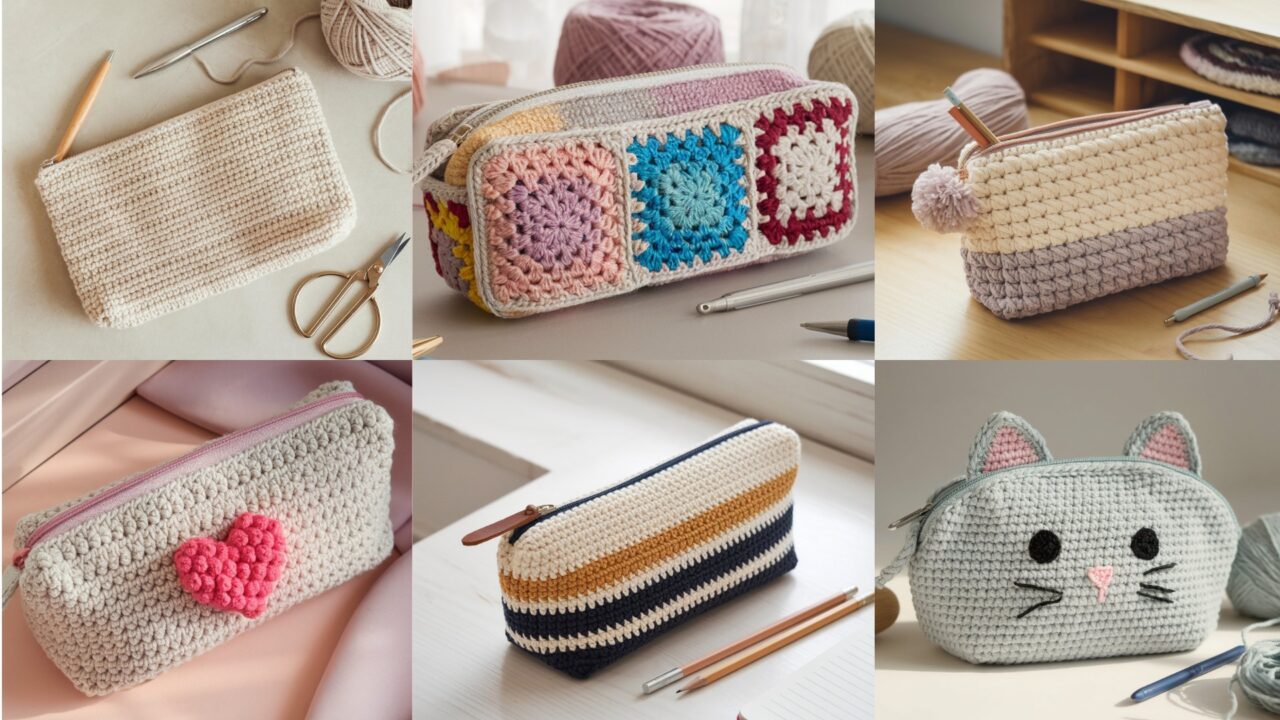
School supplies, art tools, makeup brushes, chargers — a nice pencil case keeps essentials tidy and looks good on a desk. These six crochet pencil case patterns are fast, usable, and cover a range of styles: faux-knit texture, cute cat motif, classic stripes, a chunky Bernat-style pouch, granny-square patchwork, and a romantic bobble-heart design. Each pattern below includes: materials, finished size, skill level, abbreviations, a clear step-by-step pattern, zipper/lining instructions, finishing tips, and variations so you can make one in an evening or batch a set over a weekend.
Read the intro notes first (abbreviations, general tips), then pick the pattern you like.
Quick notes & abbreviations (read this first)
- Abbreviations used: ch = chain · sl st = slip stitch · sc = single crochet · hdc = half double crochet · dc = double crochet · tr = treble · st(s) = stitch(es) · inc = increase (2 sts in same st) · dec = decrease (sc2tog unless stated) · BLO/FLO = back loop only / front loop only · MR = magic ring.
- Yarn & hook: Patterns use common worsted (weight 4) unless noted. Use the hook listed to get fabric density suitable for a pouch; smaller hooks = denser, sturdier fabric.
- Finished sizes can be adjusted by changing stitch counts or adding/subtracting rows. I give example sizes — measure as you go.
- Lining & zipper: For durability and neatness, I recommend sewing an inner fabric lining and inserting a zipper. I include simple lining instructions under each pattern. If you prefer a no-sew option, use hot glue to attach zipper to felt backing and glue felt inside the case (less durable).
- Gauge is not strict for small pouches, but aim for an even fabric. If you need sturdier structure for heavy pens, use cotton or hold two strands.
1. Crochet Faux Knit Pencil Pouch Pattern
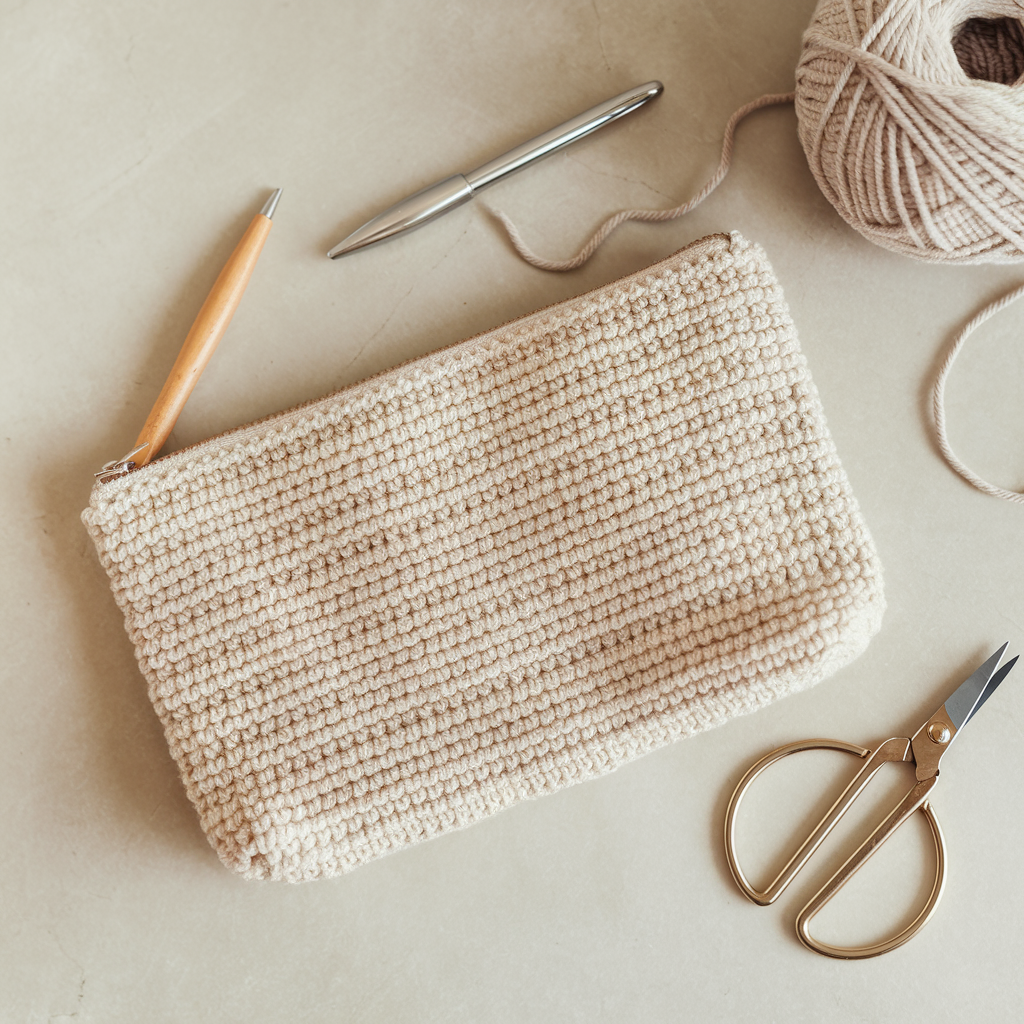
Style: Sleek, modern pouch with knitted-look ribbing using back loop-only stitches. Minimalist and elegant.
Skill level: Beginner → Advanced Beginner
Finished size: ~8.5″ × 3.5″ × 1.5″ (fits pens, brushes, slim markers)
Materials:
- Worsted weight cotton or cotton-blend yarn — 150–200 yds.
- Hook: 4.0 mm (or to get firm fabric).
- 9″ zipper, fabric for lining (~10″ × 12″), tapestry needle, scissors, pins, sewing needle & thread or sewing machine.
Why this works
Working sc in the back loop only creates a neat horizontal rib that looks like knit ribbing. The result is stretchy yet structured.
Pattern — step-by-step (worked flat, then seam)
Foundation & body
- Ch 34 (or ch to desired width; final width after seaming will be ~8.5″). Turn.
- Row 1: sc in 2nd ch from hook and across — 33 sc. Turn.
- Row 2: ch 1, sc in BLO across (work in back loop only) — 33 sc. Turn.
- Repeat Row 2 until piece measures 8.5″ from starting chain (roughly 30–40 rows depending on gauge). End with a folding-friendly even row. Fasten off leaving long tail for seaming.
Make gusset (optional for depth)
5. Option A — flat bottom (no gusset): proceed to assembly.
Option B — add depth by making a separate rectangle for bottom: ch 12, sc in 2nd ch and across for a 3–4″ deep base. Make two and seam as bottom piece, or create a folded gusset when seaming.
Assemble pouch
6. Fold the crocheted panel right sides together with the cast-on row meeting the final row. Align edges. If you added a bottom strip, pin it in place between front and back edges.
7. Whipstitch or mattress stitch along the long side (and bottom if no separate base) leaving top open for zipper. If you want a flat bottom, leave a small opening at the base corners and flatten seam to create triangle corners, then stitch across each corner for a boxed base.
Zipper & lining
8. Prepare lining: cut fabric 1/4″ smaller than crochet panel dimensions (so it fits inside). Fold and sew lining into a tube, stitch bottom closed. Press seams flat.
9. Pin zipper to top edge of crochet pouch (right side of zipper inward toward crochet). Hand-sew with whipstitch or use a zipper foot on machine to attach zipper to the lining first, then hand-sew lining to crochet top for a clean finish. Alternatively, sew zipper to crocheted top with small whipstitches, then sew lining into place so zipper is sandwiched.
Finishing touches
10. Weave in all ends. Block lightly if desired to open rib pattern. For extra stiffness, iron a thin strip of fusible interfacing on the outer lining at the zipper area (if lining fabric tolerates it).
Variations & tips
- Use a contrasting yarn for the last 3 rows to create a clean trim.
- Add a leather tab or tassel to the zipper pull for style.
- Double-up cotton yarn for a firmer pouch and reduced stretch.
2. Crochet Cat Pencil Bag Pattern
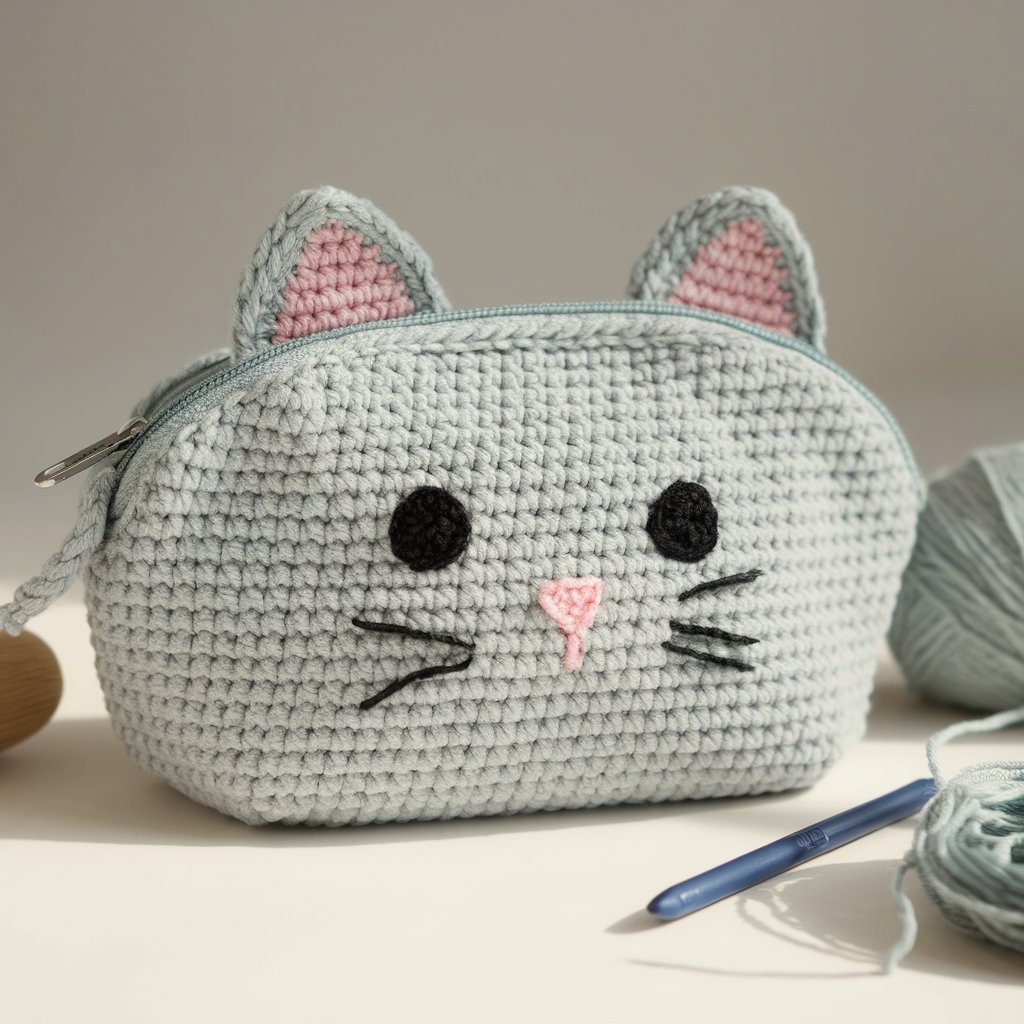
Style: Cute cat face on one side, plain back or simple stripes on the reverse. Perfect for kids or cat lovers.
Skill level: Beginner → Intermediate (includes simple amigurumi ears and embroidery)
Finished size: ~8.5″ × 4″ × 1.5″
Materials:
- Worsted yarn: main color (gray/cream), accent for inner ears and nose (pink/white), small black for eyes/whiskers. ~150 yds total.
- Hook: 4.0 mm.
- 9″ zipper, lining fabric, tapestry needle, stitch markers.
Components
- Body rectangle (main pouch)
- Two ears (sewn to top)
- Embroidered eyes/whiskers or small safety eyes (for adult use, embroidered recommended for children).
Pattern — step-by-step (worked flat)
Body
- Ch 36. Row 1: dc in 4th ch from hook and across (33 dc). Turn.
- Row 2–18: ch 3 (counts as dc), dc across. Continue until rectangle measures ~8.5″ tall. (For a shorter pouch use fewer rows.) Fasten off and weave in ends.
Ears (make 2)
3. MR, ch 1, 6 sc into MR, pull tight and join (6 sc). R2: sc, inc around = 9 sc. R3: sc around = 9 sc. R4: sc 2, dec, sc 2 (shape triangle) — OR do a small triangle by ch 5, sc back to base. Fasten off leaving tail. Make inner ear with contrasting color smaller and sew inside.
Face embroidery
4. Position ears: fold the top center of the front panel so ears sit on top corners (approx 1.5–2″ from each end). Pin ears to the right side of the front panel and baste stitch in place.
5. Embroider eyes with black yarn: two small French knots or satin stitch oval. Nose: small triangle in pink. Whiskers: three straight stitches on each side using black yarn. Keep embroidery low-profile so it fits under the zipper and lining.
Assembly & zipper
6. Fold body in half right sides together (so front with face is on one side of fold). Insert zipper along top edge and stitch as in the previous pattern, or sew lining, attach zipper to lining then crochet.
7. Sew side seams leaving top open; box corners if desired. Attach ears to top seam so they stick out above zipper.
Lining & finish
8. Make a lining and attach to zipper as described earlier. Weave ends and trim.
Variations & tips
- Make a different animal motif by changing ear shape (bunny long ears, bear rounded).
- Add small felt appliqués (must be sewn securely for kids).
- For a plush look, hold a fuzzy yarn with a smooth one for the body.
3. Crochet Stripe Pencil Case Pattern
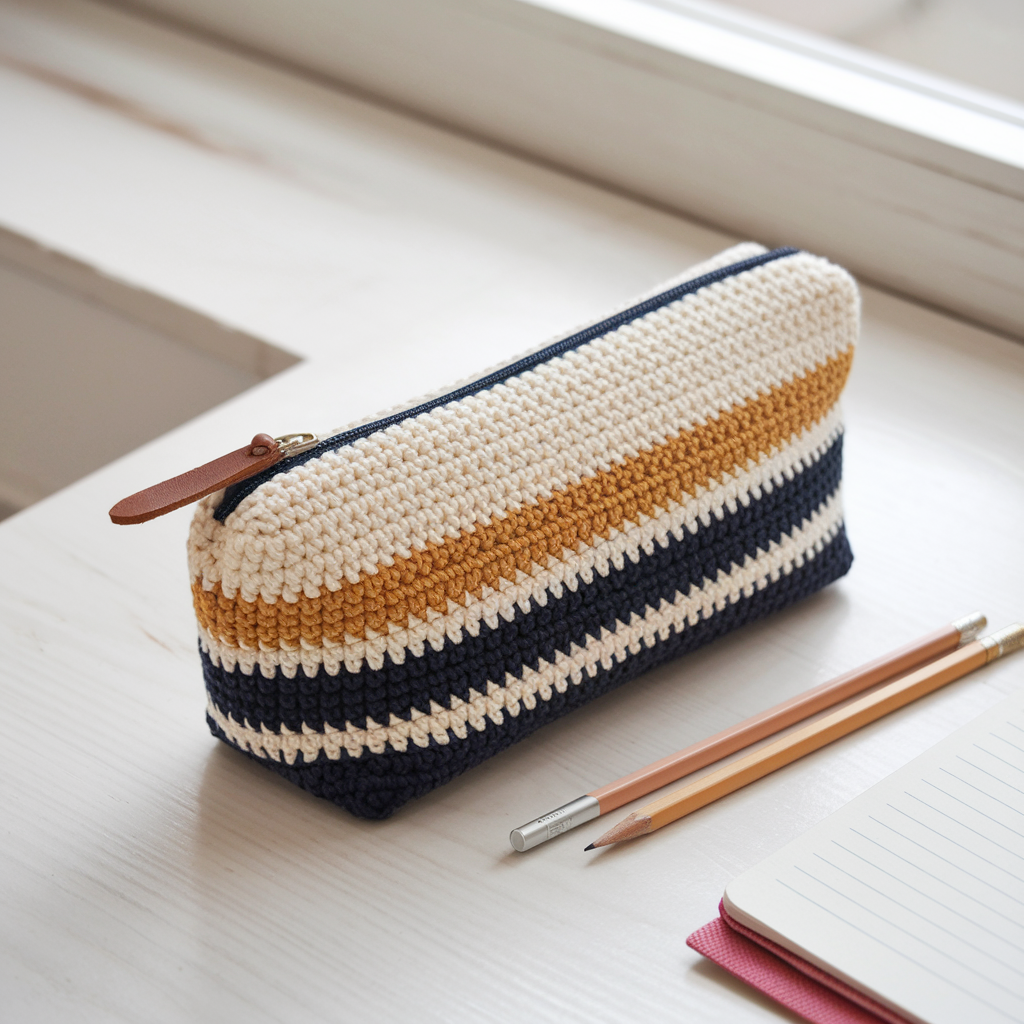
Style: Classic horizontal stripes in two or more colors; quick and highly customizable.
Skill level: Beginner
Finished size: ~9″ × 3.5″ × 1.5″
Materials:
- Two or three contrasting worsted yarn colors (A, B, C) — total ~150–200 yds.
- Hook: 4.0 mm.
- 9″ zipper, lining, tapestry needle.
Pattern — step-by-step (worked flat, color changes)
Foundation & body
- Ch 38. Row 1: sc in 2nd ch from hook and across — 37 sc. Turn.
- Row 2–4 (Color A): ch 1, sc across in BLO if you want slight ridge, or sc across in both loops for flat fabric. Turn.
- Join Color B: on the last stitch of Row 4 carry new color and sc across Row 5–7. Repeat stripes: change color every 3 rows (or choose 2 rows for thinner stripes). Use the standard color-change method: finish the last stitch of the old color by yarn over with the new color and pull through to complete the stitch — this hides the start neatly.
- Continue until panel measures ~9″ tall (or desired height). Fasten off.
Seaming & zipper
5. Fold and seam side & bottom edges. Attach zipper and lining as earlier described. For a tidy stripe match, center the zipper along the color boundaries or make stripes vertical on the zipper-facing panel for contrast.
Extra finishing ideas
- Add a leather zipper pull or tassel.
- Work sc in FLO on the last round before finishing to create a contrasting rolled edge.
- For durable edges, single crochet the top edge in a neutral color before attaching zipper.
4. Crochet Bernat Pencil Pouch Pattern

Style: Chunky, cozy pouch reminiscent of bulky Bernat yarn projects — quick to make with super bulky yarn. Great for a modern, hand-knit look.
Skill level: Beginner (fast)
Finished size: ~9″ × 4″ × 2″ (varies with yarn)
Materials:
- Super bulky yarn (Bulky 6), 1 skein (150 yds) or 2 depending on size.
- Hook: 8.0–10.0 mm (match yarn label).
- 9″ zipper (or a shorter one if you prefer), lining optional but recommended for stability, tapestry needle.
Why this works
Super-bulky yarn works up fast and the dense fabric holds shape even without lining. Great for gift making.
Pattern — step-by-step (worked flat)
Foundation & body
- Ch 22 (large, thick stitches) — this chain will yield a wide pouch; for narrower reduce chains. Row 1: hdc in 3rd ch from hook and across (20 hdc). Turn.
- Row 2–12: ch 2, hdc across (or dc for looser fabric) until piece is ~9″ tall. With super-bulky yarn you’ll only need 10–12 rows. Fasten off.
Seam & zipper
3. Fold right sides together and use a tapestry needle to mattress stitch sides (the stitches are big — use large gauge needle). For stability, consider adding an inside fabric lining that matches soft yarn — sew lining to top edge and insert zipper. If you don’t want to sew lining, sew zipper directly to crochet with strong thread and back by a row of sc around top to enclose seam.
Optional handles & embellishments
4. Crochet a short strap or loop to add as pencil tote handle or wrist carry. Add a pompom or oversized button.
Variations & tips
- Use variegated super-bulky yarn for a marled, colorful pouch.
- To stiffen: insert a small piece of thin plastic canvas into the bottom interior (cut to shape) before inserting lining.
5. Crochet Granny Square Pencil Case Pattern
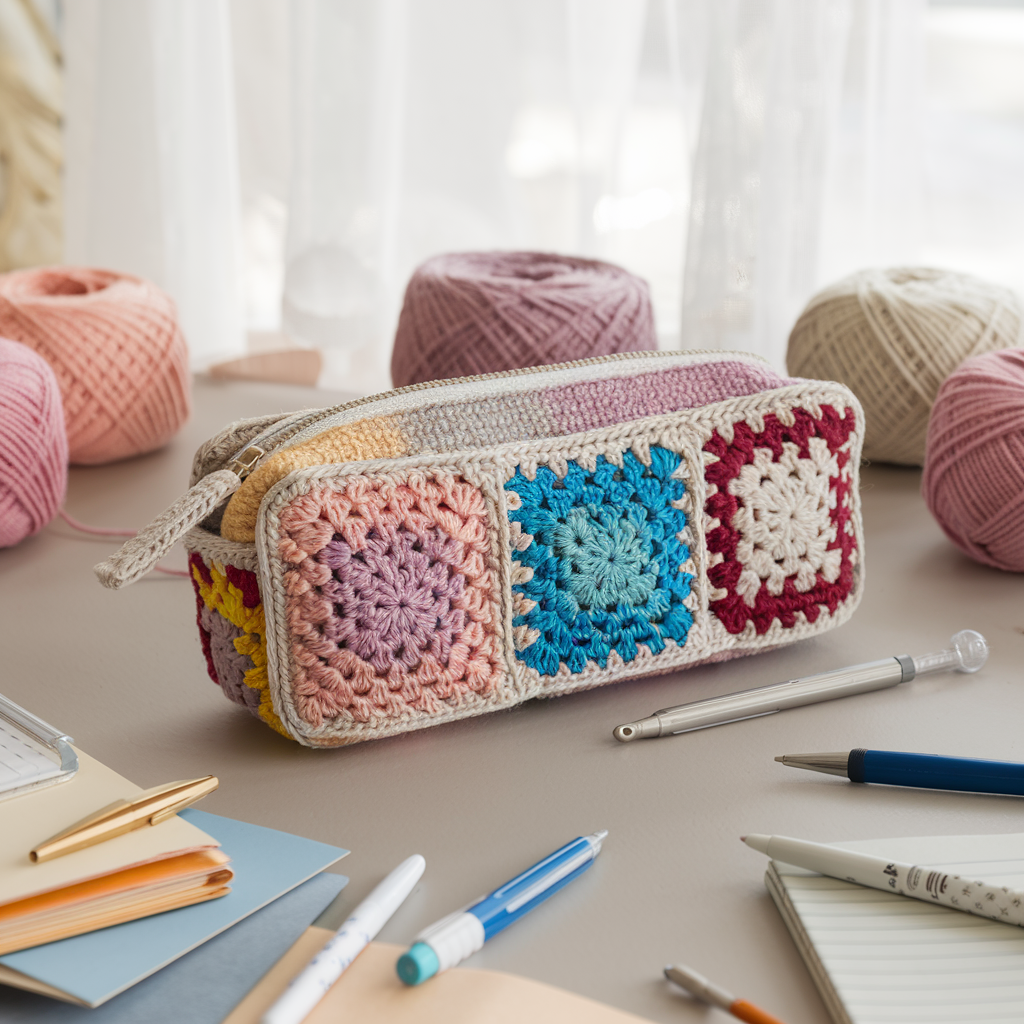
Style: Patchwork granny squares joined into a charming, boho pouch. Great for using small scraps and making colorful sets.
Skill level: Beginner → Intermediate (many small motifs)
Finished size: depends on motif size — example: 3 small squares across × 2 tall at 3.5″ each = 10.5″ × 7″; I give a 3×2 grid example for a larger pencil case.
Materials:
- Multiple small yarn scraps (worsted) in assorted colors.
- Hook: 4.0–4.5 mm.
- 10–12″ zipper (or 9″ if you prefer); lining fabric.
Motif & layout
Make small granny squares (~3.5″ each) and join them into a rectangle sized for your pouch.
Pattern — step-by-step
Small granny square (one motif)
- MR, ch 3 (counts as dc), work 2 dc in MR, ch 2, 3 dc in MR — repeat to have 4 clusters separated by ch-2 spaces. Pull tight and join. (4 clusters)
- R2: join new color in any ch-2 space, (3 dc, ch 2, 3 dc) in same space (corner), ch 1, 3 dc in next ch-2 space; repeat around and work corners at each corner (3 dc, ch 2, 3 dc). Join. R2 creates a small square; add a final round of sc to tidy if desired. Fasten off. Make 6 squares for a 3×2 pouch (3 across × 2 down).
Joining & backing
3. Block all squares to same size. Lay out 3×2 grid and join squares with slip-stitch join or join-as-you-go when completing the final round of each square. The slip-stitch join on the wrong side is neat and flat.
Assembly & zipper
4. Once front and back rectangles are done (mirror the layout for the back or use a single color back panel), seam sides and bottom. Attach zipper at top — because of the different yarn colors, I recommend sewing zipper onto the lining first then hand-sewing lining to the granny top to hide threads.
Lining
5. Use a cotton lining — cut to the inner dimensions and sew with seams inside, press, and glue or hand-stitch into crochet top.
Variations & tips
- Use a single neutral border color for all squares to unify the palette (join with a single color).
- Add small decorative buttons or embroidered initials on a square for personalization.
6. Crochet Bobble Heart Pencil Case Pattern
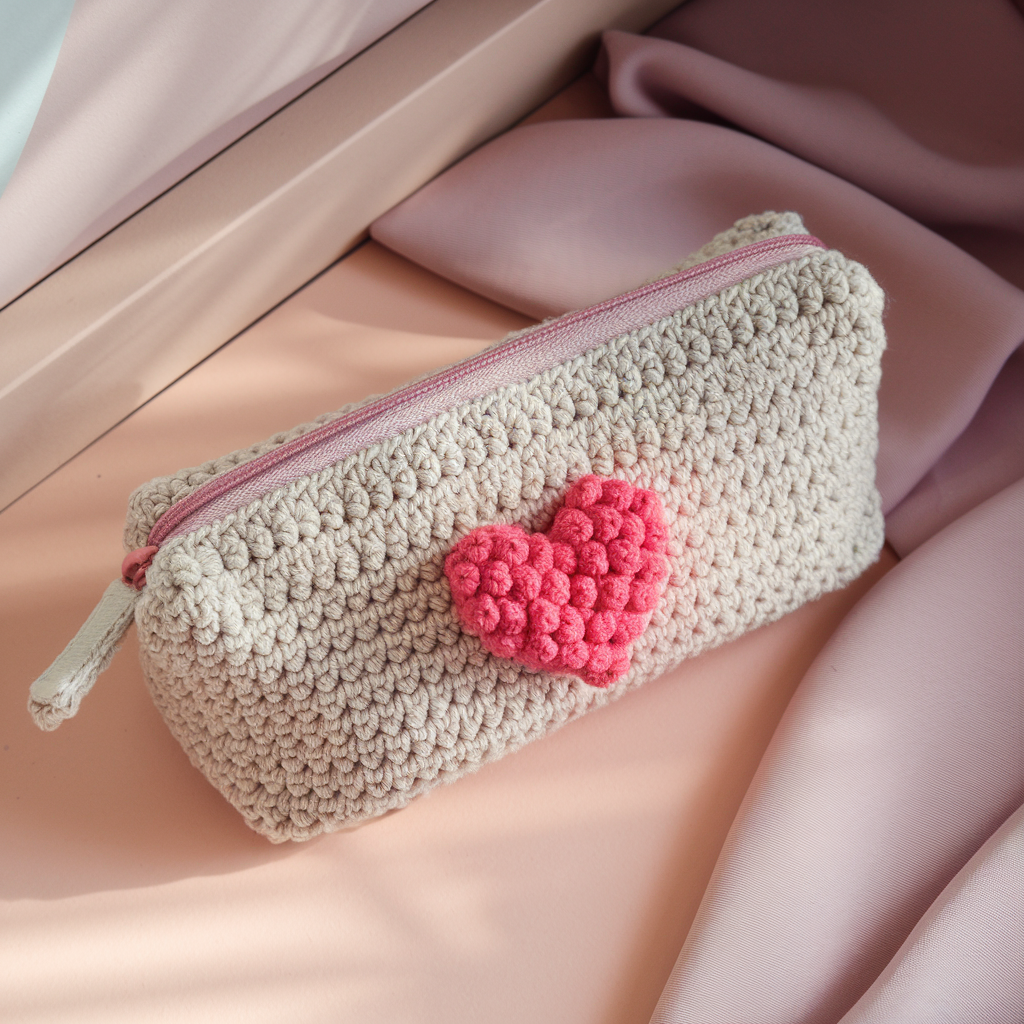
Style: Feminine, textured pouch with raised bobble hearts on the front panel for a romantic look. Great for gifts and Valentine’s projects.
Skill level: Intermediate (bobble stitches)
Finished size: ~9″ × 3.5″ × 1.5″
Materials:
- Worsted yarn main color (background) and contrast color for hearts, ~200 yds.
- Hook: 4.0 mm.
- 9″ zipper, lining fabric.
Techniques used
- Bobble stitch (5 loops/5 partial stitches gathered together) creates the heart texture.
Pattern — step-by-step
Make charted front panel
- Decide placement: the front panel will be worked in rows and incorporate bobble stitches where hearts sit. For a single centered heart, plan the chart: e.g., rows 6–12 contain bobble clusters forming a heart silhouette.
Basic panel (without bobbles)
2. Ch 38. Row 1: sc in 2nd ch from hook across (37 sc). Turn.
3. Row 2–6: ch 1, sc across (background). These first rows create a base before heart begins. Adjust counts for height.
Bobble stitch refresher
4. Bobble (example): yo, insert hook, pull up loop, yo, pull through 2 loops, repeat 4 times total so you have 5 partial loops on hook, yo and pull through all 5 loops, ch 1 to close bobble. Practice on scrap to perfect size.
Work heart chart
5. On the rows where heart appears: follow chart row-by-row: where a heart pixel occurs, make a bobble in that stitch; otherwise sc. Ensure bobble stitches don’t make edges ripple excessively — you can substitute bobbles for sc and ch 1 between neighboring bobbles to reduce bulk. Continue rows until panel reaches desired height (~9″).
Back panel
6. Make a back panel of the same size in sc for a flat reverse.
Assembly & zipper
7. Block panels if necessary. Pin zipper and sew into lining and surfacing. Because bobbles create bulk, cut lining pockets slightly larger and use a narrow seam allowance. Sew lining to zipper and to the crochet top to hide raw crochet loops.
Finishing touches
8. Weave in ends and check that bobble side sits flat. If bobbles are very prominent and make zipper attachment tricky, use a narrow strip of felt behind the bobble row sewn into lining to smooth the top seam area.
Variations & tips
- Make repeated small hearts in a grid across the panel.
- Use two-tone bobbles (heart color bobbles on background) for a pixel-art style.
- Substitute bobbles with popcorn stitches if you prefer a slightly different texture.
Lining & Zipper — Simple How-To (unified method)
- Measure crochet panel length × height and subtract 1/4″ from width and height for a snug fit inside (so lining doesn’t flare).
- Cut lining fabric: two rectangles of that size. With right sides together, sew three sides leaving top open. Press seams.
- Attach zipper to lining: Pin zipper along top edge of lining (right side of zipper facing right side of fabric). Use a zipper foot to machine stitch in place. Repeat for the opposite side so zipper is sandwiched between the two lining pieces.
- Insert lining into crochet: With zipper open, slip lining into the crocheted pouch with right sides facing out and baste the top edge of lining to the crochet top by hand. Sew by hand into the crochet stitches with ladder stitch for neat finish.
- Close zipper half-open so you can turn pouch through zipper if you need to. Press fabric and check finishes.
Troubleshooting & FAQs
- Pouch too floppy? Use cotton yarn (less stretch), smaller hook, or insert interfacing/fabric lining with interfacing. You can also single-crochet a dense final round to stiffen the top.
- Zipper won’t sit flat over bobbles or heavy texture? Sew zipper to lining instead of directly to crochet, then sew lining into the crochet top so zipper edge is hidden and smooth.
- Corners won’t box evenly? When creating boxed corners fold base into a triangle and measure equal distances on both sides before stitching; a small slip of cardboard as template helps.
- Color transitions showing gaps? Carry color neatly inside or weave in tails carefully; consider changing color at the start of a row for cleaner joins.
Great finishing ideas (gift-ready)
- Add a matching keychain tassel or pompom on the zipper.
- Include a small label or embroidered initials on the front for personalization.
- Make a matching set: pencil case + small coin pouch + phone charger pouch.
- Package with stationery inside a kraft box and tie with twine for a handmade gift.
Strong Conclusion
These six pencil case patterns give you a wide range of looks and speeds — from the fast, chunky Bernat pouch to the polished faux-knit rib, the playful cat motif, classic stripes, granny-square patchwork, and the textured bobble-heart design. Each can be finished with a zipper and lining for longevity, personalized with trims or initials, and adapted in size to hold larger art supplies or smaller pens. Pick one for a quick evening make, or plan a set as handcrafted gifts — they’re small projects with big charm.