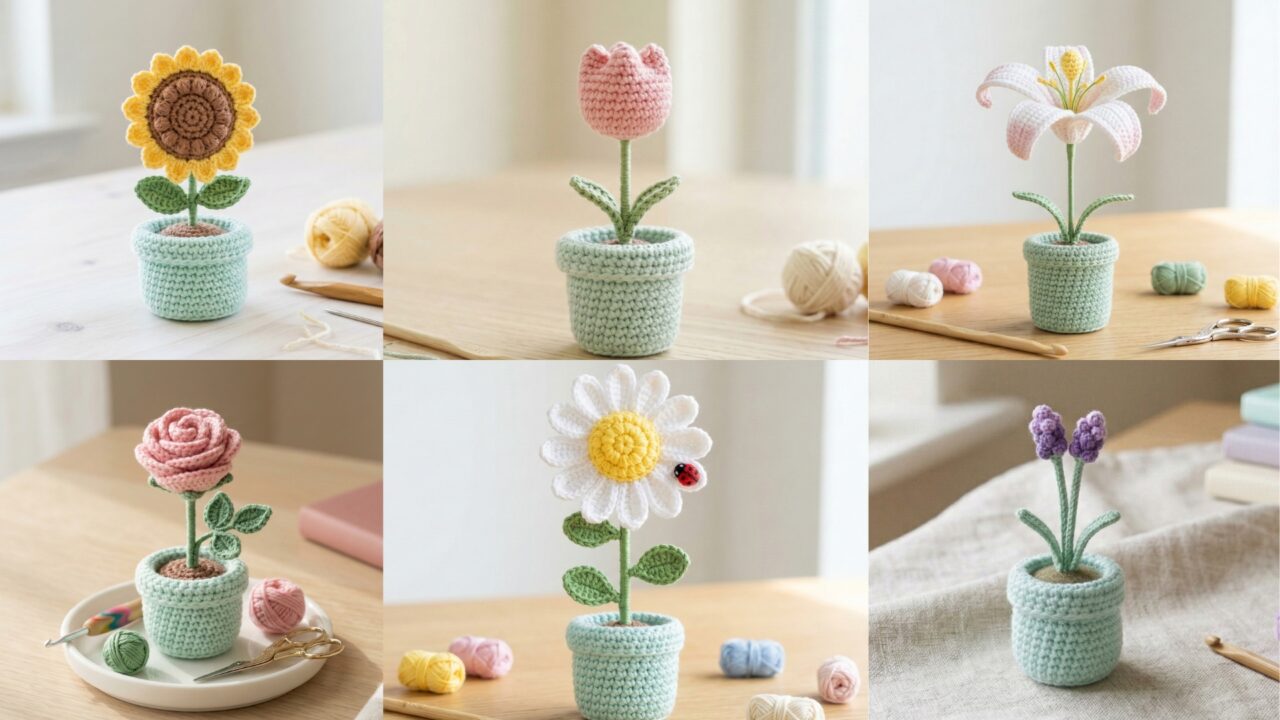
There’s something incredibly charming about tiny handmade plants—especially when they never need watering. Crochet flower pots are a delightful way to combine creativity with the beauty of nature, bringing colorful blooms into your home that last forever. Whether you’re decorating a cozy corner, looking for a thoughtful handmade gift, or simply searching for a relaxing crochet project, these adorable amigurumi flower pots are perfect for plant lovers and crafters alike.
One of the best things about crocheted flowers is their versatility. You can experiment with different yarn colors, textures, and sizes to create a unique collection of mini plants. From bright sunflowers that bring cheerful vibes to elegant lavender stems that add a touch of calm, each crochet flower pot has its own personality. Plus, these small projects are great for beginners and experienced crocheters alike because they use simple stitches while still allowing plenty of room for creativity.
In this guide, you’ll discover six adorable crochet flower pot patterns that are perfect for decorating shelves, desks, or gifting to friends and family. Each design includes step-by-step instructions to help you crochet beautiful flowers growing from their own little pots. You’ll learn how to create a cheerful sunflower, a graceful tulip, a classic daisy, an elegant lily, a romantic rose, and a calming lavender arrangement.
Whether you want to create a full crochet garden or just make one cute pot to brighten your day, these patterns will help you bring your handmade flowers to life—no green thumb required. So grab your yarn, pick your favorite colors, and let’s start crocheting these adorable flower pots!
Quick notes before you start (general supplies, abbreviations, and tips)
General materials (per pot + flower):
- Worsted weight (medium / aran) yarn: small amounts of 2–3 colors (pot + flower + center/leaf colors). Use cotton or acrylic.
- Hook: 3.5–4.5 mm (G to 7) depending on how tight you crochet — tighter for amigurumi to avoid stuffing showing.
- Polyester fiberfill (stuffing)
- Tapestry needle
- Stitch marker (or scrap yarn)
- Scissors
- Optional: small piece of felt for pot “soil”, hot glue for secure attachment, pipe cleaner or floral wire (for adjustable stems), poly pellets (for weighted base)
Abbreviations used throughout (US terms):
- ch = chain
- sc = single crochet
- hdc = half double crochet
- dc = double crochet
- sl st = slip stitch
- inc = increase (2 sc in same stitch)
- dec = decrease (single crochet decrease)
- BLO = back loop only
- FLO = front loop only
- st(s) = stitch(es)
- rnd = round / round(s)
- repeat instructions inside brackets as indicated
General construction notes & tips:
- Work in continuous rounds (spiral) unless stated; use a stitch marker to track first stitch.
- Keep stitches tight. If stuffing shows through, go down a hook size or tighten tension.
- Make a small cardboard disc or use a flat felt circle for the pot base to stabilize shape (optional).
- Gauge isn’t critical for amigurumi, but finished size will vary. Each finished pot + flower is approximately 3–5 inches tall depending on hook and yarn.
1. Crochet Amigurumi Sunflower Pot Pattern

Difficulty: Beginner+
Finished size: ~4–5 inches tall (pot + flower)
Colors: Pot color, brown (center), yellow (petals), green (stem/leaves)
Materials
- Main pot yarn (color A)
- Brown yarn for sunflower center (color B)
- Yellow yarn for petals (color C)
- Green yarn for stem/leaves (color D)
- 3.5–4.0 mm hook
- Polyfill
- Tapestry needle, stitch marker
Sunflower Overview
This sunflower has: a small round pot, a soil disc (felt), a stem (stuffed or pipe-cleaner), a round center made with bobble/cluster texture, and layered petals around the center.
Pot (make one)
- Rnd 1: With color A, magic ring, 6 sc into ring (6).
- Rnd 2: Inc in each st around (12).
- Rnd 3: [Sc, inc] ×6 (18).
- Rnd 4: [2 sc, inc] ×6 (24).
- Rnd 5: [3 sc, inc] ×6 (30).
- Rnds 6–9: Sc around (30) — this builds pot height; make more rounds for a taller pot.
- Rnd 10: [3 sc, dec] ×6 (24).
- Rnd 11: [2 sc, dec] ×6 (18).
- Rnd 12: [sc, dec] ×6 (12). Fasten off, leaving a long tail for sewing. Lightly stuff bottom if you want a weighted base; insert a small felt/ cardboard disc for flatness before finishing closing. Sew closed or leave the top open (we’ll insert “soil” + stem later).
Tip: If you want the pot more open-topped, stop decreases earlier so top remains wider.
Soil disc (optional)
Cut a circle of brown felt slightly smaller than the pot opening. Glue or sew it to the inner rim to hide raw ends and hold the stem.
Stem
Option A (pipe cleaner): Insert pipe cleaner from center and bend bottom to secure.
Option B (crocheted stem):
- With green, ch 2. Work 20–30 sc in rows around (or sc in spiral) to form a tube; stuff lightly and insert into pot.
Sunflower center (textured)
- Rnd 1: With brown, magic ring, 6 sc (6).
- Rnd 2: Inc around (12).
- Rnd 3: [Sc, inc] ×6 (18).
- Rnd 4: [2 sc, inc] ×6 (24).
- Rnd 5: Use bobble stitches to create texture: Option: replace Rnd 5 with a textured round — e.g., [bobble, sc] around or do surface slip stitch “seed” speckles using a darker brown. Fasten off leaving tail for sewing.
Creating bobbles (one common method): Yarn over, insert into stitch, yarn over and pull up (3 loops), yarn over, insert into same stitch, etc., until you have 5 partial loops then yarn over and pull through all loops, chain 1 to close bobble.
Petals (make 10–12)
Each petal is worked flat and sewed around the center.
Pattern (flat petal):
- Ch 6.
- Row 1: sc in 2nd ch from hook, sc across (5).
- Row 2: ch1, turn, hdc, 2 dc, hdc (center top).
- Row 3: ch1, turn, sc across (5). Fasten off leaving long tail for sewing.
Arrange petals around the center; sew them evenly spaced to the back of the center disk. Then sew the assembled center (with petals) onto the top of the stem. Insert stem into pot; use hot glue or whip stitch to secure. Add felt soil around base as needed.
Leaves
Make 2 leaves:
- Ch 7. Sc in 2nd ch from hook, hdc, dc, hdc, sc, sl st to finish. Fasten off and sew onto stem.
Assembly & Finishing
- Insert stem into pot and glue felt soil over the opening to hide join.
- Trim ends and secure any loose yarn.
- Optional: add a little brown embroidery or French knots to the center for extra seed texture.
Variations & Tips
- Make mini versions as keychains (use smaller hook and thinner yarn).
- Create a double-row of petals for a fuller sunflower.
- Add a tiny tag that says “grow” or “bloom” for gifts.
2. Crochet Amigurumi Tulip Pot Pattern
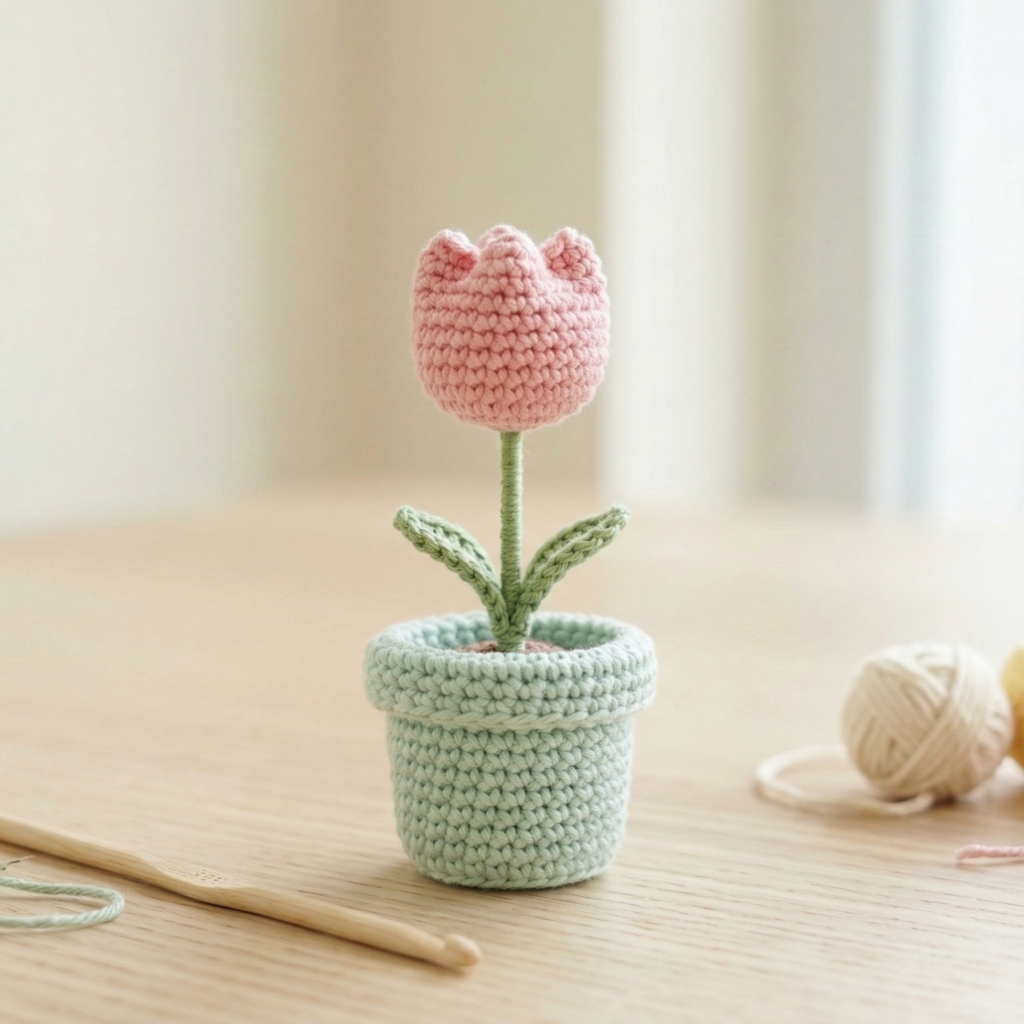
Difficulty: Beginner
Finished size: ~3.5–4.5 inches tall
Colors: Pot, red/pink/purple for tulip, green for leaves/stem
Materials
- Pot yarn (color A), Tulip color (color B), Green yarn (color C)
- 3.5–4.0 mm hook, stuffing, tapestry needle
Pot
Follow the pot instructions from the sunflower section (same base). For variety, add a decorative rim: after finishing pot height rounds, do 1 round of BLO hdc to create a rim texture.
Tulip blossom (make 1)
Tulip petals are worked as a single joined top to create a cup.
- Rnd 1: With color B, magic ring, 6 sc into ring (6).
- Rnd 2: Inc around (12).
- Rnd 3: [Sc, inc] ×6 (18).
- Rnd 4: [2 sc, inc] ×6 (24).
- Rnds 5–7: Sc around (24) — this forms the bulb.
- Rnd 8 (forming petals): [In next st: (2 dc, ch 1, sl st in same st) — this makes a petal cluster] Repeat around (24 petals spaced; you can do every 2 stitches for fewer petals). Fasten off and leave tail.
Alternatively, make 3 larger petals: mark 3 evenly spaced points and for each petal: sc along to petal base, ch2, 3 dc, ch2, sl st back — forming a bigger tulip petal. Sew edges slightly together to form the tulip cup shape.
Stem
Crochet a thin tube: with green, ch 2 then sc around in spiral for 25–35 sts (depending on desired length). Stuff lightly and secure into pot.
Leaves (2)
- Ch 10. Row 1: sc in 2nd ch from hook, hdc, dc 4 times, hdc, sc. Fasten off and sew to stem.
Assembly
- Sew tulip underside to the top of the stem securely.
- Place stem in pot; use a felt soil circle to hide the seam. If you want a floppy tulip look, sew the petals slightly to the stem so they curve naturally.
Variations
- Make tulip bunches (3 in one pot).
- Use gradient yarn for an ombré flower.
3. Crochet Amigurumi Daisy Pot Pattern
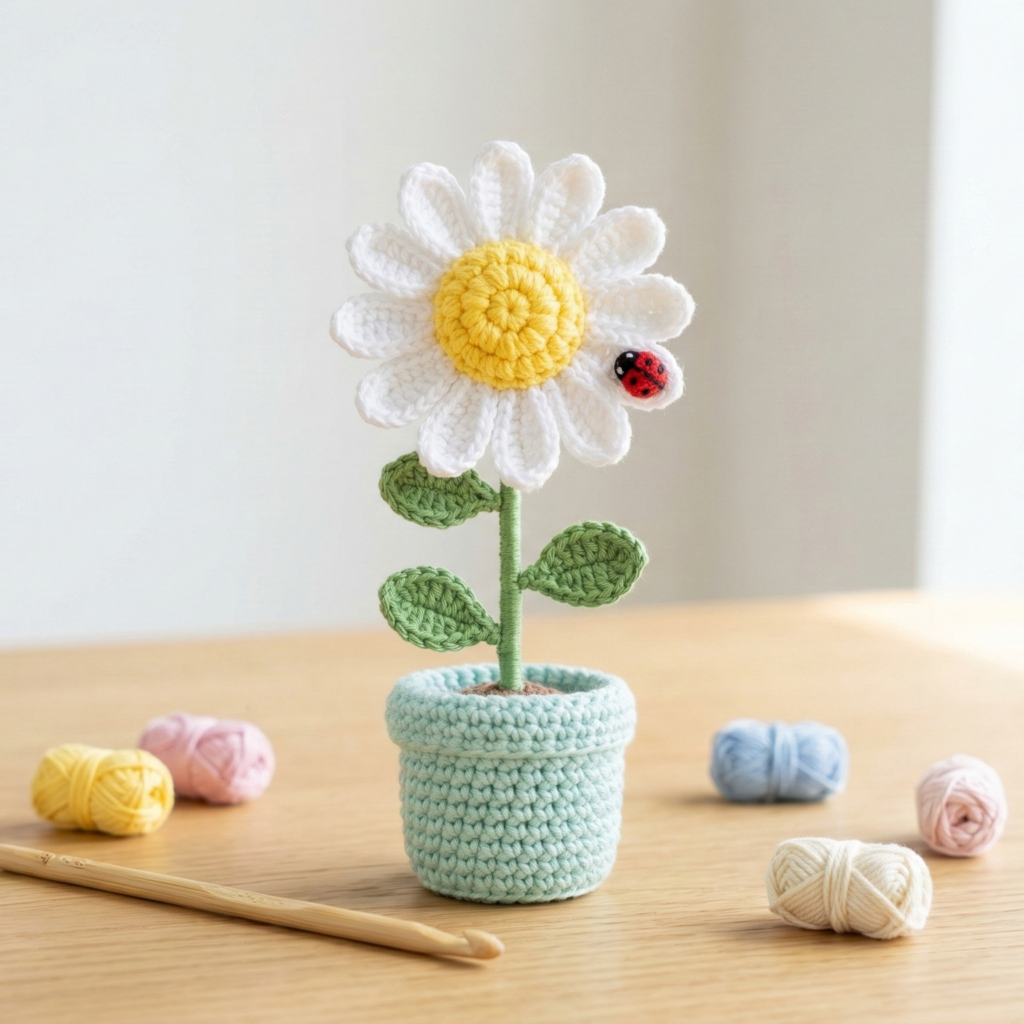
Difficulty: Beginner
Finished size: ~3–4.5 inches tall
Colors: Pot, white (petals), yellow (center), green (stem)
Materials
- Pot yarn, white yarn, yellow yarn, green yarn, hook, stuffing
Pot
Same as previous pot patterns.
Daisy center
- Magic ring with yellow, 6 sc (6).
- Inc around (12).
- Sc around for 1–2 rounds to create a small puffy center. Fasten off leaving long tail.
Petals (make 10–14)
Make individual small petals and attach around the center.
Petal pattern (small):
- Ch 5. Sc in 2nd ch from hook, hdc, dc, sl st to base. Fasten off leaving tail for sewing.
Sew petals evenly around the yellow center. You can slightly overlap petals for a fuller look.
Stem & leaves
Same as sunflower or tulip. For a daisy, a single long stem with a few small rounded leaves works well.
Assembly
Sew assembled daisy head to top of stem and secure in pot. Add a little glue dot behind center for extra hold if gifting.
Variation & Styling
- Make gerbera-style daisies by increasing petal length and adding a double layer.
- Add a tiny ladybug embroidered onto a petal for charm.
4. Crochet Amigurumi Lily Pot Pattern
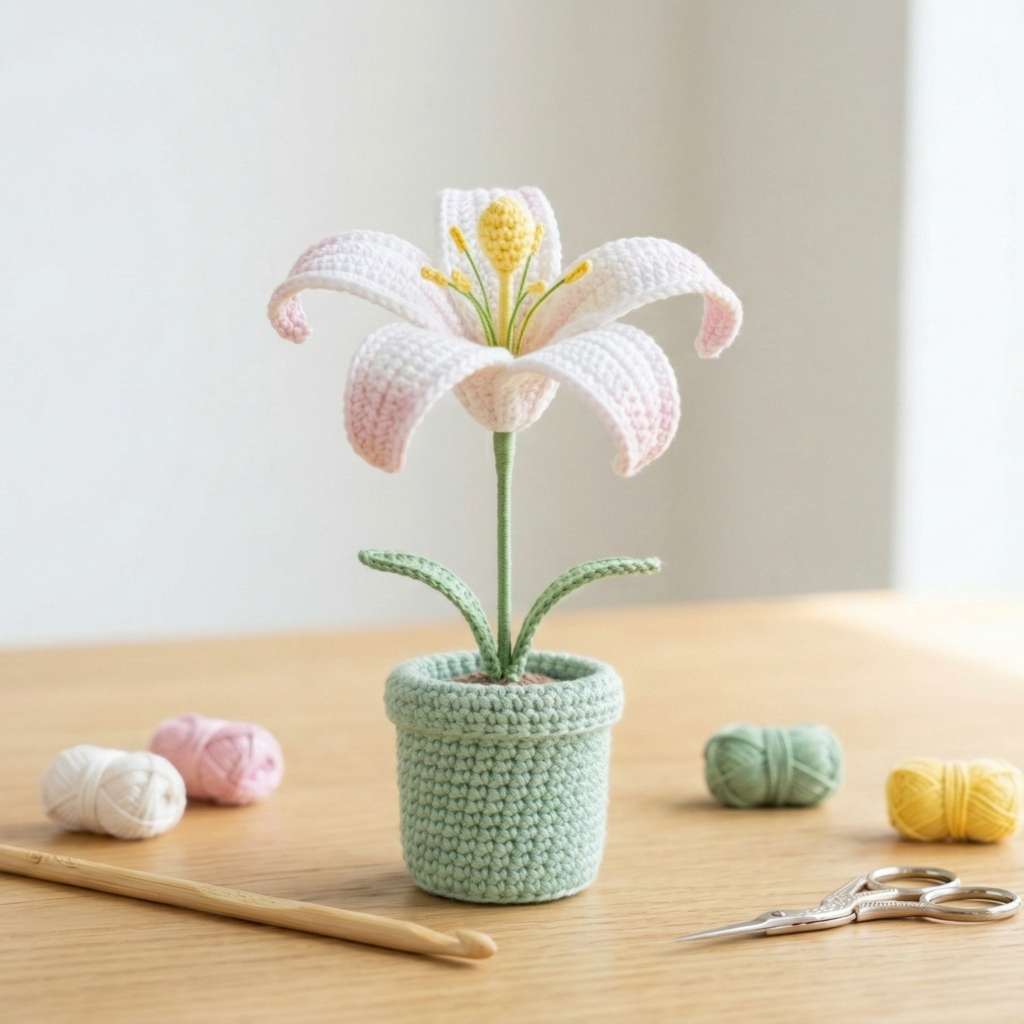

Difficulty: Intermediate (petal shaping)
Finished size: ~4–5 inches tall
Colors: Pot, white/pink/orange for petals, yellow/green for center/stamen
Materials
- Pot yarn, petal color(s), green yarn, hook, stuffing, optional embroidery floss for stamen
Pot
As before — a slightly taller pot suits lilies.
Lily petals (make 6)
Lily petals are elongated with a point and slight curl.
Petal (flat piece, then form cup):
- Ch 12. Row 1: sc in 2nd ch from hook, sc across (11).
- Row 2: ch1, turn, hdc in first, dc across middle stitches, hdc in last.
- Row 3: ch1, turn, sc decreases at both ends to point the petal: sc2tog at start and end to shape, sc across center. Repeat shaping rows 2–3 until petal has a tapered tip. Fasten off leaving a long tail.
Block petals slightly (wet and pin in shape) or shape with light starch to get natural curl. Make 6 petals.
Lily center (stamens)
Make small thin pieces (chain and attach embroidery floss or yarn tails) to mimic stamens. Crochet a small cone for the inner bulb:
- Magic ring with yellow: 6 sc, inc round to 12, sc round for 1–2 rounds, fasten off.
Assembly
- Arrange the 6 petals around a small ring: either sew them onto a small ring base or work a small circle to which petals attach.
- Attach the center cone and stamens into the middle. Sew the assembled lily onto a stuffed stem. Insert stem into pot and secure soil felt.
Variation & Tips
- Use a variegated yarn or paint subtle spots on petals with fabric marker for realism.
- For an easier lily, make 3 large petals and 3 small inner petals.
5. Crochet Amigurumi Rose Pot Pattern
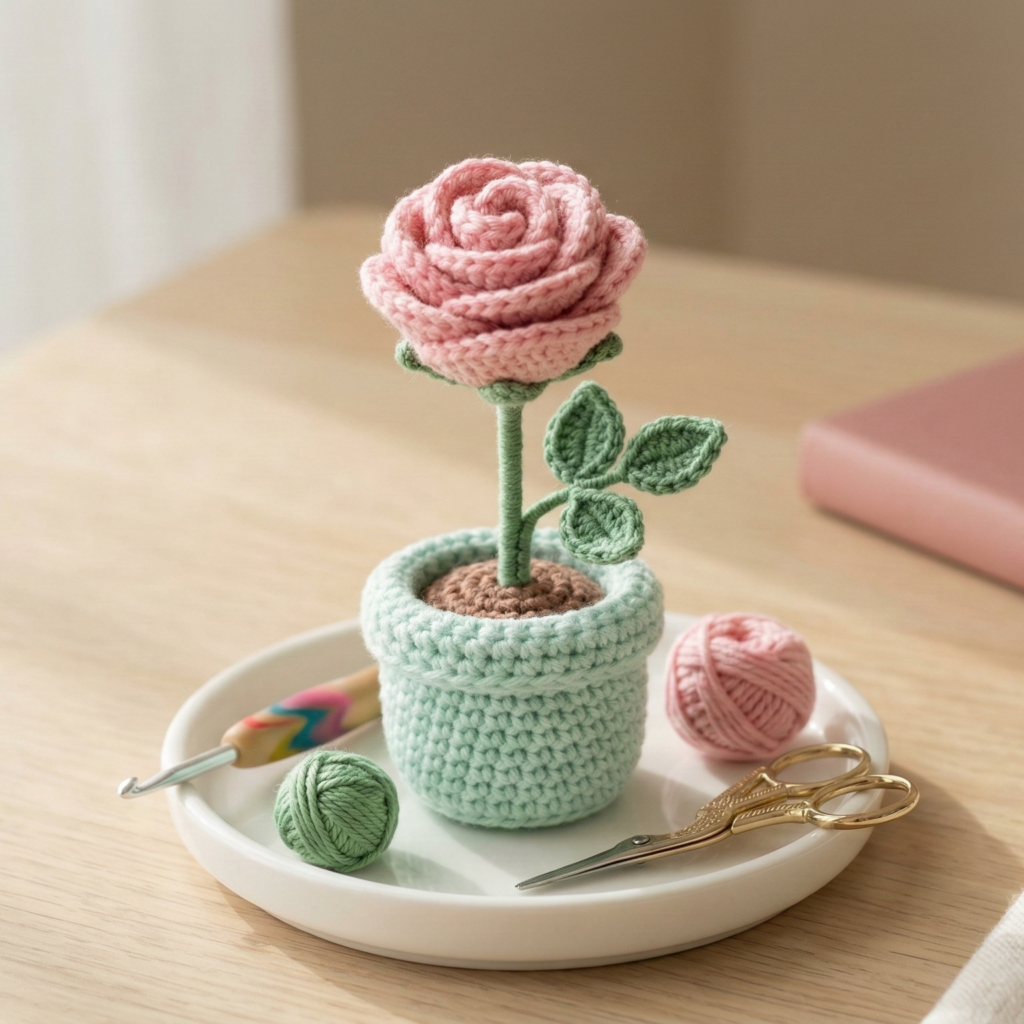
Difficulty: Intermediate
Finished size: ~3.5–5 inches depending on rose fullness
Colors: Pot, rose color (red/pink), green for leaves/stem
Materials
- Pot yarn, rose color yarn, green yarn, hook, stuffing
Rose construction options
Two common methods: spiraled rose (rolled strip) or layered petal method. I’ll give the spiraled rose (simpler, very effective).
Spiral rose method
- Make the base circle: With rose color, ch 2, 6 sc in 2nd ch (6). Inc round to ~18–24 to make a small disk (this becomes the center base). Fasten off but leave tail.
- Make the spiral strip: Ch 51 (or longer for larger rose). Row: sc in 2nd ch from hook across to end. Turn and sc back across to create a wider strip (optional: add a second row). Make the strip as long as you want for more petals.
- Form the rose: Starting at one end of strip, roll it tightly and then start wrapping it around the base disk, twisting slightly as you roll so the “petals” fan out. Sew the strip to the base as you roll to secure. Continue until the strip is fully wrapped and the rose looks full. Sew the final edge to the underside.
Alternative: Layered petals — make individual petals and sew them concentrically.
Stem & leaves
- Stem: pipe cleaner or crocheted tube.
- Leaves: make 2–3 teardrop leaves (same technique as earlier) and sew to stem.
Assembly
- Attach rose underside to stem. Secure with glue or whip stitch. Insert into pot and secure soil.
Variations & Care
- For vintage look, use lighter yarn and add embroidered veins on leaves.
- Use felt under the rose to hide sewing and glue it into place for a very stable display.
6. Crochet Amigurumi Lavender Pot Pattern
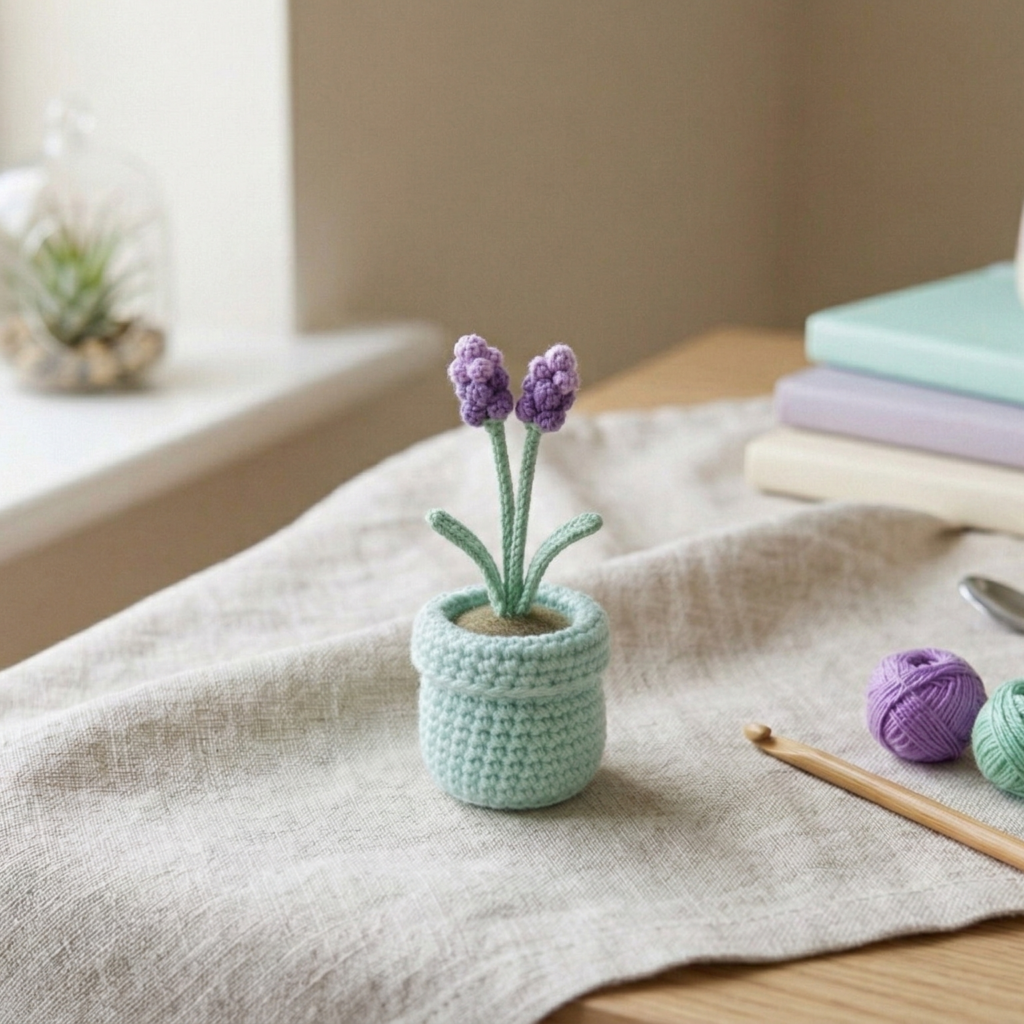
Difficulty: Beginner–Intermediate
Finished size: ~3.5–5 inches tall (a bunch of lavender stems)
Colors: Pot, lavender/purple, green for stems, brown/gray for soil
Materials
- Pot yarn, lavender or purple yarn, green yarn (for stems), stuffing, 3.5–4.0 mm hook
Pot
Same pot as other patterns. Consider a short, wide pot to hold the lavender bunch.
Lavender spike (make multiple stems — 5–8 per pot)
Each lavender spike is a thin stem topped with clusters.
Method A — simple puff clusters:
- Stem: With green, ch 2, then sc in spiral for 20–35 until desired length. Stuff lightly.
- Flower cluster: With lavender/purple, make small bobble clusters: In one stitch at the top, work 3–4 partial dc loops (yarn overs and pulls) and pull through to create a puff — make 5–8 puffs stacked along the top 1–2 inches of the stem. Alternatively, attach tiny pom-poms or knots for fluffy tops.
Method B — mini cones:
- Crochet a tiny cone: magic ring 6 sc, inc to 12, work 2 rounds sc, fasten off, and make many of these and sew them onto the stem to form a dense cluster.
Make 5–8 stems and arrange them in your pot.
Assembly
- Arrange stems in pot; tuck in felt soil between stems to secure. Use hot glue on the base of stems for stability if making a gift. Trim stems to look natural (vary heights).
Variations & Styling
- Add a scented linen sachet inside the felt soil for a lavender smell (do not make it ingestible).
- Use different shades of purple for a natural gradient.
Conclusion
Care tips
- These amigurumi plants are decorative — avoid prolonged exposure to direct sunlight which may fade yarn colors.
- Spot-clean with a damp cloth. For heavier soiling, remove felt soil and gently hand wash small items and re-stuff.
- If the piece is meant for a child, make sure all attachments (eyes, beads) are sewn on securely — or avoid small parts altogether for toddlers.
Display & Gift ideas
- Make a trio of mini pots (sunflower, daisy, lavender) for a cute windowsill garden display.
- Turn a pot into a magnet by gluing a small magnet to the base.
- Use as desk decor — attach a clip or small note card holder behind the flower for a functional piece.
- Package three mini pots in a gift box with shredded paper and a handwritten care card.
Final notes & encouragement
You now have six full, customizable amigurumi flower pot projects: sunflower, tulip, daisy, lily, rose, and lavender. Start with the simpler ones (daisy, tulip, sunflower) to build confidence, then try layered petals and textured centers for the lily and rose. Remember: yarn choice, hook size, and tight tension will change the look and size, so experiment and have fun. Each pot is a tiny, handmade piece of joy — perfect for gifting, selling, or brightening up your own room