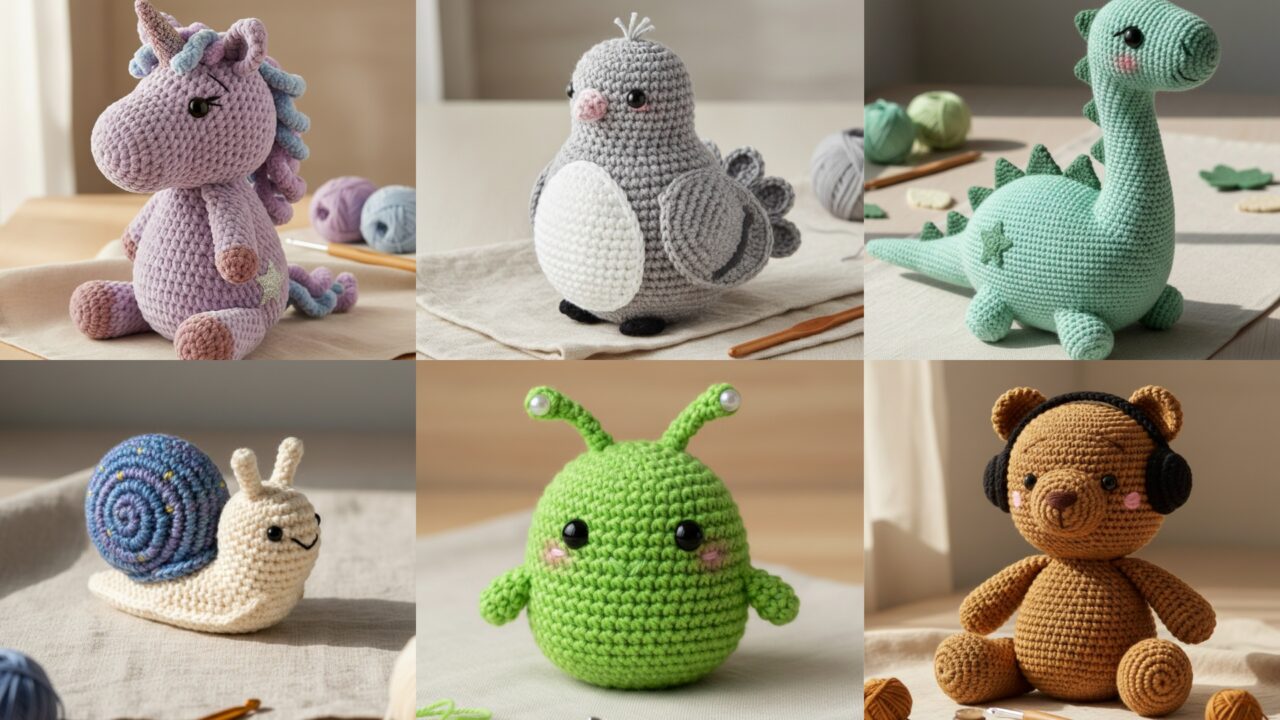
Amigurumi are little bundles of joy — tiny worlds you create stitch-by-stitch. They make thoughtful gifts, cute decor, and a satisfying way to practice shaping, color changes, and small sewing. Below you’ll find a friendly introduction covering tools, safety, and general techniques, then six fully detailed amigurumi plush patterns with materials, stitch notes, exact round-by-round instructions, assembly steps, finishing tips and creative variations: Blueberry Snail, Pigeon, Brontosaurus, Velvet Unicorn, Modern Bear with Headphones, and Pocket Alien.
Safety note for anyone making toys: if your recipient is a baby or toddler, don’t use small detachable parts (safety eyes, beads, buttons) unless they are firmly secured and rated for toy use. For infants, embroidered eyes are safest. Always test seams, keep stuffing secure, and label handmade toys with fiber and care info.
Quick intro — tools, materials, safety & amigurumi basics
Common tools & supplies
- Yarn: worsted (category 4) for sturdy, quick plushes; fingering/sport for small detailed toys; velvet/super-bulky for plushy teddy/velvet unicorn as noted in that pattern. Choose machine-washable yarn when possible.
- Hook: follow yarn label — typical amigurumi uses 2.25–4.0 mm depending on yarn and how firm you want the fabric. Use a smaller hook than the yarn label suggests for dense fabric that won’t show stuffing.
- Stuffing: polyester fiberfill (washable) — add gradually to shape smoothly. Optional poly pellets or weighted beads in a small sewn pouch make a weighted bottom for sill stability (keep pellets enclosed and away from small children).
- Safety eyes: choose appropriate size (6–10 mm common). Do not use safety eyes for toys for children under 3 unless your sewn methods are safety-certified. Embroidery floss or French knots are safe alternatives.
- Notions: tapestry needle, stitch markers (or a scrap of yarn), small scissors, pins for positioning, fine sewing thread (to attach small parts securely).
- Optional: pipe cleaners (for wire arms that can pose shape issues—avoid if toy for small child), felting needle (for wool finishing), small buttons or beads (only for older kids/adults).
Basic amigurumi techniques used here
- Magic ring (MR), continuous (spiral) rounds, invisible decrease, increasing, stuffing as you go, color changes in a round, sewing pieces together using whipstitch or ladder stitch, embroidering faces for safety.
Abbreviations (US)
- MR = magic ring
- ch = chain
- sc = single crochet
- inc = 2 sc in same st
- dec = single crochet decrease (invisible dec preferred)
- sl st = slip stitch
- hdc/dc etc specified where used
- FLO / BLO = front/back loops only
- st(s) = stitch(es)
Gauge & size
- Amigurumi isn’t strict about gauge but stitch density matters. A typical small plush made with worsted yarn on 3.5 mm will be roughly 4–6 in tall depending on pattern. Each pattern below gives a sample finished size and yarn amount.
Finishing
- Weave tails inside and knot securely. Use a second thread to reinforce high-stress joins (ears, limbs). Add a small fabric care tag for gift recipients (fiber content + wash instructions).
1. Crochet Blueberry Snail Amigurumi Plush Pattern
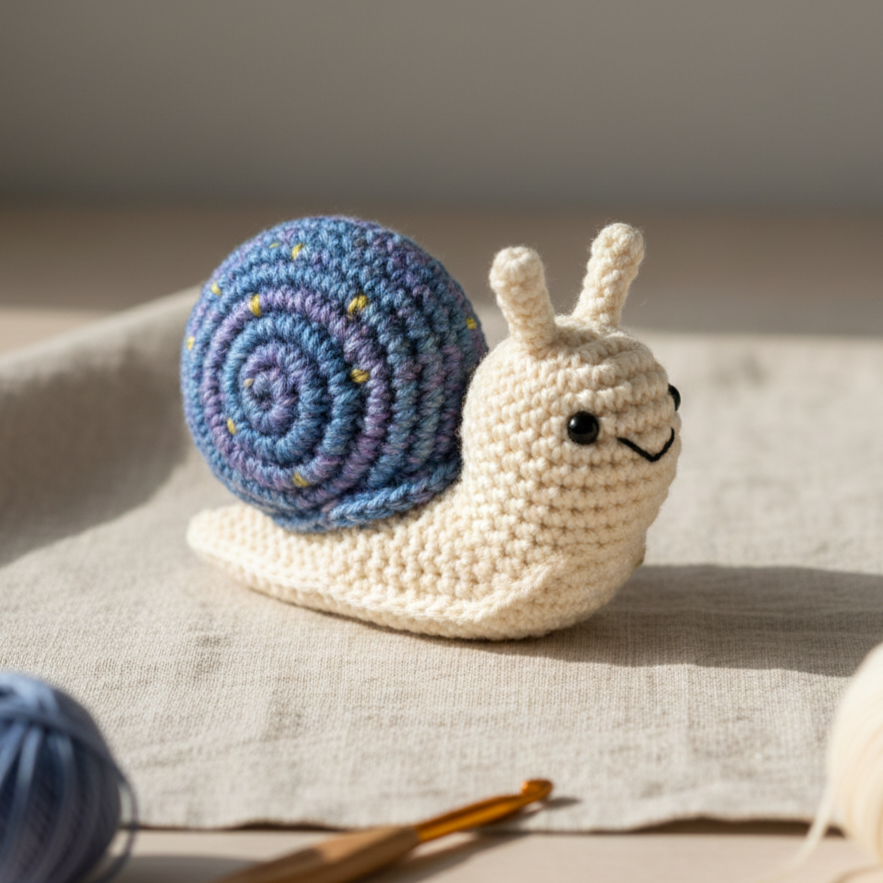
Sweet, round snail with a blueberry shell — quick, cuddly, and beginner-friendly.
Skill level: beginner → confident beginner
Finished size (sample): ~4 in long × 3 in tall (shell diameter ~2.5–3 in)
Yarn & hook (sample)
- Worsted cotton or acrylic: Main body (pale cream or tan) ~30 yd; shell (blue/purple variegated) ~25 yd.
- Hook: 3.5 mm (or smaller if you prefer denser fabric).
- Small amount of black yarn for embroidered eyes (or 6 mm safety eyes).
- Polyester fiberfill, tapestry needle, stitch marker.
Stitches & shaping summary
- Body: oval, worked flat-ish in continuous rounds, shaped with increases then decreases to form a rounded snail foot/body. Shell: worked as a flat spiral circle then coiled and sewn into a shell shape.
Body (foot and head — continuous rounds)
Use MR and work in spiral; mark round start.
- MR, ch1, 6 sc in MR — (6)
- inc in each st around — (12)
- sc 1, inc around — (18)
- sc 2, inc around — (24)
- sc 3, inc around — (30) — this is the base width. Work 6–8 rounds even (sc 30) to create foot length. Stuff slightly as you go to keep base flatish (don’t overstuff).
- Begin head shaping: sc 3, dec around until you reach about 20 st (for a subtle taper) — 1–2 rounds.
- Continue even 1–2 rounds, then sc 2, dec then sc 1, dec across (decrease gradually) to form a rounded head. Leave an opening for stuffing — stuff firmly and close with dec rounds to finish. Fasten off leaving tail for sewing.
Shell (blueberry spiral)
- MR, ch1, 6 sc in MR. (6)
- inc around — (12)
- sc 1, inc around — (18)
- sc 2, inc around — (24)
- sc 3, inc around — (30)
- sc 4, inc — (36) — continue increasing rounds until circle is about 2.5–3 in across (typically 36–48 st) depending on gauge. Fasten off leaving long tail.
Forming shell
- Fold the flat circle like a coil (roll from outside to center) to make a spiral shell shape. Sew the coil together along its inner surface so it holds shape like a blueberry swirl. Alternatively work a spiral by crocheting rounds with gradual increases and then sewing edge to a shallow spiral.
Antennae & face
- Antennae (make 2): ch 6, sc in 2nd ch from hook across (5 sc). Fasten off leaving tail, attach to top of head and curve slightly. Add a tiny embroidered mouth under head center. Add safety eyes or embroider tiny dots using black yarn.
Assembly
- Attach shell to snail’s back using ladder stitch; sew through shell base and body to make it secure. Reinforce with multiple passes if toy will be loved a lot. Weave in ends.
Variations & tips
- Make the shell variegated purple/blue for “blueberry” look. Add tiny french-knot seeds with yellow for cuteness. For a mobile, make a loop on top of shell.
2. Crochet Pigeon Amigurumi Plush Pattern
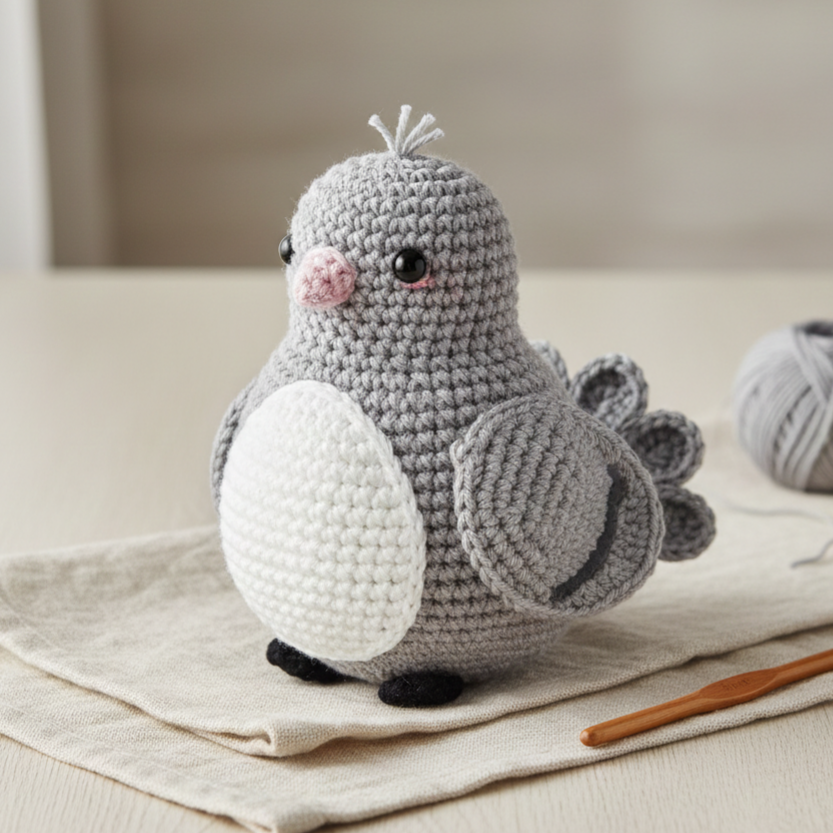
A soft, chubby city pigeon with a rounded belly and tiny wings — excellent for slightly more advanced shaping.
Skill level: intermediate
Finished size (sample): ~5 in tall sitting, ~6 in long from beak to tail
Yarn & hook
- Sport or DK cotton (body = dove gray) ~80–100 yd; contrast: darker gray and soft pink (beak), white for belly if desired.
- Hook: 3.5 mm.
- Safety eyes 8 mm (or embroidered), stuffing, tapestry needle.
Shape & concept
- Body is an egg-shaped sphere worked in spiral; wings are shallow ovals; tail is small triangle fans. Belly can be embroidered or worked as color change.
Body (egg shape)
- MR, ch1, 6 sc in MR (6)
- inc around → 12
- (sc1, inc) → 18
- (sc2, inc) → 24
- (sc3, inc) → 30
- (sc4, inc) → 36
- Work even 6–10 rounds (sc36) to build body height.
- Begin tapering for the neck/top: (sc4, dec) → (sc3, dec) → continue until about 24 st remain. Insert safety eyes between rounds ~rows where the sphere is widest and slightly above center (about round 6–8 depending on increases). If embroidering eyes, mark positions first.
- Stuff firmly as you narrow to keep plump shape. Continue decreases to close top leaving a small head nub for the beak.
Beak (small cone)
- With pink (or orange) yarn: MR, ch1, 6 sc in MR. R2: (sc1, inc) → 9. R3: sc around 9 for a short cone. Fold and stitch base to secure; attach to front center.
Wings (make 2)
- MR, ch1, 6 sc in MR. R2: (sc1, inc) → 9. R3: ch2, (3 dc) in next st, ch2, sl st to create a fan-shaped wing, or simply work 2 rounds sc and flatten into oval. Sew wings to sides at a slight back angle.
Tail
- Ch 8, join to form small loop, work 3–4 rounds of sc, then in last round place 3 small shells across the back edge to make tail feathers. Join and fasten off.
Feet (optional flat)
- Use darker gray or black: ch 6, sc across, fold and stitch to form flat feet that tuck under body so pigeon can sit. Alternatively omit feet and make a sitting pillow base.
Finishing
- Embroider small heart or letter on chest if desired. Sew a small thin neck tuft by pulling a few yarn strands through head top and trimming.
3. Crochet Brontosaurus Dino Amigurumi Plush Pattern

A long-necked, friendly dino — good practice in making long, attached shapes (neck + tail) and spike seam details.
Skill level: intermediate
Finished size (sample): ~9–10 in nose-to-tail (neck contributes to height)
Yarn & hook
- Worsted cotton (main color mint or soft green) ~200–300 yd depending on size.
- Hook: 3.5–4.0 mm.
- Small felt pads for foot bottoms optional; safety eyes 8 mm (or embroidered).
Overview
- Body is a low oval, neck and tail are attached tubes, legs are short cones, and back has small triangular spikes crocheted flat and sewn on.
Body (rounded oval)
- MR, ch1, 6 sc in MR (6)
- inc around → 12
- (sc 1, inc) → 18
- (sc 2, inc) → 24
- (sc 3, inc) → 30
- (sc 4, inc) → 36
- Continue increasing in same manner until base width is about 40–44 sc depending on desired body width. Work even rounds for about 5–8 rounds to shape body height. This gives a plump oval.
- Next, you’ll need to leave stitches for legs and neck — easiest method: mark four leg placement points spaced evenly around the base and work body as a continuous tube, inserting legs later by sewing into marked gaps. Alternatively make legs separately and sew.
Neck (long tube)
- MR, ch1, 6 sc — work 3–4 rounds inc to 12 sc to make a tapered neck base then work even rounds for desired neck length (about 15–20 rounds). Decrease slightly near the head to form small neck-to-head taper. Stuff lightly. Head can be a small sphere MR 6 → 12 → 18 approach, sewn to top.
Tail (tapered tube)
- MR, ch1, 6 sc, then work increasing rounds maybe to 10–12 sc near base then taper down to 4 sc at tip using decreases to shape – about 20–25 rounds long. Stuff and sew base into rear of body.
Legs (make 4 short cones)
- MR, 6 sc. R2: inc each → 12. R3: sc around 12 until leg height ~1–1.25 in. Stuff lightly and decrease to close top leaving tail for sewing. Sew legs to underside body positions.
Spikes
- Crochet small triangle motifs (ch 3, 3 dc in first ch, sl st to base) or work small granny triangles and sew them along back from head to tail, spaced evenly.
Assembly & stability
- Sew neck and tail base securely to body, reinforcing with extra passes. For stability, place a small poly-pellet bag in belly area before stuffing to lower center of gravity so the dino won’t tip over easily.
Finishing & personalization
- Add tiny cheeks with blush (fabric-safe) and embroider smile. Add a felt star applique on flank for a magical dino.
4. Crochet Velvet Unicorn Amigurumi Plush Pattern
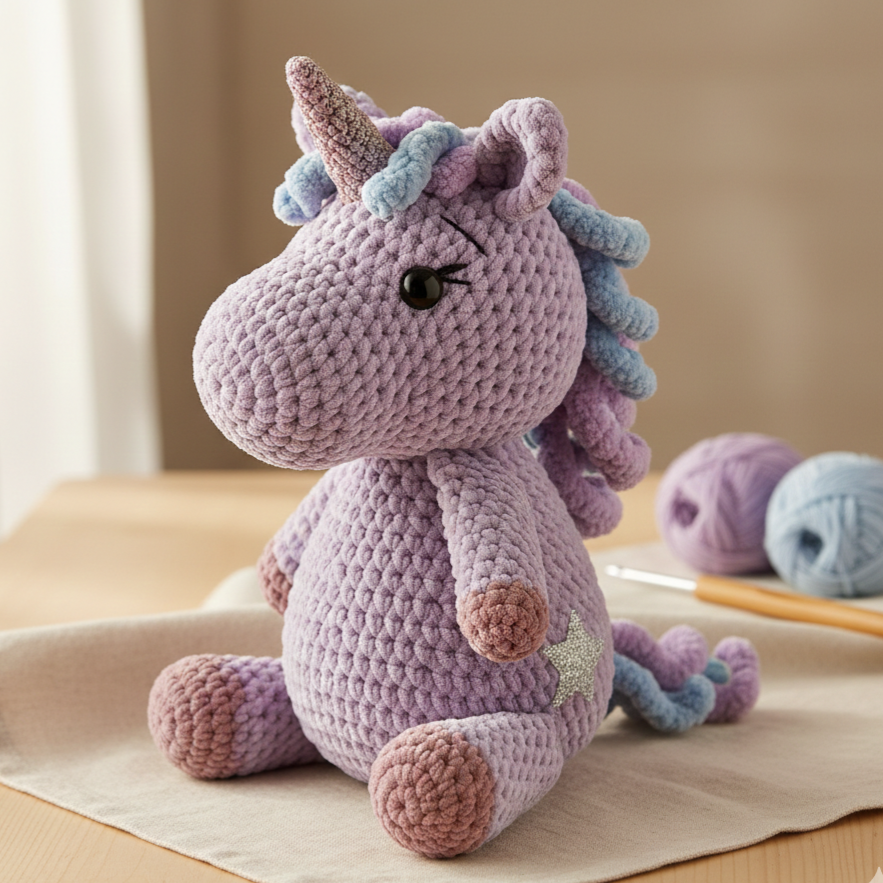
Soft-bodied unicorn made in velvet (minky-style) yarn — velvet yarn makes an ultra-plush tactile toy (care notes below).
Skill level: intermediate → advanced (velvet yarn behavior differs)
Finished size (sample): ~7–9 in tall (depending on yarn)
Yarn & hook
- Velvet/velour style yarn (aka plush, minky) for body ~250–350 yd — this yarn can be tricky: shorter stitches recommended, slightly larger hook (per yarn), and avoid very small details with the velvet since loops hide stitches. For mane/tail use fuzzy eyelash or faux fur yarn for contrast.
- Hook: 4.0–5.0 mm depending on yarn label and how firm you need thing to be.
- Polyester stuffing; safety eyes 10–12 mm (if for older kids) or embroidered eyes for safety.
Important care note: velvet yarn toys are gorgeous but shed less if made tightly; they are best for older children/adults who can air-dry and spot-clean. Machine washing may mat plush yarn—follow yarn label.
Body & head (combined tall shape)
Because velvet hides stitches, work slightly fewer rounds and shape by stuffing and smoothing rather than tiny decreases.
- MR, ch1, 6 sc (6)
- inc around → 12
- (sc1, inc) → 18
- (sc2, inc) → 24
- (sc3, inc) → 30
- Work even rounds (30 sc) for torso height ~6–8 rounds then increase slightly once for chest width, then work even for head/body height. Velvet hides gradual decreases—use stuffing to sculpt rather than fiddly decreases.
Legs & hooves (make 4)
- Work small tubes: MR 6 sc → inc to 10–12 sc and work 4–6 rounds; wrap a thin felt or contrasting yarn band for “hooves” look; stuff and sew under body.
Mane & tail
- Use stranded strands of eyelash or faux fur yarn folded in half and looped/punched into head/neck to create a thick mane. For curly mane, use boucle or chain loops to curl yarn before attaching.
Horn (gold)
- With a metallic yarn or gold worsted: MR, ch1, 6 sc; inc around → 12; then work spiral decreases OR crochet an i-cord and stuff lightly, sew to forehead. Wrap base with gold thread for sparkly finish.
Ears (make 2)
- ch 4, sc in 2nd ch from hook (3 sc), turn, sc 3, fasten off leaving tail to sew — position on head sides.
Eyes & face
- Because velvet hides stitching, either sew embroidered eyes using thin embroidery floss or attach larger safety eyes. Embroider mouth with visible contrast.
Assembly
- Attach mane along neck and down to tail base; attach horn before mane to hide seam. Sew legs under torso and tail at rear. Add a small ribbon or felt star if desired.
Special finishing & care
- For plush longevity, hand wash and lay flat air dry. Comb mane gently with a soft brush after washing to restore fluff if needed.
5. Crochet Modern Bear with Headphones Plush Pattern
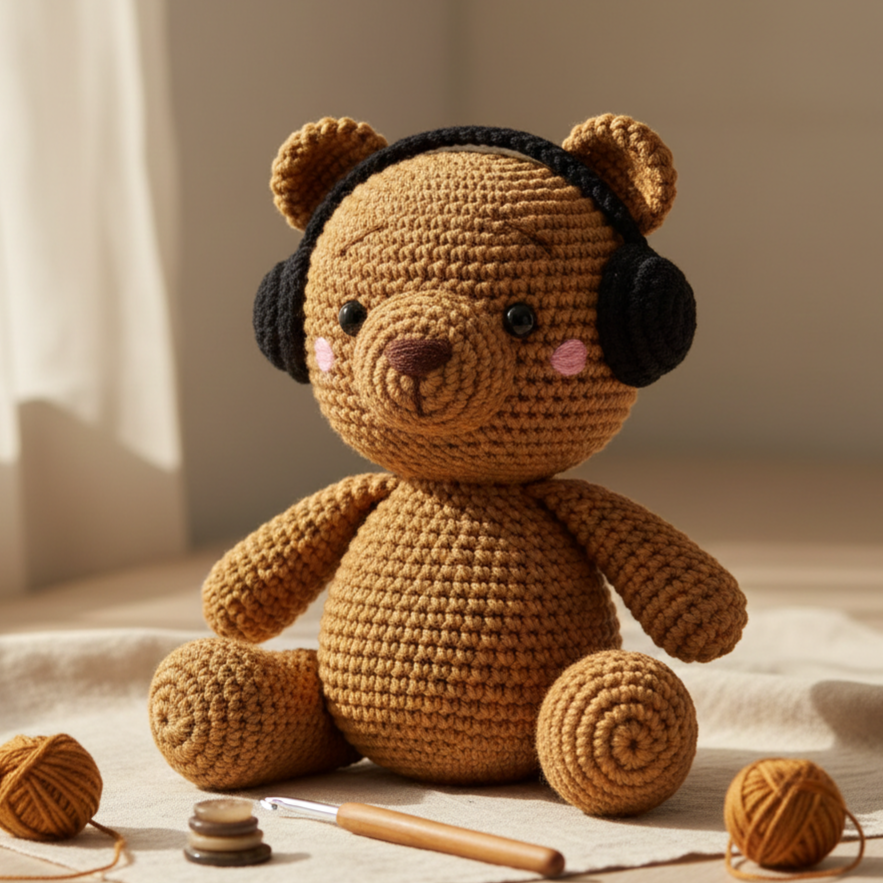
A trendy bear with embroidered features and a tiny removable headphone accessory — great for teens and gift-giving.
Skill level: intermediate
Finished size (sample): 6–8 in tall seated
Yarn & hook
- Worsted yarn for body (brown, cream) ~200 yd; small weight contrast for headphones (black/metallic) ~10 yd.
- Hook: 3.5 mm.
- 8–10 mm safety eyes (or embroidered), polyfill, small black felt circles for headphone pads optional, thin craft wire or pipe-cleaner for headphone headband (if making removable, wrap in yarn; omit wire if toy for small child).
Body & head (classic amigurumi teddy)
- Body and head in standard joined-sphere method; make head slightly larger for cute proportions.
Head
- MR, 6 sc → 12 → 18 → 24 → 30 → 36 (stop increases when desired head size). Work even rounds for height, then reduce to close. Insert eyes between rounds ~where cheeks begin, about 6–8 rounds up from first increase.
Body
- Larger sphere: MR 6 → inc –> 12 → 18 → 24 → 30 → 36 → 42 (increase more for plump body). Work 6–8 rounds even, then shape base with slight dec.
Arms & legs (make 4)
- Small tubes with a slight taper: MR 6 → inc to 10–12 sc, work 6–8 rounds (legs longer than arms), stuff and attach firmly. For seated bear, position legs forward; for standing, slightly flatter feet sewn onto base with a felt circle sewn inside for structure.
Ears
- MR 6 sc, fold and sew to head top.
Headphones (removable)
Pad (make 2)
- MR, 6 sc, sl st join, R2: inc around → 12, fasten off leaving tail to sew to felt circle or crochet onto headphone band.
Band
- Use a short strip: ch 20 (measure to fit over head proportionally), sc across, fold and seam edges to create a thin band. If you want structure, insert thin craft wire wrapped in yarn inside band for shape (do not use wire if toy for toddler).
Assembly
- Attach headphone pads by looping them over ears or sewing tiny snaps so they can be removed. For a toy for small kids, skip headphones or make them entirely crocheted and sewn permanently.
Face & finishing
- Embroider nose and mouth with darker yarn; add rosy cheeks with pale pink yarn or fabric-safe paint. Stitch a tiny music note on tummy for personality.
6. Crochet Pocket Alien Amigurumi Plush Pattern
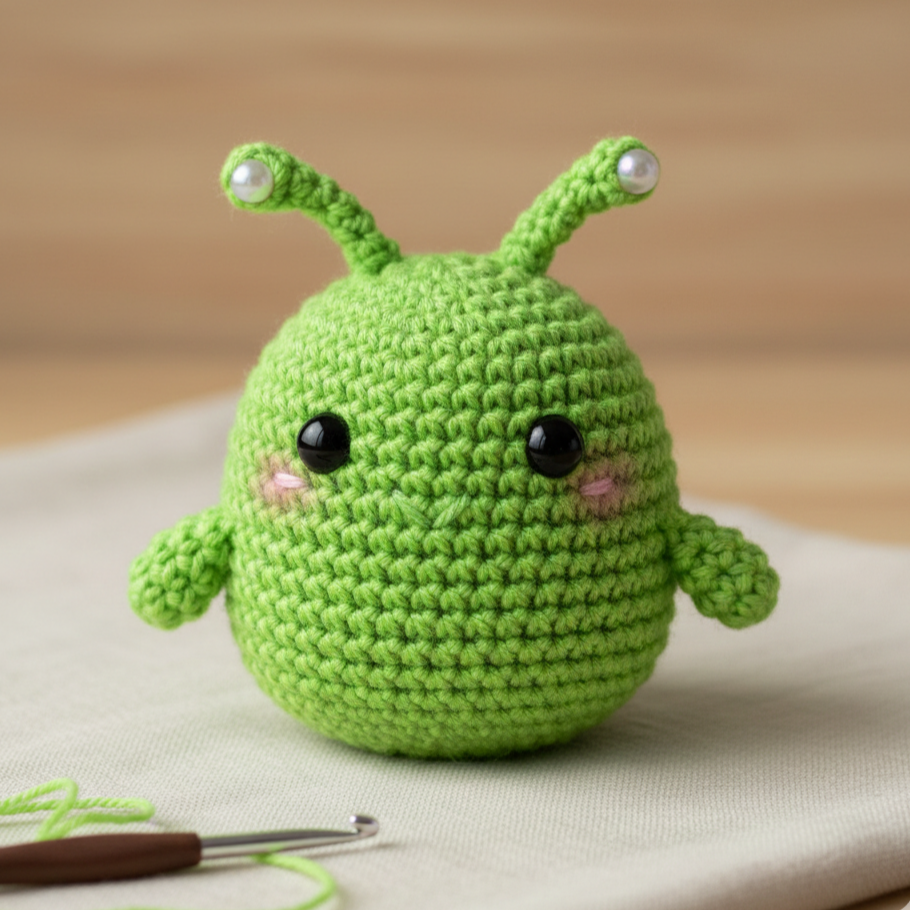
Tiny alien that fits in your pocket — simple geometry, big personality (and simple to mass-produce for gifts).
Skill level: beginner → confident beginner
Finished size (sample): ~3–4 in tall — pocket-perfect
Yarn & hook
- Fingering or sport yarn in neon or pastel ~40–60 yd total.
- Hook: 2.5–3.5 mm.
Shape & concept
- Body is a small egg; arms are short nubs, head has two antennae and a single big eye (embroidered or safety eye).
Body
- MR, ch1, 6 sc (6)
- inc around → 12
- (sc1, inc) → 18
- (sc2, inc) → 24
- Work even 4 rounds, then decrease across to close top leaving small head nub if desired. Stuff lightly.
Eye (single cyclopean eye)
- Make a small white disk: MR, 6 sc → 12 sc; embroider a pupil (black) and sew onto middle of body. For 3D eye, crochet a shallow dome: MR 6 sc; sl st, stuff lightly and sew.
Antennae (make 2)
- Ch 8, sc back, add a tiny bead or picot at tip (secure).
Limbs (make 2 small nubs)
- MR 6 sc, sc 3 rounds to make short arms; sew to sides.
Pocket pouch option
- Make the alien slightly flat on the back and add a small opening zipped or buttoned so it can act as a tiny pouch for coins or a tiny trinket — clever and playful.
General assembly & finishing advice (applies to all patterns)
- Stuffing: stuff gradually. Overstuffing distorts shaping; understuffing makes seams collapse. Aim for firm but squeezable. Use stuffing tool or back of crochet hook to push fill into small areas.
- Joining pieces: use ladder stitch or whipstitch to join limbs. Whipstitch is quick; ladder stitch gives invisible seam. Stitch through both layers tightly, then make a few reinforcing passes.
- Eyes & small parts: prefer embroidered eyes for baby-safe toys. Safety eyes and buttons are fine for older kids (3+). Always double-stitch safety eyes from the inside and consider a small washer on the inside for strength.
- Embroidering faces: use single strand of embroidery floss or tightly wound yarn and small stitches. Place features before stuffing final areas when possible – it’s easier to embroider on a flat or partially stuffed surface.
- Blocking: small amigurumi usually don’t need blocking — stuffing and sewing define shapes. For pieces with flat petals or wings, pin them to shape on a foam pad and lightly steam.
Final notes & gift presentation
- Care label idea: include a small card: “Handmade amigurumi — yarn: [fiber]; hand wash cool, air dry; spot clean for plush. Not for children under 3 unless all parts are sewn/embroidered.”
- Personalization: embroider initials, tiny pockets, or color accents to match recipient tastes.
- Variations: all six patterns can be sized up by using thicker yarn and larger hooks or down by switching to finer yarn. Adjust stuffing, safety part choices and reinforcement accordingly.
conclusion
You now have six fully sketched amigurumi patterns — from the tiny, pocket-ready Pocket Alien, to the ultra-plush Velvet Unicorn, the sweet Blueberry Snail, the city-smart Pigeon, the long-necked Brontosaurus, and the trendy Bear with Headphones. Each pattern focuses on simple repeatable techniques (magic ring, increases/decreases, simple shaping) that are easy to mix-and-match — try giving the bear a unicorn horn, or a tiny coiled snail as a dino’s friend.
Pick one, swatch, and make a prototype before committing to a gift batch — prototypes help you dial in stuffing firmness and any small adjustments to size.