Wrist warmers are one of the fastest, most useful crochet gifts: they keep your wrists and palms warm while leaving fingers free for typing, driving and cozy tasks. Below you’ll find one full introduction covering yarn choices, sizing, gauge, and construction options, then five complete wrist-warmers with very long, step-by-step instructions, variations, finishing and care. The tone is clear and practical so you can drop these straight into a blog post.
materials, sizing, gauge, construction approaches, and abbreviations
Materials & yarn choices
- Yarn weight recommendations
- DK / light worsted (recommended) — warm but not bulky; great stitch definition for lace and texture.
- Worsted — warmer, makes a chunkier warmer that’s quick to work up.
- Sport / fingering — for delicate, thin wrist warmers.
- Fiber
- Wool or wool blends — warm, elastic and great for winter wear.
- Superwash wool / wool-acrylic blends — easier care (machine wash gentle).
- Alpaca blends — very warm and soft (may stretch slightly).
- Cotton — OK for mild climates, but not as insulating.
- Notions
- Crochet hooks sized for yarn (examples below), tapestry needle, stitch markers, measuring tape, optional small elastic or ribbing for thumb reinforcement, blocking tools (pins, mat).
Sizing — how to measure and plan
Take two measurements for the wearer:
- Wrist circumference (where the warmer sits).
- Hand circumference at knuckles (for warmers that cover part of the hand) and distance from wrist to base of thumb (for thumb opening placement).
Decide desired ease:
- Snug: 0–⅓” negative ease (warmers fit snug).
- Comfortable: 0–½” positive ease (slightly loose).
- Layering: ½”–1″ positive ease (wearable over thin gloves).
Converting inches to stitches — digit-by-digit example
Always swatch in the stitch you will use and measure stitches per inch (spi). Example calculation for an average adult wrist:
- Suppose target finished wrist circumference = 7 inches.
- Suppose swatch shows 5 stitches per inch.
Calculate stitches needed: 7 × 5 = ?
- Work step-by-step: 7 × 5 = (7 × 2) + (7 × 2) + (7 × 1) — but simpler: 7 × 5 = 35.
- So you need 35 stitches around.
If your stitch repeat requires a multiple (for example, multiple of 4 + 1), round 35 to the nearest compatible number (for multiple of 4 + 1, 35 = 4×8 + 3, not matching; nearest are 33 (4×8 + 1) or 37 (4×9 + 1) — choose 33 for snug or 37 for slightly roomy). This is why swatching and matching repeat multiples matters.
Gauge & swatching
- Make a 4″ swatch in the exact stitch pattern and hook you plan to use. Block it the way you will finish the warmers. Measure stitches per inch and rows per inch. Use those values to compute required stitch counts and number of pattern repeats.
Construction approaches
- Worked in the round from wrist upward — common, seamless, tidy. Thumb opening is created when you leave stitches on a holder and work a short tube for the thumb later.
- Worked flat and seamed — easier for complex colorwork or shaping, seam at the back.
- Motif-based — join granny/hexagon motifs into a cuff shape then add a thumb opening.
- Convertible flap style — include a short flap that can be buttoned over fingers (not used here, but a variation).
Thumb opening placement
- Measure distance from wrist to base of thumb (commonly 1.5–2.25 inches depending on hand). When working the tube, stop at that height to create the thumb slit: leave a set number of stitches on hold or create a near-open vertical slit using chains.
Abbreviations (US)
- ch — chain
- sc — single crochet
- hdc — half double crochet
- dc — double crochet
- tr — treble crochet
- sl st — slip stitch
- BLO/FLO — back loop only / front loop only
- st(s) — stitch(es)
- inc — increase (2 sts in same st)
- dec — decrease (sc2tog)
- MR — magic ring
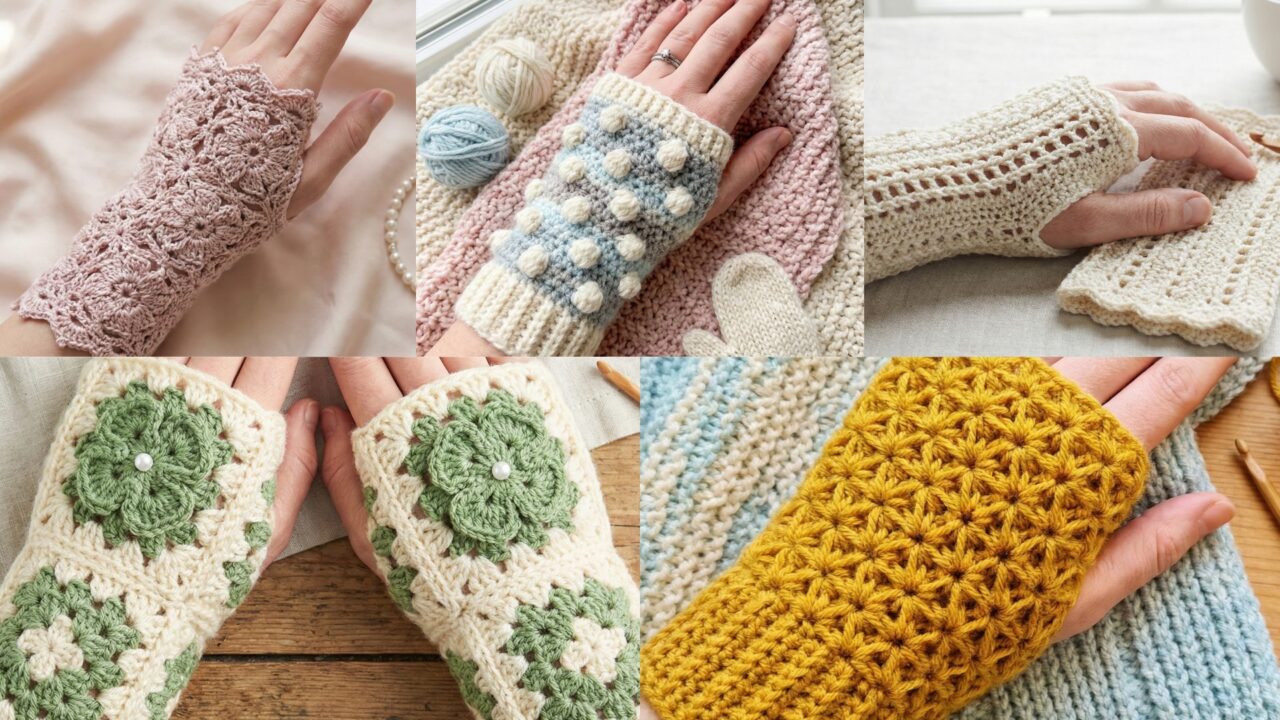
1. Crochet Star Stitch Wrist Warmers Pattern
Style & concept: A cozy, textured wrist warmer using the star stitch (also called the daisy or marguerite stitch). The fabric is dense and warm but has little stretch; the star stitch makes an eye-catching honeycomb-like surface.
Skill level: Confident beginner — star stitch requires a few special steps but is repetitive.
Materials (adult medium)
- DK yarn (100% wool or wool blend) — ~75–120 yd per pair.
- Hook: 4.0 mm (adjust for your gauge).
- Tapestry needle, stitch marker.
Gauge example (star stitch)
- After swatching and blocking: 5 stars = 2 inches across and 6 rows = 2 inches (example; your swatch may differ). Convert carefully for your gauge.
Finished size (example)
- Wrist circumference target: 7 in; height: wrist to base of thumb ~2.5 in; hand coverage ~1.5 in above wrist.
How the star stitch works (short)
The star stitch is formed by working 5 loops pulled through into the same stitch and joining them with a sl st or using dc to anchor, creating a star/daisy. It produces a thick, textured fabric.
Pattern math example (digit-by-digit)
- Target circumference = 7 inches. Swatch gives 2.5 stars per inch horizontally.
- Compute: 7 × 2.5 = ?
- Do step-by-step: 7 × 2 = 14; 7 × 0.5 = 3.5; 14 + 3.5 = 17.5 → round to 18 stars across.
- If star repeat requires an even number, choose 18. Now convert stars to stitches: each star uses a certain number of foundation stitches; for many star-stitch constructions, each star corresponds to one stitch in the foundation row (confirm via swatch). So foundation chain = 18 + turning chain (if working flat) or 18 sts in round.
Step-by-step (worked in the round — cuff up)
A. Foundation and setup
- Make a small flat star-stitch swatch and determine foundation stitch count for your chosen width (see math example above).
- Foundation chain: Ch 18 (or your computed number) and join into a ring carefully, or chain desired number plus 1 for turning if you prefer to work a short seam.
- Work a round of sc (or hdc) to set base and prevent holes (sc in each ch; join with sl st). This gives a stable base for star stitches.
B. Star stitch round
4. Round 1 (star round): Insert hook into next stitch and draw up a loop (approximately ¼–½” tall), repeat this draw-up four more times into the same stitch — you now have 5 loops on hook; yarn over and draw through all 5 loops (this creates the star center), ch1 to close the star; sl st into the center of the star or sc around the star to secure. Repeat into each stitch around. Join with sl st to first star. (This description maps to many star stitch variants — adjust to the exact star technique you prefer.)
- Round 2 (anchor row): Work a round of sc in between stars to lock the stars in place: sc in the ch-1 space between stars around. Join with sl st.
- Repeat Round 1 and 2 until the piece measures the desired height to the base of the thumb (measure on wearer — typically 2.25–2.75 inches from cuff).
C. Thumb opening
7. At the round where you reach thumb placement, you will create the thumb slit:
- Option 1 (holding stitches): On the star anchor round, work sc across half the stitches (or number corresponding to the lower side of the hand), then place the next 6–8 stitches on a stitch holder (or leave unworked and mark them). Continue working sc across remaining stitches. On next rounds, work normally — you will have an opening where stitches were held.
- Option 2 (chain slit): On the anchor round, when you reach the thumb position, ch the number of stitches needed to span the opening (e.g., ch6), skip same number of base stitches, sl st to next base stitch, continue. On next round, work across ch bridge with sc and join.
- Continue star rounds for 1–1.5 inches above the thumb base (or as desired for hand coverage). This gives the warmer a short extension over the hand.
D. Thumb tube
9. Using the held stitches or by picking up stitches around the chain gap, join yarn and work sc in the round to create a short thumb tube — about 6–8 rounds depending on desired thumb length (try on the wearer). Decrease one round at the tip if desired for a tapered fit or leave open.
E. Finishing
10. Work a neat cuff edge: pick up stitches at the lower cuff edge and work 4–6 rounds of sc in BLO for a ribbed effect that hugs the wrist. Alternatively, do 1–2 rounds of reverse sc (crab stitch) for a delicate finish.
11. Weave in all ends, block very lightly to set the star texture (do not over-stretch).
Variations & styling
- Make a longer version to cover part of the forearm.
- Hold two strands of sport yarn together hold for extra warmth and larger stars.
Fit tips & care
- Because star stitch is dense, add ½” ease if you want a less snug fit.
- Care: hand wash cool and lay flat for wool; superwash blends: machine wash gentle.
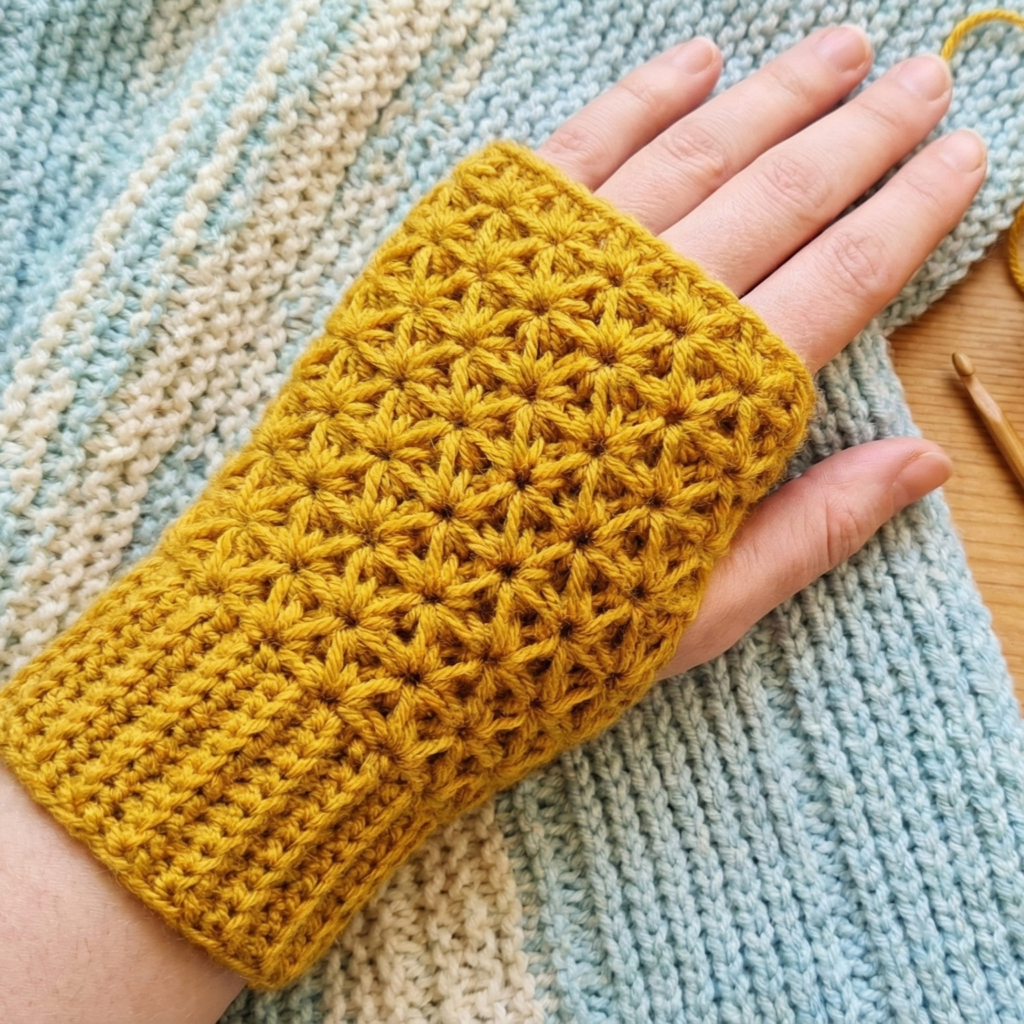
2. Crochet Lace Knit Wrist Warmers Pattern
Style & concept: A lacy, knit-look wrist warmer that mimics knitted lace using crochet stitches (for example, chain-lace and treble lace repeats). Breathable, pretty and elegant for dressy winter outfits.
Skill level: Intermediate — lace repeats require attention to stitch counts and pattern placement.
Materials (adult medium)
- DK yarn (soft wool or blend) — ~80–120 yd per pair.
- Hook: 3.5–4.0 mm.
- Tapestry needle, stitch markers.
Gauge example
- Swatch lace repeat to get spi and rpi. Example: in lace repeat you get 6 pattern repeats across 4 inches meaning 1.5 repeats per inch.
Pattern logic
- Lace worked flat or in rounds. To create a knit-like look, use tall stitches (dc/tr) and chain spaces in structured repeats. The fabric will be airy yet warm when layered with a thin lining if desired.
Step-by-step (worked flat then seamed or worked in the round with careful joins)
A. Compute stitch count
- Suppose your wrist target = 7 in, and your swatch indicates 1.5 lace repeats per inch. If each repeat is 8 stitches, first compute total repeats needed:
- 7 × 1.5 = ?
- Digit-by-digit: 7 × 1 = 7; 7 × 0.5 = 3.5; 7 + 3.5 = 10.5 → round to 11 repeats across.
- If each repeat = 8 sts, total stitches = 11 × 8 = 88 stitches.
- So foundation chain = 88 + necessary turning chains for the pattern (often +3 for tall stitches).
B. Foundation row
2. Chain 91 (88 stitches + 3 turning ch) and join into the round carefully, or work flat 91 ch and seam ends later.
C. Lace repeat (example one; adapt to your preferred lace stitch)
3. Row 1 (set-up): dc in 4th ch from hook (counts as dc3), ch2, skip 2, dc in next 2 across; join.
4. Row 2: ch3, tr into next dc, ch1, sk 1, sc into ch-2 sp, ch1, tr in next dc — this forms vertical columns that look knit-like when repeated.
5. Row 3: Work a row of dc across to stabilize then return to lace rows.
D. Continue repeats
6. Repeat rows 2–3 (or the full lace sequence of 6–8 rows) until you reach a height of approx 2.25–2.75 inches from cuff for thumb base (measure on wearer).
E. Thumb opening
7. On the round where thumb should open, work pattern across until you reach the position of the opening. Use the chain bridge method to avoid long floats:
- Work pattern across half the stitches, ch 6, skip 6 base sts (or place them on a stitch holder), then join pattern to the remaining sts.
- Continue lace repeats for desired hand coverage (1–1.5 in above the thumb base).
F. Thumb tube
9. Rejoin yarn to held stitches or pick up along the chain bridge and work sc in rounds to make thumb tube for 6–8 rounds. Because lace can gape, consider working sc rather than lace for thumb tube to give a snug opening.
G. Edging
10. Add a neat lace or ribbed cuff at the wrist: pick up along bottom and work 1 round sc in BLO followed by 4 rounds of hdc in BLO for a gentle elastic rib.
H. Finishing
11. Block: pin the lace gently to open the pattern, but do not over-stretch. Weave in ends.
Variations & styling
- Line the inside with a thin fleece or knit fabric for extra warmth—stitch lining in place by hand.
- Add a small decorative button near wrist as an accent.
Fit tips & care
- Because lace drapes, choose a slightly smaller stitch count or add a ribbed band for grip.
- Hand wash or machine gentle in a bag; lay flat to dry.
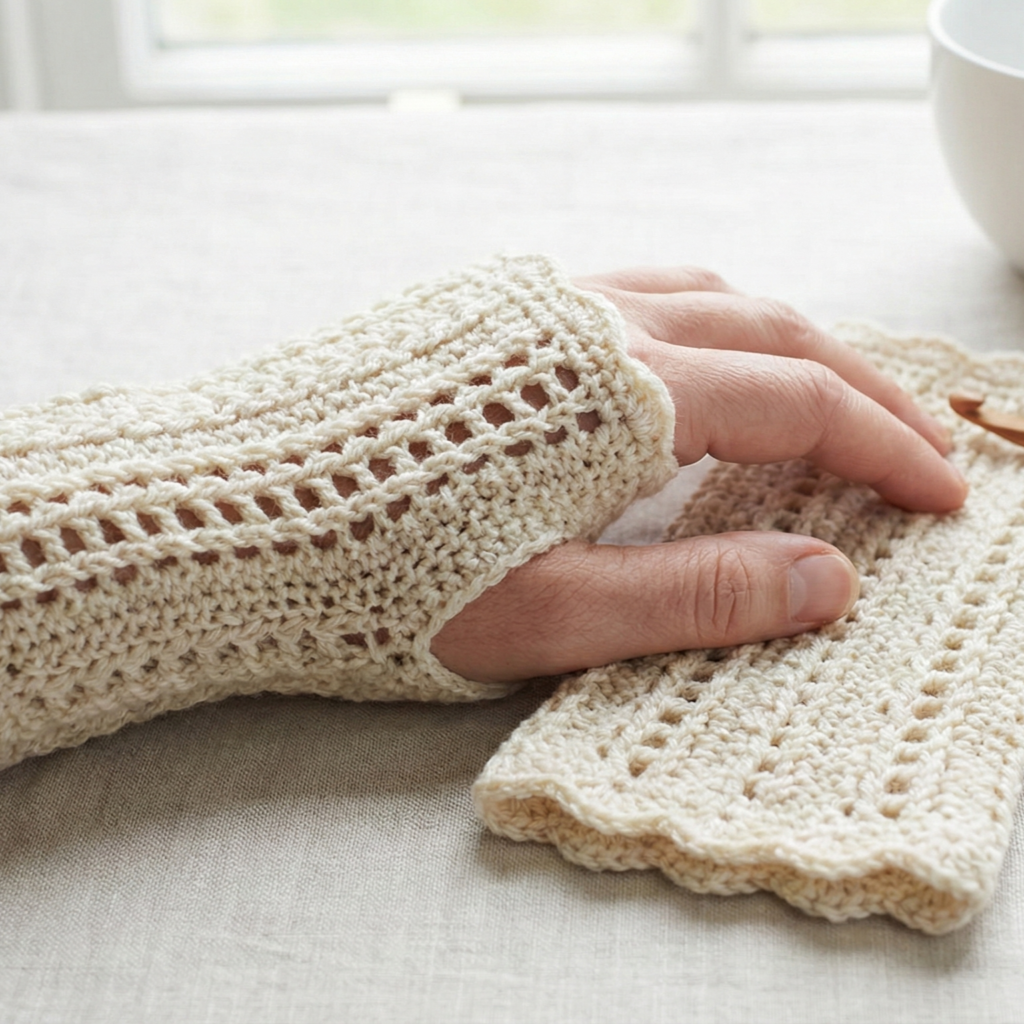
3. Crochet Nieve Wrist Warmers Pattern
Style & concept: “Nieve” (Spanish/Italian for snow) wrist warmers use raised bobble clusters to mimic snowflake tufts — textured, cozy and very tactile. This pattern is dense and insulating.
Skill level: Intermediate — bobbles require technique and stitch stability.
Materials (adult medium)
- Worsted weight yarn (wool blend preferred) — ~100–150 yd per pair.
- Hook: 4.5–5.0 mm (adjust to gauge).
- Tapestry needle, stitch marker.
Stitch concept
- The nieve effect is achieved by clustered bobbles (5-loop bobble or puff stitches) arranged in a staggered grid. Between bobble rows work sc or hdc to stabilize fabric.
Gauge & stitch math
- Bobble width may compress gauge horizontally; swatch to find how many bobbles per inch and stitches per bobble. Example: 3 bobbles = 4 inches horizontally; then for 7 inches you need 7 × (3/4) = 5.25 bobbles → round to 5 or 6 depending on preference. Convert to stitches per row accordingly.
Step-by-step (worked in the round)
A. Foundation
- Swatch a 4″ sample with bobble repeat to determine stitches needed. Compute total stitches for wrist circumference using digit-by-digit multiplication as earlier.
B. Foundation chain & base round
2. Chain required number of stitches (for example 44 ch) and join for working in the round. Work 1–2 rounds of sc to establish a firm base.
C. Bobble grid
3. Row A (bobble row): sc 2, create bobble in next st (puff or 5-loop bobble, see instructions below), sc 2 — repeat across. Join.
- Make puff/bobble: yarn over, insert hook, pull up long loop (approx ½” high), repeat 4 more times to have 5 loops on hook, yarn over and pull through all loops, ch1 to close bobble, sl st into base to anchor if needed.
- Row B (anchor row): sc across all sts, working into the ch-1 or the tops to stabilize bobbles. This row compresses bobbles slightly and gives structure.
- Row C (offset bobble row): On next bobble row, offset bobbles so they sit between bobbles of previous bobble row (staggered grid). Repeat rows A–C until desired height (typically 2.25–3 inches to base of thumb).
D. Thumb opening
6. Create thumb slit using held stitches or chain bridge as previously described. Work a sc row above the opening to stabilize.
E. Thumb tube
7. Pick up stitches and work in sc or hdc for the thumb tube 6–8 rounds. Because the body is thick, keep thumb tube plain for comfort.
F. Cuff & finishing
8. Add a ribbed cuff by working 6 rounds in BLO hdc or sc for elasticity. Weave in ends, block lightly to even bobbles.
Variations & styling
- Use contrasting color for bobbles for a polka-dot snowy look.
- For a reversible look, try smaller puff stitches so both sides are neat.
Fit tips & care
- Because bobbles add thickness, allow less ease for the wrist.
- Hand wash and dry flat for wool; machine gentle only for machine-washable yarn.
4. Crochet Floral Lace Wrist Warmers Pattern
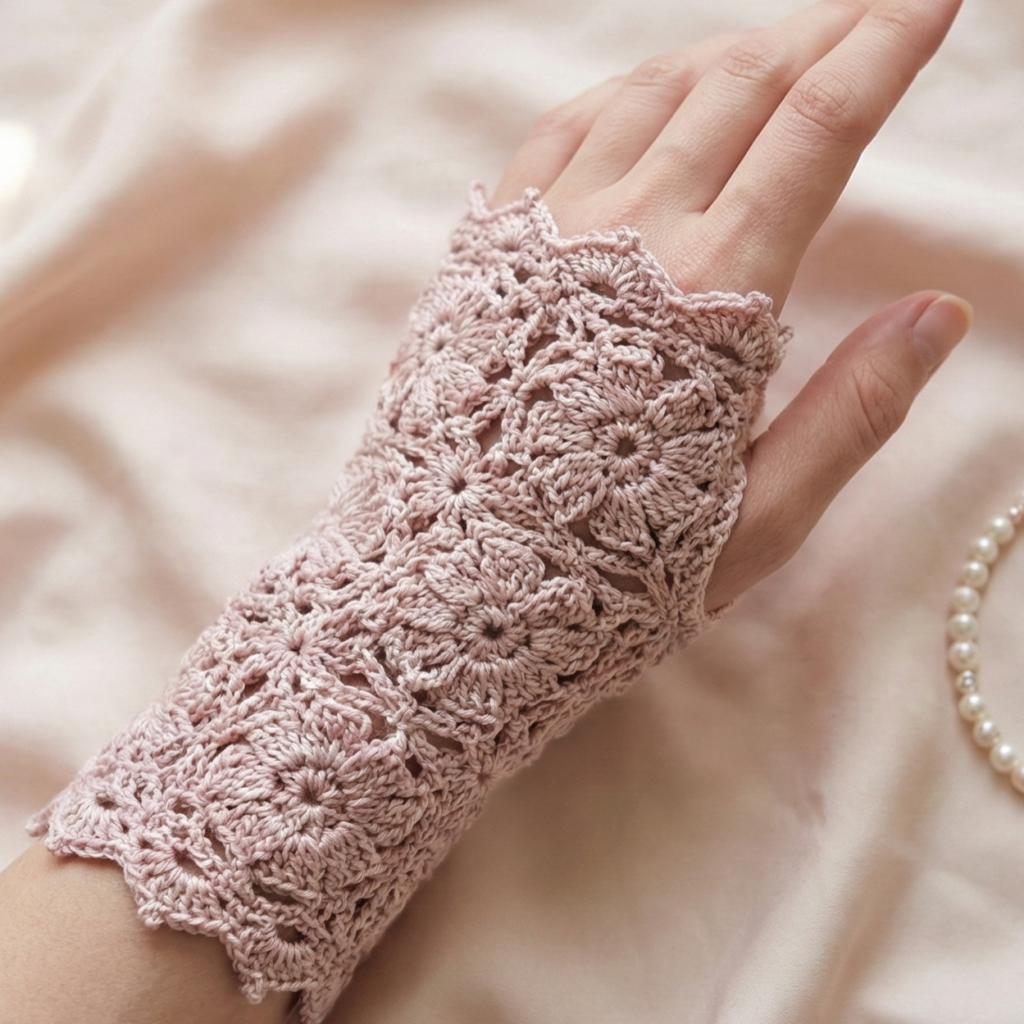
Style & concept: Delicate floral lace panels worked either as a continuous tube or as a decorative panel seamed at the back. Feminine and dressy — perfect for evenings.
Skill level: Intermediate — lace and small motif repeats.
Materials (adult medium)
- Fingering or sport weight yarn in a soft wool or silk blend (e.g., merino + silk) — ~100 yd per pair.
- Hook: 3.0–3.5 mm.
- Tapestry needle, blocking pins.
Pattern idea
- Use a small floral lace motif repeat (e.g., shell + picot clusters forming flowers) repeated horizontally and vertically.
Step-by-step (worked flat then seamed for best topography)
A. Swatch & repeat
- Make a 4″ block of the floral lace repeat and count stitches per repeat. Suppose repeat is multiple of 6 + 2.
B. Foundation
2. Compute stitches: example wrist 7 in and lace gives 4 repeats across 4 in (i.e., 1 repeat per inch). For 7 in you need 7 repeats. If repeat is 6 sts, total stitches = 7 × 6 = 42. Add 2 for turning = 44 ch.
C. Body
3. Row 1 (set-up): sc in 2nd ch from hook across. Turn.
4. Row 2–N (lace repeat rows): Work your floral lace sequence (for example):
- Row A: ch3, skip 2, sc in next, ch3, shell in next st — this is a simplified illustrative repeat. Use a tested floral lace chart for exact placement.
- Continue lace repeats until piece height equals desired length from wrist to base of thumb (usually 2.25–2.75 in).
D. Thumb slit
6. Make the thumb opening by leaving the appropriate number of stitches unworked on one row (or by chain bridge). If the warmer is flat/seamed, leave the thumb hole along one side seam when you join.
E. Seaming
7. Fold the panel with RS facing out and seam the side edges with mattress stitch leaving thumb opening unseamed (or seam around opening to form tube). For a smooth interior, use invisible mattress stitch with matching yarn.
F. Edgings
8. Crochet a narrow picot or shell border around wrist and top edges to finish: sc around, then a picot round: sc, ch3, sl st in same st etc., to get delicate points.
G. Blocking
9. Block the warmers to open the lace and shape the thumb slit. Pin gently on a mat and allow to dry fully.
Variations & styling
- Add a small crocheted flower appliqué over the thumb opening or at wrist.
- Line with fine silk for warmth without altering lace look.
Fit tips & care
- Lace can stretch — if you want a snug fit, work without positive ease.
- Hand wash recommended for delicate fibers.
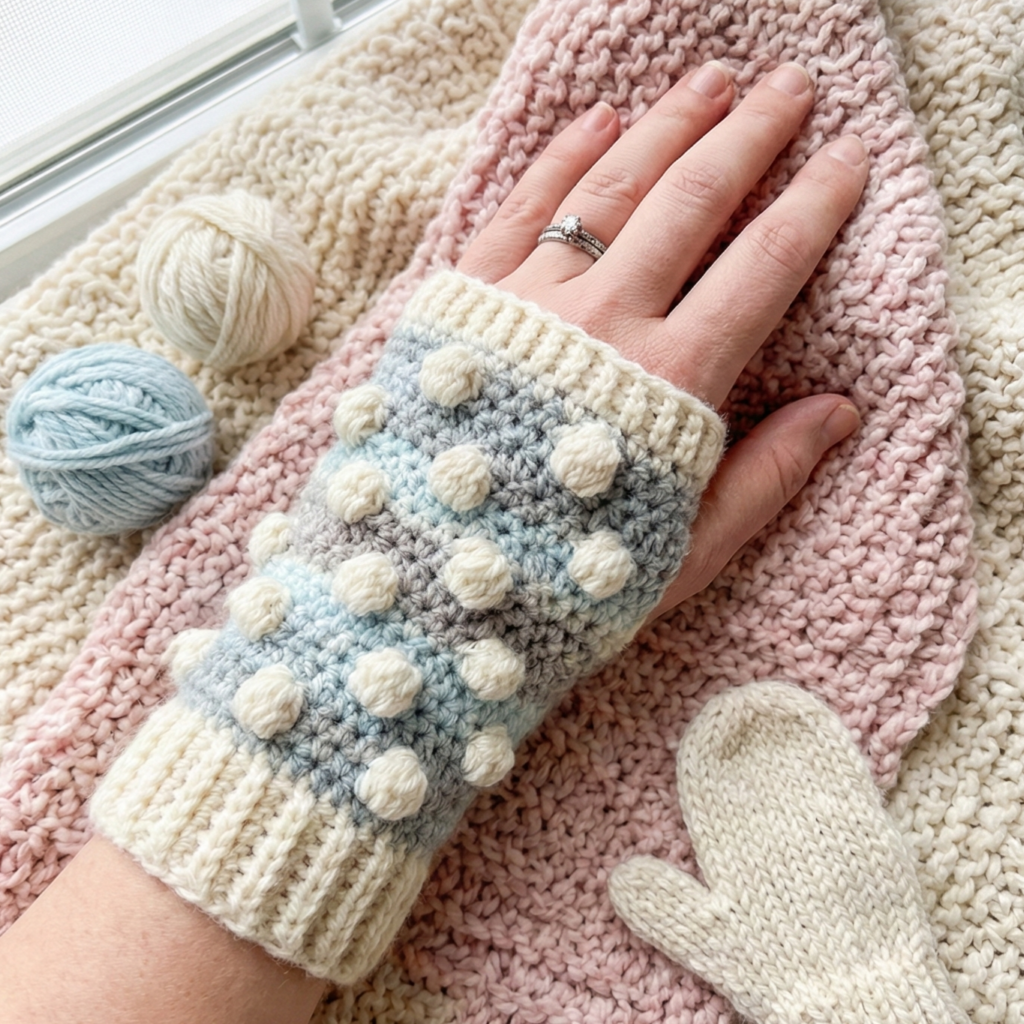
5. Crochet Four Leaf Clover Granny Square Wrist Warmers Pattern
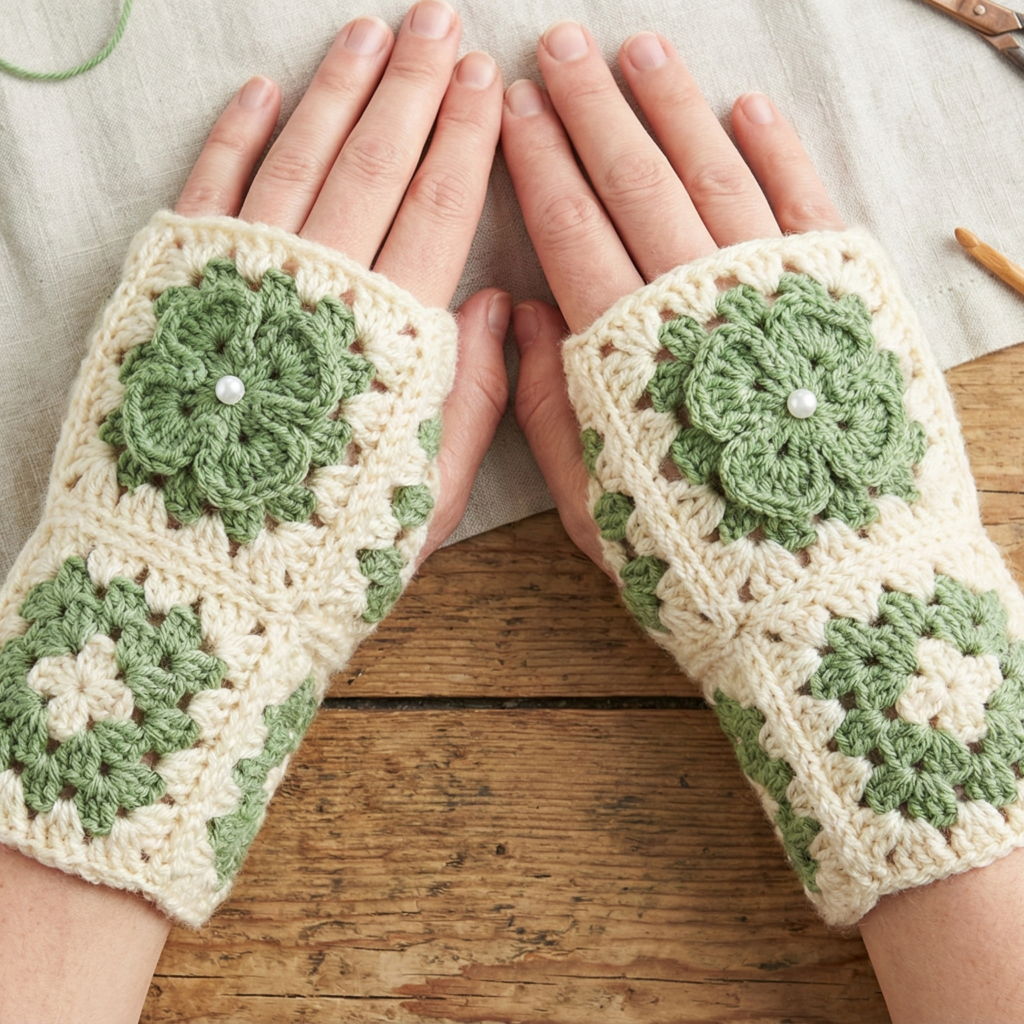
Style & concept: Motif-based warmers using small granny squares with a four-leaf clover applique in the center of each square. This gives a charming, graphic look and is excellent for using up leftover yarn.
Skill level: Confident beginner — granny squares and small appliqués.
Materials (adult medium)
- DK yarn in main color and clover color — ~100–150 yd total per pair (varies by number of motifs).
- Hook: 4.0 mm.
- Tapestry needle, blocking tools.
Design
- Use 2–3 small granny squares joined side-by-side (or a single large square folded) to create the warmer tube; add a clover applique to the front center.
Step-by-step (motif-based, make 2 warmers)
A. Make granny squares
- Small granny (approx 2.5–3 in finished):
- MR; Round 1: ch3, 2 dc, ch2, 3 dc, ch2 repeat 3 times (4 corners). Join.
- Round 2: in corner ch2 spaces work (3 dc, ch2, 3 dc), along sides work ch1, 3 dc (or more rounds if you want a larger square). Fasten off. Make 6 squares per pair (3 squares per warmer laid vertically) or 4 squares if wider squares.
B. Make four-leaf clover applique
2. Clover leaf (make 4 per clover): With clover color:
- MR; ch1; 6 sc in ring; sl st to join (small circle).
- Petal round: ch3, 3 dc in same st, ch3, sl st in next st — repeat to make 4 petals around the small circle. Sew four petals together into clover shape or make them individually and sew as cluster.
- Clover center: embroider a tiny French knot or sew a small bead (not for toddler version).
C. Join granny squares
4. Arrange squares in a rectangle sized to wrap around the wrist (for example 3 squares around). Join squares using whipstitch or join-as-you-go leaving no gaps. Once the rectangle is made, seam short ends to form a tube that fits the wrist measurement.
D. Attach clover
5. Sew clover applique onto the front-most square center using strong yarn and multiple passes. Block the warmer to flatten the motif.
E. Thumb opening
6. If using 3 squares around with height equal to 2–3 squares vertically, leave a small space at the seam edge for the thumb opening (for example when seaming the side, do not join 6–8 stitches to make thumb hole) or cut a small slit and reinforce edges with sc.
F. Edging
7. Work a round of sc around the top and bottom edges of the warmer to tidy joins and provide structure. Add a picot round (optional) for decorative finish.
Variations & styling
- Make the clover in tonal greens for a subtle effect or in bright colors for contrast.
- Make a convertible design: one square extends into finger flap that can be buttoned down.
Fit tips & care
- Motif seams have little elasticity; choose a slightly larger circumference or add elastic thread at the wrist-up edge if you want a snug hold.
- Machine wash gentle if yarn is washable; otherwise hand wash and dry flat.
Conclusion
You now have five complete wrist warmer patterns that cover textured, lacy, chunky and motif-based styles. A few final professional tips to make your finished warmers confident and gift-ready:
- Try on as you go. Fit is the most common issue; checking on the wearer while still working rows makes small adjustments (add/subtract rows or sts) easy.
- Adjust for fiber stretch. Wool stretches more than cotton; for wool allow less positive ease.
- Neaten thumb openings. Reinforce thumb slit edges with a round of sc or hdc to prevent stretching over time. For high use, consider sewing a small strip of ribbon inside the edge for stability.
- Blocking matters. For lace and motif work, block to size and to open stitch patterns. For heavy textured stitches, blocking evens the surface.
- Finishing details. Weave in ends neatly on WS, stitch through plies to lock in tails on wool yarns, and tuck ends inside post stitches for added security.
- Photography tips for your blog: show each warmer flat (close-up of stitch texture), on a wrist for scale, and a how-to shot of thumb opening or seam method. Natural light, neutral background and a small prop (mug, book) create a warm seasonal vibe.
- Care & labeling: For gifted warmers include yarn content and care instructions (e.g., “100% wool — hand wash cold, lay flat to dry” or “superwash wool — machine wash gentle”).