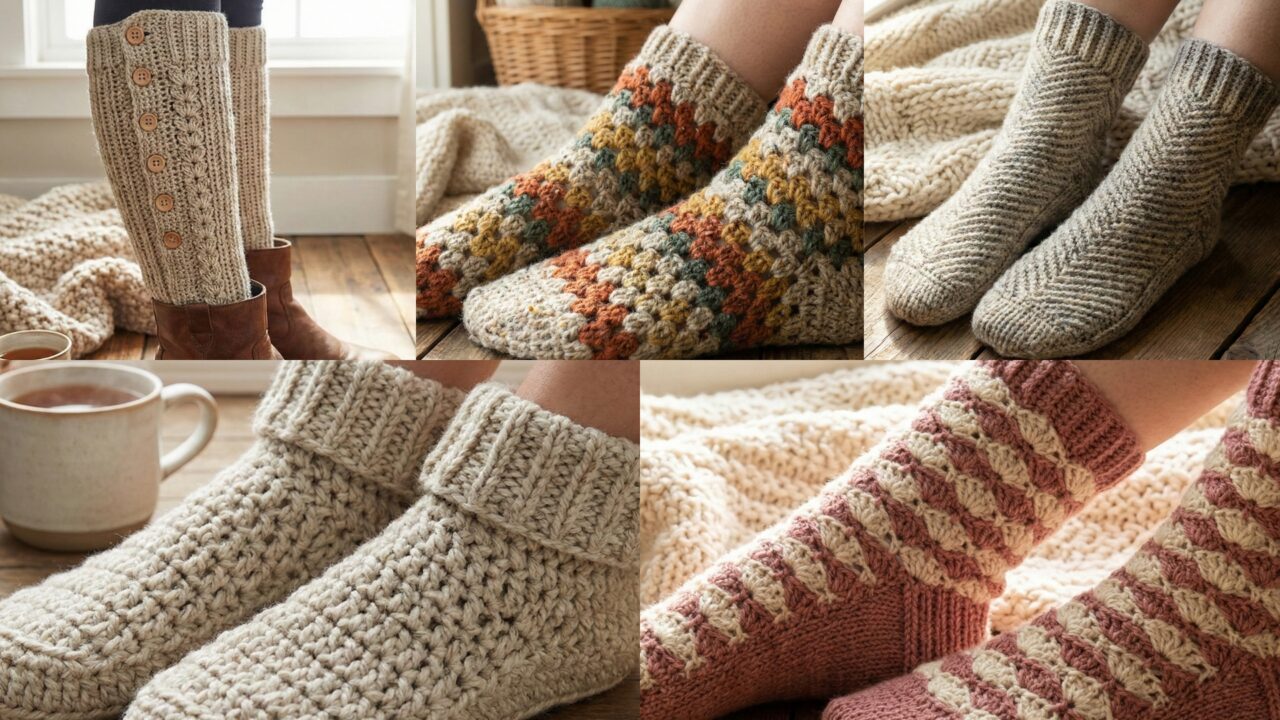
Cozy socks are the unsung heroes of winter — they keep toes toasty, make morning routines sweeter, and are one of the quickest handmade gifts that feel impossibly luxe. Below you’ll find five warm, wearable crochet sock patterns (Granny Stitch, Herringbone, Bernat Slipper, Vintage Waves, and Knee-High Buttoned) with clear, step-by-step instructions and plenty of tips for customizing fit and style. Each pattern is geared toward worsted/aran weight yarn (warm and durable), but I’ll also explain how to adapt yarn weight, hook size, and stitch counts so your socks fit perfectly.
Common abbreviations (US terms)
ch = chain • st = stitch • sl st = slip stitch • sc = single crochet • hdc = half double crochet • dc = double crochet • sk = skip • rep = repeat • sc2tog = single crochet 2 together • BLO = back loop only • FLO = front loop only
Materials used across patterns (general)
- Worsted weight yarn (Category 4) — about 100–150 g per pair for ankle socks; 200–300 g for knee-highs depending on length. Wool blends are excellent for warmth; acrylic/wool blends are easy care.
- Hook: suggested 4.0 mm (G) or 4.5 mm (7) — adjust for your tension. Use a slightly smaller hook if you want a denser, warmer fabric.
- Yarn needle, stitch marker, scissors, measuring tape, optional buttons (for knee highs).
Sizing quick guide (how I’ll refer to sizes below)
- Small (S) — women’s 5–7 (US) — target circumference ~7–8 in (18–20 cm)
- Medium (M) — women’s 8–9 (US) — target circumference ~8.5–9.5 in (21.5–24 cm)
- Large (L) — women’s 10–11+ (US) — target circumference ~10–11 in (25–28 cm)
Because feet and tension vary, the patterns give a starting stitch count for S/M/L and show how to measure and adjust as you go.
Intro: Before you begin — tips for perfect socks
- Make a gauge swatch: 10 x 10 cm worked in the main stitch pattern tells you how many sts per inch you get. That helps you choose the right starting stitch count.
- Measure the foot circumference where the sock will sit (ankle or instep). Crochet has stretch — aim for 0–1 cm negative ease for a snug fit in dense stitches (like herringbone), or 1–2 cm positive ease for looser, textured socks (like granny stitch).
- Use stretch-friendly joins: When working in the round, use slip-stitch joins, or opt for joined rounds and a stretchy cast-on if you’re worried the cuff will be too tight.
- Try on as you go: Slide the sock onto the foot after the heel & gusset to ensure length and fit before finishing the toe. Better to remove a few rounds than to rip everything later.
- Care: Most wool blends should be hand-washed or machine washed on gentle in a mesh bag and air-dried to keep shape.
1. Crochet Granny Stitch Socks Pattern
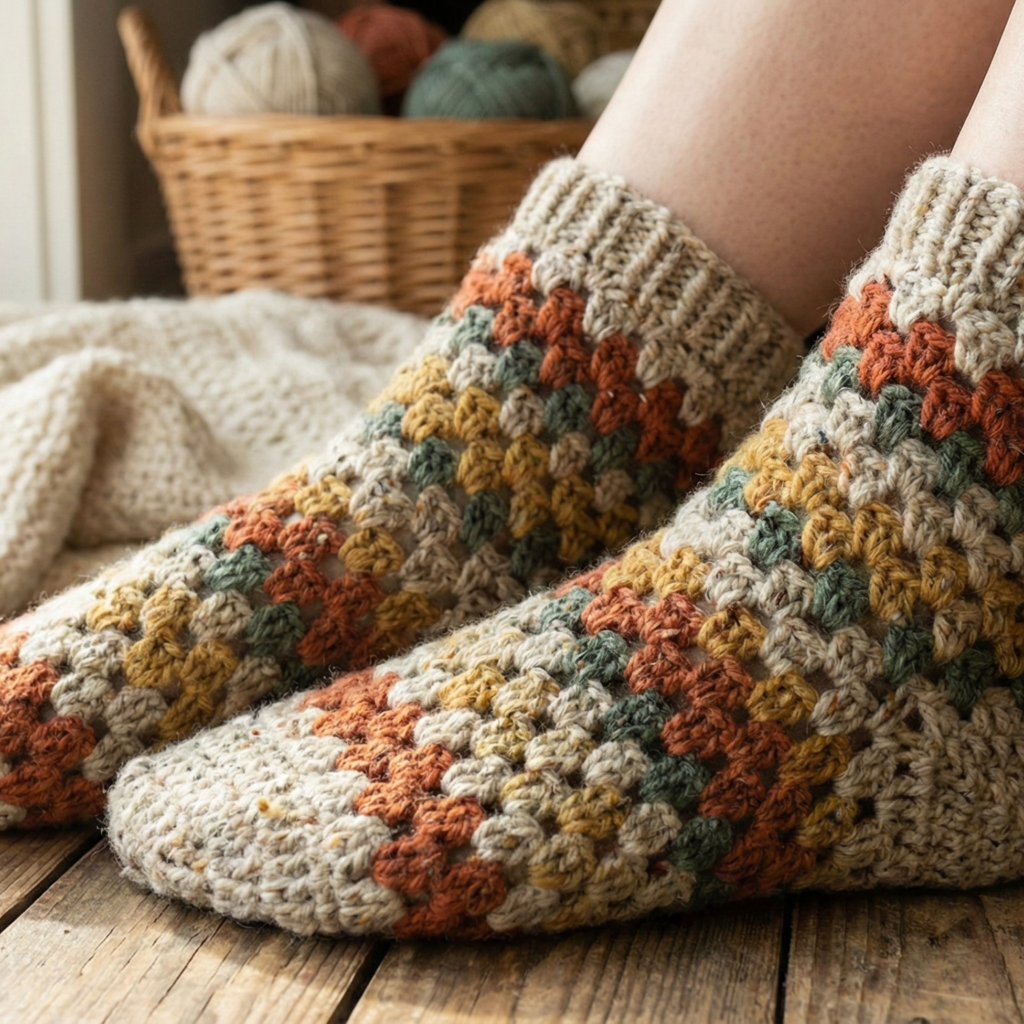
Warm, vintage-y, and surprisingly stretchy. Granny clusters make a cushy, textured fabric that traps heat.
Materials & gauge (example)
- Yarn: worsted weight (100–150 g pair)
- Hook: 4.5 mm recommended (adjust if your fabric is too loose)
- Gauge (approx): 12 clusters × 12 rows = 4″ in granny stitch (adjust to your tension)
- Suggested starting stitch counts (foundation rounds): S = 48 clusters (144 sts if you count individual dc in cluster), M = 56 clusters, L = 64 clusters. For ease, we’ll work clusters as group units.
Step-by-step (ankle sock, worked from cuff down)
- Cuff / Turning chain — Make a foundation chain long enough to fit around the ankle comfortably when stretched slightly. For a quick baseline, chain 18 (S) / 21 (M) / 24 (L). Join with sl st being careful not to twist. Place marker for round start. (If you prefer a firmer cuff, work 1–1.5 inches of single crochet rib in BLO before starting granny stitch.)
- Round 1 (granny foundation) — Ch 3 (counts as dc), dc in same ch, ch 1, skip next ch, (3 dc, ch 1, skip next ch) around. Join with sl st to top of first ch-3. You now have granny “clusters” with ch-1 spaces. Adjust cluster count so the round sits flat and matches one of the suggested sizes.
- Round 2–6 (leg length) — Repeat Round 1 for 4–6 rounds for a short cuff-height leg; for a longer leg, repeat more rounds until desired length (6–10 rounds typical for ankle socks). Try the sock on or measure to 1–2 in (2.5–5 cm) above ankle.
- Heel turning (short-row heel) — Granny stitch doesn’t lend itself easily to traditional flap + gusset heels, so use a short-row heel for a smooth fit:
- Work half the round in granny clusters; place marker where the heel will be (usually the back half of the ankle). From marker, work short rows: turn at end of each row leaving unworked sts for a curved cup. A simple short-row method: work the granny pattern straight back and forth across the heel area for about 6–8 rows, wrapping turns to avoid holes. Then resume working in the round, working decreases adjacent to the heel short rows to blend.
- If short rows feel complex, instead opt to convert the sock to a basic slipper: after leg reaches desired length, join sts and continue in the round until the foot length from back of heel to toes is about 2 in (5 cm) less than foot length, then close toe with decreases.
- Foot — Continue granny rounds in the round until the top of the foot reaches about 2 in (5 cm) shy of the end of the toes (measure from back of heel). Because granny clusters create larger holes, you can optionally slip-stitch the sole (next step) for more warmth.
- Optional sole reinforcement — To make the sole denser and warmer, work a round or two of single crochet along the entire sole (work on the bottom side only — you’ll need to identify it) or make the last 10–12 rows in sc to make a comfy, insulating sole.
- Toe closure — When you reach the final 2 in (5 cm), work decreases: switch to sc rounds and decrease evenly (e.g., sc 6, sc2tog repeat) until 8–12 sts remain. Fasten off and use yarn needle to weave through remaining sts and pull closed. Weave in ends.
- Finishing — Block lightly by pinning to shape and steaming gently if yarn allows. Add a lining if you’d like a smooth inner surface.
Tips & variations
- Use thicker yarn or hold two strands for extra warmth.
- Add a fold-over cuff by making cuff longer and folding down.
- For slipper feel, make sole in tighter stitches and add a non-slip sole (fabric glue + rubber dots/pads).
2. Crochet Herringbone Socks Pattern
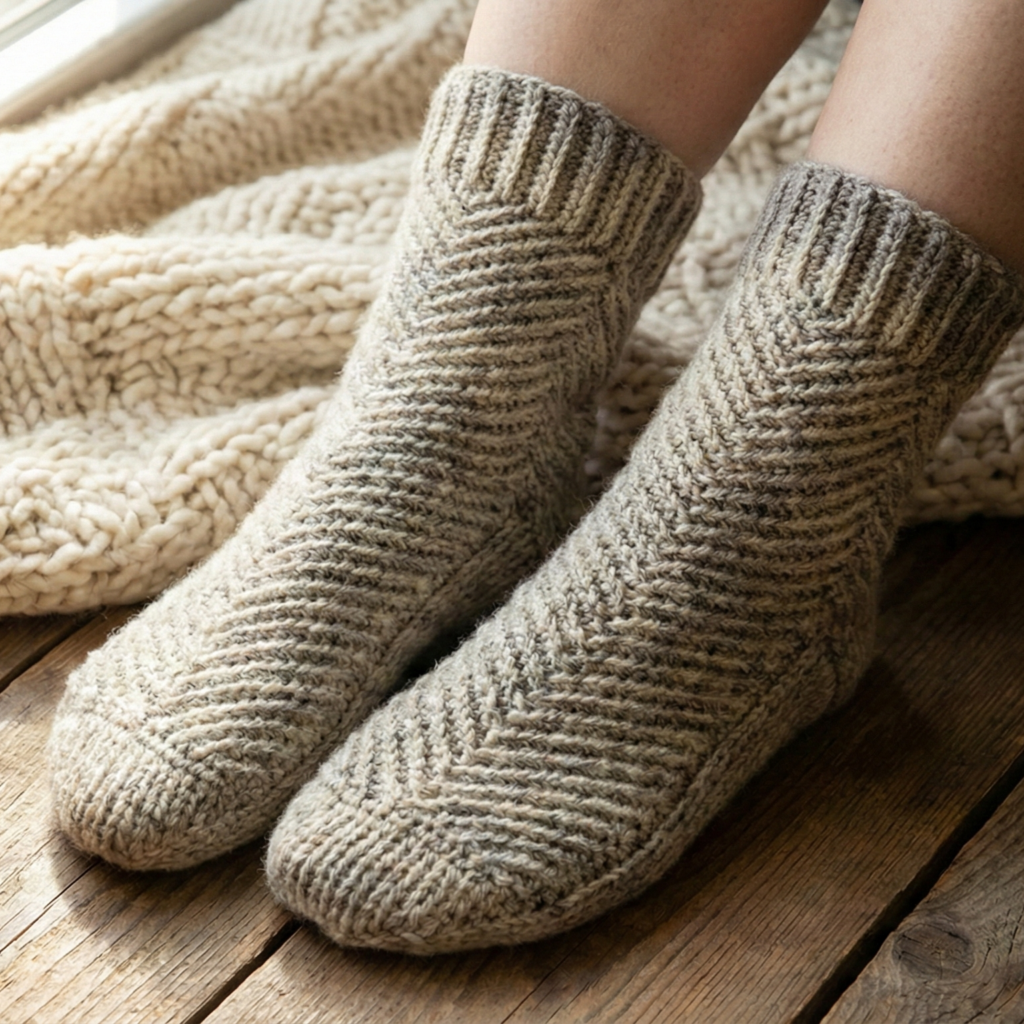
Herringbone half-double crochet (HBhdc) creates a dense, warm fabric with a gorgeous diagonal texture — perfect for winter socks that need more insulation.
Materials & gauge
- Yarn: worsted weight, 150–200 g per pair (denser fabric means more yarn)
- Hook: 4.0 mm or 4.5 mm depending on your tension
- Gauge (approx): 16 hbdc × 18 rows = 4″ (this is only an estimate — swatch!)
Suggested starting stitch counts (worked in the round)
- S = 48 sts • M = 56 sts • L = 64 sts (these are initial rounds in herringbone stitch).
Step-by-step (top-down sock with heel flap & gusset)
- Foundation round (cuff) — Make a chain to desired ankle circumference (or use magic loop to begin) and join to work in the round. For the ribbed cuff, work 8–12 rounds of alternating sc in BLO (for a stretchy rib) or hdc BLO. Bind off loosely or continue seamlessly into the leg.
- Leg (herringbone texture) — Work herringbone hdc (hbhdc) in the round: Yarn over, insert hook in next stitch, yarn over, pull up a long loop, yarn over and pull through two loops on the hook — this creates the herringbone look. Continue rounds until leg length desired (4–6 in typical for ankle socks).
- Heel flap — Place marker at back of leg where heel should begin (half the stitches). Work a heel flap over half the stitches back and forth in hbhdc for about 20–30 rows (length about 2.5–3 in for an adult medium). Use a slightly denser fabric (smaller hook or sc rows) if you want extra durability on the heel.
- Turn heel — Use short row shaping or classic heel turn: decrease at the beginning and end of rows across the flap to shape the curve. A typical approach is to decrease 1 st each side every other row until a V-shaped curve is formed.
- Gusset — Pick up stitches along both sides of the heel flap (pick up 1 stitch for every 2 rows or as your fabric permits), resume working in the round across all stitches, then decrease on gusset rounds: work until 3 sts before marker, sc2tog, sc in next 3 sts, sc2tog (or hbhdc decreases) until you return to original stitch count. Work even in the round until the foot measures about 2 in shorter than foot length from heel to toe.
- Toe — Switch to sc or hdc and decrease evenly each round until 10–12 sts remain. Close with yarn needle. For a neat finish, use mattress stitch or Kitchener graft (for advanced crocheters, grafting can be done emulating knit graft).
- Finish — Weave in ends, lightly block.
Tips & variations
- Herringbone fabric is dense; if your sock is too tight, go up a hook size.
- For slipper socks, add a sole layer of sc in a contrasting color.
3. Crochet Bernat Slipper Socks Pattern
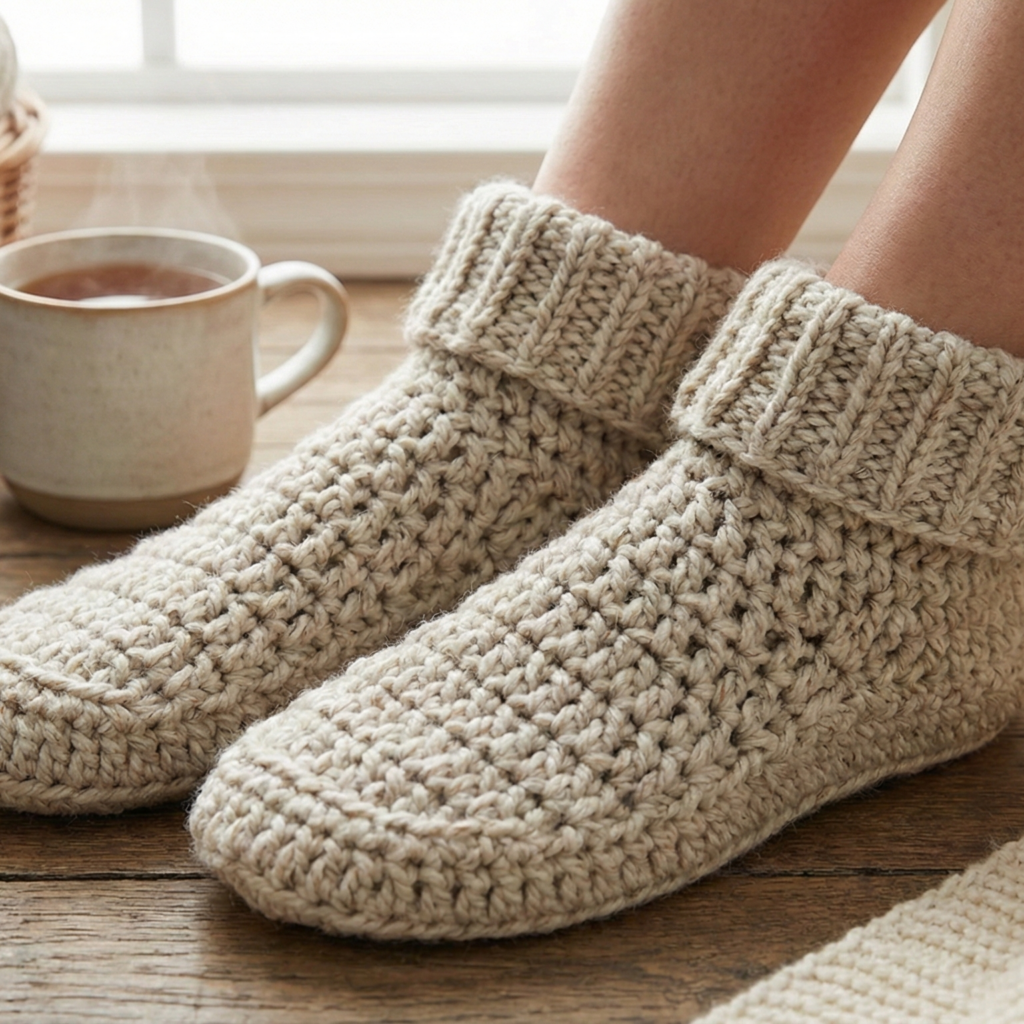
Inspired by thick, cushy Bernat-style slipper yarns — these slip-on socks are like wearing tiny blankets on your feet.
Materials & notes
- Yarn: Bulky/Chunky (Category 5) or hold two strands of worsted together for a bulky effect. Bernat makes chunky yarns ideal for this.
- Hook: 6.5 mm–8.0 mm depending on yarn thickness.
- Gauge is flexible — start with a foundation chain that fits the sole length.
This pattern is more of a slipper sock (closed back optional) — worked bottom up with a denser sole.
Step-by-step (slipper sock with cushioned sole)
- Sole foundation — Chain a length matching the foot length in inches (for example, 9 in for medium). For stitch counts, you might chain 26–30 depending on yarn. Work sc across chain, then increase 3–4 sts at each end on the next row to form a rounded toe/heel. Work in rows until the sole is the desired width and shape (you can also follow a simple oval sole formula: increase at rounds ends to create a rounded shape). Seam the sides with sl st to form a tube.
- Upper (vamp) — From the sole, join yarn at the toe center and work rows up the top of the foot to create the vamp: work hdc or dc rows until the vamp reaches the base of toes about 2–3 in. Leave an opening to slip your foot in.
- Sides & heel — Join sides with sl st or sc to form the shoe shape. For a closed back, continue working rounds up the heel until the back height is comfortable (1.5–2.5 in). Decorative ribbing in BLO can be added across the cuff.
- Cushioned sole — Add 2–3 rounds of sc or a layer of slip stitches in a contrasting yarn along the bottom to produce a cushioned sole. Optionally, sew in a foam insole or attach a non-slip sole.
- Finishing touches — Add a pompom, tassel, or fold-over cuff. Weave in ends and block lightly if needed.
Tips
- Chunky yarn + large hook = fastest socks. Great last-minute gifts.
- If you want slipper-socks that stay on, add a strap with a button or elastic.
4. Crochet Vintage Waves Socks Pattern
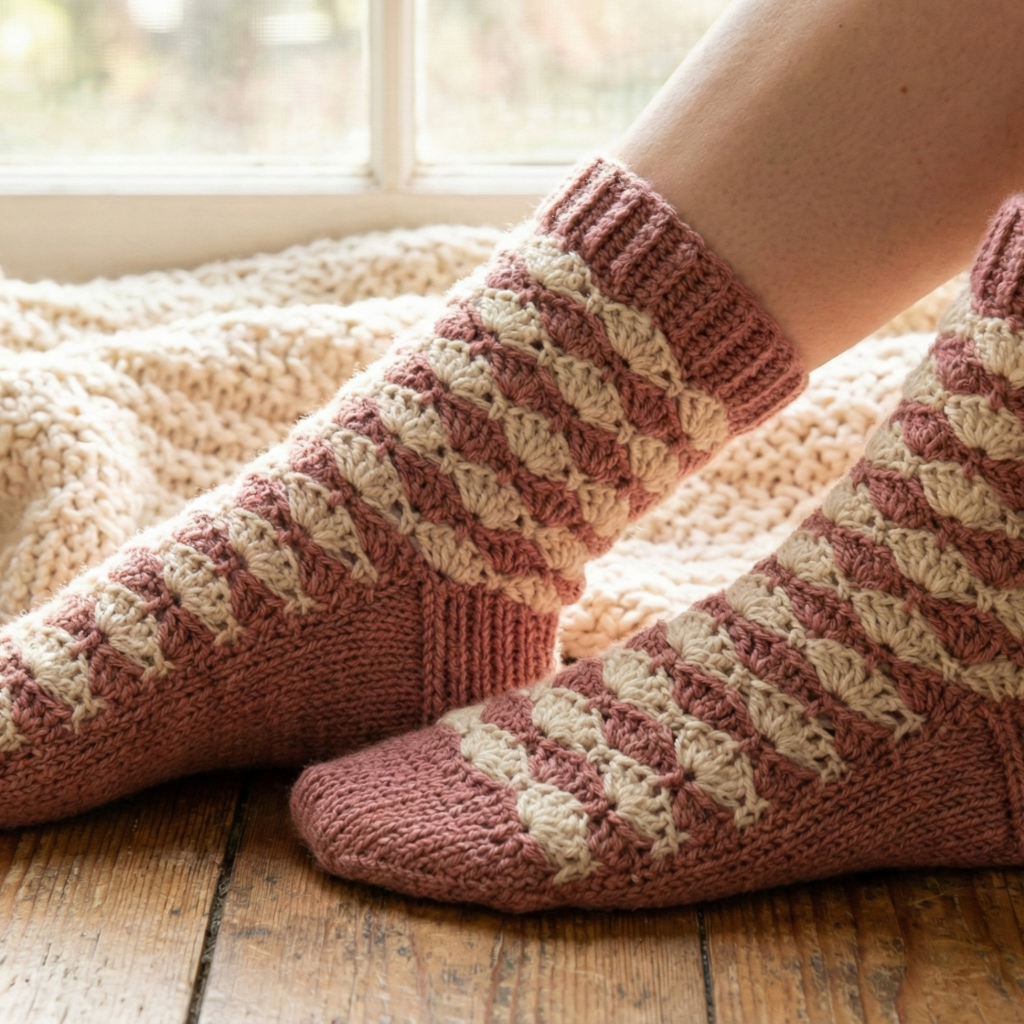
Shells and waves make a pretty textured sock that reads feminine and warm. This pattern mixes shells with slip-stitch accents for structure.
Materials & gauge
- Yarn: worsted weight recommended (150 g pair)
- Hook: 4.0–4.5 mm
- Gauge (approx): 14 sts × 18 rows in shell pattern = 4″ — make a swatch.
Step-by-step (worked top-down with gusset)
- Cuff — Make a chain and join to work in the round. Work 1 in BLO ribbing for 8–12 rounds for a comfy, folded cuff.
- Leg (wave pattern) — Wave/shell pattern row (worked in rounds): [shell over 5 sts: 5 dc in same st], skip 2, sl st in next — this is a simple decorative repeat. Alternate with a round of sc or hdc to create strong structure. Repeat pattern rounds until leg is desired length (looks great with 6–10 pattern repeats).
- Placement of heel — After leg length set, switch to heel flap method: place half the sts on a holder (or mark them) for the heel area. Work a heel flap in sc or hdc for durability (about 2.5 in long).
- Turn heel and gusset — Turn heel using standard decrease shaping. Pick up stitches along each side of flap and work gusset decreases every other round until you’re back to your original stitch count.
- Foot — Continue wave shell rounds across foot, center the shell pattern across the top of the foot so it reads nicely. For the sole use sc for sturdiness if you expect heavy wear.
- Toe — Decrease evenly as with previous patterns — switch to sc rounds and decrease to 8–12 sts then close.
- Finishing — Add a small crocheted flower or vintage button on the outer ankle for charm.
Customization & tips
- Use a contrast color for the shells to make the waves pop.
- To make the sock taller, simply add more shell repeats along the leg.
5. Crochet Knee High Buttoned Socks Pattern
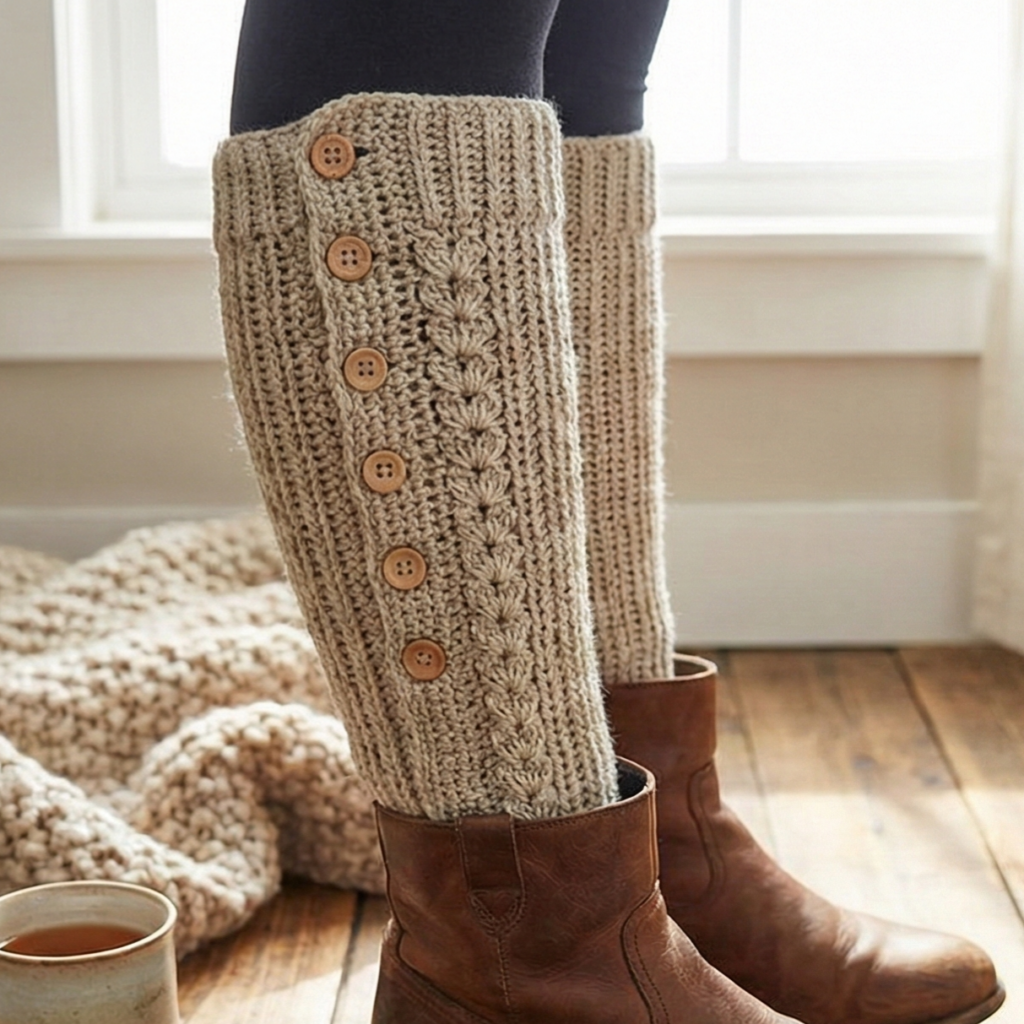
A statement piece — cozy knee-highs with a decorative buttoned cuff. These are perfect over leggings or with boots.
Materials & gauge
- Yarn: worsted weight — around 250–350 g per pair depending on length.
- Hook: 4.5 mm suggested.
- Buttons: 5–8 small buttons per sock, or fewer large ones depending on design.
- Gauge: about 14–16 sts × 18 rows = 4″ in main rib pattern (do a swatch!)
Step-by-step (top-down cuff and leg with buttoned flap)
- Top cuff / band — Chain to circumference of thigh or just below the knee (depending on desired height). Join and work 1–2 in BLO hdc or sc to form a snug ribbed cuff. For a taller knee high, work an additional 2–3 in in plain rounds before working the buttoned flap.
- Leg body — Work a decorative panel: Row pattern example — alternate 2 rounds hdc and 1 round of extended shell or cable-like raised stitches. Work the leg down to the calf bone area. For shaping, decrease slightly at the back of the calf if needed for a better fit.
- Buttoned flap (decorative opening) — At the outer side (where you want buttons), leave a column of sts unworked for flap placement or work the flap as a separate piece attached later. Crochet a 1–1.5 in wide band along the outer seam with buttonholes (chain 2 or 3 as buttonholes every 1.5–2 in depending on button size). Securely sew buttons to the opposite edge. The flap can be purely decorative (doesn’t need to open) but sewn on so the buttons look functional.
- Heel & foot — Continue the same as a standard ankle sock: place half the sts for heel, work heel flap, pick up for gusset, then foot, then toe. Because this sock is taller you may need more yarn — check frequently.
- Optional fitted ankle shaping — When you reach the ankle, you can decrease 2–4 sts around to shape into the foot for a sleeker silhouette.
- Finishing — Attach buttons, weave ends, block gently to set shape. If the cuff is too loose, add elastic thread through the top row or a crochet chain drawstring inside the cuff.
Styling tips
- Use wooden or vintage buttons for a classic look.
- Add stripes or colorwork near the cuff for a pop of character.
- Pair with tights or thin socks underneath for extremely cold weather.
Useful techniques explained (quick how-tos)
- Herringbone hdc: Insert hook as for hdc but pull up a longer loop and always finish the stitch by pulling through two loops — gives a diagonal texture.
- Short-row heel: Work partial rounds, wrap and turn, then pick up wraps on subsequent rows to close holes — great for textured stitches like granny.
- Picking up stitches for gusset: Pick up 1 stitch every row on the heel flap (or every other row depending on how tight your fabric is) so the gusset fits smoothly.
Conclusion
You’ve got five different approaches here — from quick chunky slipper socks to structured knee-highs with buttons. The secret to a great handmade sock is fit (measure, try on, adjust), yarn choice (wool blends for warmth, bulky for speed), and small reinforcements (denser soles, heel reinforcements) where it counts. Start with the pattern that matches your comfort level: chunky Bernat slippers for fast results, herringbone for dense warmth, or granny/vintage waves for textured charm. Make one pair, then tweak — swap colors, add a fold-over cuff, or line them for extra snugness. If you want, tell me which pattern you want to make first and your foot measurements (length and circumference), and I’ll customize a stitch count and row numbers to fit you exactly. Happy crocheting — and enjoy those toasty toes!