Leg warmers are cozy, practical, and a quick way to make cold-weather outfits feel intentional. They’re also a perfect small project that lets you play with texture, colorwork and plush yarns without committing to a full garment. Below you’ll find a friendly introduction covering materials, sizing, gauge and finishing notes — then five full, detailed leg-warmer patterns with materials lists, sample sizing, stitch notes, and step-by-step instructions you can use as-is or adapt. I wrote each pattern so it’s easy to read and follow, whether you’re making a pair for yourself or gifting them.
Quick essentials — materials, sizing, gauge, stitches & abbreviations
Yarn & fiber choices
- Wool & wool blends: warm and soft, great for insulation; choose superwash if you want machine washability.
- Acrylic / acrylic blends: inexpensive, durable, easy-care. Good for bright retro patterns.
- Velvet / chenille / velvet-style yarns: ultra-soft and plush — excellent for cozy leg warmers, though they can hide stitch definition.
- Hold-two-strands option: for extra warmth you can hold two fingering strands together instead of one worsted.
Recommended weights (by pattern): DK to aran (Category 3–5) is the most versatile. Bulky works for super-fast chunky versions.
Hooks & notions
- Hook range: 3.5–6.5 mm depending on yarn; patterns note recommended size but always swatch.
- Notions: tapestry needle, stitch markers, measuring tape, small elastic (optional), darning needle, scissors, blocking mat & pins.
Sizing
Take two measurements:
- Calf circumference where you want the leg warmer to sit (measure relaxed).
- Length from that line down (or up) to where you want the leg warmer to fall (e.g., mid-calf to ankle).
Common finished sizes (relaxed stretch):
- Small: 12–13 in circumference, 13–14 in length
- Medium: 14–15 in circumference, 13–15 in length
- Large: 16–18 in circumference, 14–16 in length
Leg warmers should be slightly smaller than the body measurement because ribbing and elastic stretch will accommodate the leg — aim for 0–2 in negative ease depending on stretchiness. If in doubt, make a test tube (gauge band) and measure stretch.
Gauge
Make a small tube/cuff swatch in your chosen stitch and measure stitches per inch (spi) and rows per inch (rpi). Use that to compute foundation chain or number of rounds for circumference. Example: if 4 sc = 1 in and you want a 14 in finished circumference → 4 × 14 = 56 stitches around.
Working in the round vs flat
Leg warmers are most often crocheted in the round (seamless) using a join-and-work-in-spiral or joined rounds technique. If you prefer flat panels, make two strips and seam together, but in-the-round makes the stretchy rib and cable patterns look better.
Basic stitch abbreviations (US)
- ch — chain
- sc — single crochet
- hdc — half double crochet
- dc — double crochet
- tr — treble (treble) crochet
- sl st — slip stitch
- fpdc / bpdc — front-post / back-post double crochet
- inc — increase (work 2 sts in same st)
- dec — decrease (single crochet decrease or invisible dec)
- rep — repeat
- BLO / FLO — back loop only / front loop only
1. Crochet Ribbons Leg Warmers Pattern
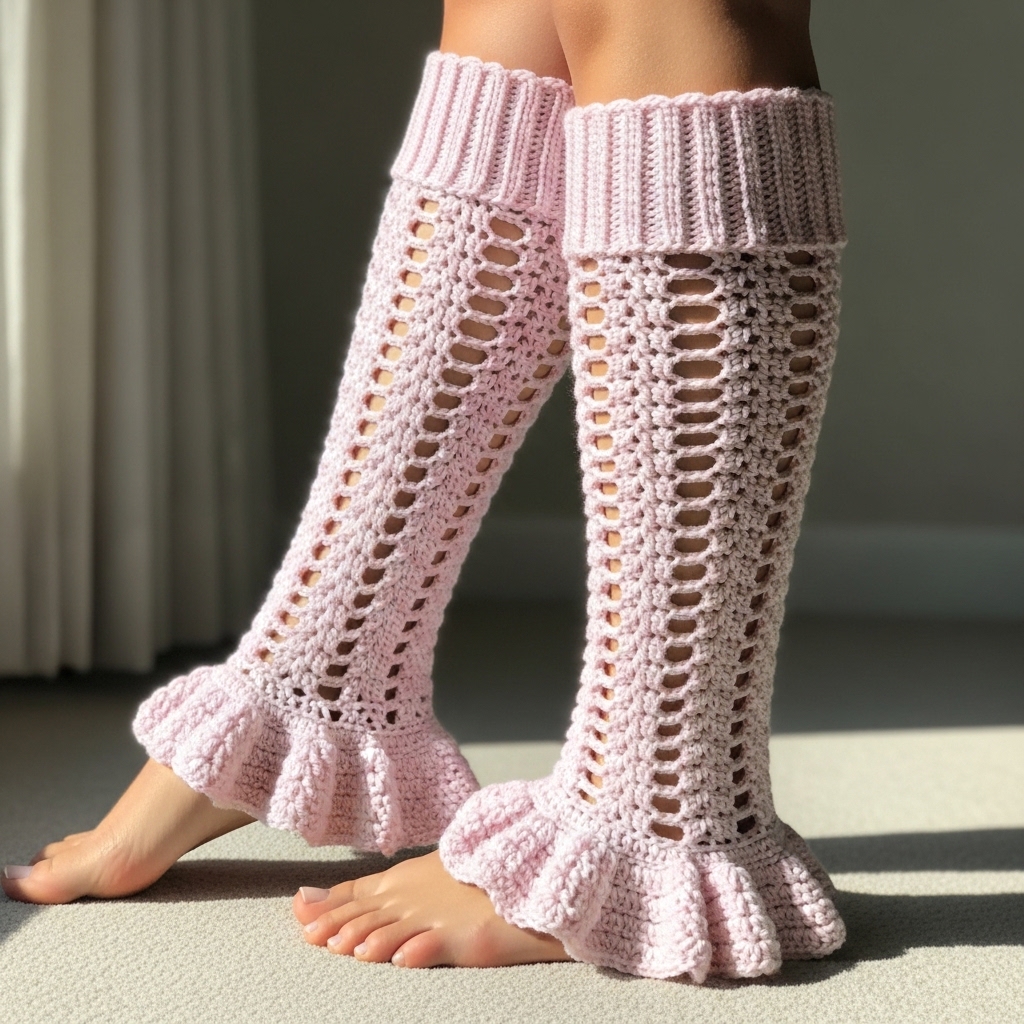
Vibe: feminine and flared — delicate ribbon-like vertical openings that create a flouncy flare at the bottom.
Skill level: intermediate (lace shaping + shaping for flare)
Materials (pair)
- DK yarn (or sport) — ~300–400 yd total (depends on length).
- Hook: 4.0 mm (adjust to gauge).
- Stitch markers, tapestry needle.
Sample finished size (medium): 15 in circumference (unstretched) × 15 in length, flaring to ~17–18 in at lower edge.
Stitches used: sc, hdc, dc, ch-spaces, FLO rows for texture.
Concept & key ideas
This leg warmer is worked in joined rounds from top down. The “ribbon” look is achieved by alternating tall open chain spaces (vertical ladder) with columns of sc/hdc. The flare is created by increasing at the lower rounds so the hem sits wider.
Gauge (example)
4 hdc = 1 in in FLO hdc. Adjust foundation count to match a multiple for the ribbon repeat (example multiple: 8 + 2).
Step-by-step
1 — Compute foundation
- Measure calf circumference (example medium = 15 in). If gauge = 4 hdc/in → 4 × 15 = 60 sts. Round to multiple: ribbon repeat 8 → 60 is divisible by 8 (good).
- Ch 60. Join to work in rounds carefully avoiding twist; place a marker.
2 — Top ribbing (1: cuff)
- Rounds 1–10: BLO hdc in each stitch around (10 rounds ≈ 1.25–1.5 in). This creates a foldable rib that grips the leg. Optional: fold and seam to create an elastic casing or insert narrow elastic after finishing.
3 — Body with ribbon verticals
- Pattern (worked in joined rounds): [sc 2, ch 4, skip 4, sc 2] — this makes small vertical chain ladders. Alternatively: sc 3, dc in next st, ch 3, dc in same st creates a taller decorative column.
- Repeat around. Work 10–12 rounds of this body pattern to reach desired length before flare (measure on leg).
4 — Flare shaping
- To create flare start increasing gradually: every 6th round add one increase for every ribbon repeat. Example: in a repeat of 8 sts, in the designated increase round work sc 2, ch 4, inc in next sc (or 2 sc in a sc), sc 2 — this adds width distributed evenly.
- Repeat increases every 6 rounds 2–3 times until the bottom circumference increases by desired amount (e.g., from 15 in to 17–18 in).
5 — Hem finishing
- Work 3–4 rounds of decorative shell or picot: e.g., sc in each st, then a round of picots (ch 3, sl st in top of last st) in every ch arch — this gives a ribbon-like frill on bottom.
- Fasten off, weave ends.
6 — Repeat for second leg warmer.
Fit & finishing tips
- Try on during construction to control flare.
- For a snug top add a small elastic in the foldable cuff casing to keep them from sliding. Sew elastic in by threading and securing ends.
Variations
- Make entirely lacy ribbons by swapping sc columns for taller dc columns.
- Change cuff height (short or long) and add buttons on the side for adjustable fit.
2. Crochet Black and Gray Striped Leg Warmers Pattern
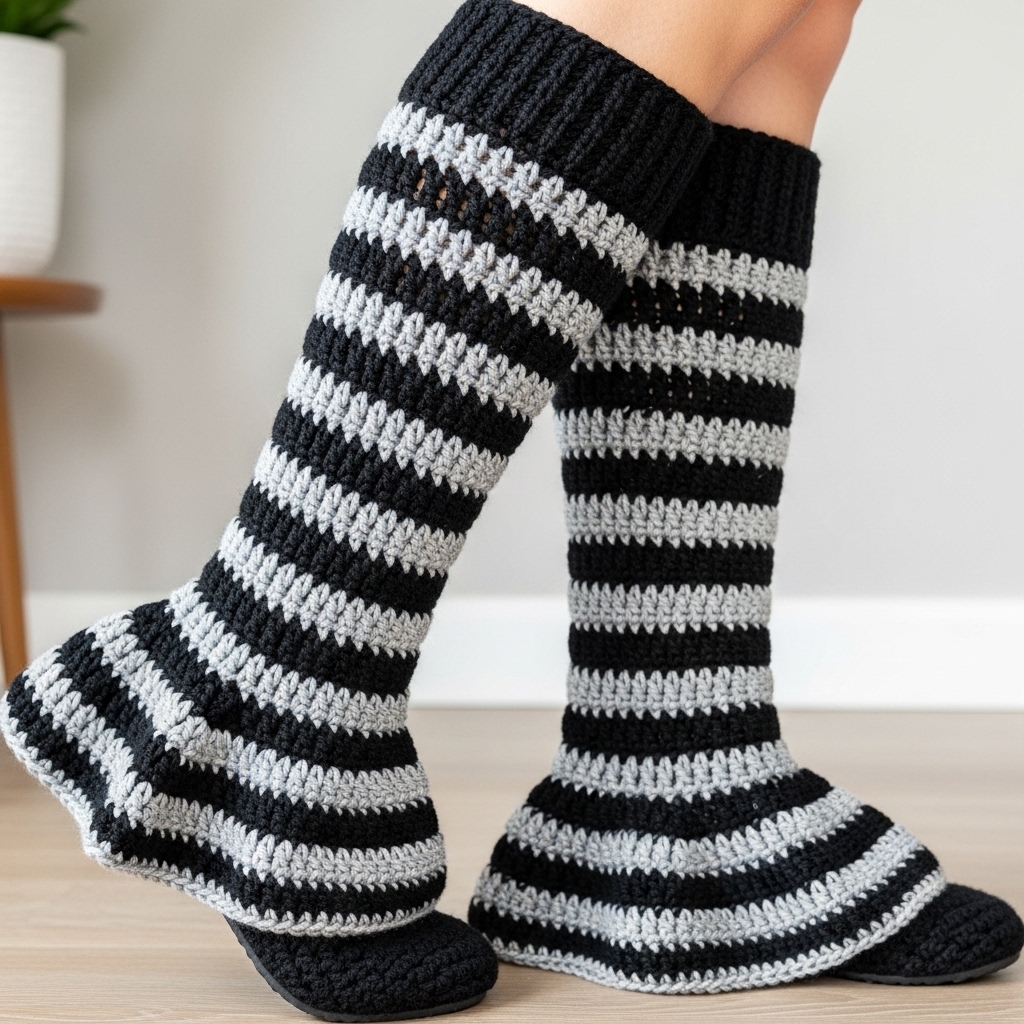
Vibe: graphic, modern stripes with a gentle flare — perfect for pairing with boots or skirts.
Skill level: confident beginner → intermediate (color changes in the round + flare shaping)
Materials (pair)
- Worsted or aran weight yarn in Black (A) and Medium Gray (B) — ~350–500 yd total.
- Hook: 5.0 mm (or to gauge).
- Tapestry needle, stitch markers.
Sample finished size (medium): 14 in circumference × 14.5 in length; bottom flares to ~17 in.
Stitches used: hdc (back loop only for subtle rib), color changes every N rounds.
Concept & key ideas
Worked in the round top-down with a simple BLO hdc band for grip. Alternate wide stripes of A/B (e.g., 4 rounds black, 4 rounds gray). Flare achieved by adding increase rounds near the hem.
Step-by-step
1 — Compute foundation
- Example: calf 14 in; gauge 4 hdc (BLO) = 1 in → 56 sts. Foundation ch 56, join.
2 — Top ribbing
- Rounds 1–8: BLO hdc (this gives a stretchy fabric that holds). Change color after a full stripe sequence so joins land neatly on the inside or use invisible color change technique.
3 — Striping body
- Work stripes: 4 rounds color A, 4 rounds color B — repeat until you are 3–4 in above desired final hem. To avoid too many ends, carry the unused color up the inside for short color runs (tapestry carry) or fasten off and rejoin — both acceptable.
4 — Flare shaping (gentle increases)
- At two placed increase rounds do hdc 1, inc around (i.e., increase every other st) OR add distributed increases: hdc 7, inc repeat across. This adds evenly and creates flare without disrupting stripes too much. Repeat increase round once or twice as needed.
5 — Hem & finishing
- Work 2 rounds sc in single color for neat edge. Optionally, add a single round puff or scallop in contrast color. Weave in ends, block gently.
6 — Repeat to make pair.
Style notes
- Make stripes narrower for a retro look (2 rounds per color) or wider for bold graphic bands.
- Consider adding a small faux-button or toggles at upper outer seam for style (sew-on).
3. Crochet Retro Snowflake Fair Isle Leg Warmers Pattern
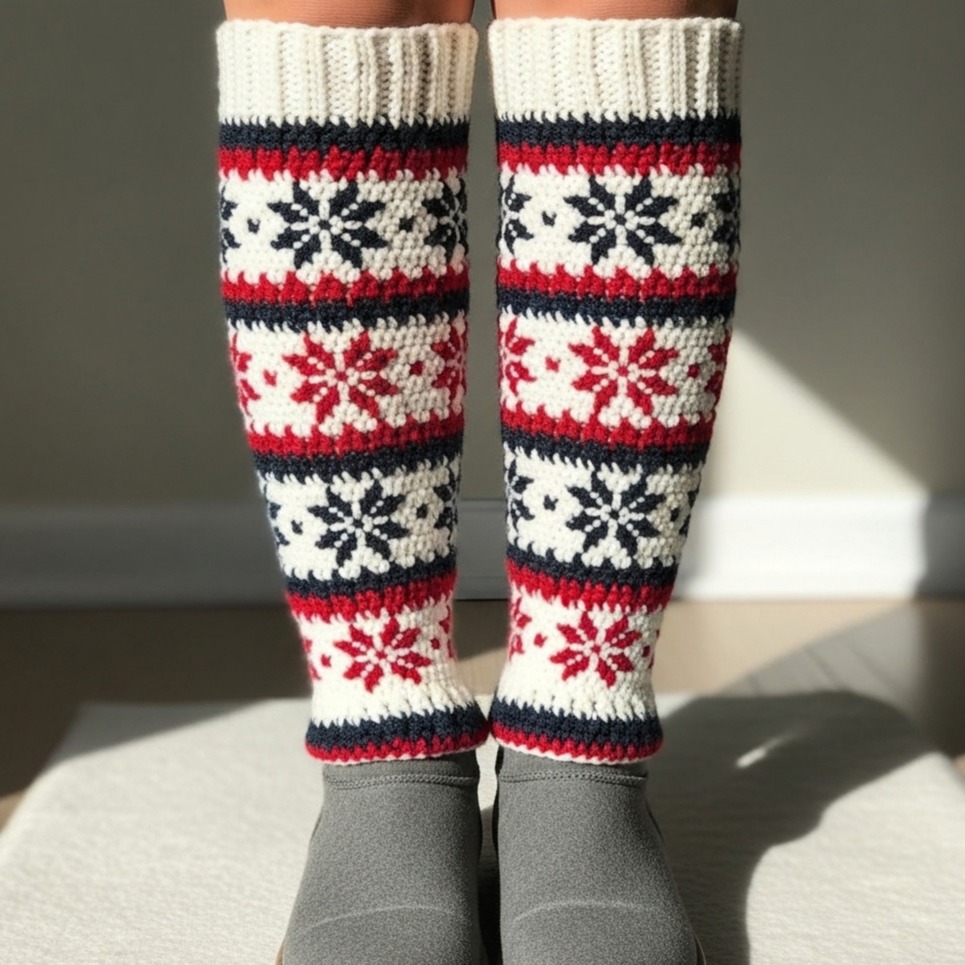
Vibe: nostalgic Scandinavian fair-isle with snowflake motifs — warm and festive.
Skill level: intermediate → advanced (tapestry / stranded colorwork)
Materials (pair)
- Sport or DK yarn in 3 colors: Main (A), Contrast1 (B), Contrast2 (C) — ~400–550 yd total.
- Hook: 3.5–4.0 mm (tighter gauge better for stranded colorwork).
- Tapestry needle, stitch markers.
Sample finished size (medium): 15 in circumference × 15 in length.
Stitches used: sc in the round or hdc in the round for dense fabric; stranded crochet (carry colors) or mosaic/tapestry crochet method.
Concept & key ideas
Use tapestry crochet to work small geometric snowflake motifs into a continuous tube. Work in joined rounds, carrying floats across the wrong side, or stop and rejoin colors frequently (weave ends securely). Because colorwork reduces stretch, size your foundation with some negative ease in mind.
Step-by-step
1 — Compute foundation & swatch
- Make a colorwork swatch in your chosen stitch (e.g., sc) holding yarn tightly. Suppose 5 sc = 1 in and you want 15 in circumference → 5 × 15 = 75 sts. Make foundation ch 75 and join.
2 — Bottom ribbing
- Rounds 1–8: BLO hdc or BLO sc in main color A to make elastic cuff.
3 — Chart & repeat
- Design or use a small snowflake chart that is e.g., 12 stitches wide × 12 rounds high. Repeat the chart around the circumference. Because 75 may not be divisible by 12, adjust repeats: choose a chart width that divides or change foundation to nearest compatible multiple (e.g., 72 or 84).
4 — Tapestry crochet technique (simple)
- Work sc in joined rounds. For each stitch, pick up the color required and crochet over the unused color carry on the inside (keep floats under 4–5 sts or twist to anchor). Keep tension even. Mark round beginnings for chart alignment.
5 — Snowflake sequence
- Work the chart vertically for the body length. Add small bands of stripes between snowflake panels for breathing room.
6 — Top shaping
- After working motifs to desired height, finish with a few rounds of BLO hdc or sc to create a soft upper band. Optionally add elastic inside if needed.
7 — Finishing
- Weave in colorwork ends on wrong side. To stabilize floats, you can block the warmers lightly and steam them into shape.
Fit & care
- Because colorwork has less inherent stretch than single-color ribbing, ensure top and bottom bands are elasticized or sized slightly larger. Hand-wash in cool water for colorfastness.
Variations
- Swap snowflakes for mittens, small trees, or geometric diamonds.
- Make ankle-length versions for subtle seasonal accents.
4. Crochet Cable Knit Leg Warmers with Pom Pom Pattern
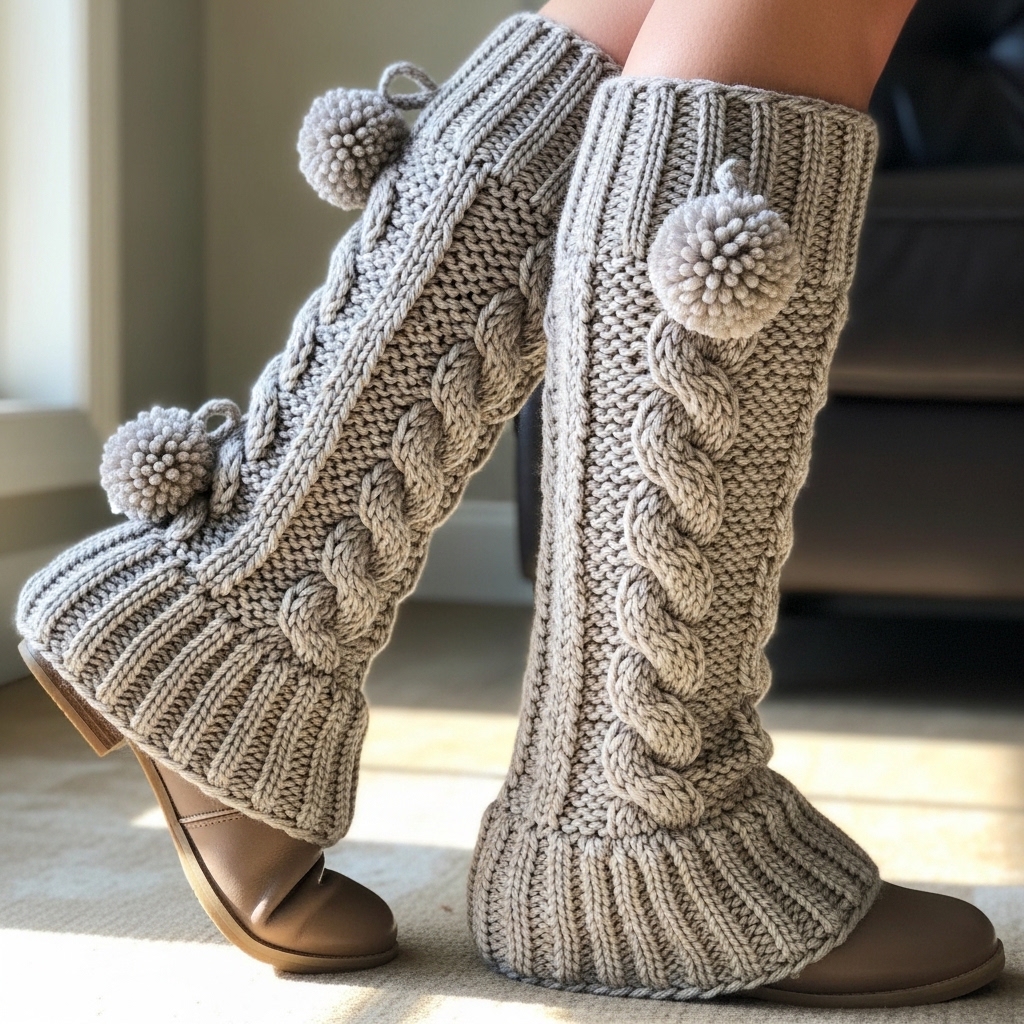
Vibe: chunky, classic cable knit look in crochet, with playful pom-poms at the cuff.
Skill level: intermediate (post-stitches & cable crossings)
Materials (pair)
- Aran / bulky weight yarn — ~400–600 yd total depending on length and cable complexity.
- Hook: 6.0 mm (or one matching yarn weight), cable needle or spare dpn alternatively use a stitch holder.
- Pom-pom makers (or scrap cardboard), tapestry needle.
Sample finished size (medium): 14 in circumference × 16 in length (cuff & pom-pom placement included).
Stitches used: fpdc/bpdc (front/back post double crochet), dc, sc for edges, bobble or puff for optional texture.
Concept & key ideas
Cables in crochet are made by working post-stitches (fpdc/bpdc) and crossing groups (skip and work later), essentially imitating knit cable twists. Work in the round to create seamless columns of cables; rib top and bottom in BLO to ensure grip.
Step-by-step
1 — Compute foundation & swatch
- With bulky yarn gauge example: 3.5 dc = 1 in. For 14 in circumference: ~49 sts. Because cable repeat uses multiples (e.g., 8 sts per cable pattern), choose a foundation divisible by that repeat (48 or 56).
2 — Ribbed cuff
- Rounds 1–8: BLO hdc or BLO dc for pronounced ribbing. Join into round.
3 — Cable panel pattern (example repeat)
- A classic 4-stitch cable: over 8 stitches make fpdc 2, bpdc 2 for a cable column. To cross: in designated cable-cross round, hold first 2 post-stitches on a cable needle behind work, work next 2 post-stitches, then work held 2 — this twists the columns. In crochet you can accomplish a cable cross by working post-stitches in order and crossing by inserting hook around later posts — but many crocheters simulate cables by offsetting fpdc and bpdc rows every few rounds to create a braided look.
4 — Worked repeat (concrete example)
- Set-up round: fpdc 2, bpdc 2, sc 4 — repeat to end (this gives cable columns and background).
- Row for twist (every 6 rounds): To twist left: work fpdc around the post of the right column first then the left column — effectively you do the 2 posts out of order. If using a cable needle: slip the first two post stitches to a holder, work next two post stitches normally, then work held posts. This is nontraditional in crochet but possible; alternatively do a mirrored fpdc/bpdc sequence to simulate cable without crossing.
5 — Continue length
- Repeat cable rows and twist rows until you have worked the desired length minus cuff & hem allowances.
6 — Lower cuff & pom-poms
- Work final 8 rounds BLO to create the bottom cuff.
- Make pom-poms in matching yarn and attach them with strong thread to back seam at top or bottom as decorative balls — for safety avoid sewing large loose pom-poms in items for young children.
7 — Finish
- Weave ends, block lightly to shape cables so they stand out. For cables to pop, steam blocking with pins helps.
Notes & tips
- Cable crossings are fiddly in crochet; start with a small sample and practice the crossing method that suits you (cable needle vs simulated method).
- A fabric lining inside the cables provides extra warmth and prevents stretching.
5. Crochet Velvet Leg Warmers Pattern
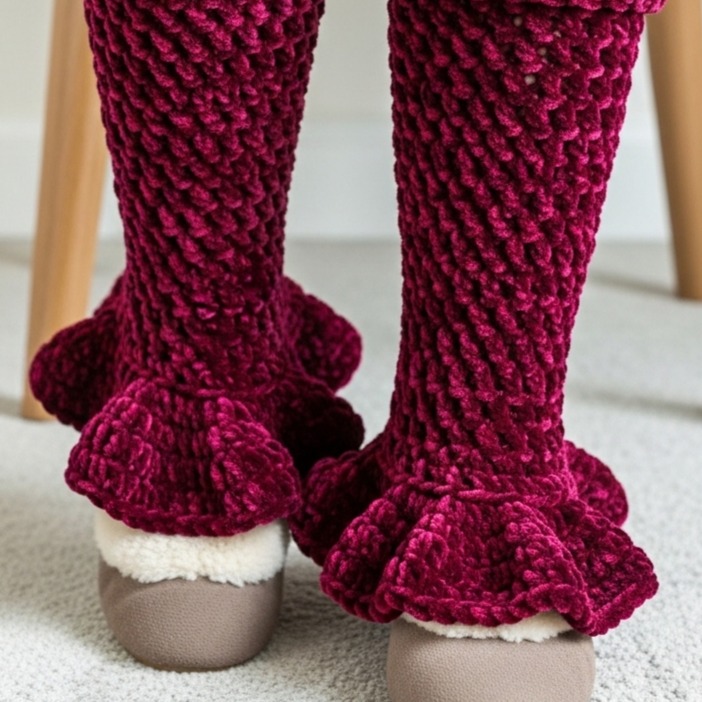
Vibe: ultra-soft, plush velvet (flared) — cozy and luxe.
Skill level: confident beginner (velvet yarn handling)
Materials (pair)
- Velvet / plush chenille yarn — ~500–800 yd depending on length/width and yardage (this yarn is heavier and uses more yardage).
- Hook: 6.0–8.0 mm or yarn label recommendation (velvet often requires larger hook).
- Stitch markers, tapestry needle.
Sample finished size (medium): 15 in circumference × 16 in length; gentle flare at bottom to 18 in.
Stitches used: hdc or dc in the round for plush fabric; avoid complex lace or cables (velvet hides definition).
Concept & key ideas
Velvet yarn is luscious but slippery — work simple stitches with a slightly smaller hook than suggested for dense fabric. Flare achieved by distributed increases near hem. Because velvet is plush, seams can be sewn or made seamless in the round.
Step-by-step
1 — Compute foundation & swatch
- Make a small tube swatch in hdc to determine spi. Velvet often compresses — e.g., 3 hdc = 1 in. For 15 in circumference → 45 sts. Ch 45 and join.
2 — Top cuff
- Rounds 1–8: BLO hdc for stretchy cuff; velvet gives a smooth foldable band. If you want tighter cuff, use a hook one size smaller for cuff and then switch to larger hook for body.
3 — Body (plush smooth)
- Rounds: hdc in each st around for 8–10 rounds. Velvet is so thick you’ll achieve warm fabric quickly.
4 — Flare shaping
- To add flare: every 6th round add an increase round: hdc 8, inc around (adjust to your foundation count). Repeat increases 1–2 times.
5 — Hem finishing
- Work 2 rounds sc or a round of shell (if yarn permits) for decorative edge. Velvet may flatten shells — keep simple.
6 — Finishing
- Weave ends carefully (velvet hides ends but they can slip). If you dislike fuzz from cutting tails, bury tails inside stitches rather than trimming flush.
- Velvet may shed a little at first; wash separately or shake before first wear.
Care
- Check yarn label: many velvet/chinelle require gentle hand-wash and dry flat — warn giftees of care instructions.
Variations
- Add a faux-fur trim at the top for an ultra-luxe look (sew on with matching yarn).
- For kids, make ankle-length velvet warmers without flare.
Final finishing tips (for all patterns)
- Try them on as you go. Leg warmers are easy to adjust mid-project: take them off the leg and measure circumference and length. It’s fast to rip back 1–4 rounds to tweak length than to finish and be unhappy.
- Blocking & shaping. For stitch-defined patterns (ribs, cables), block gently to even stitches. For plush yarns, avoid aggressive blocking.
- Secure loose ends. Use multiple weave-in passes for durability, especially on cables and colorwork leg warmers; ends under stress can come loose.
- Elastic option. If you worry about slipping, insert a small piece of 1/4–1/2 in elastic into the top cuff casing and stitch ends securely. Cut elastic slightly shorter than cuff circumference for grip.
- Lining for warmth. For extremely cold climates, sew a thin fleece lining into the inside of the warmer for windproofing.
conclusion
Whether you want feminine flare (Ribbons & Velvet), modern stripes, seasonal Fair Isle, classic cables with pom-poms, or ultra-plush velvet, these five leg-warmers let you mix textures and yarns to suit your winter style. Start by measuring accurately, make a small gauge tube, and try on as you work. If you’d like, I can convert any one of these patterns into a printable one-page pattern with exact stitch counts for three sizes (S/M/L) and a small fit chart — tell me which pattern you want first and I’ll prepare it. Happy crocheting — keep warm and stylish!