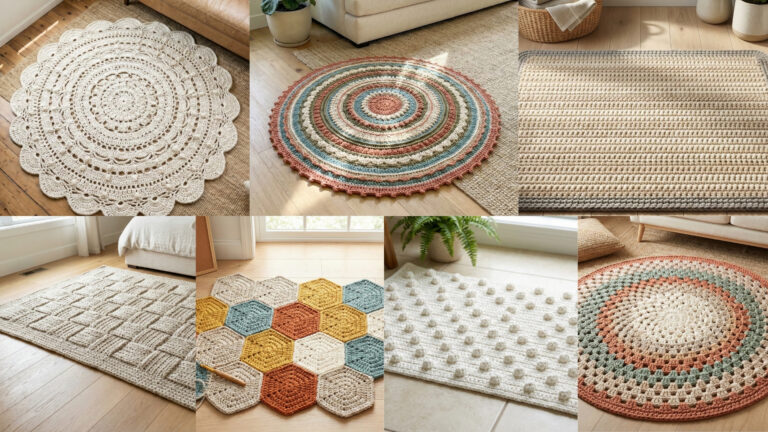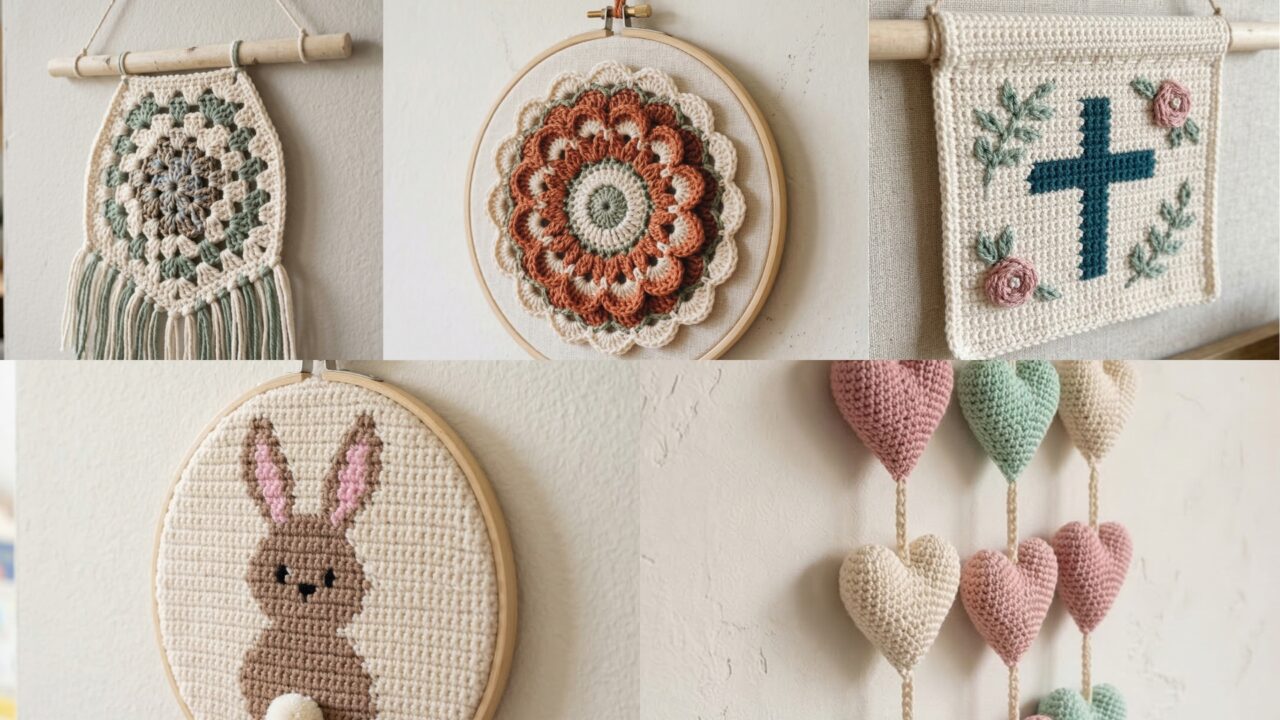
Small crochet wall hangings are the perfect way to add handmade charm to tiny walls, shelves, or gallery arrangements. They’re quick to make, playful to customize, and easy to hang in small spaces where a full-size macramé would overwhelm. Below you’ll find five small wall-hanging patterns — each written with exact materials, skill level, very detailed step-by-step instructions, finishing & hanging options, care, and variations so your readers can make them straight away.
Sizes: every design below is intentionally small — finished dimensions are listed in each section (typically 4–10 inches / 10–25 cm), perfect for above a desk, beside a mirror, or on a gallery shelf.
Quick shared notes (applies to all patterns)
- Abbreviations (US terms): ch = chain, sl st = slip stitch, sc = single crochet, hdc = half double crochet, dc = double crochet, tr = treble (US), inc = 2 stitches in same st, dec = sc2tog, MR = magic ring, BLO/FLO = back/front loop only, rep = repeat.
- Yarn: For small wall art I recommend cotton or cotton-blend (clear stitch definition, lightweight), sport/fingering or DK depending on texture. T-shirt yarn or bulky rope can be used for chunkier pieces — but these will make the piece larger. Use a hook 0.5–1 mm smaller than label if you want a firmer fabric.
- Tools: tapestry needle, small wooden dowel or metal hoop, hot glue (optional), small embroidery needle (for tapestry), blocking pins and mat, small beads/charms if desired.
- Hanging: each pattern includes options — dowel, wooden ring, brass hoop, clipboard clip, small branch. Keep hanging hardware proportionate to the piece.
- Safety/teen note: keep small parts (beads, charms) securely sewn on if young children may handle the item.
1. Crochet Granny Hexagon Wall Hanging Pattern
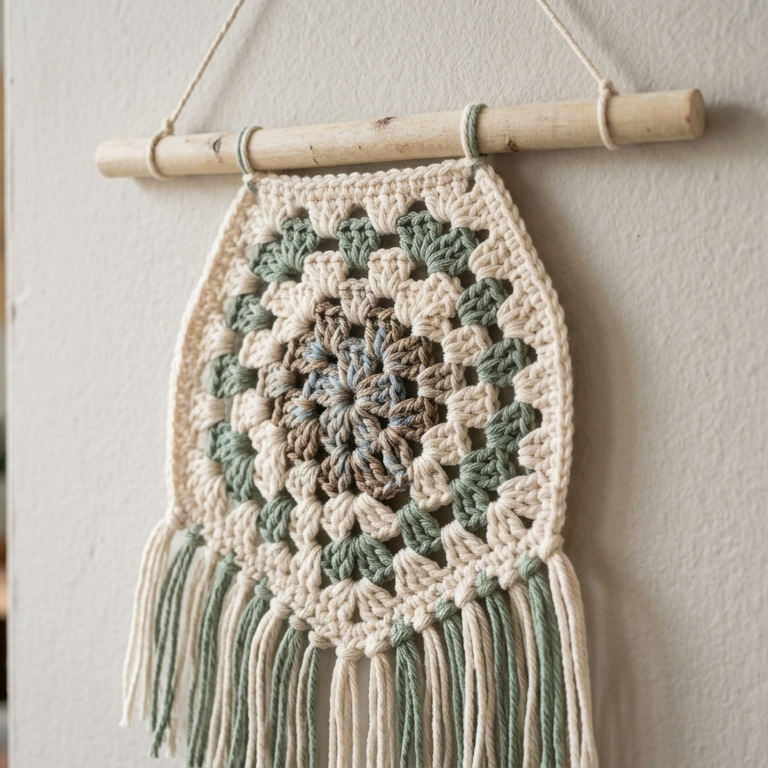
Finished size: hexagon motif ~6–7″ (15–18 cm) across; hanging depth with fringe ~9–10″ (23–25 cm)
Skill level: Beginner–Intermediate (granny rounds + simple joining)
Why this one: a tidy hexagon granny framed on a short dowel — classic and modern depending on colors.
Materials
- DK cotton (2 colors or variegated + neutral for border) — ~25–40 g total
- Hook: 4.0 mm (or smaller for firmer fabric)
- Small wooden dowel 8″ long (or thin branch), twine for knotting
- Tapestry needle, scissors, blocking mat & pins
- Optional: 6–8″ length of thin leather cord or brass ring for loop
Stitches & abbreviations used
granny cluster = (dc, dc, dc) in same sp; corner = ch2 space; sc, sl st.
Pattern — hexagon granny (one motif)
Round 0 — centre
- MR, ch3 (counts as dc), work 2 dc in ring, ch2, 3 dc in ring repeat 5 more times (total 6 clusters separated by ch2). Join to top of ch3. You now have a small hexagonal center. (6 corners)
Round 1 — start hexagon sides
- Sl st into first ch-2 corner. (3 dc, ch2, 3 dc) in same corner (makes corner), ch1, 3 dc in next side (into the space between clusters) — repeat around for 6 corners. Join.
Round 2 — expand
- In each corner work (3 dc, ch2, 3 dc), ch1, 3 dc in each side space — repeat until your hexagon measures ~6–7″ across. Usually 2–4 rounds after Round 1 depending on gauge.
Round 3 — tidy border
- Make one round of sc evenly around the outside edge to create a tidy framed look (work 2 sc in corner ch-2 spaces). Fasten off and weave ends.
Blocking
Wet-block the hexagon flat and pin to size (pay attention to straight sides). Let dry.
Finish & hang
- Cut two lengths of yarn (~8–10″) and fold in half. Using a small crochet hook, pull loop through bottom edge center and knot to form fringe rows across bottom two side edges (or create short tassels evenly spaced). Trim for even length (~3″ fringe length keeps small scale).
- Attach motif to dowel: fold top edge over the dowel and stitch the back top edge to secure (or slide onto dowel if fabric folded). Alternatively, sew two small loops at upper back and slip dowel through loops. Add hanging cord to dowel ends and knot.
Variations & styling tips
- Make a mini garland of 3 hexagons (space 2–3″ apart on the same dowel).
- Use a metallic thread for one round for a subtle shimmer.
- Back the hexagon with a small piece of felt if you prefer no fringe or to hide stitches.
2. Crochet Scalloped Edge Flower Wall Hanging Pattern
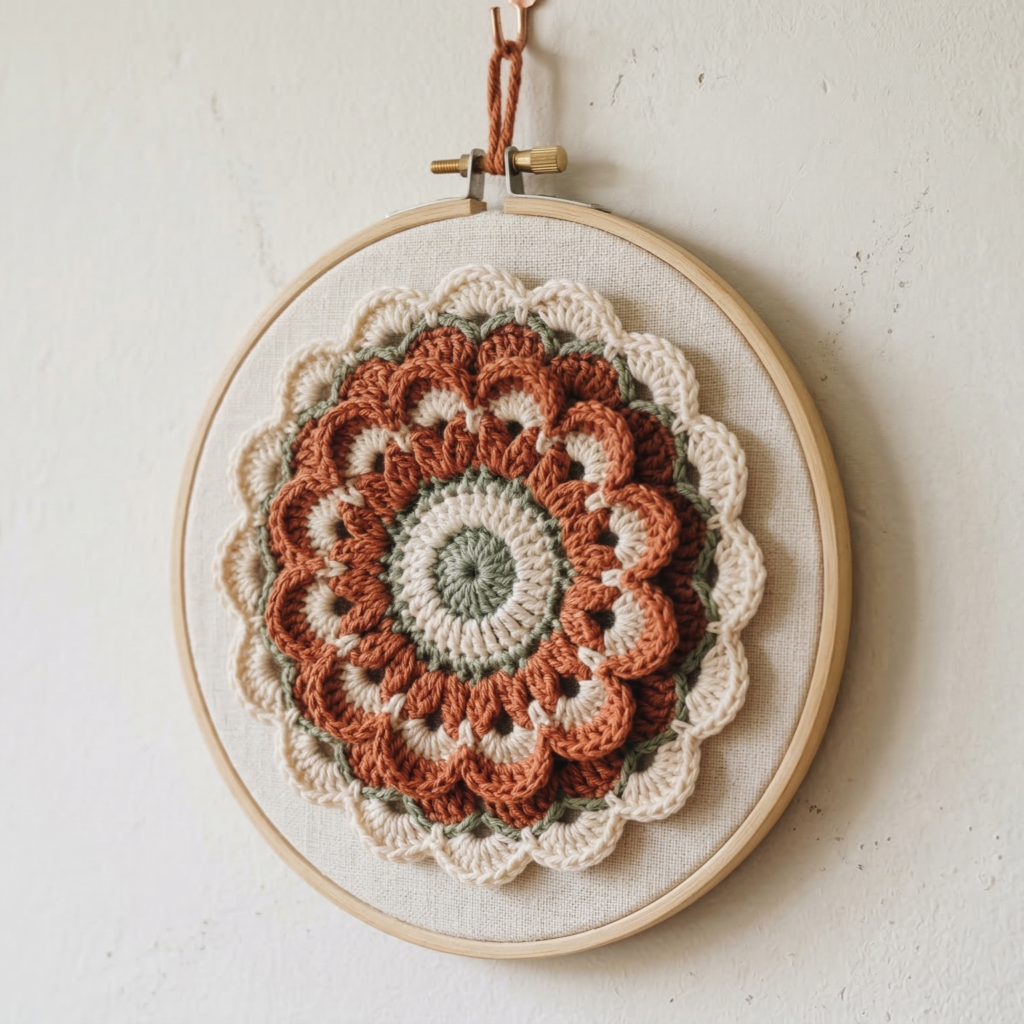
Finished size: flower diameter ~5–6″ (13–15 cm); total depth (with small hoop) ~8″ (20 cm)
Skill level: Beginner (rounds + scalloped edge)
Why this one: bold petals, soft scallop rim — looks like a ceramic tile but soft.
Materials
- DK cotton in 2–3 colors (~25–40 g)
- Hook: 3.5–4.5 mm
- Small 6–8″ metal embroidery hoop (use inner hoop as frame) or 6″ wooden hoop
- Glue stick or hot glue (for securing fabric to hoop, optional)
- Tapestry needle, pins
Stitches & techniques
dc shells, picot (optional), sl st.
Pattern — flower medallion (one)
Centre
- MR, ch1, 10 sc into MR; join. (10)
Petal foundation round
- ch5, sl st into next sc — repeat 10 times to create 10 chain loops. Join.
Petal round
- Into each chain-5 loop work: (sc, hdc, dc, tr, dc, hdc, sc) — large petal shapes. Join.
Scalloped rim
- Round: sl st into space between petals, ch3, (5 dc) in next st (shell), ch3, sl st into next petal base — repeat to form scallops between petals. Join. Fasten off.
Mounting in hoop
- Use the inner hoop only. Center the flower on top of it (RS facing out). Bring the outer hoop (or outer ring) over and press down so that petals are sandwiched. Tighten screw (metal hoop) to tension the crochet.
- For a neat look, trim excess fabric around the back and secure with a few dabs of hot glue or whipstitch the crochet to the hoop at several points on the back.
- Attach a small yarn loop to the top of hoop for hanging.
Finishing & tips
- Use the hoop as a shallow frame; paint the hoop for contrast (white hoop for bright, natural hoop for rustic).
- For more texture, make 2-tier petals: after Round 3 work a second smaller petal round between larger petals.
3. Crochet Endless Hearts Wall Hanging Pattern
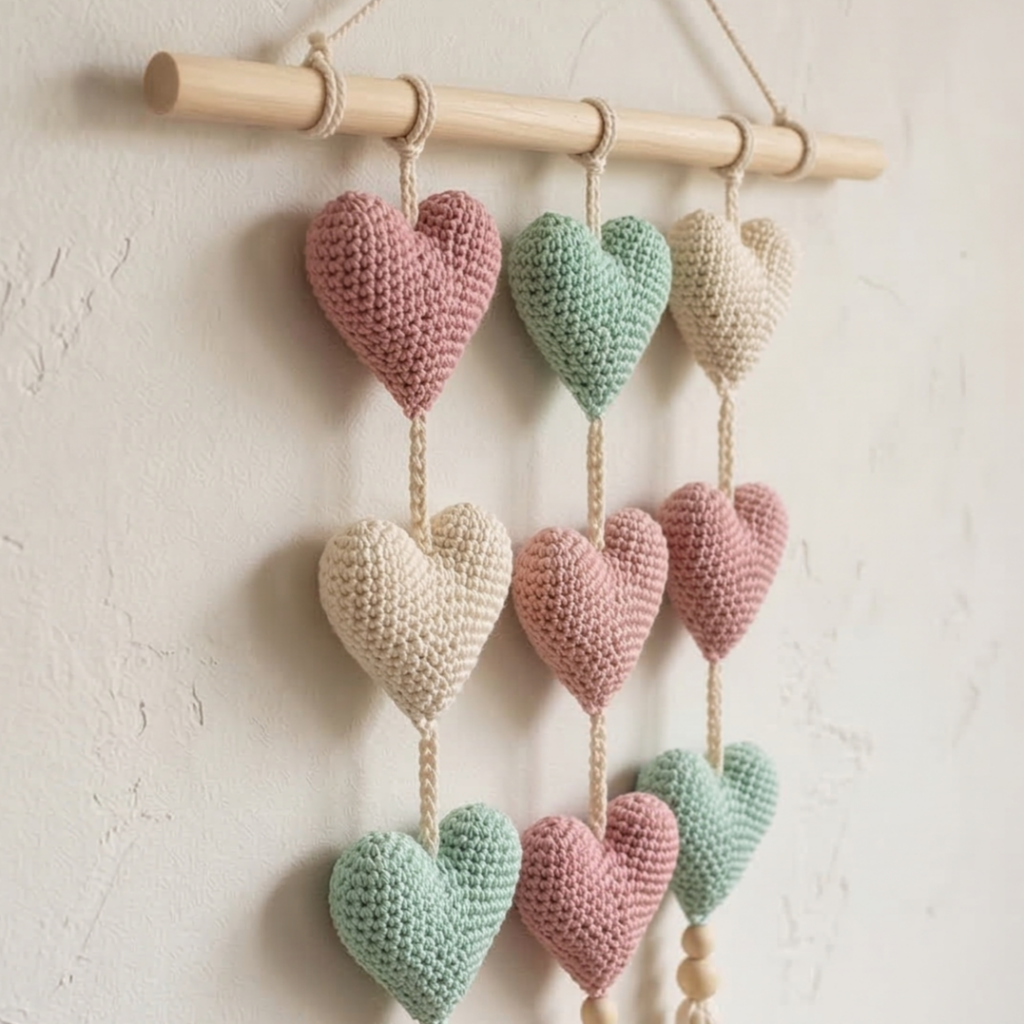
Finished size: each heart ~2.5–3″ (6–7.5 cm) wide; garland length 18–24″ with 6–8 hearts spaced small
Skill level: Beginner — small hearts repeated and linked into a looped garland
Why this one: sweet, quick, makes a set — hang over a shelf, mirror, or in a reading nook.
Materials
- Fingering or DK cotton in two or three colors (scraps are perfect)
- Hook: 2.5–3.5 mm
- 24″ thin dowel or natural twig (optional), or a short metal ring to hang garland from
- Tapestry needle, small beads (optional)
Stitches & techniques
tiny heart motif using small rounds; chaining and joining to form “endless” connected hearts.
Pattern — small heart motif (make many; but we’ll join them as we go)
Heart (single)
- Ch 4, sl st to form ring. Round: ch3, 3 dc, ch3, sl st into ring — repeat 3 times to make three lobes? (Simpler written heart below.)
Alternative compact heart (nicely shaped):
- Ch5. Row 1: sc in 2nd ch from hook, sc, hdc, dc in last ch (makes one side), now turn to work along other side of chain: dc, hdc, sc, sc in last ch — join by sl st to first sc. Fasten off and weave tails. This makes a small heart shape about 2.5–3″ depending on yarn.
Endless joining as-you-go
- To make a garland of hearts with no sewing: ch a short spacer (e.g., ch5) between hearts. Work first heart; when you finish the heart, ch5 and begin next heart in same method, anchoring it into the spacer chain where you prefer. This creates a string of hearts connected by chains (endless effect).
- Alternatively, make each heart separately and join with small chains and slip-stitch loops (so each heart hangs from the chain).
Hanging & presentation
- Mount garland on small dowel: tie each end of garland to dowel ends and hang dowel with a loop of twine.
- Or drape garland between two small brass rings fixed to the wall for a light-weight display.
Variations & gift idea
- Mix minis: hearts + tiny stars + beads for a mixed garland.
- Make a mini mobile by suspending hearts at different lengths from a small hoop.
4. Crochet Tapestry Bunny Wall Hanging Pattern
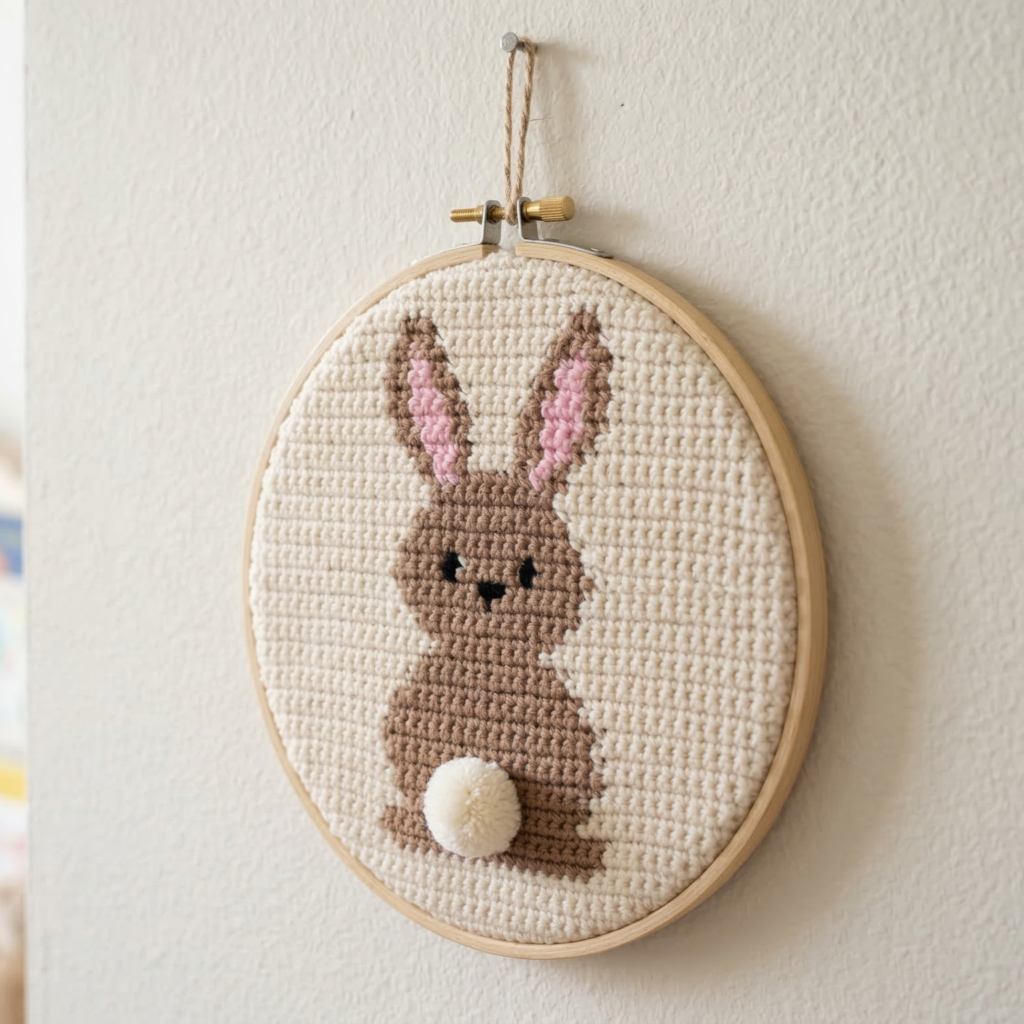
Finished size: tapestry panel 6″ × 8″ (15 × 20 cm) — small, framed in a hoop or dowel
Skill level: Intermediate (tapestry colorwork / intarsia)
Why this one: a charming little animal portrait perfect for a child’s corner or shelf.
Materials
- Sport/fingering cotton in 3–5 colors (background, bunny body, accent) — small amounts of each (10–20 g per color)
- Hook: 3.0 mm (tighter gauge for tapestry)
- Small rectangular dowel or 6–8″ embroidery hoop for framing
- Tapestry needle, graph paper or charting app (optional), blocking pins
Technique: tapestry crochet basics
- Carry unused colors (or use small bobbins) and work sc in rows, changing colors within a stitch by pulling the new color through on the final yarn over (classic tapestry). Work in a tight gauge so floats are short on the WS.
Preparation
- Create or use a small graph (e.g., 30 stitches wide × 40 rows tall yields ~6″×8″ at a tight gauge). Chart a simple bunny silhouette: round head, long ears, tiny tail — keep design bold and minimal for small scale.
Pattern — tapestry panel (example workflow)
- Foundation chain = number of stitches across chart (e.g., ch 30 +1). Turn.
- Row 1: sc across in background color following chart: when you reach a pixel that is bunny color, carry the background across the back and work sc with bunny color as needed. Keep floats on WS short (catch them every 3–4 stitches).
- Continue row by row following the chart. Use stitch markers to mark every 10 stitches if it helps.
Edge & frame
- When the chart is complete, work 1 round of sc in a border color to create a tidy frame. Block flat.
- Mount in an embroidery hoop or wrap top edge around a short dowel: fold back top edge and stitch small loops to slip dowel through. Add a cord to hang.
Finishing touches
- Add embroidered eye, nose details with contrasting thread.
- For a soft, mixed-media look tack a tiny pom-pom tail to the bunny.
Care
- Spot clean tapestry panels; tensioning and colorfastness vary by yarn—prewash small yarn samples if washing is expected.
5. Crochet “Graves to Gardens” Cross Tapestry Wall Hanging Pattern
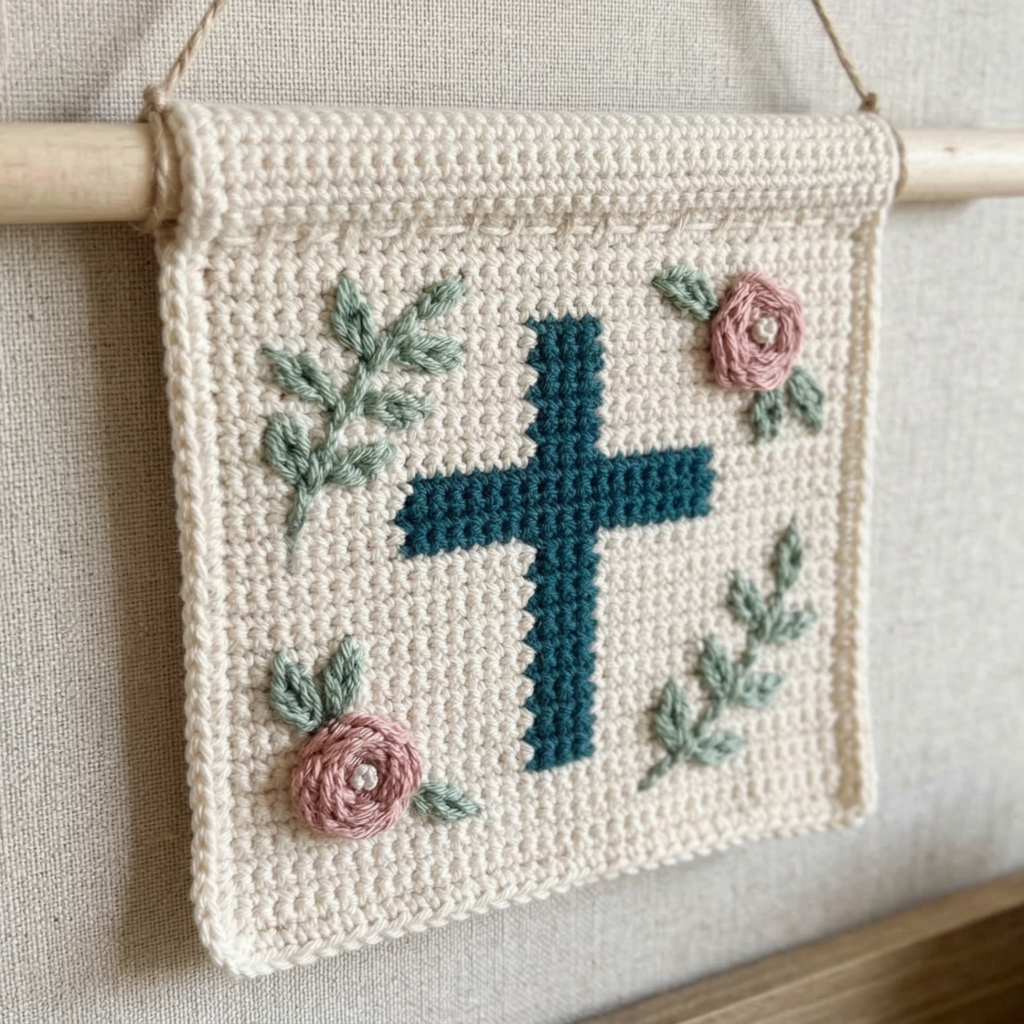
Finished size: small tapestry cross ~6″ × 6″ (15 × 15 cm) or slightly rectangular, mounted on dowel ~8″ wide
Skill level: Intermediate — small colorwork tapestry + cross shape motif
Context & tone: This piece is a small, meditative wall hanging using a cross motif paired with botanical garden accents — designed as a symbol of remembrance/renewal for small wall spaces. Keep it respectful and decorative.
Materials
- Sport/DK cotton in 3–4 colors (background, cross color, floral greens, accent bloom) — tiny amounts
- Hook: 3.0–3.5 mm for dense tapestry work
- Small dowel 8″ (or mini wooden rod), thin twine for hanging
- Tapestry needle, charted pattern (simple cross + floral border), blocking supplies
Technique & charting
- Use tapestry crochet (sc rows) or mosaic crochet for colorwork. The motif is simple: a central cross (a few stitches wide) with small sprigs of leaves/flowers around the arms and base.
Sample small chart idea (workflow)
- Plan a grid 28 sts × 28 rows (example) so final piece is square ~6″. Draw cross: center column for vertical arm and horizontal arm across center rows. Add small leaf motifs (two to three pixels clusters) at cross base and corners to evoke “gardens”.
Pattern — tapestry approach (row-by-row process)
- Ch 28 + 1. Row 1: sc across background color following chart. When cross pixels appear, bring in cross color as needed; carry background on WS to keep floats controlled.
- Continue line by line, changing to green or accent colors for tiny leaf/flower pixels. Keep embroidered highlights minimal: a French knot for a center of a tiny flower after finishing gives dimension.
Border & finish
- Work a thin sc border around the square in a neutral color.
- Fold top over dowel and secure with tiny whipstitches so the dowel sits in a shallow sleeve. Hang with twine.
Symbolic finishing & options
- Add a short handwritten tag on neutral card: a single word like “renewal” or “hope” for gifting (optional).
- Make a small pocket on the back to slip a tiny note or memory card — thoughtful for memorial or comfort gifts.
Care & sensitivity
- Because this pattern can be meaningful, include a small note about care and the materials used when gifting. Keep beads and detachable elements off if it’s to be placed where children can reach.
Final finishing, mounting & presentation tips (applies to all five)
- Dowel & hoop sizing: choose hoops/dowels proportionally — the frame should be slightly wider than the piece so it looks balanced (e.g., 6–8″ hoop for 5–6″ motifs). Natural twig adds rustic charm; a slim brass hoop gives a modern look.
- Mounting without visible staples: stitch the back edge down with small, neat whipstitches rather than gluing — it looks handmade and reversible. If you must glue, use fabric glue sparingly and hide glue points.
- Tension & blocking: tapestry pieces and motifs benefit from careful blocking (pin to final shape and lightly mist). Grannies and scalloped edges especially need pinning to show correct shape.
- Hanging hardware: use light picture hooks or small nail — these pieces are light, a single small screw or nail is sufficient.
- Group displays: small hangings look great grouped in odd-number sets (3 or 5). Keep spacing 2–3″ between frames for an intimate cluster.
- Gift packaging: tuck small wall hangings into a shallow box with tissue paper and a loop of twine around the dowel so the recipient can hang immediately.
Conclusion
These five small crochet wall hangings are designed to be fast, satisfying projects that add handmade personality to tiny walls, book nooks, kids’ corners, or as thoughtful gifts. From the geometric hexagon and scalloped flower to the sentimental cross tapestry and playful hearts and bunny, each pattern is intentionally compact and versatile — change yarn weight, colorways, or edging to match any décor.