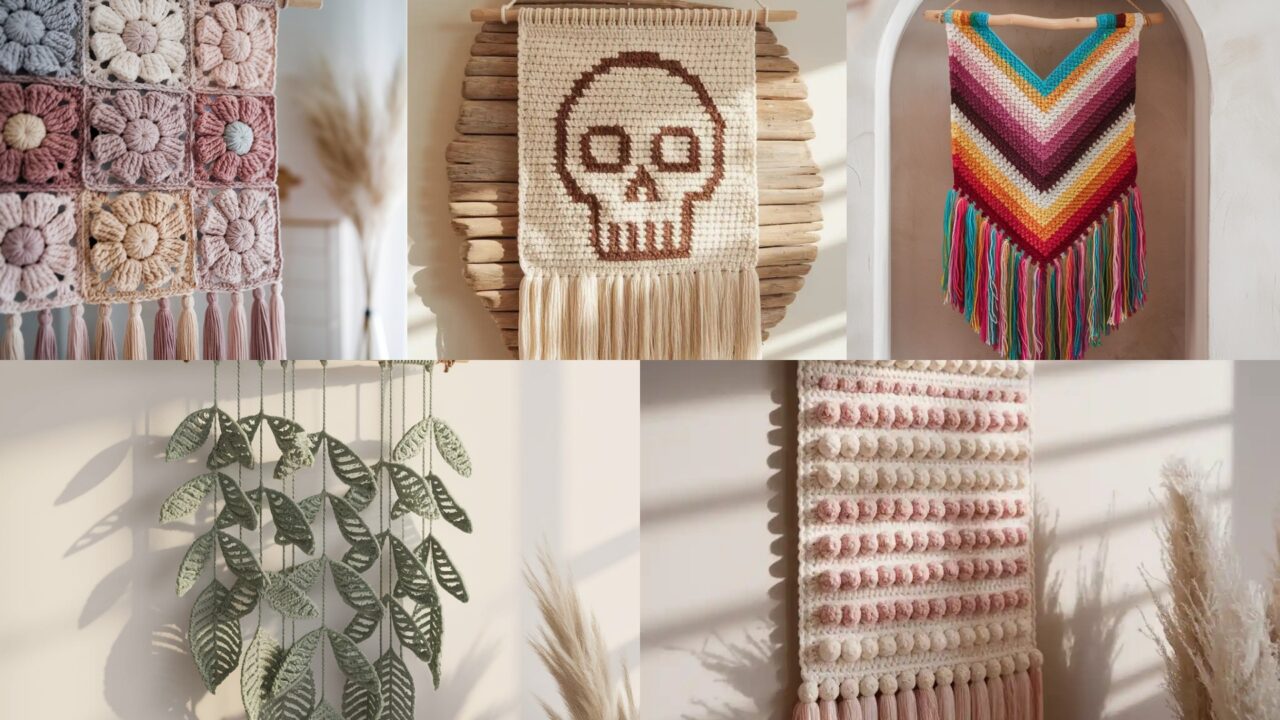
Handmade wall art is the fastest way to change a room’s vibe without committing to paint or a new sofa. Crochet wall hangings are tactile, forgiving, and surprisingly modern when you design them with scale and contrast in mind. These five patterns cover texture (mini bobbles), graphic impact (skull), classic charm (daisy granny), botanical calm (mini leaf), and bold geometry (colorful chevron). Each pattern is written to produce a finished piece you’ll actually want to display — not shove behind a curtain.
Read the short common notes first so you don’t accidentally make something floppy. Then pick a pattern and stop pretending a pillow will fix the whole room.
Quick common notes (read this — you will thank me)
Swatch & gauge (do it)
- Make a 4″ (10 cm) swatch in the stitch you plan to use. Measure stitches-per-inch and rows-per-inch. Wall hangings don’t require strict gauge, but you need to know whether the stitch opens up (lace) or compresses (bobble). Example I use in samples: 4″ = 16 sc → 4 sts/in. Use your swatch math when you change size.
Materials basics
- Yarn: For wall art use natural or cotton-blend yarn for matte, architectural texture. Acrylic works, but it can shine too much. Bulky (#5) yarn reads sculptural; worsted (#4) gives more detail.
- Hooks: 4.0–6.5 mm depending on yarn. Use the hook that gives the look you want.
- Mounting: small wooden dowel, driftwood, metal rod, embroidery hoop, or thrifted curtain rod. Use a length 2–6″ wider than the piece for a clean border.
- Tools: tapestry needle, ruler, scissors, optional hot glue for small embellishments, yarn needle for fringe, stitch markers.
- Hanging hardware: picture wire or twine, small brass screw-in hook, or leather loop.
Abbreviations (US)
ch, sc, hdc, dc, tr, sl st, st(s), MR (magic ring), inc (2 sc in same st), dec (sc2tog), bobble (see pattern), BLO/FLO (back/front loop only).
Finishing & blocking
- For geometric/tidy edges, block pieces to exact measurements (spritz with water, pin on foam board, let dry). For sculptural pieces, skip blocking — texture is the point.
- Secure knots, weave ends behind the piece or into the mounting rod, and use a little glue inside knots if the hanging will be moved often.
Sizing guidance
- Mini usually 6–10″ wide — great over a small shelf.
- Medium 12–18″ — good above a console.
- Large 20–30″+ — statement scale. I’ll provide sample finished sizes; scale by swatch math.
1. Crochet Mini Bobble Wall Hanging Pattern

Texture-forward, quick to stitch, and extremely sitcom-approved. Uses repeated small bobbles across a simple rectangle — great for beginners who like drama.
Skill level: Confident Beginner
Finished size (sample): 12″ wide × 14″ long (including fringe) when using worsted yarn and a 5.0 mm hook.
Materials: worsted weight (#4) cotton or acrylic 250–350 yds (main color), 5.0 mm hook, 12″ wooden dowel, yarn for fringe.
Gauge reference: 4″ = 16 sc (4 sts/in). For 12″ width target stitches = 12 × 4 = 48 stitches.
Special stitch — small 5-loop bobble
- YO, insert hook into indicated st, pull up loop. Repeat 5 times total (you’ll have 6 loops on hook), YO and pull through all loops, ch1 to close bobble. Secure with sc in next st if pattern calls.
Pattern (worked flat, bottom-up)
Foundation: ch 49, join with sl st to form a long loop only if you want a tubular look. For a flat panel: ch 49, sc in 2nd ch from hook across → 48 sc.
Rows:
- Row 1: ch1, sc across (48 sc). Turn.
- Row 2: ch1, sc3, bobble in next st repeat across ending with sc to finish row. Turn.
- Row 3: ch1, sc across (anchoring row). Turn.
Repeat Rows 2–3 until panel height (without fringe) ~10″. Final row: sc across. Fasten off.
Fringe & mounting
- Cut fringe lengths to 8″ (folded to 4″ when attached). Attach fringe evenly across bottom using lark’s head knots; trim to even length.
- At top edge, fold over 1″ and whipstitch to back to create a clean channel; slide dowel through or sew onto dowel with matching yarn and then hang.
Variations & tips
- Use alternating color bobbles for a polka-dot effect.
- Tighten bobble loops for more pronounced texture (smaller loops = tighter bobble).
- For a dense sculptural piece, hold two strands together and use 6.5 mm hook.
2. Crochet Simple Skull Wall Hanging Pattern

Graphic, slightly edgy, and surprisingly tasteful when scaled down and color-muted. Works best in single-color palette for modern spaces.
Skill level: Confident Beginner
Finished size (sample): 10″ wide × 12″ high (skull panel), mounted on 14″ driftwood.
Materials: worsted in neutral (e.g., cream or charcoal), 4.5 mm hook, tapestry needle, 14″ driftwood or thin wooden dowel, small amount of black for eyes/mouth embroidery.
Gauge & grid approach: Make a base rectangular grid in sc and use surface crochet or overlay to create skull lines — think pixel art.
Approach options (choose one)
Option A — Pixel grid (easy, precise)
- Make a rectangle in sc: target width = 10″ → 10 × 4 = 40 sc across; chain 41 and sc across for rows until height ~10″ (about 40 rows if 4 rows/in).
- Print a small 20×20 skull chart (pixel grid) scaled to your rectangle. Use duplicate stitch or surface crochet with black yarn to embroider skull motif onto the finished panel.
Option B — Appliqué skull
- Crochet flat skull applique using MR and shaping (oval + jaw + eye sockets). See short instructions below.
- Sew applique centered onto a textured background panel (e.g., moss stitch or sc panel) and mount.
Quick skull applique (simple)
- MR, ch1, 6 sc in MR → R1: 6.
- R2: inc around → 12.
- R3: sc 1, inc ×6 → 18.
- R4–R6: sc around 18 (3 rounds) — forms the forehead dome.
- Shape jaw by working decreasing rows across a portion: mark center bottom and do sc2tog decreases across last 6–8 sts over 2 rows to create a jaw indentation. Add small sc circles for eyes and a stitched mouth.
Assembly & hanging
- Center skull on panel and sew just through the backing to keep front tidy. Create a finished top hem and slide driftwood through. Add leather cord or twine for hanging.
Variations & tips
- Use tonal greys to read skull as texture instead of explicit motif.
- For a low-effort option, surface-crochet the skull outline only — minimalism = less risk.
3. Crochet Daisy Granny Square Wall Hanging Pattern

Light, breezy, and slow-chic. Turn a panel of daisy-over-granny squares into a soft, layered hanging with a fringe or tassel border.
Skill level: Beginner → Confident Beginner
Finished size (sample): 16″ × 16″ made from nine 5.5″ blocks (3×3 grid) — mounted on a 18″ dowel.
Materials: DK or worsted in two contrasting colors (petal/center + background), 4.5–5.0 mm hook, tapestry needle, dowel.
Gauge & counts: Each finished granny-daisy square ~5.5″ blocked; plan grid and count accordingly.
Daisy granny square (one square)
- MR, ch1, 8 sc in ring; sl st to join. (8)
- Round 2 — petals: ch3, sl st in next st around to make 8 loops.
- Round 3 — petals: in each loop make (sc, hdc, 3 dc, hdc, sc) to form a petal. Change to background color.
- Round 4–6 — create a square by working classic granny rounds: sl st to corner, ch3 (counts as dc), 2 dc, ch2, 3 dc in corner, continue. Work until square measures 5.5″ blocked.
Make 9 squares. Block them flat and even.
Joining & finishing
- Join squares using join-as-you-go or whipstitch with background color for subtle seams. Arrange 3×3 grid.
- Work 2 rounds of sc around the joined panel for a clean edge.
- Add tassels at bottom: group 6–8 strands of yarn, fold, loop through bottom edge every 1–1.5″ and knot. Trim for even length.
- Create a top sleeve by folding 1″ of top edge to back and slip-stitching to make a dowel pocket. Insert dowel and hang.
Variations & tips
- Make a long runner by joining squares in a column.
- For mature palettes, choose neutral backgrounds with desaturated petal colors.
4. Crochet Mini Leaf Wall Hanging Pattern

Calming, botanical, and tiny enough to layer with other pieces — perfect for a gallery wall. Uses small leaf motifs strung from a rod.
Skill level: Beginner
Finished size (sample): 8″ wide rod with five leaf dangles varying 6–10″ long.
Materials: sport or DK yarn in green shades, 3.5–4.5 mm hook, small branch or brass rod 8–12″ long, tapestry needle.
Gauge & motif size: Each leaf ~2–3″ long depending on yarn; make more or fewer leaves to fit the rod.
Simple leaf motif (worked flat)
- Ch 8 (or make foundation chain length appropriate to desired leaf length).
- Row 1: sc in 2nd ch from hook, hdc, dc, tr, dc, hdc, sc (mirror shape). Turn.
- Row 2: working along long edge now, sc, hdc, dc, tr, dc, hdc, sc into turning chain to mirror other side and sl st to finish in center — you’ve created a symmetric leaf. Fasten off leaving long tail for attaching. Block lightly flat.
Assembly — staggered dangles
- Create leaf strands: single strand of chain plus 3–8 leaves attached at varying intervals with lark’s head knots or small crochet loops. Example: ch 40 for longest strand, attach 3 leaves at ch 8, ch 16 attach another leaf, etc.
- Make several strands (5 recommended) of varying lengths and attach evenly across rod with a simple overhand knot or wrapped yarn loops. Wrap top of rod with yarn for polished finish; hang with thin twine or leather.
Variations & tips
- Use multiple shades of green for depth.
- Combine with tiny crochet seed pods (small bobbles) for texture.
- For boho look, add a short fringe at rod ends.
5. Crochet Colorful Chevron Wall Hanging Pattern

Bold geometry and color-block stripes — chevron is dramatic but forgiving. Scale up for real statement pieces.
Skill level: Confident Beginner → Intermediate (color changes)
Finished size (sample): 18″ wide × 24″ long (including fringe) for a medium statement piece.
Materials: worsted yarn in 4–6 coordinating colors, 5.5–6.5 mm hook for good drape, 22″ wooden dowel or branch, yarn for fringe/tassels.
Gauge example & stitch multiple: Classic chevron repeat often uses multiples of 14 + 3. Using the sample gauge (4 sts/in) and target width 18″: stitches needed = 18 × 4 = 72. Pick nearest repeat multiple: 72 − 3 = 69; 69 ÷ 14 ≈ 4.92 — choose 5 repeats: 5 × 14 = 70; +3 = 73 stitches. So foundation ch = 73.
Chevron stitch row (basic)
Foundation: ch 74 (for 73 sts across).
Row 1: dc in 4th ch from hook (counts as dc), dc in next 3 ch, [dc2tog twice, dc in next 3, 3 dc in next (peak), dc in next 3, dc2tog twice] repeat across to last 3 sts, dc in last 3; turn.
Row 2: ch3 (counts as dc), dc across in pattern (work peaks and valleys as established), change colors every 6–10 rows for bold stripes.
Color schedule example: 8 rows color A, 6 rows color B, 6 rows color C, 8 rows color D, repeat until desired length 18–22″. End on a color you like for fringe.
Fringe & mounting
- Add long fringe across bottom — grouped tassel every 1″ for maximum impact: fold 8–10 strands of yarn length 12–14″, attach with lark’s head, trim aligned.
- At top, make a neat sleeve: fold top edge over dowel by 1.25″ and sew closed, or sew small loops for an exposed dowel. Hang with braided yarn cord or leather strap.
Variations & finishing touches
- For sharper geometry, block heavily and steam lightly.
- Add a narrow contrasting top border (1–2 rows sc) to give the dowel a clean edge.
- Use thick wool for heavy swing and sculptural look, or use cotton for crisp, summer-friendly geometry.
Final assembly & display tips (yes, really practical)
- Dowel selection: driftwood = boho, painted hardwood = modern, brass rod = luxe. Dowel should extend 1–3″ on each side of piece for balance.
- Mounting: for heavy pieces use a small eye-screw in the wall with a drywall anchor. For lightweight art, a single nail or picture hook does fine.
- Grouping: small pieces look better stacked or grouped asymmetrically; an odd number (3 or 5) is a safe layout.
- Lighting: soft side-light (lamp or window) makes texture sing; overhead spotlights flatten texture. Use that to your advantage.
- Maintenance: dust with a soft brush or vacuum on low with upholstery tool. If washable yarn was used, spot-wash or hand-wash and dry flat; avoid machine tumbling on mounted pieces.
Conclusion
There. Five distinct crochet wall-hanging blueprints that scale from tiny shelf accents to actual statement pieces. The difference between a charming crochet wall hanging and a “what even is that?” blob is: a clean edge, consistent repeats, and a decent dowel. Swatch, pick scale, and block when you want crisp lines.